1
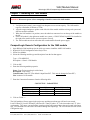
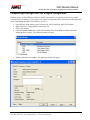
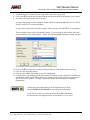
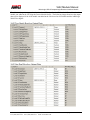
1642 Module Manual
MicroLogix 1500 & CompactLogix Resolver Interface Module
Module Overview
Utilizing licensed Allen-Bradley interface technology, these one slot Resolver Interface Modules plug directly
into an AB MicroLogix 1500 or CompactLogix PLC systems. Communicating through I/O registers assigned
to the slot, the 1642 module can be programmed to operate either with two single resolver transducers, or with
a single dual resolver transducer. When configured to use two single resolver transducers, the 1642 module
also has the ability to monitor the stopping time of channel 1.
Table of Contents
General Information
Installing the 1642 Module
Module Specifications
Programmable Parameters
Backplane Programming
Manual Revision History
2
Chapter 1
Installing the Hardware
CompactLogix Generic Configuration
CompactLogix RSLogix V20 Configuration
MicroLogix 1500 Configuration
3
3
3
4
6
Module Specifications
Front Panel & LED Functions
Connector Pinout
Brake Input
Resolver Wiring
CTL-X & CML-X diagrams
Wiring Notes
7
7
8
8
8
9
10
11
Apply Preset
Count Direction
Transducer Fault Latch
Tachometer Response
Disable Channel 2
Reference Voltage Frequency
Resolver Type
Full Scale Count
Preset Value
Transducer Type
Number of Turns
12
12
12
12
12
12
13
13
13
14
14
14
Programming Cycle
EEPROM Parameter Memory
Input Registers
Status Word
15
15
15
16
18
Output Registers
Control Word
Setup Word
20
22
22
Chapter 2
Chapter 3
Chapter 4
Chapter 5
20 Gear Drive, Plymouth Industrial Park, Terryville, CT 06786
Tel: (860) 585-1254 Fax: (860) 584-1973 Web: www.amci.com
23
page: 1
1642 Module Manual
MicroLogix 1500 & CompactLogix Resolver Interface Module
General Information
Important User Information
The products and application data described in this manual are useful in a wide variety of different
applications. Therefore, the user and others responsible for applying these products described herein are
responsible for determining the acceptability for each application. While efforts have been made to provide
accurate information within this manual, AMCI assumes no responsibility for the application or the
completeness of the information contained herein. Throughout this manual the following two notices are used
to highlight important points.
WARNINGS tell you when people may be hurt or equipment may be damaged if the procedure is not
followed properly.
CAUTIONS tell you when equipment may be damaged if the procedure is not followed properly. No patent
liability is assumed by AMCI, with respect to use of information, circuits, equipment, or software described in
this manual. The information contained within this manual is subject to change without notice. UNDER NO
CIRCUMSTANCES WILL ADVANCED MICRO CONTROLS, INC. BE RESPONSIBLE OR LIABLE
FOR ANY DAMAGES OR LOSSES, INCLUDING INDIRECT OR CONSEQUENTIAL DAMAGES OR
LOSSES, ARISING FROM THE USE OF ANY INFORMATION CONTAINED WITHIN THIS MANUAL,
OR THE USE OF ANY PRODUCTS OR SERVICES REFERENCED HEREIN.
Standard Warranty
ADVANCED MICRO CONTROLS, INC. warrants that all equipment manufactured by it will be free from
defects, under normal use, in materials and workmanship for a period of [18] months. Within this warranty
period, AMCI shall, at its option, repair or replace, free of charge, any equipment covered by this warranty
which is returned, shipping charges prepaid, within 18 months from date of invoice, and which upon
examination proves to be defective in material or workmanship and not caused by accident, misuse, neglect,
alteration, improper installation or improper testing. The provisions of the “STANDARD WARRANTY” are
the sole obligations of AMCI and excludes all other warranties expressed or implied. In no event shall AMCI
be liable for incidental or consequential damages or for delay in performance of this warranty.
Returns Policy
All equipment being returned to AMCI for repair or replacement, regardless of warranty status, must have a
Return Merchandise Authorization number issued by AMCI. Call (860) 585-1254 with the model and serial
numbers along with a description of the problem. A “RMA” number will be issued. Equipment must be
shipped to AMCI with transportation charges prepaid. Title and risk of loss or damage remains with the
customer until shipment is received by AMCI.
24 Hour Technical Support Number
Technical Support, in the form of documents, FAQs, and sample programs, is available from our website,
www.amci.com. 24 Hour technical support is also available on this product. For technical support, call (860)
583-7271. Your call will be answered by the factory during regular business hours, Monday through Friday,
8AM - 5PM EST. During non-business hours, an automated system will ask you to leave a detailed message
and the telephone number that you can be reached at. The system will page an engineer on call. Please have
your product model number and a description of the problem ready before you call.
20 Gear Drive, Plymouth Industrial Park, Terryville, CT 06786
Tel: (860) 585-1254 Fax: (860) 584-1973 Web: www.amci.com
page: 2
1642 Module Manual
MicroLogix 1500 & CompactLogix Resolver Interface Module
Chapter 1: Installing the 1642 module
WARNING Disconnect power before attempting to install or remove the 1642 module.
1. Verify that your system’s power supply has adequate reserve current capacity. The 1642 module
requires a maximum of 360mA at +5Vdc.
2. Align the tongue-and-groove guides on the left side of the module with the existing rack system and
slide the module backwards.
3. When the 1642 module is in position, move the white bus connector lever on the top of the module to
the left.
4. If the 1642 module is the right most module in a system, a 1769-ECR End Cap MUST be installed to
the right of the module for the system to operate correctly.
5. The 1642 module must be no more than the seventh module from the power supply.
CompactLogix Generic Configuration for the 1642 module
1.
2.
3.
4.
Open RSLogix 5000 and the project in which you want to install the AMCI 1642 module.
Right click on I/O Configuration in the Project Tree.
Select New Module.
Select the following module type and description from the list that appears.
Type = 1769-MODULE
Description = Generic 1769 Module
5. Click on OK.
6. Enter the following module properties.
Name: Your Choice (must begin with a letter)
Description: Your Choice
Comm Format: Data-INT (The default is Input Data-INT. This must be changed to Data-INT)
Slot: location of 1642 module
7. Enter the Connection Parameters from the following table.
CONNECTION PARAMETERS
INPUT
OUTPUT
CONFIGURATION
Assembly Instance
101
100
102
Size in 16 bit words
8
8
0
8. Click on Finish >>
The 1642 module will now appear in the project tree and three new data tags will have been created,
Local:X.I.Data[Y], Local:X.O.Data[Y] and Local:X.C.Data[Y] where “X” is the slot number and “Y” is the
word number. The status, current position, encoder position, and captured data value are located in the Input
tags. All commands are sent to the 1642 module through the Output tags. The 1642 module does not use the
Configuration tags.
20 Gear Drive, Plymouth Industrial Park, Terryville, CT 06786
Tel: (860) 585-1254 Fax: (860) 584-1973 Web: www.amci.com
page: 3
1642 Module Manual
MicroLogix 1500 & CompactLogix Resolver Interface Module
CompactLogix RSLogix 5000 V20 or higher configuration
With the release of V20 of RSLogix 5000, the AMCI 1642 module is now present in the list of available
CompactLogix I/O modules, so you now have the option of using either this or the Generic module described
above when adding the AMCI 1642 module to your I/O.
1.
2.
3.
4.
Open RSLogix 5000 and the project in which you want to install the AMCI 1642 module.
Right click on I/O Configuration in the Project Tree.
Select New Module.
Verify that the By Vendor tab is selected at the bottom of the Select Module window and expand
Advanced Micro Controls. The following window will open.
5.
Double click on the 1642 module. The following window will appear.
20 Gear Drive, Plymouth Industrial Park, Terryville, CT 06786
Tel: (860) 585-1254 Fax: (860) 584-1973 Web: www.amci.com
page: 4
1642 Module Manual
MicroLogix 1500 & CompactLogix Resolver Interface Module
6.
7.
8.
9.
Enter a name in the Name field. This parameter must begin with a letter.
If desired, describe the function of the 1642 module in the Description field.
Click on the next to the Slot field and select the slot where the AMCI 1642 module is to be located.
The AMCI 1642 can be used in one of two ways.
As a two channel single resolver transducer module, which will work with AMCI R11X-J10/7, HT-20,
H25-XX, and HT-20-X resolver transducers.
As a one channel dual resolver transducer module, which will work with AMCI HTT-20-X transducers.
The two channel single resolver is the default selection. If you are using the 1642 module with a dual
resolver transducer, click on the Change… button. The following Module Definition window will open.
10.
11.
12.
13.
Click on the next to the Selected Module field and select the 1642 module that you are using.
Click on OK to accept the changes.
Click on OK to add the 1642 module to your I/O configuration.
Using the above setup changes how the data from the 1642 module will be read into the Controller tags.
Instead of the generic Local:X:I.Data and Local:X:O.Data tags, the module will now use tags that are
specific for the 1642 module. This input / output word layout is shown in chapter 4, backplane
programming.
Changing the Selected Module type from Single-Resolver to DualResolver DOES NOT CHANGE the function of the 1642 module.
It will still be necessary to send setup data to the module that changes
the functionality from Single Resolver to Dual Resolver or vice versa.
20 Gear Drive, Plymouth Industrial Park, Terryville, CT 06786
Tel: (860) 585-1254 Fax: (860) 584-1973 Web: www.amci.com
page: 5
1642 Module Manual
MicroLogix 1500 & CompactLogix Resolver Interface Module
Configuring a MicroLogix 1500 PLC system for the 1642 module
1.
2.
3.
4.
Open or create the RSLogix 500 project in which you want to use the 1642 module.
Double click on I/O Configuration in the project tree.
Select the slot where the 1642 module will be installed.
Double click on “Other. Requires I/O Card Type ID” from the bottom of the list of available
modules.
5. Enter the following information in the window that appears.
Vendor ID:
Product Type:
Product Code:
Series/Major Rev/Minor Rev:
Input Words:
Output Words:
Input Bits:
Output Bits:
Extra Data Length:
Ignore Configuration Error:
3
9
25
A
8
8
0
0
0
Your Choice, but not recommended
6. The 1642 module will now appear in the I/O Configuration with a Part Number of Other and a
Description of I/O Module – ID Code = 25.
7. Input Data (data from the 1642 module to the PLC) will appear in Input Image Table registers
I:X.0 to I:X.7, where X is the slot number.
Output Data (data from the PLC to the 1642 module) will be written to registers O:X.0 to O:X.7,
where X is the slot number.
20 Gear Drive, Plymouth Industrial Park, Terryville, CT 06786
Tel: (860) 585-1254 Fax: (860) 584-1973 Web: www.amci.com
page: 6
1642 Module Manual
MicroLogix 1500 & CompactLogix Resolver Interface Module
Chapter 2: Module Specifications
Power Requirements
220mA @5Vdc typical
360mA @5Vdc with reference voltage shorted
Throughput Time:
Reference Voltage
Frequency
5KHz
2.5kHz
Position
Update
200µs
400µs
Backplane
Update
500µs
700µs
Compatible Transducers
This unit is compatible with any two AMCI single resolver based transducer, including the HT-20 series, the
H25-XX series, and the HT-20-X series, or one of the HTT-20-X dual resolver multiturn series where X can
be 100, 180, 1000 or 1800 turns. The use of other transducers may also be supported with the use of AMCI
RM reference modules. Please visit our website, www.amci.com for more information on these resolver
transducers. Click on www.amci.com/resolvers.asp for a direct link to page containing the resolver
information.
Programmable Parameters
Apply Preset
Full Scale Count
Preset Value
Count Direction
Tachometer Response
Transducer Fault Latch
Resolver Type
Disable Channel 2
Reference Voltage Frequency
Transducer Type (dual resolver transducers only)
Number of Turns (dual resolver transducers only)
Data Transfer
Data updated automatically during program scan. Programming the module is accomplished with a
Programming Cycle, which uses two handshaking bits (Transmit and Acknowledge).
Data Available to Processor
Status Bits, Position Data, Tachometer Data (in RPM) (both channels)
Stop Time and Brake Applied Position (channel 1 only)
Program Storage
EEPROM. Endurance of 100,000 write cycles.
Environmental Conditions
Operating Temperature: 0 to 60° C
Relative Humidity: 5 to 95% (non-condensing)
Storage Temperature: -40 to 85° C
20 Gear Drive, Plymouth Industrial Park, Terryville, CT 06786
Tel: (860) 585-1254 Fax: (860) 584-1973 Web: www.amci.com
page: 7
1642 Module Manual
MicroLogix 1500 & CompactLogix Resolver Interface Module
LED Function:
Module LED
Solid Green: Module Owned, two-way communication
Input
Module
Red Status 1 & 2 LEDs (for Resolver 1 and 2)
LED Pattern
Meaning
ON (both Status LEDs)
Module Fault (No reference voltage or
EEPROM error)
Blinks. If fault on both channels, Status 1 Non-Clearable transducer fault
& 2 will alternately blink
Six blinks, pause, six blinks
Clearable transducer fault
Off
No faults
Off
Status 2 only, channel 2 disabled, or
configured for dual resolver transducer.
Status 1
Status 2
RESOLVER
Status 1: One short blink, pause, two long blinks, repeat indicates that the 1642’s
microprocessor is not communicating with the communication ASIC.
Status 1 and 2 blinking together slowly: Reference voltage outside of its valid range
Connector Pin Out:
The resolver signals are brought into the 1642 module through an 18 pin connector that is included with the
module. The following diagrams and tables show the connector’s pinout, and three possible wiring
combinations.
Earth Ground 2
1
3
5
7
9
R2
11
1
R1
13
Earth Ground 4
15
Brake Input -
17
2
Earth Ground 1
•
4
6
•
8
•
10
12
R2
14
R1
16
Earth Ground 3
18
Brake Input +
•
•
The functions of pins 3 to 10 will vary with
the type of resolver that is being wired to the
1642 module. See the tables on the following
page for additional information.
When plugged into the 1642 module, pin 1 is
located in the upper left hand corner.
The two R1 and two R2 signals are internally
connected together.
Earth Grounds 1 to 4 are internally connected
together. The cable shields should be
connected to these terminals.
The 18 pin connector is included with the
1642 module.
Brake Input
The two Brake Input terminals accept a 24VDC signal across pins18 and 17. The input is bipolar, that is,
positive voltage can be applied to either pin. The brake monitor function is performed when power is
removed, ON to OFF, from the input.
Voltage Range: 0 to 24Vdc
On State: 10 to 24Vdc
Off State: 0 to 2Vdc
Current Draw: 5mA @ 24Vdc
20 Gear Drive, Plymouth Industrial Park, Terryville, CT 06786
Tel: (860) 585-1254 Fax: (860) 584-1973 Web: www.amci.com
page: 8
1642 Module Manual
MicroLogix 1500 & CompactLogix Resolver Interface Module
The following tables show how to wire two single resolver transducers, one AMCI Dual Resolver Multiturn
transducer, or one Autotech Dual Resolver RL210 128 turn transducer. The tables also show the AMCI
recommended wire colors.
Wiring for One or Two Single Resolver Transducers
Channel
2
2
2
2
2
2
Function
Earth Ground 2
S1 (white)
S3 (black (white))
S2 (black (green))
S4 (green)
R2 (red)
R1 (black (red))
Earth Ground 4
Brake Input -
Pin
1
3
5
7
9
11
13
15
17
Pin
2
4
6
8
10
12
14
16
18
Function
Earth Ground 1
S1 (white)
S3 (black (white))
S2 (black (green))
S4 (green)
R2 (red)
R1 (black (red))
Earth Ground 3
Brake Input +
Channel
1
1
1
1
1
1
Wiring for One AMCI Dual Resolver Transducer
Function
Earth Ground 2
S3 Fine (black (yellow))
S1 Fine (yellow)
S4 Fine (blue)
S2 Fine (black (blue))
R2 (black (red))
R1 (red)
Earth Ground 4
Brake Input -
Pin
1
3
5
7
9
11
13
15
17
Pin
2
4
6
8
10
12
14
16
18
Function
Earth Ground 1
S1 Coarse (white)
S3 Coarse (black (white))
S4 Coarse (green)
S2 Coarse (black(green))
R2 (black (brown))
R1 (brown)
Earth Ground 3
Brake Input +
Wiring for One Autotech Dual Resolver RL210 128 turn Transducer
Function
Earth Ground 2
S1 Fine (yellow)
S3 Fine (black (yellow))
S2 Fine (black (blue))
S4 Fine (blue)
R2 (black (red))
R1 (red)
Earth Ground 4
Brake Input -
Pin
1
3
5
7
9
11
13
15
17
Pin
2
4
6
8
10
12
14
16
18
Function
Earth Ground 1
S3 Coarse (black (white))
S1 Coarse (white)
S4 Coarse (green)
S2 Coarse (black (green))
R2 (black (brown))
R1 (brown)
Earth Ground 3
Brake Input +
Wiring to Simulate a Resolver
It is possible to wire the 1642 module to simulate a resolver. Wiring the connector as shown in the following
table will cause each of the 1642 module’s channels to report a position value of 90 degrees to the input
registers.
Pin 14 to Pin 6
Channel 1
Pin 12 to Pins 4, 8, and 10
Pin 13 to Pin 5
Channel 2
Pin 11 to Pins 3, 7, and 9
20 Gear Drive, Plymouth Industrial Park, Terryville, CT 06786
Tel: (860) 585-1254 Fax: (860) 584-1973 Web: www.amci.com
page: 9
1642 Module Manual
MicroLogix 1500 & CompactLogix Resolver Interface Module
Pre made cables are available from AMCI. These cables come with a Bendix connector that mates with the
resolver transducer. The other end is pigtailed at the factory for easy connection to the 18 pin connector that
is included with the 1642 module. These cables have a part number of CTL-X for single resolver transducers
and CML-X for the dual resolver transducers. In both cases, X equals the length in feet.
The CTL-X cable shown below is used to connect an AMCI single resolver transducer to the 1642 module.
Two of these cables will be needed to connect two AMCI resolvers to the 1642 module.
The CML-X cable shown below is used to connect an AMCI Dual Resolver transducer to the 1642 module.
20 Gear Drive, Plymouth Industrial Park, Terryville, CT 06786
Tel: (860) 585-1254 Fax: (860) 584-1973 Web: www.amci.com
page: 10
1642 Module Manual
MicroLogix 1500 & CompactLogix Resolver Interface Module
Wiring Notes:
•
•
•
•
•
•
•
AMCI recommends the use of either the Beldin 9873 or 9730 or equivalent cables to connect the
single resolver transducers to the 1642 module. The Belden 9873 can be used on cable runs of up to
100ft, and the Belden 9730 can be used on cable runs of up to 500ft. Please note that the reference
voltage frequency should be set to a value of 2.5kHz for cable runs of greater than 100ft.
When installed in the 1642 module, pin 1 of the 18 pin connector is located in the upper left hand
corner.
Resolver signals are low voltage, low power signals. If you are using A-B guidelines for cabling
installation, treat the cable as a Category 2 cable. It can be installed in conduit along with other low
power cabling such as communication cables and low power ac/dc I/O lines. It cannot be installed in
conduit with ac power lines or high power ac/dc I/O lines.
To reduce or eliminate the influence of electrical noise on the system, the resolver cable shields must
be connected to any of the earth ground pins, pins 1, 2, 15, or 16. Also, the shields must be connected
to only one end of the cable run and treated as conductors at any junctions. Do not ground the shields
at the junction box.
If electrical noise is causing your resolver counts to jump, try running a heavy wire from one of the
Earth Ground Pins (pins 1, 2, 15,or 16) to your earth ground bus. This will provide a better low
impedance path to ground.
If the resolver cable must cross power feed lines, it should do so at right angles.
Route the cable at least five feet from high voltage enclosures, or sources of “rf” radiation.
20 Gear Drive, Plymouth Industrial Park, Terryville, CT 06786
Tel: (860) 585-1254 Fax: (860) 584-1973 Web: www.amci.com
page: 11
1642 Module Manual
MicroLogix 1500 & CompactLogix Resolver Interface Module
Chapter 3: Programmable Parameters
You configure your unit by setting the values of its Programmable Parameters. These parameters are stored
in nonvolatile memory. Therefore, there is no need to configure the 1642 after every power up. The
nonvolatile memory is an EEPROM that is rated for approximately 100,000 write cycles.
Apply Preset
There are TWO Apply Preset bits, one for each channel. Setting one of these bits while programming the
1642 module will cause the channel’s current position data to be changed to the programmed Preset Value.
The result of the Apply Preset operation is saved through power down.
Note: Programming a channel’s setup data will undo the result of an Apply Preset operation.
Count Direction
This parameter sets the direction of transducer shaft rotation that increases the position count. If the
transducer is wired as specified in this manual and the count direction is set to positive, the count will
increase with clockwise rotation, (looking at the shaft). If the count direction is set to negative, the position
count will increase with counter-clockwise rotation.
The default Count Direction Value is Clockwise.
Note: It is also possible to reverse the count direction by reversing S2 S4 wire pairs in the transducer cable. If
you are designing the 1642 into an older system, it is possible that your drawings already have the pairs
reversed and you may not need to set this parameter. Once the machine is setup, you can easily change
this parameter if the position is increasing in the wrong direction.
Transducer Fault Latch
Transducer faults can be caused by improper wiring, electrical noise, or a damaged transducer. When the unit
detects a fault condition, it reports this fault over the backplane. Normally, a transducer fault is not latched by
the 1642 module and the Transducer Fault conditions will be cleared as soon as the 1642 module detects valid
resolver signals. If you have a situation where electrical noise is causing spurious transducer faults that you
can safely ignore, leave this parameter in its default condition. However, if you want to reliably capture these
transient faults, then you must enable the Transducer Fault Latch parameter. In this case, you must send a
Clear Error command to the 1642 module to clear the fault.
The default Transducer Fault Latch value is set to Self Clearing.
Tachometer Response
This parameter sets the time between tachometer updates. It only affects the update time of the velocity. It
does not affect the update time of the position value, which is always 200 microseconds or 400 microseconds.
The default Tachometer Response is 120 milliseconds.
The Tachometer Response can be set to 120 or 32 milliseconds.
Disable Channel
This bit level parameter allows you to disable channel 2. This parameter is useful if you are only using one
single resolver transducer and do not want the 1642 to display a resolver errors on the second channel.
The 1642 module’s default setting has channel 2 disabled. Channel 2 is enabled when its setup
parameters are programmed.
20 Gear Drive, Plymouth Industrial Park, Terryville, CT 06786
Tel: (860) 585-1254 Fax: (860) 584-1973 Web: www.amci.com
page: 12
1642 Module Manual
MicroLogix 1500 & CompactLogix Resolver Interface Module
Reference Voltage Frequency
This bit level parameter allows you to choose the frequency of the reference voltage that is sent from the 1642
module to the resolver. The default value of 5kHz will work in most instances. However, programming the
reference voltage frequency to 2.5kHz may improve performance on systems with more than 100 ft of cable.
The default Reference Voltage Frequency is 5kHz
The Reference Voltage Frequency can be set to 5kHz or 2.5kHz
Programming the Reference Voltage frequency on either channel will affect both channels of the
1642 module.
Resolver Type
The Resolver Type parameter allows you to use the 1642 with Autotech transducers. Unlike the other 1642
parameters, the Resolver Type parameter will affect both channels of a 1642 module.
The default Resolver Type value is AMCI.
Note
1.
2.
3.
4.
AMCI has bolt-in replacements for most Autotech transducers and we strongly suggest using them in
place of Autotech transducers whenever possible.
If you decide to keep the existing Autotech resolver, AMCI recommends that you replace the existing
Autotech cable with the Beldin 9730, for single resolver transducers, or the Beldin 9731 for dual
resolver transducers.
You can bring both AMCI and Autotech single-turn resolvers into one unit. Set the Resolver Type to
AMCI and install a RM-3 to interface the Autotech transducers.
For more information on interfacing with Autotech transducer, see the AMCI’s FAQ,“Using
Transducers From Other Manufacturers”, posted on our website, www.amci.com.
Full Scale Count
The Full Scale Count specifies the total number of counts generated by the 1642. In the case of single turn
transducers, it is the total number of counts over the one turn. In the case of multi turn transducers, it is the
total number of counts over the transducer’s number of turns.
For Multiturn resolver transducers, the value for the Full Scale Count must be determined for the programmed
number of turns, not the number of turns actually travelled. For example, if you are using an HTT-20-100 but
only traveling 85 turns, you must program the Full Scale Count parameter as if you are travelling the full 100
turns.
For All Single-Resolver Transducers
The default Full Scale Count is 4096.
Range is 2 to 4096. Setting the Full Scale Count to 360 gives 1 degree resolution.
For AMCI Dual Resolver Multiturn Transducers
Default value is (Number of Turns * 4,096) if Transducer Type equals 100 or 180
Default value is (Number of Turns * 409.6) if Transducer Type equals 1,000 or 1,800
Range is 2 to (Default Value)
For Autotech Multi turn Transducers (Transducer Type equals 128)
Default value is (Number of Turns parameter) * 1,024
Range is 2 to (Default Value)
20 Gear Drive, Plymouth Industrial Park, Terryville, CT 06786
Tel: (860) 585-1254 Fax: (860) 584-1973 Web: www.amci.com
page: 13
1642 Module Manual
MicroLogix 1500 & CompactLogix Resolver Interface Module
Preset Value
The Preset Value parameter allows you to set the value of the position data to any count value within its Full
Scale Count range. The range of the Preset Value is 0 to (Full Scale Count - 1). Programming the Preset
Value does not change the position data, it only sets the value that the position will change to when an Apply
Preset Command is initiated.
The default Preset Value is equal to zero
The Preset Value range is 0 to (Full Scale Count -1)
Transducer Type
(Multi turn Transducer Parameter Only)
The Transducer Type parameter exists for dual resolver multi-turn transducers only. This parameter does not
exist for a channel that is programmed to be used with a single-resolver transducer. The Transducer Type
parameter defines the type of multi-turn transducer attached to the module. The 1642 needs this information
in order to decode the multi-turn position correctly. This parameter also defines the values that can be
programmed into the Number of Turns parameter.
If the Resolver Type parameter is set to AMCI, the Transducer Type parameter can be set to 100,
180,1,000, or 1,800.
If the Resolver Type parameter is set to Autotech, the Transducer Type parameter must be set to 128.
Number of Turns
(Multi turn Transducer Parameter Only)
The maximum number of turns that a dual resolver multi-turn transducer can encode is fixed by the gearing
inside of it. However, the 1642 has the ability to divide this maximum number of turns into smaller multi-turn
cycles. The unit does this without loss of absolute position within the smaller cycle. For example, the 180 turn
mechanical cycle of an HTT-20-180 can be broken down into three electronic cycles of sixty turns each. The
180 turn cycle could also be broken down into sixty cycles of three turns each.
The range of values for the Number of Turns parameter is dependent on the value of the Transducer Type
parameter.
When Transducer Type = 100: Number of Turns is programmable to 1, 2, 4, 5, 10, 20, 25, 50, or
100.
When Transducer Type = 180: Number of Turns is programmable to 1, 2, 3, 4, 5, 6, 9, 10, 12, 15,
18,20, 30, 36, 45, 60, 90, or 180.
When Transducer Type = 1,000: Number of Turns is programmable to 10, 20, 40, 50, 100, 200,
250,500, or 1,000.
When Transducer Type = 1,800: Number of Turns is programmable to 10, 20, 30, 40, 50, 60, 90,
100,120, 150, 180, 200, 300, 360, 450, 600, 900, or 1,800.
When Transducer Type = 128: Number of Turns is programmable to 1, 2, 4, 8, 16, 32, 64, or 128.
20 Gear Drive, Plymouth Industrial Park, Terryville, CT 06786
Tel: (860) 585-1254 Fax: (860) 584-1973 Web: www.amci.com
page: 14
1642 Module Manual
MicroLogix 1500 & CompactLogix Resolver Interface Module
Chapter 4: Backplane Programming
The 1642 module is programmed over the backplane through the input and output words assigned to it.
Because these words are constantly updated, the 1642 implements a simple hand-shaking protocol to control
when it accepts new programming data. This hand-shaking protocol is called a Programming Cycle
Programming Cycle
A Programming cycle consists of six steps and is controlled by the Transmit Bit in the output data words and
the Acknowledge Bit in the input data words.
a. Write the new programming data into the output data words with the Transmit Bit reset. This
step insures that the correct data is in the output data words before the Programming Cycle
begins.
b. Set the Transmit bit. A Programming Cycle is initiated when this bit makes a 0 to 1 transition.
c. Once the unit is done with the programming data, it will set any necessary error bits and the
Acknowledge Bit in its input data words.
d. Once you see the Acknowledge Bit set, check for any errors. The error bits are only valid
while the Acknowledge Bit is set.
e. Respond to any errors and reset the Transmit Bit.
f. The 1642 module responds by resetting the Acknowledge Bit. The Programming Cycle is
complete.
Sample Programs
Sample programs for both the CompactLogix and MicroLogix 1500 systems demonstrating the Programming
Cycle described above can be downloaded from the following page of our website.
http://www.amci.com/sampleprograms.asp
EEPROM Parameter Memory
Parameter values are stored in a non-volatile EEPROM memory. This memory type can store parameter
values in the absence of power for over twenty years, but you can only write to it a limited number of times
before it will be damaged. The EEPROM Memory that AMCI uses is guaranteed for a minimum of 100,000
write cycles.
Every time you have the Apply Preset bit set during a programming cycle, the 1642 module calculates an
offset and stores this value in the EEPROM. If your application requires you to continuously Apply the Preset
Value, consider doing this in the PLC instead of the 1642 module.
A FAQ showing how to calculate and apply a preset value is located on the following page of our website.
http://www.amci.com/faqs.asp
20 Gear Drive, Plymouth Industrial Park, Terryville, CT 06786
Tel: (860) 585-1254 Fax: (860) 584-1973 Web: www.amci.com
page: 15
1642 Module Manual
MicroLogix 1500 & CompactLogix Resolver Interface Module
Input Registers: (Eight 16 bits words sent from the 1642 module to the PLC)
The 1642 has two possible configurations. It can be configured to interface to two Single Resolver
Transducers, which includes the HT-20, H25-XX, and the HT-20-X series, or one Dual Resolver Multiturn
transducer, which includes the HTT-20-X series.
The following two tables show the input data format for the two possible configurations.
.
Generic Input Data for Two Single Resolver Transducers
16 bit Word
0
1
2
3
4
5
6
7
Function
Status Word
Position channel 1
Velocity channel 1
Position channel 2
Velocity channel 2
Stop Time
Brake Applied Position
0
Units
See description below
Counts
Revolutions / Minute
Counts
Revolutions / Minute
Milliseconds
Counts
Single Resolver Transducer Input Data Notes
1. Input words 3 and 4 will be zero when channel 2 is disabled
2. The Stop Position reflects the position of Resolver 1 when the Brake Input is applied and the Stop
Time reflects the time in milliseconds from the active edge of the Brake Input until the position
change of Resolver 1 is less than 4 counts out of 4096 counts/turn for 125mS
Generic Input Data for One Dual Resolver Transducer
16 bit Word
0
1
2
3
4
5
6
7
Function
Status Word
Upper 3 digits position
Lower 3 digits position
Velocity
Not Used
Not Used
Not Used
Not Used
Units
See description below
Counts
Revolutions / Minute
Dual Resolver Transducer Input Data Notes
1. When configured to read the position data from a dual resolver transducer, the 1642 module reports
the position data in two words. The upper word contains the thousands places and the lower word
contains the 100s, 10s, and 1s places. For example, if the position value is 12,345, than the upper
word would contain 12, and the lower word would contain 345. Multiply the upper word by 1000 and
add the lower word to it to combine these two values into one register.
20 Gear Drive, Plymouth Industrial Park, Terryville, CT 06786
Tel: (860) 585-1254 Fax: (860) 584-1973 Web: www.amci.com
page: 16
1642 Module Manual
MicroLogix 1500 & CompactLogix Resolver Interface Module
The tables on the previous page show how the data from the 1642 module will be reported to the PLC’s
registers when the module was added to the I/O using the Generic Module Profile. The following images
show how the input data will be displayed if the 1642 module was added to the I/O from a list of available
modules in RSLogix 5000 V20 or higher.
1642 Two Single Resolvers Input Data
1642 One Dual Resolver Input Data
20 Gear Drive, Plymouth Industrial Park, Terryville, CT 06786
Tel: (860) 585-1254 Fax: (860) 584-1973 Web: www.amci.com
page: 17
1642 Module Manual
MicroLogix 1500 & CompactLogix Resolver Interface Module
Status Word (Input Word 0)
Bit
12
Bit
11
Bit
10
Bit
09
Bit
08
Bit
07
Bit
06
Bit
05
Bit
04
Bit
03
Acknowledge Bit
Ch 1 Transducer Fault
Ch 2 Transducer Fault
Brake Input Status
Ch 2 Velocity at zero
Ch 1 Velocity at zero
Command Error
Message Ignored
Number of Turns Error
Transducer Type Error
Ch 2 Preset Value Error
Ch 2 Full Scale Count Error
Ch 2 Setup Word Error
Bit
02
Bit
01
Bit
00
Ch 1 Setup Word Error
Bit
13
Ch 1 Full Scale Count Error
Bit
14
Ch 1 Preset Value Error
Bit
15
Setup Word Error: Set under the following conditions
1. Set if any of the reserved bits are set in the setup word
2. Set if the Disable Channel Bit (bit 4) is set when either the channel 1 single resolver transducer setup
or the dual resolver transducer setup are sent to the module.
Full Scale Count Error: Set under the following conditions
1. Set if the Full Scale Count is outside of the range of 2 to 4096 for single resolver transducers.
2. Set if the Full Scale Count is outside of the range of (2 to 4096 * Number of Turns) for HTT-20-100
and HTT-20-180 AMCI dual resolver transducers.
3. Set if the Full Scale Count is outside of the range of (2 to 409.6 * Number of Turns) for HTT-201000 and HTT-20-1800 AMCI dual resolver transducers.
4. Set if the Full Scale Count is outside of the range of (2 to 1024 * Number of Turns) for Autotech
RL210 dual resolver transducers.
5. Set if the lower word of a Dual Resolver transducers Full Scale Count is outside of the range of 0 to
999.
Preset Value Error:
Set when the Preset Value is outside the range of 0 to (Full Scale Count – 1)
Transducer Type Error:
Dual Resolver Transducer Programming Error only. This bit is set if the transducer type is not equal to
100, 180, 1000, or 1800 if the module is configured for AMCI transducers, or 128 if the module is
configured for Autotech transducers. This bit will always be reset when the module is being used with
two single resolver transducers.
Number of Turns Error:
Dual Resolver Transducer Error only. This bit is set if the number of turns is invalid for the transducer
type selected. This bit will always be reset when the module is being used with two single resolver
transducers.
Message Ignored: Set under the following conditions
1. This bit will be set if you attempt to program the module if a programming error exists on a different
channel. For example, if you attempt to program channel 2 when there is a channel 1 Full Scale
Count Error.
2. If you try to Apply the Preset Value to a channel that is in transducer fault.
20 Gear Drive, Plymouth Industrial Park, Terryville, CT 06786
Tel: (860) 585-1254 Fax: (860) 584-1973 Web: www.amci.com
page: 18
1642 Module Manual
MicroLogix 1500 & CompactLogix Resolver Interface Module
Command Error: Set under the following conditions
1. Set if more than one of the Command Bits 2, 3, or 4 are set at one time.
2. Set if any of the reserved command word bits are set.
3. Set if the Apply Preset Channel 2 bit is set when channel 2 has been disabled or if the 1642 module
has been configured for a Dual Resolver Transducer.
4. Setting the transmit bit without setting any other command bits.
Velocity At Zero:
This bit will be se if there is no change in the resolver position for the programmed velocity update time,
either 120ms or 32ms.
Brake Input State:
This bit will be set when brake is active (power removed) or reset when brake is inactive (power applied)
or when the 1642 module has been configured to used a Dual Resolver Transducer.
Transducer Fault:
This bit will be set if a transducer Fault has been detected. Possible causes are a miss wired cable, an
incompatible resolver transducer, a faulty transducer, or a faulty 1642 module. A document showing
How Do I Test an AMCI Resolver System to determine which of the previous is the cause of the
Transducer Fault is available from the FAQ section of our website.
http://www.amci.com/faqs.asp
Acknowledge Bit:
This bit is set whenever the Transmit Bit in the Output Registers is set and indicates that the 1642 module
has received the new programming data. The 1642 module will reset this bit when it detects that the
Transmit Bit has been reset.
20 Gear Drive, Plymouth Industrial Park, Terryville, CT 06786
Tel: (860) 585-1254 Fax: (860) 584-1973 Web: www.amci.com
page: 19
1642 Module Manual
MicroLogix 1500 & CompactLogix Resolver Interface Module
Output Registers: (Eight 16 bit words sent from the PLC to the 1642 module)
The 1642 has two possible configurations. It can be configured to use two Single Resolver Transducerswhich includes the HT-20, H25-XX, and the HT-20-X series- or one Dual Resolver Multiturn transducer,
which includes the HTT-20-X series.
The following two tables show the Output Data format for the two possible configurations.
Generic Output Data for Two Single Resolver Transducers
16 bit Word
0
1
2
3
4
5
6
7
Function
Command Word
Setup Word
Full Scale Count
Preset Value
0
0
0
0
Range
See Description Below
See Description Below
2 to 4096
0 to (Full Scale Count – 1)
0
0
0
0
Default
4096
0
Two programming cycles will
be necessary to program both
channels when it has been
configured to use two single
resolver transducers
Generic Output Data for One Dual Resolver Transducer
16 bit Word
0
1
2
Function
Command Word
Setup Word
Transducer Type
3
Number of Turns
4
5
6
7
Upper Full Scale
Count
Lower Full Scale
Count
Upper Preset
Value
Lower Preset
Value
Range
See Description Below
See Description Below
Default
For AMCI: 100,180,1000,1800
For Autotech: 128
For Type 100: 100,50,25,20,10,5,4,2,1
For Type 1000: 1000,500,250,200,100,50,40,20,10
For Type 180: 180,90,60,45,36,30,20,18,15,12,10,9,6,5,4,3,2,1
For Type 1800: 1800,900,600,450,360,300,200,180,150,120,
100, 90,60,50,40, 30,20,10
For Type 128: 128,64,32,16,8,4,2,1
For AMCI (Type 100,180): 2… (Number of Turns)*4096
For AMCI (Type 1000,1800): 2… (Number of Turns)*409.6
For Autotech (Type 128): 2…(Number of Turns)*1024
100
409,600
0
(0 to (Full Scale Count – 1))
20 Gear Drive, Plymouth Industrial Park, Terryville, CT 06786
Tel: (860) 585-1254 Fax: (860) 584-1973 Web: www.amci.com
100
page: 20
1642 Module Manual
MicroLogix 1500 & CompactLogix Resolver Interface Module
The tables on the previous page show how the data will be sent from the PLC to the 1642 module when the
module was added to the I/O using the Generic Module Profile. The following images show how the output
data will be displayed if the 1642 module was added to the I/O from a list of available modules in RSLogix
5000 V20 or higher.
1642 Two Single Resolver Output Data
1642 One Dual Resolver Output Data
20 Gear Drive, Plymouth Industrial Park, Terryville, CT 06786
Tel: (860) 585-1254 Fax: (860) 584-1973 Web: www.amci.com
page: 21
1642 Module Manual
MicroLogix 1500 & CompactLogix Resolver Interface Module
Command Word (Output Word 0)
Bit
11
Bit
10
Bit
09
Bit
08
Bit
07
Bit
06
Bit
05
0
0
0
0
0
0
0
0
0
Bit
04
Bit
03
Bit
02
Bit
01
Bit
00
Apply Preset Ch 1 or
Dual Resolver
Transducer
Apply Preset Channel 2
Clear Errors
Bit
12
Program Single Resolver
Ch 1 setup
Transmit Bit
Bit
13
Program Single Resolver
Ch 2 setup *
Bit
14
Program Dual Resolver
setup
Bit
15
* If channel 2 is disabled, as it is by default, then setting the Program Single Resolver Ch2 Setup bit, and
having valid data in output words 1 to 7, will enable the channel.
Setup Word (Output Word 1)
Bit
09
Bit
08
Bit
07
Bit
06
0
0
0
0
0
0
0
0
0
0
Bit
05
Bit
04
Bit
03
Bit
02
Bit
01
Bit
00
Count Direction
(0 = CW, 1 = CCW)
Bit
10
Velocity Update
(0 = 120ms, 1 = 32ms)
Bit
11
Transducer Fault Latch
(0 = self clearing, 1 = latched)
Bit
12
Resolver Type
(0 = AMCI, 1 = Autotech)
Bit
13
Disable Channel 2
(0=enabled, 1=disabled) **
Bit
14
Reference Voltage Frequency
(0 = 5kHz, 1 = 2.5kHz)
Bit
15
** The Disable Channel 2 bit only exists in the channel 2 single resolver setup word. This bit is reserved
in both the channel 1 single resolver setup word and the dual resolver setup word.
Programming Notes
1. All of the setup parameters must be present each time a programming block has been sent to the unit.
2. Programming the setup parameters will clear the internal offset generated by an Apply Preset
operation.
3. For Dual Resolver Transducer setup, the Full Scale Count and Preset values are divided into two
words. The upper word contains the thousands places and the lower word contains the 100s, 10s, and
1s places of the values. For example, if the Full Scale Count value is 123456, than the upper word
would contain 123, and the lower word would contain 456.
4. If the 1642 module has been programmed to work with two Single Resolver transducers, programming
the Dual Resolver Transducers setup will immediately cause the module to begin reporting the Dual
Resolver Transducer data.
If the 1642 module has been programmed to work with a Dual Resolver Transducer, programming
either of the Single Resolver Setups will immediately cause the module to begin reporting Single
Resolver Transducer data.
20 Gear Drive, Plymouth Industrial Park, Terryville, CT 06786
Tel: (860) 585-1254 Fax: (860) 584-1973 Web: www.amci.com
page: 22
1642 Module Manual
MicroLogix 1500 & CompactLogix Resolver Interface Module
5. Programming the Resolver Type or the Reference Voltage parameter on either of the channels will
affect both channels. If you have to use one AMCI and one Autotech resolver, set the module for
AMCI and use a RM-3 reference module between the 1642 module and the Autotech resolver.
Chapter 5: Manual Revision History:
Revision 0.0 was created on 6/18/03 and was the initial release of the specifications.
Revision 0.1 was created on 7/23/03. The following changes were made.
•
•
•
•
The wiring for the 18 pin connector was added.
The ability to disable channel 2 was added.
Because only single color LEDs can be used, the function of the Status LEDs was changed.
A setup word error status bit was added.
Revision 0.2 of the specifications was created on 11/11/03. The following changes were made
•
•
•
The wiring information was corrected.
The LED patterns were updated.
The reasons for setting the error bits were added.
Revision 1.0 was released on 4/28/06. The following changes were made.
•
The wiring information was expanded to include the CTL-X and CML-X drawings and notes were
added that the Beldin 9730 cable must be used on runs greater than 100ft.
More detailed explanations of the programmable parameters were added.
•
Revision 1.1 was released on 10/23/06. The following changes were made.
•
The location of the channel 1 and channel 2 transducer fault bits was corrected. These bits had been
incorrectly reversed in the previous versions of these specifications.
A note was added in the installation information saying that the 1642 module must not be more than
seven modules away from the PLC.
Information on how programming the reference voltage frequency affects both channels was added to
the specifications.
•
•
Revision 1.2 was released on 4/13/11. The following changes were made.
•
•
•
•
•
Changed the name from Specifications to Manual
Added some LED patterns
Added a table on simulating a resolver
Corrected some wiring note errors
Added more detail on how channel 2 can be enabled and disabled.
Revision 1.3 was released on 3/8/2013. Added information for adding the 1642 module to the I/O using the profile
available in RSLogix 5000 V20 or higher. Also added a note that the Full Scale Count must be programmed for
the programmed number of turns, not the number of turns being traveled.
File: 1642-compact_micrologix-resoler-interface.doc
Date: 3/8/2013
20 Gear Drive, Plymouth Industrial Park, Terryville, CT 06786
Tel: (860) 585-1254 Fax: (860) 584-1973 Web: www.amci.com
page: 23