1
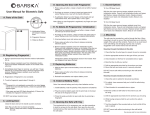
iStranger Manual
Compatibility:
The iStranger was designed to function with smart phones, such as those
from Apple, Samsung, HTC and other manufacturers. To be compatible, the
phone must have a 3.5mm phone jack that supports a 4-contact male
connector (reference picture below). If you are unsure about which type
your phone accepts, please consult its user manual or spec sheet.
Alternatively, if the phone came with a microphone or headset, please count
the number of divided sections. If that connector has 3 sections, the voice
changer will not be compatible with your phone. If that connector has 4
sections, the voice changer will work with your phone. You may reference
the picture below containing a 3 and 4 section male phone jack to determine
the necessary connection type compatible with the iStranger.
Charging the Device:
The voice changer has an internal rechargeable battery to power itself.
When the device is in use and the battery is low, the red indicator light at
the top of the device will be lit. Please note that the device will not indicate a
low battery while not in operation and in its sleep mode(see number 4 in the
‘Important Notes’ section below).
To charge it, use the included USB cable by inserting the Micro USB end into
the top of the voice changer and placing the other end into USB charging
source, such as a USB wall charger or powered hub.
When charging, the yellow indicator light will remain lit until the battery is
full, at which point it will turn off.
Device Modes:
The voice changer has 2 modes, "Low" and "High". “Low” mode is indicated
by a Red LED. “High” mode is indicated by a Blue LED. By pressing the
"Mode" button once the device will switch between Low and High, confirmed
by the change in LED color. You may change modes before or during use.
LOW VOICE HIGH
MODE
Using the Voice Changer:
Before using the iStranger, be sure to read all the instructions and important
notes(next section) to ensure that optimal performance can be obtained. It
is also recommended that users practice with the device utilizing both modes
while trying different speech patterns, volumes and speeds to discover the
optimal voice changing experience.
Once the voice changer is fully charged and ready to use, plug the 3.5mm
male connector into your smart phone headset jack. The voice changer will
automatically turn on and both of the Mode LEDs will flash for approximately
2-3 seconds. After startup, the Red LED will remain lit indicating that the
voice changer is in “Low” mode and ready to use.
The voice changer will now function as the phone’s headset. Using the
phone to dial, place the voice changer speaker, located at the top of the
unit, to your ear and speak into its microphone, located at the base. Again,
you may change modes at anytime during use, if desired.
Earpiece
location
iStran ger
Microphone
location
Important Notes:
1. For best results, speak clearly and concisely. Due to the nature of
mobile phone connections, performance may also be affected if you
speak too quickly.
2. The quality of the voice heard by the recipient may be affected during
first 5-10 seconds of the phone call. This is due to adjustments made
by the service provider and is a normal process associated with all
mobile communication to enhance voice clarity.
3. Due to the variance in the octave of the human voice, some people
may not be able to use both “Low” and “High” modes to reasonably
mask their voice. Please make a few test calls to understand how the
device will specifically perform with your voice.
4. To conserve battery life, the iStranger will go into a sleep mode when
not in use. This will occur approximately 15 seconds after the headset
jack is removed from the smart phone, when the smart phone screen
turns off, or upon ending a phone call with the screen turned off. The
iStranger will resume from sleep mode once the headset jack is reinserted or the phone’s screen is turned back on.
Included in the Package:
1. Voice Changer “iStranger”, model VC1200 – 1
2. Cable “USB to micro USB” – 1
3. Manual -1