1
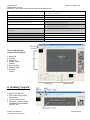
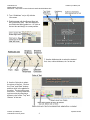
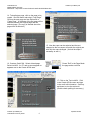
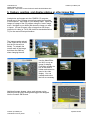
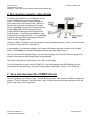
UHM Media Lab
2350 DOLE ST. KHET Studio B
WEB SITE: http://www.communications.hawaii.edu/mlab/about.htm
Director: Don Kozono
Manager’s Phone: 956-3358
FRONT DESK: 956-3355
COMPIX (CYNERG) CG and STILL STORE computer
STUDY GUIDE
PURPOSE
PURPOSE
This Study Guide was created to help UH students prepare to use the COMPIX CG. The CG Certification
exam, which is necessary to reserve and use the COMPIX CG, is designed specifically for classroom
purposes. This Study Guide provides all essential information on the proper handling and use of COMPIX
CG, including an explanation of contents, procedures to demonstrate, and required features and techniques
to know.
The official Owner’s Manual can be downloaded online at: http://www.compixmedia.com/downloads/
Chose the GenCG User’s Guide (CYNERG Family)
REQUIRED INFORMATION FOR CERTIFICATION
7 basic procedures for using the COMPIX CG
1. Identify the components of the COMPIX CG and the input
options.
2. Power up the COMPIX CG system and software program,
GenCG. Create and save a new GenCG project file in a
Desktop Folder
3. Identify the software tools and interface used in GenCG
4. Create “supers” (graphic title pages) and a credit roll
5. Capture, position, and display photo or other image files
6. Run graphics output to video display
7. Save and close GenCG project, then shut down computer
before shutting off power
1. The COMPIX CG system
1. There are 4 major hardware components in the COMPIX
CG system.
1. COMPIX CG computer
2. Keyboard and Mouse
3. Computer Monitor
4. Video Display
2. Unlock the face panel and identity the 3 input options
1. USB Port
2. Flash card memory slots
3. CD/DVD Drive
COMPIX (CYNERG) CG
UHM Media Lab Study Guide
Updated 8/27/08
1
UHM Media Lab
FRONT DESK: 956-3355
COMPIX (CYNERG) CG
WEB SITE: http://www.communications.hawaii.edu/mlab/about.htm
2. Power up the COMPIX CG system
1. Press the computer “On” switch and wait for the computer
to start up
2. Create a desktop folder with
your name
3. Double click the CG program on
the desktop and select and open
one of the two graphics channels
4. Name and save a new GenCG
project to your desktop folder
3. Identify Software tools and interface componets used in GenCG
GenCG tool bars are a convenient way of accessing all of the capabilities that GenCG has to offer. Below is a
description of what each icon means. (Students are not required to know the tools that are colored in grey.)
1. 2. 3.
4. 5. 6.
32.
7.
8. 9. 10. 11. 12. 13. 14. 15. 16. 17. 18. 19. 20. 21. 22. 23. 24. 25. 26. 27. 28. 29. 30. 31.
33. 34. 35. 36. 37. 38. 39. 40. 41. 42.
43.
44. 45. 46. 47. 48. 49. 50.
GenCG Tool descriptions
1. New: Create a new GenCG project.
26. Scheduler Suite:: Schedule documents to run automatically at different times.
2. Open: Open a previously saved GenCG project.
27. Option: Opens the option menu.
3. Save: Save the currently opened project.
28. Take In: Take selected page directly through the preview and program output.
4. Cut: Delete a selected object in the create & edit screen with means of pasting
29. Take Out: Immediately clear selected page through the program output,
it elsewhere.
5. Copy: Copy a selected object on the create & edit screen.
30. Stop: Stops an animation or page mode immediately from program output if
previously used take in.
6. Paste: Paste a currently cut or copied object onto the create & edit screen.
31. Graphic Animation: This option is not available.
7. Print: Go to the print setup page for prompt printing.
32. Page Mode: Select one of multiple modes that pages will be displayed with.
8. Delete: Delete a selected object on the create & edit screen.
33. Select: This GenCG cursor can select any object on the page. It can also
manipulate any object as well.
9. Undo: If a mistake is made on an object in the create & edit screen, go back
34. Text: Insert text on the create & edit screen. After selected, simply left click the
to previously positioned state of the page.
create & edit screen to type.
10. Redo: Re-apply a previously undo action.
35. Shape: Insert shapes on the create & edit screen. After selected, simply left click
the create & edit screen to type.
11. Object Lock: Enables selected objects to be locked. Locked objects cannot
36. Insert Image: Insert images into the opened document. GenCG supports jpeg,
be moved or changed.
bitmap, targa, png, tif, and gif images.
12. Object Unlock: Enables locked objects to be functional.
37. Insert Background: Insert a stabilized image that cannot be edited easily.
13. Bundle Attributes: If multiple pages are selected in the page list and a single
38. Align Left: If text is selected on the create & edit screen, the text can be aligned to
object is selected, change all objects attributes in all pages simultaneously.
the left if it has multiple rows.
14. Update Page List: If bundle attributes is selected, all pages in the page list are
39. Align Center: If text is selected on the create & edit screen, the text can be aligned
to display the updated information. For older systems, it is recommended to
to the center if it has multiple rows.
not activate this function.
COMPIX (CYNERG) CG
UHM Media Lab Study Guide
Updated 8/27/08
2
UHM Media Lab
FRONT DESK: 956-3355
COMPIX (CYNERG) CG
WEB SITE: http://www.communications.hawaii.edu/mlab/about.htm
15. First Page: Go to the first page of the page list.
40. Align Right: If text is selected on the create & edit screen, the text can be aligned
to the right if it has multiple rows.
16. Previous Page: Go to the previous page of the page list.
41. Screen Align: Aligns objects within the video safe title area.
7. Next Page: Go to the next page of the page list.
42. Area Align: Aligns objects within the X and Y axis.
18. Last Page: Go to the next last page of the page list.
43. Object Align: Aligns all selected objects with any specified object.
19. Mask Effect: Creates an area in the create & edit screen in that, everything
44. Match Width: If multiple objects are selected, the width of all the objects are
outside that area is masked and cannot be seen on-air.
matched by the width of the main selected object.
20. Live View: Editing pages in GenCG can be viewed directly on-air in real
45. Match Height: If multiple objects are selected, the height of all the objects are
time.
matched by the height of the main selected object.
21. View Text: View the current document in a standard text file. Document
46. Match Width & Height: If multiple objects are selected, the width and height of
cannot be edited.
all objects are matched by the width and height of the main selected objects.
22. Multiple CG Page List: View two GenCG page lists (CYNERG series)
47. Front: If multiple objects collide, it will bring the selected object to the front.
23. Controller: Run two Playback Controls. (CYNERG series)
48. Back: If multiple objects collide, it will bring the selected object to the back.
24. Church DB: Function not available
49. Forward: If multiple objects collide, it will bring the selected object forward.
25. GenlockVGA Control: Controls internal Genlock with test patterns.
50. Backward: If multiple objects collide, it will bring the selected object backward.
The GenCG interface
components consist of:
1. Menu Bar
2. Tool Bar
3. Page List
4. Create & Edit
Screen
5. Style Catalog
6. Attribute Tabs
7. Playback
Control
4. Creating “supers”
1. Select Text tool #34
2. Click in the Create & Edit
screen area
3. Type in names or text
4. Click Left, Center, or Right
Justification tool if needed
(#38, 39, 40)
COMPIX (CYNERG) CG
UHM Media Lab Study Guide
Updated 8/27/08
3
UHM Media Lab
FRONT DESK: 956-3355
COMPIX (CYNERG) CG
WEB SITE: http://www.communications.hawaii.edu/mlab/about.htm
5. Turn “Guidelines” on (or off) with the
View menu
6. Position super with the Screen Align tool
#41 (positioning tool) This tool keeps the
text within the safety guide box. Or click on
the text box and drag it to a new position.
7. Use the Attributes tab to select the desired
font, size, outline thickness, etc. for the text.
8. Use the Color tab to select
the colors of the font. Click on
the “Face” and “Both” buttons
and then click in the palatte for
the color. The text will be one
solid color. You may make the
text two colors by choosing a
different color for the “Top” and
“Bottom” of the text.
COMPIX (CYNERG) CG
UHM Media Lab Study Guide
Updated 8/27/08
4
UHM Media Lab
FRONT DESK: 956-3355
COMPIX (CYNERG) CG
WEB SITE: http://www.communications.hawaii.edu/mlab/about.htm
9. Click on the Shape tool #35. Then click in the Create &
Edit screen and drag a box shape. The size and shape of
the box may be adjusted by clicking and dragging the little
boxes in the shape’s corners. Several different shapes
may be chosen in the Attributes tab. One choice allows
for a customized shape.
10. Select the Color tab and make the shape a two color
gradient. Select a dark color for “Top” and white for
“Bottom”. Turn the gradient sideways by adjusting the
“Angle” to 90.
11. Click on the Selection tool #33. Then
click on the shape box and drag it over the
super. Move the shape behind the super
using the Layer positioning tools.
12. The Shape and/or super can be locked to
prevent it from being moved or changed with
the Object Lock tool #11
13. Start another page. Click on a blank page to bring it
into the Create & Edit screen. You can then create a new
super. However, if you want to make another super with
the same look but with different names, it is not necessary
to start from scratch.
COMPIX (CYNERG) CG
UHM Media Lab Study Guide
Updated 8/27/08
5
UHM Media Lab
FRONT DESK: 956-3355
COMPIX (CYNERG) CG
WEB SITE: http://www.communications.hawaii.edu/mlab/about.htm
14. To duplicate a page, click on the page to be
copied. Use Edit menu and select “Copy Page.”
Click on the next page and use Edit menu to
“Paste Page.” A duplicate of the first page will be
inserted between the original page and the
selected page. (The copy is inserted about the
page which is selected.)
15. Now the super can be selected and the text
changed so the new super will match the original one
with only the name changed. (Unlock the super if
necessary to edit it.)
16. Create a Credit Roll. Select a blank page.
Select tool #32. An “R” and up arrow appear on
appears next to the Create & Edit area.
Chose “Roll” in the Page Mode
the page and a scroll bar
17. Click on the Text tool #34. Click
in the Create & Edit screen and type
in the credit roll information. Scroll up
and down to view the entire roll.
(Double check spelling for accuracy.)
COMPIX (CYNERG) CG
UHM Media Lab Study Guide
Updated 8/27/08
6
UHM Media Lab
FRONT DESK: 956-3355
COMPIX (CYNERG) CG
WEB SITE: http://www.communications.hawaii.edu/mlab/about.htm
5. Capture, position, and display photos or other image files
Load photos and images onto the COMPIX CG computer
through any of the 3 storage connections under the faceplate
of the computer. Save them to your desktop folder. Import the
images to a page of the CG program using the “Insert: Image”
menu. Navigate to your folder and chose the image you want
to import. It’s best to import a file no larger than full screen
resolution for video (or 740 X 486 pixels for standard definition
TV) for the most efficient performance
The images can be resized
in the Create & Edit Screen
(but the file size will not
shrink). To maintain the
correct scale of the image,
hold down the Shift key
when changing the size.
Use the Mask Effect
tool #19, to crop an
image for display.
Everything outside the
box of the mask is
hidden and cannot be
seen in the video
display. You can
reshape and resize
the box as necessary.
Additional images, shapes, colors, and textures can be
selected from the Style Catalog and dragged and dropped
into the Create & Edit Screen.
COMPIX (CYNERG) CG
UHM Media Lab Study Guide
Updated 8/27/08
7
UHM Media Lab
FRONT DESK: 956-3355
COMPIX (CYNERG) CG
WEB SITE: http://www.communications.hawaii.edu/mlab/about.htm
6. Run graphics output to video display
To display your graphics, use the Playback Controls.
Press the Play button to activate the playback
section. Use the Scroll Bar to select the page you
want to start with in the Preview Screen. When you
have the page you want to display on the Preview
Screen, press Play to send it to the Program Screen.
Pressing Play again removes the page from the
Program Screen and brings the next page into the
Preview Screen. You can also press Clear to clear
the page from the Program Screen. If you press Stop
it stops any animation from proceeding but does not
clear it from the Program Screen.
Check your Video CG Monitor to see if the graphics are being displayed properly. Select “A” on the monitor
for Channel 1 output (and “B” for Channel 2).
In an emergency, you can select a page in the Create & Edit Screen and send it directly to the Program
Screen. Press Stop and then Cut to immediately display the Create & Edit Screen.
When you are using the Playback section, you can move any page to the Preview Screen by typing in the
number of the page and then pressing Enter on the keyboard.
The Pause button can be used to pause a roll, crawl, or reveal page.
For more information on how to use the COMPIX CG, you can download the USER MANUAL from the
internet with this download page: http://www.compixmedia.com/pdf/Users_Guide_5.0_CYNERG.pdf
7. Save and shut down the COMPIX CG unit
Save your project to your desktop Folder. Quit the GenCG program. Shut down the COMPIX computer by
selecting “Turn Off Computer” in the Start menu. Wait until the computer shuts down and then turn off the
power to the control room components.
COMPIX (CYNERG) CG
UHM Media Lab Study Guide
Updated 8/27/08
8