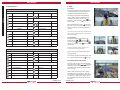
1
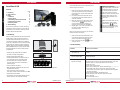
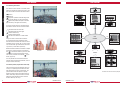
User manual
User manual
Vision is our mission, Orlaco deploys the development, manufacture, supply and service of camera
and display systems that will improve safety and
efficiency of all vehicles, machinery and offshore
vessels. Our systems will give the end user a
view on each blind spot and will create comfort,
efficiency and improved working conditions. Our
active approach will support market demands and
innovations and will lead to enthusiastic ambassadors in the market; our Customers.
SmartView H.264
Manual No. UM0060310 R1-3
2010
Art No:
For more information: www.orlaco.com
0060310
ORLACO PRODUCTS BV
Albert Plesmanstraat 42, 3772 MN Barneveld
PO Box 193, 3770 AD Barneveld
The Netherlands
Phone:
Fax:
E-mail:
Internet:
Date:
The camera and display systems from Orlaco comply
with the latest CE, ADR, EMC and mirror-directive
regulations. All products are manufactured in accordance
with the ISO 9001-2000 quality management system,
ISO 14001 environmental management systems and all
Ex products with the
IECEx scheme and
ATEX directives.
Name:
Initials:
8
+31 (0) 342 404555
+31 (0) 342 404556
[email protected]
http://www.orlaco.com
UM0060310 R1-3
ENGLISH
ENGLISH
User manual
User manual
SmartView H.264
ENGLISH
Contents
1. Introducing
2. Button overview
3. Usage
3.1 Interface
3.2 View options
3.3 Switching between video streams
3.4 Controlling the camera
3.5 Camera presets
4. Troubleshooting
First, follow these instructions to define the preset
location of your PTZ camera:
1.
Select on mouseover the video stream view
of the PTZ camera that you want to define a
preset location for. (border of the video view
blinks yellow)
2. Use the PTZ controls to adjust the view of
that camera to the preset location that you
would like to define.
3. When the view is in the right position, select
a preset number
that you want to
use and press and hold the button for 5
seconds. (green button color disappears)
4. Repeat steps 1-3 for each PTZ camera location that you want to define for you
SmartView system.
page
2
4
5
5
5
5
6
6
7
If you have any questions or issues concerning
the operation of this equipment, consult the relevant section in the manual or contact the Orlaco
Products BV Service department.
1.
DISPLAY
PTZ CONTROL
2
2.
Select on mouseover the video stream view
of the PTZ camera that you want to control.
(border of the video view blinks yellow)
Click on the preset number
that you
would like to use.
4. Troubleshooting
Problem
Possible cause / Solution
1. SmartView is asking for a
registration key.
- Please contact the administrator or installer of your SmartView
system.
2. ‘Connecting to camera’
appears (black image)
- Check the video cable connection to the video server or there is no
camera connected.
3. ‘Error opening video’
appears (red image)
- Check the ethernet connection LED’s. Are ethernet cables connected?
- Are the PC and the video server assigned IP addresses in the same
network range? Try to ping the video server from the PC:
• Click Start / Run
• Enter ’cmd’ and press enter
• Now a text console opens. Type the command ping <ip address>
• If the video server and PC are properly configured, the ping
command will show propery replys. If ’request timed out’ appears,
check the IP settings.
- TCP/IP network problems; bandwidth too low.
- Power problems; check the power supply of the video
server / cameras.
- CPU consumption is full?
ORLACO SMARTVIEW SOFTWARE
TCP/IP
• Viewing of high quality video for multiple
cameras in multiple configurations
• Support H.264 digital video codec
• The SmartView software is simple and fast. It
has a low latency and a high quality image.
• Control Orlaco PTZ or AF-Zoom cameras
by using mouse, tochscreen, trackerball or
optional joystick
• Easy and intuitive navigation
• Many possibilities of different split views and
selectable video streams
• PTZ presets and master-presets for
controlling multiple PTZ simultaneously *NEW*
• Sequential camera switcher
• Its possible to mix and match different types of
Orlaco cameras in one SmartView system.
When all the video views is in the
right position, select a master
preset number
that you
want to use and press and hold
the button for 5 seconds. (green
button color disappears)
After you have setup your presets, you can follow
these instructions to use them:
1. Introducing
This user manual describes the Orlaco SmartView
H.264 software. Orlaco SmartView H.264 is a
complete video view software system for up to
16 cameras. SmartView H.264 runs a Windows
service on a dedicated PC. View and control easily
the cameras over TCP/IP on a local computer or
network. After the easy installations (Installation
Manual IM0060310) you’ve got a powerful video
viewing application for various camera-system
configurations.
Master preset (optional)
The preset buttons on the left side
of the display allow you to set up
to 4 master preset view layouts.
The master preset view layout
allow an operator to quickly adjust
all the camera views to all the
locations that you define in one
view layout.
ENGLISH
User manual
TCP/IP VIDEO SERVER
CAMERAS
basic overview SmartView components
UM0060310 R1-3
UM0060310 R1-3
7
User manual
User manual
3.4 Controlling the camera
PTZ CONTROL
DISPLAY
Zoom in
Zoom out
Brightness (used for enhanced image when
looking at dark objects in a light environment)
Night vision (Enable this option to increase
light sensitivity in low-light environments.)
TCP/IP VIDEO SERVER
4 X COMPACT COLOUR CAMERAS
ENGLISH
ENGLISH
If an autofocus zoom camera is connected, these
buttons are visible if the mouse goes over a view
and can be used to control the camera functions:
4 X AUTO FOCUS ZOOM CAMERAS
TCP/IP VIDEO SERVER
ORLACO SMARTVIEW SOFTWARE
3.4 control camera buttons
If a pan & tilt (PTZ) camera is connected, these
extra buttons can be used to control the camera:
TCP/IP
Horizontal movement to the left
Horizontal movement to the right
Vertical movement up
Vertical movement down
Lock all control buttons in a video stream
DISPLAYS
TOUCHSCREEN DISPLAY
TCP/IP
Using the mouse to control the PTZ camera:
For horizontal and vertical movements; Click
and hold left mouse button and move the mouse
horizontal (Pan) or vertical (Tilt). For zoom in and
out; Click and hold right mouse button and move
up (zoom in) or move down (zoom out).
When SmartView software is installed on multiple
computers in a camera system it is possible to
lock
all the control buttons by one user. Other
users can not use the control buttons ((the buttons are red) until these are unlocked
by the
locker. (figure 3.5)
TCP/IP
NETWORK
TCP/IP
F1
ORLACO SMARTVIEW SOFTWARE
F2
F3
F4
F5
F6
F7
F8
ORLACO SMARTVIEW SOFTWARE
TCP/IP
ROUTER
Pan & Tilt
Zoom in/Zoom out
TCP/IP VIDEO SERVER
TCP/IP VIDEO SERVER
wireless
1 X PTZ CAMERA
2 X COMPACT COLOUR CAMERAS
1 X AUTO FOCUS ZOOM CAMERA
4 X PTZ CAMERAS
DISPLAY + TRACKBALL
It is also possible to control all these camera
functions with the keyboard commands. (refer to
chapter 2 “Button overview”)
3.5 Camera presets (only valid for Orlaco PTZ)
ORLACO SMARTVIEW SOFTWARE
The PTZ controls built into SmartView allow you
to set up to 4 (default) preset locations for each
PTZ camera that the system is controlling. The
preset locations allow an operator to quickly
adjust the camera view to the locations that you
define. These easy setup instructions cover how
define PTZ preset locations and how to those
locations after they are set up.
6
SmartView 16 cameras overview (example)
3.5 Control buttons are locked by a user
UM0060310 R1-3
UM0060310 R1-3
3
User manual
User manual
3. Usage
Default buttons
Pan & Tilt
Buttons
Functions
Preset
Keyboard
up
Buttons
-
Functions
Keyboard
preset 1 - 4
View
ENGLISH
down
left
Buttons
right
-
PTZ lock
l
Keyboard
full view 1 - 16
0-16
quad view
Camera
Buttons
Functions
2-inset top view
Functions
Keyboard
vertical-split view
zoom in
+
sequential switcher
zoom out
-
brightness
b
night vision
0
Functions
Keyboard
close window
Esc
min./max. window
f
View
Functions
Control
Keyboard
Buttons
Functions
3.2 View options
The default interface has four different view
layouts: full view
, quad view
,
2-inset top view
and vertical-split view
(figure 3.2.) Optional: 16 cam
and other inset
view layouts.
Keyboard
Click on one of the view layout buttons and the
image will change.
horizontal-split view
wiper
1-2 top view
washer
For continuous rotation of all video streams; click
on the camera sequential switcher
.(on / off)
2-1 bottom view
lamp
3.3 Switching between video streams
Focus
1-2 left view
2-1 right view
Buttons
Functions
Keyboard
2-inset bottom view
auto focus
/
2-inset left view
focus near
,
2-inset right view
focus far
.
3.1 interface (quad view)
full view
vertical-split view
UM0060310 R1-3
2-inset top view
quad view
3.2 default view layouts
There are 3 ways to switch from video streams;
Using the full view buttons
or keyboard
commands. (see overview chapter 2) And you
can choose a video stream by click right mouse
button in a view.
Select a video view. The border line of a video
view blinks yellow by a mouse over. Click right
mouse button. A “Choose stream” menu will popup. Now you can select a video stream. (figure
3.3) The selected video stream will open in the
same view.
16 cam view
4
Each camera view has a spinner
in the right
top corner. There is a correctly continuous video
stream if the spinner spin counterclockwise all
the time.
Please refer to chapter 2 “Button overview” if your
interface has other view layouts buttons.
Optional buttons
Buttons
The buttons on the left side of the display are
used to select a view layout. With the buttons
in the left bottom corner you can close
,
minimize
and maximize
the SmartView
program.
If your spinner doesn’t spin the video view will automatically display a red warning image “Error opening video”
Please refer to chapter 4.
Window
Buttons
3.1 Interface
After starting SmartView the program runs in a
window. Depending on the custom settings you
will see the default interface like figure 3.1.
ENGLISH
2. Button overview
UM0060310 R1-3
3.3 choose stream menu
5