1
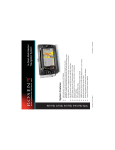
PENPOWER WorldCard User Manual Prepare by Version: 1.0 Edition: 1 Release: October, 2014 P a g e 1 | 22 Contents Chapter 1 Product Introduction............................................................. 3-4 1.1 WorldCard Ultra plus........................................................................................... 3 1.2 Product Feature...................................................................................... 3-4 Chapter 2 Getting Started....................................................................... 4-7 2.1 System Requirements............................................................................. 4 2.2 Installing Penpower WorldCard............................................................... 4 2.2.1 Software and Driver Installation.................................................................... 4-6 2.2.2 Connecting Hardware................................................................................... 6 2.3 Preparation for Card Scanning................................................................ 6-7 Chapter 3 Overview................................................................................. 8-10 3.1 User Interface.......................................................................................... 8 3.1.1 Toolbar......................................................................................................... 9 3.2 Scan Business Cards.............................................................................. 9 3.2.1 Scan wizard.............................................................................................. 9-10 Chapter 4 Edit Cards............................................................................... 10-11 4.1 Edit Contacts........................................................................................... 10 4.2 Rescanning Card..................................................................................... 11 4.3 Exchanging Front and Back Side Card Image......................................... 11 Chapter 5 Manage Business Cards........................................................ 11-22 5.1 Categorize Cards..................................................................................... 11 5.1.1 Categorize from Management Page............................................................. 11 5.1.2 Categorize from Editing Page....................................................................... 12 5.1.3 Send Email by Category............................................................................... 12 5.2 Search Contacts....................................................................................... 12 5.2.1 Text Search................................................................................................... 12-13 5.2.2 Advanced Search.......................................................................................... 13-14 5.2.3 Finding Duplicate Data.................................................................................. 14 5.3 Exchange Contacts................................................................................... 15 5.3.1 Export............................................................................................................. 15-17 5.3.2 Import............................................................................................................. 17-19 5.3.3 Sync............................................................................................................... 19-20 5.4 Settings................................................................................................... 21 5.4.1 Export Option............................................................................................... 21 5.4.3 Field Display................................................................................................. 21-22 5.4.5 Scan Option.................................................................................................. 22 P a g e 2 | 22 Chapter 1 Product Introduction Penpower WorldCard provides a total business card management solution by integrating card recognition, management, and printing functions in a single digitizing unit to find your business cards at any given time. 1.1.2 WorldCard Ultra plus Inherit the design concept of WorldCard Ultra, WorldCard Ultra plus help you scan business card in the easiest way that you have never experienced. Tips • Insert a Business Card Here: Insert a card with the information side facing up. • Intuitive LED indicator: The LED indicator will blink when a card is inserted. It will blink faster during scanning. Specification • Dimensions: 107x99x28mm • Weight: 168g • Resolution: 600 dpi • Interface: USB • Image: Color 1.2 Product Feature • Easy Card Reader Scanning or capturing your business cards has never been quicker or easier. • Organize Business Cards After scanning or capturing your business cards, WorldCard software can organize, sort, search, add and delete any entries. Also, you can easily edit and add notes to any business card. • Advanced Search Full text search to find your contacts easily and conveniently. • Support multiple languages Recognize business cards in different languages, including English, French, German, Italian, Dutch, Swedish, Norwegian, Danish, Finnish, Russian, Polish, Turkish, Hungarian, Spanish(Spain and Mexico) Portuguese(Portugal and Brazil), Greek, Czech, Slovak, Traditional Chinese, Simplified Chinese, Japanese, Korean and many more to come. P a g e 3 | 22 • Multiple Categories and Sub-Categories Organize card information into categories and sub-categories in anyway you want. • Print Templates WorldCard provides various print templates. You can also easily create your own templates and print contact information in different formats. • Data Exchange Support synchronization/importing/exporting for Outlook, Outlook Express, Lotus Notes, Palm, Windows Mobile, ACT! by Sage, Goldmine, Salesforce, PIM software, and World-Card series, such as WorldCard Mac, or WorldCard Mobile versions (WorldCard Mobile and WorldCard Contacs). Chapter 2 Getting Started 2.1 System Requirements • Pentium III 800 CPU or above • 512MB of RAM • 500MB of available hard disk space • Windows 7/Vista /XP • USB Port 2.2 Installing Penpower WorldCard To properly use your WorldCard 1. Install the software included in the CD. 2. Connect your WorldCard scanner to your PC. 3. Scan or capture your business cards. 2.2.1 Software and Driver Installation To start, insert the CD into your CD/DVD ROM (if the installation program does not start automatically, please doubleclick the setup.exe file on the CD). 1. Click Next. P a g e 4 | 22 2. Select I accept the terms of the license agreement to accept the license agreement. Please read the license agreement completely. 3. Please follow the instructions in the onscreen notice. Click Next to continue. 4. Please select the location to install the program. The default location is c:\Program Files\WorldCard. Click Next to continue. P a g e 5 | 22 5. If you want to run the Scan Manager when starting up the computer for quick scanning into Outlook, Outlook Express, Windows Contacts or ACT! directly, click I want to execute Scan Manager when start-up, and then click Next to continue. 6. Click Yes, I want to restart my computer now. Click Finish to complete installation. 2.2.2 Connecting Hardware After installing the software, connect the USB connection of your WorldCard scanner or business card camera to the USB port of your computer. 2.3 Preparation for Card Scanning Start your WorldCard application by double-clicking the WorldCard shortcut on your desktop. After the WorldCard application starts, the following screen will appear. P a g e 6 | 22 1. To start the wizard, click Next. 2. The Wizard can help you quickly choosewhat you want to do: Scan Card: Add a card to your file. Load Card Image: Take an existing picture of a business cardand add it toyour file. Import data: Import data from sources such as Lotus Notes, Microsoft Outlook and Outlook Express, PocketPC, Palm, ACT! by Sage, Goldmine, Salesforce, and WorldCard series, such as WorldCard windows versions, WorldCard Mobile versions ( WorldCard Mobile and WorldCard Contacs). Import Old Version Data: Import the previous WorldCard file formats into your new WorldCard File. You can select a command and click Finish to continue. P a g e 7 | 22 Chapter 3 Overview 3.1 User Interface A: Category tab F: Delete Category B: Search tab G: Disk space used C: Card Window H: Status D: Recycle bin I: Alphabet Index E: Add Category J: Connection status P a g e 8 | 22 3.1.1 Toolbar A: Save Your Card File H: Scan Multiple Business Cards B: Print Preview I: Add a New Card from Another Picture Source C: Delete Card J: Synchronize with Outlook/PDA/Palm/Lotusnotes D: Delete Card from Category K: Send Email E: Settings L: Export All Your Data and the Portable Software to the Selected Flash Disk or Hard Drive F: Mode Button M: Edit Card G: Scan a New Business Card N: Edit Print Template 3.2 Scan Business Cards To scan your business card, insert the card into your WorldCard Scanner. The scanner scans the card immediately. The recognition result saves to the system. 3.2.1 Scan Wizard To scan business cards, select Scan to launch Scan Wizard. P a g e 9 | 22 1. Under Card Style, select Single-sided or Double-sided. 2. Select the language of the card. If the card is double-sided, please select the language of the both sides. 3. Insert the card into your WorldCard Scanner and insert the card. Then the Scanner status area should say Ready. 4. In the Scanner Panel area, please select: - Auto scanning if you want the scan to automatically start when the card is inserted. - Auto recognition after scanning if you want the card information to be automatically added to your file. If you want to preview the scanned card image before recognition, do not select this. If you select Double-sided, you can click Skip back side to scan the front side only. - Editing business card after scanning to display the Edit window when closing the Scan Wizard. 5. After you recognize the card, the information will automatically go into the Unfiled category. Chapter 4 Edit Cards 4.1 Edit Contacts We can edit Name Card if we see some information wrong. We can delete incorrect information, or we can change information. Ex: select on your logo choose logo. Position is incorrect, so we can delete it. P a g e 10 | 22 4.2 Rescanning Card If a card is scanned inappropriately,you may use the Rescanning command of the WorldCard editor by clicking the Rescanning button . After clicking theRescanning button, the following menu appears. You can select the appropriate languages from the pulldown menus.After you have selected the appropriate language settings, you can click the Scan icon to rescan the business card. The card must then be inserted into the WorldCard scanner as appropriate for the orientation of the languages selected. 4.3 Exchanging Front and Back Side Card Image Click to exchange the front side and back side images of the business card. Chapter 5 Manage Business Cards 5.1 Categorize Cards The WorldCard software allows you to manage your business cards by storing them in the category groups. After installing your WorldCard software, you will find two default categories on the management page: the All Records category and Unfiled category. You can add as many user-specified categories and sub-categories as you choose to manage your business cards. 5.1.1 Categorize from Management Page Each card, in addition to being categorized by last name, can also be categorized with our own individual settings so that you can efficiently manage numerous cards in your WorldCard database. From the WorldCard Management pane, highlight the card information you want to categorize, drag it directly into a specific category type under the Category list on the left side of the management window. P a g e 11 | 22 5.1.2 Categorize from Editing Page WorldCard allows you to categorize a business card directly from the Editing pane. To categorize a card from the editing page, click on the Set Category button. The Card Category dialog box appears. Select the category and then click OK. You may also add a subcategory from this window by clicking the Subcategory button. 5.1.3 Send Email by Category To send email to a category group, select the appropriate category group from the management page. Once selected, the category will appear in the right pane of the Management window. To send email to the group, click the Email button . WordCard will add the email addresses of the group members into your default email software. Also the Email editing window will then open with the appropriate contact list. 5.2 Search Contacts You can quickly and efficiently find your contacts with WorldCard Search features. 5.2.1 Text Search The Text Search command of the WorldCard software allows you to quickly find a specific contact. To use Text Search in the WorldCard Management window, on the View menu point to Search, and click Text Search. The Text Search pane appears as follows: Tip: You may enter the Text Search window directly from the WorldCard Management window by clicking the Search button . In the Text Search pane, enter a key word or a group of key words separated by a blank space in the Search box and click the Search button . The Search pane will update, displaying the results as in the following picture. In the left pane, there is a list of all categories where the data from your search string was found. The right pane shows the search results that display all of the applicable fields for the cards stored in your WorldCard database. P a g e 12 | 22 You can double-click on any record displayed in the Search Results pane to open the card in the Editing window. 5.2.2 Advanced Search WorldCard also offers an advancedsearch function. To use the advanced Search function, on the View menu, point to Search and click Advanced Search. The Advanced Search pane will open and appear as right. Tip: You may also open the Advanced Search pane from the WorldCard Management window by clicking the Search button . When the Text Search pane appears, click on the Advanced Search button In the Advanced Search pane, you can enter your search criteria by category. You may select from categories in any one of three option windows. If you have several cards with similar criteria in your database, you may narrow your search further by using more than one of the Search Criteria menus. P a g e 13 | 22 After a Category for your Advanced Search is selected from one or all threeCategory options, you may enter anappropriate search string in the text field of each Category. A completed search will appear. Please also note that the Search Criteria options include the AND operator and the OR operator . You may use these operators to further define your Advanced Search. The AND operator defines that your search results contain the criteria listed in all three search fields. Using the OR operator, a valid result must only match one of any of the three fields to be a valid result. You can further define your Advance Search Criteria by using a specified Category. To select a specific category, select Select Category and specify a category. You may also define your Advanced Search by calendar dates. To define a period for an Advanced Search by Dates, select Select Dates icon and make date selection available. After selecting search by date, you may use the From and To date options to specify a period for your search criteria. The From and To options appear as in the right picture. 5.2.3 Finding Duplicate Data Over a period of time, you may find that you have received a business card from the same individual on more than one occasion. WorldCard has a built-in feature for finding duplicate data. To use Finding Duplicate Data, click Run on the Main Menu and then Duplicates Data. A progress meter briefly displays in the middle of the Management window showing the progress of the search. After all records have been scanned, the Search Results pane displays the same display name entries as shown. P a g e 14 | 22 5.3 Exchange Contacts WorldCard software allows you to exchange valuable contact information with other applications through the use of the Import, Export and Synchronize commands. 5.3.1 Export To select export fields, you may refer to 5.10.1 Export Option for a detailed explanation. 1. To export your WorldCard database to another application such as Microsoft Excel, Access, Outlook, Outlook Express, Lotus Notes, PocketPC, Palm, ACT!, Goldmine, Salesforce(Contacts), Salesforce(Leads), CSV, VCard, or WorldCard series, such as WorldCard windows versions, WorldCard Mobile versions ( WorldCard Mobile for iPhone and WorldCard Contacs for iPhone), on the File menu click Export. This will open the WorldCard Export Wizard screen and the following dialog box appears. For the supported software, please refer 5.9.4 WorldCard Data Exchange Compatibility List. Select the type of application for the file type that you want to create. Tips: 1. Export Text File allows you to export all fields. 2. Export function supports on Excel 97, Outlook 97 and Outlook Express 4.0 version and higher. 3. Export Wizard will compress the file . It makes your filing and mailing easier by producing a smaller file. 2. Click Next. The next Export Wizard dialog box displays. 3. Follow the instructions given in theExport Wizard dialog box to select which cards you want to export. And then click Next. P a g e 15 | 22 4. If you have chosen to continue with the Export function, choose the directory to export the files to. Click OK to export the cards. To complete exporting the files, review the information displayed in the Export Wizard window. 5. After exporting is completed, click Finish to close the Export Wizard dialog box. 6. The Export Wizard operations for exporting your WorldCard database to all application types are similar and will not be discussed individually in this manual. However, a brief overview of the Export of a card to Microsoft Outlook will be presented. P a g e 16 | 22 5.3.2 Import The new data exchanging function in WorldCard allows you to import contacts from another WorldCard series product, such as WorldCard Mobile for iPhone or WorldCard Contacts for iPhone. WorldCard will import the .wcxf file, whicn is compatible with all WorldCard Series products. 1. Click Import on the File menu. The Import Wizard dialog box appears. Select WorldCard Exchanged File. P a g e 17 | 22 2. Click Browse to select a .wcxf file in your computer and click Next to continue the importing process 3. A note window will appear to ask whether you want to import category or not. Click Yes to import categories or vice versa. 4. Please click Finish to complete the importing process. 5. The new contacts should appear in the Browse pane. P a g e 18 | 22 5.3.3 Sync The WorldCard Synchronize function allows you to synchronize the data between WorldCard and other applications such as Microsoft Outlook Express, Microsoft Outlook, Lotus Notes, PocketPC Contacts, Palm Desktop, ACT! by Sage, Goldmine and Salesforce(Contacts). 1. To use the Synchronize function, on the File menu, click Sync. The Sync Wizard dialog box appears. For the supported software, please refer 5.9.4 WorldCard Data Exchange Compatibility List. 2. Select the application that you desire to synchronize with your WorldCard database by clicking Next. The Sync Wizard Status and Information dialog box will open. At the same time WorldCard will begin to synchronize with the selected application. P a g e 19 | 22 Note: If you are synchronizing with Outlook Exrpess and there are contacts whose name fields are empty, a message dialogue will pop up to warn you that those contacts will not be synched with. If you agree with it, then you can click Yes to continue the synchronization. 3. While synchronization occurs, a blue progress bar displays. Once the process is completed, the Sync Wizard window will display Status and Information data about the records you have synchronize. In the Status pane you can see that there is a difference between the Microsoft Outlook database and the WorldCard database. The Information pane shows all actions that have been completed at this point. 4. You can view the complete details of the actions that will be taken to synchronize the two databases from the Details dialog box. To view the Details dialog box, click Detail. The Details dialog box appears. From the Details dialog box, you can click Select all data to accept all data in the list as acceptable changes. For this item, the Sync function would DELETE the entry from Microsoft Outlook. Alternatively, you can use the Select none data icon to clear the selection of all items in the list. After reviewing the Detail list, you may close the Detail window by clicking OK. 5. To accept the actions required to synchronize the two databases, click Accept. The Details dialog box will display the updated Status and Information panes. To close the dialog box and complete the Sync process, click Exit. P a g e 20 | 22 5.4 Settings WorldCard has many selectable Setting options to allow you to configure the operational functions of Export, Synchronize, Field Display, User Define Field, Scan and Personal setting options. To set your WorldCard options, use the procedures outlined in this chapter. On the Tool menu, point to Setting and click any of the options. Alternatively, on the main toolbar click the Setting button . 5.4.1 Export Option To configure the Export options, open the Setting dialog box page as described in the preceding section of this chapter. The Setting Export dialog box displays with ALL options selected as a default configuration. The fields on the right will be exported to Excel, Access, CSV files and Text file. To add another field, select a field from the left side and click the [->] button. Click [>>] button to export all fields. You can set the number of fields with the same name to export (up to 10 ). Select Split address field to export address detail to different fields. After you’ve selected the options you want, click OK to accept the changes. 5.4.3 Field Display To set the Field Display options of the List Mode and Duel mode, open the Setting dialog box as described in the preceding section of this chapter. The Field Display tab of the Setting dialog box appears with a default configuration as displayed in the above window. To modify the selected options, click any available field from the Available Field menu on the left side of the dialog box. After a field is selected, click Add to add it to the Displayed Field list. The selected field will be added to the applicable WorldCard screens. P a g e 21 | 22 To remove a field, click the desired field in the Displayed Field list. Then click Remove to delete the field from your WorldCard screen views. You may also set field options from the available options on the right side of the Field Display window. Once you have completed your changes, click Apply to apply any changes. The Alphabet index can be indexed by Display Name or by Company. Please refer to Chapter 3.1. 5.4.5 Scan Option To configure the Scan options, open the Setting dialog box as described in the preceding section of this chapter. The Scan tab displays the default configuration as seen in the preceding picture. You may define Card Style, Language, Chinese character options and Scanning method. Check Capitalize the first letter of name to recognize the first letter of the contact's name to a capital letter. The other letters of the name will be recognized to lowercase letters. Click Apply for the settings to take effect. P a g e 22 | 22