1
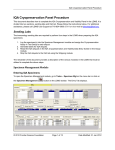
WOMEN’S INTERAGENCY HIV STUDY
SECTION 29: PBMC IQA PROTOCOL
PART 1: INFORMATION AND SPECIMEN COLLECTION
A. PURPOSE
The proper storage of viable peripheral blood mononuclear cells (PBMCs) is critical to the
research efforts of the WIHS. Specimens are batched during a core visit and saved locally or
at the national repository. These specimens may be used for assays performed months to
years after initial freezing and storage. The purpose of this program is to assess the ability of
laboratories to process and store viable (PBMC) for use in various immunologic and
virologic assays.
B. BACKGROUND AND SIGNIFICANCE
Information in this protocol was assembled from IQA, the DAIDS Virology Manual and
ACTG guidelines. The DAIDS PBMC Cryopreservation Evaluation Program’s assessment
is accomplished by comparing the viability of PBMC’s and the viable cell yield before
freezing and after thawing. Proper processing and freezing are critical components in the
process of storing viable PBMC’s. As such, all WIHS labs that prepare and store viably
frozen PBMC’s from subjects enrolled in WIHS studies must participate in this ongoing
program. Every three months, frozen PBMC must be shipped from your laboratory to the
NIAID Immunology Quality Assessment (IQA) contractor. The contractor determines the
percentage of viable cells and viable cell yield for each sample received from each lab. The
data is reported back to the labs and to the following committees: Executive Committee, Lab
Working Group. Based on criteria for acceptable performance, a lab is deemed capable or not
capable to freeze viable PBMCs. If any lab demonstrates poor performance in its ability to
freeze viable PBMCs the IQA will work with the lab to try to determine what the problem
may be.
C. IRB APPROVAL
Participation in the PBMC Cryopreservation Evaluation Program is dependent on local IRB
approval. Sites can use the attached sample consent form in Appendix A to aid in
preparation of the IRB application.
D. ELIGIBILITY OF DONORS
Identify and obtain consent for donation of 2 10mL tubes from 2 participants. One donor
must be a healthy, HIV seronegative volunteer. The second donor must be an HIV
seropositive volunteer with an absolute CD4 count of greater than 200 cells per mm3 and
Viral Load less than 5000 copies /ml.
E. SPECIMEN COLLECTION
Refer to Section 10, Part II for Blood Drawing Protocol.
1. SCHEDULING SPECIMEN COLLECTION
Coordination and laboratory staff should review the guidelines (Appendix B) three weeks
prior to the shipment date. Please make arrangements to obtain blood from your two
volunteers two weeks before the shipment deadline (Appendix D). Ideally, your
volunteers should come in on the same date and time so that a single freeze can be done.
WIHS Manual of Operations (10/01/03)
Page 29-1 of 25
If this is not possible, handle the samples in the same manner, one that preserves the
viability of the cells, so that handling does not introduce differences between the two
samples.
2. COLLECTION
From each donor, obtain 20ml of blood (two 10ml tubes) by standard venipuncture
technique.
WIHS method: See Section 10.
ACTG method: ACD (yellow-top) should be used as the anticoagulant. Isolate PBMC’s
from each donor by Ficoll-Hypaque separation. After separation, determine the cell yield
and viability by trypan blue dye exclusion. Make sure to count at least 100 cells for these
determinations.
F. PUBLISHED CRYOPRESERVATION STUDIES
1. Bohbot A, Lioure B, Faradji A, Schmitt M, Cuillerot JM, Laplace A, Oberling. Positive
selection of CD34+ cells from cryopreserved peripheral blood stem cells after thawing:
technical aspects and clinical use. Bone Marrow Transplant. 1996 Feb;17(2):259-64.
2. Farzadegan H, Imagawa D, Gupta P, Lee MH, Jacobson L, Saah A, Grovit K, Rinaldo
CR Jr, Polk BF. The effect of fresh lymphocytes on increased sensitivity of HIV-1
isolation: a multicenter study. J Acquir Immune Defic Syndr. 1990;3(10):981-6.
3. Fowke K, Behnke J, Hanson C, Shea K, Cosentino LM. Apoptosis: a method for
evaluating the cryopreservation of whole blood and peripheral blood mononuclear cells.
J Immun Meth. 2000:24:139-144.
4. Gjerset G, Nelson KA and Strong DM. Methods for cropreserving cells. In Manual of
Clinical Laboratory Immuniology, NR Rose, EC de Macario, JL Fahey, H Friedman and
GM Penn (eds.), 4th ed, American Society for Microbiology, Washington DC, 1992: 6167.
5. Lee TH, Sheppard HW, Reis M, Dondero D, Osmond D, Busch MP. Circulating HIV-1infected cell burden from seroconversion to AIDS: importance of postseroconversion
viral load on disease course. J Acquir Immune Defic Syndr. 1994 Apr;7(4):381-8.
6. Milson TJ Jr, Keller RH. The variable effect of cryopreservation on peripheral blood
mononuclear populations. J Clin Lab Immunol. 1982 Apr;7(3):205-13.
7. Paul MO, Tetali S, Pahwa S. Effective use of frozen donor peripheral blood
mononuclear cells for human immunodeficiency virus type 1 isolation from vertically
infected pediatric patients. J Clin Microbiol. 1994 May;32(5):1379-82.
8. Pratt Riccio EK, Neves I, Banic DM, Coret-Real S, das Graças Alecrim M, Morgado M,
Daniel-Ribeiro CT, Ferreira-da-Cruz MF. Cryopreservation of peripheral blood
mononuclear cells does not significantly affect the levels of spontaneous apoptosis after
24-h culture. Cryobiology. 2002:45:127-134.
9. Reimann KA, Chernoff M, Wilkening CL, Nickerson CE, Landay AL, ACTG.
Preservation of Lymphocyte Immunophenotype and Proliferative Responses in
Cryopreserved Peripheral Blood Mononuclear Cells from Human Immunodeficiency
Virus Type 1-Infected Donors: Implications for Multicenter Clinical Trials. Clin Diagn
Lab Immunol. May 2000:7(3):352-359.
WIHS Manual of Operations (10/01/03)
Page 29-2 of 25
10. Sleasman JW, Leon BH, Aleixo LF, Rojas M, Goodenow MM. Immunomagnetic
Selection of Purified Monocyte and Lymphocyte Populations from Peripheral Blood
Mononuclear Cells following Cryopreservation. Clin Diagn Lab Immunol. Nov
1997:4(6):653-658.
11. Strong DM, Ortaldo JR, Pandolfi F, Maluish A, Herberman RB. Cryopreservation of
human mononuclear cells for quality control in clinical immunology. I. Correlations in
recovery of K- and NK-cell functions, surface markers, and morphology. J Clin
Immunol. 1982 Jul;2(3):214-21.
12. Tollerud DJ, Brown LM, Clark JW, Neuland CY, Mann DL, Pankiw-Trost LK, Blattner
WA. Cryopreservation and long-term liquid nitrogen storage of peripheral blood
mononuclear cells for flow cytometry analysis: effects on cell subset proportions and
fluorescence intensity. J Clin Lab Anal. 1991;5(4):255-61.
13. Venkataraman M. Effects of Cryopreservation on Immune Responses. Cryobiology.
1996:33:581-588.
14. Weinberg A, Zhang L, Brown D, Erice A, Polsky B, Hirsch M, Owens S, Lamb K.
Viability and Functional Activity of Cryopreserved Mononuclear Cells. Clin Diagn Lab
Immunol. Jul 2000:7(4):714-716.
15. Weinberg A, Betensky RA, Zhang L, Ray G. Effect of Shipment, Storage,
Anticoagulant, and Cell Separation on Lymphocyte Proliferation Assays for Human
Immunodeficiency Virus-Infected Patients. Clin Diagn Lab Immunol. Nov
1998:5(6):804-807.
PART II: PROCESSING, FREEZING, THAWING, AND SHIPPING
It is preferable that WIHS labs use CPT for collection as well as the extraction and freezing
methods stated in Section 10. However, some WIHS labs are also ACTG labs and would be
required to send samples drawn from another tube or method. In the second instance, if possible,
please send two samples using the WIHS protocol and the ACTG protocol. Labs are advised to
keep a parallel vial of each donor to check the report from the IQA contractor.
A. EQUIPMENT AND SUPPLIES FOR PROCESSING-ACTG
1. Gloves (latex, vinyl, nitrile)
2. Lab coat or protective gown
3. Anticoagulated blood (EDTA, ACD or HEP); 2 10 mL tubes
4. Ficoll density gradient solution (density = 1.077), sterile and endotoxin tested. Label
container with date after opening. The shelf life for Ficoll is 6 months after opening.
However, discard if manufacturer’s expiration date occurs before this 6-month period. It
is best to purchase small volumes of this reagent and replace frequently. Examples:
Ficoll-Paque, Amersham-Pharmacia, cat# 17-1440-02; Sigma Histopaque-1077 HybriMax, cat# H8889
5. Sterile Phosphate Buffered Saline (PBS), Ca++-free and Mg++-free or Sterile Hanks
Balanced Salt Solution (HBSS). Observe manufacturer’s outdate. Label bottle with open
date; use opened bottle within three months.
6. Fetal Bovine Serum (FBS), heat-inactivated at 56o C for 30 minutes (mix larger volumes
several times while inactivating).
WIHS Manual of Operations (10/01/03)
Page 29-3 of 25
7. Sterile Complete RPMI 1640 medium
Supplement RPMI with L-glutamine (2 mM final concentration), 100 units Pen/mL,
100ug Strep/mL, and 10% fetal bovine serum. Medium may be filter-sterilized after
addition of supplements.
8. Dimethyl Sulfoxide (DMSO)
Store at room temperature. DMSO must be fresh and sterility maintained. The shelf life
for DMSO is 6 months after opening. Label with the date upon opening. Example:
Hybrimax, Sigma, cat# D2650
9. 0.4% Trypan Blue solution. Store at 18 to 250 C. Filter as needed. Observe
manufacturer’s outdate. Example: Sigma # T81540 100mls
10. Sterile conical centrifuge tubes, 50-mL and 15-mL
11. Microcentrifuge tube for cell counting, 0.5 mL
12. Sterile pipettes, graduated and transfer
13. Pippetting device
14. Sterile pipette tips
15. Micropipettors of various volumes
16. Sterile, Cryopreservation Vials (cryovials)
1.8 to 2-mL with screw cap, external threads, and O-rings
a. NOTE: Some cryovials are unacceptable for use in liquid nitrogen. Please check
the manufacturer’s recommendations before using.
17. Examples: Sarstedt, cat# 72.694.005; Corning, cat# 430489
18. Cryo Labels specific for use in freezing and liquid nitrogen Examples:
Cryotags/Cryobabies 1.50” x 0.75”, Cat# LCRY-1200; Shamrock 5/8” x 1” satin cloth
labels, cat# ACTG-SCPF; Pioneer 1.75” x 0.5”, cat# 710; CILS 9100 labels
19. Laminar flow hood (minimum class 2, Type A Biosafety hood)
20. Centrifuge with horizontal rotor, with speeds up to 1800 X g, and equipped with aerosol
safe canisters
21. Hemacytometer and microscope
22. Nalgene “Mr. Frosty” (Nalgene Cryo 1oC Freezing container, Nalgene cat# 5100-0001;
Curtis Matheson Scientific, cat# 288-383; or Fisher Scientific, cat# 15-350-50); or
Cryomed Freezing Chamber (Gordinier Electronics)
23. –20oC freezer
24. –70oC freezer
25. Liquid nitrogen storage tank with LN2-rated boxes (with holes to allow LN2 drainage).
Note: storage of single vials in canes is not recommended due to safety concerns
(submersion in liquid phase) and possible damage to the affixed labels.
WIHS Manual of Operations (10/01/03)
Page 29-4 of 25
B. PROCESSING AND FREEZING PROCEDURE-ACTG
These instructions assume the lab uses LDMS and the ACTG method. Sites who do not use
LDMS can also participate.
1. Label cryovials with LDMS-derived specimen number, WIHSID, protocol, date of
collection, VID, cell count, and LDMS specimen code. The label should be placed on the
tube so that the contents are visible. Cryovials may be chilled in the freezer for at least
30 minutes prior to cell freezing.
2. Prepare the freezing medium: 90% fetal bovine serum + 10% DMSO; chill on ice or
place in refrigerator at 4°C for at least 30 minutes. Freezing medium may be stored up to
one week. (Experience from some ACTG laboratories has shown that larger volumes can
be prepared, aliquotted and stored at –20oC for up to one year.)
3. Centrifuge the whole blood tubes at 400 X g for 10 minutes at room temperature.
Remove the plasma layer and save.
4. Separate the PBMCs using Ficoll. Follow Ficoll manufacturer’s instructions with respect
to blood/Ficoll ratios and centrifugation time and speed. Centrifuge at room temperature
with NO brake.
5. After centrifugation, transfer the cloudy interface layer (PBMC layer) into appropriately
labeled 50-mL (15-mL if pediatric sample) sterile, centrifuge tubes by carefully
aspirating the cells with a sterile, transfer pipette. Avoid aspirating the Ficoll solution by
maintaining the pipette tip above the cell layer and SLOWLY drawing the cells up into
the pipette.
6. Wash PBMCs by diluting the PBMC layer solution with at least an equal volume of PBS
or HBSS. Centrifuge the cells at 200-400 X g for 10 minutes at room temperature.
Discard supernatant. A second wash is recommended.
7. When ready to count the PBMCs, resuspend them in 1 to 4 mL of complete medium
depending on the size of the cell pellet. (For example, if the PBMC pellet covers the
entire bottom of the 50-mL conical tube and is greater than 1 mm thick, add 4 mL of
medium. If pellet does not cover the entire bottom of the 50-mL conical tube and is less
than 1 mm thick, add 2 mL of medium.) (Experience from some ACTG laboratories has
shown that acceptable viability is obtained if the cell pellet is resuspended in 1 to 4 mL of
cold freezing medium provided that the cells are counted and dispensed into freezing
vials within 15 minutes).
8. Due to the variability in Total Cell Viable Recovery performed by IQA, participating labs
should pay particular attention to their cell counting methods.
Please follow the methods described below. Count and record the number of viable
PBMCs per mL:
8.1
Pipette 10 µL of PBMC suspension into a 0.5 mL microcentrifuge tube. Add
90 µL of 0.4% Trypan Blue stain, making a 1:10 dilution (final concentration of
Trypan Blue is 0.36%). Mix carefully to avoid aerosol formation.
WIHS Manual of Operations (10/01/03)
Page 29-5 of 25
Dilution Factor:
(90µl Trypan Blue) + (10µl PBMC [suspended in cell media not freezing media]) = 101
10 µl PBMC
8.2
Load the mixture (Trypan Blue + PBMC’s) onto the Hemacytometer chamber
until the area under the cover slip is sufficiently filled. Labs should only use
cover slip that is designed specifically for the Hemacytometer. Allow the cell
suspension to settle in the hemacytometer for 5 – 10 minutes before counting.
This will allow the cells to truly settle. Also, cells will be fully exposed to the
Trypan Blue and marginally viable cells will succumb to the Trypan Blue. This
extended waiting period will provide a more accurate cell count.
Count the 4 large corner squares (see diagram below). Viable PBMCs will be
clear; nonviable PBMCs will be blue. Record Viable and Non-Viable Cells on
the Freezing Form (Appendix C or F).
Count cells in the 4
corner 1mm squares.
Include cells that touch
either the top line or left
vertical perimeter line
of any corner square.
Do NOT count any
cells that touch either
the bottom line or right
vertical perimeter line
of any corner square.
8.3. Calculate the number of PBMC/mL:
104 = volume conversion factor to 1 mL
101 = specimen dilution factor
PBMC/mL = PBMC in all four squares x 104 x 101
4
example:
88 X 105 = 2.2 X 10⁶ PBMC/mL
4
WIHS Manual of Operations (10/01/03)
Page 29-6 of 25
8.4. To calculate Cell Viability:
% Viability =
Number of Viable Cells Counted
Total Number of Cells Counted
8.5. Total Viable Cell Count:
Total Number of Viable Cells in 4 squares X 10 4 X 10 [Dilution Factor] X [Vol. of original Cell suspension]
4 [Number of squares counted]
Automated counting may also be used. Follow manufacturer’s instructions.
9. Cell concentration for cryopreservation can be adjusted to 5–10 x 106 viable cells/mL per
cryovial. If cells were resuspended in complete medium for counting purposes,
centrifuge the cells before resuspending them in cold freezing medium. Dispense 0.5 mL
aliquots of the cell suspension into cryovials. Be sure that the cryovial caps are securely
tightened.
10. Immediately place the cryovials in a slow-freeze container (e.g. “Mr. Frosty”) and place
the container in a -70°C freezer for 4 to 24 hours. Alternatively, place the cryovials into
controlled-rate LN2 freezing chamber (Cryomed Freezing Chamber).
NOTE: To prepare the “Mr.Frosty”:
•
Remove the high-density polyethylene vial holder and foam insert from the
polycarbonate unit.
•
Add 250 mL of 100% isopropyl alcohol to the fill line. DO NOT OVERFILL.
Avoid slopping the isopropyl alcohol on the labels because the alcohol can cause
the ink to run.
•
Replace alcohol after every fifth use and document this reagent change.
•
Replace foam insert and vial holder.
•
Place cryovials containing sample into holes in vial holder.
•
Close “Mr. Frosty” and place in –70oC freezer.
•
Pre-chilling “Mr. Frosty” in the refrigerator (4oC) prior to use does not affect cell
viability (ACTG experience).
11. After 4 to 24 hours in a –70oC freezer, transfer the cryovials into a LN2-rated box and
place the box into vapor phase liquid nitrogen (-135oC) for long-term storage. Avoid
liquid phase storage due to safety concerns and to prevent possible problems with label
adhesion failure.
12. Record results for each sample on the Freezing Form in Appendix C or F. It is important
for sites to write down the correct Total Viable Cell Count per vial on the Data form.
Include handwritten calculations for Viability and Cell Count, for one of the samples
vials being submitted to the IQA.
WIHS Manual of Operations (10/01/03)
Page 29-7 of 25
C. THAWING PROCEDURES
NOTE: Be sure to wear a full-face shield during the thawing procedure because
cryovials containing liquid nitrogen have been known to explode.
1. Remove the cryovials from the liquid nitrogen container to a 37°C water bath. If liquid
nitrogen has seeped into the cryovial, loosen the cap slightly to allow the nitrogen gas to
escape during thawing.
2. Hold the cryovial in the surface of the water bath with an occasional gentle “flick” during
thawing. Do not leave the cryovial unattended during the thawing process. (It is
important for cell viability that the cells are thawed and processed quickly - thawing only
takes a few seconds). When a small bit of ice remains in the cryovial, transfer the
cryovial to the biosafety hood. Dry off the outside of the cryovial and wipe with an
alcohol solution before opening the vial to prevent contamination.
3. Quickly transfer the thawed cell suspension from the cryovial to a 15-mL conical
centrifuge tube containing 10 mL of chilled Complete RPMI medium (contains 10% fetal
bovine serum).
4. Centrifuge at room temperature at 200-400 X g for 10 minutes. Remove the supernatant
without disturbing the cell pellet. Wash once with 10 mL of room temperature PBS and
centrifuge at room temperature at 200-400 X g for 10 minutes. Gently resuspend the
PBMCs in the appropriate medium for the assay to be performed.
5. Determine the cell number and percent viable cells.
D. SHIPPING
A WIHS and/or ACTG Freezing Form must accompany all samples. The anticoagulant and
method should be clearly marked.
Please see Appendix D for the current shipping timeline. Sites using LDMS should consult
Appendix E instructions to prepare samples.
1. IQA SHIPPING INSTRUCTIONS
1. Samples must be frozen in 1.8-mL cryovials.
2. Samples must be labeled with all the proper identification. (Donor ID#, Sample #,
date frozen, etc.)
3. Samples must be put into a watertight primary receptacle (cryovial). Then samples
must be place into a watertight secondary packaging (sealed Styrofoam container).
4. Place an absorbent material between the primary receptacle and the secondary
packaging. The absorbent material must be sufficient to absorb THE ENTIRE
contents of ALL primary receptacles. If multiple primary receptacles are placed in a
secondary packaging, they must be wrapped individually to ensure that contact
between them is prevented.
5. A sturdy outside packaging container constructed of corrugated fiberboard must be
used. The minimum size is 7” x 4” x 2”. The tested packaging must bear the UN
specification markings as required by the IATA regulation.
6. The packages containing infectious substances must contain an itemized list of
contents enclosed between the secondary and the outer packaging.
WIHS Manual of Operations (10/01/03)
Page 29-8 of 25
7. The package containing the infectious substances must be marked durably and legibly
on the outside of the packaging with the NAME and TELEPHONE NUMBER OF A
PERSON RESPONSIBLE FOR THE SHIPMENT.
8. The samples must be shipped frozen in DRY ICE. Therefore, a DRY ICE label must
be placed on the outside of the secondary packaging. When dry ice is used, then the
outer container must permit the release of carbon dioxide gas. The primary receptacle
must maintain its containment integrity at the temperature of the refrigerant being
used as well as temperature and pressure of air transport to which the primary
receptacle could be subject if the refrigerant were to be lost.
9. Samples are to be shipped to the following address:
UMD-NJ Medical School
NIAID-DAIDS IQA Program
Raul Louzao (Program Manager)
MSB F-570
185 South Orange Ave.
Newark, NJ 07102
Tel: 973-972-1500
Fax: 973-972-1503
Email: [email protected]
2. MARKING AND LABELING
1. The shipping laboratory (shipper) is responsible for all necessary marking and
labeling of each package of dangerous goods. Each package must be of a size where
there is adequate space to affix all the required markings and labels.
2. For each package the shipper must make sure all relevant markings and labels are in
the correct location and any irrelevant markings and labels are to be removed.
3. There are two different kinds of labels that are required for shipment:
a. HAZARDS LABELS – identifies the class of dangerous goods and must bear the
class or division number in the bottom corner of the label.
b. HANDLING LABELS – identifies any special handling instructions that apply to
the class of dangerous goods.
4. The following labels are required for the shipment of dangerous goods and must be
marked durably and legibly on the outside of the package:
a. PROPER SHIPPING NAME of the contents in the package and the
corresponding UN NUMBER (S) or ID NUMBERS.
b. A class 9 hazard label and label stating "UN1845 DRY ICE ____ kg" is required
for specimens shipped on dry ice. There is a maximum of 200kg per package.
c. NAME and TELEPHONE NUMBER of the person responsible for the shipment
must be available to answer 24 hours of the day in case of an emergency
regarding the package(s) shipped.
WIHS Manual of Operations (10/01/03)
Page 29-9 of 25
3. SHIPPING DOCUMENTATION
The shipper is responsible for the completion of documentation for each shipment
containing dangerous goods as defined by IATA.
1. Paperwork (i.e. Air Waybill, Commercial Invoices) and the box should include the
phrase: “Diagnostic Specimens – Packed in compliance with IATA Packing
Instructions 650.” There must be two copies of the declaration presented to the
shipping carrier (i.e. FedEx). The carrier holds one of these copies and the other copy
is forwarded with the shipment to its destination.
2. A Shippers Declaration is NOT required and should NOT be used.
3. A class 6 hazard label is NOT required and should NOT be used.
4. An Air Eligible label (label with the airplane) is required for specimens being shipped
by air (mandatory January 2004).
5. Your shipments will still be considered "Dangerous Goods" and you will need to
check the "Yes, Shipper's Declaration not required" box in section 6 of a Federal
Express Air Waybill in response to the question "Does this shipment contain
dangerous goods?" As a shipment containing "Dangerous Goods," the 24-hour
Emergency Response contact number will still be required on the outside of the
package, and recipient notification must also be made prior to releasing the package
to a carrier.
4 PRIOR ARRANGEMENTS
1. Dangerous Goods Regulations 1.3.3.1 covers special arrangements that a shipper of
dangerous goods must comply with. The shipper must notify the recipient that a
dangerous goods package is being shipped to.
2. The shipper must provide a telephone number that is available to be answered 24
hours a day in case of an emergency.
3. The name and title of the responsible person for the package must be printed or
stamped.
4. The date and place and signature by the responsible individual for the packaged may
be printed or stamped.
WIHS Manual of Operations (10/01/03)
Page 29-10 of 25
APPENDIX A: SAMPLE IRB CONSENT
Form #2 02/99
Human Studies Committee
INFORMED CONSENT FOR PARTICIPATION IN RESEARCH ACTIVITIES
Participant
HSC Approval Number
Principal Investigator________
PI’s Phone Number:
Title of Project: Blood Donation for the Immunology Quality Assessment Program
This consent form may contain words that you do not understand. Please ask the study
doctor or the study staff to explain any words or information that you do not clearly
understand.
You are being asked to participate in a blood donor program for the Immunology
Quality Assessment Program (IQA) under the local direction of Dr X.
1. You are invited to participate in a research study conducted by Dr. ______ and/or
colleagues. The overall purpose of this research is: to measure the quality of blood tests
being done by our laboratories by sending a blood specimen from two donors to a
central testing lab which will compare its findings to our labs to make sure that our
laboratory reports the correct results. This type of testing for quality will help assure that
HIV infected patients throughout the United States have accurate immune blood tests
that monitor their disease. We are one of many laboratories throughout the United
States that perform immune blood tests to follow the course of HIV disease.
This study will enroll approximately 8-12 people. This study will last seven years. Your
participation, however, will be limited to one blood donation per year.
2. Your participation will involve:
Screening
If you decide to participate as a blood donor in this study and sign this consent, you will
have tests and examinations done before you donate any blood. This is being done to
be make sure that you will be able to donate blood without harm to you. These tests
and procedures include measuring blood pressure, body temperature, heart and
breathing rate. Your hemoglobin level may (about 2 teaspoon of blood) be measured
to make sure that you are not too anemic (having low numbers of red cells) to
participate in this program without affecting your health.
Blood Donation
Once it is determined that you are able to participate in this project, an appointment
will be made for the days that your blood will be drawn. Blood will be obtained by
inserting a needle in your arm vein , the amount of blood to be taken will vary, but will
not exceed 100 ml (6 tablespoons). You will be allowed to donate no more than once
a year and will receive payment for each pre-screen visit and blood donation. The
Medical Director will be available to discuss any screening test results with you and will
share these results with your physician, if you approve.
WIHS Manual of Operations (10/01/03)
Page 29-11 of 25
Financial consideration: Your ability to pay will not affect your participation in this study.
You will receive payment for your participation in this blood donor program in the
amount of $X to $X. The amount you receive is dependent on the amount of time
required to complete the pre-screen visit and the blood donation.
Screening visit = $X/enrollment
Up to one hour of time (Blood Donation) = $X
3. There are certain risks and discomforts that may be associated with this research. They
include: As a blood donor, you should understand that there may be some risks and side
effects associated with donating blood. Drawing blood from a vein can cause local pain,
bruising or bleeding from where the needle enters the skin. There is also a minimal risk of
inflammation or infection of the vein, decreased blood pressure, dizziness or fainting that
can occur during or after you donate blood.
4. The possible benefits to you and society from this research are:
As a blood donor, you will receive no therapeutic benefit from this study. However, the
improvement in the quality of the blood studies being performed in the laboratories
throughout the United States, will benefit all HIV infected patients who need to have these
blood studies done as part of their routine medical care and participation in clinical drug
trials
5. Your participation is voluntary and you may choose not to participate in this research
study or withdraw your consent at any time. Your choice will not at any time affect the
commitment of your health care providers to administer care and there will be no penalty
or loss of benefits to which you are otherwise entitled. Other than non-participation in the
research, available alternatives include:
Since this is not a treatment study, there is no alternative, except not to participate and
have blood tests done by your primary care doctor at a clinical laboratory.
6. All reasonable measures to protect the confidentiality of your records and your identity
will be taken. Your identity will not be revealed in any publication that may result from this
study. The confidentiality of all study related records will be maintained in accordance with
State and Federal laws. There is a possibility that your medical research record, including
identifying information, may be inspected and photocopied by officials of the Federal or
State government agencies and the University Human Studies Committee and the National
Institutes of Health.
7. If you have any questions or concerns regarding this study, or if any problems arise, you
may call the Principal Investigator at______. You may also ask questions or state concerns
regarding your rights as a research subject to Dr. _________, Chairman of the University’s
Institutional Review Board, at
8. __________ University investigators and their colleagues who provide services at _______
University Medical Center hospitals, and facilities recognize the importance of your
contribution to research studies that are trying to improve medical care. __________
University investigators and their staffs will make every effort to minimize, control, and treat
WIHS Manual of Operations (10/01/03)
Page 29-12 of 25
any complications that may arise as a result of this research. If you believe that you are
injured as the result of the research question being asked in the study, please contact the
Principal Investigator and/or the Chairman of the Institutional Review Board as stated in
item 7. Washington University reserves the right to make decisions concerning payment for
medical treatment for injuries solely and directly relating to your participation in biomedical
or behavioral research.
9. You will be informed of any significant new findings developed during the course of
participating in this research that may have a bearing on your willingness to continue in the
study. The investigator may withdraw you from this research if circumstances arise which
warrant doing so.
I have read this consent form and have been given the opportunity to ask
questions. I will also be given a signed copy of this consent form for my
records. I hereby consent to my participation in the research described
above, titled:
ACTG 001: Blood Donation for the Immunology Quality
Assessment Program
Parent or legal guardians’ signature on /Date
participants’ behalf if participant is less than 18
years of age or not legally competent.
(Blood drawing only: Less than 17 years of age.)
Participant’s Signature
Date
Relationship to Child
Signature of Principal Investigator or
DesigneeDate
Informed Consent provided by:
Signature of
Principal Investigator or Collaborating Investigator when informed consent responsibility is entrusted to a
designee. See HSC Guidelines on Who May Obtain Consent to Participate in Research Activities.
This form is valid only if the Institutional Review Board’s current stamp of approval is shown below.
WIHS Manual of Operations (10/01/03)
Page 29-13 of 25
APPENDIX B: SAMPLE PBMC QA REMINDER
The IQA contractor will send a formal version of this memo to participating sites prior to all scheduled
shipments.
This QA program for preparation of viably frozen PBMC is required quarterly of ALL labs processing
and freezing PBMC. Sites will review this reminder three weeks prior to each quarterly shipment cycle
stated in the IQA timeline.
Obtain Samples
Identify and obtain consent from 2 blood donors. One donor must be a healthy, HIV seronegative
volunteer. The second donor must be an HIV seropositive volunteer with an absolute CD4 count of
greater than 200 cells per mm3 and Viral Load less than 5000 copies /ml. Refer to Section 29, Appendix 1
for an IRB sample.
Please make arrangements to obtain blood from your two volunteers two weeks before the shipment
deadline (see the IQA timeline). Ideally, your volunteers should come in on the same date and time so that
a single freeze can be done. If this is not possible, handle the samples in the same manner, one that
preserves the viability of the cells, so that handling does not introduce differences between the two
samples.
From each donor, obtain 20ml of blood (two 10ml tubes) by standard venipuncture technique. ACD,
EDTA or Heparin may be used as the anticoagulant. Isolate PBMC’s from each donor by Ficoll-Hypaque
separation. After separation, determine the cell yield and viability by trypan blue dye exclusion. Make
sure to count at least 100 cells for these determinations.
Use the Cryopreservation method described in Section 29, Part II.B for all freezes.
LDMS
IQA Cryopreservation and Viability samples should be logged in, resulted and shipped through the
LDMS. Please follow the steps outlined below to ensure that the data has been entered properly. For
additional information, please reference the LDMS User Manual sections listed for each step. The LDMS
manual is available online at: http://www.fstrf.org/ACTG/ldmsweb/manual/ldms_manual.html
Step 1: Log the samples into Specimen Management.
Samples must be logged into the Specimen Management module as group IQA with the PID or donor
identifier entered into the ID1 field. For each aliquot, enter the cell count for the volume with CEL as the
derivative and the volume unit. The IQA Cryopreservation and Viability assay should be ordered in the
Test Setup tab of Specimen Management for each aliquot. Please see LDMS User Manual pgs 5.5-5.11;
5.22-5.23.
Step 2: Generate Labels for IQA Specimens.
Use the Labels module to create custom labels for the IQA specimens that will print out the ID1, LDMS
specimen #, cell volume, specimen date and derivative type for each label. Please see LDMS User
Manual pages 11.5; 11.10-11.11
Step 3: Complete the IQA Cryopreservation and Viability Data Entry Screen
Go into the Assay module and select the IQA Cryopreservation and Viability assay from the Immunology
tests that are listed. Select a new run and >search for your specimens in the Filters/Criteria tab. Select
your specimens and complete all fields on the Results tab. Print out patient reports for your records.
Please see LDMS User Manual pages 8.4-8.8; 8.77.
Step 4: Create a Shipping Disk and Manifest Report
In the Shipping module, search for your IQA samples and create a shipping disk to be sent to the IQA
Lab 213. Print out and include a copy of the manifest report in your shipment. Please see LDMS User
Manual pages 7.3-7.5; 7.11; 7.17-7.23.
WIHS Manual of Operations (10/01/03)
Page 29-14 of 25
If you have any questions using the LDMS program, please contact LDMS user support at 716-834-0900
ext. 311 or email [email protected].
Shipping Instructions
Make arrangements to ship the samples, as stated in Section 29, Part II.D on Monday, Tuesday or
Wednesday of the week of (two weeks before specified ship date).
If your site is not going to be able to obtain samples for this iteration of the program, please send a
message to Mr. Raul Louzao ([email protected]) two weeks before the scheduled ship date with an
explanation of your circumstances. Include, in your message, the WIHS site name/number and the
specific lab unable to participate.
Please Note:
1. Labs are required to freeze 4 vials on each Donor, specifically for this QA program. Two vials from each
Donor to be shipped to the IQA and 2 vials to remain at the lab site.
2. The conc. per vial of Cryopreserved PBMC’s is 10 x 106/ml in 0.5ml aliquots. Therefore a total of 5 x
106 Viable cells per VIAL.
3. Both % viability and viable cell recovery will be assessed by the IQA after thawing. Therefore, an
accurate count of total viable cells in each vial is important. For instructions on cell counting
methodology refer to Section 29, Part II.B.9. Make sure label states:
Donor #
LDMS Specimen #
# cell Volume
Date
Der: CEL
WIHS Manual of Operations (10/01/03)
Page 29-15 of 25
APPENDIX C: ACTG FREEZING FORM
ACTG FREEZING ASSESSMENT PROGRAM
IQA Cryopreservation and Viability Data Entry Form
LDMS Site#:
Lab Site#:
Site Name:
Name of Contact:
Contact Telephone #:
Contact Email:
Directors Email:
Name of Lab Director:
Director Telephone #:
Donor Number:
Date of Blood Draw:
m
HIV Status:
Positive
Negative
m
Volume of Blood Draw:
mm3
Most Current CD4 Absolute # :
m
Anticoagulant used:
d
d
y
y
y
y
mls
ACD
Heparin
EDTA
Date of Blood Separation:
m
m
m
d
d
y
y
y
y
with Trypan Blue:
Cell Counting Method Used: Manual:
X 10
Total Viable Cell Yield (Total # of PBMC):
Viability:
6
without Trypan Blue:
Automated: Specify___________________
%
Viability Method Used: Trypan Blue
Other: Specify___________________
Freezing Date:
Volume per Vial [ml]:
m
m
m
d
d
y
y
y
.
mls
y
Should be volume
per vial times
Number of Vials Frozen:
Total Viable Cell Count per Vial:
Shipping Date:
Number of Vials Shipped:
m
m
m
d
d
y
y
y
y
m
m
m
d
d
y
y
y
y
Date of Thaw
WIHS Manual of Operations (10/01/03)
Page 29-16 of 25
X 10
6
10 million
APPENDIX D: IQA TIMELINE
2003
IQA Cryopreservation Project Timeline
January
S M T W T
5 6 7
12 13 14
19 20 21
26 27 28
F
S
1 2 3 4
8 9 10 11
15 16 17 18
22 23 24 25
29 30 31
January
27
Notification by IQA
February
24
July
S M T W T
6 7
13 14
20 21
27 28
F
S
1 2 3 4 5
8 9 10 11 12
15 16 17 18 19
22 23 24 25 26
29 30 31
Collection of Samples by Sites
February
S M T W T
2 3 4 5 6
9 10 11 12 13
16 17 18 19 20
23 24 25 26 27
F
S
1
7 8
14 15
21 22
28
March
10
Shipment of Cryo Samples to IQA
April
28
August
S M T W T
3 4 5 6 7
10 11 12 13 14
17 18 19 20 21
24 25 26 27 28
31
F
S
1 2
8 9
15 16
22 23
29 30
Notification by IQA
March
S M T W T
2
9
16
23
30
F
3 4 5 6 7
10 11 12 13 14
17 18 19 20 21
24 25 26 27 28
31
S
1
8
15
22
29
May
19
Collection of Samples by Sites
June
2
September
S M T W T F
7
14
21
28
S
1 2 3 4 5 6
8 9 10 11 12 13
15 16 17 18 19 20
22 23 24 25 26 27
29 30
Shipment of Cryo Samples to IQA
April
S M T W T
6 7
13 14
20 21
27 28
July
14
F
S
1 2 3 4 5
8 9 10 11 12
15 16 17 18 19
22 23 24 25 26
29 30
Notification by IQA
August
18
Collection of Samples by Sites
October
S M T W T
5 6 7
12 13 14
19 20 21
26 27 28
F
S
1 2 3 4
8 9 10 11
15 16 17 18
22 23 24 25
29 30 31
September
8
May
S M T W T
4 5 6 7
11 12 13 14
18 19 20 21
25 26 27 28
Shipment of Cryo Samples to IQA
F
S
1 2 3
8 9 10
15 16 17
22 23 24
29 30 31
October
20
Notification by IQA
November
17
November
S M T W T F
S
1
2 3 4 5 6 7 8
9 10 11 12 13 14 15
16 17 18 19 20 21 22
23 24 25 26 27 28 29
30
Collection of Samples by Sites
June
S M T W T
F
S
1 2 3 4 5 6 7
8 9 10 11 12 13 14
15 16 17 18 19 20 21
22 23 24 25 26 27 28
29 30
December
1
Shipment of Cryo Samples to IQA
WIHS Manual of Operations (10/01/03)
Page 29-17 of 25
December
S M T W T F
7
14
21
28
S
1 2 3 4 5 6
8 9 10 11 12 13
15 16 17 18 19 20
22 23 24 25 26 27
29 30 31
APPENDIX E: LDMS INSTRUCTIONS
IQA Cryopreservation and Viability Panel Documentation
This document describes the steps that must be taken in the LDMS to complete the IQA
Cryopreserbation and Viability Panel. It is divided into two sections, one for the sending lab and
another for the IQA lab. Please follow the instructions as they appear in the document. For
additional assistance, please call LDMS User Support at 716-834-0900 x311.
Sending Labs:
Entering the IQA specimens
To begin, you must first enter the samples into the LDMS and create cell aliquots.
1.
2.
3.
4.
5.
6.
7.
Click on the Specimen Management button on the LDMS toolbar.
Select IQA from the group combo box.
Enter the donor number or PID in the ID1 field.
Select the specimen and receive dates.
Select BLD as the primary type and select either ACD, EDT or HEP as the additive type.
Enter 20 ml as the primary volume.
Select 4 for the number of aliquots, 5 for volume, CEL for units and CEL for derivative
and the click the add button on the side of the aliquot grid.
8. Click the Add button on the LDMS toolbar.
9. Click the Enroll button on the dialog box that appears.
NOTE: Repeat the above steps for the second blood donor.
Figure 1.1: Logging IQA specimens in Specimen Management
WIHS Manual of Operations (10/01/03)
Page 29-18 of 25
Ordering the IQA Cryopreservation and Viability assay
1. Click on the Test Setup tab.
2. Click on a sample in the Specimens grid.
3. In the Tests grid in the middle left of the screen, scroll down the list and double click on
the IQA Cryopreservation and Viability row
4. Repeat steps 2-3 for each specimen.
5. Click the Save button on the toolbar
Figure 1.2: Ordering the IQA Cryopreservation and Viability Assay
Designing the Custom Labels for IQA specimens
Custom labels will need to be designed for the IQA group that includes the following fields:
Donor/patient ID, LDMS specimen number, volume and volume unit, specimen date and
derivative type.
1.
2.
3.
4.
5.
6.
7.
Select the Labels from the Tools menu.
Select the blank row from the Format combo box.
Click on the Add button on the toolbar.
Type IQA in the Label Name dialog box and click OK.
Select IQA from the Format combo box.
Click on a row in the Description grid to select a label type.
Click the checkbox next to each data item that should be included on the label and enter a row
and column for each item.
8. Click the Save button on the toolbar. This custom label is now available for use.
WIHS Manual of Operations (10/01/03)
Page 29-19 of 25
Figure 1.3: Designing a custom IQA label
Generating Labels for IQA specimens
Once your custom label is designed, you can then print out labels for each of your aliquots.
1. In the Labels module, select IQA from the Format combo box and select your label type
from the Description grid.
2. Select group from the Field combo box, = from the Operator combo box and IQA from
the Value combo box.
3. Click the Add button beneath these combo boxes to add your search criteria.
4. Select the received date for your samples.
5. Click the Execute button on the toolbar.
6. Click the Print button on the Crystal Reports toolbar to print your labels.
Figure 1.4: Custom IQA label
WIHS Manual of Operations (10/01/03)
Page 29-20 of 25
Completing the IQA Cryopreservation and Viability Data Entry Screen
Prior to shipping the samples to the IQA lab, each aliquot must be resulted in the Assay module.
1.
2.
3.
4.
5.
6.
Click on the Assay button on the LDMS toolbar.
Click on the plus sign next to Immunology Category.
Click on the IQA Cryopreservation and Viability row.
Click on the New Run/Not Setup radio button.
Click the Select button on the Assay Selection screen.
Enter the specimen received date in the From calendar combo box. You may also
generate a pending specimen report from this tab by clicking the Report button on the
toolbar.
7. Click the Find Specimens button.
8. Select the IQA samples in the Specimens Found screen and click the Add to Run button.
9. Enter data or select responses for each of the fields on the Result screen.
10. Click the Add button on the toolbar to save the record.
11. Click the Report button on the toolbar to print a patient report.
12. Use the VCR buttons to scroll to the next record.
13. Repeat steps 9-12 for all remaining samples.
Figure 1.5: Entering IQA Cryopreservation and Viability Results
WIHS Manual of Operations (10/01/03)
Page 29-21 of 25
Creating a Shipping Disk and Manifest Report
Once the samples have been resulted in the Assay Module, the last step for the sending lab is to
create a shipping disk and manifest report to send with the frozen aliquots to the IQA lab.
1.
2.
3.
4.
Click on the Shipping icon on the LDMS toolbar.
Click on the Setup Shipment tab to search for your samples.
Select IQA from the Group combo box.
Select Received Date from the Type combo box and enter the received date into the ID
edit box.
5. Click the arrow button to move the criteria into the next grid.
6. Click the Execute button on the toolbar.
7. Select two aliquots from each blood donor by clicking on the rows to highlight them.
8. Click on the Shipment Destination tab and select lab 213 Immunology Quality
Assessment Lab from the Lab combo box.
9. Select a contact from the Contact Person combo box.
10. Select a contact from the Contact @ Sending Lab combo box.
11. Click the Add button on the toolbar to batch the shipment.
12. In the View Shipment screen, select your batch and click on the Manifest Report button.
Print the Box Map report if applicable.
13. Right click on the selected batch and select Create Diskette from the menu.
14. Click OK to view the storage report or click Cancel to continue.
15. Select your disk drive and select LDMS format.
16. Click OK on the dialog box that appears and write the shipping batch number on the
diskette.
IQA Lab: LDMS # 213
Importing IQA samples
1.
2.
3.
4.
5.
6.
7.
8.
Click the Shipping button on the LDMS toolbar.
Click the Import tab.
Click on the Shipment Location button and select the floppy drive on your PC.
Enter the batch number from the Shipping Manifest in the Batch Number edit field.
Click on the Import button.
Select LDMS as the shipping disk format.
Click Yes on the Test Setup dialog box.
Click OK on the Success dialog box.
WIHS Manual of Operations (10/01/03)
Page 29-22 of 25
Figure 1.6: Importing an IQA shipping disk
NOTE: Your imported IQA samples will automatically show up in Specimen Management with the
imported box checked, the imported date, the IQA Cryopreservation and Viability test ordered and
the sending labs results available in the Assay Module.
Completing the IQA Cryopreservation and Viability Data Entry Screen
After the samples have been imported and tested, you need to go into the Assay module and enter
your findings for each sample.
1.
2.
3.
4.
5.
6.
Click on the Assay button on the LDMS toolbar.
Click on the plus sign next to Immunology Category.
Click on the IQA Cryopreservation and Viability row.
Click on the New Run/Not Setup radio button.
Click the Select button on the Assay Selection screen.
Enter the specimen received date in the From calendar combo box. You may also
generate a pending specimen report from this tab by clicking the Report button on the
toolbar.
7. Click the Find Specimens button.
8. Select the IQA samples in the Specimens Found screen and click the Add to Run
button.
9. Enter data or select responses for each of the fields on the Result screen. The left side
of the result screen displays the sending lab’s specimen information. These fields are
grayed out and the results can not be changed.
10. Click the Add button on the toolbar to save the record.
11. Click the Report button on the toolbar to print a patient report.
12. Use the VCR buttons to scroll to the next record.
13. Repeat steps 9-12 for all remaining samples.
WIHS Manual of Operations (10/01/03)
Page 29-23 of 25
Figure 1.7: Entering IQA findings for Cryopreservation and Viability samples
Deleting Extra Aliquots from the Pending List
After the IQA lab’s findings have been entered for each aliquot tested, there may be extra
aliquots that have been sent and have been ordered for the IQA Cryopreservation and Viability
Assay. To remove these samples from appearing in the pending list for the assay, please
complete the steps listed below.
1.
2.
3.
4.
5.
6.
7.
8.
Click the Specimen Management button on the LDMS toolbar.
Click the Browse button on the toolbar.
Type in the specimen number you wish to delete.
Click on the Run button, click on a row to highlight a specimen and then click the Select
button.
Click on the Test Setup tab and click on the aliquot listed in the lower grid that you want
to delete the test information. A “No” should appear in the Done column.
Click the Delete button on the toolbar.
Click Yes in the Delete Test message box that appears.
Repeat steps 2-7 for each test that you wish to delete from your pending list.
NOTE: Deleting the test will not remove the specimen record from the LDMS Specimen
Management module.
WIHS Manual of Operations (10/01/03)
Page 29-24 of 25
APPENDIX F: WIHS FREEZING FORM
WIHS FREEZING ASSESSMENT PROGRAM
IQA Cryopreservation and Viability Data Entry Form
LDMS Site#:
Lab Site #
Site Name:
Name of Contact:
Contact Telephone#:
Contact Email:
Directors Email:
Name of Lab Director:
Director Telephone #:
Donor Number:
Date of Blood Draw:
m
HIV Status:
Positive
Negative
mm
Most Current CD4 Absolute # :
m
m
Volume of Blood Draw:
3
d
d
y
y
y
mls
Method:
Ficoll
CPT
Other
Anticoagulant used:
ACD
EDTA
Heparin
Date of Blood Separation:
m
m
m
d
d
y
y
y
y
with Trypan Blue:
Cell Counting Method Used: Manual:
X 106
Total Viable Cell Yield (Total # of PBMC):
Viability:
without Trypan Blue:
Automated: Specify___________________
%
Viability Method Used: Trypan Blue
Other: Specify___________________
Freezing Date:
Volume per Vial [ml]:
m
m
m
d
d
y
y
y
.
mls
y
Number of Vials Frozen:
Total Viable Cell Count per Vial:
Shipping Date:
X 106
10 million
Number of Vials Shipped:
m
m
m
d
d
y
y
y
y
m
m
m
d
d
y
y
y
y
Date of Thaw:
Percent Viable Cell Recovery:
Total Viable Cell Count:
Viability:
%
X 106
%
Cell Counting Method Used:
Manual:
Viability Method Used: Trypan Blue
WIHS Manual of Operations (10/01/03) Page 29-25 of 25
with Trypan Blue:
without Trypan Blue:
y