1
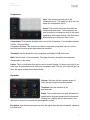
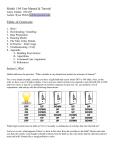
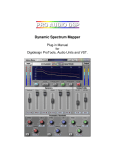
+10db User’s Manual +10db User’s Manual 1 +10db User’s Manual Intro Thank you for installing +10db! This plugin is modelled after a very popular analog compressor unit that was built in the 60s, famous for it’s ability to give a huge sound to drums and vocals. We created this plugin because we wanted to provide you the opportunity to use that same sound without having to shell out thousands of dollars and find space in your rack. Now you can take that sound with you and use it on as many tracks as you like. We hope you love it as much as we do. System Requirements This plugin was crafted to be as light as possible on your CPU, enabling you to put this on many tracks without eating up your processing power. For Mac, you must be running OSX 10.5 or greater. For windows, you need Windows XP or greater. Available Formats This plugin is available in both 32 and 64 bit versions of each format (except RTAS, which is 32 bit only). It is available in the following formats: Mac VST2, VST3, AU, RTAS, AAX Native Windows VST2, VST3, RTAS, AAX Native 2 +10db User’s Manual The Controls This plugin is broken up into two sections: EQ and Dynamics. This manual will walk you through all the nitty gritty details and show you how to make the best use of these controls. For all knobs, you drag up and down on the knob to change the value. You can right click (ctrlclick in Pro Tools) the knob to enter the value in manually. Also, as you hover over the knob, a short description will appear at the bottom of the screen as well as an indicator that shows you the exact value of the knob. EQ This section of the plugin provides a 4 band parallel equalizer, each band having a specifically crafted bandwidth designed to give you the most musical results for the frequency. Each band has 3 controls (Boost/Cut, Mode, and Frequency). Rather than run these filters in series like most EQ plugins, these filters are run in parallel. Why does this matter? First of all, they sound different. Most digital equalizers run in series because it’s far simpler to design, but when it comes to older hardware, many of them had parallel designs instead. It helped to cut down on the inherent noise of running a bunch of amplifiers one after another. It also has an interesting side effect where the bands interact with each other in a completely different way that can’t really be done easily with series eq, giving more of a “natural” feel to the sound. Make sense? Mess with it and you will get a feel for its character. Input: This knob provides a simple input gain for the Equalizer section. It ranges from infinity to 0dB. Power: Enables/Disables the entire equalizer section. dB: This controls how much gain (or attenuation) is applied to the band filter. It ranges from 0dB to 20dB. Dip/O/Peak: This switch controls whether the band is in Attenuate mode (Cut), Boost mode (Peak), or bypassed. When set to Cut, the filter will attenuate by the amount specified on the dB knob. When set to Peak, the filter will boost by the amount specified on the dB knob. When set to O, the filter will be bypassed. fHz: This knob controls which frequency the band will be boosting/cutting. 3 +10db User’s Manual Pre/Post/S.C.: This switch controls where the equalizer sits in the processing chain. When set to Pre, the equalizer comes before the dynamics processor. When set to Post, the EQ comes after the dynamics processor. When set to S.C. (meaning Side Chain), the equalizer is passed to the sidechain of the dynamic processor, but the dynamics processor will apply its gain reduction to the dry (not the equalized) signal. For example, if you have a vocal track that has a lot of sibilance that needs to be tamed, a great way to do that is to boost the offending frequencies in the sidechain. That will make the compressor more sensitive to those frequencies, causing it to clamp down harder when those nasty esses come through. Conversely, cutting a frequency in when in S.C. mode causes the compressor to be less sensitive to those frequencies. The sidechain mode is an incredibly powerful tool for shaping the tone character of the compressor once you get the hang of it. Compressor/Expander The dynamics processing section of this plugin is where it gets really fun. This section contains 3 dynamics processors (Compressor, Expander and Limiter). Dry: This knob controls the level of the dry throughput at the output of the compressor. This allows you to blend the wet (compressed and eq’d) signal with the dry signal, giving you “parallel compression.” When set to 0, none of the dry signal is passed through to the output. When set to 100, the dry signal is passed through unchanged to the output and blended with the wet signal. Parallel Compression Tip By combining the dry signal with the wet signal, you have a little more freedom to smash the compressor really hard without having bad side effects. One way to add a nice room sound to your drums without killing the dynamics is to smash the drums really hard while blending it with the dry signal. The rules of “classy” compression can almost be thrown out the window when run in parallel, so play with it and come up with some fun results. Power: Enables/Disables the dynamics processing section. 4 +10db User’s Manual Compressor Input: This controls the input gain to the compressor circuit. The harder you drive this, the harder the compression will be. Output: This controls the output level after the compression takes place. The compressor can have a tendency to change the level of the signal significantly with certain settings. Use this knob to bring it back up to where you want it to be. Comp Attack: This controls the attack rate in ms of the Compressor. It is switchable between 0.25ms, 2.5ms and 25ms. Compressor Release: This controls how fast the compressor jumps back up to it’s normal level after the incoming audio drops below the threshold. Threshold: Sets the threshold of the compressor, switchable in 2dB increments. Ratio: Sets the ratio of the compressor. The higher this ratio, the harder the compressor clamps down on the sound. Limiter: This is a hard limiter that can be used to prevent clipping. It’s also a nice touch for an extra layer of compression when driving the compressor hard. The red “Limit” light will light up when the signal crosses above the threshold. Expander Release: Sets how fast the expander drops off when the signal drops below the threshold. Threshold: Sets the threshold of the gate/expander. Range: This controls how much gain attenuation is applied when the signal drops below the threshold, ranging from 20dB to 0dB (no attenuation). Use this knob to control how extreme the gate/expander sounds. Exp Attack: How fast the gate opens up when the signal rises above the threshold, measured in milliseconds. 5 +10db User’s Manual Mode: This switches between Expander, Gate and Bypass. When in bypass, the gate/expander section is completely bypassed. Gate and Expander are pretty similar, but differ in the way they sound. The Gate applies a static gain reduction amount when the signal is below the threshold. On the other hand, the expander on the other hand, drops off gradually as the signal gets quieter. It’s like a smoother, but less extreme, version of the gate. Presets +10db comes equipped with it’s own preset menu. To save a preset, just hit the save icon next to the preset menu, type the name of the preset and hit enter. If you enter a name of an existing preset, the old preset will be overwritten. Presets can be organized into sub menus by sorting them into folders in your finder/explorer window. Note that the preset menu only supports one layer of sub folders, so if you put presets inside a folder that is inside a folder, the preset scanner will not find them. Presets are sharable across formats, computers and operating systems. This means that if you save a preset in your DAW in OSX, you can send that preset file to a friend who uses a different DAW on Windows and it will work exactly the same. Next to each preset control is a “Reset” button, which resets the controls to their default settings. For convenience, you can scroll through the presets by hitting the next/previous buttons. A/B Bank: This lets you quickly compare different settings in the plugin without losing your knob settings. As you make changes to the knobs on the plugin, those changes are saved into whichever bank is selected. Switch banks to change all the values to what is stored in the other bank. Note that when you first open the plugin, all changes are stored to both banks until you switch banks for the first time. 6 +10db User’s Manual 7 +10db User’s Manual Credits Plugin concept and algorithm: Boz Millar Graphic design: Marcus Valsecchi Thank you A quick thank you is in order for everybody who helped out making this plugin. Thank you to all of our beta testers who tested the zillions of updates we had. A huge thanks to the CockOS team (http://www.cockos.com/) and Oliver Larkin (http://www.olilarkin.co.uk/) for putting together a great set of tools for creating plugins, and putting up with all our stupid questions. Contact If you ever run into issues or have any questions, you can send an email to [email protected]. For information on becoming an affiliate marketer, you can contact us at [email protected] 8