1
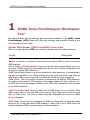
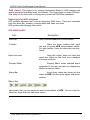
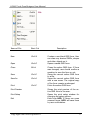
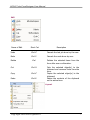
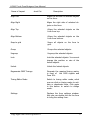
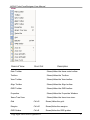
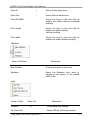
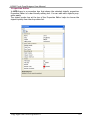
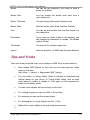
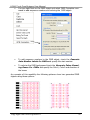
HODA Tools-FormDesigner User Manual
Copy Right 2007-HODA System Co.
1
HODA Tools-FormDesigner User Manual
Copy Right 2007-HODA System Co.
2
HODA Tools-FormDesigner User Manual
1 HODA TOOLS FORMDESIGNER WORKSPACE TOUR
4
OPTICAL MARK READER (OMR) AND HODA TOOLS TERMS
EXPLORING THE HFD WINDOWS
HFD MAIN PARTS
Menu bar
File
Edit
Layout
View
Window
Help
Toolbars
Main Toolbar
Align Toolbar
OMR Toolbar
View Toolbar
Object Toolbox
ITEMS TREE VIEW
PROPERTY EDITOR
4
5
5
5
6
7
7
9
10
10
11
11
11
12
12
13
13
14
2 DESIGNING AN OMR FORM
15
EDITOR SETTINGS
OMR SETTINGS
DEFAULT PROPERTIES
DESIGN AN OMR FORM
Label
Box
Ellipse
Line
Picture
Round Box
OMR Object
16
17
18
18
19
19
20
21
22
23
23
TIPS AND TRICKS
25
Copy Right 2007-HODA System Co.
3
HODA Tools-FormDesigner User Manual
1
HODA Tools-FormDesigner Workspace
Tour
Becoming familiar with terminology and workspace available in the HODA Tools
FormDesigner (HFD) helps you follow the concepts and procedure found in this
user manual and online help.
Optical Mark Reader (OMR) and HODA Tools terms
Before you get started in HFD, you should be familiar with the following terms:
Terms
Description
Bubble A small box or ellipse on the paper form that is filled by user and read by
OMR machine.
Clock Marks (Timing Marks) A group of special black printed boxes, on left or
right side of OMR form. Only the bubbles that are in front of these timing marks will
be read by Axiome OMR Machines.
OMR Optical Mark Reader is a proven solution for data capturing. It needs designing and printing OMR forms, filling printed forms by users and finally read them by
OMR devices like Axiome machines, and save the results for more processing.
OMR Form This is a special form which is designed to be read by OMR machines.
It contains timing marks, OMR bubbles, text, image, shape and other objects on it.
An OMR Form must be designed based on the OMR Ruler standards to be readable
by the OMR machines.
OMR Form Standard There are two kinds of OMR forms. In one of them, Clock
Marks are printed on left side and in the second, Clock Marks are printed on right
side of OMR forms. The first is called American Standard and second is called
Europe Standard.
OMR Ruler There are three standards for OMR form designing. In these standards
there are 32, 40 and 48 tracks (OMR bubbles) in each row of form. OMR rulers are
used to designing OMR forms according to these standards.
Copy Right 2007-HODA System Co.
4
HODA Tools-FormDesigner User Manual
OMR Object This object is for drawing customized Blocks of OMR bubbles with
special properties and data inside the bubbles. This object helps to draw OMR bubbles easily on the form with out being worry about the OMR Ruler standards.
Exploring the HFD windows
HFD contains elements and tools for designing OMR forms. These are reachable
from the menu bar, toolbars, property editor and items tree view.
HFD contains the following main parts:
HFD MAIN PARTS
Part
Description
Menu bar
Used to access HFD main functionalities.
Toolbars
There are some toolbars that users
can use to access HFD functionalities rapidly.
For each toolbar, there are shortcuts from keyboard.
Items tree view
Using this object, users can view and
select any object on the form via a standard
tree view structure.
Property Editor
Property Editor shows selected item’s
properties to the user and user can change any
desired property’s value.
Status Bar
At any time, status bar shows you the
status of HFD, like the active object and curser
position.
Menu bar
Using menu bar you can access to main functionalities of HFD. You can view the
Menu bar items and their sub items below:
Copy Right 2007-HODA System Co.
5
HODA Tools-FormDesigner User Manual
File
Items of File
Short Cut
New
Ctrl+N
Open
Ctrl+O
Close
Ctrl+L
Save
Ctrl+S
Save As
Ctrl+A
Print
Ctrl+P
Print Preview
Print Setup
Exit
Copy Right 2007-HODA System Co.
Description
Creates a new blank OMR form. User
can draw any desired OMRs, shapes
and other objects on it.
Opens a saved OMR form.
Closes the active OMR form. If form
was changed, user should confirm a
question to save the form or not.
Saves the current active OMR form
to a file.
Saves the current active OMR form
with a new name. The original copy
of the form remains unchanged.
Prints the active OMR form.
Shows the print preview of the active OMR form to the user.
Opens the print setup window for
changing the setup options.
Exits from HFD. If there are some
unsaved forms, HFD will save them
by user confirmation.
6
HODA Tools-FormDesigner User Manual
Edit
Items of Edit
Short Cut
Description
Undo
Ctrl+Z
Cancels the last job done by the user.
Redo
Ctrl+Y
Cancels the undo done by user.
Delete
Del
Deletes the selected items from the
form after user confirmation.
Cut
Ctrl+X
Copy
Ctrl+C
Paste
Ctrl+V
Cuts the selected object(s) to the
clipboard and removes them from the
form.
Copies the selected object(s) to the
clipboard.
Pastes the contents of the clipboard
on the active form.
Layout
Copy Right 2007-HODA System Co.
7
HODA Tools-FormDesigner User Manual
Items of Layout
short Cut
Description
Align Left
Aligns the left side of selected objects
on the form.
Align Right
Aligns the right side of selected objects on the form.
Align Top
Aligns the selected objects on the
form from top.
Align Bottom
Aligns the selected objects on the
form from bottom.
Snap to grid
Snaps all objects on the form to
grid.
Group
Groups the selected objects.
Ungroup
Ungroup the selected objects.
Lock
Lock the selected objects. You cannot
change the position or size of the
locked objects.
Unlock
Unlock the locked objects
Regenerate OMR Timings
Generate the required timing marks,
in front of the OMR objects and
Form ID’s.
Timing Editor Mode
Switch to timing editor mode, witch
you can click on timing marks to activate or deactivate them. Click again
in this button to switch to design
mode.
Settings
Displays the form settings window.
Also you can double click on the form
to bring the setting form.
Copy Right 2007-HODA System Co.
8
HODA Tools-FormDesigner User Manual
View
Items of View
Short Cut
Description
Main Toolbar
Shows/Hides the items main toolbar.
Toolbox
Shows/Hides the Toolbox.
View Toolbar
Shows/Hides the View toolbar.
Align Toolbar
Shows/Hides the Align toolbar.
OMR Toolbar
Shows/Hides the OMR toolbar.
Properties
Shows/Hides the Properties Window.
Items Tree View
Shows/Hides the items tree view.
Grid
Ctrl+G
Shows/Hides the grid.
Margins
Ctrl+M
Shows/Hides the margins.
OMR Guides
Ctrl+R
Shows/Hides the OMR guides.
Copy Right 2007-HODA System Co.
9
HODA Tools-FormDesigner User Manual
Zoom In
+
Zoom Out
-
Zooms In the active form.
Zooms Out the active form.
Zoom All Width
Zooms the form to the size that all
objects are visible without horizontal
scrolling.
Fit to height
Zooms the form to the size that all
objects are visible without
vertical scrolling.
Fit to width
Zooms the form to the size that all
objects are visible without scrolling.
Window
Items of Window
Description
New Window
Creates and opens a new form.
Windows
Opens the Windows form, witch is
containing the names of all opened
OMR forms.
Help
Items of Help
Contents
Short Cut
F1
Tip of the Day
Copy Right 2007-HODA System Co.
Description
Shows HFD help window.
Shows HFD tip of the day window.
10
HODA Tools-FormDesigner User Manual
Application Shortcuts
Shows HFD shortcuts list.
About
Shows HFD about window.
TOOLBARS
HFD has some toolbars that help users, to access HFD functionalities more rapidly. These toolbars are mobile. You can change their places in the screen or
hide them.
Main Toolbar
Press this button
To
Create a new OMR form.
Open an existing OMR form.
Save
current
active
OMR
form.
Go back to the previous job.
Cancel Undo
Cut the selected object(s) to clip
board
Copy the selected object(s) to clip
Press this button
To
board
Paste contents of clipboard on the
OMR form.
Delete the selected object(s)
Preview the form for print
Print the OMR form
Important Note: Users can copy/paste items from one OMR form to others.
Align Toolbar
Copy Right 2007-HODA System Co.
11
HODA Tools-FormDesigner User Manual
Align the left side of selected object
Align the right side of selected object
Align the selected objects from top
Align the selected objects from bot
tom
Resize the selected objects to be the
same size
Group the selected objects
Ungroup the selected objects
Lock the selected objects
Unlock the selected objects
OMR Toolbar
Press this button
To
Shows/Hides the OMR grids, witch
shows the position of the OMR bubbles
Regenerate the timing marks, in front
of the OMR objects
Switch to Timing Editor Mode
View Toolbar
Press this button
To
Show/Hide the grid
Copy Right 2007-HODA System Co.
12
HODA Tools-FormDesigner User Manual
Snap all objects on the form to grid
Show/Hide the margins
Zoom In the active form
Zoom Out the active form
Zoom the form to the size that all
objects are visible without horizontal
scrolling
Zoom the form to the size that all
objects are visible without vertical
scrolling
Zoom the form to the size that all
objects are visible without scrolling
Display the form settings window
Object Toolbox
Press this button
To
Switch to the select tool
Select the Label tool
Select the Box tool
Select the Ellipse tool
Select the Line tool
Select the Picture tool
Select the Round Box tool
Select the OMR Object tool
Items Tree View
Items tree view is a useful tool to access form main items quickly. Using Items
tree view, user can select each item quickly and edit its properties in the property editor window.
Copy Right 2007-HODA System Co.
13
HODA Tools-FormDesigner User Manual
Properties Editor
In HFD there is a properties box that shows the selected object's properties.
Properties Editor is a user-friendly editing tool. You can edit each object's properties easily.
The object combo box at the top of the Properties Editor helps to choose the
objects quickly from the drop-down list.
Copy Right 2007-HODA System Co.
14
HODA Tools-FormDesigner User Manual
2
Designing an OMR Form
In the following picture you can see a blank OMR Form. In its body, you can
write text, draw shapes and OMR bubbles, place images and design your form
in the way you like by changing the form properties and settings.
You can set the form properties in one of the following ways:
•
•
•
Click settings button on the view toolbar
Choose settings from Menu bar -> Layout -> settings
Double click on the form
Copy Right 2007-HODA System Co.
15
HODA Tools-FormDesigner User Manual
Editor
By default the Editor Settings panel displays first. You can change some general
properties like page size, margins, grid size and zoom factor in this tab.
Editor Settings
The first group box is for changing the paper size and its background color.
There are three options for setting paper size (pixels, inch and centimeter) that
you can choose from the combo box and then set the forms width and height.
Back to Default button changes the paper size to the default value (A4).
You can change the forms background color by choosing it from the Background
Color combo box.
Page Margins
The second group box relates to page margins. You can set your desired margins and its appearance color. Also you can set the restriction rules:
• Margin: means the objects can’t place out side of the margins.
• Page: means that you can set the margins but there is no restriction to
place objects.
• None: It makes the margins invisible and there is no restrictions to place
objects.
Grid Settings
In this group box you can set the Grid size and its appearance color.
Zoom Settings
In this group box you can set the zoom steps.
Object Tree View
If you check the corresponding check box, when you click on the object names
Copy Right 2007-HODA System Co.
16
HODA Tools-FormDesigner User Manual
on the tree view, HFD scrolls to view the selected object, automatically.
OMR Settings
By clicking on the OMR button on the left panel in setting window the OMR Setting panel appears on the right side.
You can either change the bubble shape of the grid and its color by choosing
the desired shape and color combo boxes.
The timing group box relates to the properties of the forms Timing Marks.
You can change the following properties in this group box:
•
Timing Position: Timing Marks could be placed on the left, right,
top or bottom of the form.
•
Standard OMR Head: You can choose the standard OMR Head
that is compatible with your OMR Machine.
•
Timing Width: Sets the width of timing marks
•
Timing Height: Sets the height of timing marks
•
Number of columns: Sets the forms column number for drawing
OMR objects
•
Number of Rows: Sets the forms row number for drawing OMR
objects
•
Generate missing clock marks while adding or moving OMR
objects automatically: If you check this check box, while you are
drawing a OMR object timing marks places automatically in front of
them
•
Show OMR Timing Guide Numbers: if you check this box, HFD
will show row number and column number guide lines.
In Timing Arrangement Group box you can set the timing marks visibility by
checking the row number of the timing.
Copy Right 2007-HODA System Co.
17
HODA Tools-FormDesigner User Manual
Important Note: You can use the corresponding tool to do clock marks arrangement, using Layout menu-> Timing Editor Mode command.
Form ID group box is useful when you want to have OMR Booklets. It means
that you have two or more forms. Form ID helps the OMR Machine to recognize
each forms template while reading them.
You can choose to mark columns by checking the desired column number.
Default Properties
By clicking on the Default Properties button on the left panel in setting window
the Default Properties panel will be appeared on the right side.
You can set the default properties for all kind of objects and save them to be
available always. For example you can define different color schemas for OMR
objects and save them. Using this capability, you can restore the color themes
and design different OMR forms with different colors.
Design an OMR Form
After you set the forms general properties, you can start to design the form. On
each OMR form user can add these main objects:
• Label
• Box
• Ellipse
• Round Box
• Line
• Picture
• OMR Object
Copy Right 2007-HODA System Co.
18
HODA Tools-FormDesigner User Manual
Label
To add Label:
• Click on the Label tool in Toolbax
• Move mouse to the desired position on the OMR form
• Click on the form and draw the label
Now you can change the properties of the label in the properties box
Label Properties
Property
Description
Name
Each Label has a name that you can distinguish it
from other labels on the form
Caption
You can write your desired text here
Left
The horizontal position of the label on the form
Top
The vertical position of the label on the form
Width
The width of the label
Height
The height of the label
Font
Text Align
You can set the label font and font styles in a
font dialog box
If you want to rotate a label, you can change the
orientation to rotated. The default angle is 90 but
you can change the angle in the text angle
property
Sets the label alignment (Right- Center- Left)
Text Angle
You can set the rotation angle here
Orientation
Bidi Mode
Sets the label bidi mode (Right to Left- Left to
Right)
Note: You can double click on the label to change its text property.
Box
To add Box:
• Click on the Box tool in Toolbax
• Move mouse to the desired position on the OMR form
• Click on the form and draw the box
Now you can change the properties of the box in the properties box
Box Properties
Copy Right 2007-HODA System Co.
19
HODA Tools-FormDesigner User Manual
Property
Description
Name
Each box has a name that you can distinguish it
from other boxes on the form
Left
The horizontal position of the box on the form
Top
The vertical position of the box on the form
Width
The width of the box
Height
The height of the box
Fill Object
If you want to fill the box (fill color) you can
change this property to Yes then set the fill color
in next property
Fill Color
You can change the fill color here from a color
dialog box
Border
This property sets if the box has a border or not
Border Color
You can change the border color here from a
color dialog box
Border Thickness
You can change the border thickness here
Border Style
Sets the border style (Solid- Dashed- Dotted)
Ellipse
To add Ellipse:
• Click on the Ellipse tool in Toolbax
• Move mouse to the desired position on the OMR form
• Click on the form and draw the ellipse
Now you can change the properties of the ellipse in the properties box
Ellipse Properties
Property
Description
Name
Each Ellipse has a name that you can distinguish
it from other ellipse on the form
Left
The horizontal position of the ellipse on the
form
Copy Right 2007-HODA System Co.
20
HODA Tools-FormDesigner User Manual
Top
The vertical position of the ellipse on the form
Width
The width of the ellipse
Height
The height of the ellipse
Fill Object
If you want to fill the ellipse (fill color) you can
change this property to Yes then set the fill color
in next property
Fill Color
You can change the fill color here from a color
dialog box
Border
This property Sets if the ellipse has a border or
not
Border Color
You can change the border color here from a
color dialog box
Border Thickness
You can change the border thickness here
Border Style
Sets the border style (Solid- Dashed- Dotted)
Line
To add Line:
• Click on the Line tool in Toolbax
• Move mouse to the desired position on the OMR form
• Click on the form and draw the line
Now you can change the properties of the line in the properties box
Line Properties
Property
Description
Name
Each line has a name that you can distinguish it
from other lines on the form
Left
The horizontal position of the line on the form
Top
The vertical position of the line on the form
Width
The width of the line
Copy Right 2007-HODA System Co.
21
HODA Tools-FormDesigner User Manual
Height
The height of the line
Color
You can change the line color here from a color
dialog box
Thickness
You can change the line thickness here
Style
Sets the line style (Solid- Dashed- Dotted)
Picture
To add Picture:
• Click on the Line tool in Toolbax
• Move mouse to the desired position on the OMR form
• Click on the form
Now you can change the properties of the picture in the properties box
Picture Properties
Property
Description
Name
Each picture has a name that you can distinguish
it from other pictures on the form
Left
The horizontal position of the picture
Top
The vertical position of the picture
Width
The width of the picture
Height
The height of the picture
Border
This property sets if the picture has a border or
not
Border Color
You can change the border color here from a
color dialog box
Border Thickness
You can change the border thickness here
Border Style
Sets the border style (Solid- Dashed- Dotted)
Note: You can double click on the picture to select an image file.
Copy Right 2007-HODA System Co.
22
HODA Tools-FormDesigner User Manual
Round Box
To add Box:
• Click on the Round Box tool in Toolbax
• Move mouse to the desired position on the OMR form
• Click on the form and draw the round box
Now you can change the properties of the Round Box in the properties box
Round Box Properties
Property
Description
Name
Each round box has a name that you can distinguish it from other round boxes on the form
Corner Radius
Sets the radius of the round corners
Left
The horizontal position of the round box on the
form
Top
The vertical position of the round box on the form
Width
The width of the round box
Height
The height of the round box
Fill Object
If you want to fill the round box (fill color) you
can change this property to Yes then set the fill
color in next property
You can change the fill color here from a color
dialog box
Fill Color
Border
you can set this property to draw a boreder for
round box
Border Color
You can change the border color here from a color
dialog box
Border Thickness
You can change the border thickness here
Border Style
you can set the border style (Solid- Dashed- Dotted)
OMR Object
To add OMR Object:
Copy Right 2007-HODA System Co.
23
HODA Tools-FormDesigner User Manual
• Click on the OMR Object tool in Toolbax
• Move mouse to the desired position on the OMR form
• Click on the form and draw the OMR Object
Now you can change the properties of the OMR Object in the properties box
OMR Object Properties
Property
Description
Name
Each OMR object has a name that you can
distinguish it from other OMR objects on the form
Data
Sets the data that you want to show in the bub
bles
Shape
Sets the shape of the bubbles (Ellipse- CircleRectangle- Square- Round Corner RectangleRound Corner Square- Six Dimensional PolygonSix Dimensional Polygon (W=H))
Filling Order
specified the fill order as horizontally or vertically
Bubble Height
Sets the height of the bubbles
Start Row
Sets the start row of the OMR object
Row Count
Sets the row number of OMR object
Row Interval
Sets the interval between rows of OMR object
Start Column
Sets the start column of the OMR object
Column Count
Sets the column number of OMR object
Column Interval
Sets the interval between columns of OMR object
Fill Object
If you want to fill in the bubbles (fill color) you
can change this property to Yes then set the fill
color in next property
Fill Color
You can change the fill color here from a color
dialog box
Copy Right 2007-HODA System Co.
24
HODA Tools-FormDesigner User Manual
Border
You can set this property if you want to draw a
border for bubbles
Border Color
You can change the border color here from a
color dialog box
Border Thickness
You can change the border thickness here
Border Style
Sets the border style (Solid- Dashed- Dotted)
Font
You can set the bubbles font and font styles in a
font dialog box
Orientation
If you want to rotate a data in the bubbles, you
can change the orientation to rotated. The default
angle is 90 but
Text Angle
You can set the rotation angle here
Layout
Sets the direction of OMR data (Normal-Reverse)
Tips and Tricks
There are some points that help you to design an OMR form in easier fashion:
•
After adding OMR Objects on the form you can rearrange the timing
marks in this way:
Main Menu -> Layout -> Regenerate OMR Timings
•
You can switch to Timing Editor Mode to activate or deactivate the
timings marks on your forms. In Timing Editor Mode, click on each
clock marks to enable or disable it. Click again on this command to
switch to the design mode.
•
You can move objects with arrow keys on the form.
•
For resizing objects you can use Shift + Arrow Keys.
•
For zooming you can use the mouse wheal.
•
For selecting two or more objects use Ctrl + Click.
•
•
Right click on each object to bring the fast access menu.
Copy Right 2007-HODA System Co.
25
HODA Tools-FormDesigner User Manual
•
You can right click on the OMR object and select OMR Cosmetics command to add sequence numbers and coloring the OMR object:
•
To add sequence numbers to the OMR object, check the Generate
Auto Number Labels for OMRs and specify the start number.
•
To colorize the OMR background check the Generate Zebra Bounding Boxes For OMRs and specify the Color1, Color2 and direction of
the boxes.
As a sample of this capability the following pictures show two generated OMR
objects using these options:
Copy Right 2007-HODA System Co.
26
HODA Tools-FormDesigner User Manual
•
To add multiple characters as bubble data, you can enter them using
‘[‘ and ‘]’ characters. For example entering [YES][NO] as data for an
OMR object with 2 bubbles creates the following picture:
Notes:
Copy Right 2007-HODA System Co.
27
HODA Tools-FormDesigner User Manual
Copy Right 2007-HODA System Co.
28