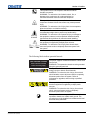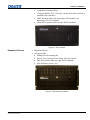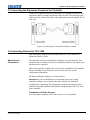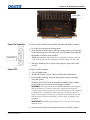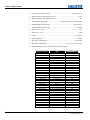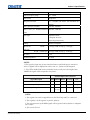
1
China RoHS Compliance Information 关于中国《电子信息产品污染控制管理办法》的说明 • Environmentally Friendly Use Period 环保使用期限 The year number in the centre of the label indicates the Environmentally Friendly Use Period, which is required to mark on the electronic information product sold in China according to the China RoHS regulations. 本标志中表示的年数是根据《电子信息产品污染控制管理办法》(2006年2月28日)以及《电子信息 产品污染控制标识要求》(2006年11月6日)制定的、适用于在中华人民共和国境内销售的电子信息 产品的环保使用期限。 • Material Concentration Values Table 有毒有害物质含量表 Part Name Material Concentration (有毒有害物质或元素) 部件名称 铅 汞 镉 六价铬 多溴联苯 多溴二联苯醚 (Pb) (Hg) (Cd) (Cr 6+) (PBB) (PBDE) 电源 X O O O O X Harness/cable 连接电线/缆 X O O O O X Fan 风扇 O O O O O O CPU 中央处理器 X O O O O O Hard drive 硬盘 X O O O O O RAM & ROM 存储器 X O O O O O Video input PCB 图像输入卡 X O O O O O Host interface card 主机接口卡 X O O O O O PCI expansion card PCI 扩展卡 X O O O O O PCI backplane PCI 底板 X O O O O O System board PCB 主板 X O O O O O SCSI RAID disk array controller 磁盘阵列控制器 X O O O O O Video overlay card 视频叠加卡 X O O O O O Display card 显卡 X O O O O O Sound card 声卡 X O O O O O Network adapter 网络适配卡 X O O O O O Mechanical enclosure* 机械附件 X O O O O O Keyboard 键盘 O O O O O O Mouse 鼠标 O O O O O O Windows CD 视窗软件光盘 X X X X X X Power supply TVC Hardware Setup Manual 020-100107-01 Rev. 1 (10/07) i Battery 电池 O O O O O O Note: O : indicates that the concentration value of the particular hazardous substance contained in all the homogeneous materials for this part, according to EIP-A, EIP-B, EIP-C, is below the stipulated levels in China SJ/T11363-2006. 表示该有毒有害物质在该部件所有均质材料中的含量均在SJ/T11363-2006规定的限量要求以下。 X: indicates that the concentration value of the particular hazardous substance contained in all the homogeneous materials for this part, according to EIP-A, EIP-B, EIP-C, may be above the stipulated levels in China SJ/T11363-2006. 表示该有毒有害物质至少在该部件的某一均质材料中的含量可能超出SJ/T11363-2006规定的限量要求。 * This part uses metallic alloys, which may contain Lead. 因该部件使用金属合金材料,故可能含有铅。 ii TVC Hardware Setup Manual 020-100107-01 Rev. 1 (10/07) COPYRIGHT NOTICE © 2006 Christie Digital Systems, Inc. All Rights Reserved This document contains proprietary information of Christie Digital Systems Canada, Inc. and Christie Digital Systems USA, Inc. (collectively known as “Christie Digital Systems, Inc.”), and may not be reproduced, stored in a retrieval system, transferred to other documents, disclosed to other manufacturers, or used for manufacturing or for any other purpose, in whole or in part, without prior written permission from Christie Digital Systems, Inc. Christie Digital Systems, Inc., reserves the right to make changes to specifications at any time without notice. The information furnished in this publication is believed to be accurate and reliable. Christie Digital Systems, Inc. makes no warranty of any kind with regard to this material, including, but not limited to, implied warranties of fitness for a particular purpose. Christie Digital Systems, Inc. shall not be liable for errors contained herein or for incidental or consequential damages in connection with the performance or use of this material. GRAPHIC ILLUSTRATIONS All drawings, including system layout, hardware devices, controls and indicators, screens and maintenance drawings are provided to enhance understanding of the accompanying text. These graphics are representations only; they are not necessarily drawn to scale and may not represent parts of your specific machine. TRADEMARKS All trademarks used in this manual are the property of their respective owners. GENERAL Notices: Unless otherwise set forth in this Agreement, all notices, demands or other communications to the Licensor hereunder shall be in writing (including telecopy) and shall be deemed to have been duly given if delivered during normal business hours by hand, Federal Express, United Parcel Service or other reputable overnight commercial delivery service, by telecopy, confirmation of receipt received, or by mail with return receipt requested, addressed as follows: Christie Digital Systems Canada Inc. Legal Department 809 Wellington Street North Kitchener, Ontario N2G 4Y7 Severability: If any provision of this Agreement is held to be invalid, such invalidity shall not affect the other provisions of this Agreement. Waiver: No waiver by the Licensor of any particular default or omission committed by the Licensee shall affect or impair the right of the Licensor in respect to any subsequent default or omission of the same or a different kind. No delay or failure by the Licensor to exercise any rights in connection with any default or omission committed by the Licensee shall affect or impair the Licensor’s rights in respect of that particular default or omission or any subsequent default or omission of the same or different kind. In any event, time shall continue to be of the essence without the necessity of specific reinstatement. Governing Law: This Agreement shall be governed by and interpreted in accordance with the laws of the Province of Ontario and the federal laws of Canada applicable therein. The Parties hereby will attorn to the non-exclusive jurisdiction of the Courts of the Province of Ontario. TVC Hardware Setup Manual 020-100107-01 Rev. 1 (10/07) iii Table of Contents SECTION 1: PREFACE 1.1 IN THIS DOCUMENT ................................................................................................1-1 1.2 SAFETY INFORMATION .............................................................................................1-1 Preventing Electrostatic Discharge ......................................................................1-1 Installation Guidelines..........................................................................................1-1 Symbols and Labels for the TVC Controller & Expansion Chassis......................1-2 1.3 DOCUMENT CONVENTIONS......................................................................................1-4 1.4 RELATED DOCUMENTS ............................................................................................1-4 SECTION 2: HARDWARE 2.1 ABOUT THE TOTAL VIEW CONTROLLER ....................................................................2-1 Key Features and Capabilities..............................................................................2-1 Base Configuration ...............................................................................................2-2 2.2 UNPACKING THE TVC.............................................................................................2-2 TVC Chassis..........................................................................................................2-2 Expansion Chassis ................................................................................................2-3 2.3 PURCHASE RECORD AND SERVICING........................................................................2-4 SECTION 3: CONNECTING THE CONTROLLER 3.1 GROUNDING THE EXPANSION CHASSIS ....................................................................3-1 3.2 CHANNEL AND DISPLAY NUMBERING .......................................................................3-2 TVC-1200..............................................................................................................3-2 TVC-1100..............................................................................................................3-2 3.3 CONNECTING THE EXPANSION CHASSIS TO THE CONTROLLER ..................................3-3 3.4 CONNECTING DEVICES FOR TVC-1200 ...................................................................3-3 About Source Connections....................................................................................3-3 Connecting Display Devices/Screens....................................................................3-5 3.5 CONNECTING DEVICES FOR TVC-1100 ...................................................................3-7 About Source Connections....................................................................................3-7 Connecting Display Devices/Screens..................................................................3-10 3.6 CONNECTING PERIPHERAL DEVICES......................................................................3-10 3.7 CONNECTING POWER ............................................................................................3-11 3.8 POWERING ON/OFF ............................................................................................3-12 Power ON Expansion Chassis ............................................................................3-12 Power ON Controller..........................................................................................3-13 Power OFF .........................................................................................................3-13 3.9 SYSTEM MONITORING............................................................................................3-14 Monitoring Controller Components....................................................................3-14 Monitoring Hard Disk Drives .............................................................................3-15 SECTION 4: SPECIFICATIONS 4.1 HARDWARE .............................................................................................................4-1 Main Chassis.........................................................................................................4-1 Expansion Chassis ................................................................................................4-2 Motherboard .........................................................................................................4-3 Processor ..............................................................................................................4-3 Main Memory........................................................................................................4-3 I/O Interfaces ........................................................................................................4-3 Storage..................................................................................................................4-4 DVD Drive ............................................................................................................4-7 Display/Video Architecture for TVC-1200............................................................4-7 Display/Video Architecture for TVC-1100............................................................4-9 Graphics Output (D4 card)...................................................................................4-9 Composite and S-Video Input Compatibility.......................................................4-12 RGB Input (R2) ...................................................................................................4-12 Networking..........................................................................................................4-14 TVC Hardware Setup Manual 020-100107-01 Rev. 1 (10/07) v Peripheral Devices .............................................................................................4-15 4.2 SOFTWARE ............................................................................................................4-16 Operating System................................................................................................4-16 Application Software...........................................................................................4-16 4.3 REGULATORY ........................................................................................................4-16 Safety...................................................................................................................4-16 EMI .....................................................................................................................4-16 EMC....................................................................................................................4-16 Marking...............................................................................................................4-16 4.4 RELIABILITY AND SERVICEABILITY..........................................................................4-16 Reliability............................................................................................................4-16 Serviceability ......................................................................................................4-16 4.5 ENVIRONMENTAL ..................................................................................................4-17 Operating............................................................................................................4-17 Storage (Non-operating).....................................................................................4-17 Shipping ..............................................................................................................4-17 4.6 QUALITY ..............................................................................................................4-17 SECTION 5: TROUBLESHOOTING vi 5.1 DISPLAY .................................................................................................................5-1 TVC Hardware Setup Manual 020-100107-01 Rev. 1 (10/07) Section 1 Preface 1.1 In this Document This manual includes information regarding the setup and connection of the TVC chassis and Expansion chassis. It also contains important specifications for both the TVC-1100 and the TVC-1200. 1.2 Safety Information Review all safety information before attempting to service the TVC controller. Preventing Electrostatic Discharge Electrostatic Discharge (ESD) can damage electronic components like the system board, CPU, and display modules. ESD damage can shorten a component’s life expectancy or render it useless. The following precautions can reduce the risk of ESD damage to components: • • • • Installation Guidelines Ground yourself properly when working with a static-sensitive component or assembly. If possible, work on a grounded surface like a mat. Keep electrostatic-sensitive components in their static-safe packaging until you are ready to install. Always avoid touching pins, leads, or circuitry. Installation in a rack assembly is recommended for this product. Carefully read the following guidelines to ensure the TVC can maintain optimum operation: Elevated Ambient Temperature If installed in a closed or multi-unit rack assembly, the operating ambient temperature of the rack environment may be greater than the ambient temperature of the room. Therefore, consideration should be given to installing the equipment in an environment compatible with the maximum ambient temperature of 35°C. Reduced Air Flow Maintain unrestricted airflow around the installed equipment at all times. TVC Hardware Setup Manual 020-100107-01 Rev. 1 (10/07) 1-1 Section 1: Preface Mechanical Loading Mounting of the equipment in a rack should be such that a hazardous condition is not achieved due to uneven mechanical loading. Circuit Overloading Ensure that the equipment is properly connected to the supply circuit to avoid overloading the circuits. Follow the equipment ratings when addressing this concern. Reliable Grounding Reliable grounding of rack-mounted equipment should be maintained. Particular attention should be given to supply connections rather than direct connections to the branch circuit (e.g. use of power strips). Grounding the Expansion Chassis You MUST connect the expansion chassis to a reliable earth ground and install it in accordance with local electrical safety standards. Figure 1-1 Grounding the Expansion Chassis Symbols and Labels for the TVC Controller and Expansion Chassis Observe and follow all warnings and instructions marked on the chassis, the components in the controller, and in the service guide. The following symbols indicate potential hazards: This symbol indicates the presence of hazardous energy circuits or electrical shock hazards. WARNING: To reduce the risk of injury from electrical shock hazards, do not open this enclosure. Refer all maintenance, upgrades and servicing to qualified personnel. This symbol indicates that the area contains no user or field serviceable parts and electrical shock hazards may be present. WARNING: To reduce the risk of injury from electrical shock hazards, do not open this enclosure. 1-2 TVC Hardware Setup Manual 020-100107-01 Rev. 1 (10/07) Section 1: Preface This symbol on an RJ-45 receptacle indicates a network interface connection. WARNING: To reduce the risk of electric shock, fire, or damage to the equipment, do not plug telephone or telecommunications connectors into this receptacle. This symbol indicates the presence of a hot surface or hot component. Contact with the hot surface may cause personal injury. WARNING: To reduce the risk of injury from a hot component, allow the surface to cool before touching. 25-41 kg 55-90 lbs This symbol indicates that the component exceeds the recommended weight that on person may handle safely. WARNING: To reduce the risk of personal injury or damage to the equipment, observe local occupational health and safety requirements and guidelines for manual material handling. These symbols, on power supplies or systems, indicate that the equipment is supplied by multiple power sources. WARNING: To reduce the risk of injury from electric shock, remove all power cords to completely disconnect power from the system. HP © 2005 Reproduced with permission. The following labels indicate potential hazards: HIGH LEAKAGE CURRENT Earth connection essential before connecting supply The power supplies combined exceed the 3.5mA touch current limit. WARNING: The expansion chassis must be grounded using the grounding terminal. This symbol indicates the presence of hazardous energy circuits or electric shock hazards. WARNING: To reduce the risk of injury from electric shock hazards, remove all power cords to completely disconnect power from the system. Refer all maintenance, upgrades, and servicing to qualified personnel. These symbols, on power supplies or systems, indicate that the equipment is supplied by multiple power sources. WARNING: To reduce the risk of injury from electric shock, remove all power cords to completely disconnect power from the system. This symbol indicates that you MUST connect the expansion chassis to a reliable earth ground. The ground wire must be installed in accordance with local electrical safety standards. TVC Hardware Setup Manual 020-100107-01 Rev. 1 (10/07) 1-3 Section 1: Preface 1.3 Document Conventions 1. Fields, buttons, panel names, and other elements that you need to interact with on the screen are formatted like this in stepped procedures. For example, in the MediaManager window, click Profile>Create Shortcut… 2. Screen elements in introductory paragraphs, descriptive text and notes are formatted the same as the surrounding text. 3. Text that must be entered as specified in the guide is bold. For example, in the Run dialog, type D:\autorun\autorun.exe. 4. Bold is also used for company contact information. For example, you can register your product on-line by visiting www.christiedigital.com. 5. An arrow “>” indicates movement through menu options. For example, File > Save indicates select Save from the File menu. 6. Operational states are CAPITALIZED. For example, turn device ON. 7. Listed items, where order is of no significance, are preceded by bullets. 8. Numbered items are to be performed in the order in which they appear. 1.4 Related Documents For information about using the MASTERSuite software, please refer to the MASTERSuite User Manual. 1-4 TVC Hardware Setup Manual 020-100107-01 Rev. 1 (10/07) Section 2 Hardware 2.1 About the Total View Controller The Total View Controller (TVC) is a computer device that allows a user to control a display wall. Through specially designed wall management software, the user can control and display several applications simultaneously on a large, ultra-high resolution desktop. Each controller is pre-configured according to each customer’s specifications. Key Features and Capabilities: • • • • • • • • • • • • • • • • • • • • • • • • • TVC Hardware Setup Manual 020-100107-01 Rev. 1 (10/07) Rugged, industrial 19” rack mount form factor with front panel status LEDs 5U main chassis with 4 PCI-X and 2 PCI Express expansion slots Multiple 6U expansion chassis, each with 13 PCI expansion slots Hot-plug power supplies Hot-plug main chassis cooling fans Up to two dual-core Intel Xeon processors Up to 4GB of DDR2 SDRAM Up to 1.8TB of Ultra320 SCSI hot plug hard drive storage Optional RAID controller card Up to 11 Gigabit Ethernet ports Three USB 2.0 ports One parallel port Two serial ports One keyboard One two-button optical mouse with scroll wheel DVD +RW 16x drive 1.44MB floppy drive Up to 64 display outputs Up to 16 simultaneous video windows per display output Up to 16 RGB windows System hardware and software monitoring of the main chassis Windows Server 2003 SE MASTERSuite 4.1 >50 000 hours of mean-time-between-failure (MTBF) for all major hardware components <15 minutes mean-time-to-recovery (MTTR) for all major hardware components 2-1 Section 2: Hardware Base Configuration The controller is packaged and shipped in a pre-configured manner. The base configuration includes the 5U main chassis with the following: • • • • • • • • • • • • • • • Three available PCI-X expansion slots Two available PCI Express expansion slots Intel® Xeon™ 3.00GHz/800MHz with 2MB L2 cache 1GB of PC2-3200R 400MHz DDR2 memory with Advanced ECC capabilities 36.4GB Ultra320 SCSI 15K RPM hot plug hard drive Embedded PCI-X Gigabit network port Four-channel graphics module with advanced video support Single hot plug power supply 3x hot plug chassis cooling fans Keyboard Two-button optical mouse with scroll wheel DVD +RW 16X drive 1.44MB floppy drive Windows Server 2003 SE MASTERSuite 2.2 Unpacking the TVC Please ensure that you have received all standard components. NOTE: Components that are optional are marked with an asterisk. TVC Chassis 2-2 Main Box: • Controller • Accessories Box 1: • Sliding rail rack mounting kit • Accessories Box 2: • Product Registration Card • Start-up Instruction Sheet (Windows Server only) • Operating System CD (Windows Server) • MASTERSuite Software CD • MASTERSuite User Manual (PN: 013-100267-01) • Keyboard • Mouse • One AC Line Cord per Power Supply • Dual VGA splitter cables (two per D4/D4A module) • HP SmartStart CD (required for Windows reinstall) TVC Hardware Setup Manual 020-100107-01 Rev. 1 (10/07) Section 2: Hardware • 2 controller Front Panel Keys • *V4 Input Module (TVC-1100 only: one per D4 module, the first is installed in the controller) *BNC breakout cables (one required per VS16 module, two required per V9/V16A module) *Dual DVI-D splitter cables (two per D4/D4A module) • • Figure 2-1 The Controller Expansion Chassis • • Expansion Chassis Accessories Box • Sliding rail rack mounting kit • One AC Line Cord per Power Supply (four per chassis) • Dual VGA splitter cables (two per D4/D4A module) • Misc. hardware (screws, etc.) Figure 2-2 The Expansion Chassis TVC Hardware Setup Manual 020-100107-01 Rev. 1 (10/07) 2-3 Section 2: Hardware 2.3 Purchase Record and Servicing If you encounter any problems with the controller and require assistance, contact Christie Technical Support by sending e-mail to [email protected]. In North America, call toll free 1-800221-8025. Updated contact information can be found at http://www.christiedigital.com/ under “Contact Christie”. Fill out the information in the table below and keep with your records for future reference. Purchase Record TVC Serial Number: Expansion Chassis Serial Number: Purchase Date: NOTE: The serial number can be found on the license label. You can also register your product on-line by visiting www.christiedigital.com > Product Resources & Support > Product Registration. This will keep you up-to-date with all the latest product information, such as updates, technical bulletins, downloads and newsletters. 2-4 TVC Hardware Setup Manual 020-100107-01 Rev. 1 (10/07) Section 3 Connecting the Controller This section discusses how to prepare your controller for operation. It provides a detailed look at the controller chassis and its various components, instructions on how to connect various sources and how to power the controller ON or OFF. • • • • • • • • • Grounding the Expansion Chassis Channel and Display Numbering Connecting the Expansion Chassis to the Controller Connecting Devices for TVC-1200 Connecting Devices for TVC-1100 Connecting Peripheral Devices Connecting Power Powering ON/OFF System Monitoring NOTE: Connection instructions are different for the TVC-1100 and TVC-1200 cards. Ensure that you are referring to the appropriate section for your specific hardware. 3.1 Grounding the Expansion Chassis The Expansion chassis must be connected to a reliable earth ground. The ground wire must be installed in accordance with local electrical safety standards. Refer to Figure 1-1. TVC Hardware Setup Manual 020-100107-01 Rev. 1 (10/07) 3-1 Section 3: Connecting the Controller 3.2 Channel and Display Numbering Channel numbering refers to the position of the input cards in the TVC base and Expansion chassis. TVC-1200 The following diagrams illustrate how the cards installed in the TVC-1200 and the Expansion chassis translate to channels in MASTERSuite. Figure 3-1 TVC Base Chassis Channel Numbering (rear view) Figure 3-2 TVC Expansion Chassis Channel Numbering (rear view) TVC-1100 3-2 Channels for TVC-1100 cards are always numbered from left to right when viewed from the back. TVC Hardware Setup Manual 020-100107-01 Rev. 1 (10/07) Section 3: Connecting the Controller 3.3 Connecting the Expansion Chassis to the Controller Connect the Expansion Host card (controller) to the Expansion Interface card (expansion chassis) with the specialized cable provided. The connectors and cable are keyed. Connect the cable to the right-hand connector (labeled 32) on each card. Figure 3-3 Connecting the TVC and the Expansion Chassis 3.4 Connecting Devices for TVC-1200 Input and display modules can be installed in the TVC base chassis, the expansion chassis, or both. About Source Connections The controller comes pre-configured according to your specifications. You should be able to connect your sources and display content on the display wall when the unit is unpacked. This section provides a high-level overview of the capabilities of the modules that are available for this controller. It also touches on some system configuration information. All Input and Display Modules are clearly labeled. IMPORTANT! If you are installing new component(s) into your existing controller, read the service sheet(s) that came with the new module(s) carefully before beginning. The information provided in this chapter is not sufficient for proper installation and module configuration for the TVC-1200 series controller. Composite or S-Video Sources You can connect composite and S-video sources to V16A modules. TVC Hardware Setup Manual 020-100107-01 Rev. 1 (10/07) 3-3 Section 3: Connecting the Controller V16A Module The V16A module (16-input) is installed into the controller to allow connection of S-video, composite sources or both. A single V16A module has 16 built-in decoders. Each decoder has two inputs, which are the corresponding inputs from the top connector (A) and the bottom connector (B). To hook up composite video, connect “A” inputs. To hook up Svideo, connect Y (Luma) to the “A” input and C (Chroma) to the corresponding “B” input. A single V16A module can connect up to 32 composite or 16 S-video signal sources simultaneously. Up to 16 composite or S-video video overlays can be displayed anywhere on one or more displays in a display wall. Figure 3-4 V16A Connections NOTES: 1) A total of eight V16A modules can be installed in a controller. You can connect four V16A modules to a single D4A module. 2) To view multiple videos on any given display, the video sources must be connected to a single V16A module. Only one V16A module can drive a display at any given time. R2 Module The R2 module is not part of the standard controller configuration. You can install up to a maximum of eight R2 modules in one TVC. For RGB channel configuration, refer to Figure 3-1 and Figure 3-2. Each R2 has two connectors. An RGB source connected to the top connector is considered Input 1. Figure 3-5 R2 Connections 3-4 TVC Hardware Setup Manual 020-100107-01 Rev. 1 (10/07) Section 3: Connecting the Controller Connecting Display Devices/Screens The controller comes standard with one D4A or D4 display module and two dual VGA cables (or DVI cables). In this configuration, the controller can be connected to up to four display devices. The controller can be customized to include up to 16 D4A (using multiple expansion chassis) or 10 D4 (using a single expansion chassis) modules, enabling you to choose from a variety of configurations. VGA Cables When connecting display devices to the controller, do the following: 1. Connect the single end of each of the two dual VGA cables to the display module connectors on the rear panel. See Figure 3-6. 2. Connect the other two ends of each cable to your display devices. The way you connect these should reflect how you want to number your display devices. By software default, numbering begins from the top left of your display wall and continues across each row and down. See Figure 3-7. Figure 3-6 Connecting Displays Figure 3-7 Standard (left) and Alternate (right) Display Numbering NOTES: 1) Changing the display numbering requires a re-installation of the TVC Display module drivers. 2) It is possible to configure other custom layouts. For details contact Christie Technical Support at [email protected]. DVI-D Cables When connecting DVI-D cables, the controller and display devices must be powered down. DVI-D connection requires EDID (Extended Display Identification Data) information which is detected at startup. Follow these steps: 1. Connect the single end of each of the two dual DVI-D cables to the display module connectors on the rear panel. TVC Hardware Setup Manual 020-100107-01 Rev. 1 (10/07) 3-5 Section 3: Connecting the Controller 2. Connect the other two ends of each cable to your display devices. See the diagrams and explanation in the VGA Cables section above for more information about display numbering. 3. Power up the display devices. 4. Power up the controller. No DVI signal If you do not see output on any of the display devices, it is possible that there is a problem with the EDID information. For example, if the system detects different resolutions as reported by EDID information, it automatically switches to analog output. 1. Power down the controller. 2. Connect an analog multi-sync monitor to the Display 1 connector. 3. Power up the controller and confirm that the configuration is correct. Figure 3-8 Christie Tab NOTE: The video overlay created when a MediaManager window is opened is maintained for some time after the MediaManager window is closed. Changing the resolution while this overlay is active can cause unpredictable behavior. Restart the system before changing the resolution. 4. 5. 6. 7. Check the ‘Force DVI’ checkbox. Power down the controller. Reconnect the DVI cable for Display 1. Power up the display devices and the controller. NOTE: If you still do not see output on the DVI displays, contact Christie support. 3-6 TVC Hardware Setup Manual 020-100107-01 Rev. 1 (10/07) Section 3: Connecting the Controller 3.5 Connecting Devices for TVC-1100 Input and display modules can be installed in the TVC base chassis, the expansion chassis, or both. About Source Connections The controller comes preconfigured according to your specifications. You should be able to connect your sources and display content on the display wall when the unit is unpacked. This section provides a high-level overview of the capabilities of the modules that are available for this controller. It also touches on some system configuration information. All Input and Display Modules are clearly labeled. IMPORTANT! If you are installing new component(s) into your existing controller, read the service sheet(s) that came with the new module(s) carefully before beginning. The information provided in this chapter is not sufficient to properly install and configure modules for the TVC-1100 series controller. Composite or S-Video Sources You can connect composite and S-video sources to V4 modules or V9 modules. VS16 modules do not support S-video input. V4 module Each controller comes standard with a V4 module for each D4 module installed, which gives you the ability to display multiple composite or Svideo sources. The controller can include up to a maximum of ten V4 modules. A system with a single V4 module is capable of displaying up to four composite or two S-video sources anywhere on the display wall. You can also connect one S-video and two composite video sources to a single V4 module. Each input is numbered and can be selected from software. The image you display, and where it appears on the display wall, depends on the input selection you make. IMPORTANT! The controller cannot support V4 modules if VS16 modules are already installed. TVC Hardware Setup Manual 020-100107-01 Rev. 1 (10/07) 3-7 Section 3: Connecting the Controller Figure 3-9 V4 Connections VS16 Module The 16-port VS16 module is an optional module that can be installed into your system to provide additional composite connections. A single VS16 module in a controller provides 16 composite video inputs. A maximum of two VS16 modules can be installed in one controller. A 16 BNC cable is shipped with each module and is required for source connection. Connect the cable to the top D-sub connector on the VS16 module. The bottom connector is not needed and should remain empty. VS16 Module #1 Not Used #1 #2 #3 #4 #5 #6 #7 #8 #9 #10 #11 #12 #13 #14 #15 #16 Module #2 #1 Note: n/a for 20 heads and up. Note: n/a for 20 adn 24 heads Not Used 16 Composite Video Inputs #17 #18 #19 #20 #21 #22 #23 #24 #25 #26 #27 #28 #29 #30 #31 #32 16 Composite Video Inputs Figure 3-10 VS16 Connections V9 Module The V9 module (nine-input) is another optional module that can be installed into the controller to connect S-video, composite sources or both. A single V9 module has nine built-in decoders. Each decoder has two inputs, A and B, of which only one can be viewed at any given time. A single V9 module can connect up to nine composite plus nine composite/Svideo video signals and can display up to nine composite or S-video video overlays simultaneously on one or more displays in a display wall. 3-8 TVC Hardware Setup Manual 020-100107-01 Rev. 1 (10/07) Section 3: Connecting the Controller Figure 3-11 V9 Connections NOTES: 1) A total of 12 V9 modules can be installed in a controller. You can connect four V9 modules to a single D4 module. 2) To view multiple videos on any given display, the video sources must be connected to a single V9 module. Only one V9 module can drive a display at any given time. R2 Module The R2 module is not part of the standard controller configuration. You can install up to a maximum of eight R2 modules. For RGB channel configuration, refer to Figure 3-1 and Figure 3-2. Each R2 has two connectors. An RGB source connected to the top connector is considered Input 1. Figure 3-12 R2 Connections TVC Hardware Setup Manual 020-100107-01 Rev. 1 (10/07) 3-9 Section 3: Connecting the Controller Connecting Display Devices/Screens The controller comes standard with one D4 module and two dual VGA cables. In this configuration, the controller can be connected to up to four display devices. The controller can be customized to include up to 10 D4 modules (using a single expansion chassis), enabling you to choose from a variety of configurations. See Figure 3-7 Standard (left) and Alternate (right) Display Numbering. Display devices not connected to the D4 module are detected by the system during the boot up process. One long beep and three short beeps are emitted if the display output is not connected to the first output on display module 1. When connecting display devices to the controller, do the following: 1. Connect the single end of each of the two dual VGA cables to the D4 module connectors on the rear panel. 2. Connect the other two ends of each cable to your display devices. The way you connect these should reflect how you want to number your display devices. By software default, numbering begins from the top left of your display wall and continues across each row and down. See Figure 3-7. 3.6 Connecting Peripheral Devices Connect the keyboard and mouse. 1. Connect the keyboard and mouse to the PS/2 ports highlighted below. Mouse and keyboard Figure 3-13 PS/2 Ports 3-10 TVC Hardware Setup Manual 020-100107-01 Rev. 1 (10/07) Section 3: Connecting the Controller Connect Ethernet. This step is only required if you are connecting to a network. Connect the CAT5 cable to the RJ45 connector located on the rear input panel (Figure 3-14). Ensure that the CAT5 cable is connected to the port on the left. The port on the right is used by HP for diagnostic connections. Figure 3-14 RJ-45 Connection Connect Additional Peripheral Devices (if required) Connect any peripheral devices such as USB, serial or parallel components to the appropriate connectors on the rear panel. 3.7 Connecting Power Connect the approved rated line cords supplied with the controller to the AC sockets of the power supplies on the rear panel(s) and connect the three-pronged end of the line cords to a grounded AC outlet. The input voltage must be capable of 100-240 VAC, 15A. Connect AC Line Cords to the TVC The TVC base chassis can have up to two power supplies. Figure 3-15 TVC Base Chassis AC Connection NOTE: The line cords provided with the controller are approved and rated for North American use only. Do not attempt to operate the controller if the AC supply and power cord are not within the specified voltages and power range. TVC Hardware Setup Manual 020-100107-01 Rev. 1 (10/07) 3-11 Section 3: Connecting the Controller Connect AC Line Cords to the Expansion Chassis The expansion chassis has four power supplies. Figure 3-16 Expansion Chassis AC Connections NOTES: 1) The line cords provided with the controller are approved and rated for North American use only. Do not attempt to operate the controller if the AC supply and power cord are not within the specified voltages and power range. 2) This equipment must be grounded to a reliable earth ground. The ground must be installed in accordance with local electrical safety standards. 3.8 Powering ON/OFF Power ON Expansion Chassis IMPORTANT: If this is the very first time you are powering up the server, please refer to the start-up instruction sheet supplied with the controller for information about configuring the system, and activating the operating system. If you have an expansion chassis, it must be powered up first so that the controller can detect the input and display modules in the expansion chassis. To power up the expansion chassis: 1. Open the door on the front of the expansion chassis. 2. Switch ON the power switch. If a power supply is not plugged in or has failed, an alarm will sound. To silence the alarm, press the Alarm Reset button located to the left of the power switch (Figure 3-17). 3. Close and secure the door with the butterfly lock. 3-12 TVC Hardware Setup Manual 020-100107-01 Rev. 1 (10/07) Section 3: Connecting the Controller Power Switch Figure 3-17 Expansion Chassis Power Switch Power ON Controller To power up the controller and initialize the input and display modules, 1. Press the Power button on the front panel. 2. Wait until the Windows Server 2003 operating system cycles through its initialization process. This may take several minutes depending on the number of display cards installed. Power Button NOTE: Depending on your display device capabilities you may or may not see the boot up process. The resolution of the boot sequence is 640 x 480. 3. When the Windows Server login screen appears, login with a valid user ID. Power OFF To power off the controller, 1. Close all applications. 2. Shutdown Windows Server 2003 by clicking Start>Shut Down. 3. In the Shutdown dialog, select the appropriate reason for shutting down the system. Windows Server 2003 shuts down and the controller enters standby power mode, the system power LED changes to amber. WARNING! The front panel Power On/Standby button does not completely shut off system power. Portions of the power supply and some internal circuitry remain active until AC power is removed. If you are powering down for maintenance, you must also remove the power cord from each power supply to remove power from the server. Failure to remove the power cord may increase the risk of personal injury, electric shock, or damage to the equipment. IMPORTANT! If installing a hot-plug device, it is not necessary to power down the server. 4. Set the power switch on the expansion chassis to the OFF position. TVC Hardware Setup Manual 020-100107-01 Rev. 1 (10/07) 3-13 Section 3: Connecting the Controller 3.9 System Monitoring The controller is equipped with a monitoring system. The LEDs on the front and back panels provide information about the controller’s status. Monitoring Controller Components 1 2 As the system cycles through the components, the LEDs on the front panel will illuminate to indicate status. Item Description Status 1 UID switch and LED Blue = Activated Flashing blue – System being managed remotely Off = Deactivated 2 Internal system health LED Green = Normal (system on) Amber = System health is degraded Red = System health is critical Off = Normal (system off) 3 External system health (power supply) LED Green = Normal (system on) Amber = Redundant power supply failure Red = Power supply failure, no operational power supplies Off = Normal (system off) 4. NIC link/activity LED (embedded NIC only) Green = Linked to network Flashing green = Linked with activity on the network Off = No network connection 5 Power on/Standby button and LED Amber = System has AC power and is in standby mode Green = System has AC power and is turned ON Off = System has no AC power 3 4 5 NOTE: You can also monitor the server remotely through WallManager’s Administration>Status window. 3-14 TVC Hardware Setup Manual 020-100107-01 Rev. 1 (10/07) Section 3: Connecting the Controller Monitoring Hard Disk Drives TVC Hardware Setup Manual 020-100107-01 Rev. 1 (10/07) Fault Status lights on the hard drive indicate the health of the drive. A flashing light indicates a failing drive. Item LED description Status 1 Activity status On = Drive activity Flashing = High activity on the drive or drive is being configured as part of an array Off = No drive activity 2 Online status On = Drive is part of an array and is currently working Flashing = Drive is actively online Off = Drive is offline 3 Fault status On = Drive failure Flashing = Fault-process activity Off = No fault-process activity 3-15 Section 4 Specifications 4.1 Hardware Main Chassis Physical Dimensions (HxWxD)................... 8.69 x 19.0 x 25.75 in (22.07 x 48.26 x 65.43 cm) Max. Weight ..................................................................................................... 90 lbs. Cosmetic ......... Customized "look and feel" chassis front to match expansion chassis Drive Bays 6x hot plug Ultra320 SCSI drive bays 1x embedded 1.44MB floppy drive bay 2x media drive bays (one available) Power Range Line Voltage ..............................................................................90 to 264 VAC Rated Input Voltage ............................................................................100 to 240 VAC Rated Input Frequency ............................................................................... 47 to 63 Hz Rated Input Current ........................................................ 10A (110 V) to 4.8A (220 V) Rated Input Power .......................................................................... 1001W (100VAC) Nominal Input Voltage (Vrms) 208 220 230 240 775 775 775 775 775 775 8.6 4.7 4.4 4.1 4.0 Max Rated Input Wattage Rating (Watts) 981 969 957 945 934 934 Max. Rated VA (Volt-Amp) 1001 989 976 964 963 953 Efficiency (%) 79 80 81 82 83 83 Power Factor 0.98 0.98 0.98 0.98 0.98 0.98 Leakage Current (mA) 0.43 0.50 0.65 0.96 1.00 1.04 30 30 30 30 30 30 3 3 3 3 3 3 Nominal Input Current (Arms) Maximum Inrush Current (Apeak) Maximum Inrush Current duration (mS) 020-100107-01 Rev. 1 (10/07) 115 10.0 Max Rated Output Wattage Rating TVC Hardware Setup Manual 100 4-1 Section 4: Specifications Cooling Standard .................................................................... 3x hot plug chassis cooling fans Optional .................Additional 3x hot plug, redundant chassis cooling fans (6x total) Monitoring CPUs Memory Fans Power supplies Temperature Hard drives Expansion Chassis Physical Dimensions (WxHxD, not including faceplate or handles) .. 482.6 x 265 x 487.3 mm Max. Weight ...................................................................................................... 70 lbs Cosmetic ...................................................................................... Black painted finish Expansion Slots 32-bit/33MHz, PCI slots .......................................................................................... 13 Power Voltage range ..................................................................100-120/200-240VAC ±10% Line frequency..........................................................................................47Hz – 63Hz Inrush current ........................................................... 60/100A @ 115/230VAC (25°C) Current rating ............................................ 20-10A max at any low/high input voltage Power consumption ............................................................................................... TBD Input connections ................................................................................ Four AC inputs Power supply modules ................................................................................... 4x 500W Cooling 4-2 3x chassis cooling fans (86.5cfm each) TVC Hardware Setup Manual 020-100107-01 Rev. 1 (10/07) Section 4: Specifications Monitoring Audible alarm for power degradation (failed or unplugged module) Motherboard Chipset Intel E7520 Chipset Expansion Slots 64-bit/100MHz, PCI-X 3.3V slots ....................................................................... Four Note: All PCI-X slots can only accept universal keyed PCI cards running at 3.3 volts. PCI Express x4 slots...............................................................................................Two Note: x8 cards are supported but will run at x4 speeds. Processor Standard .............................. Intel Xeon Processor 3.0 GHz/800MHz -2MB L2 cache Optional upgrades ............... Intel Xeon Processor 3.8 GHz/800MHz -2MB L2 cache Dual-core Intel Xeon Processor 2.8 GHz/800MHz -2x2MB L2 cache Main Memory Maximum processors ......................................................................... Two (matching) Type ........................................ Advanced PC2-PC3200R DDR2 SDRAM (400MHz) Standard capacity ..........................................................................1 GB (2 x 512 MB) Optional upgrades ..........................................................................2 GB (4 x 512MB) 4 GB (4 x 1GB) Memory Protection ............................................................................. Advanced ECC Online spare capabilities I/O Interfaces TVC Hardware Setup Manual 020-100107-01 Rev. 1 (10/07) Parallel .................................................................................................................. One Serial .....................................................................................................................Two Mouse ................................................................................................................... One Keyboard .............................................................................................................. One USB 2.0 ports ................................................................... Three (two rear, one front) 4-3 Section 4: Specifications Storage 36.4GB hot plug hard drive Capacity ...................................................................................................36419.2 MB Height ................................................................................................ 1.0 in (2.54 cm) Width ................................................................................................4.0 in (10.16 cm) Interface ............................................................................................... Ultra320 SCSI Transfer Rate Synchronous (Maximum) ...................................................... 320 MB/s Seek Time (typical reads, including settling) Single Track ......................................................................................... 0.4 ms Average ................................................................................................ 3.8 ms Full-Stroke ........................................................................................... 8.0 ms Rotational Speed ...........................................................................15,000 rpm Physical Configuration Bytes/Sector .............................................................................................. 512 Logical Blocks .............................................................................. 71,132,000 72.8GB hot plug hard drive Capacity ...................................................................................................72837.2 MB Height ................................................................................................ 1.0 in (2.54 cm) Width ................................................................................................4.0 in (10.16 cm) Interface ............................................................................................... Ultra320 SCSI Transfer Rate Synchronous (Maximum) ..................................................... 320 MB/s Seek Time (typical reads, including settling) Single Track ......................................................................................... 0.4 ms Average ................................................................................................ 3.8 ms Full-Stroke ........................................................................................... 8.0 ms Rotational Speed ............................................................................15,000 rpm Physical Configuration Bytes/Sector .............................................................................................. 512 Logical Blocks ............................................................................. 142,264,000 4-4 TVC Hardware Setup Manual 020-100107-01 Rev. 1 (10/07) Section 4: Specifications 146.8GB hot plug hard drive Capacity ............................................................................................... 146815.74 MB Height ................................................................................................ 1.0 in (2.54 cm) Width ................................................................................................4.0 in (10.16 cm) Interface ............................................................................................... Ultra320 SCSI Transfer Rate Synchronous (Maximum) ...................................................... 320 MB/s Seek Time (typical reads, including settling) Single Track ......................................................................................... 0.4 ms Average ................................................................................................ 3.8 ms Full-Stroke ........................................................................................... 8.0 ms Rotational Speed ...........................................................................15,000 rpm Physical Configuration Bytes/Sector .............................................................................................. 512 Logical Blocks ............................................................................. 286,749,488 300GB hot plug hard drive Capacity ....................................................................................................300000 MB Height ................................................................................................ 1.0 in (2.54 cm) Width ................................................................................................4.0 in (10.16 cm) Interface ............................................................................................... Ultra320 SCSI Transfer Rate Synchronous (Maximum) ..................................................... 320 MB/s Seek Time (typical reads, including settling) Single Track ....................................................................................... 0.55 ms Average ................................................................................................ 4.9 ms Full-Stroke ......................................................................................... 10.0 ms Rotational Speed ...........................................................................10,000 rpm Physical Configuration Bytes/Sector .............................................................................................. 512 Logical Blocks ............................................................................ 585,937,500 TVC Hardware Setup Manual 020-100107-01 Rev. 1 (10/07) 4-5 Section 4: Specifications Standard Storage Controller Data Transfer Method ............................................................... 64-bit PCI bus-master SCSI Channel Transfer Rate .....................................................320 MB/s per channel Maximum Transfer Rate per PCI Bus (peak) ...........................400 MB/s per channel SCSI Protocol ........................................................................................ Ultra320 SCSI Electrical Protocol ...................................................Low Voltage Differential (LVD) SCSI Termination .........................................................................Active Termination Internal SCSI Connectors ....................... Two 68-Pin Wide-Ultra SCSI-3 connectors Optional RAID Controller Card Dimensions ...............................................12.3 x 4.2 x 0.6 in (31.24 x 10.7 x 1.5 cm) Protocol ............................................................................................... Ultra320 SCSI Architecture ....................................................................................................... 64-bit SCSI Electrical Interface .........................................Low Voltage Differential (LVD) Drives Supported ............................................... Up to six Ultra320 SCSI hard drives SCSI Port Connectors ............................................................. One internal SCSI port Data Transfer Method .............................................................. 64-Bit PCI bus-master PCI Bus Speed ..................... 64-bit, 133-MHz PCI-X (1 GB/s maximum bandwidth) PCI .......................................................................3.3 volt PCI slot compatibility only Simultaneous Drive Transfer Channels ................................................................Two Channel Transfer Rate ....................................320 MB/s total; 320 MB/s per channel Software Upgradeable Firmware ...........................................................................Yes Cache Memory ....................64 MB of DDR memory used for RAID and read cache Logical Drives Supported ........................................................................................ 32 Maximum Capacity ..................................................................1.80 TB (6 x 300 GB) Memory Addressing ........64-bit, supporting servers with memory greater than 4 GB RAID Support ................................................... RAID 5 (Distributed Data Guarding) RAID 1+0 (Striping and Mirroring) RAID 1 (Mirroring) RAID 0 (Stripping) 4-6 Upgradeable Firmware .............................................................2 MB Flashable ROM Disk Drive/Enclosure Protocol Support ........................................................Ultra320 TVC Hardware Setup Manual 020-100107-01 Rev. 1 (10/07) Section 4: Specifications DVD Drive HP DVD±R/RW IDE Drive is compatible with industry-standard ISO 9660, MPC 3, and High Sierra logical formats. Read compatible DVD-ROM DVD+RW and DVD-RW DVD+R dual layer CD-ROM Mode 1 data disc CD-ROM Mode 2 data disc CD-ROM XA CD-I Photo-CD multi-session CD audio disc Mixed mode CD-ROM disc (data and audio) CD Extra CD-R/CD-ROM CD-RW Write compatible Display/Video Architecture for TVC 1200 TVC Hardware Setup Manual 020-100107-01 Rev. 1 (10/07) CD-R/CD-RW DVD+R, DVD+RW, DVD-R, DVD-RW DVD+R dual layer Graphics Output (D4A) Card Format .........................................................................32bit 66Mhz PCI adapter Card Size ............................................................................................... 105 x 310mm Graphics memory ....................................16MB per output channel (64MB per card) Number of output channels .................................................................................. Four Max. analog output resolution per channel ...................................2048x1536 @60Hz Max. DVI output resolution per channel . 1600x1200 @60Hz (2048 x 1536 @35Hz) Max. video overlay windows ..............................16 per output channel (64 windows) Max. cards per system .......................................................... 16 (64 display channels) 4-7 Section 4: Specifications 4-8 Overlay frame buffer resolution ........................................................ 1280 x 1024 x 4 Digital advanced video input bus speed ............................................................ 5 Gb/s Maximum digital video channels per bus .............................................................. 128 Video window update rate ................................... Real time: 25/30 fps (PAL/NTSC) Standard output connector type ............................................................. HD15 (VGA) Optional output connector type ........................................................................DVI-D Output level – signal ............................................................................................ 0.7V Output level – sync ...............................................................................................TTL Offset .......................................................................................................... 0V typical Output impedance .......................................................................................... 75 ohms Max. power consumption ..........................................................................36.44 watts Max. power requirements ..............................................+5V @ 2.8A, +3.3V @ 6.8A Supported display modes (all available in 16bpp and 32bpp): Resolutions (Pixels x Lines) Vertical Frequency (Hz) DVI Support 640 x 480 720 x 480 720 x 576 800 x 600 848 x 480 856 x 480 1024 x 512 1024 x 768 1064 x 600 1152 x 864 1248 x 702 1280 x 720 1280 x 768 1280 x 800 1280 x 960 1280 x 1024 1280 x 1024 1360 x 765 1360 x 768 1400 x 1050 1400 x 1050 1600 x 1200 1600 x 1200 1704 x 960 1792 x 1344 1856 x 1392 1888 x 1062 1920 x 1080 1920 x 1200 1920 x 1440 2048 x 1536 2048 x 1536 60, 75, 85, 100 75 75 56, 60, 72, 75, 85, 100 60, 75 60 60 60, 70, 75, 85, 100, 130 60 60, 70, 75, 85, 100 60 60, 70 56, 60, 70 60 60, 85 57, 60, 75, 85 100 60 60, 75 60, 75 85, 100 30, 36, 37, 42, 56, 59, 60 75, 85, 100 60 60, 75 60 60 60 60 60, 75, 85 30, 35, 37 60, 75 Yes Yes Yes Yes Yes Yes Yes Yes Yes Yes Yes Yes Yes Yes Yes Yes No Yes Yes Yes No Yes No Yes No No No No No No Yes No TVC Hardware Setup Manual 020-100107-01 Rev. 1 (10/07) Section 4: Specifications Video Input (V16A) Display/Video Architecture for TVC 1100 TVC Hardware Setup Manual 020-100107-01 Rev. 1 (10/07) Card Format .........................................................................32bit 66Mhz PCI adapter Card Size .......................................................................... 105mm x 310mm Full size Number of capture channels .................................................................................... 16 Max. capture resolution per channel ............................................................ 720 x 288 Supported video formats .........NTSC, PAL, SECAM in either Composite or S-video Video window update rate ................................... Real time: 25/30 fps (PAL/NTSC) Max. power consumption ..........................................................................23.73 watts Max. power requirements ............................................+12V @ 1.4A, +3.3V @ 2.1A Graphics Output (D4 card) Card Format .........................................................................32bit 33Mhz PCI adapter Card Size ........................................................................................ 105mm x 295mm Graphics memory ..................................32MB per output channel (128MB per card) Number of output channels .................................................................................. Four Max. analog output resolution per channel 1600x1200 @ 75Hz (2048x1536 @ 35Hz) Max. DVI output resolution per channel . 1280x1024 @ 75Hz (2048x1536 @ 30Hz) Max. number of overlay windows ..........9 per output channel (36 windows per card) Max. cards per system .......................................................... 10 (40 display channels) Overlay frame buffer resolution ............................................................ 720 x 576 x 4 Video window update rate ................................... Real time: 25/30 fps (PAL/NTSC) Standard output connector type ............................................................. HD15 (VGA) Optional output connector type ........................................................................DVI-D Output level – signal ............................................................................................ 0.7V Output level – sync ...............................................................................................TTL Offset .......................................................................................................... 0V typical Output impedance .......................................................................................... 75 ohms Max. power consumption ...............................................................................14 watts Max. power requirements ................. +12V @ 250mA, +5V @ 2.5A, +3.3V @ 2.5A Supported display modes: 4-9 Section 4: Specifications Resolutions Vertical (Pixels x Lines) Number of Colors Frequency (Hz) Standard Monitor Resolutions 640 x 480 848 x 480 852 x 480 856 x 480 800 x 600 1024 x 768 1152 x 864 1280 x 768 1280 x 1024 1280 x 1024 1360 x 765 1400 x 1050 1600 x 1200 1600 x 1200 16.7 Million 16.7 Million 16.7 Million 16.7 Million 16.7 Million 256 / 65,536 / 16.7 Million 256 / 65,536 / 16.7 Million 16.7 Million 256 / 65,536 16.7 Million 16.7 Million 65,536 256 65,536 60 60 60 60 56, 60, 72, 75, 85 60, 72, 75, 85 60, 72, 75, 85 56, 70 60, 75, 85 60, 75 60 60 60,75,85 60,75 Plasma Modes Fujitsu 40” 852 x 480 16.7 Million 60 Pioneer 50” 1280 x 768 16.7 Million 56, 70 NEC 42” 848 x 480 856 x 480 16.7 Million 16.7 Million 1360 x 765 16.7 Million NEODIGM PK8401 65,536 Other 65,536 60 60 NEC 50” 1706x960 2048 x 1536 60 60 30, 35, 38 Video Input 4-port video input module (V4) 4-10 Card Format ....................................................................................... Floating adapter Number of capture channels .............................................F Composite (two S-video) Max. cards per system ......................................................... 10 (one per display card) Max. capture resolution per channel ............................................................ 720 x 288 Supported video formats ......................................NTSC, PAL, SECAM (Composite) Video window update rate ................................... Real time: 25/30 fps (PAL/NTSC) Max. connected D4 graphics output modules .......................................................... 10 Simultaneous video windows per D4 graphics output............................................ One TVC Hardware Setup Manual 020-100107-01 Rev. 1 (10/07) Section 4: Specifications 16-port video switch module (VS16) Card Format .........................................................................32bit 33Mhz PCI adapter Card Size .........................................................................................100mm x 240mm Number of capture channels .................................................................................... 16 Switch size ....................................................................................................... 16 x 16 Switching time ..................................................................................................... 50ns Max. cards per system ...................................... Two (16x32 switch or 32x16 switch) Max. capture resolution per channel ............................................................ 720 x 288 Supported video formats ......................................NTSC, PAL, SECAM (Composite) Video window update rate ................................... Real time: 25/30 fps (PAL/NTSC) Max. connected D4 graphics output modules ...................................................... Four Simultaneous video windows per D4 graphics output............................................ One Max. power consumption ..............................................................................1.5 watts 9-port multiple video input module (V9) Card Type ............................................................................32bit 33Mhz PCI adapter Card Size .........................................................................................100mm x 260mm Number of capture channels ............................................................. 18 Composite or nine Composite and nine S-video TVC Hardware Setup Manual 020-100107-01 Rev. 1 (10/07) Video decoders per module ................................................................................. Nine Video buffers per module .................................................................................... Four Max capture resolution per channel ............................................................. 768 x 288 Supported video formats ............................................ PAL, NTSC, SECAM, S-video Max. connected D4 graphics output modules ...................................................... Four Simultaneous video windows per D4 graphics output........................................... Nine Max. power consumption ...............................................................................12 watts Max. power requirements ...........................................+12V @ 100mA, +5V @ 2.2A 4-11 Section 4: Specifications Composite and SVideo Input Compatibility Signal formats: Composite-video (CVBS), S-video (Y/C) Video standards NTSC M, NTSC J, NTSC N, NTSC 4.43 50/60, PAL I, PAL B, PAL D, PAL G, PAL H, PAL M, PAL N, PAL NC, PAL4.43 60, SECAM B, SECAM D, SECAM G, SECAM K, SECAM L, SECAM L, SECAM LD Input levels Composite-video: 1.0 Vp-p ± 3dB (including sync tip) S-video luma (Y): 1 1.0 Vp-p ± 3dB (including sync tip)1 630 mVp-p nominal (burst) S-video chroma (C): Connector type BNC DC offset ± 2V Nominal impedance 75 ohms V16A Bandwidth 60 MHz(-3dB) VS16 Bandwidth 60 MHz(-3dB) V4/V9 Bandwidth 7 MHz (-3dB) Crosstalk -50dB Fin < 5MHz (V9), -80 dB @ 20kHz (VS16, V16A) -50 dB (V4) RGB Input (R2) 4-12 Card Format .........................................................................32bit 33Mhz PCI adapter Card Size ............................................................................. 105 x 170mm (Half size) Video capture memory ........................................6 MB per channel (12MB per card) Number of input channels ....................................................................................Two Max. cards per system ..................................................... Eight (16 capture channels) Max. capture resolution per channel ........................................................ 1600 x 1200 Input connector type .............................................................................. HD15 (VGA) Max. power consumption ..............................................................................9.4 watts Max. power requirements ..........................................+12V @ 200mA , +5V @ 1.3A TVC Hardware Setup Manual 020-100107-01 Rev. 1 (10/07) Section 4: Specifications Horizontal frequency range 15 – 120kHz 1 Vertical frequency range 50 – 120Hz Scan format progressive 2 Dot (pixel) clock rate 25 – 140 MHz (one frame), max 280 MHz (two frames) Active pixels per scan line 2 640 min, 1600 max. Active lines per field/non-interlaced 400 min., 1200 max. frame Sync types Separate H and V Composite (bi-level) Sync-on-green (bi-level) Polarity3 Positive or Negative Input levels 3 R,G,B – 1.0Vp-p ±2 dB (0.79Vp-p – 1.26Vp-p) R,G,B – without sync: 0.7Vp-p ±2 dB (0.56Vp-p – 0.88Vp-p) with sync: 3 DC offset ± 2V Nominal impedance3 75 ohms NOTES: 1. This specifies frame rate for non-interlaced sources and field rate for interlaced sources. Signals will be displayed at a lower rate (i.e., frames will be dropped) 2. For UXGA (1600x1200) sources and other sources with pixel clock higher than 140MHz the signal will be acquired in two passes. Standard Input VGA Connectors Signal Description RGB with H & V Sync (5 wire) RED GREEN BLUE Hor/Comp 1, 2, 3 Red Green Blue RGB with composite sync (4 wire)1, 2, 3, 4, 5 Red Green Blue Green w/ sync Blue RGB with sync-on-green (3 wire) 4,5 Red H-Sync Vert V-Sync Comp sync No signal No signal No signal NOTES: 1. Sync signals can not be swapped between the Hor/Comp and Vert connectors. 2. Sync signal(s) can be negative or positive polarity. 3. Sync present on any of the RGB signals will be ignored when separate or composite sync is input. 4. Sync can be bi-level. TVC Hardware Setup Manual 020-100107-01 Rev. 1 (10/07) 4-13 Section 4: Specifications 5. 'No signal' means no signal should be applied to the input. Networking Embedded PCI-X Gigabit NIC Server Adapter Network Interface ................................................................................ 10/100/1000-T Compatibility ............................................................................ IEEE 802.3 10Base-T IEEE 802.3ab 1000Base-T IEEE 802.3u 100Base-TX Data Transfer Method ..............................................................64-bit/133MHz PCI-X Connector ........................................................................................................... RJ-45 Network Transfer Rate 10Base-T (Half-Duplex) ......................................................10 Mb/s 10Base-T (Full-Duplex) .......................................................20 Mb/s 100Base-TX (Half-Duplex) ...............................................100 Mb/s 100Base-TX (Full-Duplex) ................................................200 Mb/s 1000BaseTX (Half and Full-Duplex) ..............................2000 Mb/s Cable Support 10Base-T ..............................................Cat. 3, 4, 5 UTP; up to 328ft 10/100/1000Base-TX .................................. Cat. 5 UTP; up to 328ft Optional Dual-port PCI-X Gigabit NIC Server Adapter Dimensions.......6.6 x 2.5 in (16.5 x 6.4 cm), 4.8 in (12.2 cm) width including bracket Communications processor ...................................................................Intel 82546EB Compliance IEEE 802.3, 802.3u, 802.3x, 802.3ab, Dynamic 802.3ad, 802.1p, 802.1Q Transfer rate .............................................. 10/100/1000 Mbps, Half- and full-duplex On-board memory .......................................................................................... 128 KB Data transfer method ................................................................64-bit/133MHz PCI-X Interrupt levels ......................................................................................... INTA and B Bus architecture ...PCI bus-mastering, compatible with existing PCI bus architecture Cable Connector ........................................................................................... 2x RJ-45 Bus Connector ............................................. Universal, keyed for 3.3 and 5 volt slots Transmit load balancing supported ........................................................................Yes Switch-assisted load balancing supported .............................................................Yes Network fault tolerance supported .........................................................................Yes Distance and Wiring ...Up to 328 feet/100 m with Category 5 (or better) twisted-pair cable 4-14 Power requirement ...................... 1600 mA @ 5V maximum; 1550 mA @ 5V typical TVC Hardware Setup Manual 020-100107-01 Rev. 1 (10/07) Section 4: Specifications Optional Single-port PCI Express Gigabit NIC Server Adapter Dimensions .............................................................4.5 x 3.0 in (11.43 cm x 7.62 cm) Communications Processor ............... IEEE 802.3-2002, 802.3ab, Dynamic 802.3ad, 802.1QBroadcom 5721 Compliance ............................IEEE 802.3-2002, 802.3ab, Dynamic 802.3ad, 802.1Q Transfer rate ..................................................................................10/100/1000 Mbps On-board memory ............................................................................................. 40KB Data transfer method ........... Single lane (x1), 100MHz PCI Express Reference Clock Interrupt levels ................................................................................................... INTA Cable Connector ................................................................................................ RJ-45 Distance and wiring ...................Up to 328 ft (100 m) with Category 5 or better UTP Power requirement ............................................................................1250mA @ 3.3V Optional Dual-port PCI Express Gigabit NIC Server Adapters Dimensions ..........18.9 cm x 11.1 cm (without bracket) (7.44 x 4.37 inches (L x W)) Bus Width .................................................................................................... Four lanes Bus Speed ....................................................................................................... 2.5 GHz Data Transfer Method ...................................................................... Bus Master DMA Standards Supported . IEEE 802.3ab, 802.3ad, 802.3u, 802.3x, 802.3, 802.1p, 802.1q Connector ....................................................................................................... 2x RJ-45 10BASE-T ........................................... Category 3, 4, or 5 UTP 100 Meters (328 feet) 100BASE-TX .................................................. Category 5 UTP 100 Meters (328 feet) 1000BASE-TX ................................................ Category 5 UTP 100 Meters (328 feet) Interrupts Supported ............................................................ Automatically configured Power requirement .................................................................................1.05A @ 12V Peripheral Devices Keyboard Type.................................................................................................................. 104-key Features ................................................................................ Eight programmable keys Interface..........................................................................................Four-pin male USB Adapter ......................................................................................................USB to PS/2 Mouse TVC Hardware Setup Manual 020-100107-01 Rev. 1 (10/07) Type.................................................................... Two-button optical with scroll wheel Features ............................................................. Scroll wheel functions as third button Interface..........................................................................................Four-pin male USB Adapter ......................................................................................................USB to PS/2 4-15 Section 4: Specifications 4.2 Software Operating System Windows Server 2003 Standard Edition – English Version. Application Software MASTERSuite Display Wall Software. 4.3 Regulatory Safety EMI CAN/CSA-C22.2 No. 60950-00, UL 60950 3rd Ed., IEC 60950 3rd Ed. CE, CB Certificate FCC Code of Federal Regulations, Title 47, Part 15, Conducted and Radiated Emissions, Class A EN50081-1 / EN55022 (CISPR 22) European Norm, Information Technology Equipment, Conducted and Radiated, Class A EMC CISPR 24:1997/EN55024: 1998 EN50082-1 European Norm under which, currently mandatory are European Norms EN61000-4-2, EN61000-4-3, EN61000-4-4, EN61000-4-5, EN61000-4-6, EN610004-8, Marking EN61000-4-11, EN61000-3-2, EN61000-3-3 The product shall conform to all relevant European directives, standards, safety, health, and environmental concerns and bare the CE marking. China Compulsory Certification (CCC) 4.4 Reliability and Serviceability Reliability Serviceability 4-16 MTBF of major components .................................................................. >50,000 hours MTTR..................................................................................................15 minutes max. TVC Hardware Setup Manual 020-100107-01 Rev. 1 (10/07) Section 4: Specifications 4.5 Environmental Operating Storage (Nonoperating) Shipping Temperature ......................................................................................... 10°C to +35°C Humidity ........................................................................ 15% to 80% non-condensing Altitude ......................................................................................................0 to 3000m Temperature ........................................................................................ -20°C to +40°C Humidity .......................................................................... 5% to 90% non-condensing Thermal Shock .................................................................................... -20C to +40°C Thermal Drop ............................................ -20°C for 8 hours then 30cm onto bottom Altitude ................................................................................................. 15,000m max. Vibration ...............................................10 Hz, 100Hz, 300Hz for 15 min/frequency. Impact / Handling ............Must survive a 30cm drop onto concrete when in standard packaging. 4.6 QUALITY ISO 9001:2000 Manufactured in Christie’s Canadian facility, which is ISO 9001:2000certified TVC Hardware Setup Manual 020-100107-01 Rev. 1 (10/07) 4-17 Section 5 Troubleshooting 5.1 Display System is on, but nothing displays If you have an expansion chassis, the expansion chassis must be powered up first, then the controller so that the controller can detect the input and display modules. TVC Hardware Setup Manual 020-100107-01 Rev. 1 (10/07) 5-1