1
Part Number: 82G2557
Printed in U.S.A.
Contents
Safety lnformatlon
2
Safely Using Simon
Radio Waves
Radio Frequency Energy
Construction Areas
Other Explosive Atmospheres
Care of Simon
2
2
3
3
3
lntroducing Simon
4
-
Getting Started
5
Charging the Battery
Removing the Battery
5
lnformation About the Battery Pack
lnstalling the Battery
Turning Simon On and Otf
LCD Contrast Adjustment
Using Your Touch Sensitive Screen
7
HowSimonWorks
Using the Buttons
Practicing with Simon
What To Do Next
SimonFeatures
Phone
911
Answer with Any Key
Area Code
Answer Automatically
Call Talk Time
CallTimers
Clear
Code
ln-CallScreen
Last 10
Mark to Dial
Menu
Mute
iv
User's Guide
2
@
6
I
8
I
9
.....11
12
13
16
......17
. . fi
..18
. . 18
18
19
't9
19
19
19
20
20
20
20
20
One Minute Beep
Phone Pager
Phone Power
Phone Settings
Quick Dial
22
Redial
22
Copyright IBM Corp. 1994
21
21
21
22
Retry Automatically
Ringer ToneAy'olume
Roaming Preference
Save Number
Send
Set Up Special Code
Speaker Volume
Status Monitor
Vox (Voice Activated Transmitter)
Emergency Dialing
Phone Settings
Last 10 Phone Use
Quick Dial
Phone Pager
Setting Up Roaming
Settlng Phone Timers
NAM Programming
Mobile Office
Address Book
New Entry
Using the Index
Using an Entry
23
23
23
24
24
24
25
25
25
26
.27
.28
.n
3'
=.
v
v
c,
35
35
35
36
Search
Additional Address Books
Calculator
Calendar
New Entry
settinganAtarm . . . : . . : . : . : . .
41
41
41
.
42
Repeating Meetings
42
Changing Dates and Using the 3-Month View 42
Using an Entry
43
Going Directly to the To Do List
+.,
riJ
Fax
Managing Faxes
+.5
Setting Up the Fax Feature
;,
Receiving Faxes
,5
Viewing and Working r',.rth Faxes
Creating a Nerv Fax
Sending Faxes
tri'a.
Llemory Ltanagemenl
Workrng wrth Files
Prepare, Back Up, and Restore
Mail
54
57
57
57
59
59
59
59
59
60
60
60
60
Password
Creating a Password
Locking Simon
Dialing 911 when Locked
Unlocking Simon
Changing the Password
Removing the Password
Sketch Pad
Working with Sketches
Erasing All Sketches
61
System
Making a New Entry
Working with To Do ltems
Working with Done ltems
Using Keyboards
The Standard Keyboard
The PredictaKey Keyboard
Numeric Keypad
Type Size
63
63
63
63
64
64
65
65
65
65
67
67
69
70
70
Optional Features
71
PCMCIA Card Slot
lnput and Output Connector
72
The Suspend Timeout
Adjusting Screen Settings
Adjusting Sound Settings
Running Diagnostics
Time
To Do
71
Solving Problems
73
74
Disposal of Simon
Appendix
A.
Simon Specifications
B. How to send calendar notices
in an electronic message
Appendix
Sending Meeting Notices
Receivlng Meeting Notices
76
76
78
51
Setting Up Mail
Creating Mail
Sending and Receiving Mail
Working with a Message
vi
46
46
48
48
48
49
How to Erase Unwanted Messages
Note Pad
Creating a New Note
Working with Notes
User's Guide
51
Appendix C. Notices
52
53
53
Trademarks
Copyrights
79
79
80
Contents vii
Appendix D. Electronic Emission Notices
Federal Communications Commission (FCC)
Statement
lndex
81
81
83
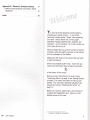
Yo,
no* have total personal communications
including your cellular phone
in one small,
hand-held, mobile device. Simon-' has everything
you need: cellular phone, fax, E-mail, pager,
paperless notepad, address book, calendar, and
calculator. And it's wireless! So it works where you
work, goes where you go.
Simon's design lets you go from function to function
smoothly, using the graphic symbols on the buttons
and the messages on the display.
Buftons are the areas on the screen that you touch
to start the features.
Simon has complete built-in help. Each time you
need more information about a feature, just press
at the bottom of the screen.
Before you start using Simon, be sure to read
"lntroducing Simon" on page 4 and "Getting Started"
on page 5, for useful information to help you get
started. You may find it especially valuable to go
through the tutorial, "Practicing with Simon" on
page
13.
Before you continue, please take a few minutes to
complete the Registration card. Return it to the
address shown on the card.
't
viii
User's Guide
Trademark of Bellsouth Corporation.
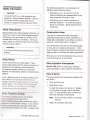
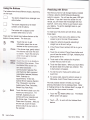
the following precautions to avoid exposure to
additional radio frequency energy.
Safety lnformation
.
lmportant!
To prevent harm to you and damage to your
equipment, read this section carefully. Some or
all of these conditions might apply to your
vehicle or the place where you use your Simon.
.
While Simon is on, do not hold it with the
antenna contacting any exposed parts of your
body, especially your eyes or face.
Hold Simon as you hold the handset of a
standard telephone. The antenna should be
above your shoulder. Speak directly into the
microphone.
Safely Using Simon
Because Simon has cellular telephone features, you
should know how to use cellular telephones safely.
Although you can use Simon in a vehicle, do not
operate Simon while you are driving. Drive your
vehicle safely out of moving traffic, stop the vehicle.
and then use your Simon.
lmportant!
lf you open up Simon you will cancel your
warranty.
Construction Areas
lf you are in a construction area, obey signs
concerning mobile-radio or phone transmission. lf
mobile-radio transmission is prohibited, turn phone
power off. See "Phone Power" on page 21 .
Turn phone power off if you are near blasting caps
or if you are in an explosive atmosphere. Under
some conditions, cellular phones (both incoming and
outgoing calls) can interfere with blasting operations.
When you are out of the construction area, you can
turn phone power on for your Simon.
Radio Waves
Cellular phones send out radio waves. These
waves might interfere with the proper functioning of
electronic control systems, such as electronic
fuel-injection systems, electronic cruise-control
systems, and particularly, electronic antiskid braking
Other Explosive Atmospheres
systems.
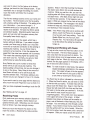
Care of Simon
lf your vehicle has any of the above systems. take
your vehicle to an authorized mechanic who is
trained in this type of system testing and ha,,,e ,-o-.
vehicle tested. The mecha.,c s-3- : -2-<s s--3
that the ope!'ai'c. c'!:-- S -:- ,,, -,:::a-_-
The following items will help prevent problems with
your Simon.
inlbldrz-^=
DO NOT USE Simon in mines, grain elevators,
natural gas fields, or other explosive atmospheres.
.
.
Badfo Frequency ErErgy
Note: Do not use waler,
ketone, or aromatic
solvents.
1
=ao-irequency
Keep Simon clean.
To clean the screen, turn Simon off. Breathe
on the screen and wipe it with a soft clean
cloth. To clean stubborn spots, moisten your
cloth with isopropyl or ethyl alcohol.
, --
-- r: : -:fl-.i:: :::rcriEs r,:- :€ !;.S. Fgderal
].:'-'- -i-ir=inr:rs ],:,-r,SS Or.l FCC)
*'a:r-:ra;lr-Errt€-E?.i saieiy g u ideli ne for h u man
=-r:r:s-=
energy. lf you use this
=
Don't get Simon wet.
.
Keep the microphone hole clear.
rccommended, exposure will be below
=f=,DJa re
. n''ii's recommended by the FCC. However,
take
O Copyright IBM Corp. 1994
Safety lnformation 3
lntroducing Simon
Getting Started
This section shows you how to install and charge
the battery to turn on Simon, then directs you to
more information, depending on how you are using
Simon. You may find it especially valuable to go
through the tutorial, "Practicing with Simon" on
page
13.
Before you use Simon for the first time, you
must fully charge the battery for 14-16 hours.
This conditions the main battery so it will work
correctly and also charges the backup battery to
prevent data loss.
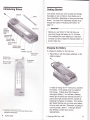
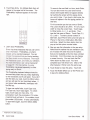
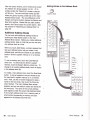
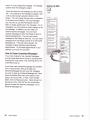
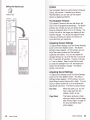
Volume/Adiust
Contrast - Up
Volume/Adiust
Contrast - 6own
Touch SensitiVe
PCMCIA Card
Release Slide
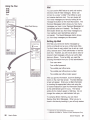
Charging the Battery
-'PCMCIA
Card Slot
To charge the battery for the first time:
lnpuyOutpui
- -------------J-\G..
\
,>t
'Phone Power /
/
(Amber)LED -:;- . -t
1.
On/Besume
(Green) LED
Place Simon, with the battery attached, in the
battery charger.
Extendable
Antenna
.:.:.
It needs to charge for 14-1 6 hours to condition
the battery. fihis applies only to a battery's
first charge. lt takes about 90 minutes to
recharge a battery.) You will see a flashing
amber light for about two seconds and then a
solld amber light (marked with the number 2)
indicating the battery is charging. lf the amber
light keeps flashing and you know your battery
is hot or cold, just wait. Otherwise, try taking it
out and putting it back in. lf the light doesn't
stop flashing, contact your service
{a,
Trademark of the Personal Computer Memory Card
representative.
lnternational Association.
User's Guide
@
Copyright IBM Corp. 1994
2.
When the amber light changes to green, the
battery is ready to use.
3.
Remove Simon from the charger.
To charge the battery after the first time, place
Simon with the battery attached, or place only the
battery, into the charger. After about an hour and a
half, the amber light (number 2) will change to
green. Remove Simon or the battery from the
charger.
lnformation About the Battery Pack
. The new battery pack has no power. fo
charge the battery pack follow the instructions
"Charging the Battery" on page 5.
.
.
You can use Simon while it charges. However. if
you use it continuouslywhile it charges, the battery,
might not receive full charge before the charge
time-out of 90 minutes occurs.
.
Removing the Battery
The rechargeable battery contains nickel
cadmium cells. Local laws or regulatlons may
require special disposal or recycling. Please
dispose of your batteries appropriately.
You should only use Simon battery chargers to
charge Simon's batteries. Other chargers might
damage your battery.
lf the battery does not charge properly, check
the contacts. Dift on the charger or battery
contacts can prevent proper charging.
Using Simon within 10 to 40" C (50 to 104' F).
will prolong your battery's life.
lmportant!
Do not recharge fully charged batteries to "top
off" the battery. lt can shorten battery life.
Turn off the phone and Simon before you
remove the battery. Otherwise, there is a good
chance that you will need to reset your Simon,
and a slight chance that you could damage your
phone. (See "Solving Problems" on page 73)
lf you store the battery at high temperatures (for
example, in the car on a hot day), allow a few
minutes for the battery to cool down before
using it. Similarly, if you store the battery in a
very cold place, allow it to warm up for a few
minutes before using it.
Check the phone power (amber) LED. lf it's on,
go to the phone screen and touch the Phone
Power button.
The battery contains protection devices that
might activate if the battery is overcharged, or if
the battery terminals are accidentally shofted.
lf the battery does not work, allow it to cool
down and then try again.
Slide the OniOff (Resume/Suspend) switch to
turn Simon off. The green LED is off.
3. Push down on the battery release latch and
slide the battery off.
Store batteries in a cool and dry place,
whenever possible, to maximize battery life. Do
not use the battery if it gets wet.
I
main
-:
baiei. ::,,,:- -.:- ,r. :s= :-= -=-= ,a-
= -C---
i_:-=€
=----
-----
=:a j- a :a::. -: :a:::_-. .,,. :-eS€:ye
=--_:=
-:' : -,: _- :i,:-:-,1-3--Er,,/hen you
-_. s.
"a'a
a ;oi; main battery may
follow the recommended battery
cnarging practices, losing data should not be a
problem. For Iurther protection against data
loss, see "Filer'' on page 48.
6
User's Guide
a
Discharge batteries before storing them.
a
You must recharge the battery after long
periods of storage. Depending on the time in
storage, it may need up to four complete
charge/discharge cycles for full capacity.
Do not use the battery in explosive
environments (mines, grain elevators, gas
fields).
Keep the battery away from loose metal (keys,
coins) which can short the battery.
Getting
Started 7
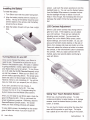
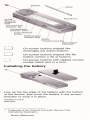
lnstalling the Battery
To install the battery:
1. Turn Simon over with the screen facing down.
2. Align the battery notches with the notches on
Simon. The top of the battery should be even
with the bottom of the arrows, and the battery
should lie flat on Simon.
3. Slide the
battery forward until you hear a slight
click.
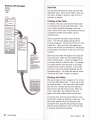
Tuming Simon On and Off
screen. Just touch the screen anywhere to turn the
backlight back on. You can use the System feature
from the Mobile Office screen to increase the time
that the backlight will stay on before it turns off.
Keep in mind, though, that increasing this time can
decrease the length of time that your battery will
last.
LCD Contrast Adjustment
Simon's LCD screen contrast may change when it
gets hot or cold. lf this happens, you can adjust
your LCD contrast. There are two methods for
adjusting screen contrast. You can touch the
System icon on the Mobile Office screen, select
Screen Settings, and move the slider. Or, you can
press and hold both volume buttons on the side of
Simon, then release and press one button at a time.
Press and release the volume-up button to increase
the contrast, or the volume-down button to decrease
the contrast. After you adjust contrast with this
method, wait a few seconds before continuing to
work with Simon.
Orce youve clrarged the battery. your Simon is
ready to use. This would be a good time to put
Simon in the protective case. The case, in addition
to giving protection, is also a good place to keep
your stylus when you're not using it. To turn Simon
on or off, slide the On/Off (Resume/Suspend) switch
up and then release it. When you turn Simon ',off,,,
you are really suspending Simon. The screen goes
blank and uses a lot less energy from the battery.
However, Simon is not completely off. you will not
lose your data when you suspend (turn off) Simon.
lf you don't use Simon for five minutes, it
automatically suspends (turns off). (you may
increase this time to 10 or 1S minutes using the
System feature from the Mobile Office screen.)
Using Your Touch Sensitive Screen
When you are ready to use Simon again, check the
green On/Resume LED. lf it,s on, just touch the
screen anywhere to continue. Otherwise, slide the
Resume/Suspend (On/Off) switch. The screen
where you were working previously will appear.
Simon has a touch-sensitive screen. To enter
numbers and letters, to select buttons, or to change
screens, touch the desired feature (number, letter,
button, or screen).
To save battery power, the backlight on the screen
goes off after one minute if you don,t touch the
You can touch a leature using either the stylus that
came with this product or your finger. The stylus
has a plastic tip on one end for using on the screen.
8
User's Guide
Getting
Started I
The other end has a cap covering a ball point pen.
Do not use the ball point pen tip to touch the
screen. (From here on, the term stylus, can also
mean your finger.) You can slide the stylus across
the screen until the button you want highlights.
Then lift the stylus to select that feature.
Tip: Keep in mind that you activate features when
you release the button, not when you first touch it.
Also, touching harder will not make it work better.
\
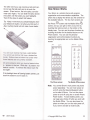
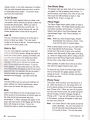
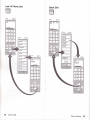
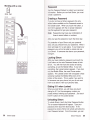
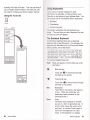
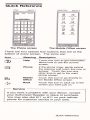
How Simon Works
Your Simon is a cellular phone with personal
organization and communication capabilities. The
phone has a display that shows you the screens for
the available features. The two main screens are
the Phone E
&
..r""n and the Mobile Office
screen, and you can get to them at any time by
touching their picture (icon) on the bottom of the
display area. You can use the phone functions by
touching the button for the desired feature on the
Phone screen. You can use the personal
organization and communication functions by
touching the appropriate icon on the Mobile Office
screen.
Fh@e
lfu
No Sec
..- a'
:cuch buttons that have a solid border.
that have a broken-line
-e'.'g a g:oken-line border when
3.-::rs
=,=,'E
:.-e rc: :jreli'y available.
:,:s€'=:-'=s
'=- :2"=: -- :r:3rs
L]II
LJ
[-1
rT'
il@
-
On some screens. when you touch a feature's box,
a viappears in the box. While lhe y' is present, that
feature is active. To remove the check, touch the
box again.
El
6D
ul
E:l
NE
lf the backlight turns off (saving battery power), just
touch the screen to turn it back on.
The Phone screen
The Mobile Oflice screen
Note: You control Simon's main power and phone
power separately. You turn main power on
and off using the Resume/Suspend button
on the side of Simon. You turn the phone
power on and off using the on screen Phone
Power button. To save battery power, you
can keep your phone off while you work with
the Mobile Office. You can also leave the
phone on when you turn the main power off,
if you want to be able to receive calls.
10
User's Guide
o
Copyright IBM Corp. 1994
11
Using the Buttons
The buttons have three different shapes, depending
on their type.
E
E
il
The button shaped like a rectangle is an
action button.
The button shaped like a file folder
contains a list of buttons.
The button with a clipped corner
contains either text or a form.
There are four special icon buttons that are at the
bottom of every screen. The icons are:
(3J
'_i
Help
Phone
Touch this icon to get
information about how to use
features on the current screen.
lf the phone rings, gently extend
the antenna and touch this icon
to answer. Touch this icon any
other time to get to the main
ohcne screen.
Xobib Tc;ch :his icon to go directly to
Office ifre Mobile ffiice screen. From
the Mobile ffice screen you
can select advanced
communication features (Fax
and Electronic Mail), personal
organization features (Address
Book, Calendar for
appointments, To-Do list),
special Simon features (System,
Filer, Password), and other
helpful tools (Time, Calculator,
Sketch Pad, Note pad).
Back
12
Touch this icon to back up to the
screen you were just on. For
example, suppose you are
working with your calendar and
the phone rings. Touch the
Phone icon to answer. After you
end the call, touch the back
arrow to return to your work in
the calendar.
Practicing with Simon
Now that you have a fully charged battery installed
in Simon, slide the On/Off (ResumeiSuspend)
switch to resume. You will see the green LED light
on Simon. lf you don't touch the screen for one
minute, you will notice that the backlight will shut
itself off. Don't worry, Simon is just trying to save
your battery. To get the backlight back on, just
touch the screen.
To make your first phone call with Simon, follow
these steps:
1. Touch the Phone icon at the bottom of the
screen to go to the main Phone screen.
2. Adjust the antenna by gently extending it
straight out as far as it will go.
3.
lf the Phone Power (amber) LED is on, go to
step 5.
4. Touch the on-screen Phone Power button and
you will see the amber LED light, indicating that
phone power is on.
5. Touch each of the
numbers for the phone
number that you want to call.
6. Touch the Send button. When you touch Send,
the phone dials the number you entered. The
ln-Call screen will appear.
7. To end the call or hang up the
phone, just
touch End.
8. To
receive calls, leave the phone's power on.
Otherwise, touch Phone Power to turn it off.
The next practice session will take you through
entering information into the Address Book. Refer
to .Adding Entries to the Address Book" on page 37
to see the flow from screen to screen.
r:ir
|EI Mobile Office icon. The Mobile
Office screen will appear.
1. Touch the
2. Touch
feature.
^*p*"-
,o work with the Address Book
User's Guide
How Simon
Works
13
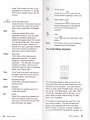
3. Touch New Entry. An Address Book form will
appear in the upper half of the screen. The
PredictaKey' keyboard appears in the lower
half.
To move to the next field in a form, touch Enter.
You can also move the cursor (the line that
shows where typed letters will appear) directly
by touching the screen with the stylus where
you want to type. lf you touch a field name, the
cursor will appear in the first typing position for
that field.
For this exercise type the last name of Smith.
The cursor should be at LAST>. lf it isn't, touch
LAST to move the cursor there. Touch Caps,
S, Other button, m, i, t, h, and Enter. Then
type the first name of Simon. Touch Caps, S, i,
m, o, and n. To enter a phone number of
555-1234, touch Phone'l (the cursor will jump to
Phonel in the form), (123) button, 555-1234,
and Done. Select the Home button from the
pop-up that lists phone number labels.
Learn about PredictaKey.
Simon has three keyboards that you can use to
enter information: PredictaKey, a numeric
<e1cad. and a standard keyboard. you can
::-:,:se :he keyboard that you like by touching
:-E r.te-- !;:on on any keyboard. Then touch
:e (si=ca-is sr:on. and make your selection.
F:,: nrcre iniomaion. see -Using Keyboards,,
on page 67. For this practice. iry using
PredictaKey, developed especially to make
typing easy on Simon.
The PredictaKey keyboard always shows the
six most-likely letters that you need, depending
on the characters you've just typed. lf you don,t
see the letter you need, touch the Other button
and you will see the next most-likely letters. lf
you type a letter accidentally, backspace with
the Bks key.
5. Now you see the information in the new entry.
Notice that the options that are available to you
are in boxes with solid lines and the options
that are not available at this time have a broken
line border. From this screen you can change
or erase the entry. You can touch the Dial
Home button to place a call. You have
completed your first Simon form. Most of the
other features in Simon work this same way.
b. Touch Erase to erase this
entry. Touch OK.
7. Touch the Mobile Office icon or the Phone icon
to leave the Address Book.
To type one capital letter, touch Caps once.
For Caps lock, touch Caps again. To unlock
Caps, touch Caps one more time. For
punctuation, touch the punctuation (?,!) button.
A second touch will lock it. For numbers, touch
the number (123) button. lt locks automatically.
To type letters again, touch the letters (ABC)
button.
-
Trademark of the IBM Corporation.
14
User's Guide
How Simon
Works
15
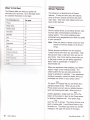
What To Do Next
Simon Features
The following table can help you quickly find
information you want next. Go to the page shown
for complete information on that topic.
For lnformation On
See page
Phone
17
Mobile otfice
34
Address book
34
Calculator
41
Calendar
41
Fax
43
Filer
48
Keyboards
67
Mail
51
Note pad
57
Password security
59
ar:-^r
^^..1
:.=r ':=:-.es
-f-e
I: l:
60
i
63
u
65
The following is a descriptive list of Simon's
features. To help you learn about the features,
some of Simon's screens are shown after each
major topic. They show what happens when you
touch ceftain features.
Phone
Simon's cellular phone, as all cellular phones, uses
two-way radio communications controlled by a
cellular system. The current conditions (both
atmospheric and geographical) can affect the quality
of your connection.
Note: When you place or receive a call, you must
extend the antenna straight out as far as it
will go.
Cellular phones are different from the standard
"corded" phones with which you are familiar. Note
that you don't hear a "dial tone" when you turn on
your phone. Also, there might be times when you
or the party to whom you are talking experience
static, noise or occasionally a "dropped,' or
disconnected call.
When you experience these problems, your Simon
might or might not be working correctly. The
cellular system that you are using could be the
cause lor problems in operation. lf you experience
problems frequently, contact the dealer where you
purchased your Simon or your cellular carrier.
m
{3
The phone
feature lets you use Simon like a
standard cellular phone. When you are at the
Phone screen, you can use your cellular phone to
send and receive phone calls. When you are in
E
another application, simply touch tne
at tne
bottom of the screen to return to the phone screen
for placing a telephone call. lf the phone rings,
m
[jJ
touch the
to answer. The phone must be on to
send or receive calls. Touch Phone power to turn
the phone on. The amber LED comes on, and the
message in the upper left corner of the status
16
User's Guide
How Simon
Works
17
window changes from "Phone is Off" to "Phone
IS
On".
provider.) To change the area code, touch Menu,
then Roaming Preference, and then the Area Code
button. Use the special phone number pad to
change the area code. See "Setting Up Roaming"
on page 31.
Answer Automatically
To set the automatic answer feature, touch Menu,
then Phone Settings. When you set the Answer
Automatically feature, the phone will answer
automatically after 10 seconds. Just pick up the
phone and begin speaking; Simon takes you to the
ln-Call screen.
Call Talk Time
To turn off the phone, touch Phone Power again.
The amber LED goes off, and the status message
:-anges to "Phone is Off."
911
- :-.-::-:-. .jsi one touch of the 911 button is
: =.:- --: -'= 1? ',,, ii start with no other action
.'' :=-'=)--- ' .l-::-:: 91 1 by accident, it's easy
io cance; ltrm :ne .arge Cancel Emergency Call
button. You can change this setting to any
emergency number you wish. To do this, just follow
the instructions in "Phone Settings" on page 27.
Answer with Any Key
This feature makes it easier to answer your phone
when you are on the main Phone screen. All you
have to do to answer is touch any key on the main
Phone screen. To set this feature, touch Menu,
then Phone Settings, and then touch Answer with
Any Key to check it. See "Phone Settings" on
page 27.
The Call Talk Time feature shows you how long
your call lasts in minutes and seconds. To set this
feature, touch Menu, then Time in Use, then Display
Call Time. After you set this feature, the call talk
tlme will appear in the status window of the ln-Call
screen.
Call Timers
Your phone has a number of call timers that help
you keep track of the time you spend talking on
your cellular telephone. The timers include your last
call time, total call time, time in calls you originated,
time in calls you received, time you spent in calls
while roaming, and the operation time (the total
amount of time you've spent in calls). You can
reset all the timers, except the operation time, to
zero by touching the Reset Call Timers button on
the Timers screen. To review or reset your call
timers, touch Menu and then Time in Use to see the
Timers screen. See "Setting Phone Timers" on
page 32.
Clear
Area Code
The Clear button erases previously entered
characters, one at a time, like the backspace key on
the standard keyboard. lf you touch and hold the
Clear button, it will repeat.
This feature lets you change your preset area code.
When you dial seven digits and you are roaming,
your phone automatically adds the area code to the
phone number. See "Roaming Preference" on
page 23. (For more information on roaming, see
the booklet you received from your cellular system
This button appears on the ln-Call screen if you
have set up a special code. (See "Set Up Special
Code" on page 24.) A special code could be a PIN
number, voice-mail password, long-distance service
18
User's Guide
Code
Simon
Features
19
charge number, or any other sequence of numbers
that you need frequently when you are in a call to
an automated phone system. To send the code,
just touch the Code button.
ln-Call Screen
The ln-Call screen appears when you place a call.
(You place a call by entering the phone number and
touching the Send button.) When you want to
hang-up, touch the End key to end the call. To
adjust the speaker volume during a call, use the
volume adjust button on the side of the phone.
Last 10
The Last 10 feature provides a list of the last 10
phone numbers you called. The most recent
number is at the top of the list. You can touch any
number on the list to place a call.
Mark to Dial
You can mark telephone numbers in notes and
forms by touching the screen, sliding your stylus to
a:'JS: the cursor position, pausing a moment (until
,:- -..'a sr'tort beep), then sliding your stylus
.ls ,:: sr cie your stylus, the number
=J.--r,l-,,J.= rrr'-€^ .,.3-v€ marked the number you
A2-.-- - 1r-- s1--s::orn ihe screen. A pop-up
rnenu appears. To ciial. select Dial from the menu.
The ln-Call screen will appear as the Phone feature
places the call. For example, this can be useful if
someone sends you a phone number in an
electronic mail message. Just mark it and dial.
Menu
The Phone Menu lets you set sound settings, set
phone settings, set roaming preferences, review
time in use, and review the status monitor.
Mute
Use the mute feature (on the ln-Call screen) to turn
off the sound to the microphone so that the party on
the other end of the line cannot hear your
conversation. A "Mute" message will appear in the
upper right hand corner of the display and the Mute
button will change to Unmute. To turn the
mlcrophone back on, touch the Unmute button.
20
User's Guide
One Minute Beep
This feature helps you keep track of how much time
you spend in a call by beeping every minute. To
set this feature, touch Menu, then Time in Use, and
then touch One Minute Beep to check it. See
"Setting Phone Timers" on page 32.
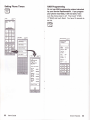
Phone Pager
The Phone Pager feature allows callers to leave a
telephone number. The Pager feature accepts up to
nine phone numbers left by callers. To set this
feature, touch Menu, then Phone Settings, then
check Accept Pages. See "Phone Settings" on
page 27.
Note: When you check Accept
Pages, Answer
Automatically also receives a check. They
must both be active to receive pages.
When a caller places a call to you, the caller hears
a few rings followed by three beeps. The caller
should touch the pound (#) sign, enter a phone
number, touch the pound (#) sign again, and hang
up. When the Page arrives, Simon beeps, and the
border around the Phone Pager button darkens to
let you know a new Page has arrived.
When possible, let callers know what to do when
they reach the pager instead of your voice.
To return the call, touch the Phone Pager button.
The list of the last nine pages appears with the
newest at the top. To dial the number, just touch
the button you want.
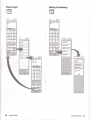
Phone Power
This button, when touched, turns the phone on or
off. When the phone is on, the amber LED is on,
and the status window on the main Phone screen
says "Phone is On." When you turn off the phone
from the main Phone screen, the amber light goes
off and the status window message changes to
"Phone is Off." lf you turn off the phone from the
ln-Call screen, a pop-up will appear to make sure
you want your phone off.
Note:
You control Simon's main power and phone
power separately. You turn main power on
and off using the Resume/Suspend button
on the side of Simon. You turn the phone
Simon
Features
21
power on and off using the on screen Phone
Power button. To save battery power, you
can keep your phone off while you work with
the Mobile Office. You can also leave the
phone on when you turn the main power off,
if you want to be able to receive calls.
Phone Settings
The Phone Settings button takes you from the
Phone Menu to the Phone Settings screen. From
this screen, you can set your phone to answer
automatically, retry automatically, answer with any
key, accept pages, set Vox (voice activated
transmitter), and change the emergency number.
Quick Dial
This feature lets you place calls quickly by touching
Quick Dial and the button containing the desired
number. You can program 16 frequently used
numbers: eight on the first screen and another eight
on a second screen. Touch the down arrow to see
the second screen, and the up arrow to see the first
screen.
Q-'c< D:al phone numbers must be in the Address
3,i:< :eiore you can put them in Quick Dlal. To put
a
-.::c€rrn
Quick Dial. touch any blank Quick Dial
bi;iton. An insiruction screen will appear. Touch
OK after you read the instructions. Next, the
Address Book index screen will appear. Touch the
tab for the last name of the person you want in
Quick Dial, and all the phone numbers for that letter
will appear. Touch the button with the desired
number, and that number will appear in Quick Dial.
To change a Quick Dial number, touch Add/Change,
then the button you want to change. Follow the
steps on the screen. To erase a Quick Dial
number, touch Erase, then the button with the
number you want to erase.
Redial
Touch the Redial button to call the last number
dialed on the phone. This feature is useful when a
number is busy the first time you try it.
22
User's Guide
Retry Automatically
This feature is convenient if you are in a busy
cellular area. To set Retry Automatically, touch
Menu, then Phone Settings, and then touch Retry
Automatically to check it. When this feature is
active and you place a call, the phone will try to
connect to the cellular system 10 times every three
seconds until it can place the call. Keep in mind
that this feature will keep trying to connect to a busy
cellular system, but will not keep trying to call a
busy phone number. See "Phone Settings" on
page 27.
Ringer Tone/'Volume
To adjust the ringer volume, touch Menu, then
Sound Settings, and adjust the slider. You have
three ringing tones that you may select: Standard,
Bell, and Beeps. When you touch a Ringing Tone
check box, you hear that tone at the current volume.
Touch OK when you finish.
Roaming Preference
(For complete information on roaming, see the
materials you received from your cellular system
provider.) When you got your Simon, you
subscribed to a cellular telephone service. Cellular
telephone services cover only a certain area. lf you
use your phone outside of this area, you are
"roaming."
Use this feature to set your roaming preferences.
Touch Menu, then Roaming Preferences to get to
the Roaming screen. You can select a roaming
preference, select which NAM (phone number) you
want to use if you have more than one, and set up
your area code. (See "Area Code" on page 18.)
"NAM" is the cellular telephone term for your
telephone's number. You can have as many as four
NAMs in Simon, each for a different cellular area.
This can be useful if you travel frequently among
different cellular system areas. lf you have more
than one NAM, you can select the NAM you want,
or you can check Auto NAM. (See the screens on
"Setting Up Roaming" on page 31.) lf you check
Auto NAM, Simon will automatically switch to the
right NAM for the current cellular area.
Simon
Features 23
Most areas have two cellular system providers
(sometimes known as "A" and "B"). your cellular
service provider is your own system, and the other
is the alternative system. You have five roaming
preference choices.
Choice
Action
Prefer Own
You will start with your system, but
will switch to the alternative if your
system is busy. This applies to both
home area use and roaming.
Prefer Alt
You will start with the alternative
system, but will switch to your
system if the alternative system is
busy. This applies to both home
area use and roaming.
Only Own
You will only use your system, both
in your home area or roaming.
Only Alt
You will only use the alternative
system, both in your home area or
roaming.
Home Only
Your phone will have service only in
your home area, using both own and
alternative systems. You cannot
service charge number. To set up the special code
button, touch Menu, then Phone Settings, and then
Set Up Special Code. See "Phone Settings', on
page 27.
Speaker Volume
To adjust the speaker volume when you,re in a call,
use the volume-adjust buttons on the side of the
phone.
Status Monitor
The Status Monitor lets you view certain types of
phone status. Normally, you would view this screen
only if directed to do so by your Service
Representative. To view the Status Monitor, touch
Menu and then touch Status Monitor.
Vox (Voice Activated Transmitter)
lf you set Vox and your cellular system supports it,
your battery will last longer. When Vox is on, your
phone transmitter only works when you talk, saving
power. To set Vox, touch Menu, then phone
Settings, and then touch Vox to check it. See
"Phone Settings" on page 27.
roam.
Save Number
lf you are talking to someone and you need to make
a note of a phone number, use this feature. Touch
the Save Number button on the ln-Call screen. The
Save Number button border darkens to show you've
set it. Enter the phone number you want to save.
Finally, touch the Save Number button again. The
phone number is now at the top of the Last 10 list,
and you can dial it later by touching the Last .l 0
button, then touching the button that contains the
number.
Send
After you enter a phone number, touch Send to
make the phone connection to the number you,re
calling.
Set Up Special Code
This feature lets you set up a Code button to appear
on the ln-Call screen. You can set up the Code
button to send a special code, such as a plN
number, voice-mail password, or long-distance
24
User's Guide
Simon
Features 25
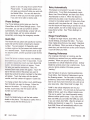
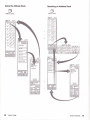
Emergency Dialing
Phone Settings
E
E
I
{
26
User's Guide
Simon
Features 27
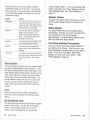
Last 1 0 Phone Use
Quick Dial
ffiil
E
13
Itu.m
ls-drzs
lhffi-l
ls-ooao
Ia.*h
ls.e175
-----l
I
I
-l
J
lfrl"l*tu---l
Isrs-s-eE23
555885'l
28
User's Guide
|
EE
Simon
Features 29
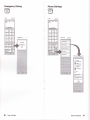
Phone Pager
Setting Up Roaming
E
fi--.l-rt
r:J
tulfuhSE
E
tutuhtu
5557232
30
User's Guide
Simon
Features
31
Setting Phone Timers
E
NAM Programming
Do not use NAM programming unless instructed
by your Service Representative. lf you program
your phone incorrectly, it will not work. Make
sure the phone power is off. Then touch *#*626
(-#-NAM) and touch Send. You have 10 seconds to
do this.
ffi
407S9062
Sgslm
lD
tffi
JAJmc
GrDH*
SID
32
User's Guide
00037
0333
02
lz
Ld
Simon
Features 33
Mobile Office
l&
The Mobile Office
screen provides a path to the
Address Book, Calculator, Calendar, Fax, Filer, Mail,
Note Pad, Password, Sketch Pad, System, Time,
and To Do features.
You can get to the Mobile Office screen from any
EII
screen by touching IEI . When the Mobile Office
screen appears, select one of the features.
@o
car.nd,
Addr4s
tur
,H9
_H""
"_@_
mq:
H
.,P,".
ECI
Once you select a feature and go to that screen,
there will be other choices that you can make. lf
you need more information about those choices, you
can touch
@
If you need the phone to pause when dialing a
number, put a comma where you need the pause.
Commas cause a two-second pause, and you can
put in as many commas as you need. This can be
useful if you are dialing special numbers, such as
extensions or codes to automated phone services.
lf you want to put more than two phone numbers
and a fax number in the entry, type the extra
numbers in the Notes field at the bottom of the form.
Then you can use the Mark to Dial feature to call
these numbers easily. See "Mark to Dial" on
page 20.
Using the lndex
The Index is the alphabetical arrangement of tabs
on the main Address Book screen. The Address
Book arranges entries by last names. When you
touch a letter (A through Z),lhe entries for that letter
appear. lf a letter has no entries, a pop-up tells
you. See the screens on "Adding Entries to the
Address Book" on page 37. Most of the other
Address Book screens have an lndex button that
you can touch to return immediately to the main
Address Book screen.
Using an Entry
.
Address Book
The Address Book provides a convenient place to
store your list of names and phone numbers. The
Address Book also has a Search feature to help you
locate a number quickly, even if you can't remember
the person's last name.
New Entry
To add information to the Address Book, touch New
Entry. The on-screen keyboard and the Address
Book form appear. You must enter a name (or
other label) in the Last Name field. Fill out all the
other information in the form that you can, but it's
34
OK if you leave some fields blank. Touch the Done
button at the bottom of the screen when you've
finished. See the screens on "Using the Address
Book" on page 38. You may also want to review
"Practicing with Simon" on page 13.
User's Guide
To see an entry, just touch its button in the entry
list. The information in the entry will appear, along
with a number of action buttons. These buttons
provide one-touch dialing for phone numbers, the
ability to change or erase the entry, the Search
feature, and the New Entry feature. See the
screens for "Using the Address Book" on page 38.
Search
When you touch Search, the "Search fo/'field and a
keyboard appear. Use the keyboard to type the
letters or numbers you want to search for in the
Address Book, then touch the Done key.
Tip: You can enter a partial name and the Address
Book will list all entries that contain those lefters.
Simon
Features 35
After the search finishes, all the entries that contain
the "Search for" phrase appear in a list. (lf no
entries contain the "Search for,' phrase, a pop-up
will tell you.) You can use these entries just like
those you get by touching a letter tab on the main
Address Book screen. The only difference is that
Restart and Cancel buttons replace the Search and
New Entry buttons. Restart lets you staft another
search, and Cancel stops the current search. See
the screens for "Searching an Address Book" on
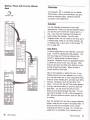
Adding Entries to the Address Book
ffi
Address Book
page 39.
Additional Address Books
You can work with additional address books by
touching the Addr Books button on the main
Address Book screen. Before you create additional
address books, keep in mind that you can use only
one address book at a time.
When you touch Addr Books, a screen appears that
lists your address books, lets you create a new
address book, and lets you choose to use address
books in Simon's system memory or on a memory
card.
To use a mernory card, touch the Card Memory
check box. To switch back to Simon,s system
memory, touch the System Memory check box. To
change to an existing address book, touch its button
in the address book list.
To create a new address book, touch the New Book
button. A pop-up appears to let you choose to put
the new book in system memory or on a memory
card. Next, use the on-screen keyboard to type a
name for the new book, then touch the Done key
when finished. The main Address Book screen
appears, and you are ready to make new entries for
the new book. The name of the current address
book appears under the screen title (Address Book).
lf the current address book is on a memory card, a
small symbol representing a memory card also
appears on the address book title line.
36
User's Guide
Simon
Features 37
Using the Address Book
Searching an Address Book
tlr
m
Address Book
Address Eook
S.ll Lrkc Cilg,
UT.
8160{
trtr
38
User's Guide
Simon
Features 39
Making a Phone Call From the Address
Book
Calculator
t=l
The calculator .,f;1,". is available from the Mobile
Office screen. When you touch Menu, you get a
choice of calculator types: standard, financial,
conversion, and programmer.
ttrjr
Address Eook
Calendar
Use the Calendar to keep track of your daily
appointments. When you start the Calendar feature,
,l
you see the current month with today,s date in a
box. lf you have any meetings, they appear as
buttons below the calendar. From the main
Calendar screen, you can create a new entry, go to
a diiferent date, switch to a 3-month calendar, use
an existing entry, or go to your To Do list (see ,,To
Do" on page 65).
New Entry
To add an appointment to the Calendar, touch New
Entry. A form for selecting the date appears. This
form has Today and Tomorrow buttons at the
bottom for easily setting the date to today or
tomorrow. Otherwise, touch the appropriate buttons
to select the correct month, day, and year. Note
that you can touch and hold arrow buttons to scroll
qulckly through the choices. When the date is
correct, touch the OK button.
fima
!mt555
tud
lh
9?
&SE
5559322
trE
I
Next, a form appears for setting the time. lf your
meeting occurs on the hour between 8 a.m. and 5
p.m., you can touch one or more consecutive check
boxes to set the meeting time, and then touch OK to
continue. Otherwise, touch the Set Other Time
button. lf you do this, the Set Time screen appears
to let you use arrow buttons to scroll the start and
stop times. You can touch and hold an arrow
button to scroll quickly through the times. you can
touch AM to change it to PM, or pM to change it to
AM. When the times are correct, touch the OK key
to continue.
Next, the calendar form and the on-screen keyboard
appear, ready for you to type in the Subject field. (lf
you're not sure how to complete a form, review
"Practicing with Simon" on page 13.) Choose your
subject so it is meaningful to you, because it will
40
User's Guide
Simon
Features
41
appear along with the start and stop times in the
entry's button when you review your day's entries.
ln the Notes field, type any additional information
you will need, such as where the meeting will take
place. lf you do not want to set an alarm or repeat
the meeting, touch the Done key now.
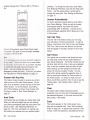
Setting an Alarm
lf you want Simon to alert you before you are due
for a meeting, you can enter a lead time (in
minutes) in the Alarm field, which appears just
above the Subject field. (You can touch the word
Alarm, and the cursor will move to the correct typing
position.) For example, if you enter 30 in this field,
Simon will beep (three short beeps)30 minutes
before the meeting starts and provide a pop-up with
allthe meeting information. The lead-time limit is g9
minutes. 0 means no alarm.
Using an Entry
To see an entry, just touch its button in the entry
list. The information in the entry will appear, along
with three action buttons. Use these action buttons
to erase or change the current entry, or to create a
new entry.
Going Directly to the To Do List
ln addition to the Calendar, Simon has a To Do
feature. Use the calendar to keep track of your
daily commitments. Use the To Do feature to keep
track of the other things you need to do and their
due dates. After you view your daily appointments,
you can go directly to your To Do list by touching
the To Do button. For more information, see ,To
Do" on page 65.
Note: To
help you manage Simon's system
memory, the Calendar feature automatically
erases calendar entries that are more than a
month old.
Repeating Meetings
lf this is a meeting that will occur regularly over a
period of time, you can indicate this with a one-letter
code in the Type of Repeat field. you can repeat
meetings (W)eekly, (M)onthty, or (y)earty. Weekty
meetings will repeat on the same day of each week,
monthly meetings will repeat on the same date of
each month, and Yearly meetings will repeat on the
same month and date for each year. Next, you
need to enter the number of times to repeat the
meeting in the Number of Repeats field. you can
repeat a meeting up to nine times.
Tip: Sefting yearly "meetings" is a handy way to
keep track of birthdays and anniversaries. To use
them as reminders, put them in your calendar a
week before they happen.
Changing Dates and Using the 3-Month
View
To go to a different date in the displayed month, just
touch the date on the calendar. lf the date you
want is within the next three months, touch the 3
Month button, then touch the desired date. lf you
want to view a date from a past month, or one more
than three months in the future, touch the date
button (the button that contains the month and year)
that appears above the calendar. A form appears
that lets you select the date to view.
42
User's Guide
Fax
With the Fax feature, you can receive, create, view
and send faxes. For example, you can write on
(annotate) a received fax, then send it somewhere
else. lf you need a paper copy, just send it to a
nearby fax machine.
Managing Faxes
Using check boxes, you can store your faxes either
on the system memory of Simon or on an optional
memory card. After you read and work with your
faxes, erase them as soon as possible or copy them
to an optional memory card (see the "Filei'on
page 48). Most faxes use a large amount of
memory, so the more faxes you keep in your Simon,
the less memory you have for other applications,
such as Address Book and Calendar. lf you have
an optional memory card, recelve your faxes on it
rather than using Simon's memory.
Setting Up the Fax Feature
To set Simon up for faxing, touch the Settings
button on the main Fax screen, and the Fax
Settings screen will appear. This screen contains
six setting buttons, one check box, and a Use
Defaults button at the bottom of the screen. lf you
Simon
Features 43
ever want to return the Fax feature to its factory
settings, just touch the Use Defaults button. To put
information into or change the setting of a button,
touch that button and follow the on-screen
directions.
The first two settings buttons are for your name and
fax number. The third button is for the fax quality,
with a factory setting of Standard. This setting is for
your information
you cannot change it. lf
someone sends you a fine-quality fax, Simon will
receive it as standard. All faxes that Simon sends
are standard quality. (Standard-quality faxes look
good, and use only half the system memory that
fine-quality faxes would require.)
-
The fourth button is for fax speed, which has a
factory setting of 4800 bps. lf you select a higher
number your faxes may go faster, but it may take
more time to make the connection to the sending or
receiving fax machine. As your Simon tries to
connect to a fax machine, it tries the selected fax
speed first, then tries lower speeds until it connects.
This means that selecting higher fax speeds may
slow down your fax. Normally, you get your best
performance by using the factory setting.
Busy Retries sets up the number of times that
Simon will try to call a busy fax machine. The
factory setting is three times, but you can change it
to one or five times. Retry Delay is the amount of
time Simon will wait to try to call the busy fax
machine between tries. The factory setting is one
minute, but you can change it to five or 10 minutes.
lf you want to send a cover page with the laxes you
send, touch the Cover Page box to put a check in it.
After you have completed the settings, touch the OK
key.
See "Setting Up Fax" on page 47.
Receiving Faxes
First, make sure your memory selection (System or
Card) is correct. lf possible, receive faxes to an
optional memory card. Othenvise, you can receive
them to Simon if you have enough memory.
When you touch the Receive Fax button on the
main Fax screen, a Receiving Fax status window
44
appears. Keep in mind that touching the Receive
Fax button turns Simon into a small wireless fax
machine. While you wait for a fax, you can't do
anything else with Simon except cancel by touching
the Back Arrow. (The Back Arrow might not work
for the first few seconds. lf this happens, just try
again.) While you receive the fax, look at the status
window occasionally. The messages in the status
window will keep you informed about whether you
are receiving or have received the fax.
Note: lf the Phone rings while you're working with
Simon, touch the phone icon to answer. lf
it's a fax call, you'll hear nothing. Touch the
Mobile Office icon, the Fax icon, then
Receive Fax. You have about 30 seconds
to do this before the calling fax machine
hangs up.
Viewing and Working with Faxes
To look at a fax, touch the View Fax button on the
main Fax screen. The list of faxes appears. To
view a fax from this list, just touch its button. The
next screen shows a set of page buttons, one for
each page in the fax. When you touch one of these
buttons, the fax page appears in the display, with a
set of tools and buttons below it.
Note: To make it easier to view faxes, they appear
rotated (landscape orientation) in the viewing
area. The upper left paft of the fax appears
first. You can return to this point of the fax
at any time by touching the Home button.
The Pencil tool is active, indicated by a box around
it. When the Pencil is active, you can draw or write
on the fax with your stylus. To erase lines with the
stylus, touch the Eraser tool. Keep in mind that the
Eraser tool will erase both new lines and the lines
that were in the fax when you received it. lf the fax
is too small to read, touch the Zoom tool
(magnifying glass). The current zoom level appears
in the upper left corner of the screen. At Most
Detailed, lines drawn on Simon will be smaller on
paper, and at Reduced or Most Reduced, they will
be larger. You are looking at a fax through a small
display. lf you need to move the fax, touch the pan
tool (the symbol with four arrow heads). When the
Pan tool is active, touch the screen, and a small box
will appear. Slide your stylus across the screen in
User's Guide
Simon
Features 45
the direction you want to drag the fax. After you lift
your stylus from the screen, the fax will move the
same distance that you slid your stylus, and in the
same direction.
appear, one for each page of the selected fax.
Touch the pages that you want to send, and they
will be highlighted. lf you change your mind about a
page, just touch it again. After you've selected the
pages you want to send, touch the OK key. The
screen will change to an on-screen keyboard and a
form with two fields. For "To:," type the name of the
person that you're sending the fax to. For "Fax #:,',
type the phone number of the recipient's fax
machine. Then touch the Done key at the bottom of
the screen. A Sending Fax status window will
appear. You can keep track of your fax's progress
by watching the messages in the status window.
lf you want to save your work with the fax, touch the
Save button. Otherwise, touch the Menu button.
The choices you have from the menu are (1) Erase
the fax, (2) Quit without saving any changes or
annotations, (3) Save the fax as is, with changes
and annotations, or (4) Rename the fax. (When you
Rename a fax, you also save it as is.) When you
receive a fax, it automatically receives a name
based on how many other faxes are stored on
Simon. If you plan to keep a fax for a while, it may
be handy to rename it.
Setting Up Fax
ru
Creating a New Fax
t-:
-.
To create a fax, touch the Create New Fax button.
A pop-up will appear that offers you three choices.
To start the Sketch Pad, touch the ln Sketch Pad
button. To start the Note Pad touch the ln Note
Pad button. (You can easily fax any sketches or
notes that you create.) To create a full-page fax,
touch its button.
Creating a full-page fax is very similar to working
with an existing fax, except you start with a blank
screen. The tools and buttons are the same, but
the zoom level stafts at Most Detailed to make it
easier to draw details and to provide the best
system performance. You can change the zoom
level, but it will take longer to pan across the page
as you create the fax.
Because you are working on a full-size page with a
small display (with landscape orientation), it can be
tricky to create a new full-page fax. lf you do not
need a full-size page, keep in mind that it is easier
to fax sketches using the Sketch Pad feature or to
fax typed notes using the Note Pad feature.
rlJ
Fax
l;m;e-
lsrmed
E,sFd-llaeo bFl
l
I
-l
tqqR. , --'l
rh... Ths
-_-l
fR;tru M{
Lom ek
M
I
I
I
u*o,.eru"
i;il
Sending Faxes
To send a fax, touch the Send Fax button on the
main Fax screen. The list of faxes available to send
will appear. Touch the one you want to send. lf the
fax has more than one page, you have the option to
send all pages or selected pages. lf you choose to
send selected pages, then a list of buttons will
46
User's Guide
Simon
Features 47
Filer
Use the Filer feature to manage your Simon files
and to back up your personal data.
with a file in Simon's system memory, you can copy
it to an optional memory card. lf you are working
with a file on a memory card, you can copy it to
Simon's system memory.
Memory Management
Prepare, Back Up, and Restore
Simon works with two kinds of memory: system
and card. System memory comes as part of Simon.
Card memory is available on optional memory
cards. As you save data to either system memory
or a memory card, you have less room to store
additional data. You can buy more memory cards,
but you may also want to use Filer to manage your
When you check card memory, three additional
buttons appear at the bottom of the main Filer
screen: Prepare, Backup, and Restore. lf you want
to back up (copy) your personal data, you need to
insert an optional memory card in the PCMCIA slot.
lf you have never used the card in Simon before,
you must prepare it by touching the Prepare button.
(Another common name for prepare is formaf.) This
will take a while, and if the card has any data on it,
preparing the card will erase it. After you've
prepared the card, just touch the Backup key to
copy all of your personal data to the card. Then, if
anything happens to Simon's memory, you can use
the Restore button to copy your personal data back
to Simon. lt is a good idea to back up your
personal data frequently, and to keep the memory
card in a safe place separate from where you keep
your Simon.
memory.
The main Filer screen has two memory check
boxes, with the System Memory box checked to
start with. To switch to card memory, touch its
check box.
The main Filer screen also has a memory-used
indicator, which shows you how much of the
currently selected memory you have used. lt also
tells you how much memory you have left in bytes.
"Byte" is a computer term for memory units. A good
way to think of memory is that you have a memory
budget to spend on data. lf you start to run out of
room, you either need to get more memory cards, or
you need to erase data that you no longer need.
For example, faxes require a lot of memory to store,
so you probably want to erase them or copy them to
memory cards as soon as possible after you receive
them.
Working with Files
When you touch Filer from the Mobile Office, you
see a set of folders for the different Simon features,
such as Address Book, Calendar, and Fax. To look
in a folder, just touch it. All available files in the
folder appear as buttons. The button label shows
the name of the file and how much memory it uses.
To work with a file, touch its button. To return to
the main Filer screen, touch the lndex button in the
upper right corner of the screen. See "Using the
Filer" on page 50.
After you touch a file's button, a menu will appear.
From this menu you can choose to copy the file,
rename the file, or erase the file. lf you are working
48
User's Guide
Simon
Features 49
Using the Filer
Mail
E
Filer
Select Card Memory
You can use the Mail feature to send and receive
electronic mail (E-mail) messages. Simon can
@nnect to a Lotus-- cc:Mail.- Post Office to send
and receive electronic mail. You can always tell
how many messages you have by looking at the
message list buttons on the main Mail screen. The
Received Messages button shows you how many
messages you have in your Received Messages list
(sometimes called an in-basket). The Ready to
Send button shows you how many messages you
have waiting to send (sometimes called an
out-basket). The Saved Messages button shows
you how many messages you have saved.
Setting Up Mail
With Mail, you send and receive messages by
calling a computer set up as a cc:Mail post office.
You don't have to worry about how to set up a post
office, because your E-mail administrator or service
does that. However, you will not be able to send or
receive E-mail messages until you set up the Mail
feature in Simon. To set up Mail, you need the
following information from your E-mail administrator:
Your user name
Your cc:Mail password
The cc:Mail post office name
The cc:Mail post office phone number
' Ae6s
w L:.= I te
F"to ----__-l
I*l
Irr*--_l
The cc:Mail post office modem speed
After you get this information, touch the Settings
button on the main Mail screen. The Mail Settings
screen will appear. Enter your cc:Mail information
by touching the appropriate button and using the
on-screen keyboard to type the information exactly
as the administrator gave it to you. The factory
setting for the modem speed is 1200 bps. Do not
change this unless your administrator tells you.
To conserve Simon memory, you can check
Receive Only Short Messages. When you put a
check in this box by touching it, you will only receive
Trademark of Lotus Development Corporation.
Trademark of cc:Mail lnc. division of Lotus Development Corp,
50
User's Guide
Simon
Features
51
messages that are no longer than a standard
paragraph. You would only want to do this if you
use the same user name and post office for your
computer E-mail.
After you have completed the settings, touch the OK
button. (See "Setting Up Mait', on page 55.)
Creating Mail
To create a new E-mail message, touch the Create
New Mail button on the main Mail screen. The Mail
Address Menu appears. Use this screen to enter
the cc:Mail addresses for the people you want to
receive this message.
To get an E-mail address from the Address Book,
touch the "Address To: (From Address Book),,
button. The Address Book alphabetical index will
appear. Touch the letter tab for the last name of
the recipient, then touch the recipient,s button to add
him or her to the "To" list. lf the recipient is not in
your Address Book, you can touch the ',Address To:
(Type)" button to type the recipient,s E-mail address
with the on-screen keyboard. Each time you type a
recipient's E-mail address and touch the Done key,
a post office name form will appear. If the recipient
uses your post office, just touch the Done key to
continue. Otherwise, fill in the recipient,s post office
name then touch the Done key. Follow the same
steps to add people to the carbon copy (cc) list with
the "cc: (From Address Book),,and ,,cc: (Type),,
buttons. You can put as many E-mail addresses as
you like in the "To" and "cc,, lists.
lf you want the Mail feature to notify you when the
recipients get the message, touch the Notify on
Receipt box to check it.
Once you have finished addressing the message,
touch the Type Message button. A message form
appears with the on-screen keyboard. Use the
keyboard to type the subject and contents of the
message, and touch the Done key when you have
finished the message. A menu will appear that will
let you (1) put the message in the Ready to Send
list, (2) put the message in the Saved Messages list,
(3) quit without saving the message, or (4) return to
the addressing menu. lf you are ready to mail the
message, put it in the Ready to Send list. lf you still
want to work on the message, put it in the Saved
52
User's Guide
Messages list. lf you thought of someone else you
need to send the message to, return to the
addressing menu. Once you've typed a message,
you can put it in the Saved Messages or Ready to
Send list directly from the Mail Address Menu. You
can move back and forth between the Mail Address
Menu and the message form as many times as you
need to before you put the message in the Saved
Messages or Ready to Send list.
Note: You can send Simon meeting notices in the
messages you create. See Appendix B,
"How to send calendar notices in an
electronic message" on page 76 for
instructions.
Sending and Heceiving Mail
Usually, you will want to send the messages in your
Ready to Send list and also receive any messages
waiting for you at the cc:Mail post office. To do this,
touch the Send and Receive button on the main
l,lail screen. lf you only want to send, just touch the
Send button. To receive only, touch the Receive
button. lf you plan to keep your messages on an
optional memory card (to conserve Simon's system
rnemory), make sure you've checked the Card
Memory box.
Once you touch one of these buttons, Simon will
call the cc:Mail post office, and the Mail Transfer in
Progress screen will appear. The messages that
appear on this screen will let you know how many
messages you've sent and received as you send
and receive them. Once you've sent and received
all your messages, the main Mail screen will
reappear. The Received Messages button shows
you the number of messages you now have in your
Received Messages list.
Working with a Message
To work with a message, touch the appropriate
message list (Received, Ready to Send, Saved).
The list of messages will appear, with a button for
each message. Buttons for received messages will
show who sent the message. Buttons for Ready to
Send messages will show the recipient. Messages
you've saved will show who the message was from
if it was originally a received message, or who the
Simon
Features 53
note is to if you created the message. All message
buttons show the message's subject.
Touch the button for the message you want to work
with. The contents of the message will appear, with
a set of action buttons along the bottom of the
screen. You can change the type size or orientation
of the text you are viewing. For long messages,
you may want to use the Find feature from the
Menu to locate specific text in the message. For all
messages, you may choose to erase, change, or fax
the message. ln addition, you can reply to or
fonvard received messages. You can move
received messages to either the Ready to Send or
Saved Messages lists. You can move saved
messages to the Ready to Send list. You can move
messages from the Ready to Send list to the Saved
Messages list. lf the Cal button appears, the
message contains specially coded calendar
appointments. To put these appointments in your
calendar, just touch the Cal button.
How to Erase Unwanted Messages
lf you have received a few unwanted messages,
you can erase them one at a time by touching them,
touching the Erase button, then touching OK on the
confirmation pop-up.
Setting Up Mail
E
rJait
3r
&#
-----'-'l
sarn
I
lF;"w-----_--l
tmr
lFuo!tuh;, l
lu.
I
om
I
lffiwb
F;mdh
il
fs:sogsz
lM* spd-l
lPm
M
I
I
I
m.ln:*'""
lf you have many unwanted messages (for example,
from a news service), then go through your
Received Messages list and move the messages
you want to keep to the Saved Messages list. Next,
touch the Mobile Office icon at the bottom of the
screen, then touch Filer. In Filer, touch the Mail
folder, then the Received button. Select Erase from
the pop-up menu, then OK from the confirmation
pop-up to erase the remaining messages in your
Received Messages list.
54
User's Guide
Simon
Features 55
Working with Messages
E
Note Pad
Use the Note Pad feature to create and work with
rypewritten notes. Once you've written a note, you
can view it, change it, rename it, copy it, fax it to
someone, or erase it.
Mait
Creating a New Note
To create a new note, touch the New Note button
on the bottom of the main Note Pad screen. First,
ifie on-screen keyboard will appear so you can
enter a name for the note. A note name can be any
combination of letters and numbers, up to 8
ffir
EM
characters long.
After you type the note name, touch the Enter
button. The note form appears along with the
on-screen keyboard. The first line of the form is the
Subject line. Later, when this note appears as a
button in the note list, the information in the Subject
line will appear in the button so you can use it as a
##;-------,.l
lsurro*rlm*
Irr:m;,M--.]
l*""p,
I
IPF-----------f
lBroestte
I
reminder.
ffffiH
St.ll Et{
tu6
Eqahb.h
E rd't{ br qdds
kdiCFl.ydcb
,dddFhllqt.
EtucFbd
aEVdFUffiFtur
turhgBltryl.ld
tlldrffi ftEthgwc
,hfu.rCal
Move the cursor below the Subject line to type the
body of the note. When you have finished typing,
touch the Done button. A menu will appear to let
you choose what to do with the note. For example,
you might choose to save the note, or you might
choose to fax the note to someone. (lf you aren't
sure how to use the on-screen keyboard, see the
Keyboards section. You might also want to review
-Practicing with Simon" on page 13 tutorial.)
Working with Notes
After you've saved a note, it appears in the note list
on the main Note Pad screen. To work with a note,
just touch its button. lf you have more note buttons
than will fit on a screen, use the arrow buttons to
scroll until you see the note you want. When you
touch a note button, the contents of the note
appear, with action buttons below the note area.
To view the note, touch the arrow buttons to read
any text that is above or below the current text. The
other action buttons will let you Erase the note,
Change the note, Copy the note (giving the copy a
different name), Rename the note, or Fax the note
to someone (using the Fax feature).
56
User's Guide
Simon
Features 57
Working with a note
E
l-lote
Password
Use the Password feature to protect your personal
nformation. Before you can lock Simon, you must
:reate a password.
Pad
Creating a Password
If you do not have a Simon password, the only
action button available on the Password screen is
:he Create button. When you touch this button, a
short form appears with the on-screen keyboard.
Use the keyboard to type your password.
GmY
{tmii
s"u;: e.sm rmwto
I
I
fiN
{hiltl
lvuiw.o
ftffi
imrsl
soi: umu"
I
I
Note: Passwords may have any combination of
three to seven letters or numbers.
I
+orull
|ircN
sdj: ou{romrkc
I
I
firurut&l
sdj:
]
subl
c!' froy
Classic Car shoy thls
I
Satu&! al &ocker Chtor
Call Dav. and Alisa X. to
s@ ll rhqte interested
ln
EE
Fins
Afler you type the password, touch the Done key.
For protection of your Simon and your personal
data, only you should know your password. Write it
down and keep it in a safe place. lf you forget your
password, you will not be able to unlock and use
your Simon. lf someone else learns your password,
change
it.
Locking Simon
After you have created a password, just touch the
Lock button on the main Password screen to lock
Simon. You will then have the choice of locking
everything, or just the Mobile Office. lf you lock
everything, the Locked screen appears. lf you lock
only the Mobile Office, the main Phone screen
appears. The Locked screen will not appear unless
someone touches the Mobile Office icon at the
bottom of the screen. This is useful if you want to
let someone use your phone, but you do not want
them to be able to view your personal data.
Dialing 911 when Locked
When you lock Simon, you still have one-touch
dialing for 9'l 1 (or the emergency number you
preset) without entering your password. Just touch
the 911 button on the Locked screen.
Unlocking Simon
To unlock Simon, touch the Enter Password button.
The on-screen keyboard will appear. Type your
password, then touch the Done button. lf the
password is correct, Simon will unlock and show the
main Password screen. From this screen, you can
58
User's Guide
Simon
Features 59
go quickly to the Phone or Mobile Office by touching
the appropriate icon at the bottom of the screen.
Changing the Password
To change the password, touch the Change button
on the main Password screen. A short form and the
on-screen keyboard will appear. Use the form to
enter the new and current passwords, then touch
the Done button. lf the current password is correct,
the password will change to the new password.
Removing the Password
lf you decide to remove the password, touch the
Remove button on the main password screen. The
on-screen keyboard will appear. Type your current
password, then touch the Done button. lf the
current password is correct, then your Simon will no
longer have password protection.
Sketch Pad
The Sketch Pad lets you write on the screen with
your stylus or finger. You can save up to 32
sketches, and you can easily fax a sketch.
However, keep in mind that the more sketches you
save, the more Simon system memory you use, and
the less you have available for other features such
as Address Book and Calendar.
selow the drawing area. The tools are a pencil and
an eraser. The action buttons are Erase, Save, and
iax. When you start, the pencil tool has a box
around it, indicating that it is active. When the
pencil tool is active, you can draw in the drawing
area. When the eraser is active, you can use your
inger or stylus to erase lines in the drawing area. lf
you want to erase everything and start over, touch
the Erase button. To fax the sketch to someone,
iouch the Fax button and follow the on-screen
directions. To save your sketch, touch the Save
button. The main Sketch Pad screen will appear,
and you will see the thumbnail version of your
sketch in the list.
Erasing All Sketches
lf you run low on Simon's system memory, you can
erase all sketches by touching Erase All on the
main Sketch Pad screen. Do not do this if there are
any sketches you want to keep. After you touch
Erase All, a pop-up appears that gives you a
chance to cancel this action by touching the
pop-up's Back Arrow.
Working with Sketches
When you touch the Sketch pad feature on the
Mobile Office screen, the main Sketch pad screen
appears. The main Sketch pad screen shows four
thumbnail (small) sketch forms, and has a New
Sketch button below the thumbnail forms.
You can start a new sketch by touching the New
Sketch button. When you save this sketch, it will
appear in the first available thumbnail form. you
can also start a new sketch by touching the
thumbnail form where you want the sketch to go
when you save it. lf you want to work with a
thumbnail form that does not appear on the screen,
touch the down arrow button until the form you want
appears. Each thumbnail form has a number so
you know where you are in the list.
After you start a new sketch, the blank sketch pad
appears, with two tools and three action buttons
60
User's Guide
Simon
Features
61
Using the sketch pad
W
Sketch Pad
System
Jse the System feature to control Simon's timeouts,
::splay, and sounds. lf directed by a Service
3epresentative, you can also use the System
:eature to diagnose problems.
The Suspend Timeout
nT
L_l
,.E L_l
tr"
The Suspend Timeout is the time that Simon will
,.;ait to turn off (suspend) automatically. The factory
setting is five minutes, but you can select check
i:oxes to change the time to 10 or 15 minutes. The
shorter this time is, the longer your battery will last
cetvveen charges. You should not adjust this time
unless you find that you need to turn Simon on
rnore often than you would like.
Adjusting Screen Settings
To adjust screen settings, touch the Screen Settings
button on the main System screen. The Screen
Settings screen appears. On this screen, you can
adjust the screen contrast and the backlight
brightness with sliders. You can also adjust the
backlight timeout so it is off all the time, or turns off
afterI 0 seconds, 30 seconds, 1 minute, 5 minutes,
or t hour of disuse. Keep in mind that the more
you keep the backlight low or off, the longer your
battery will last between charges. The factory
setting is one minute.
Adjusting Sound Settings
To adjust sound settings, touch the Sound Settings
button on the main System screen. The Sound
Settings screen appears. On this screen, you can
adjust Simon's sound volume with a slider. You can
also turn Simon sounds off or on by touching the
appropriate check box. The Simon sounds include:
Key
Click
Pager
62
User's Guide
Beep
When Key Click is on, you will
hear a click each time you
release a button or keY.
This feature produces a beep
when you receive a phone Page.
(See "Phone Page/'on Page 21
for more information about
phone pages.)
Simon
Features 63
Calendar
Error
Alarm
Beep
When this feature is on, you will
hear a beep when a calendar
alarm goes off. (See,,New
Entry" on page 4.1 for more
information about setting
calendar alarms.)
When Error Beep is on, you
hear a beep whenever there is
an error, and a pop_up message
window appears.
You can also change the phone ringer tone from
Standard to Bells or Beeps. When you touch the
check boxes for these tones, you hear what they
sound like.
Running Diagnostics
Usually, you would run the diagnostic programs only
at the request of a service representative. To run
the diagnostic program, touch the Diagnostics
button on the main System screen. The Diagnostics
screen appears. On the Diagnostics screen, you
can choose to test only the cellular telephone or to
test the system (which tests the cellular telephone,
the modem, the display, the speaker, and the
up/down buttons on the side of lhe unit).
Time
The Time feature lets you set the current date and
time on your Simon. You can display the time and
date using either a world or digital clock. To use
the time feature, just touch the Time icon from the
Mobile Office screen and then the Settings button.
Then select Set Date, Set Time, Set Alarm, or
Cancel Alarm. When the alarm sounds, just touch
the screen anywhere to turn it off.
When you set the time, be sure the clock is in the
correct time zone. If you move or travel to a
different time zone, don't forget to change the time
zone, or the clock (and any alarms you,ve set) will
not be correct.
Tip: When you set the date and time, you can touch
and hold the arrow buttons to scroll quickly. you
can touch AM to change to pM, or pM to change to
AM.
64
User's Guide
ro uo
- - :a To Do feature to help you keep track of
:-- ,,,:* items and their due dates.
ldaking a New Entry
--
:-.aie a new To Do entry, touch the New Entry
:-:::- on the main To Do screen. A form will
to let you set the due date for the entry.
-=.?,
.
'n
-: mind that you can touch and hold the arrow
:-:::s to scroll quickly through the choices. When
.:- :ave set the due date, touch the OK button.
'.=ri. th€ To Do form appears with the on-screen
.:-.:.3ard. The first line of the form is the Subject
-=
Later, when this entry appears as a button in
Do list, the information in the Subject line will
:-:€ar in the button so you can use it as a
-=-:Cer. Below the Subject line, you can type
::-=' notes for this entry. When you have finished
:..: ^E. touch the Done button. The main To Do
s:-::n will reappear, with this entry in its correct
:,::: cn in the To Do list (organized by due date).
:-:
-fc
Working with To Do ltems
-:
,,.ork with an item, just touch its
-:
srase the item, touch the Erase button. To
button. lf you
more items than will fit on a screen, use the
=-:,'; buttons to scroll the To Do items until you see
:-: :ie you want. When you touch a To Do item
:-:cn. the contents of the item appear, with action
:-:3ns at the bottom of the screen.
-:.e
::a:ge the item, touch the Change button. lf you
-=.e completed the item, but want to save it, touch
:-:
Put in Done List button. The Done list will
-.ear, with this item in it.
Working with Done ltems
-s,ally, you should erase a To Do item after you
::rplete it.
However, you may want to save some
::':,.s as reminders. To view the Done list, touch
::
Done List button on the main To Do screen.
Done list appears. To work with an item, just
::-ch its button. When you are working with a
-.:le done item, you can use the action buttons to
=
:'ase it, change it, or put it back in the To Do list.
,', -en you are looking at the entire Done list, you
:.=^ choose to erase all the items in the Done list by
--e
Simon
Features 65
touching the Erase All button. This may be handy il
you no longer need the items in the Done list, and
you need to increase your Simon system memory.
Using the To Do list
h'=l
t........1
t3
To
Do
Llsing Keyboards
':L.j
use an on-screen keyboard to enter
r:rnation, for example, to make entries in your
7-*dar
=:
.
.
.
--€
or add names to your Address Book. You
cioose one of the following Simon keyboards:
Standard
PredictaKey
Numeric key pad
system remembers the last keyboard you
The next time you use a keyboard, the last
ifiat you used will appear.
rcs€.
:re
The Standard Keyboard
--e Standard keyboard looks like a typewriter
rg@ard with a few differences. For example, this
.eitoard has the buttons for the Phone and Mobile
3Fce screens, and a help button.
--e special keyboard keys are:
l{de:
Fields are spaces in forms where you enter
information.
Back tab key
lt,o
Touch the
move back through
the fields on the screen.
Forward tab key
*!
Touch the
,o move forward through
the fields on the screen.
Backspace
Touch Bks to move back, one space at
a time. When you touch Bks, you
erase each typed character as you
move back over it.
Enter
Enter
The Enter action depends on whether
you are in a form or typing free text. ln
a form, Enter moves the cursor to the
next field. ln free text, Enter inserts a
new line if the keyboard is in insert
mode. lf the keyboard is in replace
66
User's Guide
Simon
Features 67
mode, Enter moves the cursor to the
beginning of the next line. To change
from insert to replace mode, touch the
lns key.
r+fu
shift
6
Touch this i663 [3J to return to the
Phone screen for placing a phone call.
>
Mobile Office screen
Cursor movement keys
Touch the arrow in the direction that you
want to move the cursor (the line that
shows where typed letters will appear).
Touch this icon lfr to return to the
Mobile Office screen to use features
such as the Address Book and
Calendar.
shift
Touch and release Shift to type
uppercase characters, such as capital
letters and symbols (including the
symbols that appear above the numbers
on a standard keyboard). Then, select
the key that you want. Repeat this
procedure for each uppercase character.
lf you want a series of characters in
uppercase, use the Caplk feature.
CapLk
Caps Lock
Touch Caplk when typing several
uppercase characters. This action
changes the lowercase letters to
uppercase. This key does not change
numbers or symbols. When you are
finished and want to return to lowercase
letters, touch CapLk again.
View
Touch View to be able to see more of
the page or form that you are working
on with navigation keys displayed.
Menu
Keyboard changes
Touch Menu to change keyboards or
type (font) size.
Space
Del
Phone screen
Spacebar
Touch Space to separate words and
create blank spaces.
Delete
Touch Del to erase, one character at a
time, the characters under the cursor.
The cursor is the line that shows where
typed characters will appear.
!
Herp
roucn
@
when you need help for any
feature.
Done
Touch Done when you finish entering
characters from the keyboard.
The PredictaKey Keyboard
-^e PredictaKey keyboard always shows the
six
-,:st-likely letters that you need, depending on the
::aracters you've just typed. lf you don't see the
€:er you need, touch the Other button, and you will
the next most-llkely letters. lf you type a letter
backspace with the Bks key. lf you
=:cidentally,
:ass a letter you want, keep touching the Other
-€
:;:on
until it reappears.
=:: example, to type (touch) the word "this," find,
:-er touch the letter t. The next six letters that
-,c€ar on the keyboard will be the most likely
E:ers to follow t, such as o i r w h e. Whether or
-,:: you are familiar with the Standard keyboard, you
68
User's Guide
Simon
Features 69
might get faster results using the PredictaKey
keyboard.
To change from the alphabetic keyboard to the
numeric keyboard, touch (123). To change from
the numeric keyboard to the alphabetlc keyboard,
touch (ABC).
To type one capital letter, touch Caps. For Caps
lock, touch Caps again. To return to typing
lowercase letters, touch Caps one more time. For
punctuation, touch the punctuation (?,!) button. A
second touch will lock it.
To move to the next field in a form, touch Enter.
You can also move the cursor (the line that shows
where typed letters will appear) directly by touching
the screen with the stylus where you want to type.
lf you touch a field name, the cursor will appear in
the first typing position for that field.
To use cursor control, touch the four arrows icon.
This is also where PredictaKey's lnsert (lns) key is.
Numeric Keypad
You can select the numeric keypad if you only need
to type numbers.
Type Size
You can change the type size by touching the menu
button on the keyboard and making your selection.
70
User's Guide
Quick Reference
screen
The Phone screen
The Mobile Office screen
There are four special icon buttons that are at the
bottom of every screen. The icons are:
lcon
Meaning Descriptlon
Help
Touch this icon to get information
about how to use the current
screen.
&
+
Phone
lf the phone rings, gently extend
the antenna and touch this icon to
answer. Touch this icon any
other time to get to the main
phone screen.
Mobile
Touch this icon to go directly to
the Mobile Office screen.
Office
Back
Touch this icon to back up to the
screen you were just on.
lf you have a problem with your Simon, contact
your Authorized Reseller or place of purchase.
You may also dial 61 1 or 811 on your cellular
phone for customer service in your area.
Quick Beference
:liK'nOn/Otf
(Resume/
Suspend)
Slide
Volume/Adjust
Contrast - Up
Volume/Adjust
Contrast - Down
Touch SensitiVe
Screen
PCMCIA Card
Release Slide
Battery
--PCMCIA Card Slol
r
tl
rI
33,iN*9,[',P,,
On-screen buttons shaped like
rectangles are action buttons.
On-screen buttons shaped like file
folders contain a list of buttons.
On-screen buttons with clipped corners
contain either text or a form.
lnstalling the battery
Line up the top edge of the battery with the bottom
of the arrows, then push the battery in the arrows'
direction to snap it in place.
Printed in U.S.A.
06H1 952
.-
Trademark of the Personal Computer Memory Card
lnternational Association.
Ouick Reference