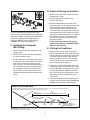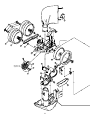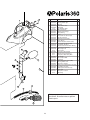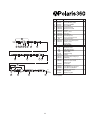
1
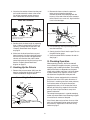
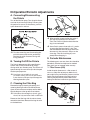
M A N U A L
O W N E R ’ S
I M P O R TA N T I N F O R M AT I O N
Important Information
The Polaris Vac-Sweep® 360 automatic pool cleaner comes ready to connect to a threaded 1-1/2" female
pipe fitting on a dedicated return line. Connections to other return lines are possible, but require additional
fittings (see Section B on page 4). If you have a chlorinator, solar system or other air inducing equipment,
contact our Customer Service Department at 1-800-VAC-SWEEP (USA and Canada only) before you
install the Polaris 360.
The following are important points to remember when installing and operating the Polaris 360.
• Always disconnect the Polaris from the pool wall when cleaning or backwashing the pool filter.
• After cleaning or backwashing, let the filtration system run for at least five minutes before
reconnecting the Polaris.
• New plumbing lines should be flushed out before installing the Polaris.
• The Polaris should not be used to remove plaster dust in new pools.
• Always remove the Polaris before swimmers enter the pool.
• Always handle the Polaris with care. Do not let children or pets play with the Polaris; it is not a toy.
• Except when checking the wheel RPM, do not handle the Polaris while it is operating.
• Never pick up the Polaris by the head float.
• Always remove the Polaris from the pool before chemical shock treatments. As a general rule,
any pool water that is unsafe for swimming is unsafe for the Polaris.
• Carefully cut the feed hose following the instructions on page 5.
By following these simple guidelines, you can help protect against injury and prolong the life of your
Polaris 360.
Before the Polaris is installed, please take a moment to record the serial number. For the location of
the serial number, refer to the Exploded Parts Diagram on page 12. You will be asked for this number
when contacting our Customer Service Department.
Serial # L _________________________
WARNING: USE OF POLARIS 360 IN A VINYL LINER POOL
Certain vinyl liner patterns are particularly susceptible to rapid surface wear or pattern removal caused
by a variety of objects coming into contact with the vinyl surface, including pool brushes, pool toys,
floats, fountains, chlorine dispensers, and automatic pool cleaners. Some vinyl liner patterns can be
seriously scratched or abraded simply by rubbing the surface with a pool brush. Ink from the pattern
can also rub off during the installation process or when it comes into contact with objects in the pool.
Polaris is not responsible for, and the Limited Warranty does not cover, pattern removal, abrasion or
markings on a vinyl liner.
U.S. Patents: 4,618,420; Unique product shape is a registered trademark.
Table of Contents
I. Introduction . . . . . . . . . . . . . . . . . . . . . . . . . . . . . . . . . . . . . . . . . . . . . . . . . . . . . . . . . . . . . . . . . . . 3
A. Thank You for Choosing Polaris . . . . . . . . . . . . . . . . . . . . . . . . . . . . . . . . . . . . . . . . . . . . . . . . . . .3
B. What to Expect from Your Polaris 360 . . . . . . . . . . . . . . . . . . . . . . . . . . . . . . . . . . . . . . . . . . . . . . 3
II. Installation Instructions . . . . . . . . . . . . . . . . . . . . . . . . . . . . . . . . . . . . . . . . . . . . . . . . . . . . . . . . . . 4
A. Polaris 360 Components . . . . . . . . . . . . . . . . . . . . . . . . . . . . . . . . . . . . . . . . . . . . . . . . . . . . . . . 4
B. Pool Connections . . . . . . . . . . . . . . . . . . . . . . . . . . . . . . . . . . . . . . . . . . . . . . . . . . . . . . . . . . . . . 4
C. Installing the Universal Wall Fitting . . . . . . . . . . . . . . . . . . . . . . . . . . . . . . . . . . . . . . . . . . . . . . . . 5
D. Pressure Testing Instructions . . . . . . . . . . . . . . . . . . . . . . . . . . . . . . . . . . . . . . . . . . . . . . . . . . . . 5
E. Cutting the Feed Hose . . . . . . . . . . . . . . . . . . . . . . . . . . . . . . . . . . . . . . . . . . . . . . . . . . . . . . . . . 5
F.
Hooking Up the Polaris . . . . . . . . . . . . . . . . . . . . . . . . . . . . . . . . . . . . . . . . . . . . . . . . . . . . . . . . . 6
G. Checking Operation . . . . . . . . . . . . . . . . . . . . . . . . . . . . . . . . . . . . . . . . . . . . . . . . . . . . . . . . . . . 6
H. Fine Tuning the Polaris . . . . . . . . . . . . . . . . . . . . . . . . . . . . . . . . . . . . . . . . . . . . . . . . . . . . . . . . . 7
1. Thrust Jet Adjustment . . . . . . . . . . . . . . . . . . . . . . . . . . . . . . . . . . . . . . . . . . . . . . . . . . . . . . . 7
2. Sweep Hose Adjustment . . . . . . . . . . . . . . . . . . . . . . . . . . . . . . . . . . . . . . . . . . . . . . . . . . . . . 7
3. Checking Wheel RPM . . . . . . . . . . . . . . . . . . . . . . . . . . . . . . . . . . . . . . . . . . . . . . . . . . . . . . . 7
III. Operation/Periodic Adjustments . . . . . . . . . . . . . . . . . . . . . . . . . . . . . . . . . . . . . . . . . . . . . . . . . . 8
A. Connecting/Disconnecting the Polaris . . . . . . . . . . . . . . . . . . . . . . . . . . . . . . . . . . . . . . . . . . . . . 8
B. Turning On/Off the Polaris . . . . . . . . . . . . . . . . . . . . . . . . . . . . . . . . . . . . . . . . . . . . . . . . . . . . . . 8
C. Cleaning the Filter Bag . . . . . . . . . . . . . . . . . . . . . . . . . . . . . . . . . . . . . . . . . . . . . . . . . . . . . . . . 8
D. Periodic Maintenance . . . . . . . . . . . . . . . . . . . . . . . . . . . . . . . . . . . . . . . . . . . . . . . . . . . . . . . . . 8
1. Filter Screen . . . . . . . . . . . . . . . . . . . . . . . . . . . . . . . . . . . . . . . . . . . . . . . . . . . . . . . . . . . . . . 8
2. Wear Rings . . . . . . . . . . . . . . . . . . . . . . . . . . . . . . . . . . . . . . . . . . . . . . . . . . . . . . . . . . . . . . . 9
3. Tires . . . . . . . . . . . . . . . . . . . . . . . . . . . . . . . . . . . . . . . . . . . . . . . . . . . . . . . . . . . . . . . . . . . . 9
4. Sweep Hose Scrubber . . . . . . . . . . . . . . . . . . . . . . . . . . . . . . . . . . . . . . . . . . . . . . . . . . . . . . 9
E. Backwashing the Pool Filter . . . . . . . . . . . . . . . . . . . . . . . . . . . . . . . . . . . . . . . . . . . . . . . . . . . . . 9
F.
Storage and Winterizing . . . . . . . . . . . . . . . . . . . . . . . . . . . . . . . . . . . . . . . . . . . . . . . . . . . . . . . 9
G. Accessories . . . . . . . . . . . . . . . . . . . . . . . . . . . . . . . . . . . . . . . . . . . . . . . . . . . . . . . . . . . . . . . . . 9
1. Ladder Guard Kit . . . . . . . . . . . . . . . . . . . . . . . . . . . . . . . . . . . . . . . . . . . . . . . . . . . . . . . . . . . 9
2. Sweep Hose Weight . . . . . . . . . . . . . . . . . . . . . . . . . . . . . . . . . . . . . . . . . . . . . . . . . . . . . . . . . 9
3. Filter Bags . . . . . . . . . . . . . . . . . . . . . . . . . . . . . . . . . . . . . . . . . . . . . . . . . . . . . . . . . . . . . . . . 9
4. WaterStars and WaterStars WF . . . . . . . . . . . . . . . . . . . . . . . . . . . . . . . . . . . . . . . . . . . . . . . . 9
5. SpaWand . . . . . . . . . . . . . . . . . . . . . . . . . . . . . . . . . . . . . . . . . . . . . . . . . . . . . . . . . . . . . . . . . 9
IV. Troubleshooting . . . . . . . . . . . . . . . . . . . . . . . . . . . . . . . . . . . . . . . . . . . . . . . . . . . . . . . . . . . . . . . 10
A. Problems and Solutions . . . . . . . . . . . . . . . . . . . . . . . . . . . . . . . . . . . . . . . . . . . . . . . . . . . . . . . 10
B. Troubleshooting Worksheet . . . . . . . . . . . . . . . . . . . . . . . . . . . . . . . . . . . . . . . . . . . . . . . . . . . . 11
Exploded Parts Diagram . . . . . . . . . . . . . . . . . . . . . . . . . . . . . . . . . . . . . . . . . . . . . . . . . . . . . . . . . . . . 12
Warranty . . . . . . . . . . . . . . . . . . . . . . . . . . . . . . . . . . . . . . . . . . . . . . . . . . . . . . . . . . . . . . . . . . . . . . . . . 15
Guide on pages 12-14. There are also part numbers listed in parentheses to help identify the
replacement parts available at your participating
Polaris dealer.
I. Introduction
A. Thank You for Choosing
Polaris
➔
Congratulations on the purchase of your new
automatic pool cleaner, and thank you for
choosing a Polaris Vac-Sweep 360. The Polaris
360 is designed to give you years of dependable
and efficient service. With the Polaris 360, you and
your family will spend more time enjoying your
pool and less time cleaning it.
Look for this symbol throughout the owner’s
manual for helpful hints in the use of your new
Polaris 360.
Once again, thank you for choosing a Polaris.
B. What to Expect from the
Polaris 360
When operating correctly, the Polaris 360 will
travel randomly throughout the pool, vacuuming,
sweeping and scrubbing the bottom. The climbing
ability of the Polaris is dependent on the pool’s
shape and available water flow. It will climb better
in pools without sharp angles or curves in the
transition from the pool floor to the pool wall.
The Polaris 360 has been built with the finest
materials available. It is backed by the Polaris limited warranty that protects against defects in parts
and workmanship (see the warranty on page 15).
Like most mechanical devices, it will require periodic adjustments, routine maintenance, and the
replacement of certain hardworking parts. Be sure
to have the Polaris checked occasionally by your
local Polaris dealer.
The Polaris comes equipped with an automatic
pressure relief valve in the quick disconnect.
If the Polaris is receiving too much water pressure, it will release water at the quick disconnect.
Always insist on genuine Polaris replacement
parts. You can be sure you are buying genuine
Polaris parts if they come in Polaris part bags or
have the Polaris logo
on them. Non-Polaris
parts are not made to our specifications. They
may have an adverse effect on the operation of
your Polaris or may even damage it. If you are
unable to find genuine Polaris parts in your
area, contact us at 1-800-VAC-SWEEP
(USA and Canada only) to receive the name
of the participating Polaris dealer nearest you.
Approximately every 3-1/2 minutes the Polaris
360 will go into back-up mode. At this time the
back-up valve will pull the Polaris away from
potential obstacles.
The sweep hose operates in a gentle sweeping
motion to prevent debris from becoming trapped
in hard-to-reach corners of the pool.
The numbers in parentheses found throughout
the manual refer to the index numbers in the
Exploded Parts Diagram and Parts Identification
3
For pools with return lines (without pipe threads)
that are cut off flush with the pool wall and the
pipe size is:
II. Installation Instructions
A. Polaris 360 Components
• 1" in diameter, obtain the 1" Stub Pipe
The Polaris 360 box contains:
1.
2.
3.
4.
5.
6.
7.
8.
9.
Connection Kit (part #9-100-8002).
All-Purpose Bag
Sweep Hose
Cleaner Head
Complete Feed Hose
Three Floats
Back-up Valve
Pressure Tester
Sweep Hose Scrubber
Quick Disconnect with Universal
Wall Fitting
3
Connection Kit (part #9-100-8002)
and the 1-1/4" Sleeve Kit (part #8-841-00).
• 1-1/2" in diameter, obtain the 1-1/2" Stub
Pipe Connection Kit (part #9-100-8003).
6
5
1
• 1-1/4" in diameter, obtain the 1" Stub Pipe
4
7
2
8
For pools with return lines that have directional
eyeball fittings, which when removed expose a
1-1/2" threaded socket, obtain the Eyeball Fitting
Connection Kit (part #9-100-8001).
9
Remove only the feed hose assembly from
the box until you have determined that you
have sufficient water pressure.
See Sections B - D below.
B. Pool Connections
The Polaris 360 comes equipped to connect to a
1-1/2" female pipe fitting on a dedicated return
line. An adjustable valve and pressure gauge
should be installed to allow you to adjust the
water flow to the Polaris. For further information,
contact our Customer Service Department at
1-800-VAC-SWEEP (USA and Canada only).
For pools with return lines that have directional
eyeball fittings, which when removed expose
something other than a 1-1/2" threaded socket,
obtain the Eyeball Adapter Connection Kit
(part #9-100-8005).
If the pool doesn’t have a dedicated return line,
you may be able to connect the Polaris 360 to
one of the other return lines using a special
adapter kit. The following is a list of the adapter
kits available for purchase at your participating
Polaris dealer. All of the kits connect to plastic
pipe only.
4
D. Pressure Testing Instructions
Wall Fitting
Adapter
Eyeball
1. Before installing the Polaris 360, make sure
the pool filter is clean.
Retainer
Ring Connector
Universal
Head Wall
Fitting
2. Connect the quick disconnect to the
universal wall fitting.
3. While someone holds the free end of the
hose in the pool, turn on the pool pump. Hold
the free end of the hose underwater and
cover the large hole at the end of the pressure tester. Reach down and feel around the
quick disconnect to see if the pressure relief
valve (#41) is releasing water. If it is, continue
with Section E. If it isn’t, the filtration pump
may not have sufficient water pressure to
operate the Polaris.
Before proceeding, contact your participating Polaris dealer or 1-800-VAC-SWEEP
(USA and Canada only).
Quick
Disconnect
If a spa is connected to the pool filtration equipment, you may also need to obtain some expansion
regulators in addition to one of the kits listed above.
Contact our Customer Service Department at
1-800-VAC-SWEEP (USA and Canada only)
to determine what parts are necessary.
C. Installing the Universal
Wall Fitting
E. Cutting the Feed Hose
1. Turn on the filtration pump and flush out the
plumbing line.
1. With the pool pump on, hold the pressure
tester underwater and do not cover the holes.
Pull the hose to the farthest point of the pool.
(The Polaris will not usually climb onto the
top step, so do not count it in the measurement.) If the hose just reaches the farthest
point of the pool, go to Section F.
2. Remove the universal wall fitting (#38) from
the quick disconnect (#42).
3. Screw the universal wall fitting into the return
line by hand. Turn the quick disconnect clockwise into the universal wall fitting and pull
away to secure. Turn the quick disconnect by
hand to tighten the universal wall fitting; do
not overtighten. Once the universal wall fitting is secure, the quick disconnect can be
removed without removing the universal wall
fitting.
2. If the hose is short of the farthest point, add
a 6-foot hose (part #9-100-3102), one swivel
(part #9-100-3002), and two hose nuts (part
#9-100-3109). Add the additional hose section at the first swivel from the pool wall and
repeat Step 1. Do not add more than one
6-foot hose.
3. If the hose extends past the farthest point of
the pool, mark the excess hose. Turn off the
pump and measure the marked amount.
Properly Sized Feed Hose
For proper cleaner performance, the hose must be sized to fit in your pool. To size correctly, follow the steps in
Section E. Once sized, the feed hose should look like the one below.
Entire Feed Hose Reaches Within 6" of Farthest Point of Pool*
Cut excess hose from
first section of hose
Universal Wall
Fitting
7’
Float
4’
Float
Pressure Tester
Float
Measure with pool
pump on and pressure
tester underwater
*Please Note: The illustrations in this section do not necessarily represent the farthest point for every pool. You must determine
where the farthest point is in your pool.
5
2. Remove the hose nut from the pressure
tester and put it onto the feed pipe.
Connect the hose to the feed pipe with the
hose nut. If the end of the hose that connects
to the Polaris has a curve to it, align it with the
curve in the feed pipe.
4. Go to the first section of hose from the pool
wall and disconnect the hose at the swivel.
Cut off the measured amount of excess
hose. Reconnect the hose to the swivel.
Hose Nut Removal
Flow Arrow
To
the
Polaris
O-ring
Feed Hose
Hose Nut
Bag Tie Collar
Swivel
Prong
Square
Hole
1. Unscrew hose nut (reversed threads).
2. Pull hose off swivel.
5. Double check the hose length by repeating
Step 1. When the feed hose has been cut
correctly, it should look like the one in the
“Properly Sized Feed Hose” diagram
on page 5.
3. Pull out the bag and snap the bag tie collar
onto the feed hose.
4. Gently place the Polaris into the pool. Turn on
the pool filtration pump.
6. Make sure the three hose floats are positioned correctly. One float should be against
the back-up valve on the side opposite the
cleaner, one float four feet and the other
seven feet upstream from the back-up valve.
See the “Properly Sized Feed Hose”
diagram on page 5.
5. Verify the wheel RPM is between 28 and 32.
See page 7.
G. Checking Operation
When operating correctly, the Polaris 360 will
travel randomly throughout the pool, vacuuming,
sweeping and scrubbing the bottom. The climbing
ability of the Polaris is dependent on the pool’s
shape and available water flow. It will climb better
in pools without sharp angles or curves in the
transition from the pool floor to the pool wall.
F. Hooking Up the Polaris
1. Remove the pressure tester (#52) from the
hose by unscrewing the hose nut. See the
“Hose Nut Removal” diagram above.
The Polaris comes equipped with an automatic
pressure relief valve in the quick disconnect. If
the Polaris is receiving too much water pressure,
it will release water at the quick disconnect.
Assembling the Polaris
Feed
Hose Hose Feed
Pipe
Nut
Approximately every 3-1/2 minutes the Polaris
360 will go into back-up mode. At this time the
back-up valve will pull the Polaris away from
potential obstacles.
Head Float
The sweep hose operates in a gentle sweeping
motion to prevent debris from becoming trapped
in hard-to-reach corners of the pool.
Thrust
Jet
Sweep
Hose
If the Polaris does not travel into all areas of the
pool, turn off the pool filtration pump and make
the necessary adjustments in the Fine Tuning
section on page 7.
Sweep Hose
Adjustment Screw
6
H. Fine Tuning the Polaris
1. Thrust Jet Adjustment
The thrust jet adjusts the direction of the Polaris.
Its standard position is eleven o’clock. See the
“Assembling the Polaris” diagram above for the
location of the thrust jet.
I
PUS
HE
9
T
IGH
TR
G
PUSHE
LEFT
SU
NIT
12
NI
U
S 11 SES CL
IMB
A
E
IN
R
NC
For proper operation, the Polaris should operate
between 28 and 32 RPM. If it has less than 28
RPM, follow the instructions below.
3
REA
BI N
G
D
EC
S E S C LI M
•
Clean the filter screen (#39). A dirty filter
screen will restrict the water flow to
the Polaris.
•
•
Clean the skimmer, filter, and pump basket.
•
If an adjustable valve has been installed,
adjust the valve to increase water to
the Polaris.
•
If the 360 is connected to a dedicated return
line, adjust the 3-way diverter to allow more
flow to the cleaner until 28-32 RPM are reached.
6
2. Sweep Hose Adjustment
The sweep hose should operate in a gentle
sweeping motion. To decrease the motion of the
sweep hose, turn the sweep hose adjustment
screw clockwise. Make sure the sweep hose
scrubber (#30) is not blocking the water flowing
out the end of the sweep hose. See the “Assembling the Polaris” diagram on page 6.
3. Checking Wheel RPM
If the 360 is connected to one of the pool's
return lines, restrict the flow from the other
returns. Use the Polaris Standard Eyeball
Regulator Disks (part #9-100-8006) available
at your participating Polaris dealer. If your pool
does not have eyeball returns, contact our
Customer Service Department.
To determine whether the Polaris is receiving
proper water pressure, turn off and carefully
remove the Polaris from the pool. Mark the outer
edge of the tire. Place the Polaris back into the
pool and turn on the filtration pump.
➔
Check the hoses, connections, and swivels for
leaks that could cause loss of water pressure.
Hold the sweep hose to avoid getting wet.
•
Hold the Polaris by the blue top, suspended on
its side just below the water level. Count the
revolutions of the marked wheel for exactly one
minute, beginning after it has completed a backup cycle. This gives the wheel Revolutions Per
Minute (RPM).
If the above suggestions do not work,
contact your participating Polaris dealer.
If you have more than 32 RPM, unscrew the
pressure relief valve (#41) until the proper RPM
are reached. If an adjustable valve has been
installed, adjust the valve to reduce the amount
of water going to the Polaris.
If you have any additional questions, please contact the Polaris Customer Service Department
toll-free at 1-800-VAC-SWEEP (USA and Canada only) or (760) 599-9600, Monday through
Friday, 7:30 a.m. to 5:00 p.m., PST.
7
III.Operation/Periodic Adjustments
A. Connecting/Disconnecting
the Polaris
Turn off the filtration pump. Turn the quick disconnect into the universal wall fitting. Pull away from
the pool wall to secure. To disconnect, push the
quick disconnect in and turn.
➔
➔
➔
To make connecting and disconnecting the
quick disconnect even easier, periodically
lubricate the quick disconnect O-ring with
O-ring lubricant.
Some Polaris owners have told us it is easier
to empty the filter bag when it is dry. They
alternate between two filter bags. When one
becomes full, they remove it and put on the
clean bag. They let the full bag dry completely before emptying it.
D. Periodic Maintenance
B. Turning On/Off the Polaris
The following parts are wear items that should be
periodically checked and replaced as needed.
Wear items are not covered under warranty.
The Polaris 360 operates off the pool filtration
system and can be turned on/off by simply
turning on/off your filtration pump. The Polaris will
operate during the same time cycle that the pool
filtration pump operates.
➔
When possible, empty the filter bag when it
gets half full, especially if the dirt load is
sand. The Polaris will perform best when the
bag is not overloaded.
1. Filter Screen (#39)
Inside the quick disconnect is a filter screen. It
acts as a safety filter to keep any debris that is
not caught by the pool filtration system out of the
Polaris. Always disconnect the Polaris prior to
cleaning the pool filter to prevent debris from
flowing into the filter screen during maintenance.
If you have a lot of debris in your pool
(i.e. after a storm), you can run your Polaris
in two shorter cycles per day and empty the
filter bag between cycles.
C. Cleaning the Filter Bag
Quick Disconnect
Remove the bag by releasing the prongs and
removing the bag tie collar from the feed hose.
Open the velcro closure and dump out the debris.
See the diagram at the top of the next column.
➔
Tab
If the velcro closure begins to lose its “grip”,
rinse it, let it dry and clean it with a stiff brush.
Reconnect the filter bag with the velcro closure
toward the feed hose. Reattach the bag tie collar
on the feed hose.
Slot
Filter Screen
8
To clean the filter screen, pull it out of the quick
disconnect, rinse it and press it firmly back
into place.
G. Accessories
Please Note: Running the Polaris without the
filter screen can damage the Polaris and void
the warranty. If the filter screen clogs often, consult your pool professional.
The ladder guard kit will help prevent the Polaris
from getting hung up around the pool ladder or
handrails.
2. Wear Rings (#36)
If the sweep hose tends to break the surface of the
water — squirting nearby windows, pool decking,
or innocent bystanders — a sweep hose weight
can be installed.
1. Ladder Guard Kit (Part #G21)
2. Sweep Hose Weight (Part #B2)
The sweep hose (#35) is fitted with rolling wear
rings to protect the sweep hose. Replace them
before the weights on either side of the wear
rings begin to wear.
➔
3. Filter Bags
To maximize the life of the wear rings, we recommend that you rotate them as they wear.
The Polaris comes with an all-purpose bag for
general use in all pools. You may want to purchase
one of our special bags listed below and rotate
between them as needed.
3. Tires (#6)
The tires provide traction and protect both the
Polaris and the bottom of your pool. Replace the
tires when the edges become rounded.
Disposable All-Purpose Bag
(Part #9-100-1013)
The disposable all-purpose bag is a convenient
and efficient alternative to the all-purpose bag.
Just let the bag fill, then simply throw it away. Sold
in packages of three.
4. Sweep Hose Scrubber (#30)
The sweep hose scrubber helps keep the bottom
and sides of your pool clean. It also helps prevent
the sweep hose from spraying water out of the
pool. The scrubber may need to be replaced
often depending on the surface of your pool.
➔
Sand/Silt Bag (Part #9-100-1015)
The sand/silt bag is made of a fine mesh material
to trap very fine silt and dust. The bag provides a
secondary filtering system, removing debris as
small as 9/1000 of an inch.
To maximize the life of the sweep hose
scrubber, we recommend that you turn it
as it wears.
Leaf Bag (Part #9-100-1012)
E. Backwashing the Pool Filter
The leaf bag is a large bag made of a more
durable material. It is specifically designed to
collect larger, heavier types of debris such as
large quantities of leaves and acorns.
Always disconnect the Polaris from the pool wall
before cleaning or backwashing the pool filter.
After cleaning or backwashing, let the filtration
system run for at least five minutes to flush out
the return lines before reconnecting the Polaris.
4. WaterStars (Part #7-400-00) and
WaterStars WF (Part #11-100-00)
F. Storage and Winterizing
The Polaris WaterStars fountains come equipped
to connect to a universal wall fitting. Once the
Polaris 360 is installed with the universal wall fitting, you can quickly and easily switch from pool
cleaner to Polaris fountain and back again.
Never store the Polaris in direct sunlight. When
storing for the winter, be especially sure to drain
out all the water (freeze damage is not covered
under the warranty). Also, remove the universal
wall fitting from the pool wall. Attach the quick
disconnect, pull away from the pool wall and
unscrew the quick disconnect. In some cases, it
may be necessary to use the universal wall fitting removal tool (part # 10-102-00) available
from your participating Polaris dealer.
5. SpaWand (Part #5-100-00)
This simple, effective hand-cleaning device allows
you to rapidly clean your spa without hoses or
hookups. It’s also great for fish ponds and other
small bodies of water.
9
IV. Troubleshooting
Problem: Polaris doesn’t back up.
Solution:
For best results, follow the troubleshooting solutions in the order in which they are listed. The
numbers in parentheses refer to the Exploded
Parts Diagram on pages 12-14.
A. Problems and Solutions
2. Check the wheel RPM.
See page 7.
Problem: Hangs up on steps or other obstacles longer than 3-1/2 minutes.
Solution:
3. If the bag (#1) is full, empty it.
1. Check the wheel RPM.
See page 7.
4. If the head float (#34) has water in
it, replace it.
2. Verify the back-up valve (#47) is
cycling. Hold the valve out of the
water and watch the jet. It should
come on and go off. It should stay
off longer than it stays on.
5. Make sure the feed hose is floating.
Problem: Polaris only turns in one direction.
Solution:
3. Adjust the thrust jet (#21).
See page 7.
3. Make sure that the swivel on the
feed pipe (#33) turns freely.
Problem: Polaris is sluggish, running with
less power than normal.
4. Make sure the feed hose is floating
Problem: Feed hose becomes tangled.
1. Check the filter screen (#39) in the
quick disconnect (#42) and clean,
if necessary. See page 8.
Solution:
2. Clean the skimmer basket, pump
basket, and pool filter,
if necessary.
1. Remeasure the feed hose to verify
that it is cut to the correct length.
See Section E on page 5.
2. With the Polaris operating, check
that the swivels (#45) in the hose
and at the hose connection to the
Polaris turn freely. If they do not
turn freely, flush out any debris
that may be caught in the swivels
by grasping the hose on either
side of each swivel and pushing in
while twisting your hands back
and forth.
3. Check all of the hoses, connections, and swivels (#45) for leaks
that could cause loss of water
pressure.
4. Check the wheel RPM.
See page 7.
Problem: Polaris flies around the pool.
Solution:
1. Adjust the thrust jet (#21).
See page 7.
2. If the end of the hose that connects to the Polaris has a curve to
it, align it with the curve of the
feed pipe (#33).
4. Remove unnecessary pool hardware or install a Ladder Guard Kit
(part #G21). See Section G
on page 9.
Solution:
1. Verify the back-up valve (#47) is
cycling. Hold the valve out of the
water and watch the jet. It should
come on and go off. It should stay
off longer than it stays on.
3. Make sure the feed hose is floating.
1. Check the wheel RPM.
See page 7.
4. With the Polaris turned off, spin
each of the wheels. All of the
wheels should turn together. If
they do not, contact your participating Polaris dealer.
2. Verify the back-up valve (#47) is
cycling. Hold the valve out of the
water and watch the jet. It should
come on and go off. It should stay
off longer than it stays on.
10
5. If the feed hose continues to
tangle, contact our
Customer Service Department
at 1-800 VAC-SWEEP.
B. Troubleshooting Worksheet
If none of the troubleshooting solutions
worked, please fill in the following information
and either contact your participating Polaris
dealer or our Customer Service Department
at 1-800-VAC-SWEEP (USA and Canada
only) or (760) 599-9600, Monday through
Thursday, 6:00 a.m. - 5:00 p.m., Friday,
6:00 a.m. - 3:00 p.m. PST.
Problem: Sweep hose is sucked into the
vacuum tube.
Solution:
1. Make sure the opening at the end
of the sweep hose (#35) is not
blocked by the sweep hose
scrubber (#30).
2. Adjust the sweep hose (#35) to
a gentle sweeping motion.
See page 7.
In order to provide faster and more convenient
service, have the following information available at the time of your call or when taking the
Polaris in for service.
Problem: Sweep hose sprays too much water.
Solution:
1.
1. Adjust the sweep hose (#35).
See page 7.
Serial #:____________________________
(See page 2 for the location of the serial #.)
2.
2. Replace the sweep hose scrubber
(part #9-100-3105) if it is worn or
missing. See page 9.
Wheel RPM:______________________
(See page 7.)
3.
Is the back-up valve cycling?
(Watch the jet on the back-up valve. It should come on
and go off. It should stay off longer than it stays on.)
■ Yes
It is important to use genuine Polaris replacement parts, because non-Polaris parts will
adversely affect the cleaner’s performance .
Bags are an excellent example; “generic” bags
are not specifically designed to work with the
Polaris and can cause operating problems.
4.
■ No
Is the feed hose the proper length?
(See page 5.)
■ Yes
5.
Are the swivels rotating freely?
■ Yes
6.
■ No
■ No
How often do you clean the filter
screen inside the quick disconnect?
(see page 8)
7.
■ Never
■ Once a Week
■ Twice a Week
■ Once a Month
Are the vacuum jets obstructed?
(While the cleaner is operating, hold it upside down
and look into the vacuum tube. There should be
three distinct, even jets of water.)
■ Yes
8.
■ No
Is the drive train functioning?
(As you spin each wheel independently, all the
wheels should spin.)
■ Yes
11
■ No
1
14
3
4
5
2
13
16
15
Serial Number
6
7
12
8
11
9
10
17
18
20
19
Shown from
opposite side.
21
25
26
15
4
24
22
27
23
28
29
11
12
11
No.
1
2
3
4
5
6
7
8
9
10
11
12
13
14
15
16
17
18
19
20
21
22
23
24
25
26
27
28
29
30
31
32
33
34
35
36
33
11
34
32
Part #
9-100-1014
9-100-1152
9-100-1114
9-100-5107
9-100-1108
C-10
9-100-1008
9-100-1017
9-100-7011
9-100-1005
9-100-5125
9-100-1139
9-100-1010
9-100-3135
9-100-1007
9-100-5115
9-100-5130
9-100-1132
9-100-1103
9-100-1116
C-131
9-100-7008
B-20
B-15
9-100-3005
9-100-7170
9-100-7009
9-100-7014
9-100-1155
9-100-3105
9-100-5132
9-100-7030
9-100-1002
A-20
9-100-1011
B-10
Description
Qty
All-Purpose Bag
1
Housing, Turbine Upper
1
Hub Cap
3
E-clip, Stainless Steel
10
Ball Bearing
8
Tire, MaxTrax™, White
3
Wheel, Double-side
2
Belt Kit, Small and Large
1
Shield, Bearing
3
Frame
1
Screw, 8-32 x 1/2" SS Pan Head
11
Axle Block Assembly
2
Belt Divider, Transfer Pulley
1
Collar, Bag Tie
1
Transfer Pulley/Drive Shaft Assembly
1
Screw, 8-32 x 3/4" SS Pan Head
5
Lock Washer, Axle Block
4
Drive Train Gear Kit with Turbine Bearing
1
Turbine Wheel with Bearing
1
Wheel, Single-side
1
Thrust Jet Kit
1
Sweep Hose Barb Complete
1
Adjustment Screw, Sweep Hose
1
Sweep Hose Attach Clamp, White
1
Base Weight
1
Hose Clamp for WMS
6
Jet Retainer
2
Water Management System (WMS)
1
Housing, Turbine Lower
1
Sweep Hose Scrubber
1
O-ring, In-head Timer/Feed Pipe Assembly 1
Top and Base Assembly
1
Feed Pipe/Timer Blank Assembly
1
Float, Head
1
Sweep Hose Complete
1
Wear Rings
7
36
31
35
To insure proper operation and long life for
the Polaris, be sure to insist on genuine
Polaris parts.
30
13
37
Pool
Wall
44
38 39 40 41 42 43
44
44
46 44
48
To
The
Polaris
50
51
Part #
37
38
39
40
41
42
43
44
45
46
47
48
49
50
51
52
9-100-3008
6-500-00
6-504-00
6-505-00
9-100-3009
9-100-3006
9-100-3109
9-100-3102
9-100-3002
9-100-1206
9-100-1200
9-100-1202
G57
9-100-1204
9-100-3103
*
B2
C11
G21
G58
5820
6-511-00
9-100-1012
9-100-1013
9-100-1015
9-100-1205
9-100-3100
45
47
49
No.
9-100-6000
9-100-8021
9-100-9010
9-100-9060
10-102-00
10-107-00
11-203-00
52
*Not sold separately.
14
Description
UWF Connector Assembly
Universal Wall Fitting (UWF)
Filter Screen, UWF/QD
O-ring, UWF/QD
Pressure Relief Valve
Quick Disconnect, UWF
Hose Nut
Feed Hose, 6 Foot
Swivel, Hose
Float, Feed Hose
In-line Back-up Valve
Case Kit, In-line Back-up Valve
Collar, Back-up Valve
Mechanism, In-line Back-up Valve
Feed Hose, 1 Foot
Pressure Tester
Parts Not Shown
Weight, Sweep Hose
Tire, MaxTrax®, Black
Ladder Guard, 2 Panels
O-ring Kit, Back-up Valve
UniCover, White
UWF Eyeball Fitting
Leaf Bag
Disposable All-Purpose Bag, Pkg. 3
Sand/Silt Bag
Booster Valve Seat, In-line Back-up Valve
Feed Hose Complete w/UWF,
No Back-up Valve
Pressure Stick
Vinyl Eyeball Kit
Polaris 380/360 Factory Tune-up Kit
Polaris 360 Factory Rebuild Kit
UWF Removal Tool, Plastic
Eyeball Regulator
Adjustable Plug, UWF
Qty
1
1
1
1
1
1
12
4
4
3
1
1
1
1
1
1
Limited Warranty
Polaris Vac-Sweep® 360 Automatic Swimming Pool Cleaner
This limited warranty is extended to the original consumer purchaser of this Polaris Vac-Sweep 360
Automatic Swimming Pool Cleaner manufactured by Polaris Pool Systems, Inc., 2620 Commerce Way,
Vista, California 92083-8438, U.S.A.
Polaris warrants the cleaning unit it manufactures, including all parts and components thereof, to be
free of defects in material and workmanship. We do not cover bags, tires, sweep hoses or sweep hose
scrubbers which have been worn out by use. These are normal replacement items. We do not cover
improper installation of the Polaris Vac-Sweep 360. The instruction manual should be read in its entirety
before the installation of the Polaris Vac-Sweep 360. All installation instructions should be carefully
followed. Failure to follow the installation instructions may void this warranty. If you have any questions
regarding your Polaris Vac-Sweep 360, please feel free to call or write us. Be sure to include the serial
number, which can be located on the rear of the frame near the single-wheel side of your unit.
EXAMPLE: L 1 2 3 4 5 6
The Polaris 360 frame is warranted for a period of ten years. The rest of the Polaris 360 parts are
warranted for a period of one year from date of manufacture of the unit as established by the serial
number, or one year from date of purchase with proof of purchase, whichever is later.
This limited warranty does not apply if the failure is caused or contributed to by any of the following:
improper handling, improper usage, improper storage, winter freezing, abuse, improper installation,
removal of the UWF filter screen, unsuitable application of the unit, improper maintenance, lack of
reasonable and necessary maintenance, damage in transit or during installation, or damage from
repairs/alterations made or attempted by anyone other than Polaris or one of its Authorized Service
Centers. Polaris will repair or replace, at its option, a unit or part proved to be defective within the
warranty period and under the conditions of the warranty.
In order to make a claim under this warranty, the consumer must deliver or ship the unit or warranty
parts freight prepaid to the nearest Polaris Authorized Service Center or return it freight prepaid (after
proper authorization) to the plant of manufacture. Authorization to return a unit or part to the plant of
manufacture must be obtained from the Polaris Customer Service Department. Check with your dealer for
the local procedure before exercising this warranty. If further directions or instructions should be required,
contact the Customer Service Department at 1-800-VAC-SWEEP (USA and Canada only) or (760) 599-9600.
Be sure you insure your shipments against loss or damage in transit.
Polaris is not responsible for the cost of removal of the unit or parts, damages during or due to removal,
any other expenses incurred in shipping the unit or parts to or from the factory or its Authorized Service
Centers, or damages during the installation of the repaired or replacement unit. The consumer must bear
these expenses.
This warranty does not cover repair or replacement of a unit or part except at our plant of manufacture
or a Polaris Authorized Service Center. This warranty does not cover pattern removal, abrasion or
markings on a vinyl liner.
THIS LIMITED WARRANTY IS IN LIEU OF ALL OTHER WARRANTIES, EXPRESS OR IMPLIED,
INCLUDING THE IMPLIED WARRANTIES OF MERCHANTABILITY AND FITNESS FOR A PARTICULAR
PURPOSE, AND ALL SUCH OTHER WARRANTIES ARE DISCLAIMED EXCEPT TO THE EXTENT ANY
IMPLIED WARRANTY MAY BE IMPOSED BY STATE CONSUMER LAW. ANY SUCH IMPLIED WARRANTY
IMPOSED BY STATE CONSUMER LAW IS LIMITED IN DURATION TO ONE (1) YEAR FROM THE DATE OF
PURCHASE.
IN NO EVENT SHALL POLARIS BE LIABLE FOR INCIDENTAL OR CONSEQUENTIAL DAMAGES OF
ANY NATURE OR KIND OR FOR DAMAGES TO PERSONS OR PROPERTY, INCLUDING ANY DAMAGES
RESULTING FROM THE USE OF THE POLARIS VAC-SWEEP 360 AUTOMATIC POOL CLEANER WITH A
SUBSTANDARD POOL CIRCULATION SYSTEM.
Some states do not allow limitation on how long an implied warranty lasts, or the exclusion or
limitation of incidental or consequential damages, so the above limitations may not apply to you.
This limited warranty is valid only in the United States of America, Canada and Australia, and it does not
apply to Polaris Vac-Sweep 360 Automatic Swimming Pool Cleaners sold or installed in any other country.
15
©2002 Polaris Pools Systems, Inc. All Rights Reserved. LP-50 9/02