1
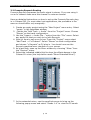
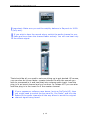
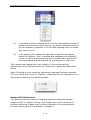
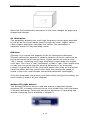
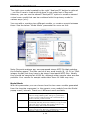
- User’s Manual -
Prosoniq Rayverb • User’s manual • v1.0.1
1
Introduction
Thank you for purchasing a Prosoniq product. We are committed to
delivering the latest in audio processing technology and the most unique
set of signal enhancement and processing tools since 1991. We are happy
to welcome you amongst the thousands of professionals who rely on
Prosoniq products in their daily work for music production and
enhancement. Should you have any questions as to how to use our
products or on any other aspect of our product line please do not hesitate
and contact us today. You will find our contact details at the back of this
manual and on our web site at http://www.prosoniq.com.
1.1 Getting started
Please fill out and send in the registration card that you have received
with your software package. By doing so you are entitled to technical
support and will be notified of updates and other news regarding
PROSONIQ RayVerb. If you have purchased this product online (and do
not have a registration card) make sure you register online with your
product serial number today.
Before proceeding, read the Software Licensing Contract included in this
package. By opening the disk pack or sending back the registration card,
you are declaring yourself to be in agreement with the conditions of the
contract.
1.2 System requirements
In order to be able to use PROSONIQ Rayverb without limitations you
need to make sure you meet the following minimum requirements
regarding your hardware and software setup.
Minimum hardware requirements:
Mac: a PowerMacintosh or compatible system with G4 processor at 450
MHz, 32 MB of free RAM and MacOS version 9.2 or MacOS X 10.2 or
higher, VST or RTAS compatible host software.
PC: Pentium III/800 MHz or compatible or faster, 16 MB of free RAM,
Windows 95/98/NT/2000/XP/ME, VST compatible host software
p. 2
Prosoniq Rayverb • User’s manual • v1.0.1
Software requirements
RTAS Version: ProTools LE (minimum version 5.0 or later) or another
100% RTAS compatible host application.
VST Version: Cubase VST 4.2 or higher (including Cubase SX and
Nuendo). Cubase SX is recommended.
-or- Emagic Logic 5.x for use under MacOS 9 and Windows. Please note
that as of Logic version 6, Emagic has dropped VST support and therefore
PROSONIQ Rayverb cannot be used with Logic 6 under OS X (at the time
of writing).
-or- any other VST or RTAS compatible host software. Here, the
availability of features like automation depends on the implemented type
and version of the plugin interface. If in doubt, you should check with the
manufacturer of the host software. Make sure you always use the most
recent version of your host software.
!
Please note that, at the time of writing of this manual, Emagic Logic
for OS X is not compatible with the VST platform. This means that you
cannot use PROSONIQ Rayverb VST directly with Logic under OS X.
1.3 Installation
The installation procedure of the VST plugin differs slightly from that of
the RTAS version. For detailed installation instruction please read the
separate document „PlugIn Installation Manual“ found on the CD or the
corresponding chapter in the printed manual.
1.4 MacOS X Installation Note
Please note that the standard system path for VST Plug ins in OS X is in
/Library/Audio/Plug-Ins/VST. An additional path for plug ins is available in
~/Library/Audio/Plug-Ins/VST which is in your local user directory. Make
sure you are aware of this distinction – consult your OS X documentation
or the Apple resources if you’re not.
If you install the plug in in the first location, you need administrator
privileges and all users on that machine will be able to access the plug in.
If you install the plug in in the second location, only the current user (you)
will be able to use the plug in.
p. 3
Prosoniq Rayverb • User’s manual • v1.0.1
2
Rayverb Technology
Using a sampled impulse response to re-create an existing acoustic space
through convolution is convenient and easy. But what if you wish to alter
that room - have a sound source move about the scenery or change your
listening position? Like with sampled instruments - once the impulse is
sampled, its sound is written in stone - forever.
Prosoniq now has a new and unique technology to change all that: The
Prosoniq Rayverb is the world's first reverberation created using inverse
raytracing.
2.1 What is “Raytracing”?
Raytracing is a way computers can model objects in a scene to create
photo realistic computer generated images or animated sequences. In
simple terms, this is accomplished by tracing back beams of light from the
viewer of the scene to the objects in that scene to determine the colour of
the pixel that should be rendered. This technique can also take into
account various effects that take place in the physical world, most notably
reflection, refraction, diffraction and dispersion. The interested reader is
referred to a good physics textbook and the internet for more information
about these effects. These effects are particularly important when light
interacts with shiny or reflective surfaces or is travelling from one medium
(like air) into another (like water).
2.2 How can Raytracing be used with sound?
When using the same technique to model the travelling of a sound wave
within a room, several things have to be changed. Sound waves have a
much longer wavelength than light, therefore, different rules apply to their
propagation. Or more precisely, the same rules can be applied, however,
most of the constants governing the operation of the raytracing system
have to be changed.
p. 4
Prosoniq Rayverb • User’s manual • v1.0.1
2.3 Auralization and the present state-of-the art room simulation
Up until now, raytracing for acoustic room simulation has been too
computationally demanding to be done in real time. A conventional
raytracing simulation of an arbitrary shaped room takes hours to process
on an average computer system. Therefore, most programs use a process
called “auralization” to estimate the room response from model data.
Auralization has its primary application in the construction of buildings, to
preview the effects of architecture and the various damping materials
used in the process. In a sense, it uses very much the same
simplifications a real-time 3D computer game uses to render its virtual
worlds, versus a full-fledged raytracing program that is used to create
photo-realistic images – it simplifies the model and leaves aside some of
the physical effects.
In its simplest form, auralization is nothing more than an EQ reproducing
the damping effects of a material blocking the sound waves that emanate
from a sound source. The more advanced auralization techniques model a
room response by applying both a damping EQ curve and calculating the
first few reflections by simplifying the room shape to be rectangular (ie. to
have parallel walls) and by leaving aside effects that are more complicated
to model, such as dispersion.
The simplest form of auralization that can be rendered in real time is
called the mirror-image-technique (sometimes also referred to as the
image-source technique), which computes the reflection paths by
considering virtual sources generated by mirroring the location of the
audio source over each of the sides of the room. This technique is useful
for modelling the first few reflections in a room, but is useful only for
rectangular, non-reverberant spaces, such as for the design of
loudspeaker enclosures. It fails for general, arbitrary room shapes or
reverberant spaces, where many generations of reflections have to be
calculated.
2.4 What is inverse raytracing?
Inverse raytracing algorithms are presently in use mostly in optics (laser
and holography), seismology and astrophysics. They are useful to pinpoint
the epicentre of an earthquake or to estimate the size of dust clouds in
space. Recent inverse raytracing techniques make it possible to view
sunspots on the far side of the sun by tracing back the waves that travel
along the sun’s surface.
Inverse raytracing, as used in the context of audio signals, is a technique
that tries to estimate the position of a sound source and the position and
material of the reflecting walls from the sampled impulse response of a
p. 5
Prosoniq Rayverb • User’s manual • v1.0.1
real room. Of course, there are many ambiguities involved in this process,
and several parameters of the room model that is created out of the
impulse response have to be found by “guessing”, since two channels of
sampled audio do not contain enough information to fully describe a
“virtual acoustic scene”.
Rayverb chooses the type of room for you, either from the available
presets or from your sampled impulse response. To do this efficiently and
to ensure good sonic results, Rayverb uses an artificial neural network
that has been trained with sampled room responses from known room
models to pick a basic room topology and adapt its parameter accordingly,
in order to reproduce the room most faithfully.
2.5 Impossible room models
However, some of your sampled impulse responses might belong to room
models that cannot exist in reality. Many of today’s reverb generation
algorithms have nothing in common with the effects that take place when
a sound wave interacts with a sonic space, so most of the impulse
responses you might own that come from synthetic reverbs may actually
lead to “physically impossible” room models. The same is true with sound
files other than impulse responses, which can also be opened in Rayverb
for analysis.
In this case, Rayverb selects a primary room model that matches your
impulse response most closely, and reproduces the additional reflections
by adding another acoustic space to the scene. This process is repeated
until all of the early reflections are covered. In other words, Rayverb
breaks up an impossible room model into as few simple room shapes as
possible, which are then combined by superposition, weighted to recreate
the original acoustic space. There is a maximum of 47 of such elementary
room models that can be “stacked”, which usually suffices to reproduce
the first 0,5-1 seconds of your room faithfully, until the reflections start to
run “out of sync” and become random. Since the early reflections are the
key elements to the perception of the room’s sonic properties, this suffices
to recreate the sound of the original sonic space.
2.6 How does Rayverb create its room simulation?
Rayverb’s powerful room model consists of two main ingredients to save
processing power when rendering the room simulation: primary room
model and an ambience model. The primary room model can be generic
(ie. created by one of the off-the-shelf-models built into Rayverb) or
analyzed from an impulse response that you provide. Rayverb can
p. 6
Prosoniq Rayverb • User’s manual • v1.0.1
determine the principal shape of the room, its size and wall material
characteristics from the main reflections within an Impulse Response
The secondary (ambience) model is used much in a similar way ambience
light is used in photography: a diffuse background reflection pattern that
randomizes the late reflections in a way that sounds more natural than
the relatively simple room shape can be alone.
2.7 Restrictions
Rayverb does one of the most demanding tasks that can be found on
today’s desktop and workstation computers: real-time rendering of
objects in a scene. Although the output is sound and not coloured pixels,
the operations and complexity of the computations required is quite
comparable. A highly optimized rendering engine allows doing this in real
time, however, this comes with a price: Rayverb introduces a delay of
9417 sample frames into the processing chain. Usually, this is of minor
concern since all professional audio software programs will automatically
compensate for this delay.
2.8 PROSONIQ Rayverb – key features
• Novel inverse raytracing algorithm models real room from a sampled
impulse response
• Seamless change of position of the sound source
• 12-node linear phase equalizer
• Predefined room models for easy setup
• Density adjustment
• Export impulse response lets you re-use room models in other programs
• Analyze your sampled impulse responses
• Change room proportions for interesting effects
• Mix, blend and morph two rooms to create a new model
• Access to all parameters in real time
• Import and analyze impulse responses as audio files
p. 7
Prosoniq Rayverb • User’s manual • v1.0.1
3
Setup
Prosoniq Rayverb can be used either in an fx send path or as a track
insert fx. It processes audio in true stereo so make sure you make your fx
track a stereo track. On hosts that do not allow for plug in latency
compensation, the Prosoniq Rayverb plugin should be used in such a way
that it replaces the original (input) signal. In this case, you should use
Prosoniq Rayverb in a channel insert effect slot in your audio/MIDI
sequencer application. When using it in a send or bus effect slot, you
should make sure that the send or bus mode is set to “pre-fader” and that
the fader of the channel in question is turned all the way down to avoid
hearing the original unprocessed signal. Note that you don’t have to do
anything special on hosts that support plug in delay compensation, such
as Cubase SX.
To use Prosoniq Rayverb, choose an audio channel with an audio recording
or activate the live input of an audio channel. Now select “•Rayverb” (for
VST hosts) or “Rayverb” (for RTAS hosts) from the fx selection popup
menu.
3.1 Prosoniq Rayverb Controls
Prosoniq Rayverb provides several different types of controls. This section
describes how to use them.
3.1.1 Dials
The dials behave similar to the dials in other windows. To set a value, click
on a dial, hold down the mouse button and move the mouse around in a
circle. Making incremental (relative) changes is easy: just click & drag in
the value field.
• The larger the radius, the finer the resolution of the values.
• To reset a dial to its factory default setting, hold down the [Command]
key on your computer keyboard and click on the fader.
p. 8
Prosoniq Rayverb • User’s manual • v1.0.1
3.1.2 Graphic EQ Nodes
Rayverb features a powerful graphic equalizer for the Room Transfer
Function, which you can adjust using “nodes” that are inserted and
removed.
• To create a node, just click in an empty spot (e.g. with no node in the
vicinity) in the equalizer display, at the desired frequency and level.
• To move a node, click & drag it into the desired direction.
• To remove a node, click & drag it at least to the next adjacent node to
the left or right.
• To change the level of a frequency band, move the corresponding node
up or down.
• To change the center frequency of a frequency band, move the
corresponding node to the left or right
Actually, you cannot directly remove the node you are dragging, but only
replace one or more of the other nodes by dragging the node over them
(with exception of the leftmost and rightmost nodes, which cannot be
removed.) You can drag a node beyond the horizontal limits set by its left
and right neighbours; this will remove all the nodes which would become
“superfluous” with the new position of the dragged node. Keep in mind
that “superfluous” nodes are not removed until you release the mouse
button. You can see this if you drag a node beyond other nodes (which
makes those nodes disappear) and then - without releasing the mouse
button - dragging the node back to its original position, which will make
the previously “superfluous” nodes reappear.
To reset the EQ to a standard (flat) setting with 2 (start and end) nodes,
command-click anywhere inside the EQ area.
3.1.3 Popup Menus
There are several popup menus in the the Prosoniq Rayverb window. You
can use them e.g. to select a predefined Room Model.
p. 9
Prosoniq Rayverb • User’s manual • v1.0.1
3.2 Prosoniq Rayverb Routing
Prosoniq Rayverb processes the audio signal in stereo. If you are using it
on an fx channel make sure this channel is a stereo channel.
Here are detailed instructions on how to set up the Prosoniq Rayverb plug
in in Cubase SX2. For most other host applications, the procedure is the
same or should differ only marginally.
1. Create an empty project using the “New Project” menu entry. Select
“empty” in the templates window.
2. Choose the “Add Track -> Audio” from the “Project” menu. Choose
“Stereo” as the track configuration.
3. Use the “Import -> Audio File…” option from the “File” menu. Select
any audio file that you wish to try with Rayverb.
4. Now it’s time to set up an fx bus. From the “Project” menu select
“Add Track -> Fx Channel”. Select “Stereo” as track configuration
and choose “• Rayverb” as FX plug in. You should now see the
Rayverb graphical user interface on your screen.
5. As a last step, open up the Mixer window by choosing “Mixer” from
the “Devices” menu.
6. Select the indicated middle field to show the effects busses in the
Cubase SX mixer (the help ballon reads “Show Extended Mixer”).
7. In the extended mixer, use the small tab arrow to bring up the
following popup menu and select “Sends 1-4” to view the FX sends.
p. 10
Prosoniq Rayverb • User’s manual • v1.0.1
8. From the black channel send menu at the top of the mixer window,
choose “Fx 1 – Rayverb” as the effects bus for your audio track.
9. All that is left to do is to switch on the fx send for that channel and
to turn up the fx amount as shown below:
p. 11
Prosoniq Rayverb • User’s manual • v1.0.1
!
Important: Make sure you set the wet/dry balance in Rayverb to 100%
(fully wet).
!
If you wish to hear the reverb alone, switch the audio channel to prefader and turn down the channel fader entirely. You will now hear only
the effects signal.
That should be all you need to set everything up to get started. Of course,
you can also do it even faster: create a stereo file with the sounds you
wish to processed in it and load that into a stereo audio track. Load the
plug in in an insert channel and you’re done. In Cubase VST you can also
load the plug in in the insert fx of the master channel.
!
If your sequencer software uses buses (such as ProTools/LE), then
you might need to switch the bus send to „Pre-Fader“ and turn the
faders of the audio channels all the way down to avoid the original
channel signal being heard.
p. 12
Prosoniq Rayverb • User’s manual • v1.0.1
4
Parameters
The Prosoniq Rayverb has a number of parameters that affect its sound
and operation. Please find these parameters explained below.
Ambience Size
Sets the size of the ambience room model. The ambience room model is a
generic room model that is used to simulate late reflections that are not
covered by the actual raytracing process. Since realtime calculation
imposes some restrictions on the length of the “rays” and how often they
can bounce off a surface, this model helps creating dense late reflections
that sound natural and integrate smoothly into the room architecture. You
can think of ambience reflections as being the equivalent to “ambient
light” used when rendering a visual scene.
p. 13
Prosoniq Rayverb • User’s manual • v1.0.1
Ambient Refl. Amount
Sets the basic amount of the late reflection intensity. Higher values yield
longer decay times and a more dense reverb effect.
Refl. Persistence
Determines the length of the reverb tail that is produced by the ambience
model. Higher values will yield a longer reverb tail and a longer decay
time for a given room.
Iterations
Sets the number of iterations that are used to render the ambience
reflections. Higher iterations will produce a room with higher reflectivity,
ie. there will be more reflections and the room will generally sound
brighter. This dial should generally be set to about the same setting as
Refl. Persistence. If you set it higher, the room will sound more metallic, if
you set it lower than this value, individual echoes might become audible.
Room Xfer Function
Determines the room’s frequency response. This can be looked at as a
powerful, 12-node freeform equalizer that can be used to adapt the
room’s sonic characteristics to your needs. Please see chapter 3.1.2 for
details on how to operate it.
X/Y Location
This powerful control positions the sound source within the virtual
rendered room. The position is perspective rendered – placing the yellow
ball further in the room will do the same for your audio source. The two
axes depicted in the middle of the display mark the “neutral” (middle)
position of the sound source.
p. 14
Prosoniq Rayverb • User’s manual • v1.0.1
Note: The audio source is a stereo input. The left and right channels are
sent into the virtual room at an angle of approximately 30° (degree) to
the left and right of the viewing direction. You can change that angle with
the “Separation” parameter described below.
Note: Depending on the input IR and the room that is generated from it,
small positional deviations can occur that place the middle position of the
source slightly off-center from the axes. Make sure you listen to the
output via headphones for precise position adjustment.
Technical note: Updates to the rendering parameters are not done in the
same thread in which the audio data are being rendered. This would
impose too high a processor load on the system since both the actual
rendering process and the parameter updates for the virtual room would
compete with each other. Instead, parameter updates are done in parallel
to the actual processing. On slower machines, it may take some time
before changes on the user interface will have an effect on the audio
signal. Since parameter updates generally happen at a slower rate than
the audio is being processed, this is not a concern on faster machines. On
slower machines, this has no negative side effects except that the
automation may not be very effective.
Model Popup Menu
Selects one from the default room models that are available as built-in
models within Rayverb. There are presently two different basic room
models at various sizes available by default.
p. 15
Prosoniq Rayverb • User’s manual • v1.0.1
(1)
is an ideal chamber created from a purely mathematical model. It
offers a neutral sound while having very dense reflections and an
all-flat frequency response. It is the ideal starting point to create
any type of room.
(2)
is an actual room model that has been created by averaging
about 60 different “real” (sampled and subsequently analyzed)
rooms. It offers a natural sound and is a ideal starting point for
any sonic space that should end up sounding like a real room.
The various sizes adjust the room metrics. A more detailed size
adjustment can be achieved with the “Dimension” parameter described
below.
Note: Creating a room model by analyzing a sampled impulse response
(IR) will switch this menu to “Custom”, indicating that an analyzed room is
being used instead of the default models.
Analyze IR (left button)
This powerful function lets you load and analyze a sampled impulse
response (IR) to create a virtual room model from via the process of
inverse raytracing. Please see the above discussion of raytracing and
inverse raytracing that is available in chapter 2.
p. 16
Prosoniq Rayverb • User’s manual • v1.0.1
Note: Rayverb analyzes any uncompressed stereo AIFF file that matches
the following specs: The files can be of any word length (8, 16, 24 or 32bit
integer format) but they have to be stereo interleaved AIFF files. Ideally
they should be sampled at 44100 Hz, although other sample rates are also
possible. Your results for sample rates other than 44.1kHz may vary.
Volume
Adjusts the volume of the primary room model.
Density
This parameter adjusts the density (number of reflections) of the virtual
room. Higher values yield a more dense sounding room, lower values will
result in more isolated reflections.
Material Popup Menu
There are several pre-defined material transfer and reflection
characteristics available for your room model.
p. 17
Prosoniq Rayverb • User’s manual • v1.0.1
“Concrete” is set to be a neutral material with regards to reflection and
transfer characteristics. “Wood” simulates a room with wooden tiles,
“Glass” simulates reflective glass surfaces, “Carpet” models the absorption
properties of curtains and carpets in a room and “Tin” simulates metal
plating.
Separation
Separation defines the amount of channel separation between the two
reverb input channels in ° (degree). This separation is achieved by
injecting the sound from the input channels at different angles into the
room. See the below diagram for more details:
Dimension
Dimension controls the overall size of the room. Higher values will result
in a larger room model, smaller values will reduce its size. You can change
the size of any room from very small (about the size of a speaker cabinet)
to very large (as large as the original room was).
p. 18
Prosoniq Rayverb • User’s manual • v1.0.1
Note that the fundamental resonance of the room changes by applying a
dimensional change.
Air Absorption
This parameter adjusts how much high frequency content gets absorbed
by the air as the sound waves travel through the room. Higher values
yield a higher absorption rate than low values. This parameter is
especially handy for long sounding rooms.
Silkiness
Silkiness is in a sense the opposite of the Air Absorption parameter.
Silkiness defines the amount of random vibration of the air molecules as
the sound waves travel through them. Higher values will yield a more
“silky” sound, containing more high-frequency content than the original
room had. This is not a “real” parameter, in that a “real” room would have
no way how one could alter the physical behaviour of air molecules
(maybe it is possible to fill the room with gases other than air that would
have this effect, but they would most likely also change the speed of
sound in the room, and silkiness leaves that parameter unchanged).
Since this parameter has proven to be both useful and good-sounding, we
have chosen to keep it at your disposal.
Analyze IR (right button)
This powerful function lets you load and analyze a sampled impulse
response (IR) to create a second virtual room model from via the process
of inverse raytracing. Please see the above discussion of raytracing and
inverse raytracing that is available in chapter 2.
p. 19
Prosoniq Rayverb • User’s manual • v1.0.1
The right room model created by the right “Analyze IR” button is optional
– you don’t have to load anything here to get sound out of Rayverb.
However, you can use the second “Analyze IR” option to create a second
virtual room model that can be combined with the primary model in
various ways (s.b.).
You can add or combine two different models, or create a morph between
them. See the below “Model Mode” parameter for more on this.
Note: Rayverb analyzes any uncompressed stereo AIFF file that matches
the following specs: The files can be of any word length (8, 16, 24 or 32bit
integer format) but they have to be stereo interleaved AIFF files. Ideally
they should be sampled at 44100 Hz, although other sample rates are also
possible. Your results for sample rates other than 44.1kHz may vary.
Model Mode
With this parameter you can choose how the two room models generated
from the impulse responses (or the generic room models from the Model
popup menu) interact. There are 4 different modi available:
Mix
Combine
Morph A>B
Both room models are processing the audio signal and the
results are simply added together. This gives good results if
you have a perfect setting and just want to add a little bit of
another room that you have in mind.
This creates a new room out of the two room models by
geometrically matching both rooms until they occupy as much
as the same space as possible. This usually produces a very
wide stereo image and excellent localization.
This changes the shape of the room as you move the sound
source across the room. Room A is modelling the front side
reflections, while room B is modelling the far side.
p. 20
Prosoniq Rayverb • User’s manual • v1.0.1
Morph B>A
reflections, while room B is modelling the far side.
Same as before but inverted
Volume
Sets the volume of the second room model
Amount
Determines the intensity of the influence of the second room model. If set
to 0, the second room model has no effect on sound.
Export IR
This powerful function exports the current setting as sampled impulse
response to a 16bit split stereo AIFF file for use in other programs. All
processing is halted until this function has completed.
p. 21
Prosoniq Rayverb • User’s manual • v1.0.1
Dry/Wet Mix
Determines the overall dry/wet relation of the original signal versus the
effects signal. Should be set to 100 if Rayverb is used as a send effect or
in a pre-fader console setup.
Absorption
Defines the amount of late reflection absorption for the current setting.
Higher values will cause a higher damping of the late reflections of the
ambience model.
Jitter
Jitter determines the amount of random modulation that is added within
the ambience model, to break up repeating reflection patterns in a room
and make it sound “smooth”. Higher values might cause some audible
pitch modulation so make sure you set this value carefully if you are
working with natural instruments like a piano.
Out Volume
Determines the overall output volume of the Rayverb effect.
p. 22
Prosoniq Rayverb • User’s manual • v1.0.1
5
Support
Contact us
As audio professionals, we are always eager to listen to your needs. If
there is something you would like us to know, or any improvement to a
Prosoniq product you would like to see, do not hesitate to e-mail us about
it. To ensure a prompt reply, use the e-mail addresses listed on our web
site at
http://www.prosoniq.com
or send e-mails to
[email protected]
From there you can also subscribe to our user forum to discuss your
experiences with other customers, ask questions and even get in touch
with our software development team. Also, before sending support
request e-mails, please don’t forget to check if there is an answer to your
question on our FAQ page, also available on our web site.
Of course you can also send us postal mail:
Prosoniq Products Software
Customer Support
Blumenstr. 23
76133 Karlsruhe
Germany
p. 23
Prosoniq Rayverb • User’s manual • v1.0.1
PROSONIQ End User License Agreement
PLEASE READ THIS LICENSE CAREFULLY BEFORE USING THE SOFTWARE.
BY USING THE SOFTWARE, YOU ARE AGREEING TO BE BOUND BY THE
TERMS OF THIS LICENSE. IF YOU DO NOT AGREE TO THE TERMS OF THIS
LICENSE, PROMPTLY RETURN THE UNUSED SOFTWARE TO THE PLACE
WHERE YOU OBTAINED IT AND YOUR MONEY WILL BE REFUNDED.
1.
License.
The application, demonstration, system and other software accompanying
this License, whether on disk, in read only memory, or on any other media
(the ‘Software’), the related documentation and fonts are licensed to you
by Prosoniq and its Licensors. You own the disk on which the Software and
fonts are recorded but Prosoniq and/or Prosoniq’ licensors retain title to
the Software, related documentation and fonts. This License allows you to
use the Software and fonts on a single computer. You may use a copy of
the software on a home or portable computer, as long as the extra copy is
never loaded at the same time the software is loaded on the primary
computer on which you use the Software. You may make one copy of the
Software and fonts in machine-readable form for backup purposes. You
must reproduce on such copy the Prosoniq copyright notice and any other
proprietary legends that were on the original copy of the Software and
fonts. You may also transfer all your license rights in the Software and
fonts, the backup copy of the Software and fonts, the related
documentation and a copy of this License to another party, provided the
other party reads and agrees to accept the terms and conditions of this
License.
2.
Restrictions.
The Software contains copyrighted material, trade secrets, and other
proprietary material. In order to protect them, and except as permitted by
applicable legislation, you may not decompile, reverse engineer,
disassemble or otherwise reduce the Software to a human-perceivable
form. You may not modify, rent, lease, loan, distribute or create derivative
works based upon the Software in whole or in part.
3.
Termination.
This License is effective until terminated. You may terminate this License
at any time by destroying the Software, related documentation and fonts
and all copies thereof. This License will terminate immediately without
notice from Prosoniq if you fail to comply with any provision of this
License. Upon termination you must destroy the Software, related
documentation and fonts and all copies thereof.
4.
Limited Warranty on Media.
Prosoniq warrants the compact disc on which the Software and fonts are
recorded to be free from defects in materials and workmanship under
p. 24
Prosoniq Rayverb • User’s manual • v1.0.1
normal use for a period of ninety (90) days from the date of purchase as
evidenced by a copy of the receipt. Prosoniq’s entire liability and your
exclusive remedy will be replacement of the diskettes and/or compact disc
not meeting Prosoniq limited warranty and which is returned to Prosoniq
with a copy of the receipt. Prosoniq will have no responsibility to replace a
disk/disc damaged by accident, abuse or misapplication. ANY IMPLIED
WARRANTIES ON THE COMPACT DISC/DISKETTE(S), INCLUDING THE
IMPLIED WARRANTIES OF MERCHANTABILITY AND FITNESS FOR A
PARTICULAR PURPOSE, ARE LIMITED IN DURATION TO NINETY (90) DAYS
FROM THE DATE OF DELIVERY. THIS WARRANTY GIVES YOU SPECIFIC
LEGAL RIGHTS, AND YOU MAY ALSO HAVE OTHER RIGHTS WHICH VARY
BY JURISDICTION.
5.
Disclaimer of Warranty on Prosoniq Software.
You expressly acknowledge and agree that use of the Software and fonts
is at your sole risk. The Software, related documentation and fonts are
provided ‘AS IS’ and without warranty of any kind and Prosoniq and
Prosoniq’ Licensor(s) (for the purposes of provisions 4 and 5, Prosoniq and
Prosoniq’ Licensor(s) shall be collectively referred to as ‘Prosoniq’)
EXPRESSLY DISCLAIM ALL OTHER WARRANTIES, EXPRESS OR IMPLIED,
INCLUDING, BUT NOT LIMITED TO, THE IMPLIED WARRANTIES OF
MERCHANTABILITY, FITNESS FOR A PARTICULAR PURPOSE AND
NONINFRINGEMENT. PROSONIQ DOES NOT WARRANT THAT THE
FUNCTIONS CONTAINED IN THE SOFTWARE WILL MEET YOUR
REQUIREMENTS, OR THAT THE OPERATION OF THE SOFTWARE WILL BE
UNINTERRUPTED OR ERROR-FREE, OR THAT DEFECTS IN THE SOFTWARE
AND THE FONTS WILL BE CORRECTED. FURTHERMORE, PROSONIQ DOES
NOT WARRANT OR MAKE ANY REPRESENTATIONS REGARDING THE USE
OR THE RESULTS OF THE USE OF THE SOFTWARE AND FONTS OR
RELATED DOCUMENTATION IN TERMS OF THEIR CORRECTNESS,
ACCURACY, RELIABILITY, OR OTHERWISE. NO ORAL OR WRITTEN
INFORMATION OR ADVICE GIVEN BY PROSONIQ OR A PROSONIQ
AUTHORIZED REPRESENTATIVE SHALL CREATE A WARRANTY OR IN ANY
WAY INCREASE THE SCOPE OF THIS WARRANTY. WITHOUT LIMITING THE
FOREGOING, PROSONIQ DISCLAIMS ANY AND ALL EXPRESS OR IMPLIED
WARRANTIES OF ANY KIND, AND YOU EXPRESSLY ASSUME ALL
LIABILITIES AND RISKS, FOR USE OR OPERATION OF THE SOFTWARE,
INCLUDING WITHOUT LIMITATION. SHOULD THE SOFTWARE PROVE
DEFECTIVE, YOU (AND NOT PROSONIQ OR A PROSONIQ AUTHORIZED
REPRESENTATIVE) ASSUME THE ENTIRE COST OF ALL NECESSARY
SERVICING, REPAIR OR CORRECTION. SOME JURISDICTIONS DO NOT
ALLOW THE EXCLUSION OF IMPLIED WARRANTIES, SO THE ABOVE
EXCLUSION MAY NOT APPLY TO YOU.
6.
Limitation of Liability.
UNDER NO CIRCUMSTANCES INCLUDING NEGLIGENCE, SHALL PROSONIQ
BE LIABLE FOR ANY INCIDENTAL, SPECIAL OR CONSEQUENTIAL
DAMAGES THAT RESULT FROM THE USE OR INABILITY TO USE THE
p. 25
Prosoniq Rayverb • User’s manual • v1.0.1
SOFTWARE OR RELATED DOCUMENTATION, EVEN IF PROSONIQ OR A
PROSONIQ AUTHORIZED REPRESENTATIVE HAS BEEN ADVISED OF THE
POSSIBILITY OF SUCH DAMAGES. SOME JURISDICTIONS DO NOT ALLOW
THE LIMITATION OR EXCLUSION OF LIABILITY FOR INCIDENTAL OR
CONSEQUENTIAL DAMAGES SO THE ABOVE LIMITATION OR EXCLUSION
MAY NOT APPLY TO YOU. In no event shall Prosoniq’ total liability to you
for all damages, losses, and causes of action (whether in contract, tort
(including negligence) or otherwise) exceed that portion of the amount
paid by you which is fairly attributable to the Software and fonts.
7.
Controlling Law and Severability.
This License shall be governed by and construed in accordance with the
laws of the Federal Republic of Germany. If for any reason a court of
competent jurisdiction finds any provision of this License, or portion
thereof, to be unenforceable, that provision of the License shall be
enforced to the maximum extent permissible so as to effect the intent of
the parties, and the remainder of this License shall continue in full force
and effect.
8.
Complete Agreement.
This License constitutes the entire agreement between the parties with
respect to the use of the Software, the related documentation and fonts,
and supersedes all prior or contemporaneous understandings or
agreements, written or oral, regarding such subject matter. No
amendment to or modification of this License will be binding unless in
writing and signed by a duly authorized representative of Prosoniq.
Should you have any questions or comments concerning this license,
please do not hesitate to write to: Prosoniq Products Software GmbH,
Attn: Warranty Information, Blumenstr. 23, 76133 Karlsruhe, Germany or
send e-mail to [email protected].
p. 26