1
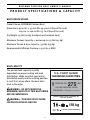
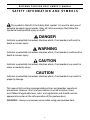
Bozeman
Pontoon Boat
O W N E R ' S
M A N U A L
B OZ E M A N P O N T O O N B O AT O W N E R ’ S M A N U A L
TABLE OF CONTENTS
INTRODUCTION3
PRODUCT SPECIFICATIONS & CAPACITY
4
SAFETY INFORMATION AND SYMBOLS
5
RESPONSIBILITIES OF THE OPERATOR(S)
6
CERTIFICATE OF ORIGIN AND HIN NUMBERS
7
INFLATION & ASSEMBLY
8
PARTS LIST
9
ASSEMBLY AND USE
10-14
TROUBLESHOOTING 15
BLADDER REPAIR
16
CARE AND STORAGE
17
2
B OZ E M A N P O N T O O N B O AT O W N E R ’ S M A N U A L
INTRODUCTION
Congratulations on your purchase of a Classic Accessories pontoon boat.
This manual has been compiled to help you assemble your boat correctly and
operate it safely. It contains specific details of the boat, including its parts and
equipment, and information on its safe operation, proper care, maintenance and
repair. Please read it carefully, and familiarize yourself with your boat before
using it.
If this is your first pontoon boat, or if you are changing to this type of boat for
the first time, for your own comfort and safety, please ensure that you obtain
handling and operating experience before serious use. Doing so will assure
many years of trouble free use and enjoyment.
PLEASE KEEP THESE INSTRUCTIONS IN A SECURE PLACE, AND TRANSFER THEM
TO THE NEW OWNER IF YOU SELL THE CRAFT.
MODIFICATIONS
Because of possible interference with the design and integrity of the boat,
owner modifications to the boat, any of its parts, equipment or systems are not
recommended and will void the warranty.
Questions, problems, missing parts? Before returning to your retailer, call Classic
Accessories customer service at 1-800-854-2315, 8 a.m. - 4 p.m., PST, Monday-Friday.
Email: [email protected]
3
B OZ E M A N P O N T O O N B O AT O W N E R ’ S M A N U A L
P R O D U C T S P EC I F I C AT I O N S & C A PA C I TY
BOAT SPECIFICATIONS
Product Name: BOZEMAN Pontoon Boat
Dimensions: 96 inch L x 55 inch W x 29.5 inch H (top of the seat)
244 cm L x 140 cm W x 75 cm H (top of the seat)
Dry Weight: 45 lbs (20 kg) (backpack and pontoon boat)
Maximum Persons Capacity: 1 person up to 275 lbs (125 kg)
Maximum Person & Gear Capacity: 350 lbs (159 kg)
Recommended Inflation Pressure: 2.5 psi (0.17 BAR)
BOAT CAPACITY
The person/load capacity is partly
dependent on proper seating and load
distribution. Make sure that your load is
distributed evenly and the seating position
is such that, when afloat, the boat rides
level in the water.
WARNING - DO NOT EXCEED THE
MAXIMUM CAPACITY OF THIS BOAT UNDER
ANY CIRCUMSTANCES.
WARNING - THIS BOAT IS NOT RATED
FOR PROPULSION BY A MOTOR.
U.S. COAST GUARD
MAXIMUM CAPACITIES
1
PERSON OR
275
LBS.
350 LBS PERSONS, GEAR
PRESSURE = 2.5 psi (main chambers)
MANUFACTURER: CLASSIC ACCESSORIES, INC.
KENT, WA, USA 98032
158 kg
0.17 bar (main chambers)
4
B OZ E M A N P O N T O O N B O AT O W N E R ’ S M A N U A L
SA F E TY I N F O R M AT I O N A N D S Y M B O L S
The symbol to the left is the Safety Alert symbol. It is used to alert you of
potential personal injury hazards. Obey all safety messages that follow this
symbol to avoid possible injury or death.
DANGER
Indicates a potentially hazardous situation which, if not avoided, will result in
death or serious injury.
WARNING
Indicates a potentially hazardous situation which, if not avoided, could result in
death or serious injury.
CAUTION
Indicates a potentially hazardous situation which, if not avoided, may result in
minor or moderate injury.
CAUTION
Indicates a potentially hazardous situation which, if not avoided, may result in
property damage.
This manual lists certain recommended practices and provides some basic
precautions. However, this list of precautions is not all-inclusive. Users
must follow all applicable laws, rules, and regulations and should exercise
appropriate caution in the safe operation of this pontoon boat.
REMEMBER - always use common sense when using your pontoon boat.
5
B OZ E M A N P O N T O O N B O AT O W N E R ’ S M A N U A L
RESPONSIBILITIES OF THE OPERATOR
IMPORTANT SAFETY AND CARE INFORMATION
SAFETY
• Follow the inflation sequence listed in this
instruction manual.
• Recommended working pressure is 2.5 psi (0.17
bar). DO NOT EXCEED 2.5 PSI.
• Check for leaks before using.
• Remember that air pressure changes with
temperature and elevation so always check
your air pressure before use.
• Partially deflate if leaving boat in direct sunlight
or within a vehicle in sunlight.
• Check all frame pins,screws and wing nuts before
each use.
• Read this owner’s manual carefully before using
your pontoon boat.
• This product is not to be used by children under
16 years of age or by any child
without adult supervision. This pontoon boat is
not a toy. Check the laws in your state.
• Not for use by children or as pool toy.
• This is not a life saving device.
• You MUST always wear an approved Coast Guard
personal flotation device (PFD).
• All safety equipment & PFDs must properly fit the
user, be in good condition and suitable
for your body weight.
• Know and follow all local water safety rules and
boating regulations.
• Do not exceed 350 lbs (159 kg) total cargo weight.
(The weight of you and all of your gear
should not exceed 350 lbs (159 kg).
• Inspect your pontoon boat for wear or damage
before and after each use.
• Class 1 river rating: not for use in rough water,
white water, rapids or open sea.
• Never float alone.
• Never use this boat in bad weather.
• Keep sharp objects (knives, fish hooks, etc.) away
from the pontoons.
• Do not use under the influence of drugs or
alcohol.
• Do not tow this pontoon boat.
• Use only in water free from debris and
obstructions.
• Do not use in high wind, rapid currents, open
water or dangerous tides.
• Seek shelter from water if there is threat of
lightning.
• Do not stand on this product while in use.
• Never jump into or dive from this boat.
• Inflate with cold air only.
• Do not over inflate or use CO2 or a high pressure
air compressor to inflate.
6.43 inch
CARE
• Clean with warm water and a mild detergent.
• To avoid mildew be sure your boat is dry before
storing it.
• Deflate pontoons slightly between uses to extend
the life of your boat.
WARNING
DO NOT stand on
your boat while
on the water
WARNING
• Not a life saving device
• Not a toy
• Not to be used by children
under age 16
• Do not overload
• Always wear an approved
personal flotation device
(life preserver)
• Check for leaks before
using
• Use only in water
away from debris
and obstructions
• Do not over inflate
6
• Never dive into or from
this boat
• Never leave boat in water
when not in use
• Do not use in high wind,
rapid currents, open water
or dangerous tides
• Know and follow local
water safety rules and
boating regulations
• Follow the inflation
sequence listed in the
instruction manual
• Partially deflate if leaving in
the sun
AVERTISSEMENT
• Ceci n’est pas un appareil
de sauvetage
• Ne jamais plonger sur ni
depuis ce bateau
B OZ E M A N P O N T O O N B O AT O W N E R ’ S M A N U A L
C E R T I F I C AT E O F O R I G I N A N D H I N N U M B E R S
CERTIFICATE OF ORIGIN
A separate Certificate of Origin form has been included with this pontoon boat. If your state requires
registration of your pontoon boat, you will need to include the HIN number on the form. Check your state's
boating regulations to see if your pontoon boat requires registration.
LOCATING THE HIN (HULL IDENTIFICATION NUMBER)
The HIN Number or "Hull Identification Number" is required for every pontoon boat with a unique number
assigned to each boat. The assigned number appears on three locations of the pontoon boat (one on each
pontoon skin and one located on the frame).
The HIN is located on both pontoon boat skins. They are located to the front, towards the inside of the boat.
LBS.
159 kg
275
0.17 bar (main chambers)
PERSON OR
THIS BOAT IS NOT RATED FOR
PROPULSION BY A MOTOR
PRESSURE = 2.5 psi (main chambers)
350 LBS PERSONS, GEAR
MAXIMUM CAPACITIES
1
WARNING
AVERTISSEMENT
AT T E N T I O N
DO NOT stand on
your boat while
on the water
INFORMATION SUR LE GONFLAGE
INFLATION INFORMATION
CAUTION
Left Pontoon Shown
NE PAS se tenir
debout sur le bateau
lorsqu’il est sur l’eau
HIN is located on
the bottom PVC
panel, aligned with
the warning label,
towards the inside
of the boat
HIN is located on
a plate on the rear
frame.
XXQ00001L708
Example of HIN number
7
B OZ E M A N P O N T O O N B O AT O W N E R ’ S M A N U A L
I N F L AT I O N & A S S E M B LY
PROPER INFLATION
During final inflation, inflate until most of the wrinkles in the fabric are gone and it feels firm to the touch,
but DO NOT exceed 2.5 psi (0.17 bar) in the main air chambers.
CAUTION - DO NOT OVER INFLATE YOUR PONTOON BOAT
Water temperature and weather affect the air pressure in the boat. In cold weather your pontoon boat will
lose some pressure because the air will contract. If this occurs, you may want to add more air.
In hot weather, the air will expand. You must let out some air to prevent the pontoons from failing from over
pressure. Avoid exposing your pontoon boat to extreme temperatures (hot or cold).
CAUTION
On warm sunny days, keep the pontoon boat either in water or in shade (if kept inflated on land). This will
decrease the risk of overexpansion of the pontoon chambers posed by rising temperatures, which can result
in seam tears, delamination and pinholes.
Avoid asphalt, sand, pebbles or concrete in direct sunlight as they radiate high ground heat.
Also understand that changes in altitude will cause the air in the bladders to expand or contract. If traveling
to higher elevation with the pontoon boat inflated, frequently check the pressure in the pontoons to avoid
over pressure. If traveling to lower elevation you may have to add more air to maintain proper pressure in the
pontoons.
WARNING - ALWAYS CHECK THE AIR PRESSURE IN THE PONTOONS BEFORE
AND DURING EACH USE.
ASSEMBLY
It is important to follow these instructions to successfully and safely assemble
your Classic Accessories Pontoon Boat.
Please pay particular attention to the bold faced instructions and any
symbol next to it.
information which has this
8
B OZ E M A N P O N T O O N B O AT PA RT S L I S T
Hard Parts
Before you begin please unpack the carton and
check that you have all your parts.
IMPORTANT: All small parts are located inside
the seat back pocket and marked by a tag for
easy identification.
2 Pontoon Side
Frames
Small Parts (Small parts bag located in seat back pocket)
1 Seat Frame
2 Pontoon Bladder Patches
(Two self-adhesive patches)
2 Foot Pegs
1 Inflation Adapter
with Tube
1 Rear Platform
Frame
1 Inflation Valve Wrench
Soft Parts
2Oarlocks
2 Oarlock Cotter Pins
1Backpack
8 Clevis Frame Pins with wire security retainers
2 Pontoon Skins
(left and right)
1 Foot pump
2Bladders (installed)
Oar Parts
1 Apron/Cargo Deck
2 Three-piece Oars
Tools Needed (NOT INCLUDED)
1Seat
&
10mm or 11mm
Box Wrench
1 Seat Platform
Crescent
Wrench
9
B OZ E M A N P O N T O O N B O AT O W N E R ’ S M A N U A L
A S S E M B LY A N D U S E
IES
OR
SS INA
)
CE CH
AC IN # CODE
SIC DE RT N
AS MA PA TIO
CL
UC
OD
(PR
FR
T
ON
R
1. Confirm that all the parts are present.
(See the parts list on page 9).
2. Identify the right and left pontoons.
You can identify the right and left pontoons by the “R” (right) and “L” (left) labels
sewn on the inside of the main pontoon pocket on top of each.
3. Inflate the pontoon bladders.
Inflation
Inflation Valve
C
A
B
The valve is located on the top of the
adapter
Press and
pontoons in front of the main pocket
Insert
turn on
into
center
[A].
valve and
button
twist to
The valve has a center button that
inflate
opens and closes by simply pushing
down [B].
THE VALVE IS OPEN WHEN THE CENTER D
BUTTON IS DOWN, AND CLOSED
WHEN IT IS UP. Before inflating,
make sure the valve is in the UP
(closed) position.
Unscrew the valve cap, make sure the
valve is closed. If the valve is open,
unlock it by pushing down on the
button and turning a quarter turn. Insert the inflation adapter into the valve and twist to secure [C].
Inflate using a foot pump or hand pump with a cone-type nozzle fitting [D].
Inflate the pontoon to about 3/4 full.
Do not inflate beyond 3/4 full because it
will make the next step very difficult—attaching the pontoons to the frame.
Repeat this step with the other pontoon. You will fully inflate the pontoons in step 8.
4. Attach the seat frame to the pontoon side frames.
Locate the seat base frame and pontoon side frames.
The front of the pontoon side frames are the ends
labeled “L” (left) and “R” (right).
First, remove the four tube end caps in the side posts
of the pontoon side frames. Make sure the seat
frame strap is facing to the rear. Then insert the seat
platform frame rails into the pontoon side frame posts.
Insert four clevis frame pins from the top down into
the holes where the four seat platform rails slide onto
the pontoon side frame posts. Each wire security
retainer must go over the seat frame rail and then over
the clevis pin as shown.
You MUST lock the security retainers on all four
clevis pins to insure that the frame stays together.
10
Front
Left
Right
pontoon
pontoon
side
side
frame
frame
Rear
Seat
Frame
Seat frame strap to rear
B OZ E M A N P O N T O O N B O AT O W N E R ’ S M A N U A L
5. Install the stripping apron/cargo deck to the pontoon frame.
Locate the stripping apron/cargo deck and the rear platform
frame.
Insert the rear platform frame through the four loops found
around the fabric section of the apron/cargo deck.
Insert the ends of the rear platform frame into the rear tubes of
the pontoon side frames. Insert two clevis frame pins from the
top down into the holes where the platform frame slides into the
pontoon frames.
You MUST lock the security retainers on all four clevis pins
to insure that the frame stays together.
Continue by locating the five reinforced openings in the apron/
cargo deck. The four openings with round holes fit over the four
seat upright posts. The single opening with the square hole in
the middle is used to feed the strap attached to the seat frame
through the apron/cargo deck.
Note: There are two straps on the front of the apron/cargo deck that are used later in step 9.
6. Attach the seat platform to the seat frame.
Locate the seat platform.
You must SIMULTANEOUSLY insert all four posts of the
seat base into the seat frame posts.
A small quantity of lubricant applied to the inside of the
seat frame receptacle posts with a paper towel will
greatly ease this step.
Place the seat frame on the ground with the open ends
of the four small posts facing up. Now place (do not yet
insert) the four small posts of the seat platform over the
seat frame posts as shown.
With the seat platform posts leaning in, slightly press in
all four of the seat frame receptacle posts, then put your full weight evenly across both seat platform
rails and press them all the way down.
7. Attach the pontoons to the pontoon side frames.
Each pontoon attaches to the side frame with four
webbing attachment straps.
Locate the left and right pontoon side frames. On the
front of each rail (where the front of the boat will be)
there is a “L” (left) or “R” (right) label indicating left
or right. Place the left pontoon side frame on top of
the left pontoon (remember—the left/right label is in
the pocket) and the right pontoon frame on the right
pontoon.
11
Rear
Front
Apron/cargo deck not
shown in photo for clarity
B OZ E M A N P O N T O O N B O AT O W N E R ’ S M A N U A L
Now attach the four webbing straps on the pontoon to the pontoon
side frame. Thread the straps as follows:
1. Around the inside metal tube of the pontoon side frame...
2.Back to the buckle...
3.Through the buckle threading path...
4.Fold the remaining webbing back around the inside
metal frame tube and trap it between the pontoon
and webbing.
Repeat for the remaining straps then attach the other pontoon
to its frame in the same manner.
8. Inflate the pontoons completely.
Finish inflating the pontoons as outlined in Step 4.
Inflate to approximately 2.5 psi (0.17 BAR).
Inflate until firm but not hard. DO NOT over inflate.
9. Finish securing the apron/cargo deck.
Find the web loops sewn in at the front outside edges
of the pontoons.
Thread the rip-and-grip strips at the front of the apron/
cargo deck from the bottom and tighten, securing the
rip-and-grip on itself. [Fig.1]
Find the rip-and-grip strips on the sides of the apron/
cargo deck and on the inboard sides of the pontoons
near the center pocket. [Fig.2] Press both sides firmly
together.
10. Attach the seat.
Place the seat on the seat platform connecting the
rip-and-grip strips on the bottom of the seat and the
top of the seat platform. (Don't worry about the seat
position—we'll deal with that later).
Next, find the buckle located at the bottom on the rear
of the seat and the strap that you threaded through
the apron/cargo deck in step 5. Join the two halves of
the of the buckle and tighten the strap.
12
4
Pontoon side
frame rail
3
1
Apron/cargo
deck
2
1
Pontoon
side frame
2
strap
threading
diagram
B OZ E M A N P O N T O O N B O AT O W N E R ’ S M A N U A L
11. Insert the foot pegs.
Locate the front of the
pontoon frames, (the end
closest to the oar lock).
Insert the foot pegs into the
pontoon frame and attach
with clevis pins.
You MUST lock the
security retainers on all four
clevis pins to insure that the
frame stays together.
12. Insert the oar locks and assemble the oars.
Your oars come in three sections. To assemble, slide the sections
together, matching up the spring loaded pins with the holes.
To attach the oars to the oarlocks you will need a 10mm or 11mm box
wrench and/or a crescent wrench. Loosen the retaining nut holding the
retaining plates to the protruding stud with a box wrench, using another
wrench to hold the bolt head if necessary. Then loosen the wing nut at
the top of the retaining plates. Slide the oar shaft between the retaining
plates and retighten the retaining nut and the wing nut until snug.
Insert the oarlock into the oarlock bracket on the frame. Insert the cotter
pins into the holes found on the protruding stud of the oarlock. At this
point, fully tighten the retaining nut and wing nut.
Repeat with the other oar and oarlock.
13. The bladder repair kit.
Included with your boat are self-adhesive tube patches to repair any tears or holes in the pontoon
bladders. We recommend storing these in one of the pockets to keep it available for repairs.
14. Do the fitting and adjustments.
Sit in the boat on dry land and adjust the foot pegs and oar lock placement to your leg length and
preference. You can adjust the balance point by moving the seat forward or backward on the rip-andgrip strips.
Float your pontoon boat in shallow water. Push off, get seated comfortably, place your feet on the
foot pegs and check to see if you are level in the water. (This is easier with a another person on shore
letting you know if you are level or not).
WARNING - The goal is to find your balance point. When you are floating in the
boat it should be level in the water.
WARNING - If you need to adjust the seat or foot pegs, bring the boat back to
shore and make the needed adjustments.
WARNING - DO NOT STAND UP IN YOUR BOAT WHILE ON THE WATER.
YOU COULD LOOSE YOUR BALANCE AND FALL OVERBOARD.
WARNING - THIS BOAT IS NOT RECOMMENDED FOR USE IN SALTWATER.
Practice going forward and backward a bit to get comfortable. Then catch some fish and enjoy
your boat!
13
B OZ E M A N P O N T O O N B O AT O W N E R ’ S M A N U A L
PA C K I N G YO U R B OZ E M A N P O N T O O N B O AT
INSIDE THE BACKPACK
Bozeman Packing Sequence
Ordre d’emballage des pièces du Bozeman
The Bozeman pontoon boat, oars and foot
pump is designed to pack into the Bozeman
backpack. In order to fit all the pieces inside
the pack, follow these instructions.
Note: A visual packing instruction guide is
sewn into the backpack.
Pompe à pied
Place small parts in
backpack pocket:
Clevis pins, repair
kit, etc.
Placez les petites pièces
dans les poches arrière du
siège: axes à épaulement,
trousse de réparation, etc.
Oars
Rames
Pontons
Pontons
2 Pontons
2 pontons
Under seat apron,
trampoline and
seat
Jupe/tablier de pêche
se fixant sous le
siège, la plateforme
en toile et le siège
4
Seat Frame
Cadre du siège
3
Left & right side
frame, foot pegs
and rear platform
frame
Armatures gauche
et droite, appuipieds et cadre de
plateforme arrière
Backpack
Sac à dos
Place in top pocket
Place in the backpack
exterior side pockets and
secure with straps
1. Lay the empty backpack on the ground.
2. Start by placing the left and right side
frame, foot pegs and rear platform in the
bottom of the backpack. Place the left and
right side frames together and slide into
the pack. Then place the foot pegs and rear
platform ontop of the side frames.
3. Next place the seat frame with the four pegs
facing down.
4. Fold the seat apron, trampoline and seat
and place in backpack.
5. Fold each pontoon into thirds and place on
top.
6. Close up the backpack.
7. Disassemble each oar and place the pieces
into each exterior side pocket and secure
with the compression straps.
8.Place the foot pump into the backpack lid
pocket. Place all the small parts (clevis pins,
repair kit, etc.) in the backback pocket.
Fold each pontoon
into thirds
(folded into thirds)
14
8
Foot Pump
Rangez-la dans la poche supérieure
Placez-les dans les poches
extérieures latérales et fixezles avec des sangles
Pliez chaque ponton en
tiers
(pliés en tiers)
7
6
5
2
1
B OZ E M A N P O N T O O N B O AT O W N E R ’ S M A N U A L
TROUBLESHOOTING
If your boat appears to be losing air, it might not be because of a leak. Changes in air
temperature, elevation and use on cold water (which can cool the air inside the pontoon
bladders) can all have an effect on the air inside the bladders. If none of these factors have
changed, you may need to look for a leak. Follow the steps listed below.
1. Check the inflation valves.
2. Give them a visual inspection, making sure the valve is closing
properly and the valve cap closes securely.
Check valve edge
for leaks
3a.Check if you can hear air escaping. You may also use soapy water
around the valve to see bubbles. A leak will produce bubbles. If you
find that a valve is leaking air around its edge, the valve may be
loose.
Inflation Valve Cage
3b.The inflation valve consists of a two-part
assembly. There is the inflation valve intself
and the inflation valve cage. The inflation
valve cage protects the inflation valve from
damage and is bonded into the pontoon
bladder.
(bonded to pontoon bladder)
4. To tighten a loose valve insert the Inflation
Valve Wrench into the valve and twist
clockwise (note: do not overtighten). It may
be necessary to grasp the inflation valve cage (which is inside the
pontoon bladder) to get enough purchase to twist the valve. Be
careful not to tear or rip the bladder skin.
Inflation Valve
Valve O-ring
Inflation
Valve
Wrench
If the valve is difficult to turn, remove the valve completely and add a
small amount of silicon grease to the valve O-ring and reassemble.
If the valve is not leaking around its edge, you may have a defective
valve.
Please visit our website at: www.classicaccessories.com to order a new
valve.
Turn counter-clockwise to loosen
If the valves are OK, proceed to bladder trouble shooting
Inflation
section. You must remove the bladder from the pontoon skins
Valve Wrench
to check for holes or tears. Completely unscrew the inflation
valve from the inflation valve cage and remove bladder from
the skin. Reinsert valve and proceed to page 16.
Turn
clockwise
to tighten
15
B OZ E M A N P O N T O O N B O AT O W N E R ’ S M A N U A L
BLADDER REPAIR & TROUBLESHOOTING
NOTE: The most common cause of leakage is a loose valve. Please verify using the steps on page 15.
Repairing Tears and Holes in Pontoon Bladders
Check if you can hear air escaping the bladder in any suspected areas. You can apply soapy water
to any suspected areas as well. A leak will produce bubbles. If you find a hole, fix it using the
methods listed below.
1. For best results, it is important to apply patch to a clean, dry surface and that the surface temperature is 50° F (10° C) or warmer.
2. Use an alcohol prep pad to clean the surface to be repaired. If you do not have an alcohol
prep pad, use a 50/50 mixture of isopropyl alcohol and water. After cleaning, allow the
surface to dry completely.
3. Peel back 1/8 inch - 1/4 inch (0.3 cm - 0.6 cm) of paper backing, position and anchor the
exposed patch edge, allowing the patch to extend 1 inch (2.5 cm) beyond all edges of the tear.
4. Slowly peel the paper backing while carefully applying the patch over the tear. Take care to
avoid air bubbles.
5. Rub the patch firmly for proper adhesion and allow to cure for 4 hours before use.
6. Reinflate bladder to confirm repair.
7. Once repair is confirmed, deflate and reinstall the
bladder.
8.Make sure to align the valves in the bladder with
the valve openings in the pontoon skin. Insert the
valve and tighten until snug. Since the pontoon skin
is captive in between the inflation valve cage and
the inflation valve, care must be taken not to tear,
rip or stress either the bladder or the skin by overtightening the valve.
16
Extend patch
one inch (2.5 cm)
beyond tear
B OZ E M A N P O N T O O N B O AT O W N E R ’ S M A N U A L
CARE & STORAGE
TRANSPORTING YOUR PONTOON BOAT
The pontoon boat can be transported partially or fully assembled and or inflated. Due to size
constraints, many customers will keep their frame fully intact and simply inflate and attach their
pontoons once they reach their destination. Various methods such as a pickup truck bed, trailer,
or roof rack can be used to transport your boat. If you are carrying a partially or fully assembled
and or inflated boat, please consult with your vehicle, trailer, or roof rack Manufacturer.
CARE FOR YOUR BOAT
The pontoon boat can be cleaned with soap and water then rinsed.
Use a soft rag for hard to clean areas.
SEASONAL STORAGE OF YOUR BOAT
Remove pontoons from the frame, empty pockets of any sharp objects that may puncture the
skin. Deflate completely and fold for storage. Store pontoons away from sharp objects, heat or
abrasive wear. Dismantle frame and boat parts and store in box.
17
B OZ E M A N P O N T O O N B O AT O W N E R ' S M A N U A L
M A N U E L D ' U T I L I SAT I O N D U B AT E A U P O N T O N B OZ E M A N
IMPORTANT
Your new Classic Accessories pontoon boat has been carefully
inspected before shipment. In case of a problem, do not return
to the store.
Call 1-800-854-2315 between 7:30 AM to 4:00 PM Pacific
Standard Time to help resolve any questions or problems you may have.
IMPORTANT
Votre nouveau bateau ponton de Classic Accessories a été
rigoureusement inspecté avant d’être expédié. En cas de
problème, veuillez ne pas retourner au magasin.
Appelez le 1.800.854.2315 de 7:30 h à 16 h
(heure du Pacifique) en cas de questions ou de problèmes.
Classic Accessories, Inc., Kent, WA, USA 98032
Tel: (253) 395-3900
Fax: (253) 395-3991
www.classicaccessories.com
Email: [email protected]
Classic Accessories, Inc., Kent, WA É.-U. 98032
Tél: (253) 395-3900
Fax: (253) 395-3991
www.classicaccessories.com
Courriel: [email protected]
CLASSIC ACCESSORIES, INC.
KENT, WA USA 98032 © 2 0 1 1
classicaccessories.com
Designed in the U.S.A. • Mis au point aux États-Unis.
32-037-011901-00
11cF51_12393