1
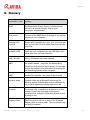
Avira Rescue System User Manual Introduction Trademarks and Copyright Trademarks Ubuntu® and Canonical are registered trademarks of Canonical™ Ltd. in the United Kingdom and other countries. All other brand and product names are trademarks or registered trademarks of their respective owners. Protected trademarks are not marked as such in this manual. This does not mean, however, that they may be used freely. Copyright information Code provided by third party providers was used for Avira Rescue System. We thank the copyright owners for making the code available to us. For detailed information on copyright, please refer to "Third Party Licenses" in the Program Help of Avira Rescue System. Avira Rescue System - User Manual (Status: 25 Jun. 2013) 2 Introduction Table of Contents 1. 2. 3. Introduction ................................................................................... 5 1.1 System requirements ............................................................................................................ 5 1.2 Icons and emphases ............................................................................................................. 5 1.3 Shortcuts ................................................................................................................................ 6 1.4 Licensing ................................................................................................................................ 7 1.5 Product description................................................................................................................ 7 Download and start ......................................................................... 9 2.1 Downloading the Avira Rescue System .............................................................................. 9 2.2 Product version details .......................................................................................................... 9 2.3 Creating a bootable CD ...................................................................................................... 10 2.4 The BIOS setup ................................................................................................................... 10 2.5 Changing the BIOS ............................................................................................................. 11 Avira Rescue System Desktop ....................................................... 12 3.1 The Avira Rescue System desktop .................................................................................... 12 3.1.1 The icons of the Dock ............................................................................................................................12 3.2 Adding icons to the Dock .................................................................................................... 13 3.3 Removing icons from the Dock .......................................................................................... 13 3.4 The Wizard ........................................................................................................................... 13 3.4.1 The Welcome screen .............................................................................................................................13 Avira Rescue System - User Manual (Status: 25 Jun. 2013) 3 Introduction 3.5 Connecting to the Internet .................................................................................................. 14 3.6 Checking your Internet settings.......................................................................................... 15 3.7 Restoring renamed files ...................................................................................................... 15 3.8 Hibernated systems............................................................................................................. 17 3.9 Exiting the hibernation mode .............................................................................................. 17 3.10 Selecting partitions .............................................................................................................. 18 3.11 Scanning the system ........................................................................................................... 19 3.12 Scanning without the wizard ............................................................................................... 20 3.13 Rebooting the system ......................................................................................................... 20 3.14 Shutting down your system ................................................................................................ 21 3.15 Checking and saving the scan report ................................................................................ 22 3.16 Entries of the scan and update report ............................................................................... 22 3.16.1 Scan Report ..............................................................................................................................................22 3.16.2 Update Report ..........................................................................................................................................22 3.16.3 Details .........................................................................................................................................................23 4. Editing the Windows registry ......................................................... 24 5. TeamViewer - First-hand Avira support assistance ............................ 25 6. Update ........................................................................................ 26 6.1 7. Support ....................................................................................... 27 7.1 8. Updating the Avira Rescue System ................................................................................... 26 Contact and Support ........................................................................................................... 27 7.1.1 Support service ........................................................................................................................................27 7.1.2 Community Forum ..................................................................................................................................27 7.1.3 FAQs ...........................................................................................................................................................27 7.1.4 Contact .......................................................................................................................................................27 Glossary...................................................................................... 28 Avira Rescue System - User Manual (Status: 25 Jun. 2013) 4 Introduction 1. Introduction 1.1 System requirements 1 GB RAM 700 MHz CPU CD/DVD drive VGA, capable of 800 x 600 pixel screen resolution (recommended) Existing Internet connection (recommended) The Avira Rescue System scans and repairs Windows XP, Vista, Windows 7 and Windows 8 desktop systems Note The Windows 8 function "Secure Boot/UEFI" is supported by the Avira Rescue System. If your screen stays nevertheless black for a long time during the start of the Avira Rescue System, you have to disable "Secure Boot" in your BIOS/UEFI configuration. If this issue persists or you require additional assistance, please contact our Support. Note Currently the Avira Rescue System can mount dynamic disks as simple volumes, volume sets, stripe sets, spanned volumes, striped volumes and RAID volumes (Redundant Arrays of Inexpensive Disks) , as well as virtual hard disks (VHD). But those are mounted with incorrect drive letters. The Avira Rescue System does not support a multi-boot scenario at this stage. 1.2 Icons and emphases The following icons are used in the documentation: Avira Rescue System - User Manual (Status: 25 Jun. 2013) 5 Introduction Icon / designation Explanation Placed before a condition which must be fulfilled prior to execution of an action. Placed before an action step that you perform. Placed before an event that follows the previous action. Warning Note Placed before a warning when critical data loss might occur. Placed before a link to particularly important information or a tip which makes your Avira product easier to use. The following emphases are used in the documentation: Emphasis Explanation Italics File name or path data. Displayed software interface elements (e.g. window section or error message). Bold Clickable software interface elements (e.g. menu item, navigation area, option box or button). 1.3 Shortcuts All available shortcuts of the graphical user interface of the application are marked as underline. The available shortcuts are valid for the currently opened view of the Avira Rescue System. Shortcut Action [Alt] + W Start Wizard [Al]t + C Cancel the scanning process or Close the help file Avira Rescue System - User Manual (Status: 25 Jun. 2013) 6 Introduction [Alt] + N Next, to start a scan [Alt] + P Pause the scanning process [Alt] + R Resume the paused scan [Alt] + C Contact Avira Support [Alt] + T Start TeamViewer [Al]t + R Start Avira Registry Editor [Alt] + A Go to Avira Website [Ctrl] + Tab Switch between the side bar entries of the application 1.4 Licensing The Avira Rescue System checks if the inbuilt license is valid. Valid means, the system checks if the inbuilt license is broken or manipulated or, if there are newer version of the virus definition file and the scan engine. If there is no valid license, you receive an appropriate message, including a download link to the Avira Rescue System download page. You may use your outdated version of the Avira Rescue System, but we recommend to download the latest version from the Avira website to achieve the best possible scan and repair results. 1.5 Product description The Avira Rescue System offers you a downloadable ISO file to create a bootable CD. After you have created a bootable CD, you can boot your computer with the CD and start the Avira Rescue System. You can also download the Rescue System as an executable .exe file that contains already a burner. The Avira Rescue System can help you to restore and repair your system after a serious crash or an infection. The Avira Rescue System offers several features to restore your system, e.g. virus and malware removal and registry modification. Furthermore, it offers tools to save your data to a hard disk or USB drive. Note To cause your computer to start from the CD drive and not from its hard disk, you may have to change the boot priority of your BIOS. Avira Rescue System - User Manual (Status: 25 Jun. 2013) 7 Introduction After downloading the ISO file of the Avira Rescue System from our website, you have to burn the file onto a CD that should be provided in a bootable form while being copied. Once the Avira Rescue System has booted, the Ubuntu® based live system opens the End User License Agreement that has to be accepted to open the Avira Rescue System application with its Welcome screen. The application does contain a wizard. The wizard guides you through important functions of the rescue system. As an experienced user, you can use other functions than the graphical wizard to scan and repair your system, for example the command line or the integrated Registry Editor. After start-up of the Avira Rescue System you can establish a remote connection to the Avira Support with the help of the TeamViewer client, to gain direct help if problems will arise during the repair of your system. Note It is recommended to download the necessary ISO file before you ever experience any severe damages of your system. Once you have saved the file on a bootable CD, you can update the important detection and repair routines of the Avira Rescue System at any time. If you want to save the ISO file to an USB stick, please follow the instructions of the Avira Knowledge Base. Avira Rescue System - User Manual (Status: 25 Jun. 2013) 8 Download and start 2. Download and start 2.1 Downloading the Avira Rescue System To create a rescue CD or USB stick that can restore your operating system in case of a damaged boot sector, you have to download the necessary file from the Avira website. Go to the download section of the Avira website. Navigate to the section Product Installation Files. Click the download link of the Avira Rescue System. Click Save File. The ISO file or the .exe file is downloaded. With this ISO file you have to create a bootable CD with a burn tool compatible to your Operating System to start up your computer with the help of the Avira Rescue System. See Creating a bootable CD. If you have downloaded the .exe file that contains a CD burner you can speed up this process. If you have already an Avira product for Windows systems available, you can download the Avira Rescue System as an .exe file via the menu command Extras > Download Rescue CD. The package contains the already bootable live system that you have to burn on CD or DVD when called upon to do so. After the burn process has finished, the CD will be ejected automatically. Certainly, the burning with the help of the .exe file included CD burner can also be used if you download the .exe file directly from the Avira website. 2.2 Product version details You find all necessary information about the product version and the detection technology inside the Avira Rescue System application. Click About Avira in the side bar of the application. The Avira Rescue System version screen opens. The following information is displayed: Product version: displays the version number of the Avira Rescue System application. Engine version: displays the version number of the malware detection engine. VDF version: displays the version number of the virus definition files. The Copyright information. Avira Rescue System - User Manual (Status: 25 Jun. 2013) 9 Download and start Moreover, you can use the link Go to Avira website to be redirected quickly to the Avira homepage. 2.3 Creating a bootable CD After downloading the ISO file of the Avira Rescue System from our website, you have to create a bootable CD with an Operating System specific burn tool and the ISO file. If you want to save the ISO file to an USB stick, please follow the instructions of the Avira Knowledge Base. If you have already an Avira product for Windows systems available, you can download the Avira Rescue System as an .exe file via the menu command Extras > Download Rescue CD. The package contains the already bootable live system that you have to burn on CD or DVD when called upon to do so. After the burn process has finished, the CD will be ejected automatically. By default, the graphical user interface of the Avira Rescue System opens with English language. To open the German interface, do the following: Insert the CD/DVD into the appropriate tray of your computer. The language setting opens. Highlight the entry Deutsch with the arrow keys. Press Enter. Press Enter again and wait for the German Endnutzer-Lizenzvereinbarung (End User License Agreement) to open. Click Akzeptieren, to open the user interface of the Avira Rescue System. 2.4 The BIOS setup If you have used the ISO file to create a bootable media but your computer does not boot from it, it may be that the option to boot from a CD/DVD or CD-ROM drive is not enabled. You enable this function in the setup options of the computer's BIOS (Basic Input Output System). The BIOS is software that resides in a special memory chip on your computer's motherboard. It is responsible for the correct start up of your computer. Although each computer is different, most use standard ways of getting in the BIOS, changing values, and saving the configuration. You access the BIOS during the start up process before your Windows system starts up. Therefore you have to press the setup key in fast rhythm several times. The setup key differs with each PC. The most frequent keys are: Del F2 F12 F1 Avira Rescue System - User Manual (Status: 25 Jun. 2013) 10 Download and start F8 Esc On some PC, the name of the key used to access the setup functions of your computer is displayed on your screen during the start up process. Warning Once you accessed the BIOS, be very careful while changing the boot priority. 2.5 Changing the BIOS To change the setup process of your computer, you have to access the BIOS while your PC tries to start up. Note The following explanation can only be an example. To access the BIOS and to change the priority of the boot setup settings varies from PC to PC. Press the setup key when your PC is starting up. Which one of the keys is the setup key is sometimes displayed on your screen during the starting up process. The setup utilities of your computer open. Once you enter the computer's BIOS, use the arrow keys to navigate between the elements. Navigate to the Boot section. Move the item CD/DVD / CD-ROM Drive or USB Drive to the top of the boot sequence, above the entries Removable Devices and Hard Drive. Save the changes you made by: navigating to Save and Exit and press Enter. OR pressing ESC and waiting for the computer to prompt you to save the changes. Avira Rescue System - User Manual (Status: 25 Jun. 2013) 11 Avira Rescue System Desktop 3. Avira Rescue System Desktop 3.1 The Avira Rescue System desktop The Avira Rescue System uses an adapted Ubuntu® Unity desktop that consists of: the Panel at the top of the screen displays the name of the active program and contains three icons to open the indicator menus Energy Settings, Network Connection and System Settings the Working space contains the Avira Rescue System application the Dock at the left-hand side of the screen contains program shortcuts 3.1.1 The icons of the Dock You can change the order of the icons in the Dock using drag & drop while the appropriate application is open and active. You can also add icons to, or remove icons from the Dock. Dash home opens the start menu with all available applications Avira Rescue System opens the graphical interface of the application as such FireFox Web Browser opens the Ubuntu® website Home Folder opens the File Manager GParted opens the graphical Partition Editor, to create, edit and remove hard disk partitions Terminal opens the command line interface System Settings opens the graphical interface of the System Settings Trash opens the Trash folder To search for menu commands, applications or files and folders, use the Head-Up Display of the Ubuntu® desktop: Avira Rescue System - User Manual (Status: 25 Jun. 2013) 12 Avira Rescue System Desktop Click the Dash Home icon to open the Head-Up Display (HUD) where you can enter text to search for and select menu commands. 3.2 Adding icons to the Dock You can add an application as an icon to the Dock. Click Dash home. The start menu with all available applications opens. Click the application you want to add to the Dock. The program opens and its icon is displayed in the Dock. Right-click the icon in the Dock. Select Lock to Launcher. The application's icon is added to the Dock. 3.3 Removing icons from the Dock You can remove an application via its icon from the Dock. Click the application's icon in the Dock. The application opens. Right-click the icon in the Dock. Select Unlock from Launcher. The icon is removed from the Dock. 3.4 The Wizard The Wizard of the graphical application helps you to scan and repair your system in 3 steps only. If your system is in hibernation mode, 4 steps are required to scan and repair. Use the Wizard if you are an inexperienced user and prefer guidance. 3.4.1 The Welcome screen From the Welcome area of the Avira Rescue System you start the Wizard. The Avira Rescue System will not delete infected files but renames detections to .vir files, in order to make them still accessible for you. Avira Rescue System - User Manual (Status: 25 Jun. 2013) 13 Avira Rescue System Desktop Note Encrypted files and partitions cannot be scanned. After booting, the graphical interface of the Avira Rescue System application opens automatically on the adapted Ubuntu® desktop. Depending on your system environment this may take some time. First, you have to accept the End User License Agreement (EULA) to use the Avira Rescue System. If you do not accept this license agreement, you can not use the Avira Rescue System, but you may still use the functionalities available on the Ubuntu® desktop. On startup of the GUI, the product checks for an Internet connection that is required to perform an update of the detection technology. Click Welcome in the sidebar. The Welcome screen of the Avira Rescue System opens. Click the Start Wizard section to start a scan and follow the on-screen instructions. Note The Wizard checks for available updates of the Avira Rescue System inbuilt detection. If no Internet connection is established, you are prompted to configure your network via the displayed link. If no Internet connection can be achieved, the detection technology located inside the product is used. 3.5 Connecting to the Internet On startup of the GUI, the product checks for an Internet connection that is required to perform an update of the detection technology prior to scan and repair your system's partition. If no Internet connection is established, you are prompted to configure your network via the displayed link. Click the link Click here to establish an Internet connection. The Network Connections window opens. Choose the tab Wired, if you usually are connected wired to your local area network. Click the name of your wired connection, if visible and click Edit. - OR Click Add, to establish a new wired connection. The Editing Wired connection window opens. You can configure your physical address and IP settings. Choose the tab Wireless, if you want to establish a WLAN Internet connection. Click the name of your wired connection, if visible and click Edit. Avira Rescue System - User Manual (Status: 25 Jun. 2013) 14 Avira Rescue System Desktop - OR Click Add, to establish a new wired connection. The Editing Wired connection window opens. You can configure your SSID (Service Set Identifier, the unique name of your wireless network) and IP settings. 3.6 Checking your Internet settings If your system is not connected to the Internet, check your network settings first. Click Dash home in the Dock of the Ubuntu® desktop. The search field opens. Enter the word network in the search field. Click the Network icon. Check, if your wired connection is turned off. Click the button next to OFF, to turn your wired connection on. The physical addresses of your system and the domain name, displayed as DNS number, are shown. You can edit these settings by clicking Options. The Editing Wired connection window opens. 3.7 Restoring renamed files The Avira Rescue System renames possible detections to .vir files. You can restore these files to regain access. Click Terminal in the side bar. The Terminal window where you enter your commands opens. Note Please be aware that your keyboard layout may change to English when you open the Terminal. Enter the command avundoren.py and press Enter. The application searches for files that probably were renamed during previous scans. The Summary lists all files that were renamed. Avira Rescue System - User Manual (Status: 25 Jun. 2013) 15 Avira Rescue System Desktop The Avira Rescue System gives back the following information about the files: File type File scan info File path Alarm Alarm-URL Please navigate through the list entries and confirm the restore of files by entering yes where you are prompted. Enter no if you do not want to restore a file. To see all options of the avundoren.py command, enter the following line: avundoren.py --help The following options for searching renamed files are given: . Shortcut Command Description -h --help Displays all options for searching renamed files. -d --dir Searches in the directory you <directory> named, e.g. avundoren.py -d /user. -p --path Searches in the path you named, <directory> e.g. avundoren.py -p /user/downloads. -D --dry-run Simulates the avundoren.py command, without performing any changes. -l --limit <num> Skips files after the named limit has been reached, e.g. avundoren.py -l 100. Whereas the number reflects the count of renamed detections. -v --verbose Displays in real time exactly what the avundoren.py command is doing. Avira Rescue System - User Manual (Status: 25 Jun. 2013) 16 Avira Rescue System Desktop -q --quiet -i -The interactive mode asks the interactive user what to do with renamed files. -b --batch Displays in silent mode a minimum of the command. Faster than the verbose mode. The non-interactive batch mode restores all renamed files without confirmation of the user. 3.8 Hibernated systems The Avira Rescue System detects if your system is in hibernation mode. If hibernation mode is activated, the Avira Rescue System takes precautions, to avoid any damage to your system and will mount any partition in read-only mode. You may trigger a scan on partitions, but detected threats will not be removed and the system will not be repaired. Moreover, you can not use the Avira Registry Editor as long as your system is in hibernation mode. The Avira Rescue System can exit the hibernation mode first and then starts the scan. Warning Exiting the hibernation mode may lead to loss of data. Note The Avira Rescue System detects the hibernation mode only, if it is a NTFS drive. For FAT drives, the hibernation mode will not be detected. 3.9 Exiting the hibernation mode The Avira Rescue System detects if your system is in hibernation mode. When your system is in hibernation mode you receive an appropriate message that the Avira Rescue System will mount all partitions in read-only mode. You have the following options to exit the hibernation: Click Reboot to force Windows to restart your system. Then exit the hibernation mode manually in Windows. - OR Avira Rescue System - User Manual (Status: 25 Jun. 2013) 17 Avira Rescue System Desktop Click Exit Hibernation. The Avira Rescue System deletes the hibernation file and remounts your system's partitions in read/write mode. The Avira Rescue System automatically remounts the partition you selected beforehand. Select the partitions you want to scan and repair. - OR Click Scan to start a scanning process. The progress bar displays the scanning process. After the scan is finished, click Cancel to see the scan result. Click Cancel to go back to the Welcome page Warning Exiting the hibernation mode may lead to loss of data. If you are unsure what to do, please contact us via the link Avira Support. 3.10 Selecting partitions You can select one or more partitions simultaneously of your computer to be scanned. Click Welcome in the side bar. The Welcome screen of the Avira Rescue System opens. Click the wizard section. The Partition Selection window opens. Select the partitions you want to scan and repair. Click Next to start the scanning process. The progress bar displays the scanning process. The name of the last scanned file is displayed. You can see the number of files that are scanned and the time elapsed. Possible detections are displayed as number of Threats detected. Click Pause to stop the scanning process. Click Resume to continue the scanning process. You can abort the scan by clicking Cancel. You are prompted to confirm the cancelation. You get the information that the scan has been cancelled. Avira Rescue System - User Manual (Status: 25 Jun. 2013) 18 Avira Rescue System Desktop The progress bar shows 100%. Click Next to open the results area. The detection screen opens. 3.11 Scanning the system Before starting the scan process, the Avira Rescue System searches automatically for detection updates and if necessary, updates the detection technology. During the scan process the total number of files to be scanned is calculated. Depending on the amount and the kind of files located in the partitions you selected, the scan process may take some time. Especially the scan of compressed files, such as .zip and .rar archives, needs more time. The scan engine uses a recursive scan: Archives in archives are also unpacked and scanned for viruses and unwanted programs. The files are scanned, decompressed and scanned again. This process reduces the scanning speed. Moreover, unpacking and scanning recursive archives can require a great deal of computer time and resources. After the scan of the selected partition is finished, the Results window opens. You have the following options: Report Opens the scan report. See chapter Scan Report. New scan Opens the Partition Selection window. See chapter Selecting partitions. Shut Down Shuts down your system. See chapter Shutting down the system. Restart Reboots your system. See chapter Rebooting the system. Note Encrypted files will not be scanned. Note In hibernation mode scans will be executed, but detected threats will not be treated or repaired. Avira Rescue System - User Manual (Status: 25 Jun. 2013) 19 Avira Rescue System Desktop 3.12 Scanning without the wizard You may trigger an on-demand scan using the Avira Command Line Scanner via the terminal. Note Using the Avira Command Line Scanner can not replace the scan and repair features of the wizard. The detection technology will not be updated when using the Avira Command Line Scanner and you can not repair your system via the terminal. A repair of your system, especially of the Windows registry can only be done by the wizard. To scan on-demand you use the following syntax: avscan [option] [directory] [filename] If you do not specify a directory, the Avira Command Line Scanner scans only the current directory. You can use the following options: Option Function avscan -help Displays usage information about avscan. avscan -batch Enables "batch mode": If you enable this option, avscan will enter the non-interactive batch mode. In this mode all actions carried out are based on the given configuration file and command line settings. You will not be asked to make or confirm any decisions. avscan -alertaction Sets the action to be taken when viruses or unwanted programs are detected, e.g. avscan --alert-action=delete avscan -s Enables the recursive scanning of all subdirectories within a specified path. 3.13 Rebooting the system After the scan is completed, the Results area shows whether your system was completely cleaned and repaired. Problems found while repairing the system are displayed in a table. Example: Avira Rescue System - User Manual (Status: 25 Jun. 2013) 20 Avira Rescue System Desktop Entry Number Time 00:09:34 Detections 6 Total files 16976 Renamed files 6 Repaired registry keys 0 You can reboot your system from here. Click Restart. The system starts to shut down. You are prompted to remove the installation media and close the tray (if any). Press Enter to trigger the reboot of your system. Your system starts again. Note On some computer the CD/DVD drive can not be opened after a reboot. In this case, completely shut down your system please, and than restart it. 3.14 Shutting down your system After the scan is completed, the Results area shows whether your system was completely cleaned and repaired. You can shut down your system from here. Click Shut down. The system starts to shut down. You are prompted to remove the installation media and close the tray (if any). Press Enter to trigger the shut down of your system. Your system powers down. Avira Rescue System - User Manual (Status: 25 Jun. 2013) 21 Avira Rescue System Desktop 3.15 Checking and saving the scan report After the Avira Rescue System has scanned and cleaned your system, you can check the scan report. Click Report in the results area after the scan is completed. The window Scan Report opens. Click Save to store the Scan Report file in your system. The File Manager opens. Select a storage location and click Save. Click OK to close the Scan Report window. 3.16 Entries of the scan and update report 3.16.1 Scan Report Start displays the start time of the scan process End displays the finish time of the scan process Detections displays the total number of detected suspicious files Files treated displays the total number of treated files Files scanned displays the total number of scanned files Engine version displays the version number of the used scan engine VDF version displays the version number of the virus definition file Scan status displays if the scan was completed or aborted by the user 3.16.2 Update Report Successful/Failed Avira Rescue System - User Manual (Status: 25 Jun. 2013) 22 Avira Rescue System Desktop displays if the update was successful or failed, for example due to missing internet connectivity Log displays the updated detection files 3.16.3 Details displays a table with the path and the name of the detection and the action that was taken by the Avira Rescue System Avira Rescue System - User Manual (Status: 25 Jun. 2013) 23 Editing the Windows registry 4. Editing the Windows registry To edit various configuration settings of your Windows system, you can open the graphical interface of the Avira Registry Editor. The Avira Registry Editor allows you to create, delete, edit and rename registry keys, subkeys, values and value data. By default the HKEY_LOCAL_MACHINE and the HKEY_USERS hives are displayed. Warning Change entries of the Windows registry only, if you are an expert user. Editing the registry may damage your Windows system! The following task contains steps that tell you how to modify the registry. However, serious problems might occur if you modify the registry incorrectly. Under all circumstances, you should back up the registry before you modify it. Only then, you can restore the registry at any time if a problem occurs. For more information about how to back up and restore the registry, click the following link to view the article in the Microsoft Knowledge Base. Click Tools in the side bar of the application. Click Start Avira Registry Editor. The Avira Registry Editor opens. Expand the root keys to their subkeys and values. The Avira Registry Editor table displays the Name, the Type and the Data of the value. Right-click the entry you want to edit. You may edit, delete or rename the name of a value. You are prompted to confirm a value removal. You may create new key types. You may create different kind of data values: String Value Binary Value DWORD (32-bit) Value QWORD (64-bit) Value Multi-String Value Expandable String Value Avira Rescue System - User Manual (Status: 25 Jun. 2013) 24 TeamViewer - First-hand Avira support assistance 5. TeamViewer - First-hand Avira support assistance To let the Avira experts of the support department have a look at your system and help to solve your problem, use the TeamViewer tool. Click Support in the side bar. The Support area opens. You have two options to contact the Avira Support department. You can access the Avira Support website and then choose between different offers to find help, or you establish a remote connection to let an Avira expert have a look at your system. Click Contact Avira Support. You are redirected to the Avira Support website. Choose the offer that fits you best. - OR Click Start TeamViewer. The TeamViewer End User License Agreement opens. Click Accept License Agreement. The TeamViewer window opens. Dial the number of the Avira Support hotline, considering if you have a Free or Paid product version. Tell the Avira support expert the ID and the password that are displayed in the TeamViewer. The Avira support expert will remotely log in to your computer and control your mouse while explaining the action performed. Note Please do not interfere in trying to use the mouse by your own while the expert is working on your system. Avira Rescue System - User Manual (Status: 25 Jun. 2013) 25 Update 6. Update 6.1 Updating the Avira Rescue System The effectiveness of anti-virus software and repair tools depend on how up-to-date the program is, in particular the virus definition file and the scan engine. To carry out regular updates, the Updater component is integrated into the Avira Rescue System. The Updater ensures that your Avira product is always up-to-date and able to deal with the new viruses that appear every day. The Updater of the Avira Rescue System updates automatically the following components: Virus definition file: The virus definition file contains the virus patterns of the harmful programs which are used by your Avira product to scan for viruses and malware and repair infected objects. Scan engine: The scan engine contains the methods used by your Avira product to scan for viruses and malware and with which your system can be repaired. An update checks whether the virus definition file and scan engine are up-to-date and if necessary, implements an update. Avira Rescue System - User Manual (Status: 25 Jun. 2013) 26 Support 7. Support 7.1 Contact and Support 7.1.1 Support service All necessary information on our comprehensive support service can be obtained from our website http://www.avira.com. 7.1.2 Community Forum Before you contact the hotline, we recommend that you visit our user forum at http://forum.avira.com. 7.1.3 FAQs Please also read the FAQs section on our website: http://www.avira.com/en/support-for-home-knowledgebase Your question may already have been asked and answered by other users in this section. 7.1.4 Contact Address Avira Operations GmbH & Co. KG Kaplaneiweg 1 D-88069 Tettnang Germany Internet You can find further information about us and our products at the following address: http://www.avira.com Avira Rescue System - User Manual (Status: 25 Jun. 2013) 27 Glossary 8. Glossary Abbreviation / term Meaning BIOS The Basic Input Output System is software that resides in a special memory chip on your computer's motherboard. Boot sector The part of the MBR that is in charge of the startup process of your computer. Bootable CD / Live-CD Burned with a specific burn tool, your computer will start up from the CD drive rather than from its hard disk drive. Bootable USB Starts up your computer from the USB flash drive rather than from its hard disk drive. LAN / W-LAN Wired / Wireless Local Area Network MBR On a BIOS-based computer, the Master Boot Record is the first sector (boot sector) of a storage device that contains the information for starting up the Operating System of the computer. SSID Service Set Identifier, the name of the network. Dynamic disks Dynamic disks are a Microsoft technology for allowing special features that normal partitions do not, such as spanning multiple disks and raid. to mount To access a file, a partition or a device on a Unix system, it has to be mounted via the mount command first, telling the Operating System that it is ready to use. Registry Editor The Avira tool to edit the entries of the Windows Registry after a severe crash. This tool should only be used by experts! Avira Rescue System - User Manual (Status: 25 Jun. 2013) 28 Glossary TeamViewer A tool that allows an Avira expert to remotely log in to your computer. ISO file It is an archive file that contains the image of the content of a CD / DVD. Burn tool An authoring software that burns any data from your system to a CD or DVD. Encrypted files Files that are encrypted in order to protect their confidential data from unauthorized access. Hibernated system The computer is powered down while retaining its state. All-in-one update Update of the product itself and its detection technology. VDF The virus definition files. GPT Globally Unique Identifier Partition Table is a standard for the layout of the partition table on the physical hard disk of your computer. NTFS New Technology File System, a file system introduced 1993 by Windows NT. FAT File Allocation Table, used by MS-DOS to organize and manage files. UEFI Unified Extensible Firmware Interface Avira Rescue System - User Manual (Status: 25 Jun. 2013) 29 This manual was created with great care. However, errors in design and contents cannot be excluded. The reproduction of this publication or parts thereof in any form is prohibited without previous written consent from Avira Operations GmbH & Co. KG. Issued Q2-2013 Brand and product names are trademarks or registered trademarks of their respective owners. Protected trademarks are not marked as such in this manual. However, this does not mean that they may be used freely. © 2013 Avira Operations GmbH & Co. KG. All rights reserved. Subject to change. Errors and omissions excepted. Avira Operations GmbH & Co. KG Kaplaneiweg 1 | 88069 Tettnang Germany Telephone: +49 7542-500 0 Facsimile: +49 7542-500 3000 www.avira.com