1
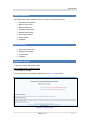
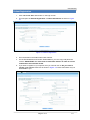
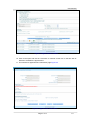
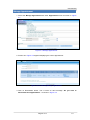
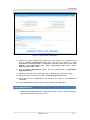
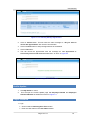
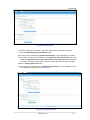
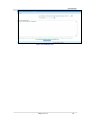
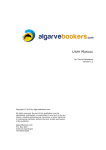
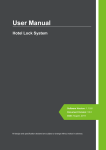
User Manual Participant User Manual Appointment System Page 1 of 17 1.0 User Manual TABLE OF CONTENTS TABLE OF CONTENTS .................................................................................................... 2 System Overview ............................................................................................................ 3 Menu Options ................................................................................................................. 3 Application Access......................................................................................................... 3 Patient Registration ........................................................................................................ 4 Schedule Appointment ................................................................................................... 5 Manage Appointment...................................................................................................... 9 Cancel Appointment ..................................................................................................... 11 Profile Update ............................................................................................................... 12 Feedback ...................................................................................................................... 16 Page 2 of 17 1.0 User Manual System Overview The Appointment System enables the User to perform the following functions: New Patient Registration Retrieve User Name Retrieve Password Schedule Appointment Manage Appointment Cancel Appointment Profile Update Feedback Menu Options Schedule Appointment Manage Appointment Profile Update Feedback Application Access 1. Open the browser and enter the URL: URL to Application in separate email 2. Press Enter or click Go 3. The login page of the application appears as in Figure 1.1 Login Screen Figure 1.1: Login Screen Page 3 of 17 1.0 User Manual Patient Registration 1. Click I am a new User radio button on the login screen. 2. This will open the Patient Registration - Contact Information as shown in Figure 2.1 Figure 2.1 Patient Registration 3. Fill in the details in the fields marked with asterisk. 4. For the Email Address and Confirm Email Address, you can’t copy and paste the content. IMPORTANT: You must enter a valid email address in order to receive confirmation and reminder emails. 5. If you wish to register for your spouse, then you need to click on Do you want to register your spouse check box as shown in Figure 2.2. Note: this feature may not be available to you. Page 4 of 17 1.0 User Manual Figure 2.2 Spouse Registration 6. Click on Register button to get registered. This will take you to Manage Credential Screen where you will give the Security Question and Answer as seen in Figure 2.3 Figure 2.3 Manage Credentials 7. Select the Security Question and answer and click on Update Security Question Information. This will take you to Schedule Appointment Page. Schedule Appointment 1. After successful login you will get the Schedule Appointment page as shown in Figure 3.1 Figure 3.1 Schedule Appointment Page 5 of 17 1.0 User Manual 2. The values for Client Name and Program will be grey out and fixed. 3. Select the value for State from State dropdown menu. 4. The corresponding value for City and Site will be populated. Select the value of City from City dropdown and for Site from Site dropdown menu as shown in Figure 3.2 5. Here Click to Manage Appointment button will be disabled as there is no appointment in the name of this user to manage or reschedule. 6. After selecting the Site the values for the Clinics available will be populated. Figure 3.2 Lists of Clinics 7. The list of Clinics associated with that particular Site will be populated with the radio button as shown in Figure 3.2. This shows the list of clinics which are going to take place in the future. This does not show the expired clinics. 8. Select the value of Clinic by clicking on the radio button against the clinic. 9. Click on Click To Schedule Appointment button. This will open the Clinic Layout with the Appointments Available and color Legends to indicate Available, Unavailable, Waitlist and Your Schedule Slot as shown is Figure 3.3 Page 6 of 17 1.0 User Manual Figure 3.3 Appointments Available 10. Click on the space with text as “Click here to schedule a time slot” on the time slot as desired to schedule the appointment. 11. This will lead to Appointment Confirmation page Figure 3.4 Figure 3.4 Appointment Confirmation Page 7 of 17 1.0 User Manual 12. Answer the various questions by selecting the radio buttons and checkboxes and click on Confirm Appointment button. (Note: there may not be any questions to answer depending on the program) 13. This will confirm your appointment on the desired slot and show the message as “Your appointment has been booked. A confirmation email has been sent to your email Address. Your Appointment Date: 07/30/2010, Appointment Start Time: 10:00 AM, Appointment End Time: 10:30 AM” as shown in Figure 3.5. Here you will receive the email from Admin regarding your appointment confirmation. Figure 3.5 Appointment Confirmation and mail sent 14. When you click on Cancel Appointment button, this will take you back to the Schedule Appointment page. 15. When you hit on Print button, this will print the screen of the appointment scheduled. 16. Click on Exit button, this will make you logout of the application. Page 8 of 17 1.0 User Manual Manage Appointment 1. Select the Manage Appointment tab under Appointment menu as shown in Figure 4.1 Figure 4.1 Manage Appointment 2. Screen as in Figure 4.2 appears displaying the current appointment Figure 4.2 On selecting Manage Appointment 3. Click on Reschedule button. This is show an alert message “Do you want to Reschedule this appointment?” as shown in Figure 4.3 Page 9 of 17 1.0 User Manual Figure 4.3 Alert Message 4. Click on Cancel button to remain on the same page. 5. Click on OK button, this will open the Reschedule Appointment page as shown in Figure 4.4. Here the user can Reschedule his/her appointment time for the same clinic based on the availability of the slots. The green strip shows user’s already Scheduled slot. This also shows the number of appointments available out of total number of Appointment Available in a particular time slot. Figure 4.4 Reschedule Appointment 6. Click on the space with text as “Click here to schedule a time slot” on the time slot as desired to schedule the appointment This shows the Appointment Confirmation page as shown in Figure 4.5 Page 10 of 17 1.0 User Manual Figure 4.5 Appointment Confirmation 7. Answer the various questions by selecting the radio buttons and checkboxes and click on Confirm Appointment button. This will show the message as “Your appointment has been booked. A confirmation email has been sent to your email Address. Your Appointment Date: “Date”, Appointment Start Time: “Time”, Appointment End Time : “Time”” 8. Click on Cancel Appointment button. This will navigate back to Reschedule Appointment page. 9. Reselect the desired slot, this will again take to Appointment Confirmation page. 10. Select the various questions and click on Confirm Appointment button. 11. When the user hit on Print button, this will print the screen of the appointment scheduled. 12. Click on Exit button, this will make the user to logout of the application. Cancel Appointment 1. Select Manage Appointment from Appointment menu. This will show the Manage Appointment page as shown in Figure 5.1 Page 11 of 17 1.0 User Manual Figure 5.1 On selecting Manage Appointment 2. Click on Cancel button. This will show the alert message as “Do you want to cancel this appointment” with Ok and Cancel button. 3. Click on Cancel button to keep the appointment as scheduled. 4. Click on Ok button. 5. This will cancel the appointment with the message as “The Appointment is Successfully Canceled and email sent to the user.” As shown in Figure 5.2 Figure 5.2 Appointment Canceled Profile Update 1. Click My Profile on menu 2. This will open the Profile Update page with Employee Details and Employee Password Details as headers as shown in Figure 6.1 Forgot Password 1. Login Click on I am a Returning User Radio button Enter the User Name in the User Name textbox Page 12 of 17 1.0 User Manual 2. Forgot Password Click on the Forgot Password link Screen as in Figure 1.2 Forgot Password appears Click on YES button if you are registered with an Email ID Click on NO or Don’t Know button if you are not registered with an Email ID. Figure 1.4 When you hit on YES button, this will ask you to enter your User Name and Email ID. Screen as in Figure 1.3 Send Password appears. Click Send Password. A message Your Password has been sent to your Email ID. is displayed to confirm that the password has been emailed to your email id Click on Cancel to go back to login page and login with user name and password Figure 1.2 Forgot Password Figure 1.3 Send Password when user hit YES button on Figure 1.2 Page 13 of 17 1.0 User Manual Figure 1.4 Send Password when user hit NO or Don’t Know button on Figure 1.2 When you select the No or Don’t Know option in the Forgot Password screen, you will get the option to enter the First Name, Last Name, User Name, Security Question and Answer. Click on Create Password button. This will create a password and an email will be sent to you. Click on Back button to go back to the login page. 7. Forgot User Name Click on Forgot Username link Screen as in Figure 1.5 Forgot UserName appears Figure 1.5 Forgot User Name Fill in the details like First Name, Last Name, Middle Initial, Email ID, Security Question and Answer. Fill in all the mandatory fields marked with asterisk(*) Click on Send User Name button. This will email the User Name to you. Page 14 of 17 1.0 User Manual Figure 6.1 Profile Update 4. Edit the details like First Name, Last Name, Date of Birth, Email ID and Phone. 5. Click on Update Employee Information button. 6.This will give the message as “Updated Successfully.” and will update your profile. 7.If you wish to change your password, in the Employee Password Details, fill in the values for Old Password then New Password and Confirm Password. Verify that the values are valid and matching or else the system will throw the alert message. 8.Click on Change Password button. 9.This will show the message as “Updated Successfully” and the Password of the user will get changed as shown in Figure 6.2 Figure 6.2 Change Password Page 15 of 17 1.0 User Manual Feedback 1. Click on Feedback tab on the header. 2. This will open the Feedback page as shown in Figure 7.1 Figure 7.1 Feedback 3. Select the option for Clinic from Clinic dropdown menu. 4. Select either Question or Feedback from Type dropdown menu. 5. Fill in the comments in the “Enter your feedback here” section. 6. Check in the “Please select here if you would like a reply” if you want the reply to the feedback. 7. Click on Send Feedback button. 8. This will send the feedback of the clinic with the confirmation message as “Your valuable feedback has been successfully sent.” As shown in Figure 7.2 Page 16 of 17 1.0 User Manual Figure 7.2 Feedback Sent Page 17 of 17 1.0