1
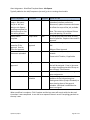
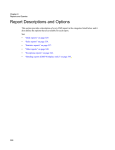
Alerts and Alert Assignments Users Guide Updated 11/26/13 Page 1 of 24 Alerts and Alert Assignments - General Information Use Alerts to communicate and collaborate on everything you do. The uses for Alerts are endless as they provide an organized and streamlined method for communicating electronically through a single application. Alerts and Alert Assignments can be used to help you manage and stay informed on the status of project details by initiating and routing assignments as an extension of the schedule and timeline. They can also be used for many other purposes to communicate and route information across the agency seamlessly. Pop-up Alerts notify team members of important events requiring attention. Inform team members on the creation of projects, creative direction, specifications, task assignments, and more. Include documents or files such as copy, artwork, links to websites or anything related to the alert or assignment. Create your own workflow templates and assign them to Alerts. These alert assignments are then routed intelligently to team members based on their current state. Alerts are delivered to the Desktop or through email which leads to a series of comments and attachments on the subject. Replies and attachments sent through email are posted back to the Alert. Everything is organized by levels that already exist in Advantage where a history of events and decisions is kept. Manual vs. Automatic in Webvantage Alerts generated in Webvantage are either automatic or manual. Automatic Alerts are created based on Alert Event Settings and other automatic processes defined below. They have limited user control and are designed to send notifications on important events without user initiation. This type of Alert is typically sent automatically when the associated event is generated, in some cases, the user can control the alert through Alert Event Settings and a 'prompt' may be displayed allowing the user to select from the default or other Alert Groups (depending on settings). Some alerts are automatic and do not include an option in Alert Event Settings. See the chart below for a list of automatic alerts and how they are controlled. Manual Alerts are created when the user clicks on an Alert button in various applications. Manual Alerts may be sent as a Standard Alert or an Alert Assignment depending on the application and are always initiated by the user. Manual alerts can be initiated in the following areas to facilitate communication and approval for any related task or document: Updated 11/26/13 Page 2 of 24 Alert Inbox –For levels including: Office Client Division Product Campaign Job Job Component Accounts Payable (Advantage) – Send invoice copies for approval Billing Approvals (WV) Campaigns (WV) Estimate (WV) – Send Estimate for approval Job Jacket (Advantage and WV) Project Schedule (WV) – Send the schedule for review Project Schedule Task (Special features exist for Task Alerts – See page 16) Print/Send (WV) – Send printed documents for review or approval. Document Manager – Send a simple alert when documents are uploaded. Manual vs. Automatic in Webvantage – Below is a chart describing all alert types and how they are categorized. System generated alerts are ones can be controlled in Alert Event Settings. See Event Type columns. Event Type legend – applies to automatic alerts only: S = generated from Advantage Services E = controlled through the Alert Event Settings A = Automatic when related process is completed Type of Alert Automatic Automatic Automatic Automatic Automatic Automatic Automatic Automatic Automatic Automatic Automatic Automatic Automatic Automatic Automatic Updated 11/26/13 Alert Type Approvals Approvals Approvals Approvals Approvals Approvals Billing Calendar Calendar Calendar Client Contract Client Contract Client Contract Employee Time Forecast Employee Time Forecast Event Type A A A A A A A A A A S S S A Alert Category Expense Report Approval Request Expense Report Approval Response PO Approval Request PO Approval Response Timesheet Approval Request Timesheet Approval Response Billing Selection Call Meeting To Do Required Report Completed Upcoming Contract Renewal Upcoming Required Report Hours Changed For Supervised Employee A Hours Overbooked For Employee Page 3 of 24 Automatic Automatic Automatic Automatic Automatic Automatic Automatic Automatic Automatic Automatic Automatic Automatic Automatic Automatic Automatic Automatic Automatic Automatic Automatic Automatic Automatic Automatic Automatic Automatic Automatic Automatic Automatic Automatic Manual Manual Manual Manual Manual Manual Manual Manual Manual Manual Manual Updated 11/26/13 Import Validation Media Media Missing Time Missing Time Production Production Production Production Production Production Production Production Production Production Production Production Production Production Production Production Production Production Project Schedule Project Schedule Project Schedule Project Schedule Project Schedule Billing Billing Client Portal Client Portal Std Alert/Assignment Std Alert/Assignment Std Alert/Assignment Std Alert/Assignment Std Alert/Assignment Std Alert/Assignment Std Alert/Assignment S NA NA S S E E E E E E E E E E A E E E E E E S S E E A S Media Ocean Validation Issue Media Insertion Created [FUTURE USE] Media Insertion Revised [FUTURE USE] Change Request Change Request Campaign Created Campaign Modified Creative Brief Created Creative Brief Revised Estimate Created Estimate Quote Approved Estimate Quote Modified Estimate Revised Job Created Job Modified Job Process Control Changed Job Specs Created Job Specs Modified Job Specs Revised Purchase Order Created Purchase Order Modified Purchase Order Voided Quote vs Actual Alert Past Due Task Project Schedule Created Project Schedule Modified Task Temp Complete Upcoming Task Billing Approval Batch Approved Billing Approval Batch Created Change Request Work Request Action Discussion Topic Document Event File Issue Review Page 4 of 24 Manual Alerts are categorized as either Standard or Alert Assignments. Standard Alerts vs. Alert Assignments Standard Alerts may be created for communicating and collaborating on various category types such as Action, Event, Discussion Topic, Issue and Review. At any level, Alerts may be sent with attachments and used to collectively communicate and collaborate on actions to take. Like a threaded discussion, all comments and decisions made are kept with the Alert and the related level as an audit trail. Every recipient on the Alert, including the sender, is notified as comments are made. Alert Assignments may be created to initiate a series of assignments (or routes) based on a user-defined workflow. Because these Alerts are moved from one staff member to the next in a series of assignments, they play a special role in project management and scheduling. But Alert Assignments can also be used to route any type of task or issue related to any type of operation even outside of a project schedule. Examples include routing for RFPs, Contracts, Job Openers, Creative Process such as copy/proofing, Approvals of any type, Issue Tracking, IT Tickets, and more. Alerts and Alert Assignments share many of the same features. The main differences are in how Alerts and Alert Assignments are routed and how they are used in other applications at different levels. Alert Assignments are routed to one employee at a time, whereas Alerts are collaborative and are sent to multiple recipients at the same time. Other recipients may be ‘copied’ on an alert assignment so that they may be informed of such assignment and updates to the assignment as it is moved from person to person. They are also copied on comments added by the assignees as they update the alert assignment with notes. The Alert CC creates a standard alert recipient record and an email to the CC recipients. The CC alert records can be dismissed while the alert assignment remains active for the assignee until they are finished. o Tip: You can tell the difference between a cc alert record and the alert assignment (which can only be assigned to one person at a time) by the icon in the Alert display. Standard alerts are shown with a normal ‘dismiss’ icon. Alert assignments are shown with a ‘complete’ (check box) icon. Alert Assignments may used to supplement the project's schedule, and remove details or circular events from the timeline. Those details do not have to be continuously edited and updated by the project manager and are instead routed by employees when the state of the assignment is changed. o The schedule/timeline should be established with key milestones that are estimated to include rounds of revisions, issue resolution and other details. However, the details of every task that are typically assigned and monitored by the Project Manager can be transferred to the Alert Assignment, at any level including Task. Alert Assignments can be used to route documents and other information for approval. Updated 11/26/13 Page 5 of 24 Alert Assignments are routed to staff members automatically, based on the state of the task or issue. Individual employees simply update the 'state' of the assignment (like a status) and it is routed to the default employee for that state, or one that you select. Alert Assignments may be left ‘unassigned’ allowing for staff members to pick-up tasks to complete as they can. Alert Assignments are self-commenting. When an assignment changes state, the new state, new employee assigned, date, time, and information on who updated the Alert is added to the comment log automatically. Because each Alert Assignment can be in only one state and assigned to one employee at a time, managers can always see the exact status of any task or issue quickly using several different views. Alert Assignments appear in Alert boxes with an assignee and a state. Assignments may be filtered out from standard Alerts and viewed separately. Managers can group Alerts and Alert Assignments by key levels. They may see assignments for all employees (if they have the rights) for complete visibility into the exact status of every task and issue assigned. Alerts and Alert Assignments - Features Overview Alert vs. Alert Assignment: Depending on the window from which you initiate an Alert, several options are available to easily select the type of Alert you wish to send. From the Alert main window, the Print/Send or print toolbar, Job Jacket, Project Schedule, Task, or Campaign, click on either the New Alert or New Alert Assignment icon. From the Document Manager, click ‘send alert’ to send a standard alert when the document is uploaded. From Accounts Payable, click New Assignment. [See section on Alert and Alert Assignment Setup for required maintenance.] Alert Levels: Alerts and Alert Assignments are established at various levels found in Advantage (such as office, client, division, product, job, component and task) so that they can be tracked. Alerts and Alert Assignments sent from the Task level include some special features (see page 15). Alert Recipients: Standard Alerts: Alert Recipients are established by selecting one or more Alert Groups or by selecting individual recipients from one or more Alert Groups. If creating an Alert at the Job or Job Component level, a "dynamic" Alert Group is also displayed that includes anyone associated with the project, so an Alert Group selection is not mandatory in this case. Alerts Recipients may be changed at any stage by deselecting recipients from the recipient list or selecting additional recipients from Alert Groups. This allows for Alert 'forwarding'. If routing is required, consider using an Alert Assignment instead. Updated 11/26/13 Page 6 of 24 Alert Assignments: If an Alert is designated as an Alert Assignment, the standard Recipient List is not available. Instead, recipients are selected based on a user-defined workflow and the 'state' of the assignment. However, other recipients may be ‘copied’ on the alert assignment. This means that each CC recipient will receive a standard alert (in their Alert Inbox) and an email each time the alert assignment is updated (by routing to the next employee or when a comment is added). Alert Assignments may be left ‘unassigned’ as an option. Alert Categories and Other Fields All Alerts include a Category and Priority, but Manual Alerts (Standard and Assignments) include the ability to select, enter and modify fields for Category, Priority, Due Date and Due Time. Alert Assignments allow for a default Category to be set, based on the State of the Assignment. Email or Alert: Alerts and Alert Assignments may be delivered to recipients as Email as well as Alerts in their Alert Inbox. Settings at the Employee level determine whether the user receives an Email and Alert or both. Alert Attachments & the Document Manager: Unlimited attachments may be included with every Alert and Alert Assignment. As attachments are added at certain levels, they may optionally be added to the Document Manager for the same level, at the same time. Optionally, attachments can be included or excluded from the Email portion of the Alert or Alert Assignment (if applicable). A default setting for this option is available in Agency Maintenance. Alert Comments: Unlimited, standard comments may be added to Alerts and Alert Assignments. When comments are added to any type of Alert, recipients are notified automatically. When using Alerts and Alert Assignments to manage projects, comments can be used to keep the project manager and other staff members informed. Long comments that have been truncated display a ‘read more…’ link. Click on the ‘read more…’ link to view the full comment or click on the ‘Display Full Comments’ button, on the toolbar, to view all comments as whole. Standard Alerts: Adding comments keep the Alert active in all inboxes. Once dismissed, if another recipient adds a comment, the Alert is re-activated for all recipients and moved to the top of their Alert list. This means that one Alert can be used to track an issue until its end, without creating additional Alerts that can't be tied together. Alert Assignments: Alert Assignments are self-commenting. When an assignment changes state, the new state, new employee assigned, date, time, and information on who updated the assignment is added to the comment log automatically. In addition to the automatic comments, the employee may include their own notes in comments created or they may add standard comments. As comments are added to the assignment, the sender is also copied, which allows the project manager to remain informed on pending alert assignments as comments are added. Updated 11/26/13 Page 7 of 24 Email Listener – Add comments and attachments to Alerts through Email programs such as Outlook (any Email program) and those comments and attachments will be posted to the original Alert in Advantage automatically, using the Email Listener. This action also re-sends the alert to all recipients. This allows your staff to update Alerts outside of the system and keep everyone informed at all times. See Advantage Services | Email Listener for setup and other instructions on this feature. Other Alert Edits: The Alert subject and description can be updated on all Alert types after they are sent. If this is done, an automatic comment is added to the Alert comment list with a notation that it was changed. Depending on the Alert, the Category, Priority, Due Date and Time Due may also be edited, which is also captured in the automatic comment. Note: Changes are tracked only if option is activated to track changes in Alert Assignment Maintenance/Other Settings. Alert & Alert Assignment Options and Actions Level - Used to select the level to which the Alert is related. When adding an Alert from the Alert Inbox, the levels are limited to the ones below. When adding an Alert from the source page, the level info is pre-filled. This cannot be changed after the Alert is generated. It’s easier to initiate the alert from within the level you are in, when available. o Alert Inbox Levels: Office Client Division Product Campaign Job Component Alert Recipient List - Used to enter or select one or more recipients for Standard Alerts. Recipients can be edited on subsequent edits to the Alert. Alert Assignment Workflow Template - Determines the States and Assignees Available. The template can be different for every Alert Assignment but when selected from the Job Component level, first selection establishes a default. The template cannot be changed after the Alert is generated. o Alert Assignment State - Determines the current State (status) of the assignment. States are displayed based on the Workflow Template selected. The State can also set the Alert's Category if a default Category is established for the State. o Alert Assignment Assigned To - Defaults to the employee established as the default for the Workflow Template and State selected. Any employee associated with the template/state (Assigned Team) may be selected, but the default is selected automatically. Alert Assignments may be left ‘unassigned’. When a State is selected, focus is set to the Assigned To field so that an alternate assignee can be selected if needed. o Send Assignment - After an initial Alert Assignment is sent, and assigned employees EDIT the assignment by selecting a new State, the Send Assignment Updated 11/26/13 Page 8 of 24 option is available. After selecting an assignee or accepting the default assignment, click on Send Assignment which will prompt you to enter an optional comment. You may enter a comment or save without a comment. An automatic comment will be added for you that includes: State Assignee Your Comments User ID who updated the Assignment Date and Time the Assignment was updated. o CC Recipients – You can ‘copy’ other recipients on Alert Assignments. These recipient records can be dismissed after reading but allow you to keep others informed on every assignment. Category - Used to separate types of Alerts. Not user-definable. o Alert Assignments allow for a default Category to be set, based on the State of the Assignment. o The Category can be edited after the initial Alert has been sent for Manual Alerts (not automatic ones). Use the UPDATE button to save changes. o Action o Discussion Topic o Event o Issue o Review Exclude Attachment from Email check box - Allows the user to determine whether or not attachments are sent with the Email or not. This may also be established as default in Agency Maintenance. This setting is available for all Alerts that allow attachments to be added. Priority – Highest, High, Normal, Low or Lowest o The priority can be edited after the initial Alert has been sent for Manual Alerts (not automatic ones). Use the UPDATE button to save changes. Due Date - Used to establish a Due Date on Manual Alerts only (not automatic ones). o Note: When initiated from the Project Schedule Task, the Due Date and Due Time are also prefilled in the Alert along with the level. o The Due Date can be edited after the initial Alert has been sent. Use the UPDATE button to save changes. Time Due - Used to establish a Time Due on Manual Alerts only (not automatic ones) (text field). o The Time Due can be edited after the initial Alert has been sent. Use the UPDATE button to save changes. Subject - Short description o The subject can be edited after the initial Alert has been sent. Use the UPDATE button to save changes. o An automatic comment is added to the Alert when the subject is edited that stores what the subject was changed from. Description - Long description o The description can be edited after the initial Alert has been sent for Manual Alerts (not automatic ones). Use the UPDATE button to save changes. Updated 11/26/13 Page 9 of 24 o An automatic comment is added to the Alert when the description is edited notating that a change was made. Attachments - Add unlimited attachments for viewing or collaborating on. o Option to upload the attachment to the Document Manager. o Attachments can be added to any type of Alert, any time. Add Comments - Unlimited comments may be added by any recipient after the initial Alert or Alert Assignment is generated. o Standard Alerts - When comments are added to Standard Alerts, they are automatically un-dismissed for the selected recipients. The Alert date/time is refreshed so that the Alert appears based on when it was updated last. Print Alert - Prints a report of the Alert with all comments. Dismiss or Complete Alert - From Alert View (Alerts Application or Alerts Desktop Object) o Standard Alerts Employees can only dismiss their own Alerts. When Alerts are dismissed, they are sent to the Dismissed Inbox for each recipient. Alerts can be un-dismissed. When comments are added to Alerts, they are automatically undismissed for the selected recipients. The Alert date/time is refreshed so that the Alert appears based on when it was updated last. If an Alert is associated with a Task, when the Alert is marked complete, the Temp Completed date is updated for the related task on the schedule for the assignees (if they exist). o Alert Assignments Employees can complete their own assignments. Anyone with rights to "Show All" assignments can view but cannot complete assignments for others. When Alert Assignments are completed, they are sent to the Dismissed Inbox and changed to a State of "Completed". An automatic comment includes: State (completed) The last Assignee User ID who updated the Assignment Date and Time the Assignment was completed. Alert Assignments can be re-opened. If an Alert Assignment is associated with a Task, when the Alert is marked complete, the Temp Completed date is updated for the related task on the schedule. As an option, if a task is marked temp complete, an Alert is sent to the project schedule manager. This option is activated in Maintenance/Project Schedule Settings. Dismiss or Complete Alert - From Job View - Job View - The Job Alert View includes all Alerts and Assignments regardless of whether they are dismissed (completed) or not. This provides a diary of events for every job. o Standard Alerts Updated 11/26/13 Page 10 of 24 Standard Alerts are not dismissed from the Job View because they are shown for all recipients as a diary of events. Standard alerts are displayed with a ‘dismiss’ (trash) icon. o Alert Assignments Employees can complete their own assignments. Anyone with rights to "Show All" assignments can view but cannot complete assignments for others. Alert assignments are displayed with a ‘complete’ (check mark) icon. When Alert Assignments are completed they are changed to a State of "Completed" and remain in the Job Alert View. An automatic comment is added that includes: o State (completed) o The last Assignee o User ID who updated the Assignment o Date and Time the Assignment was completed. Like Standard Alerts, Alert Assignments for all employees are displayed in the Job View but can only be edited or dismissed by the assigned employee. Alert Assignments can be re-opened. If an Alert Assignment is associated with a Task, when the Task’s Due Date is changed, the Alert Assignment’s Due Date is also updated. If an Alert Assignment is associated with a Task, when the Alert is marked complete, the Temp Completed date is updated for the related task on the schedule. Accessing Alerts and Alert Assignments Alerts Application - Full accessibility with Inbox, Sent, Dismissed/Completed and All Received. Filters and Groupings allow for viewing of Alerts at various levels. Left Pane o Inbox Displays Standard Alerts that have not been dismissed. Displays Alert Assignments for the assigned employee or all employees depending on the Assignment Filter setting. All Filters apply - See section on Filters for a description of what is available. Filter Levels Assignment Filters o Sent Alerts Displays all Standard and Alert Assignments initiated by the employee. o Dismissed Alerts Displays all Standard and Alert Assignment for the employee or all employees depending on the Assignment Filter setting. o Filter - Filter all types of alerts by: Last Updated Date (range) Updated 11/26/13 Page 11 of 24 Employee - Defaults to the employee logged in unless the Assignments Filter "Show All" is selected. Level - Filter by any level Use the "Clear Filter" button to clear the selections and start over. o Types - Buttons serve as additional filters to find certain types of Alerts: Show All - Displays all types of Alerts both Automatic and Manual. Alert - Displays Manual Alerts (Standard and Assignments). This is the most common and is the default option. Approvals - Displays Automatic Approval Alerts which are limited to PO, Expense Report and Timesheet approvals. Billing - Displays Automatic Billing Alerts. Calendar – Displays Automatic alerts generated by adding scheduled activities to the Calendar. Client Alert - Displays Client Alerts originated in the Client Portal. Client Contract – Displays Client Contract Alerts originated in Advantage Services. Employee Time Forecast Import Validation – Displays Alerts generated by Advantage Services with import errors (Media Ocean Import only). Media - Displays automatic Media alerts. [Future Use] Missing Time - Displays Automatic Missing Time Alerts. Production - Displays Automatic Production Alerts. Project Schedule - Displays Automatic Project Schedule Alerts. o Categories - Buttons serve as additional filters to find certain categories of Alerts. Show All - Displays all categories and is the default option. Action - Displays all Alerts in the Action category. Discussion Topic - Displays all Alerts in the Discussion Topic category. Event - Displays all Alerts in the Event category. Issue - Displays all Alerts in the Issue category. Review - Displays all Alerts in the Review category. o Dismiss All - Dismisses all open Alerts and Alert Assignments (completes) displayed in the window. Use the filters to dismiss just the types of Alerts desired. Toolbar - Toolbar options apply to all Alerts displayed in the view. o New Alert - Initiates a new Standard Alert o New Alert Assignment – Initiates an Alert Assignment. o Refresh - Refreshes the current view. o Search - Searches for text (case insensitive) in the Alert Subject and Alert Description. If searching for a number, it also searches the Alert ID and Job Number fields. o Clear - Clears the Search Criteria and refreshes the view. o Group/Filter - Groups and filters by the levels listed below. Grouping displays records only at the selected group level and displays Alerts at lower levels when possible. None - No grouping, displays all Alerts. Category - Groups by the Alert Category Updated 11/26/13 Page 12 of 24 Office - Groups Alerts assigned at the Office level. Client - Groups Alerts assigned at the Client level. Includes Division, Product, Job, Component, Task levels. Division - Groups Alerts assigned at the Division level. Includes Product, Job, Component, Task levels. Product - Groups Alerts assigned at the Product level. Includes Job, Component, Task levels. Campaign - Groups Alerts assigned at the Campaign level. Estimate - Groups Alerts assigned at the Estimate level. Includes Estimate Component level. Estimate Component - Groups Alerts assigned at the Estimate Component level. Job - Groups Alerts assigned at the Job level. Includes Job Component, Task levels. Job Component - Groups Alerts assigned at the Job Component level. Includes Task level. Task - Groups Alerts assigned at the Task level. Template - Groups by the Alert Assignment Workflow template. State - Groups Alerts by the State and only includes Alert Assignments. Due Date - Groups Alerts by Due Date. Priority - Groups Alerts by Priority. o Assignments Filter - Provides options for filtering Alert Assignments My Alerts and Assignments – Displays both Alerts and Alert Assignments for the user logged in. My Alerts - Displays Standard Alerts for the employee logged in. My Assignments - Displays Alert Assignments (only) for the employee logged in. All Assignments (rights permitting) - Displays Alert Assignments (only) for all employees. Allows managers and others to view all assignments for any level. Unassigned – Displays Unassigned Alerts. Bookmark – Allows saving of a filtered Alert Inbox as a bookmark. o EXCEL icon - Provides a full export of the filtered grid of Alerts including grouping. This allows for flexible reporting or lists. Grid Options The Grid display is customizable by deciding which columns to show by right clicking on the column header and selecting the columns to display: o View Alert - Icon to view the Alert. o Dismiss/Un-Dismiss Alert - Icon to Dismiss or Un-Dismiss the Alert. o Attachment - Icon to indicate that the Alert contains an attachment. o Subject - Displays the Subject of the Alert - Click to Sort By. o By - Displays the employee who last updated the Alert - Click to Sort By. o Last Updated - Displays the Last Date the Alert was updated. o Due Date - Displays the Alert Due Date - Click to Sort By. o State - Displays the current State of Alert Assignments (Standard Alerts will be blank) - Click to Sort by. Updated 11/26/13 Page 13 of 24 o Priority - Indicator for Highest, High, Normal, Low or Lowest priority. o Assigned To - Displays the current, assigned employee for Alert Assignments (Standard Alerts will be blank) - Click to Sort by. o Alert Type - Displays the Alert Type - Click to Sort by. o Category - Displays the Category - Click to Sort by. o ID - This is the ID of the Alert and is defined by the type of Alert and level. Standard Alerts - A generic Alert ID is assigned to all Alerts at any level and can be used for searching. Alert Assignments Job Level Alerts are given a separate sequence so that assignments can be tracked by individual ID at the job level. All Other Levels use the generic Alert ID mentioned above. All Alert ID's can be searched for in the Alert Application. Note that Alert ID's are also used in Email Replies and are important for tracking. o Version – Versions can be associated to an alert based on the Job Number. This option allows for issue tracking using Alerts or Alert Assignments. o Build – Further defines the Version. Job Alert - The Job Alert view is accessed from both the Job Jacket and the Project Schedule applications. The Job Alert is designed to display a diary of events (Standard Alerts) as well as all the Alert Assignments generated and completed for the selected Job Component and Task levels. These Alerts are displayed in a single box and are not separated into Inbox, Sent and Dismissed. Other Alert features are available to filter, group and sort the records so that the status of the job may be easily reviewed. From the Job Jacket, Estimate or Project Schedule, select Alerts from the toolbar. Left Pane o Types - Buttons serve as additional filters to find certain types of Alerts. All types are available, but only the ones listed apply to the Job view. Show All - Displays all types of Alerts both Automatic and Manual. Alert - Displays Manual Alerts (Standard and Assignments). This is the most common and is the default option. Production - Displays Automatic Production Alerts. Project Schedule - Displays Automatic Project Schedule Alerts. o Categories - Buttons serve as additional filters to find certain categories of Alerts. Show All - Displays all categories and is the default option. Action - Displays all Alerts in the Action category. Discussion Topic - Displays all Alerts in the Discussion Topic category. Event - Displays all Alerts in the Event category. Issue - Displays all Alerts in the Issue category. Review - Displays all Alerts in the Review category. o Dismiss All - Dismisses (completes) all open Alert Assignments (only). Use the filters to dismiss just the types of Alerts desired. Standard Alerts are not dismissed from this view. Updated 11/26/13 Page 14 of 24 Toolbar - Toolbar options apply to all Alerts displayed in the view. o New Alert - Initiates a new Standard Alert. o New Assignment – Initiates a new Alert Assignment. o Refresh - Refreshes the current view. o Search - Searches for text in the Alert Subject, Alert Description, User Name, and Employee Code. o Clear - Clears the Search Criteria and refreshes the view. o Group / Filter - Groups by the levels listed below. Grouping displays records only at the selected group level and displays Alerts at lower levels when possible. All group levels are available, but only the ones listed apply to the Job view. None - No grouping, displays all Alerts. Category - Groups by the Alert Category Job Component - Groups Alerts assigned at the Job Component level. Includes Task level. Task - Groups Alerts assigned at the Task level. State - Groups Alerts by the State and only includes Alert Assignments. o Show - Provides options for filtering Alert Assignments All Alerts & Assignments – Displays both Alerts and Alert Assignments for the job. All Alerts – Displays all Standard Alerts for the job. My Assignments - Displays Alert Assignments (only) for the employee logged in on the selected job. All Assignments (rights permitting) - Displays Alert Assignments (only) for all employees on the selected job. Allows managers and others to view all assignments for any level. Unassigned – Displays Unassigned Alerts. o Incl. Completed - For Alert Assignments, includes ones that have been completed for a full look at any level (open and completed Alert Assignments). o View All Comments - Alert Comments Icon Displays all Alerts for the Job in a single window with all related Comments o EXCEL icon - Provides a full export of the filtered grid of Alerts for the selected job. o Bookmark – Provides ability to “Save the Page” using bookmarks. Grid Options o View Alert - Icon to view the Alert. o Complete/Re-open Alert - Icon to complete or re-open alert assignments. o Dismiss – Icon to dismiss alerts (standard or cc of alert assignments). Note: Not available when viewing from Job Jacket, Estimate or Project Schedule. o Attachment - Icon to indicate that the Alert contains an attachment. o Subject - Displays the Subject of the Alert - Click to Sort By. o By - Displays the employee who last updated the Alert - Click to Sort By. o Last Updated - Displays the Last Date the Alert was updated. o Due Date - Displays the Alert Due Date - Click to Sort By. o State - Displays the current State of Alert Assignments (Standard Alerts will be blank) - Click to Sort by. Updated 11/26/13 Page 15 of 24 o Priority - Indicator for Highest, High, Normal, Low or Lowest priority. The Priority can be modified from within the grid. o Assigned To - Displays the current, assigned employee for Alert Assignments (Standard Alerts will be blank) - Click to Sort by. The Assigned To can be modified from within the grid. o Alert Type - Displays the Alert Type - Click to Sort by. o Category - Displays the Category - Click to Sort by. o Client – Displays the Client associated to the Alert or Alert Assignment. Click to Sort by. o ID - This is the ID of the Alert. Standard Alerts - The generic Alert ID is displayed and can be used for searching. Alert Assignments - The Job Level Alert ID (unique list of Alert ID's by job) is displayed and can be used for searching. o Version - Identifies the Version number. Click to Sort by. o Build – Identifies the Build number for the Version. Version and Build are only available when the alert is at the Job or Job Component level and the Job or Job Component must be setup in Software Version Maintenance. These fields can be used for reporting purposes. Task Alert – Alerts and Alert Assignments may be generated at the Task Level to: Activate the Task – All tasks default to ‘projected’ until they are activated or the priority is changed. Initiating an Alert or Alert Assignment at the task level automatically activates the task. Track notifications sent to staff members and their comments. Create a series of assignments as a subset of task on the schedule. Update Alert and Assignment Due Dates when the Task’s Due Date changes. Alert manager when the Task is marked “Temp Complete”. Alert Task Employees when a Task is made ‘active’. Use Alerts and/or Alert Assignments based on what they can do for you. Knowing the features of both options will help you determine which ones to use: Alerts Activates the Task. Creates Alert (to do) in the Alert Inbox for one or more recipients. Sender (PM) is included as a recipient automatically, even if not an assignee on the task. Comments made by any recipient keep all recipients and PM informed on the status. Dismissal of the Alert marks the task complete for that recipient on the schedule. Displayed at the Job, Schedule and Task level. Alert Assignments Activates the Task. Updated 11/26/13 Page 16 of 24 Creates an Alert Assignment (to do) in the Alert Inbox for one assignee which is then routed to other recipients as the state of the Alert changes. This allows for subset of assignments for the Task. Comments made by the assignee are also sent to the original Sender (PM) so both remain informed on the status of the assignment. Dismissal of the Alert Assignment marks the task complete for all assignees on the task. It assumes the series of assignments has been completed. Displayed at the Job, Schedule and Task level. Viewing Task Alerts from various applications: Alerts My Alerts & Assignments – Displays both Alerts and Alert Assignments for you. My Alerts – Displays your Alerts. My Assignments – Displays your Alert Assignments. All Assignments – Displays all Alert Assignments. Unassigned Job Jacket My Alerts & Assignments – Displays both Alerts and Alert Assignments for the job. My Alerts – Displays all Alerts for the job. My Assignments – Displays your Alert Assignments for the job. All Assignments – Displays all Alert Assignments for the job. Unassigned – Displays Unassigned Alert Assignments for the job. Estimate My Alerts & Assignments – Displays both Alerts and Alert Assignments for the job. My Alerts – Displays all Alerts for the job.. My Assignments – Displays your Alert Assignments for the job. All Assignments – Displays all Alert Assignments for the job. Unassigned – Displays Unassigned Alert Assignments for the job. Project Schedule My Alerts & Assignments – Displays both Alerts and Alert Assignments for the job. My Alerts – Displays all Alerts for the job. My Assignments – Displays your Alert Assignments for the job. All Assignments – Displays all Alert Assignments for the job. Unassigned – Displays Unassigned Alert Assignments for the job. Task Displays both Alerts and Alert Assignments related the Task. Alert Desktop Object - Displays Inbox only with various Filters and Groupings that allow for viewing of Alerts and Alert Assignments for the employee logged in. Filter by Alert Type and Category and for Assignments only (check box). Group by the same levels allowed in the Alerts application. Updated 11/26/13 Page 17 of 24 Search the Alert Subject to find associated Alerts. Dismiss Alerts and Assignments as desired. In/Out option - Check in and out using this option which is reflected on the In/Out board. User Defined Columns - Click on the Column Preferences button to choose columns. Alerts and Alert Assignments - Setup Requirements Advantage - Agency Maintenance System and Alert Options - Alert Options Activate System Generated Alerts - Select this option to activate the 'automatic' Alerts that are generated based on Alert Event Settings. If you wish to control all alerts by using Manual Alerts, deactivate this option (leave it unchecked). Include Alert Groups in Prompt Window (applies to automatic or system generated alerts only)- Select this option to allow users to see all Alert Groups when prompted to send the Alert. If this option is not selected, the only Alert Group displayed for automatic Alerts is the default one. Include Attachments with Alerts Only (Exclude from E-Mail) - Check to exclude attachments from all Emails generated from Alerts. Leave unchecked to allow the users to determine this at the Alert level in Webvantage. o Exclude Attachment by Default - If the option above is unchecked, select the default desired. Check to exclude the attachment from the E-Mail by default. Leave unchecked to include the attachment from the E-Mail by default. System and Alert Options - SMTP E-Mail Setup Complete this section if E-Mail messages are to be sent from the system. See SMTP Setup instructions for details. Pop3 Settings If you plan to use the Email Listener to track replies made to Alert Emails through your email program, you’ll need to complete this section. See the Email Listener Users Guide for more information on this feature. Advantage - Employee Maintenance Employee Settings - Alert Settings Receives Email - Check if the employee should receive Email Messages when Alerts are generated. Receives Alerts - Check if the employee should receive Alerts. If not checked, the employee will not be notified when an Alert is generated for them. E-Mail Address - Enter the employee's E-Mail address. Setup Tab - Alert Groups Updated 11/26/13 Page 18 of 24 From the Setup Tab, employees may be quickly assigned to one or more existing Alert Groups. Advantage - Alert Groups Maintenance Alert Groups contain groups of employees that should be notified when an Alert is sent. Alert Groups can be established by client, team or any other grouping that allows users to easily find the correct recipients for any alert being sent. Automatic Alerts without a prompt go to all recipients in the default Alert Group. Manual Alerts or Alerts that are setup to prompt the user prior to sending, allow for selection of recipients from any Alert Group. So Alert Groups could be setup by category or department. Alerts may be setup as 'default' at the Product, Job Component, or Campaign levels. When the default is present Advantage - Alert Event Settings Maintenance Alert Event settings control automatic alerts that are generated in both Advantage and Webvantage. This document only refers to the automatic alerts that are triggered by Webvantage events. Those include: Job - Created Job - Modified Specifications - Created Specifications - Modified Check the box for these events to trigger an automatic Alert for each Alert Group. Check the Prompt option if a 'prompt' should appear, allowing the user to cancel the Alert, make a diary entry only, or change recipients. The PDF attachment option is not applicable to these Webvantage options. Alert Assignment Maintenance located in Webvantage – Maintenance – Project Management This application contains four tabs that allow you to design Workflow Templates that contain States and Employees (assignees) for use on Alert Assignments. States States are the various statuses that a Task or Issue can be 'in' at any point in time. The state of the assignment for the selected template determines which employees will be available as assignees (or as the default employee). Before adding States, consider how you might use Alert Assignments. Determine what types of Workflow Templates you'll create, and then design a list of States that can be shared between various templates, where possible. Because they are selected by the individual employees who are completing their issues and tasks or moving them on to other staff members, create States that mimic the actions they typically represent or the statuses they can be related to, such as "To Copy", "To Proofreading", Updated 11/26/13 Page 19 of 24 "For Review", "To Manager" OR "Copy Complete", "Proofreading Complete", "Review", "For Approval", etc. For issue tracking you might see things like "New", "To Developer", "Fixed", "To QA", "Doc Needed", "Passed", "Failed", etc. See additional samples later in this document. Selection of the State determines where the assignment will go 'next', so uses States that relate to how you operate and where you want tasks and issue to 'go' when the State is selected. States - Data Entry - States are required in order to create Templates with workflow detail. Type the State description into the State Name field. The Active flag will default to checked (true). States can be deactivated later if necessary. If deactivated, they will no longer be available for use when adding new States to new or existing templates. Select a Default Category. When an Alert Assignment is assigned to a State, the Alert Category is set automatically based on this default. Available Categories are: o Action o Discussion Topic o Event o Issue o Review Click on the "plus" icon to save the new State or the "save" icon to update an existing one. Click on the "minus" icon to remove the unsaved State or the "X" icon to delete an existing one. Templates (Template and Template Detail) Templates represent the various types of workflow that will drive routing of the Alert Assignments. Templates contain a description (header record) and detail. The template detail is where the States and Employees are entered to create the workflow path. Templates - Data Entry - Templates are required in order to add workflow detail. Type the Template description into the Template Name field. The Active flag will default to checked (true). Templates can be deactivated later if necessary. If deactivated, they will no longer be available for use when creating Alert Assignments. Click on the "plus" icon to save the new Template or the "save" icon to update an existing one. Click on the "minus" icon to remove the unsaved Template or the "X" icon to delete an existing one. Template Detail Template Detail- Data Entry - Template Detail where the States and Employee assignments are established to define the workflow for each Template. Updated 11/26/13 Page 20 of 24 Select the Template to define. Four boxes will appear that represent the options needed to complete the template. Each section must be completed in order to establish a valid Workflow Template. Available States - Lists all the active States that can be applied to the selected Template. States Currently in the Template o Lists the States that have been assigned to for use with the selected Template. o To add States to the Template, use the arrow keys or drag and drop. Use control/click to select multiple States. o States may be 'ordered' by using the arrows to the right of the box or drag and drop. States can be selected in 'any' order on the Alert Assignment, but they can ordered logically here to help employees visualize a natural workflow. o Employees are assigned by State, so to assign employees, click on a State. Only one State may be selected at a time, but the assignments may be copied from one State to another. Available Employees o Make a filter selection to narrow the list of employees to select from. Employees are assigned to the Template by State, so you can narrow the list to the type of employees that would apply. For example, if the State is "To Copy", you may want to filter by Role to display only copywriters. If you work in client or other teams, you may create Templates by Team and assign the set of employees that work on that team by State. Example: Workflow Template: Creative Workflow - Team A State: To Copy Select from either Alert Groups or Roles to find the employees that write copy for Team A. o Select a Filter. Options are: Manual – Displays all employees in the database. By Role - Displays employees for the selected Role. By Department – Displays employees in the selected Department. By Alert Group - Displays employees in the selected Alert Group. Employees Currently in State o Lists the team of Employees available for assignment when using the selected Workflow Template and State. Must select at least one employee to be part of the Assigned Team. o To add Employees the Template/State, use the arrow keys or drag and drop. Use control/click to select multiple Employees. o Select a Default Employee by dragging an Employee from either the Available Employees box or the Current Assignment Team box onto the Default Employee icon. This Employee will be the default assignee for the selected Workflow Template and State. The default may always be overridden, so include anyone that could possibly be assigned to the task or issue. o Click on "Copy Current Assignment Team" to copy the employees displayed to other States in the template. Click on one or more states to copy to. Updated 11/26/13 Page 21 of 24 Template Detail- Copy Current Template - Select this option to copy an existing template (with the option to copy the team or not) to a new template. Sample Workflow Templates with States Create Workflow Templates by major types of work such as Creative Process, Job Opener, Print Production Process, Broadcast Production Process, Issue Tracking, Document Approval (any), Request for Proposal, IT Ticket Tracking, etc. Assign workflows to the Project level or even at the Task level, depending on how you manage your projects. You may create different templates by Client or Other Teams. Each State within the workflow creates a “to do” on the assignee’s list. As each state is completed, the assignee clicks the new or next state. This ensures that each step is completed and the date and time of completion is tracked for everyone to see. Comments can be added to the alert to keep others informed on the status. States can be done in any order if needed, this allows for a process to be repeated multiple times until it is completed. continued… Updated 11/26/13 Page 22 of 24 Alert Assignment - Workflow Template Name: Job Opener Typically added to the Job/Component (not task), prior to creating the schedule. Action Completed Click State Client requests new New Job project. AM opens the job in WV and adds the Job Opener workflow template (to the Job/Comp) to start the routing process. Job activation Project Brief complete. Assignee Action to Take AM Fill out required job details or fields. Upload any relevant preliminary documents, update comments and notes to reflect the scope of the job, available. Brief is done and routed to CD for approval. Send to Client for Approval. Job is created and all documents uploaded. Project Brief Approval AM, CD Activate Job PM Project Brief is approved. Assign Team CD Team is selected. Confirm Team CD Team is confirmed. Create Schedule PM AM Note: This state may be skipped if done upon job opening. Go to next. Fill out project brief form with as much detail as possible. Requires client and CD approval. CD reviews and approves, routes back to AM AM gets Client Approval Make Job Jacket (Manual) if used for artwork. Create Initial Timeline, if applicable. Responsible party determines the team that will be assigned. Enter in job notes or assign the appropriate Alert Group to use the Apply Team feature. Creative Director confirms or changes team assignments. Project manager creates the schedule based on all the information given. Sends general Alert (Project Schedule) to team alerting them of the general schedule. Workload is established as team is assigned. When workflow is complete: Click Complete and the last state will remain with the date and time when it was completed. It can also be re-opened if done in error! Everything goes back to the way it was. Updated 11/26/13 Page 23 of 24 Alert Assignment - Workflow Template Name: Copywriting Typically added to the Task to establish a series of assignments that are routed by the staff. Action Completed PM determines that copy may begin. Initial copy is complete and ready for internal approval. Copy requires proofreading. Click State Copy – Create Copy – Internal Approval Assignee Action to Take CR Write initial copy based on creative direction specified on the job. AM Account Manager reviews copy and determines if revisions are required. Copy - Proof PR Copy requires revisions requested either internally or by client. Copy is internally approved and ready to send to client. Copy us approved internally and by client. Copy – Revisions CR Copy – To Client AM Copy Approved PM Proofreader reviews copy for mistakes. Send to Copy Revision for corrections. When complete, send to Internal Approval. Copywriter makes revisions requested. Returns to AM for approval when done (repeat state above). Return to Proofreader as needed. Client either requests revisions or approves. PM reviews and completes the workflow. OR the AM can mark approved and complete the workflow. Alert Assignment - Workflow Template Name: Issue Tracking Typically added to the Job/Component (not task), to track bugs and issue on digital projects. Action Completed Click State Assignee Action to Take Issue found/reported Developer Selected Development Complete Assign QA. This may be a QA or the PM. Dev, PM or QA needs more info. Can't recreate the issue As designed If issue requires doc. Issue failed Issue passed and doc complete. Released New Issue Issue to Dev Issue Fixed PM DEV PM Assign Developer Complete programming. Determine testing required Issue to QA QA or PM PM QA Testing Cannot Recreate As Designed Assign to Doc Issue Failed Issue Passed PM Re-test and provide more info PM DOC PM PM Notify Client PM Review and "Assign to PM" when done Write Doc prior to passing issue. Assign Developer Assign to a Release, update release document if applicable. Notify if applicable. Updated 11/26/13 Need more Info Provide information Page 24 of 24