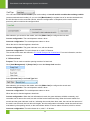
1
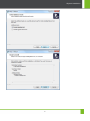
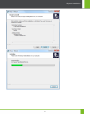
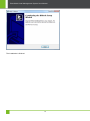
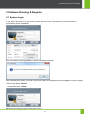
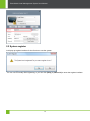
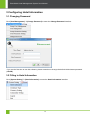
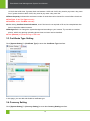
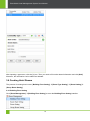
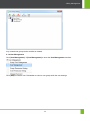
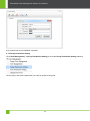
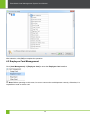
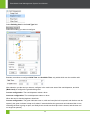
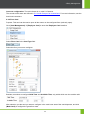
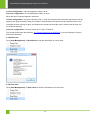
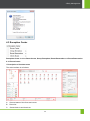
Contents User Manual Hotel Lock System Software Version: 1.1.9.6 Document Version: V2.0 Date: August, 2014 All design and specification declared are subject to change without notice in advance. I Contents Contents 1 System Installation ................................................................................................. 1 1.1 Environmental Requirement of System Installation ............................................................. 1 1.2 Database and System Installation ........................................................................................ 1 1.2.1 One-click Database Installation .................................................................................. 1 1.2.2 One-click Software Installation.................................................................................... 6 2 Software Running & Register ................................................................................ 11 2.1 System Login ....................................................................................................................... 11 2.2 System register .................................................................................................................... 12 3 Configuring Hotel Information ................................................................................ 14 3.1 Changing Password............................................................................................................. 14 3.2 Filling in Hotel Information ................................................................................................... 14 3.3 Certificate Type Setting ....................................................................................................... 16 3.4 Currency Setting .................................................................................................................. 16 3.5 Commodity Setting .............................................................................................................. 17 3.6 Creating Hotel Rooms ......................................................................................................... 18 3.6.1 Building Floor Setting ................................................................................................. 18 3.6.2 Room Type Setting .................................................................................................... 20 3.6.3 Room Setting ............................................................................................................. 22 3.6.4 Group Room Setting .................................................................................................. 25 3.7 Setup Card ........................................................................................................................... 25 3.7.1 Authorised Card ......................................................................................................... 26 3.7.2 Time Sync Card ......................................................................................................... 27 3.7.3 Room Card ................................................................................................................. 27 3.7.4 Lost Card .................................................................................................................... 29 3.7.5 Record Card ............................................................................................................... 30 3.7.6 Close card .................................................................................................................. 31 3.7.7 Guest exit card ........................................................................................................... 31 3.7.8 Group setting card...................................................................................................... 32 3.8 Logout and Exit .................................................................................................................... 33 4 Daily Management ................................................................................................. 34 4.1 User Management ............................................................................................................... 34 4.1.1 Group User Management .......................................................................................... 34 4.1.2 User Management...................................................................................................... 35 4.1.3 Group Permission Setting .......................................................................................... 36 4.1.4 User Permission Setting ............................................................................................ 37 4.2 Employee Card Management .............................................................................................. 38 I Biosafelock Hotel Management System User Manual 4.2.1 Emergency Card ........................................................................................................ 40 4.2.2 Master Card................................................................................................................ 40 4.2.3 Building Card .............................................................................................................. 41 4.2.4 Floor Card .................................................................................................................. 43 4.2.5 Read Card .................................................................................................................. 44 4.2.6 Clear Card .................................................................................................................. 44 4.3 Reception Center ................................................................................................................. 45 4.3.1 Room Center .............................................................................................................. 45 4.3.2 Group Reception ........................................................................................................ 51 4.3.3 Room Reservation ..................................................................................................... 59 4.3.4 Check Room .............................................................................................................. 62 4.4 Consumption Management ................................................................................................. 62 4.5 Database Log ...................................................................................................................... 63 4.5.1 Guest Details .............................................................................................................. 64 4.5.2 Expenses Log ............................................................................................................ 64 4.5.3 Other Logs.................................................................................................................. 65 4.5.4 Card Setting Log ........................................................................................................ 65 4.5.5 Group Card Setting Log ............................................................................................. 66 4.5.6 Lock Open Log ........................................................................................................... 66 4.6 Database Management ....................................................................................................... 67 5 Appendix................................................................................................................ 68 5.1 Sound Prompt of an Invalid Card ........................................................................................ 68 5.2 Database Configuration ....................................................................................................... 68 5.2.1 Configuring the Server of Database .......................................................................... 68 5.2.2 Create an Account for Database Login...................................................................... 70 5.3 System Setting..................................................................................................................... 75 II 1 System Installation 1 System Installation 1.1 Environmental Requirement of System Installation Operating system: Microsoft Windows XP SP3 or more advanced Database: Microsoft SQL Server 2005 or more advanced Available Memory: 1G or above 1.2 Database and System Installation 1.2.1 One-click Database Installation Decompress HotelLock_Setup.rar, double click [Biolock.exe], and choose the language. Firstly, you should install the Hotel Lock System. The system will prompt you that Microsoft SQLEXPRESS 2005Database will be installed. If yes, please click [Yes] to finish the database installation, otherwise click [Cancel] in the following pictures will appear during the database installation. 1 Biosafelock Hotel Management System User Manual 2 1 System Installation The above pictures show that the database installation is done, and the Biolock software installation will start. Just follow the prompts and click [Next] to install Biolock software. Click [Browse] to set the installation path. 3 Biosafelock Hotel Management System User Manual 4 1 System Installation 5 Biosafelock Hotel Management System User Manual The installation is finished. 1.2.2 One-click Software Installation If database has already existing in your computer, so you only need to install the Biolock software. Decompress HotelLock_Setup.rar, double click [Biolock.exe], and choose the language. 6 1 System Installation 7 Biosafelock Hotel Management System User Manual 8 1 System Installation 9 Biosafelock Hotel Management System User Manual The installation is finished. 10 2 Software Running & Register 2 Software Running & Register 2.1 System Login If you are the first time to run the system, please wait a moment, it will spend you several minutes to automatically create a database. After successfully creating database, a picture will appear as below: After restarting the system, you need to input login Name and password and click [Login] to enter the system. Default Login Name: admins Default Password: 123456 Choose the language type in setting and save it. 11 Biosafelock Hotel Management System User Manual 2.2 System register It will pop up register interface for the first time to use the system. You can use it normally after registering, or you can click [Help] [About Us] to enter the register interface. 12 2 Software Running & Register Note: Only distributor can provide register key. 13 Biosafelock Hotel Management System User Manual 3 Configuring Hotel Information 3.1 Changing Password Click [User Management] [Change Password] to enter the Change Password Interface. If you are the first time to use this software, please remember to change the default Administrator password (123456). 3.2 Filling in Hotel Information Click [System Setting] [Hotel Information] to enter the Hotel Information Interface. 14 3 Configuring Hotel Information You can input and modify hotel information like Hotel Name, Hotel Web, Hotel Number, Phone, Address, Fax, and Post. Note: Stay Day indicates how many days the user will stay. The system default 1 day when issuing a card. Cleaning Time Limit indicates the cleaning time, the default time is 10 minutes (measured in minutes). It can be modified according to the actual circumstance of the hotel. When guests checkout, the room will automatically turn into empty and dirty , 10 minutes later, it will automatically become available, if you set 0, you need to manually modify room status Check In Time can be set by the hotel. If guests check in before Check In Time, their check out time must be today, If guests check in during Check In Time, their check out time is the next day. As shown above, it is set to 10:00, if guests check in before 10:00, then check out at 12:30 on the day, if guests check in after 10:00, then check out at 12:30 on the next day. Check Out Time indicates the default expiry time of the guest stay. The default expiry time is 12:30 of every day. Minimum hour for Hour Room means how many hours at least the guest has to stay, it can be changed to by hotel management staff. Extended Check can be set by the hotel. If guests check out between the first Extended Check and the second Extended Check, they need to pay extra half a day room fee; if guests check out after the second Extended Check, they need to pay extra a day room fee. As shown above, the Check Out Time is 12:30, the first Extended Check is 14:00, and the second Extended Check is 18:00. It means that from 12:30 to 15 Biosafelock Hotel Management System User Manual 14:00 for the buffer time, if guests check out between 14:00 and 18:00, they need to pay extra a day room fee; if guests check out after 18:00, they need to pay extra a day room fee. Room Capacity indicates the maximum number of cards that can be issued for a room before check-out. Tax Type: fill the Tax Type manually. Tax Rate: set the Tax Rate manually. After ticking Confirm Guest Information, even if the item is not required to fill out, but receptionists also have to input the related contents. Background. You change the system background according to your interest. Try to avoid an oversize picture, which may prolong uploading picture time and even lead to deadlock. Click [Browse] to upload the logo of the hotel. 3.3 Certificate Type Setting Click [System Setting] [Certificate Type] to enter the Certificate Type Interface. In this page, you can add and disable a certificate type. 3.4 Currency Setting Click [System Setting] [Currency Setting] to enter the Currency Setting Interface. 16 3 Configuring Hotel Information In this page, you can add and disable a currency type. Note that the Ex-Rate is inputted by hotel staffs, not fluctuating according to the market’s change. 3.5 Commodity Setting Click [System Setting] [Commodity Setting] to enter the Commodity Setting Interface. 17 Biosafelock Hotel Management System User Manual After inputting a type name, click the [+] icon. Then you need to fill out the related information and click [Add]. Moreover, the information can be edited and deleted. 3.6 Creating Hotel Rooms The process of creating hotel rooms: [Building Floor Setting] [Room Type Setting] [Room Setting] [Group Room Setting]. 3.6.1 Building Floor Setting Click [Room Management] [Building Floor Setting] to enter the Building Floor Setting Interface. 18 3 Configuring Hotel Information Creating a building To create a building: select the hotel name, input a Name and Code in the Building Setting section, and click [New], as shown in the figure below. Create a floor To create a floor: select a building name, input Name and Code in the Floor Setting section, and click [New]. 19 Biosafelock Hotel Management System User Manual Deleting a floor To delete a floor: select the name of the floor to be deleted, and click [Disable Floor]. Only when all the rooms of this floor have been disabled can this floor be deleted. Deleting a building To delete a building: select the name of the building to be deleted, and click [Disable Building]. Only when all the floors in this building have been disabled can this building be deleted. 3.6.2 Room Type Setting Click [Room Management] [Room Type Setting] to enter the Room Type Setting Interface. 20 3 Configuring Hotel Information Adding a room type: filling in room type information, and click [New Type], as shown in the figure below: Disabling a room type: select the type, and click [Disable]. Only a room type which has never been used can be deleted. 21 Biosafelock Hotel Management System User Manual 3.6.3 Room Setting Click [Room Management] [Room Setting] to enter the Room Setting Interface. Creating a room Enter room information. 22 3 Configuring Hotel Information Room Status: five room status you can choose. There are vacant, unclean, clean, repairing, stop used. The new room is defaulted as vacant room. You can set the room status for each room, Note: The Room Code should be unique, and the value is less than 256. Create a batch of rooms Floor Code Length indicates the length of a floor name. For example, for Room 1201 on Floor 12, 12 is the floor name whose length is 2; for Room 412 on Floor 4, 4 is the floor name, whose length is 1. Start Room No.: The number of first room. Quantity: How many rooms will be created. Special Option: Hotel management staff can add Prefix in the room number or suffix behind the room number. When you fill out all information above, then you need to click [Batch], confirm the prompt and click [Yes] to complete batch creation. 23 Biosafelock Hotel Management System User Manual Disabling/Restoring rooms Choose a room, click , and then click . If a room which has never been used, it can not be restored after disabled; otherwise, it can be restored after disabled. Click again. , and then click , disable rooms (have used before) which are ticked up will appear 24 3 Configuring Hotel Information To restore a room, you can choose a disable room, click , and then click . 3.6.4 Group Room Setting Click [Room Management] [Group Room Setting] to enter the Group Room Setting Interface. Step 1: Add a new group name. Step 2: Select and add rooms to the group. The figure below illustrates creation of a new group named Single Room, and moving of all the rooms of the Single Standard Room into this group: 3.7 Setup Card Click [Card Management] [Setup Card] to enter the Setup Card Interface. 25 Biosafelock Hotel Management System User Manual Setup cards include an Authorised Card, Time Sync Card, Lost Card, Record Card, Close Card, Guest Exit Card, Group Setting Card, and Room Card. Note: Before operating this menu, make sure that card dispenser connects with a computer. Otherwise, it is impossible to read or write a card; when a new lock is installed, please be sure to configure an Authorised Card, Time Sync Card, and Room Card in turn, and initialize the lock. 3.7.1 Authorised Card Purpose: This is used to authorised a hotel lock. Only after a hotel lock is authorised can it reacts to a corresponding card of the hotel. Otherwise, it will alarm. Click [Card Management] [Setup Card] to enter the Setup Card Interface. Select [Authorised Card] in the Card Type field. You can select [Unlock Warming], and specify how many times the alarm will be given. Or you may disable it. After selection, put a card on the reader, and click [Make Card] to configure the authorised card. Correct configuration: The card dispenser makes a buzz. 26 3 Configuring Hotel Information Incorrect configuration: The card dispenser makes no buzz. When the card is checked against a hotel lock: Correct configuration: The green indicator is on, with two buzzes. Incorrect configuration: The red indicator is on, with 5 ~15 buzzes. The sounds of the alarm are defined in 5.1 Sound Prompt of an Invalid Card. For more information, please refer to the hotel lock instructions. 3.7.2 Time Sync Card Purpose: This is used to configure time for a hotel lock. Once configured, a hotel lock will have its time synchronized with the system time. Otherwise, some error alarms, like early expiry or extended use, are likely to occur to an issued card when checked. Click [Card Management] [Setup Card] to enter the Setup Card Interface. Select [Time Sync Card] in the Card Type field. You can either synchronize with the system time or modify the time as necessary. After selection, put a card on the reader, and click [Make Card] to configure the time card. Correct configuration: The card dispenser makes a buzz. Incorrect configuration: The card dispenser makes no buzz. When the card is checked against a hotel lock: Correct configuration: The green indicator is on, with two buzzes. Incorrect configuration: The red indicator is on, with 5-15 buzzes. The sounds of the alarm are defined in 5.1 Sound Prompt of an Invalid Card. For more information, see the hotel lock instructions. 3.7.3 Room Card Purpose: This is used to configure a lock address for a hotel lock. Click [Card Management] [Setup Card] to enter the Setup Card Interface. 27 Biosafelock Hotel Management System User Manual Select [Room Card] in the Card Type field. Click to search for empty rooms. Select a floor to view the rooms on it, and tick the room you want to configure. 28 3 Configuring Hotel Information After selection, put a card on the reader, and click [Make Card] and select [Yes] in the prompt window to configure the room card. Correct configuration: The card dispenser makes a buzz. Incorrect configuration: The card dispenser makes no buzz. When the card is checked against a hotel lock: Correct configuration: The green indicator is on, with two buzzes. Incorrect configuration: The red indicator is on, with 5-15 buzzes. The sounds of the alarm are defined in 5.1 Sound Prompt of an Invalid Card. For more information, see the hotel lock instructions. 3.7.4 Lost Card Purpose: In the valid time of the card, it is used for the following two cases: (1) Lost current number: This is used to report loss of a card. When a card is reported lost, the current hotel lock will react to it no more. (2) Lost all card No. smaller than existing card No. This is used to restrict access of a card number. When access is restricted, the current hotel lock will react no more to any card with a number smaller than the access-restricted card number. Click [Card Management] [Setup Card] to enter the Setup Card Interface. Select [Lost Card] in the Card Type field. 29 Biosafelock Hotel Management System User Manual You can select Lost current number (lost card number) or Lost all card No. smaller than existing card No. (access-restricted card number). Or you can click [Max Number] to register loss of an access-restricted card, but this function must be used with caution, when the configuration is completed, all the cards issued previously will be invalid to the configured lock. After selection, put a card on the reader, and click [Make Card] to configure the lost card. Correct configuration: The card dispenser makes a buzz. Incorrect configuration: The card dispenser makes no buzz. When the card is checked against a hotel lock: Correct configuration: The green indicator is on, with two buzzes. Incorrect configuration: The red indicator is on, with 5-15 buzzes. The sounds of the alarm are defined in 5.1 Sound Prompt of an Invalid Card. For more information, see the hotel lock instructions. 3.7.5 Record Card Purpose: This is used to read the opening records of a hotel lock. Click [Card Management] [Setup Card] to enter the Setup Card Interface. Select [Record Card] in the Card Type field. After selection, put a card on the reader, and click [Make Card] to configure the record card. Correct configuration: The card dispenser makes a buzz. Incorrect configuration: The card dispenser makes no buzz. When the card is checked against a hotel lock: Correct configuration: When the lock information is read, the green indicator will blink constantly, and remember not to remove the card, but wait until the buzzer starts sounding. When the buzzer makes five sounds and the green indicator is still on, indicating the records have been read, the card can be removed. If the card is not removed, the lock will read it again, but the configuration information inside the card has been overwritten by the opening record, so the red indicator will be on and an alarm will sound, which is normal. Incorrect configuration: The red indicator is on, with 5 ~15 buzzes. 30 3 Configuring Hotel Information Note: If the green indicator starts blinking in the very beginning, but before the whole operation is completed, the red indicator is on and 14 buzzes are sounded, that indicates only a part of the record has been read for some error. The other sounds of the alarm are defined in 5.1 Sound Prompt of an Invalid Card. For more information, see the hotel lock instructions. 3.7.6 Close card Purpose: This is a card used to disable all the current hotel locks. Any hotel lock to which this card has been applied will react no more to any card, and can be enabled by applying the authorised card to it. Click [Card Management] [Setup Card] to enter the Setup Card Interface. Select [Close Card] in the Card Type field. After selection, put a card on the reader, and click [Make Card] to configure the close card. Correct configuration: The card dispenser makes a buzz. Incorrect configuration: The card dispenser makes no buzz. When the card is checked against a hotel lock: Correct configuration: The green indicator is on, with two buzzes. Incorrect configuration: The red indicator is on, with 5 ~15 buzzes. The sounds of the alarm are defined in 5.1 Sound Prompt of an Invalid Card. For more information, see the hotel lock instructions. 3.7.7 Guest exit card Purpose: This is used to check out. Once configured, any guest card can no longer open the door. Click [Card Management] [Setup Card] to enter the Setup Card Interface. Select [Guest Exit Card] in the Card Type field. After selection, put a card on the reader, and click [Make Card] to configure the guest exit card. Correct configuration: The card dispenser makes a buzz. 31 Biosafelock Hotel Management System User Manual Incorrect configuration: The card dispenser makes no buzz. When the card is checked against a hotel lock: Correct configuration: The green indicator is on, with two buzzes. Incorrect configuration: The red indicator is on, with 5 ~15 buzzes. The sounds of the alarm are defined in 5.1 Sound Prompt of an Invalid Card. For more information, see the hotel lock instructions. 3.7.8 Group setting card Purpose: This is used to set the group type to which the current hotel lock belongs. When a configured group number card is used to open a door, only if the card is a member of the group to which the lock belongs can the lock be opened. Click [Card Management] [Setup Card] to enter the Setup Card Interface. Select [Group Setting Card] in the Card Type field. You can set or delete all groups, set or delete selected groups. Double-click a listed group to add a corresponding group. Each setting card can contain up to six groups. Users can use special options for group setting, which are defined as follows: 32 3 Configuring Hotel Information Set all groups: Set selected groups: Delete all groups: Delete selected groups: After selection, put a card on the reader, and click [Make Card] to configure the group setting card. Correct configuration: The card dispenser makes a buzz. Incorrect configuration: The card dispenser makes no buzz. When the card is checked against a hotel lock: Correct configuration: The green indicator is on, with two buzzes. Incorrect configuration: The red indicator is on, with 5-15 buzzes. The sounds of the alarm are defined in 5.1 Sound Prompt of an Invalid Card. For more information, see the hotel lock instructions. 3.8 Logout and Exit Click [Logout] to logout from the system. Click [Exit] to exit from the system. 33 Biosafelock Hotel Management System User Manual 4 Daily Management 4.1 User Management Click [User Management] in the user menu to pop up the submenus as follows, which will be described respectively in the sections that follow. 4.1.1 Group User Management Click [User Management] [Group User Management] to enter the Group User Management Interface. Click [Add] to create your own user group, such as Manage Groups and Receptionist. When the user group is created, it will be listed as shown in the figure below. 34 4 Daily Management Any created user group can be modified or deleted. 4.1.2 User Management Click [User Management] [User Management] to enter the User Management Interface. Click [Add] to create a user. Remember to select a user group which the user belongs. 35 Biosafelock Hotel Management System User Manual Any created user can be modified or deleted. 4.1.3 Group Permission Setting Click [User Management] [Group Permission Setting] to enter the Group Permission Setting Interface. Click a group, and tick the permission you want to assign to the group. 36 4 Daily Management After selection, click [OK] to complete the operation. 4.1.4 User Permission Setting Click [User Management] [User Permission Setting] to enter the User Permission Setting Interface. Click a user, and tick the permission you want to assign to the user. If there are no rights specified in particular for a user, the user’s permissions are limited to those assigned to his/her user group. 37 Biosafelock Hotel Management System User Manual After selection, click [OK] to complete the operation. 4.2 Employee Card Management Click [Card Management] [Employee Card] to enter the Employee Card Interface. Note: Before operating on this menu, be sure to connect the card dispenser correctly. Otherwise, it is impossible to read or write a card. 38 4 Daily Management The employee cards include an Emergency Card, Master Card, Building Card, Floor Card, and Group Card. The first four types of cards have the same setting interface, as shown in the figure above. A group card has a separate setting interface as follows: 39 Biosafelock Hotel Management System User Manual 4.2.1 Emergency Card Purpose: This is used to open a door in emergency. It can open any door. You can select the Override Manual Lock and Keep Open functions. Click [Card Management] [Employee Card] to enter the Employee Card Interface. Select Emergency Card in the Card Type field. You can select the Keep Open and Override Manual Lock functions. When Keep Open is ticked, the door will be opened and not closed until the card is applied again. When Override Manual Lock is ticked, even a door that is locked inside can be opened. Besides, remember to configure Valid Time and Available Time, only within which can the card be valid. After selection, put the card you want to configure in the card issue area of the card dispenser, and click [Make Card] to configure the emergency card. Correct configuration: The card dispenser makes a buzz. Incorrect configuration: The card dispenser makes no buzz. When the card is checked against a hotel lock: Correct configuration: The green indicator is on, with a buzz. Constantly open: The green indicator is on, with one buzz (the lock is opened or closed). Ordinarily open: The green indicator turns on, with one buzz (the lock is opened, and the door can be opened); the green indicator is kept on for about 5 seconds before the green and red indicators blink in turn, indicating the door is going to open, and finally there sounds one buzz (the lock is closed, and the door can no longer be opened). Incorrect configuration: The red indicator is on, with 5-15 buzzes. The sounds of the alarm are defined in 5.1 Sound Prompt of an Invalid Card. For more information, see the hotel lock instructions. 4.2.2 Master Card 40 4 Daily Management Purpose: This is used for general control of the hotel. It is actually equivalent to the emergency card, as it can open any door. You can select the Keep Open function or not. Click [Card Management] [Employee Card] to enter the Employee Card Interface. Select Master Card in the Card Type field. You can select Keep Open function or not. When Keep Open is ticked, the door will be opened and not closed until the card is applied again. Besides, remember to configure Valid Time and Available Time, only within which can the card be valid. After selection, put the card you want to configure in the card issue area of the card dispenser, and click [Make Card] to configure the master card. Correct configuration: The card dispenser makes a buzz. Incorrect configuration: The card dispenser makes no buzz. When the card is checked against a hotel lock: Correct configuration: The green indicator is on, with a buzz. Constantly open: The green indicator is on, with one buzz (the lock is opened or closed). Ordinarily open: The green indicator turns on, with one buzz (the lock is opened, and the door can be opened); the green indicator is kept on for about 5 seconds before the green and red indicators blink in turn, indicating the door is going to open, and finally there sounds one buzz (the lock is closed, and the door can no longer be opened). Incorrect configuration: The red indicator is on, with 5-15 buzzes. The sounds of the alarm are defined in 5.1 Sound Prompt of an Invalid Card. For more information, see the hotel lock instructions. 4.2.3 Building Card Purpose: This card can be used to open all the rooms in the configured building (ordinarily open). Click [Card Management] [Employee Card] to enter the Employee Card Interface. 41 Biosafelock Hotel Management System User Manual Select Building Card in the Card Type field. Select the building you want to configure: Besides, remember to configure Valid Time and Available Time, only within which can the card be valid. After selection, put the card you want to configure in the card issue area of the card dispenser, and click [Make Card] to configure the guest building card. Correct configuration: The card dispenser makes a buzz. Incorrect configuration: The card dispenser makes no buzz. When the card is checked against a hotel lock: Correct configuration: The green indicator turns on, with one buzz (the lock is opened, and the door can be opened); the green indicator is kept on for about 5 seconds before the green and red indicators blink in turn, indicating the door is going to open, and finally there sounds one buzz (the lock is closed, and the door can no longer be opened). 42 4 Daily Management Incorrect configuration: The red indicator is on, with 5-15 buzzes. The sounds of the alarm are defined in 5.1 Sound Prompt of an Invalid Card. For more information, see the hotel lock instructions. 4.2.4 Floor Card Purpose: This card can be used to open all the rooms on the configured floor (ordinarily open). Click [Card Management] [Employee Card] to enter the Employee Card Interface. Select Floor Card in the Card Type field. Select the floor you want to configure: Besides, remember to configure Valid Time and Available Time, only within which can the card be valid. After selection, put the card you want to configure in the card issue area of the card dispenser, and click [Make Card] to configure the guest floor card. 43 Biosafelock Hotel Management System User Manual Correct configuration: The card dispenser makes a buzz. Incorrect configuration: The card dispenser makes no buzz. When the card is checked against a hotel lock: Correct configuration: The green indicator turns on, with one buzz (the lock is opened, and the door can be opened); the green indicator is kept on for about 5 seconds before the green and red indicators blink in turn, indicating the door is going to open, and finally there sounds one buzz (the lock is closed, and the door can no longer be opened). Incorrect configuration: The red indicator is on, with 5-15 buzzes. The sounds of the alarm are defined in 5.1 Sound Prompt of an Invalid Card. For more information, see the hotel lock instructions. 4.2.5 Read Card Click [Card Management] [Read Card] to read the information of current card. 4.2.6 Clear Card Click [Card Management] [Clear Card] to clear the information of current card. 44 4 Daily Management 4.3 Reception Center Reception Center includes Room Center, Group Reception, Room Reservation and Room Reservation. 4.3.1 Room Center i. Description of function zones The main interface is as follows: A. General status of the floors and rooms B. Room list C. Guest check-in and check-out 45 Biosafelock Hotel Management System User Manual D. Current room status For the operation on each zone, please refer to ii. Function zone operation and description). ii. Function zone operation and description A. General status of the floors and rooms Note: Operators can click a floor name to check the room list and corresponding status. The figure below illustrates the room list and general status of 2F. Refresh this function zone B. . Please use the button inside the red frame. Room lists Note: The rooms on the current floor are displayed in a classified list or in a general list. To search for a room: select Type and Status, input Room Name or Reserve Information (displayed when the Status is Reserve), and click the search button (the magnifier icon) to obtain the room list. Both Room Name and Reserve Information support fuzzy search. Room Status includes vacant room, unclean, room reservation, general guest, VIP guest, group guests, cleaning, repairing, stop used, available reserved room and expired reservation. You can select the room status for each room when creating, otherwise, the new room is default as vacant room. Available reserved room: It means though the room has been reserved, other guests still can check in if it is still not the time for the guest who reserved the room to check in. Expired reservation: The reservation time has expired, it means the guest who booked the room did not check in on time. And during this period of time, other guest can’t check until you cancel the reservation at reservation management. Room reservation: Other guests can not check in a certain room an hour (including cleaning time) before the reserved time. To switch the list: click the button to switch the way the list is displayed. Right-click menu: Right-click the icon of a room to pop up a shortcut menu, as shown in the figure below: 46 4 Daily Management The figure above illustrates the right-click menu of 203, from which operators can check the Expenses Log, Change Status and Guest Details, Rewrite Guest Card, Rewrite Group Card, Change Room, and check Other Expenses. To refresh this list: click the search button C. . Guest check-in and check-out Note: This zone consists of three modules: Guest Check In, Guest Check Out, and Group Reception. a. Guest Check In Operations: Click the icon of a room in the list, input guest information, select Arrival Date, Stay Day, Level Date, and Level Time, and click [Checking In] to finish check-in, as shown in the figure below: Upon successful check-in, the corresponding icon in the room list will be modified, for example, to b. Guest Extension 47 . Biosafelock Hotel Management System User Manual Four ways for extension: extension by days, extension by hours, day room extension by hours, hour room extension by days. The operation of extension by days and extension by hours (take extension by hours as example): Fill in the check in information(extension by hour time) that pops up , click [Extend Stay], and click [OK] to finish extension, as shown in the figure below: The operation of day room extension by hours and hour room extension by days (take day room extension by hours as example): Fill in the check in information (day room extension by hours) that pops up, click [Extend Stay], the system information will pop up as following: Click [OK] to continue extension, as shown in the figure below: Click [Yes] to finish extension. Note: The extension operation is available to the guests with a card or not; the settlement above is not check out, you can see the details in the expenses list. c. Guest Check Out Note: There are two cases: Check out with Card and Check out without Card. a) To check out with a card: click [Check out with Card], and click [Yes] in the information box that pops up to finish checking out, as shown in the figure below: 48 4 Daily Management b) To check out without a card: click [Check out without Card], and a picture the same as above (check out with card) pops up. The figure above provides the information about the guest in 203. Click [Yes] to finish Check out without Card. d. Rewrite Guest Card and Rewrite Group Card In the Room Center, right-click a checked-in room, and select Rewrite Guest Card or Rewrite Card from the shortcut menu. In the window that pops up, select the guest whose card needs rewriting, prepare the card, and click [Make Card] to finish rewriting. Note: After the rewritten card is punched on the lock, previous card will be invalid. e. Change Room Right-click checked-in room in the Room Center, and select Change Room from the shortcut menu. The menu bar will show the change room pane, select the new available rooms, as shown in the figure below: 49 Biosafelock Hotel Management System User Manual Click [OK], and a picture pops up as follows: Different types of rooms have different price. When the guests change the room, it will generate the price difference. There are different Charging standard Previous room: During the change room, the charge is previous room price. New room: During the change room, the charge is new room price. 50 4 Daily Management Separate Calculation: From the time you when checking in to the time when changing to another room, the extra charge equals to previous room price; while from the time when you change to another to the time of checking out, the extra charge equals to the new room price. Note: Our software provides Manual Setting the Have Stayed, Extra Payment, Service Charge. When group need to change room, the Separate Calculation is default. Click [OK], then according to the prompt operate written card or not. D. Current room status Click on a guest room, can view current room status at the bottom of the software interface, the following figure: 4.3.2 Group Reception This section includes Group Check In, Group Check Out, and Group Extension functions. i. a) Group Check In Group Check In: As there are plenty of settings involved, they are processed in a new interface. Click [Group Check In], and a picture pops up as follows: Step 1: Create a bureau. Click the [+] button, and an interface for adding a travel bureau pops up. For example, the figure below illustrates how to add the information of a travel bureau. Save the setting and close the interface, and a figure pops up as follows: 51 Biosafelock Hotel Management System User Manual Step 2: Check the History Group (skip if unnecessary). Step 3: Input the group information, as shown in the figure below: Step 4: Select rooms, as shown in the figure below: Step 5: Select a check-in date and level date, and click [Group Check In]. Confirm the group information, and click [Yes] to start to input information about group members, as shown in the figure below: 52 4 Daily Management After inputting information about a guest, click [OK] to input information about the next one. The [Skip] button can be used to cancel this room, and [Cancel] to stop registering information about the group members (the registered member information is still valid). After finish checking in, click [Have Member] in the group information edition zone in step 3 to view the checked-in members. For example, the figure below displays the three members that have been input. 53 Biosafelock Hotel Management System User Manual To add a member: click [History Group] in step 2 to obtain registered group information. Click the desired group, and select [Add Member] in step 3. Select rooms, and click [Group Check In] to input information about the added guest. To modify information: click [History Group] in step 2 to obtain registered group information. Click the desired group, input information in the group information edition zone, and click [Modify]. All the information can be modified, except Group Name, Certificate, Group Guide, and Number. Disable a group: only a group that is not checked in can be deleted. Group reserve: input group information, select rooms, change check-in time and level time, and click [Reserve] in step 4 to finish reservation. The rooms with successful check-in are displayed as follows: b) Group check out: To check out a group, first Read Card or Search for group information, and confirm the guide’s certificate before executing check-out. Step 1: Click [Read Card] or [Search] to obtain group information, as shown in the figure below: 54 4 Daily Management Step 2: Click [√] to check the guide’s certificate. 55 Biosafelock Hotel Management System User Manual Step 3: Click [Group Check Out], and the prompt information appears. Click [Yes] to finish group check out, as shown in the figure below: 56 4 Daily Management c) Group extension: To perform group extension, the first two steps are the same as those of performing Group Check Out. In step 3, in the operation prompt that pops up, modify the extension day as necessary. Click [OK] to finish Group Extension, as shown in the figure below: ii. Group Information Click [Reception Center] [Group Reception] [Group Information] to enter the Group Information Interface. 57 Biosafelock Hotel Management System User Manual iii. Group Expenses Log Click [Reception Center] [Group Reception] [Group Expenses Log] to enter the Group Expenses Log Interface. ⅳ. Group Guest Details Click [Reception Center] [Group Reception] [Group Guest Details] to enter the Group Guest Details Interface. 58 4 Daily Management 4.3.3 Room Reservation i. Reservation Click [Reception Center] [Room Reservation] [Reservation] to enter the Reservation Interface. Single guest reserve steps: Step 1: Search for and select rooms. Step 2: Input reservation information, and click [OK] to finish reservation, as shown in the figure below: The rooms that are reserved successfully are displayed as follows: 59 Biosafelock Hotel Management System User Manual Note: for group reservation, please refer to 4.3.2 Group Reception. ii. Reservation Management Click [Reception Center] [Room Reservation] [Reservation Management] to enter the Reservation Management Interface. Check or delete a reserved room, as shown in the figure below: The figure displays a list of reserved rooms, and those in red are overdue (selected by default and should be deleted). ⅲ. Reservation check in Check in for guest who has already reserved in advance. Steps: Step1: Click [Reception Center] [Room Reservation] [Reservation check in]. 60 4 Daily Management Step 2: Click , you can find the picture below and find the rooms which have already been booked. Step 3: Choose a group or a guest. Step 4: Choose reservation room, whether make card, fill in guest name and ID number. Step 5: Fill in the information as below. Step 6: Click [Guest Check In ] to finish reservation check in. 61 Biosafelock Hotel Management System User Manual 4.3.4 Check Room Click [Reception Center] [Check Room] to enter the Check Room Interface. Check Room includes Guest Check and Clean Check, through which a reminder can be set for the rooms that need checking out and cleaning. 4.4 Consumption Management Note: A guest purchase commodity should with a card. Click [Consumption Management] [Commodity Purchase] to enter the Commodity Purchase Interface. 62 4 Daily Management Put the guest card on reader, click [Read], then you can double click the commodity you need in the left column, they will show in the right column. You can refer to the picture below: After selecting all commodities you need, you can choose to pay cash at sight or pay all the money when checking out. If you pay in cash, the consumption information won’t show in the check-out Billing. Note: You can see the shopping cart and consumption records in the right column. 4.5 Database Log Click [Database Log] in the user menu to pop up the sub-menus as follow, which will be described respectively in the sections that follow. 63 Biosafelock Hotel Management System User Manual 4.5.1 Guest Details This function is used to view the detailed records of the guests who have checked in. Operators can input search conditions to view related records and export them to an Excel sheet, as shown in the figure below: 4.5.2 Expenses Log This function is used to view records of the room use, dividing into two inquiry ways, details and statistics inquiries. Figure 1 displays details inquiry, while Figure 2 displays statistics inquiry. 64 4 Daily Management 4.5.3 Other Logs This function is used to view other consumption records of a room, dividing into 2 inquiry ways, details and total expenses inquiries. Figure 1 displays consumption details, while Figure 2 displays consumption total expenses. 4.5.4 Card Setting Log This function is used to view all card issue records, and also supports multi-condition query and data export. The following figure displays records on non-group setting cards. 65 Biosafelock Hotel Management System User Manual 4.5.5 Group Card Setting Log This function is used to view the records on issue of all group setting cards, and supports data export. 4.5.6 Lock Open Log This function is used to read the record card to view the lock records. Put the record card on the card reader, and click [Get Lock Information] to obtain lock information and records, as shown in the interface below: 66 4 Daily Management 4.6 Database Management Click [Database Log] [Database Management] to enter the Database Management Interface. This function is used for database backup and restoration. This operation is available only on the server. Please use the Database Restore operation with caution. Tick up [Confirm], click a corresponding button, the figure illustrates the backup operation: Select a path, and click [Save] to continue the operation (the time needed depends on the size of the database), when backup successfully, the system information will pop up as following: 67 Biosafelock Hotel Management System User Manual 5 Appendix 5.1 Sound Prompt of an Invalid Card Five buzzes: Wrong card type Six buzzes: A guest card has a wrong room number, or a group card, emergency card, or master card has a wrong group number. Seven buzzes: The card has expired. Eight buzzes: A guest card has an invalid code, or an employee card has an invalid period of Available time. Nine buzzes: In a blacklist. Ten buzzes: An authorised card has an invalid authorised code. Eleven buzzes: A building card has a wrong building number, or a floor card has a wrong floor number. Thirteen buzzes: The card number is an access-restricted card number. Fourteen: The record card downloads incomplete data. Fifteen buzzes: This is not a card of the hotel. 5.2 Database Configuration For how to configure the database, let’s take Microsoft SQL Server 2005 as an example in this manual. If it is unable to connect to the database, you can check the database configuration through the following methods. 5.2.1 Configuring the Server of Database Click [Start] [All Programs] [Microsoft SQL Server 2005] [Configuration Tools], and then the figure below will appear: Click [SQL Server Configuration Manager], then click [SQL Server 2005 Network Configuration], and the figure below will appear: Double click the server which you want to connect with, such as [Protocols for SQLEXPRESS] (or Protocols for SQLHOTELLOCK), and the figure below will appear: 68 5 Appendix Right click [Shared Memory], choose [Enable], and the figure below will appear: Click [OK], the Status of Shared Memory, Named Pipes, TCP / IP can be changed into Enable. When we set TCP / IP enable Status, double-click [TCP / IP], and the figure below will appear: Click the [IP Addresses] tab, IP All columns TCP Port is set to 1433, and the figure below will appear: 69 Biosafelock Hotel Management System User Manual Click [Apply] and [OK] to complete the database configuration. Please restart it and the server will take effect, the restart steps are as following: 1. Click [SQL Server 2005 Services] 2. Right-click the server that you need to restart, then choose [Start]. NOTE:Because it is so hard to clear all information of SQL in your computer . So please don’t uninstall it . 5.2.2 Create an Account for Database Login If your computer has already had a database, you can update it through database management software, Here we will take Microsoft SQL Server 2005 as an example to illustrate how to update the database via database management software. Click [Start] [All Programs] [Microsoft SQL Server 2005], and the figure below will appear: Click [SQL Server Management Studio Express], and the figure below will appear: 70 5 Appendix Choose server name and [Windows Authentication], click [Connect] to connect with the database server which need to share. Right-click [LINDA-PC\SQLEXPRESS] server name, and choose [Properties] to enter the Server Properties interface. Click [Security] [SQL Server and Windows Authentication mode], click [OK]. 71 Biosafelock Hotel Management System User Manual Choose [Security] [Logins] in Microsoft SQL Server Management Studio Express interface, right-click [sa], choose [New Login] to create new Logins, or choose [Properties] to assign operation levels. 72 5 Appendix Click [Status] in Login Properties – sa interface, click [Grant] and [Enabled] in Settings. Click [General] in Login Properties – sa interface to set login password. Click [Server Roles] in Login Properties – sa interface to set server roles. Click [User Mapping] in Login Properties – sa interface to assign operation levels. 73 Biosafelock Hotel Management System User Manual Click [OK] to save setting. Note: If your operation is affected by firewall or other defense software, please check your computer firewall setting and close the firewall to finish the rest operations. 74 5 Appendix 5.3 System Setting You can choose the language or database of the system at your pleasure. Server: Define the server name in the LAN, click to search database server in the LAN, there are four kinds of naming: [IP] or [computer name] [IP] : [PORT] or [IP] \ [instant name] [computer name] \ [instant name] Special usage: Computer name can be replaced as [.] when connecting the native database. Login name and password: Verify the connection of database. Note: The default login name is sa, and default password is 123. Database: Operating target (Database files are stored in BiolockData folders of the dish in which system is installed. Click [Save] to save the setting and restart the system, then it will take effect. Only if the server fails to connect with the software, the login interface appears [Create Database] in Setting interface, then you can create the database manually, and the default path is Documents. Note: Please refresh the information of rooms before checking in. 75 5 Appendix 1