1
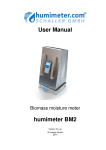
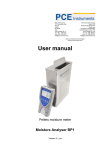
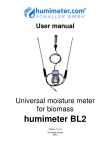
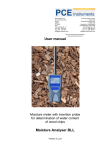
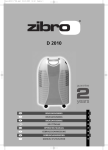
User manual
Moisture meter for determining
water content of biomass
humimeter BMA
version 1.8
© Schaller GmbH
2014
Design of the device
display
start push
button
ON/OFF
button
LED (status)
power supply
interface
measuring
box
drawer
bulk density (option)
atro weight/m³ (option)
page 2
material
temperature
water content
version 1.8
Operation
1. Put the empty measuring box into the
humimeter BMA correctly. Make sure to
hook in the aluminium part of the
measuring box centrically into the
plastic brackets of the drawer.
2. Close the drawer and push it down
(normally this is effected automatically).
3. Plug in the round plug of the delivered
power supply unit at the humimeter BMA
and tighten it.
4. Plug in the power supply unit into a
Schuko socket (230VAC).
5. After plugging in, the humimeter BMA
switches on automatically. If not, switch
on the instrument by pressing the
button for 3 seconds.
6. The query for a self calibration
„Reinitialize?” shows up on your display.
Accept by pressing the button.
7. The self calibration has finished when
the display shows the measuring
window.
8. If the self calibration cannot be
completed successfully, please read
through page 12, header fault
correction.
version 1.8
page 3
Measuring procedure
1. Open the drawer of the humimeter BMA
and take out the measuring box. For
that, lift the box and then pull it out.
2. Completely fill up the measuring box with
the material to measure. For that you
must use the delivered bucket.
3. Wipe off the material at the upper edge
of the box evenly.
4. Put the filled measuring box into the
drawer correctly and close it.
5. Select the right product (calibration
curve) using the arrow keys.
6. Press
the Start push button. The
measurement will start automatically.
During the measurement, the LED is
blinking in blue and the display shows the
symbols for an ongoing measurement (see
picture).
7. After
the measuring procedure is
completed, the LED is shining in blue
constantly and the measuring values are
shown on the display.
8. If desired the measuring values can be
saved now. For that, please follow the
instructions on the next page.
9. Open the drawer and carefully remove
the measuring box.
10. Empty the measuring box completely.
page 4
version 1.8
Saving of measuring values
1. If desired the measuring values can be
saved in the store menu by pressing the
button (
button). The storage was
successful when the number in front of
the
symbol
increases.
To reach the store menu please press
the left button ( ) as long as the symbol
appears.
2. To name the saved results press the
button.
3. Here you can name the measuring
series using numbers and letters. For
numbers press
(0..9) and for letters
(A..Z).
4. After entering the name, confirm by
pressing
(Enter). Now the saving is
completed.
name of series
water content (average)
temperature (average)
atro weight / m³ [kg/m³]
(average) optionally
bulk density [kg/m³]
(average) optionally
Note: The accuracy of a measurement can be improved by
performing several measurements (3) with the same sample and
calculating the average of them. If the individual measuring values
are stored on the BMA, the device calculates the average
automatically.
Printing hot key (only with optional integrated printer)
Pressing the second button from left (
series is printed.
) the last saved measuring
Note: This means that the last saved value is printed, and not the
last measured value.
List of calibration curves
Pressing one of the arrow keys in the
measuring window for at least 3 seconds, a
list of all available calibration curves will
appear. Select your desired product using
the arrow keys and confirm by pressing .
version 1.8
page 5
Calibration curves
name (material)
description
dimensions
measuring range
Woodchips
forest wood chips (or similar)
P16 - P45
5 - 70 %
Coarse ch.
wood chips with less fines
P45
5 - 70 %
Industr. WC
wood chips without fines
P45 - P63
5 - 70 %
Barks
barks
P31,5 - P45
5 - 70 %
Pellets
wooden pellets
Ø 6 mm
5 - 14 %
Miscanthus
chopped miscanthus
similar P16
5 - 35 %
Shavings
shavings
5 - 45 %
Sawdust
sawdust
5 - 70 %
Corn cob
corn cobs (chopped or total)
5 - 40 %
Empty 1
for special sorts (calibration by Schaller GmbH)
Reference
for testing humimeter BMA. Not suited for measuring!
Selection of the right calibration curve:
These are advices for selecting the right calibration curve. If you
are not sure about the right calibration curve, we recommend
carrying out a comparison measurement by kiln drying (EN 14774).
At page 12 and 13 you find pictures of different sorts of wood chips.
Determination of the material reference moisture
The humimeter BMA determines the water content, this is the
moisture
related
to
the
total
mass
(wet
base):
Mn − Mt
%WG =
× 100
Mn
M n:
Mass with average moisture content
Mt :
Mass of the dried sample
%WG: water content (according to norm EN 14774)
Definition of wood chips classes (EN 14961)
The stated numbers refer to the particle size that goes through
round gaps of the corresponding diameters (e.g. P16: 16 mm).
o P16 minimum 75% of mass is between 3.15 and 16 mm
o P31,5 minimum 75% of mass is between 8 and 31,5 mm
o P45 minimum 75% of mass is between 8 and 45 mm
o P63 minimum 75% of mass is between 8 and 63 mm
page 6
version 1.8
Keypad symbols
Menu level overview
Measuring window:
Rolling menu
On/Off
Switch upper
Switch lower
Save
Watch saved data
Add suppliers data
Type selection menu
Next calibration curve
Last calibration curve
Power off (3 sec.)
Store menu
Menu:
Enter
Switch upper
Switch lower
Back
Enter numbers
Enter letters
Next or right
Left
Yes
No
Shift
OK
Watch last saved data
Save new value
Printing hot key
Main menu
Switch lower
Switch upper
Open the menu / Enter
Overview main menu
Edit logs
Manual logs
Clear logs
Print logs
Last log
All logs
Clear logs
Send logs
Manual logs
Clear logs
Options
Status
version 1.8
Options
Date / Time
Datalog Time
Language
Unlock
°C / °F
o Userlevel
BL On time
Auto Off Time
Calibrate
Materialcalib.
Adjust
Password
Reset
SN.
Logo
Admin
page 7
Transfer saved data to the PC
(only possible with USB data interface module)
To send your saved logs to the PC, connect
the humimeter device to your PC using the
USB cable that was delivered with your
device. Carefully loosen the protection cap
on your humimeter and plug in the USB
miniB connector. The bigger connector has
to be connected to a USB slot on your PC.
Start the LogMemorizer software on your
PC and switch on your humimeter BMA.
The data transfer can be started on your
humimeter or on the software:
Starting the data transfer on the humimeter:
Press the
key until you reach the menu
(see image on the right). Then choose
„Send Logs“ and confirm by pressing the
key. Now choose „Manual Logs“ and
confirm with
again. All saved logs will be
sent to your PC now.
Starting the data transfer on your PC:
Press the button „remote control“ in the
LogMemorizer software. A drop-down menu
with several options opens (see image
below).
For transferring the data you can select
„Import last manual log“ (the last saved
measuring series is transferred) or „Import
all manual logs“ (all saved logs are
transferred).
If you click on one of these menu items, the
transfer starts immediately.
For the basic adjustments of the software
please look through the instructions on the
LogMemorizer USB flash drive.
page 8
version 1.8
Print saved data
(only possible with optional integrated printer)
To print out your saved data, send a print
job at your humimeter device.
button until you reach
the menu (see image on the right). Select
the menu item „Print logs“ and confirm by
pressing .
For that press the
Now you can select if you want to print the
last saved measuring series or all saved
measuring series (logs).
Confirm by pressing
again. The selected
logs are printed out now.
To save paper, please think of clearing the data
storage regularly.
If the printing has been started successfully,
the printer begins to print out the logs
immediately. The green LED shows the
correct operation.
Changing the paper roll
For exchanging a blank thermo paper roll, lift
up the clip until the cover opens (see
picture).
Remove the blank roll.
Put a new opened roll into the printer,
ensuring that the paper comes out to the
fore (see picture).
While closing the cover, hold the beginning
of the paper tightly to prevent the paper from
wrinkling.
Now the printer is ready for use again.
version 1.8
page 9
Several functions
Setting the clock
2 times -> Options -> Date / Time
Enter date and time using the button. Pressing the button the
cursor shifts to the next place. Pressing the button (OK) your
entry will be saved.
Info: If the power supply unit is unplugged the clock stands still!
Unlocking the instrument (Super User)
2 times
- Options – Unlock
Enter the 4-digit password using the button (standard is the
4-digit serial number) and confirm by pressing .
Online print
2 times -> Options -> o Online Print
For choosing that menu item you have to unlock your BMA first!
If you have activated that function, your BMA will print the current
measuring value after pressing save button immideatley.
LED signals
Shining in blue
Blinking in blue
Blinking in red
device is ready for operation
ongoing measurement
failure
Possible reasons for failure (red blinking LED):
• Drawer has not been closed correctly
• Measuring box is missing resp. empty
• Wrong positioning of measuring box
• Overloaded motor for compression
The failure can be confirmed by pressing the START push
button!
page 10
version 1.8
Definition of important units for wood chips accounting
version 1.8
page 11
Self-calibration - fault correction
If the values of the self-calibration exceed a
certain limit, the procedure is stopped for
reasons of safety.
For this fault, a pollution of the contacts at the
bottom of the measuring chamber may be
responsible. In this case slightly sand the
stainless steel contacts (marked in blue on
the picture) using 400 grade abrasive paper.
Afterwards the contacts have to be cleaned
with alcohol.
If after that procedure the self-calibration is still not successful,
please contact Schaller GmbH. Note: For the self-calibration the
measuring chamber has to be empty and cleaned!
Pictures of wood chips types
Woodchips
page 12
version 1.8
Coarse ch.
Industr. WC
version 1.8
page 13
Notes for bulk density and bone dry weight (atro) / m³
For determining the bulk density according to the norm EN14961 a
round bucket is used. As the humimeter BMA uses a rectangular
measuring box, we have entered a compensation factor in the
device. This compensation factor has been optimised for wood
chips and therefore can differ when measuring other material
types. The bulk density of biomass material during transport can
change considerably (compacting), when measuring the volume a
material cone has to be considered.
An eventual discrepancy of the bulk density directly influences the
displayed dry weight /m³.
Notes for comparison measurement with drying oven
The humimeter BMA uses a much higher sample quantity than the
drying oven (12-fold to 20-fold quantity of kiln-drying method).
Furthermore, to determine a more accurate average moisture value
in case of inhomogeneous material, the humimeter BMA enables a
large number of measurements within a short time. Considering a
sampling error due to the considerably smaller sample quantity as
well as the content of volatile matters, resin etc. (that are not
water), the kiln-drying method will practically reach an accuracy of
approx. +/- 3%. Therefore, if the measuring values of these two
very different methods of determining the water content are
compared, differences of +/- 3% can be considered to be normal.
Notes for shavings and wood chips made of fast growing wood
Weight of shavings must be more than 380g. If you go below that weight
you have to compress the shavings in measuring chamber up to 380g.
Wood chips of fast growing wood chips which are produced with a field
chopper have to be measured with calibration curve “Woodchips”.
Exemption from liability
For miss-readings and wrong measurements and of this resulting
damage we refuse any liability. This is a device for quick
determination of moisture. The moisture depends on multiple
conditions and multiple materials. Therefore we recommend a
plausibility check of the measuring results. Each device includes a
serial number and the guarantee stamp. If those are broken, no
claims for guarantee can be made.
page 14
version 1.8
Technical data
Resolution
0.1% water content
Measuring range
5 to 70% water content
(dependent on the material)
Operation temperature
0°C to +50°C
Storage temperature
-20°C to +60°C
Temperature sensor
Infrared (non-contact)
Temperature compensation
automatic
Power supply
100-240 VAC, 1 A, 50-60 Hz
Plug
Schuko plug as per CEE 7/7
Display
128x64 matrix display lighted
Dimensions (BxTxH)
432 x 282 x 862 mm
Weight
approx. 26 kg
(with measuring box)
Degree of protection
IP 40
Scope of delivery
humimeter BMA
BMA measuring box (12 litre)
power supply unit 12 VDC, 4 A
2 pieces bucket, 13 litre
Options
determination of bulk density
and bone dry weight (atro)
USB data interface module
integrated printer for BMA
Rechargeable batteries
version 1.8
page 15
!IMPORTANT! Please read
Most common reasons for incorrect measurements
• Product temperature out of application range
Material below 0°C resp. above +50°C may cause faulty
measurements.
• Measuring material is frozen or mixed with snow
In these cases the accuracy is decreasing heavily.
• Wrong calibration curve
Before starting a measurement please double-check if you
have chosen the right calibration curve (material).
• Wet or mouldy material
In this case the accuracy may decrease.
• Moisture measurement of barks
In case of uneven shape of barks in comparison of wood
chips, the accuracy may decrease.
• Wrong filling quantity
Ensure that the measuring box is filled with material
completely; there must not be less neither more material in it.
• Wrong filling procedure
Place the measuring box on the floor and pour the material
into it. Use delivered bucket for that action at every time.
Device maintenance instructions
To provide a long life of your device please do not expose it to
strong mechanical loads, extreme heat, rain and heavy dust.
The weighing plate (grey plastic plate at the bottom of the BMA)
has to be free from wood chips and dirt. In
case of pollution please vacuum-clean the
weighing plate.
Mind the golden contacts, they must not be
touched!
At the bottom of BMA housing is a cover
plate for cleaning screwed. You can remove that and vacuum-clean
inside.Clean the measuring box using a dry cloth or a soft brush.
Any kind of wet cleaning and any use of cleaning powder may
damage the device. The device and the measuring box are not
rainproof, keep them in dry areas!
page 16
version 1.8