1
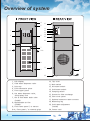
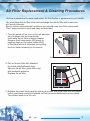
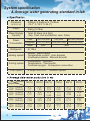
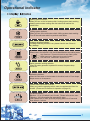
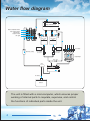
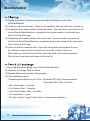
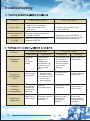
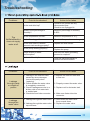
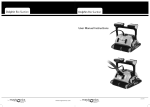
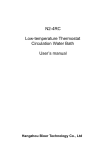
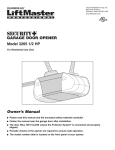
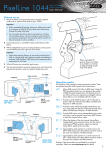
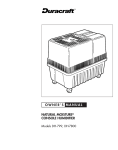
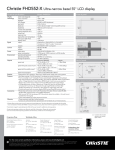
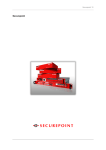
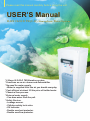
Please read this manual carefully before using the unit.
USER’S Manual
RAIN CLOUD TM (C-21) Atmospheric Water System
* 6 Steps SLO-FLO TM filteration system.
* Functions as an air cleaner and dehumidifier.
* No need for water supply.
- Water is supplied from the air you breath everyday.
* Cost efficient at about 1/6 the price of bottled water.
* Chemical free process.
* External water supply.
- Can drau water from the pail.
* Safety Devices.
- Leakage sensor.
- Children safety lock valve.
- UV Indicator.
- Double overheat protector.
- Double overflow protector.
Table of contents
* Safety notes
3
* Overview of system
4
* Operational indicator
5
* System specification and average water
generating standard in lab
6
* Water flow diagram
7
* Installation & Operation
- Location of installation
- Precaution for installation
- Procedure for operation
- Storage
8
TM
* Function of SLO-FLO filters
10
* Maintenace
- Cleaning
- Filter & UV exchange
11
* Troubleshooting
- Cooling system-related problems
- Heating system-related problems
- Refrigerant system-related problems
- Water generating system-related problems
- Leakage
12
* Reminder
15
* Warranty
16
Safety notes
Follow safety precautions for the AirWaterMachine
- Check the electric power supply (230V or 115V depending on the country).
The required voltage can be found on the back of the AirWaterMachine.
- Avoid exposure to extreme temperature and rain.
- Place the AirWaterMachine on a hard, flat surface to prevent noise,
leakage and shaking.
- Place the AirWaterMachine more than 10cm away from the wall for
proper air flow and operation of the condenser.
- Do not decline the AirWaterMachine more than 45 degrees when
moving it. Handle with care when moving and installing.
- Connect the electrical power 30 minutes after installing it.
- Plug into the proper outlet.
- Don’t move during operation.
Your unit is also equipped with HYBRID technology that allows it to be
hooked up to a water line in the same manner as a water line is connected
to an ice water in a refrigerator. The HYBRID System is in place as an
emergency back up line. By pushing the pumping switch (located on the
back right hand side) it will only allow a small amount of water into the unit
through the attached line. This water immediately goes through the
filtration system and mixes with airwater.
Due to the intricacies of the micro-computer and filtration system it is
necessary to give your unit the time to get all system controls in place.
Additionally the unit needs about 3.5gallons to fill the water lines,
filters, and hot & cold water tanks.
This is initially accomplished by priming the unit with about 3gallons of
distilled water using the intake pumping switch. Then allow the unit
to run for 24 hours or until the full indicator light (located on the front
display panel) comes on. You are then free to begin experiencing the
“Plants Purest WaterTM”
Note : Atmospheric Water is a valuable commodity and should be
treated as such.
Only take the amount of water you are going to drink.
3
Overview of system
4
10
5
1
2
6
11
12
13
14
15
16
3
19
7
9-A
9-A
8
9
17
20
18
1. LCD display
2. Cold water dispenser valve
3. Drip tray
4. Front decorative piece
5. Front upper panel
6. Hot water dispenser valve,
Child safety lock
7. Hot & Cold water drain valve
(inside)
8. Replaceable air filte
(inside)
9. Front lower panel / to remove
9-A. Front panel / to removal grips
4
10. Top cover
11. Main switch
12. Hot water switch
13. Cold water switch
14. Pumping switch
15. Screws for filter exchange
16. filter cover panel
17. Optional outsource water connect
18. Balancing leg
19. Cold water adjustment
(inside)
20. Power cord
Air Filter Replacement & Cleaning Procedures
Air flow is paramount to water production; Air Purification is paramount to your health.
You must keep the air filter clean and exchange the old air filter with a new one
at 2 month intervals.
Due to various environmental conditions you should rinse your filter every week.
This 3 step process is quick and easy as described:
1. Turn the power off on your unit so air particles
are not drawn into the evaporation
coils while the air filter is being cleaned.
Remove front lower panel (#9) panel by
pushing down on the upper sides (#9A)
of the panel while at the same time pulling
the front cover towards you to remove.
②
①
Push down on sides, then pull forward & up
2. Pull out the air filter (#8) attached
by double sided adhesive tape.
Vacuum the air filter (outer side only)
with moderate pressure.
Replace the air filter
3. Replace the lower front panel by placing the lower slot holes back into the frame
holes, push down and push forward so that the cover slides back up into place.
Turn power back on to the unit
5
System specification
& Average water generating standard in lab
Dimension
(W X D X H)
Weight
Water Storage
Capacity
Power
Consumption
Refrigerant
55Kg (121lbs)
Total 25 liters (6.6 Gal.)
(Top, Cold, Hot and Bottom tank, Filter)
Power
110V~120V, 60Hz
230V, 50Hz
220V~240V, 50Hz~60Hz
Compressor 473W (115V, 60Hz) 373W (230V, 50Hz) 373W (230V, 50Hz)
Heater
450W
430W
R-134a
Heating system
Heater : Band heater
Temperature control : Auto bimetal
Overheat protector : Manual bimetal
Cooling system
Compressor : Hermetic
Temperature : Thermostat
Condensing type : Compulsive convection
Filter system
Humidity
Temperature
15℃ (Liters)
59℉ (Gallon)
20℃ (Liters)
68℉ (Gallon)
25℃
77℉
30℃
86℉
6
400mm X 464mm X 1125mm
(15.7” X 18.3” X 44.3”)
(Liters)
(Gallon)
(Liters)
(Gallon)
6 steps SLO-FLOTM filtration system
50(%)
60(%)
65(%)
70(%)
80(%)
90(%)
6.7
1.77
8.6
2.27
6.9
1.82
9.6
2.54
13.6
3.59
8.4
2.22
10.8
2.85
16.8
4.44
22.0
5.81
9.9
2.62
12.2
3.22
19.5
5.15
26.9
7.11
10.7
2.83
13.6
3.59
23.2
6.13
13.6
3.59
18.6
4.91
28.5
7.53
38.4
10.14
10.9
2.88
13.4
3.54
19.2
5.07
30.4
8.03
Operational indicator
Heating system indicator.
When you turn on the hot water switch, heating system starts working.
Heating system starts working after the water level reaches the
middle once.
Chilling system indicator.
When you turn of the cold water switch, chilling system starts working.
Turn off the cold water switch to produce water faster.
Leakage detecting indicator.
If leakage detecting indicator is on, please check to see if there is
any leakage.
Water level indicator (High, Middle, Low).
When water in the top tank is full, the AirWaterMachine stop making water.
High water level. Top tank is full and unit stop making water.
Middle water level. Water level in top tank is middle.
Low water level. Water level in top tank is low.
Water generator working indicator.
When the water generator is paused for recess, the pause lamp
comes on.
Refreshing indicator.
When the cold water or the hot water is circulated, each of 3 arc shape
lamps comes on in sequence.
Outside water connection indicator.
When you push the pumping switch, water is supplemented from the
outside. (Please see Procedure for operation on page 10)
UV failure indicator.
Blackout : UV or UV ballast is out of order. Please call a service man.
Flickering : UV bulb reaches the expected life span.
(After replace the UV bulb, push the pumping switch for 10 seconds
three times in 1 minute.
7
Water flow diagram
Top Reservoir
Tank
Micro Sediment Filter
Pre Carbon Filter
Post Block
Carbon Filter
UV light
Hot Water
Tank
DRAIN
DRAIN
Boorter pump
Cold Water
Tank
Hot refresh
Sol valve
Air Filter
Cold refresh
Sol valve
Evaporatpr
Ball valve
SOL
Bottom reservoir
Tank
OUTSIDE
Bottle
The unit is fitted with a microcomputer, which ensures proper
working of internal parts to requlate, supervise, and control
the functions of individual parts inside the unit.
8
Installation and operation
1) Avoid direct sunlight, exposure to rain and extreme temperatures (indoor use only).
2) Place the AirWaterMachine on a hard, flat surface.
3) It should not be shaken or rocked.
4) Locate the AirWaterMachine in a well-ventillated place.
5) Install it more than 10cm away from the wall to insure proper operation and air flow.
6) Avoid Harmful gas or heat.
7) In order to be sanitary, the AirWaterMachine must not come-in contact with any harmful
gas or excessive heat.
* CAUTION : In subzero temperatures, the parts which contain
water may freeze and rupture.
1) Confirm the proper voltage.
2) Make sure to use an individual outlet.
3) When the plug becomes disconnected or power is off, give the AirWaterMachine up to
five minutes with the plug in before using.
4) Don’t move during operation.
5) Don’t turn on the hot water switch when water is not filled in hot tank.
If heating system works without water in hot tank, the tank will be overheated and manual
bimetal will stop the heating system.
Push the manual bimetal to start the heating system again.
9
Installation and operation
1) Do not turn on at least 6 hours after transportation.
2) Connect the power cord and turn on the main switch at the back side.
3) If available, connect the tubing hose (shich is provide with the unit) to bulkhead fitting
at the back side of the unit and immerse the opposite side of the tubing hose to water
in any pail. And push the red round button at the back. The unit will suck water from the
pail during 20 minutes (Do not connect to tap water).
4) Drain water through drain cap. Step 3,4 are recommended for the first time of using.
5) Wait for at least 12 hours until the unit create enough water to drink.
6) Turn on hot and cold water switch (Please make sure water comes out from hot water valve).
7) Wait up to about 30 minutes for hot and cold water.
8) If leakage detecting indicator is on, please check to see if there is any leakage.
9) Push both round botton and lever of hot water valve at the same time to drink hot water.
1) In case of storing the AirWaterMachine for a long period of time, open the drain cap located
at the front and completely drain all water inside of hot water tank and cold water tank.
2) Drain all water inside of bottom reservoir tank.
3) Clean the AirWaterMachine with care.
4) Cover to prevent dust from forming on the AirWaterMachine and store the AirWaterMachine
in original box if possible.
10
Function of SLO-FLOTM filters
The first filter that air passes through before being condensed and converted to water.
Our electrostatic filter effectively prevents micro particles and dust from entering
the machine.
Removes any remnants of foreign particles in the water.
Removes chlorine, bad taste, odor, sediment extant and THM’S sediment.
Focuses on removing lead, copper, chlorogorm, chemical residual, herbicides,
pesticides, and other volatile organic compounds.
Removes other residual substance and improves water taste.
Ultra filtration cartridge is simply a bundle of permanently hydrophilic (water loving)
capillary membrane filters. These filters have a highly porous, asymmetric structure
in which the feed water follows a path from the large pores on the outside wall to
the small pores on the inside wall.
Ultra filter’s patented low-pressure membrane technology is unique for its high flow
rates at minimal pressure membrane technology is unque for its high flow rates at
minimal pressure requirements and its very tight pore size control (0.01micron).
This results in unparalleled removal of organic contaminants, bacteria, and cysts.
Ultra violet ray is the most effective available on bacteria, viruses and most algae
with a 99.999% kill rate.
24 hours recirculation system keeps water clean and pure during long period storage.
11
Maintenance
1) Unplug the power cord and unscrew the top lid and back cover of the
AirWaterMachine.
2) Clean the top reservoir tank : Open the lid carefully, and use soft cloth to clean up.
3) Completely drain water inside of cold water tank : Open the drain cap locate at the
front of the AirWaterMachine, completely drain water inside of cold water tank,
then close the drain cap.
4) Completely drain water inside of hot water tank : Open the drain cap locate at
the front of the AirWaterMachine, completely drain water inside of hot water tank,
then close the drain cap.
5) Clean the bottom reservoir tank : Open the front panel and separate the top
lid of bottom reservoir tank and draw out the body of tank to clean up.
After clean up, close the top lid firmly and slide back to the original position.
(Do not touch any lines and tubes on the top lid)
1) Open the filter panel at the rear of the AirWaterMachine.
2) Separate the fittings from the filters.
3) Replace filters and insert the fittings again.
4) Filter exchange period.
> Double-layered Electornic Air Filter : Washable PP Filter Semi permanent
Disposale NWF Filter 3 months
> Micro Sediment : 6 months
> Pre-Carbon filter : 6 months
> Post block Carbon filter : 6 months
> UF membrane : 1 year
> UV light : about 1 year (Follow the UV replacement indicator)
12
Troubleshooting
Problems
Point to be checked
1. Is there a power failure?
2. Is it plugged in?
Not
being
cooled
at all
Compressor
does not
work
3. Is there a shorted fuse?
4. Are all the connections OK?
5. Are there any damaged parts?
Action to be taken
1. Check other electric purifiers.
2. Plug in and check whether power
is on.
3. Replace with new fuse.
4. Arrange the connection properly
refer to the circuit diagram.
5. Replace damaged parts.
1. After operating for more than
30 minutes, check whether the
water is cold or hot.
2. Is cooling gas solenoid valve is
working properly?
3. Is circulation solenoid valve is
working properly?
1. Repair the refrigeraing system.
Difficulty cooling
water
1. Is the thermostat positioned at
“LOW?”
2. Huge amount of water
consumption?
3. Direct sunlight or heat source?
1. Set the thermostat position at
“HIGH”.
2. Wait until unit completes the
cooling process.
3. Avoid the heat and the direct ray
of sunlight.
Water is too cold
1. Is the thermostat positioned at
“HIGH”?
2. Is the thermostat working properly?
1. Set the thermostat position at
“LOW”
2. Replace the thermostat.
1. Level the AirWaterMachine.
Strange noises
occur
1. Is it installed on a flat and firm
surface?
2. Are there any loose screws?
3. Are there any frozen pipes or
surrounding plates causing it to
shake?
4. Is the compressor well balanced?
5. Is the rear of the AirWaterManchine
touching the wall?
6. Are there any foreign objects
around the compressor?
7. Are there any noises coming from
the compressor valves?
Compressor
is working
2. Replace the solenoid valve.
3. Replace the solenoid valve.
2. tighten loose screws.
3. Leave some space between pipes.
4. Adjust the level of the compressor.
5. Give some space between rear of
the AirWaterMachine and the wall.
6. Remove the foreign object.
7. Replace defective compressor.
13
Troubleshooting
Problems
Not hot water
Point to be checked
1. Using tester, check whether hot
water switch is energized.
2. Check it the heater has a
shot-circuit.
Hot water temperature
is too low
Check the working conditions of
automatic BI-METAL.
Hot water temperature
is too high
Check the working conditions of
automatic BI-METAL.
Problems
Point to be checked
Compressor
Condenser
Action to be taken
1. Replace the hot water switch.
2. Replace the assembly of hot
water container.
Replace the automic BI-METAL, if
the temperature does not go up after
checking the water temperature.
Action to be taken
Evaporator
Discharge
pipes
are slowly
heated.
In the case of
refrigerant
leakage, the
temperature may
rise a little, but it
will be cooled
soon.
Clogged up
with moisture
& dirt
Leads to high
temperature.
No flowing sound
1. Temperature of
entrance is rising. of refrigerant.
2. Is there any frost
at drier outlet
shile operating?
Slowly cools and
makes water.
Defective
discharge
& compression
No difference
between the
suction & the
discharge.
Same as
surrounding temp.
A little flowing sound
of refrigerant.
Never cools nor
makes water.
Sharp rise of
surface temp.
Discharge pipe has
an abnormally
high temp.
Flowing sound of
refrigerant, but
poor cooling
condition.
Frost on the
suction pipes &
defective cooling
condition.
Refrigerant
leakage
Overfilling of
refrigerant
14
1. No flowing sound
of refrigerant.
2. A little sound at
the time of small
amounts of
leakage.
Condition
Naver cools nor
makes water.
Troubleshooting
Problems
The
AirWaterMachine
does not supply
water at all.
Point to be checked
Action to be taken
Is the tank dried up?
Check to see if there are any
disconnected fuse.
Check to see if plugged in.
Shows a low percentage of
humidity?
Minimum percentage of humidity
is 50%
Is the temperature too low?
Minimum temperature is 15℃
Is the filter clogged?
Check its life span, then exchange.
Is the float sensor in bottom
reservoir tank working properly?
Replace the float sensor.
Is the pump working properly?
Replace the pump
Huge amount of water
consumption?
Wait until the water generating
process is complete.
Is the air filter dirty?
Clean air filters periodically to
prevent bad air circulation.
Problems
Point to be checked
1.Replace the reservoir tank with
a new one.
Leakage
through inside
or outside of
purifier
1. Leakage in the reservoir tank
caused by minor damagas
(occurs frequently when
replacing).
2. Check whether the water valve
is completely connected.
3. Check if leakages are due to a
broken cold or hot water tank
or welded part.
4. Check tube and tube connector.
1. Leakage through the water valve.
1.Press down the water valve
lever several times.
2. Replace the water valve.
Leakage
through the
water valve
2. Leakage through the water valve
cap and lever.
Action to be taken
2. Properly connect the water valve.
3. Replace cold or hot water tank.
4. Make sure fasten tube into
connector.
15
Reminder
16
WARRANTY
We warrant this product (including any accessories) aganist natural
defects in material or workmanship as follows:
PARTS : We will supply at no charge, new or rebuilt replacements
in exchange for defective parts for a period of one (1) year.
This warranty does not cover cosmetic damage or damage due
to acts of god, accident, misuse, abuse, negligence,
or modification of, or to any part of the product.
This warranty does not cover damage due to improper operation
or maintenance, connection to improper voltage supply,
or attempted repair by anyone other than a facility authorized
by us to service the product. This warranty does not cover
products sold AS IS or WITHALL FAULTS, or consumable
(such as fuses or water valves).
Proof or purchase in the form of a bill of sale or receipted invoice
which is evidence that the unit is within the warranty period must
be presented to obtain warranty service.
“Should general maintenance procedures not be followed
concerning air filter cleaning & replacement and/or water filter
replacements as described in the owner’s manual, warranty
service calls will not be covered under warranty”.
PRODUCT NAME
AirWaterMachine
MODEL NUMBER
RAIN CLOUDTM (C-21)
SERIAL NUMBER
Year
PURCHASE DATE
Month
Address
CUSTOMER
Name
Phone
Date