1
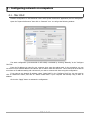
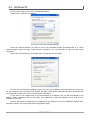
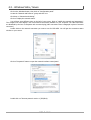
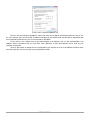
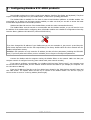
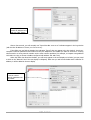
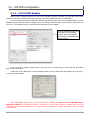
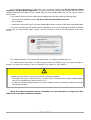
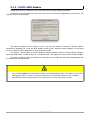
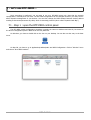
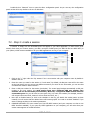
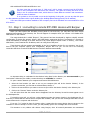
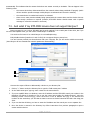
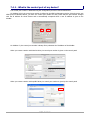
RTP-MIDI INTEGRATION GUIDE
FOR WINDOWS AND MAC OS-X
Copyright (c) 2013 - KissBox
Page 1 of 25
Page 2 of 25
Contents
1 - What is RTP-MIDI ?............................................................................................... 4
2 - Understanding the RTP-MIDI sessions concept.....................................................5
3 - Understanding the IP addresses............................................................................ 7
3.1 - What is an IP address ?............................................................................................ 7
3.2 - Here comes the subnet mask.................................................................................... 7
3.3 - What is my network setup ?......................................................................................8
3.4 - A tip for the best performances................................................................................. 8
4 - Configuring network on computers....................................................................... 9
4.1 - Mac OS-X.................................................................................................................9
4.2 - Windows XP........................................................................................................... 10
4.3 - Windows Vista / Seven........................................................................................... 11
5 - Configuring KissBox RTP-MIDI products............................................................. 13
5.1 - DHCP/Zeroconf.......................................................................................................15
5.2 - RTP-MIDI configuration.......................................................................................... 16
5.2.1 - V1/V2 MIDI KissBox...........................................................................................16
5.2.2 - V3 RTP-MIDI KissBox......................................................................................... 18
6 - rtpMIDI driver installation...................................................................................19
7 - Let's use RTP-MIDI.............................................................................................. 20
7.1 - Step 1 : open the RTP-MIDI control panel................................................................ 20
7.2 - Step 2: create a session.......................................................................................... 21
7.3 - Step 3 : connecting to remote RTP-MIDI devices with Bonjour..................................22
7.4 - And what if my RTP-MIDI device does not support Bonjour?.....................................23
7.4.1 - What is the control port of my device?.............................................................. 24
8 - Document revisions............................................................................................. 25
Page 3 of 25
1 - What is RTP-MIDI ?
RTP-MIDI is a worldwide open and completely free standard, listed in RFC documents (RFC4695 / RFC6295).
This guarantees that anybody can use RTP-MIDI without needing to pay any license and ensures that no company
can claim RTP-MIDI to be its proprietary product. It is based on the well-known RTP protocol (listed as RFC3550
standard), which is based in turn on standard IP stack. This allows any RTP-MIDI product to use standard
networks components.
RTP-MIDI does not necessarily relies on Ethernet and can be used over wireless links (iPad is using RTPMIDI in this way). However, the use of Ethernet guarantees extremely low latency over the complete network.
RTP-MIDI benefits from all RTP advantages, like clock synchronization, detection of lost packets, etc...
Moreover, RTP-MIDI provides a recovery mechanism, which allows a receiver to recover missing informations due
to lost packets without needing any retransmission.
RTP-MIDI is natively integrated in Mac OS X since 2006 (no need to install any driver on this platform), and
free Windows drivers are now available for all Windows platforms for XP, Vista, Windows Seven and Windows 8, in
32 and 64 bits versions.
These drivers are needed only to emulate MIDI ports from system point of view. Since RTP-MIDI is running
on the top of open, mature standards (IP / UDP / RTP), an application can run an RTP-MIDI engine without
needing to install any driver, like what is done in the VSTizer plugins from KissBox. RTP-MIDI is also compatible
with any existing router or network device, since it does not use any reserved/proprietary communication code.
A legend about RTP-MIDI is the introduction of more latency than other solutions, because it is based on IP
technology. This is of course completely false, and extremely low latency can be easily be achieved with RTP-MIDI.
If you have any doubt about what can be done with RTP over Ethernet in terms of latency, just take a look to the
work done by Audio Engineering Society (AES) in the workgroup X192. They have demonstrated that it is possible
to have RTP/IP exchanges over a LAN network with 125 microseconds latency.
By the way, the latency due to the operating systems like Windows or Mac OS is exactly the same whatever
you use IP or pseudo-direct Ethernet access (technically speaking, this is called “threading model” and you can not
change it... apart if your name is Microsoft or Apple).
Another legend about RTP-MIDI claims that the configuration is awfully complex. In fact, the configuration of
a RTP-MIDI setup is exactly the same as the configuration process you used for your Internet access on your
computer. It's true that there is a configuration tool to use (the KissBox Editor), but you should then ask yourself
“why do solutions sold to be Plug&Play and with zero configuration need also a configuration tool to
be run before they can be used ?” Not so zero configuration then...
And do not trust also people claiming that RTP-MIDI exposes your computer to viruses because it uses IP.
Viruses do not spread because of a protocol, but because of security breaches in operating systems, whatever the
protocol used, even those which are not using IP.
The only thing we can not guarantee for now is the ability of RTP-MIDI to protect users against vampires...
But we are studying a solution to this problem... (that's a joke of course... vampires are naturally afraid of RTPMIDI, you have nothing to do to scare them when you use RTP-MIDI)
Page 4 of 25
2 - Understanding the RTP-MIDI sessions concept
Before using RTP-MIDI, it is very important to understand the concept of session, because RTP-MIDI relies
completely on this completely.
A session is simply a virtual link between two RTP-MIDI devices, which creates automatically one MIDI IN
port and one MIDI OUT port in each device. What is sent to MIDI OUT in the first session participant will be
received on the MIDI IN of the other session participant, and vice-versa. We will see also that sessions are also
providing MIDI Merge and MIDI THRU functionalities.
So let's stay simple : a RTP-MIDI session is nothing else than a pair of MIDI IN / MIDI OUT ports for a
device. Each time you create a RTP-MIDI session on a machine, you create a new pair of MIDI ports!
Sessions are needed with RTP-MIDI since all the devices are sharing the same communication media (the
network). They were not needed with MIDI 1.0 or USB since the MIDI communication is naturally point-to-point
with these systems.
Sessions are exactly the same concept as the one you use everyday when you make a phone call. Since all
phones are sharing the same network, you need to tell to your phone that you want to join a specific person. You
must then dial the number and wait until the other person accepts the call. Speaking in your phone before the
remote person has accepted the call is useless.
RTP-MIDI session are working exactly in the same way. A first device, called the Session Initiator will send a
specific message to the RTP-MIDI device with which you want to exchange MIDI data (this message is technically
called the Invitation). The device being invited is called a Session Listener.
Most devices (including computers) can be Session Initiator and Session Listener at the same time (KissBox
V3 modules, Mac OS-X RTP-MIDI driver, rtpMIDI driver, VSTizer plugins, etc...), while some devices can be only
Session Listeners (iPad, iPhone, KissBox V1/V2, etc...)
If the remote device accepts the invitation, it sends a specific reply to the Initiator which knows that a link is
now established between the two devices (the session is opened), and MIDI data can be exchanged (to be exact, a
clock synchronization sequence will take place between the two devices just after the session is opened, and
before MIDI data can be exchanged. This step is however completely transparent from RTP-MIDI point of view).
The sessions are very powerful mechanisms, and they allow to perform some features which do not exist in
other MIDI implementations, or are requiring some specific MIDI hardware (like mergers and Thru-boxes):
•
detection of lost data between RTP-MIDI session participants, with optional automatic data recovery on the
receiver without needing a retransmission (this is called RTP-MIDI journalling)
•
automatic duplication of MIDI streams between multiple receivers (equivalent to MIDI THRU function, but
without needing THRU cables or THRU-BOXES). If you look to the diagram below, you will see that Device
1 has opened a session with Device 2 and another session with Device 3. Every MIDI message sent by
Device 1 (red arrow) is automatically copied in Device 2 and Device 3.
•
automatic merging of MIDI streams coming from multiple senders (equivalent to a MIDI 1.0 hardware
merger). In the diagram below, you can see that Device 2 is sending data to Device 1 (blue arrow), and
Device 3 is sending data to Device 1 also (green arrow). The virtual MIDI IN port in Device 1 will
automatically merge the two streams.
Note that Device 2 does not see any data from Device 3 and vice versa, since they do not have opened a
session together.
Page 5 of 25
(Picture from Wikimedia Commons under free license)
Of course, if you create a new session on Device 1 with a fourth device, the Device 2 and Device 3 will not
see the data sent to/received from this last device, since the sessions are different.
Page 6 of 25
3 - Understanding the IP addresses
We wrote this chapter for those who never heard of IP addresses or who have no idea of what they mean. If
you already know what they are, you can jump this chapter and go directly to the next one, where the practice
starts.
Creating and configuring an RTP-MIDI network is far from being difficult. There are basically two important
parameters to know:
•
the IP addresses of the RTP-MIDI devices which will be connected over the network
•
the subnet mask
3.1 - What is an IP address ?
Before anything else, note that IP simply means “Internet protocol”. This must be read as “inter networking
protocol” (a protocol to exchange data from a network to another), not as a protocol for Internet (aka the Web),
even if Internet uses this protocol of course.
An IP address is just a number used by a computer to identify itself uniquely on a network.
You can easily understand how an IP address works if you imagine that a network is a city, and the
computers/printers/etc.. connected to the network are buildings in this city. If you want to send letters or packages
from one building to another (or even to another city), the postman (this role being played by the network itself)
just need a simple information : its number.
You can then easily understand that each computer must have a unique IP address in a given network.
An IP address is formed of four numbers, between 0 and 255, separated by dots (We will not speak of IPv6
here. If you know already that there are IPv4 and Ipv6 addresses, this tutorial is probably useless for you...). For
example, the computer on which I am typing this text right now has address 192.168.0.6.
3.2 - Here comes the subnet mask...
There is a lot of possible addresses (0.0.0.0 to 255.255.255.255, so 4294967296 possible addresses
precisely), but a unique worldwide network with all those addresses would be almost impossible to manage.
Having multiple smaller networks is far better, but is it better to have only a few very big networks with
many computers in them, or having a lot of small networks, with a limited number of possible computers?
If you look from Internet point of view, the first solution is the best (let's say one network per country to
have an idea), but if you look from your home or a studio point of view, the second solution is the best. So, what
can we do?
That's where the subnet mask comes into the game. It simply defines the size of a network (or how many
computers you can connect to a given network). The subnet mask is also formed of four numbers, separated by
dots, which are directly related to the four numbers of the IP address. The subnet mask defines the boundary
in the IP address between the network number and the computer number. Thanks to the subnet
mask, an single IP address contains both a network number and a computer number.
Technically speaking, the '1' bits in the subnet mask (when written in binary) tells what bits in the IP address
define the network number, while the '0' bits define the computer number in this network.
Let's take a practical example: a 255.255.255.0 subnet mask says that the 3 first numbers of the IP address
represent the network number, and that the last number of the IP address is the computer number in the network.
Since each number in the IP address ranges from 0 to 254 (255 has a special meaning), you see that you can have
up to 255 computers in this network, and you can have 255 x 255 x 255 different networks. This setup is very
common for domestic and middle sized setups (like a music studio for example)
Another example? Let's take another common subnet mask: 255.0.0.0. This subnet mask allows you to have
“only” 255 networks, but this time, each of them can contain 255 x 255 x 255 computers! This is typically what you
Page 7 of 25
find at Internet levels or in very big companies.
Let's concentrate on 255.255.255.0 subnet mask. Most of the time, you will following network numbers with
such a mask: 192.168.0.xx and 192.168.1.xx (do not forget: xx is the computer number...) As we have seen, each
of these networks can contain up to 255 computers. However, a computer located at address 192.168.0.1 can not
talk directly with another computer located at 192.168.1.1, even if they are connected together. The reason
is that do not belong to the same network number (these are separate networks from IP point of view. Going from
one network to another would require a specific device named a router or a gateway. We will not talk about these
devices here).
As you can see, if you want computers or devices to talk to each other over a given network, the setup rules
are then extremely simple:
•
Make sure that devices have the same subnet mask (255.255.255.0 for example)
•
Make sure that devices use the same network number (192.168.0.xx for example)
•
Make sure that each device has a unique number number in the network (e.g. 192.168.0.0 for
one device, 192.168.0.1 for another device, etc...)
For example, if you decide to use 192.168.0.x network with subnet mask 255.255.255.0, you can have
device (computers or KissBox or anything else) from address 192.168.0.0 to 192.168.0.254.
Let's finish by saying that there are standard systems to assign automatically addresses to devices once they
are connected to the network (these standards are called DHCP and Zeroconf). However, we recommend you to
use static IP addresses each time you can, because you will then keep everything under control (this is called
“network administration”.
We can tell you that solutions supposed to be “No configuration without IP addresses” are very difficult to
maintain when something goes wrong, especially with devices without any user interface... If a device stops
working, there is simply no way to locate it directly, since you do not know its number. Try to imagine what would
happen in your studio if all devices would define their MIDI channels and numbers all by themselves. If your
sequencer says “I can't communicate with device 123”, how will you find it, since everything has been configured
“magically”?
3.3 - What is my network setup ?
Now that you know how IP addresses are working, before doing anything else, prepare a simple sketch of
your network installation, to see where you will connect what, and also to make sure that you will not disturb any
existing setup (for example, if you already have a network-connected printer)
Take the time to see where your current wired and wireless networks are going, and what is connected to
them, even if you decide to use a separate network. Write down on a sketch paper what devices are already
connected to your network, and what are the IP addresses used by them, and keep them for future reference.
And then, you can start to configure your network!
3.4 - A tip for the best performances
We highly recommend you to keep the network used for RTP-MIDI separate from the network used for
Internet access or office use. If possible, use two different network cards. Or use WiFi for Internet and wired
network for RTP-MIDI on laptops. This will guarantee the lowest possible latency on RTP-MIDI even if a computer
starts to use a lot of bandwidth to access Internet or access a printer for example, since it will use a different
network than the RTP-MIDI network.
Page 8 of 25
4 - Configuring network on computers
4.1 - Mac OS-X
Network configuration on the Macintosh is done with “System Preferences” application (the icon with gears).
Open the “System Preferences” then click on “Network” icon. You will get the following window:
The static configuration (recommended for RTP-MIDI) is activated by choosing “Manually” in the “Configure
IPv4” list.
Enter the IP address you want for your computer, then enter the subnet mask. In the screenshot, you can
see that we have selected address 192.168.0.6 with a subnet mask 255.255.255.0. This means that all IP devices
must have an IP address starting with 192.168.0 if you want to connect with them using this configuration.
If you want to use dynamic IP address, select “Using DHCP” in the “Configure IPv4” list. You may need to
click on “Advanced” button, and click on “Renew DHCP lease” if your computer was already using a static IP
address.
Click on the “Apply” button to activate the configuration.
Page 9 of 25
4.2 - Windows XP
Click on “Start” button, then click on “Configuration panel”
Double-click on “Network connections”
Select the network interface you want to use for the RTP-MIDI network and double-click on it (wired
networks appear under the name “Local network connection”. You can also make a right-click and choose
“Properties”
Scroll down the elements list, and double-click on “Internet Protocol (TCP/IP)”
Click on “Use the following IP address” button and enter the IP address and subnet mask you want to use
for your computer (here we have used IP address 192.168.0.4 with subnet mask 255.255.255.0). Remember that
this configuration method is the one we recommend for RTP-MIDI.
If you want to use a DHCP server to get automatically an IP address, click on “Get automatically an IP
address” button. Remember that you may have some difficulties to find what address will be used by your
computer in that case.
Click on “Ok” button to activate the new configuration (you will have to do it on the different windows which
have been opened, until you get back to the configuration panel)
Page 10 of 25
4.3 - Windows Vista / Seven
Click on the Windows button, then click on “Configuration panel”
Locate the “Network and Internet” group and click on it
Click then on “Network and sharing”
Click on “Display the network status”
You will then get a different menu on the left of your screen. Click on “Modify the network card parameters”.
The computer will now display a list of all network connections available on your computer. The LAN connections
are identified by the icon of computers with a network plug (WiFi connections show a bargraph in place of network
connector)
Double click on the network connection you want to use for RTP-MIDI. You will get the connection status
window on your screen.
Click on “Properties” button to open the network interface control panel
Double click on “Internet protocol version 4 (TCP/IPv4).
Page 11 of 25
Click on “Use the following IP address” button and enter the IP address and subnet mask you want to use
for your computer (here we have used IP address 192.168.0.90 with subnet mask 255.255.255.0). Remember that
this configuration method is the one we recommend for RTP-MIDI.
If you want to use a DHCP server to get automatically an IP address, click on “Get automatically an IP
address” button. Remember that you may have some difficulties to find what address will be used by your
computer in that case.
Click on “Ok” button to activate the new configuration (you will have to do it on the different windows which
have been opened, until you get back to the configuration panel)
Page 12 of 25
5 - Configuring KissBox RTP-MIDI products
Most KissBox products do not have a local Human Machine Interface (like display and keyboard). They then
require a external configuration tool, the KissBox Editor, to define their operating parameters.
The KissBox Editor is available for free both for Mac OS and Windows platforms on KissBox website. We
recommend you to always use the latest version available, to make sure that you are able to access the latest
functionalities implemented in the KissBox products.
Windows and Mac OS versions of the KissBox Editor provide the same commands and menus.
The KissBox Editor uses the network to communicate with the KissBox modules, so you will need to know
the address of the modules before configuring them. All KissBox modules use a default IP configuration when they
leave the factory (address 192.168.0.253 / subnet 255.255.255.0).
If you have changed the IP address of your KissBox and you can not remember it, just power it up and keep the
reset button depressed until the blue LED stops blinking. The factory default values are then restored into the
KissBox configuration memory.
WARNING: this operation not only resets the IP address, but also all other parameters (including the RTP-MIDI
ones). If you have performed a factory reset on a KissBox, do not forget to reconfigure all parameters.
Connect the KissBox and the computer running the KissBox Editor to the network. Make sure that your
computer network is configured correctly (same subnet mask, same network number).
If you want to configure a new KissBox (or a KissBox which has been “factory reset”), your computer must
use 255.255.255.0 subnet mask, and the network number shall be 192.168.0.xx (for example, the computer can
use 192.168.0.10 address).
Enter the IP address of the Box in the four edition boxes located in the “Add Kiss-Box manually” panel and
click “Add” button. The KissBox Editor will then try to connect to the KissBox module. You will see “Trying to
connect to Box xx.xx.xx.xx” in the log window (bottom right).
Page 13 of 25
Enter the KissBox
module IP address here
and click “Add” button
After a few seconds, you will normally see “Found Kiss-Box xx.xx.xx.xx” indication appear in the log window
(with the Box IP address of course, not “xx.xx.xx.xx”).
If the Editor can not find the KissBox (the indication “Found” does not appear in the log window), check your
computer's network parameters and make sure they are adapted to the KissBox you want to connect to. A wrong
subnet mask or a wrong network number are the most common problems (for example, a computer using address
192.168.1.10 trying to access a KissBox configured with address 192.168.0.200)
When the Editor has found the KissBox, you will see it appear in the tree display on left side (you may need
to click on the “Network” line if the tree display is collapsed). Each time you add a new KissBox with a different IP
address, it will be added in the tree display.
Select the KissBox here
to see its current
network parameters on
the panels
Page 14 of 25
Click on the KissBox you want to work with in the tree display (for a RTP-MIDI KissBox, you will see “RTPMIDI @ xx.xx.xx.xx”). The current network parameters used by the KissBox are also displayed on the right side of
the window.
You can then modify all the network parameters of the KissBox (address, subnet mask, gateway address).
Note that the TCP port, TCP mirror port and UDP port are not used by the RTP-MIDI application.
If you change any network parameter of the KissBox, always click on “Upload configuration” button before
doing anything else!
When you click the “Upload Configuration” button, the KissBox will reset and use the new parameters (this
means also that this button shall be clicked only when all parameters are defined in the Editor)
Once the KissBox has restarted, do not forget to add the Box again (with the “Add” button) using its new IP
address if you have changed it.
Never start the RTP-MIDI configuration process (described in the next chapter) without uploading first the
correct network configuration. The older KissBox models may become unreachable if RTP-MIDI configuration is
not consistent with the network configuration.
5.1 - DHCP/Zeroconf
DHCP/Zeroconf is supported by all KissBox products running at least firmware V5.0.
Do not try load V5.x or greater firmwares in older products based on V1 or V2 CPU!
You must have a V3 CPU to use these firmwares. You can check if your CPU is a V3 hardware by different
means:
•
if the firmware version indicated in the KissBox Editor is V5.0 or greater, then you have a V3 CPU
•
if the bootloader version reported on the sticker on the back of the KissBox is V3.0 or greater
To activate the DHCP/Zeroconf mode, just enter 0.0.0.0 in the KissBox Address, click “Upload configuration”
and restart the KissBox.
If a DHCP server is found on the network, the KissBox will use it to get an IP address. If no server DHCP is
found, the KissBox will automatically switch to ZeroConf mode and will use a 169.254.xx.xx IP address.
Note that it is not possible to know which address the KissBox will receive from the DHCP server, apart if you
have specifically configured the server. You will then need to use the Scan Network function to locate the KissBox
in the network.
Do not forget that your DHCP server may be configured to provide addresses in a different network. In that
case, you will need to adapt the computer's configuration once the KissBox is restarted othewise the KissBox Editor
will not be able to reach the KissBox module anymore.
Page 15 of 25
5.2 - RTP-MIDI configuration
5.2.1 - V1/V2 MIDI KissBox
Older models of KissBox based on V1 and V2 CPU hardware support RTP-MIDI, but they also include other
protocols in the same firmware files (that's why they were called “MIDI with UDP” not “RTP-MIDI”)
You can identify the hardware version by checking the MIDI firmware version in the KissBox Editor, once the
KissBox has been selected in the tree display. If you are running a firmware with a version V4.99 or lower, then you
have a V1 or V2 hardware and you must follow the instructions in this chapter.
Check the firmware version here
after selection of the KissBox
module in the left tree display
(the firmware V4.2 indicates that
this is a V2 CPU)
If you see a V5 or greater firmware version, then you have a V3 CPU and you must follow the instructions
given in the next chapter.
Double click on the MIDI entry in the tree display (where you see “MIDI (with UDP support) @ xx.xx.xx.xx”)
to open the setup window.
VERY IMPORTANT: always select “Mac OS-X RTP-MIDI”, even if you want to use the KissBox with a
Windows computer. The WinXP RTP-MIDI is reserved for an older driver made by KissBox and is not fully
compatible with the last RTP-MIDI driver. The other modes are reserved for specific uses which are not described
in this manual.
Page 16 of 25
If the selection was already on “Mac OS-X” when the dialog opened, then do not need to change
anything in the RTP-MIDI configuration. The port numbers are computed automatically and must not be
changed (otherwise the KissBox will not respond anymore to the KissBox Editor, and you will need to make a
factory reset)
If the selection was on any other mode when the dialog opened, strictly follow the following steps:
•
select “Mac OS-X” application profile, but do not click on Upload button for now!
•
close the dialog
•
double-click on the MIDI entry in the main KissBox Editor window to open the RTP-MIDI setup dialog again
You will then probably get the following warning displayed if you have just changed the KissBox IP address.
In that case, just read carefully what is written... and do not forget to click on the Upload button in the setup
window.
The “Target IP address” is not used for RTP-MIDI profile. You can let the default value in it.
The “Node name for RTP session” is used to assign a name to the KissBox, so you can easily remember its
function. You can put any string in it, up to 16 characters (e.g: “Synth1” or “DX7+EX800”)
KissBox modules based on V1 and V2 CPU have the following limitations:
•
the KissBox can only be a Session Listener: it requires then an external Session Initiator (KissBox module
with V3 CPU, rtpMIDI driver, Mac OS-X driver, etc...)
•
no “Bonjour” based automatic discovery: the Session Initiator needs to be manually configured to connect
with the MIDI KissBox.
Write down the port numbers used by the KissBox. You will need then to configure the RTPMIDI driver on the Mac or Windows computer.
Page 17 of 25
5.2.2 - V3 RTP-MIDI KissBox
Configuration of the V3 hardware is much more easier than previous KissBox generations.
Double click on the RTP-MIDI entry in the tree (where you see “RTP-MIDI (Single/Dual) @ xx.xx.xx.xx”). The
following window will then appear
The address indicated on this window is used if you want the KissBox to become a Session Initiator,
especially for iPad/iPhone or to use with older KissBox models (V1/V2). When used with computers, you can keep
the 0.0.0.0 address, which deactivates the session initiator function.
The “Bonjour / Session name” is used to identify the KissBox in Bonjour service. It's a good idea to change it
into a meaningful name, in order to help you to remember what is the application of the current RTP-MIDI KissBox.
Click then on “Upload” button to activate the configuration. The KissBox will then restart automatically with
the selected RTP-MIDI parameters.
•
the V3 KissBox must run the RTP-MIDI firmware, not the MIDI/UDP firmware if you want to use the RTPMIDI protocol! Take care when you select the firmware file from KissBox website in case of upgrade.
•
the RTP-MIDI firmware version shall be 5.5 minimum if you want to use Bonjour services
Page 18 of 25
6 - rtpMIDI driver installation
The rtpMIDI driver is needed on Windows platform if you want to make RTP-MIDI devices like the KissBox or
other computers appear as standard MIDI interfaces in your MIDI applications. This driver is not needed for
applications or plugins like the VSTizer series which are implementing RTP-MIDI communication stack in
themselves.
The driver works for all versions of Windows, from XP to Win8, both for 32 bits and 64 bits versions. It can
be found on KissBox download page and on Tobias Erichsen's webpage http://www.tobiaserichsen.de/software/rtpmidi.html
Note that the KissBox version of the driver is free, even for commercial applications, but it is restricted to the
use with KissBox RTP-MIDI products. The driver on Tobias Erichsen webpage can be used to connect computers
together, but you have to contact Tobias for any commercial applications in that case (the driver is free however).
The driver installation is very simple and direct. Just start the installer and follow the instructions.
If you get a warning in XP about the installation of a non-signed driver, you can safely ignore it. Just click on
“Continue” button if the window appears.
We recommend you also to install the Bonjour client on your PC (available from Apple website), in order to
get the “Bonjour Plug&Play” support on Windows.
The Bonjour package is available at this address: http://support.apple.com/kb/DL999?viewlocale=en_US
If you have any problem with the rtpMIDI driver installation, we recommend you to take a look to the great
tutorial made by Tobias Erichsen on his webpage http://www.tobias-erichsen.de/software/rtpmidi/rtpmiditutorial.html
Page 19 of 25
7 - Let's use RTP-MIDI...
Once everything is configured, you can start to use your RTP-MIDI setup now. Note that the network
configuration is normally done one time. The RTP-MIDI configuration can be changed whenever you want, since it
allows dynamic management of your devices. You can then change the MIDI streams between devices without
needing to disconnect/reconnect any cable, which is extremely powerful (this is called “Dynamic Patch Bay”)
7.1 - Step 1 : open the RTP-MIDI control panel
The RTP-MIDI session configuration procedure is exactly the same on Windows and Mac OS, but access to
the driver's configuration panel is different on the two platforms.
On Windows, you have to double-click on the icon on your desktop. You can also use the entry in the Start
menu.
On Mac OS, you have to go in Applications/Utilities/Audio and MIDI Configuration. Click on “Window” menu
and choose “Show MIDI window”.
Page 20 of 25
Double-click on “Network” icon to open the driver configuration panel. As you can see, the configuration
panel on Mac OS is very similar to the one on Windows.
7.2 - Step 2: create a session
A session is simply how the RTP-MIDI ports will appear in your MIDI application (in other terms, their
names). Each time you create a session, you add a new pair of MIDI ports (one MIDI IN and one MIDI OUT) in
your system, which becomes available to all your MIDI applications running in your computer.
4
3
2
1
1. Click on the “+” sign under the “My sessions” list. A new session with your computer name by default is
added in the list
2. Enter the name you want for the session in “Local name”. By default, the Bonjour name will be the same
as the local name, but you can use two different names if you want. On the screenshot, you can see that
we named this session “Demo session 1”
3. Enter a UDP port number for the session (see below). The control panel assigns automatically a UDP port
number to any new session, but each session must use a different UDP port number (two
sessions can not use the same port numbers). Moreover, a single RTP-MIDI session uses two
consecutive ports. So you will need to count ports 2 by 2 for each new session (for example, session 1
will use ports 5004 and 5005, session 2 will use 5006 and 5007, etc...)
4. Now click on Enable button (or click in the checkbox in the list, just beside the session name we have
created). You will notice that the edition boxes will become grayed. You need to uncheck “Enabled” if you
want to change anything in the session parameters.
5. CONGRATULATIONS! You have created your first RTP-MIDI session (and your computer now has a new
MIDI Interface available). If you open any MIDI application on your computer, you will notice that your
session name appears as a MIDI interface.
Page 21 of 25
Who said that RTP-MIDI was difficult to use?
You have seen that we speak here of “UDP ports”. UDP is simply a protocol used by RTP-MIDI
(UDP in fact “transports” the data across the network). The ports are nothing else than a subentity in the IP communication stack, which allows to create different receivers and transmitters
within the same IP address.
If we go back to the city model we use at the beginning of this guide, you can say that UDP ports
are like apartment numbers within a given building (the building address being given by the IP address).
There are 65536 port numbers available in each computer, 5004 is the standard one recommended for a first
RTP session.
7.3 - Step 3 : connecting to remote RTP-MIDI devices with Bonjour
When you have opened the RTP-MIDI control panel for the first time, you may have seen than names
appeared automatically in the Directory list. This will happen for example when you connect a V3 KissBox RTPMIDI device on the network.
The magic behind this is called “Bonjour”. This protocol has been developed by Apple to simplify network
configuration of devices like printers. When a RTP-MIDI device supporting Bonjour is connected to a network, it
sends automatically a message to all other devices to say “Hello (Bonjour means “Hello” in French), I am a RTPMIDI device, I am located at this IP address, and I am using these UDP ports”
These devices will then appear automatically in the list of available devices for your sessions. You do not
have to tell your computer what is their configuration, Bonjour did it for you. You can see in the following
screenshot that three remote RTP-MIDI devices have been detected automatically.
1
2
3
An important thing to understand is that devices being listed in the directory are not connected to your
local session. When they are visible, it means that they are available for a session.
To open a session between your computer and remote RTP-MIDI device:
1. Select the local session you want to use on your computer (this will be the Session Initiator). In the
previous screenshot, you see that we selected Demo Session 1
2. Click on the remote device you want to connect to (this will be the Session Invitee) in the Directory list
3. Click on the “Connect” button under the Directory list
You will notice then that the remote device disappears from the Directory list and its name appear now in
the Participants list.
If everything goes well, you will see a value appearing under the Latency header in the Participants list. In
that case, it means that the remote device accepted the invitation, and you can now exchange MIDI data over the
network between the computer and the device.
If you see “???” symbol in place of a latency value, it means that the remote device does not answer to the
invitation or does not accept it. In such a case, you will probably get an error message after a few seconds.
This situation is very seldom with devices using Bonjour, since all network parameters are transmitted
Page 22 of 25
automatically. This indicates that the remote device does not answer correctly to invitation. This can happen in the
following cases:
•
the remote device been disconnected from the network without being switched off properly (and it
did not send the specific message used by Bonjour to indicate that it leaves the network)
•
the remote device is crashed and need to be rebooted
•
there are too many sessions already being opened with the remote device and the device does not
have enough resources to respond (however, RTP-MIDI devices should answer with a specific
message to refuse the invitation in that case)
7.4 - And what if my RTP-MIDI device does not support Bonjour?
Bonjour protocol is not a part of RTP-MIDI and is purely optional. It is a native part of Mac OS-X, but if you
use a PC with rtpMIDI driver, you will need to install Bonjour in Windows.
You can then find some PC on which Bonjour is not installed/running.
Early KissBox devices (based on V1 and V2 CPU) do not support Bonjour protocol too.
You can however perfectly use these devices with your computer, but you will need to add them manually
(since Bonjour will not transmit their network parameters automatically)
1
2
3
Here are the steps to follow to add manually a device to your directory list:
1. Click on “+” button under the Directory list to open the “Add remote peer” window
2. In the “Add remote peer” pop-up, enter a name for the remote device
3. If you use rtpMIDI driver on Windows, enter the IP address and the RTP-MIDI control port number in the
Host/Port (see below for details on how to get the control port number for KissBox devices), using the
following format: xx.xx.xx.xx:yyyy, where xx.xx.xx.xx is the IP address and yyyy is the Control Port
number. On the screenshot, you see that we want to connect to device located at 192.168.0.100 using port
4391.
4. If you use the Mac OS driver, you have to enter the IP address and the control port on two separate line
5. Once the device is entered in the Directory list, follow instructions from previous paragraph to open a
session with this device.
Page 23 of 25
7.4.1 - What is the control port of my device?
The control port number is defined during the configuration process of a RTP-MIDI device.
On KissBox V1/V2, the control port number is defined in the MIDI configuration window (since there are two
MIDI ports on MIDI2TR device, you have one control port number for each). Note that the port number changes
with the IP address for these devices and is automatically computed when a new IP address is given to the
KissBox.
On KissBox V3, the control port number is always 5004, whatever the IP address of the KissBox.
When you create a session with Mac OS driver, its control port number is given on the control panel
When you create a session with rtpMIDI driver, its control port number is given by the control panel
Page 24 of 25
8 - Document revisions
Date
Auteur
Version
Description
01/06/2013
B.Bouchez
1.0
First document release
05/10/2013
B.Bouchez
1.1
Corrected error with bold font visible on wrong places
Added a section to explain difference between V1, V2
and V3 KissBox CPU
Added details related to CompactMIDI product
Detailed steps with screenshots for major operations
Page 25 of 25