1
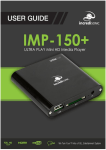
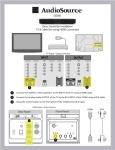
DT-HDMP-1 and DT-HDMP-2 User Manual Safety Instructions AVOID USING PRODUCT NEAR WATER. ALWAYS CLEAN WITH A DRY CLOTH ONLY. DO NOT INSTALL NEAR A HEAT SOURCE SUCH AS RADIATORS OR OTHER APPARATUS THAT CAN PRODUCE HIGH LEVELS OF HEAT. AVOID USING THE PRODUCT DURING ELECTRICAL STORMS. DISCONNECT THE DEVICE WHEN NOT IN USE FOR LONG PERIODS. AVOID BLOCKING THE AIR VENTS IN ORDER TO AVOID HEAT BUILD UP. A MINIMUM 5cm SPACE IS RECOMMEDED TO MAINTAIN FREE AIR FLOW. PREVENT THE POWER CORD FROM BEING WALKED ON AND BEING PULLED WITH SUDDEN FORCE. PROTECT THE CORD FROM BEING PINCHED, PARTICULARYLY AT PLUG AND FROM THE ENTRY TO THE DEVICE. DO NOT DROP THE PLAYER AS THIS WILL CAUSE IRREVERSIBLE DAMAGE. PRODUCT DETAILS: Packaging List: Please ensure that the following items are included in the box. If any items are missing, please contact your supplier immediately. Media Player Power Supply Remote Control AV Cable. Remote Control Guide BASIC SET UP: To set up your media player you will need to connect it to your TV set and supply power to the DT-HDMP-1/2 Mini Media Player. Connect the unit to an external hard drive or thumb drive. Connecting Power: Please ensure the power switch is in the off position before plugging the power adapter in the wall. Connect the power adapter to the back of the Mini HD Player and plug the power into the power socket. The LED will light up blue if it is powered correctly. Connecting the HDMI cable: Connecting the HD player to your TV with an HDMI cable will allow you to view multimedia in high definition. From the back of the HD player, connect your HDMI cable end into the HDMI port. Connect the other end of the HDMI cable to the HDMI input port of the TV set. Connecting the AV cable: Connecting the HD Player to your TV with the AV cable will allow you to view multimedia in standard definition Using the AV cable, connect the 3.5mm jack in the 3.5mm composite port of the back of the HD player. On the other end of the cable, plug the red, yellow and white connectors into the corresponding input ports of your TV. USB Host Interface: The Mini HD Player comes with a single USB Host port, allowing for quick and easy external media storage expansion. It is compatible with standard external hard disk drives, flash drive, card readers and other data storage devices. To connect your external hard disk drive to your Mini HD Player, please turn off the media player. Next, connect the external drive to the media player. Memory Card Interface: The Mini HD player is also capable of reading memory cards with its built-in card slot. The built-in card slot is capable of supporting SD and MMC cards. To view media stored in the memory card, switch the media player on. Insert the memory card gently into the card slot, and select the media type you wish to view. Once the media has been detected, select the partition where the media is located in. Depending on which media filter you have selected, only one type of media file will appear. Viewing Multimedia: The Mini HD Player is a full featured multimedia player, providing a wide range of functionality. By using its main menu you can easily play movies, music and picture files that are stored on an external storage device. User Interface: The Mini HD Player user interface has been designed to allow easy access to the media players many features. Main Menu: Upon starting the Mini HD Player this menu will be displayed first. File: Provides access to all media files- This will display all media file on HDD. Music: Provides access to audio media files Movie: Provides access to movie media files Photo: Provides access to image media files Settings: Provides access to the Set up menu Settings: Language- Choose preferred language to be displayed Screen Saver- Choose screen saver start up time Video Output Mode- Choose video output to be displayed Audio Output Mode- Choose audio output Auto Detect HDMI- Select on/off to have HDMI detected automatically Restore Default Setting- Choosing and Selecting yes will restore to factory defaults. System Information- Current software information Getting Started From the main menu screen, you will see the “file” “music” “movie” “picture” and “settings” icons. By selecting one of these icons, for example, “movie”, you will have access to the video files in your USB/SD storage device. Selecting Movie Files 1. You should have your USB device or D/MMC connected to the media player to access your files. 2. Use the left and right arrow keys on the remote to select the “Movie” icon from the main screen and press “Enter” to choose the movie file which you want to play. 3. Delete/Copy Movie: This function can copy movies between different external memory disks. 4. Once you have selected your video from the memory device, press the “OSD” key on your remote control in order to see the video options. A list of these options will be displayed in the following order: “Subenable” Subtitle” “Color” “Rim Color” “Size” “Text Encoding” “Time Sync” “Offset” a. “Subenable”- Choose to show subtitles b. “Subtitle” – Choose different subtitles c. “Color” – Change subtitle font color d. “Rim Color”- Show different effects for subtitle e. “Size” – Show subtitle size f. “Text Encoding” – Show encoding style g. “Time Sync” – Adjust the time to make the subtitle’s synchronization with the movie. h. “Off set” – adjust the subtitle location on screen. 5. To repeat, play/pause, stop, rewind or fast forward, press the corresponding function buttons on the remote control to enable these functions. 6. Resume the video: This media player supports resume playback. This function enables you to resume the video from where you left off. You will be asked if you want to resume the file from that point. \Music 1. Connect your USB device or SD/MMC to the media player in order to access the files. 2. Use the left and right arrow keys on the remote to select the “Music” icon on the main screen and click “Enter” to access the file. 3. Once you enter the “Music” icon you will see a page displaying the available inputs connected to your media player. Next, choose you input device by pressing the “enter” key on your remote which will display a page listing the folder and/or music files in your selected device. 4. Delete/Copy Music: This function can copy music between different external memory disks. 5. In order to select the “Audio Options” press the OSD key on the remote. It will now display a list of all audio settings. To select your setting, use the left and right arrow keys on the remote to choose option needed. The audio options will be listed in the following order: “EQ Mode”, “Lyric Focus Color”, “Lyric Un-focus Color” and “Lyric Play Mode” a. “EQ Mode” – Choose from “normal” “DBB” “POP” “Rock” “Classic” “Jazz” “Vocal” “Dance” “Soft” b. “Lyric Focus Color” & “Lyric Unfocus Color”, choose different color for the lyric font. c. “Lyric Play Mode” – Choose “Line Roll” or “Kalaok” by pressing “repeat to loop the music Picture 1. Connect your USB device or SD/MMC to the media player to access the files. 2. Use the left and right arrow keys on the remote to select the “Picture” icon on the main menu screen and click the “enter” key. 3. Once you have entered the “Picture” icon, you will see a page displaying the available input device connected to your media player. Next, choose your input device by pressing the “Enter” key on your remote which will display a page listing the folders and/or picture files in your selected device. 4. After selecting the picture, press “enter” to display. You can then press the OSD key on your remote to display a list of picture options. There are 3 options: “Switch Mode”, “Play Interval” and “Background Music”. a. For “Switch Mode” Press the up and down arrow keys to view all the different modes of switch available for switching your pictures, and then select one by pressing the “enter” key on the remote. The modes available are : “Default” “Persian Blinds H” “Persian Blinds V” “Slide up” Slide down” “Slide left” “Slide right” “Stretch up” “Stretch down” “Stretch left” “Stretch right” “Mosaic” “Zoom in” “Zoom out”. b. For “Play Interval”, Press the up and down arrow keys to view the interval of switching your pictures, and then select one by pressing the “Enter” key on your remote. You have the following interval choices: 1s, 3s, 5s, 10s, and 30s. c. For “Background Music”, press up and down keys to choose background music on or off. File 1. Use the arrow keys to select “File” on the main menu, and press “Enter” key to enter. 2. After entering, use the arrow keys to select the required input device. Press the “Enter” key to enter. 3. After choosing the device, you will see all available files. FRONT PANEL CONTROLS FOR THE DT-HDMP-2 Go back to previous screen Move up Move down Move left Move right Enter