1
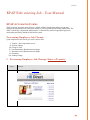
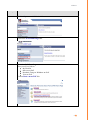
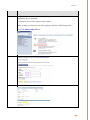
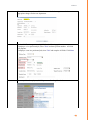
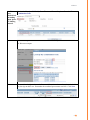
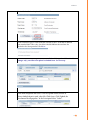
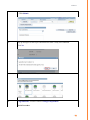
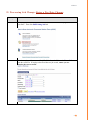
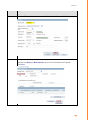
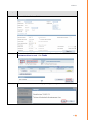
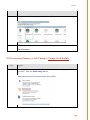
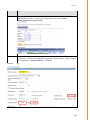
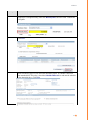
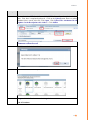
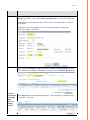
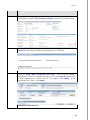
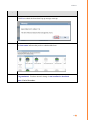
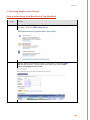
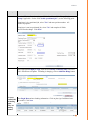
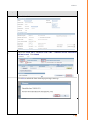
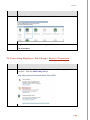
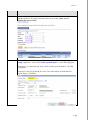
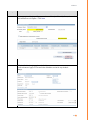
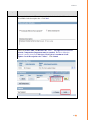
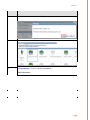
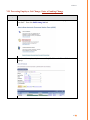
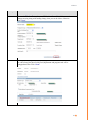
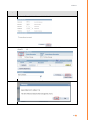
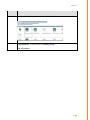
EPAF E DIT EXISTING JOB - USER MANUAL
This manual provides step by step information on how
to enter a change to an existing job.
Developed by:
Learning & Development Group
Human Resources Diversity & Inclusion
1/4/2013
1/4/2013
EPAF Edit existing Job - User Manual
EPAF AUTOMATED FORMS
ePAF (electronic personnel action form) is a module within PeopleSoft that allows for paperless
employment transactions such as hiring an employee, job or pay changes and ending employment. The
ePAF is initiated by a department initiator then it is electronically routed for appropriate approvals,
notifications and finally entered by HR into the system.
Processing Employee Job Change
Upon completion of this section, you will be able to enter:
I.
II.
III.
IV.
V.
VI.
VII.
Transfer - Have Department Access
Pay Rate Change
Change in Time
Non-Benefitted to Benefitted status change
Benefitted to Non-Benefitted status change
Promotion
Funding Change
I. Processing Employee Job Change: Enter a Transfer
Step
1.
Action
Begin by logging into HR Direct
1
1/4/2013
Step
Action
2.
Click the Department Self Service link.
3.
Click on the ePAF Home Page link.
4.
This is the ePAF Home Page.
Here you will see links to:
My Worklist
Start a new ePAF
Resubmit, Change or Withdraw an ePAF
View an ePAF
Click on Start a new ePAF link.
2
1/4/2013
Step
5.
Action
1. If you do not have access to the employee’s department, use the "Transfer No
Department Access" procedure.
2. If you have access to the employee, then continue.
In this example you do have access to the employee, therefore, "Edit Existing Job" is
used. Click Edit Existing Job link.
6.
Enter the Employee ID, Click the Search button.
7.
Current Job Info will populate. Note the Form Id #
3
1/4/2013
8.
Enter Effective Date, tab out of field. Review each of the categories and make
appropriate changes for the new department.
9.
For the field "Is this a positioned job?" Use the following guide:
If employee is in a positioned job, select "Yes" and enter position number. All fields
will populate.
If employee is not in a positioned job, select "No" and complete all fields. Click Next
10.
For non positioned employees, click Department Look up if needed
4
1/4/2013
11. For
Review the Hourly or Bi-Weekly Rate. The Annual Rate will update. Enter the GL
more
Combination Code
detailed info
on funding
input, please
see funding
manual.
12.
Or use Look up icon to find the code and select. Note: Always search for “W”
for Worcester campus.
13.
Then scroll to the right and enter the Percent. If there is another combo code needed, click
the plus sign to add a row. Remember the combined percent must total 100. Click Next
5
1/4/2013
14.
Review Union Code and update if needed. Click Next
15
Scroll to bottom of page to Time and Labor Schedule section. If schedule is different
from standard (M-F 8 hrs a day), check the Schedule Different box and note the
schedule in the description box. Click Next
16.
Action Code, Action Description and Reason Code will be populated. For schedule
changes only, you will need to upload a schedule form. See next step.
17.
Have form completed and saved. Click on Upload button, browse to
where schedule form is saved, select file, Click Open, Click Upload, the
Attachment Id will populate. In the Description select “Other”.
6
1/4/2013
18.
19.
Click Submit
Pop up message will come up to confirm that this form is ready to be submitted.
Click Yes
20.
The form status indicates that you have submitted this form.
21.
Congratulations! You have entered a change of department.
End of Procedure.
7
1/4/2013
II. Processing Job Change: Enter a Pay Rate Change
Step
Action
1.
From HR Direct click on Department Self-Service and the ePAF home page, click “Start a
new ePAF”. Then click Edit Existing Job link.
2.
Enter the employee's last name or Empl ID, Click Search. Click on the Name link
from the search list. If employee has more than one job record, ensure you are
selecting the correct record.
8
1/4/2013
Step
3.
4.
Action
Enter the Effective Date then tab out of the field. Note the Form Id #. Click Next
Enter the new Hourly or Biweekly Rate, tab out of field. Annual rate will update.
Click Next
9
1/4/2013
Step
Action
5.
Current Job Info will show, Click Next
6.
Choose the Action "PAY" and the appropriate Reason Code. Comments or file
attachments will not be used. Click Submit
7.
Click Yes to submit the form when Pop up message comes up.
10
1/4/2013
Step
Action
8.
The form status indicates that you have submitted this form.
9.
Congratulations! You have entered a Pay Rate Change.
End of Procedure.
III.Processing Employee Job Change: Change In Schedule
Step
1.
Action
From HR Direct click on Department Self-Service and the ePAF home page, click “Start a
new ePAF”. Then click Edit Existing Job link.
11
1/4/2013
Step
Action
2.
Enter the employee's last name or Empl ID, Click Search. Click on the Name
link from the search list. If employee has more than one job record, ensure
you are selecting the correct record.
3.
Enter the Effective Date then tab out of the field. Change the Standard Hours to the new
weekly hours. Tab out of field and FTE will populate, adjust if needed. Change Full/Part
time if applicable. Note the Form Id #. Click Next
12
1/4/2013
Step
4.
Action
If employee is exception hourly, enter new Biweekly Rate, tab out of field. Annual rate
will update.
5.
Click Next
6.
Scroll to bottom of page to Time and Labor Schedule section. If schedule is different
from standard (M-F 8 hrs a day), check the Schedule Different box and note the schedule
in the description box. Click Next
13
1/4/2013
Step
7.
Action
Choose the Action "DTA" and Reason Code "CIT". You will need to upload a schedule
form. First, have it completed and saved. Click on the Upload button, browse to where
schedule form is saved, select file, Click Open Click Upload, The Attachment Id will
populate. In the Description select “Other”. Click Submit
Other
Comments will not be used
8.
Click Yes to submit the form when Pop up message comes up.
9.
The form status indicates that you have submitted this form.
10.
Congratulations! You have entered a change in time.
End of Procedure.
14
1/4/2013
IV. Processing Employee Job Change:
Enter a status change from Non-Benefitted to Benefitted
Step
Action
1.
From HR Direct click on Department Self-Service and the ePAF home page, click “Start a
new ePAF”. Then click Edit Existing Job link.
2.
Enter the employee's last name or Empl ID, Click Search. Click on the Name
link from the search list. If employee has more than one job record, ensure
you are selecting the correct record.
15
1/4/2013
Step
3.
Action
Enter the Effective Date then tab out of field. Note Form Id #. Change Employee
Group if applicable. For the field "Is this a positioned job?", use the following guide:
If employee is in a positioned job, select "Yes" and enter position number. All fields
will populate.
If employee is not in a positioned job, select "No" and complete all fields that
will need to change. Click Next
4.
For more
detailed info
on funding
input,
please see
funding
manual.
Select appropriate Employee Type, enter the new Hourly or Biweekly Rate, tab out of
field. Annual rate will update. If funding is changing, click on Add Date Range button
Enter Begin Date and new funding information. Click on plus sign if additional rows
are needed. Click Next
16
1/4/2013
Step
Action
5.
If Union Code is changing, update that field.
Scroll to bottom of page to Time and Labor Schedule section for any schedule change.
6.
For any schedule that is different from standard (M-F 8 hrs a day), check the Schedule
Different box and note the schedule in the description box. Click Next
7.
Choose the Action "BEN" and Reason Code "NTB". You will need to upload a
schedule form. First, have it completed and saved. Click on the Upload button, browse
to where schedule form is saved, select file, Click Open Click Upload In the
Description select "Other" Click Submit
Other
Comments will not be used
17
1/4/2013
Step
8.
9.
10.
Action
Click Yes to submit the form when Pop up message comes up.
The form status indicates that you have submitted this form.
Congratulations! You have entered a change in non-benefitted to benefitted
status. End of Procedure.
18
1/4/2013
V. Processing Employee Job Change:
Enter a status change from Benefitted to Non-Benefitted
Step
Action
1.
From HR Direct click on Department Self-Service and the ePAF home page, click “Start a
new ePAF”. Then click Edit Existing Job link.
2.
Enter the employee's last name or Empl ID, Click Search. Click on the Name
link from the search list. If employee has more than one job record, ensure
you are selecting the correct record.
19
1/4/2013
Step
3.
Action
Enter the Effective Date then tab out of field. Note Form Id #. Change Employee
Group if applicable. For the field "Is this a positioned job?", use the following guide:
If employee is in a positioned job, select "Yes" and enter position number. All
fields will populate.
If employee is not in a positioned job, select "No" and complete all fields
that will need to change. Click Next
4.
Select appropriate Employee Type, enter the new Hourly or Biweekly Rate, tab out of
field. Annual rate will update. If funding is changing, click on Add Date Range button
For more
detailed info Enter Begin Date and new funding information. Click on plus sign if additional rows
are needed. Click Next
on funding
input,
please see
funding
manual.
20
1/4/2013
Step
5.
Action
Update Union Code
6.
7.
Choose the Action "BEN" and Reason Code "TBN". Comments and File Attachments
will not be used. Click Submit
8.
Click Yes to submit the form when Pop up message comes up.
21
1/4/2013
Step
Action
8.
The Form Status indicates that you have submitted this form.
9.
Congratulations! You have entered a change in benefitted to non-benefitted status
End of Procedure.
VI. Processing Employee Job Change: Enter a Promotion
Step
1.
Action
From HR Direct click on Department Self-Service and the ePAF home page, click “Start a
new ePAF”. Then click Edit Existing Job link.
22
1/4/2013
Step
Action
2.
Enter the employee's last name or Empl ID, Click Search. Click on the Name link
from the search list. If employee has more than one job record, ensure you are
selecting the correct record.
3.
Enter the Effective Date then tab out of field. Note Form ID #. Change Employee
Group if applicable. For the field "Is this a positioned job?", use the following guide:
If employee is in a positioned job, select "Yes" and enter position number. All fields
will populate.
If employee is not in a positioned job, select "No" and complete all fields that will
need to change. Click Next
23
1/4/2013
Step
Action
4.
Select appropriate Employee Type, enter the new Hourly or Biweekly Rate, tab out of
field. Annual rate will update. Click Next
5.
If Union Code is changing, update that field.
Scroll to bottom of page to Time and Labor Schedule section for any schedule
change.
24
1/4/2013
Step
Action
6.
For any schedule that is different from standard, check the schedule different box and note
the schedule in the description box. Click Next
7.
Choose the Action "PRO" and Reason Code "PRO". Any approval you received
from the Compensation Department must be attached. Browse to where the
approval is saved, select file, Click Open, Click Upload Attachment Id will
populate. In the Description select "Other". Click Submit
Other
25
1/4/2013
Step
Action
8.
Click Yes to submit the form when Pop up message comes up.
9.
The form status indicates that you have submitted this form
10.
Congratulations! You have entered a promotion.
End of Procedure.
26
1/4/2013
VII. Processing Employee Job Change: Enter a Funding Change
Step
Action
1.
From HR Direct click on Department Self-Service and the ePAF home page, click “Start a
new ePAF”. Then click Edit Existing Job link.
2.
Then Search the employee by last name or Empl ID. Click on the Name link when it
pops up.
27
1/4/2013
Step
Action
3.
Choose the Effective Date, tab out of field. Note Form ID #. If there are other
changes occuring along with funding change, then you can do it here. Otherwise
click “Next”.
4.
Then update the Compensation Data, change the new “GL Combination Code”. Once
the code selected, the other fields (Fund, department and program code will be
autopopulated. Then Click “Next”
28
1/4/2013
Step
Action
5.
Review the Time & Labor Data and click “Next”.
6.
Then choose the Action Code as “Data Change”. Click “Submit”.
7.
Click “Yes” to submit the form when Pop up message comes up.
29
1/4/2013
Step
Action
8.
The form status indicates that you have submitted this form.
9.
Congratulations! You have entered a Funding Change.
End of Procedure.
30