1
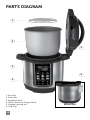
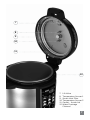
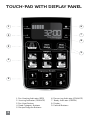
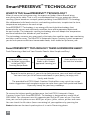
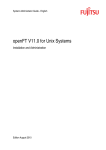
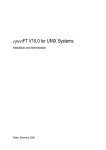
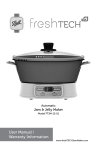
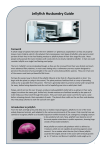
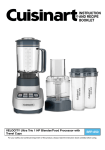
Automatic Home Canning System
with SmartPRESERVE™ Technology
Model FTAC-13-10
User Manual /
Warranty Information
www.freshTECHAutoCanner.com
Important Safeguards
Failure to follow these instructions and warnings may cause death, personal injury
and/or property damage. To reduce the risk of fire, electric shock and/or injury to
persons, basic safety precautions should always be followed when using electrical
appliances, including the following:
1. READ ALL INSTRUCTIONS, PRODUCT LABELS AND WARNINGS BEFORE USE.
2. DO NOT LIFT OR MOVE UNIT DURING OPERATION AND/OR WHILE HOT.
3. Turn the appliance off and unplug the power cord from the power source when
the appliance is not in use and before cleaning. Allow the appliance parts to cool
before putting on or taking off parts and before cleaning the appliance.
4. Never attempt to open lid while the unit is operating. Do not open the unit until
it has cooled and all internal pressure has been released. If lid is difficult to rotate,
this indicates that the unit is still pressurized. Do not force the appliance lid to
open. Any pressure in the unit can be hazardous.
5. Do not touch the appliance’s hot surfaces. Use top handle to open the lid or use
side handles to move the appliance
6. To protect against electrical shock, do not immerse the power cord, power plug or
appliance base in water or any other liquids.
7. The appliance is designed with steam vents towards the back surface of the lid.
Caution must be exercised while appliance is in operation as proximity to steam
may cause burns. Do not place hands or face near vent.
8. Extreme caution must be used if moving an appliance containing hot water.
9. After processing, use extreme caution when opening the hinged lid. Serious burns
can result from residual steam escaping from inside the unit. Lift the lid facing away
from you and allow the drops of water to trickle back from the lid into the unit.
10. This appliance cooks under pressure. Improper use may result in scalding injury.
Make certain the Lid is properly closed before operating. See section for How to
Use the Appliance.
11. Keep out of reach of children. Close adult supervision is necessary when this
appliance is used near children.
12. Do not operate any appliance with a damaged power cord or power plug, or
operate it after malfunctions, or has been damaged in any manner.
13. Do not use attachments not recommended by the manufacturer; they may cause
hazard or injury.
14. Do not let the power cord hang over the edge of table, counter, or allow it to
come into contact with hot surfaces.
15. Do not place this appliance on or near a hot gas stove or electric burner or in a
heated oven.
16. Always attach plug to appliance first, then plug cord into the wall outlet. To
disconnect the appliance, press stop / reset, then remove the power plug from
the power supply.
17. DO NOT DRY HEAT THE INNER POT. ALWAYS FILL THE INNER POT FIRST
WITH THE RECOMMENDED AMOUNT OF WATER, AND THEN ADD THE
JAR RACK AND JARS.
18. Do not touch the heater located within the Appliance Base as it becomes very hot.
19. Do not use the appliance for any reason other than its intended use.
20. Do not place anything other than water into the inner pot. Do not use the inner
pot for cooking food. The inner pot is designed for fresh preserving.
21. Always use appliance in a well-ventilated area, and not under hanging cabinets.
2
22. D
o not fill unit over or under the 48 oz / 6 cups fill line. Overfilling could result in
an under processed food. Under filling could result in too much water
evaporation before the process ends.
23. Always operate the unit using the inner pot. Operating without the
inner pot may cause an electrical shock.
24. Only qualified service technicians may repair this product using authentic
freshTECH parts and accessories. Never attempt to disassemble or repair the unit
yourself. Contact 1-800-240-3340 for Consumer Service. Hours of Operation:
Monday – Friday, 8.30 am – 4.30 pm EST.
25. To reduce the risk of electrical fire, only place appliance on flat, heat resistant
solid surface.
26. To reduce the risk of electrical fire, do not store anything directly on top
of the appliance surface when the appliance is in operation.
27. Do not operate the appliance without the vent filter in place.
28. Do not use the appliance outdoors or for commercial purposes.
29. SAVE THESE INSTRUCTIONS IN A PLACE WHERE YOU CAN EASILY LOCATE THEM.
30. RISK OF ELECTRIC SHOCK. Preserve only in removable container.
Please read ALL of the instructions in this manual carefully before you begin to use
this appliance. Proper care and maintenance will ensure a long life and trouble free
operation for this appliance. Please save these instructions and refer to them for
cleaning and care tips.
WARNING! To reduce the risk of fire or electric shock, do not remove
any service covers. There are no user serviceable parts inside the
freshTECH Automatic Home Canning System. Only authorized
personnel should repair the appliance.
SAVE THESE INSTRUCTIONS
FOR HOUSEHOLD USE ONLY
SPECIAL CORD SET INSTRUCTIONS
1.
A short power-supply cord (or detachable power-supply cord) is provided
and should be used to reduce the risk resulting from becoming entangled
in or tripping over a longer cord.
2. Longer detachable power-supply cords or extension cords are available and
may be used if care is exercised in their use. If a longer detachable powersupply cord or extension cord is used, the marked electrical rating of the cord
set or extension cord should be at least as great as the electrical rating of the
appliance, and the cord should be arranged so that it will not drape over the
countertop or tabletop where it can be pulled on by children or tripped over
unintentionally. The extension cord should be a grounded type 3 wire cord.
Contact 1-800-240-3340 for Consumer Service.
Hours: Monday – Friday, 8.30 am – 4.30 pm EST.
3
Experience A Whole New Way
of Fresh Preserving
Dear Food Enthusiast,
CONGRATULATIONS! You are now the proud owner of a new
freshTECH Automatic Home Canning System, designed with the unique,
patent pending SmartPRESERVE™ Technology! No more guesswork.
No more worries. And NO more stove-top monitoring.
With this first of a kind, counter-top appliance, you can:
1. Prepare Recipes: Prepare fresh jams & jellies, sauces, tomatoes, salsas,
fruits, and pickles using the easy-to-follow instructions in the included
freshTECH Recipe Book.*
2. Fill Jars: Fill Ball® brand canning jars with your freshly made food per the
Recipe Book instructions (only use Ball®, Kerr® or Golden Harvest® brand
canning jars, and in Canada use Bernardin® canning jars).
3. Auto-Preserve With the Touch of a Button: Preserve your freshly
prepared recipes in the automatic home canning appliance for shelf-stable
storage for up to a year. You’re now ready to share your homemade recipes
with friends and family. With the included freshTECH Meal Creations Guide
make quick snacks and meals, or entrees, beverages and desserts using the
fresh preserved foods in your pantry - especially handy for busy weekdays!
*Only use recipes exclusively developed and optimized for the appliance as
explained in the included freshTECH Recipe Book.
4
TABLE OF CONTENTS
Important Safeguards . . . . . . . . . . . . . . . . . . . . . . . . . . . . . . . . 2
Introduction . . . . . . . . . . . . . . . . . . . . . . . . . . . . . . . . . . . 4
Appliance Parts Reference Diagram . . . . . . . . . . . . . . . . . . . . . . . . . 6
What is the SmartPRESERVE™ Fresh Preserving Technology? . . . . . 10
Using Your Automatic Home Canning System . . . . . . . . . . . . . . . 11
• Cleaning before use . . . . . . . . . . . . . . . . . . . . . . . . . . . . . . . 11
• Preparing and assembling the unit . . . . . . . . . . . . . . . . . . . . . . . . . 12
• How to use the appliance . . . . . . . . . . . . . . . . . . . . . . . . . 13
• Process termination and resetting . . . . . . . . . . . . . . . . . . 15
• Cleaning after use . . . . . . . . . . . . . . . . . . . . . . . . . . 16
Frequently Asked Questions and Trouble-Shooting Tips . . . . . . . . . . 18
Service and Maintenance. . . . . . . . . . . . . . . . . . . . . . . . . . . . . . . 23
Appliance Registration . . . . . . . . . . . . . . . . . . . . . . . . . . . . . . 23
Warranty Information . . . . . . . . . . . . . . . . . . . . . . . . . . . . . . 24
5
PARTS DIAGRAM
1
2
5
3
6
4
1. Jar Rack
2. Inner Pot
3. Appliance Base
4. Touch-Pad with Display Panel
5. Hinged Locking Lid
6. Drip Cup
6
Back of Unit
7
8
9
10
11
12
7. Lift Valve
8. Temperature Sensor 1
9. Steam Vent Filter
10.Temperature Sensor 2
11.Gasket - Inside Lid
12.Water Drainage
Channel
7
TOUCH-PAD WITH DISPLAY PANEL
1
6
2
7
8
3
9
4
5
1. Pre-Heating Indicator (RED)
2. Sensing Indicator (ORANGE)
3. Pre-Heat Button
4. Food Category Buttons
5. Recipe Program Buttons
8
6. Preserving Indicator (ORANGE)
7. Ready Indicator (GREEN)
8. Display
9. Control Buttons
button features
PRE-HEAT – To activate jar pre-heating, push Pre-Heat and then Start.
START / STATUS – The status button will indicate real time process temperature
if pushed once during auto-preserving. The Status button will indicate the life
counter of your Appliance (in hours used) if pushed once prior to auto-preserving.
STOP / RESET – At any stage during the process, the Stop button can be pressed to
terminate the program. To Reset the appliance, press and hold for 2 seconds.
CATEGORY – Displays the type of foods you can preserve in your appliance.
PROGRAMMED RECIPES – Displays the program number referenced in freshTECH
Recipe Book.
Status Lights and Phase Overview
PRE-HEATING PHASE (RED) - Pre-heats your jars prior to filing with hot food
to prevent jar breakage. This phase takes 12 minutes to complete.
SENSING PHASE (ORANGE) - Designed to optimize temperature for your recipe
prior to preserving.
PRESERVING PHASE (ORANGE) - Automatically senses and constantly monitors
time and temperature to optimize each recipe using SmartPRESERVE™ Technology.
READY (GREEN) – Appliance is either ready for programming or the program has
completed a Pre-Heating or Preserving Phase (flashing green light).
9
SmartPRESERVE™ Technology
What is the SmartPRESERVE™ Technology?
When it comes to fresh preserving, the experts at Jarden Home Brands bring
everything to the table. That is why we developed the first ever automatic home
canning system based on a unique, patent pending SmartPRESERVE™ Technology.
We collaborated with food scientists, and cooking enthusiasts, to optimize the time,
temperature and process for each recipe.
SmartPRESERVE™ Technology is an energy efficient hybrid technology that
automatically senses, and constantly monitors time and temperature optimized
for each recipe. The automatic sensing technology also self-adapts the temperature
and time based on the altitude of your location.
The technology removes any guesswork, eliminates the need for stove-top monitoring
and takes worries away. The freshTECH Automatic Home Canning System empowers
you to fresh preserve delicious homemade foods, shelf-stable for up to one year.
SmartPRESERVE™ Technology Takes Guesswork Away!
Fresh Preserving a Batch of Your Favorite Food is Now Simple and Easy!
1
Prepare recipes using
easy-to-follow instructions
in the freshTECH
Canning Recipe Book.
2
3
Fill freshly prepared
foods in pre-heated
approved canning jars.
Auto-preserve with
the touch of a button.
Repeat the entire process if you wish to fresh preserve your next batch of food.
You now have jars full of homemade foods in your pantry, to enjoy with
family and friends.
The provided freshTECH Meals Creation Guide offers many quick tips, recipe
starter suggestions and complete recipes to make from your fresh preserved foods.
Especially handy for your busy weekdays.
To ensure the highest quality performance, the freshTECH Automatic Home
Canning System with SmartPRESERVE™ Technology is designed for a useful life of
1000 hours. For a frequent user this approximates to 6 to 10 years of use. Over that
time you can fresh preserve over 6000 jars of jams, jellies, sauces, pickles and more.
You can check the life status (hours remaining) of your appliance by pressing the
Status button on the touch-pad anytime it is not in Preserving phase.
10
Before first use
Important Notes:
Before using your freshTECH Automatic Home Canning System for the
first time, thoroughly review the Important Safeguards at the beginning
of this User Manual.
• Keep the box, packaging materials and promotion materials for use at a
later date, as appropriate.
• Keep this manual in an easy to locate place for future use.
• Place Appliance on a clean, sturdy and level surface that is within 3 ft of an outlet.
• Do not place under hanging cabinets; steam from pressure release may
cause damage.
• Ensure all parts illustrated on pages 6 and 7 are included with the Appliance.
• NEVER PRESS THE START BUTTON ON THE TOUCH-PAD WITHOUT FILLING
THE REQUIRED VOLUME OF WATER IN THE INNER POT. See Pre-Heating section
on page 13 in this User Manual.
First Use Cleaning
1. Make certain the Appliance is not plugged into the power supply before cleaning.
2. Remove the Inner Pot and Rack and wash in warm soapy water.
Rinse and dry thoroughly.
3. Wipe inside of the Appliance Lid, including the gasket, with a slightly damp
cloth and allow it to air-dry.
4. Wipe the inside base and the surface of the heating element in the Appliance
with a slightly damp cloth and allow it to air-dry.
5. Follow instructions for cleaning your Steam Vent located on page 17.
6. Ensure the Steam Vent located in the inside of the Lid is clear of obstruction.
If the vent cleaner cannot enter the vent hole or cannot go all the way in as
intended, this may be due to an obstruction. Do not operate the appliance.
Contact 1-800-240-3340 for Consumer Service.
Hours of Operation: Monday – Friday, 8.30 am – 4.30 pm EST.
7. Your Appliance is now ready for assembly!
11
Instructions for use
Parts Needed
Ensure all parts listed below are handy. Refer to pages 6 and 7 for parts diagram.
• Appliance, Detachable Power Cord
• Inner Pot
• Jar Rack
• Drip Cup
• Gasket, Vent Filter (these parts should be securely assembled inside
the lid prior to operating the appliance)
• Vent Cleaner
Assembling All Parts
1. SLIDE and lock Drip Cup into the black tab located
on the back of the Appliance. (figure A)
2. PLACE Rack in the Inner Pot with the wire base facing
down as it contacts the pot (as shown in the parts
diagram on pages 6 and 7) then place Inner Pot inside
the Appliance base.
3. PLUG in power cord into the Appliance and then into
the wall outlet. Once powered up, you will hear a
welcome tone and the display will read WELCOME.
figure A
4. DO NOT use Appliance without the vent filter in place.
Opening and Closing Your freshTECH Appliance Lid
To Open the Appliance Lid
1. Always use the top handle for unlocking and opening the Appliance Lid.
2. To open and unlock the Lid, rotate the top handle counterclockwise until the Lid handle arrow meets the unlock symbol. Lift the Lid handle up.
3. The Lid will rest in place at an angle slightly past vertical.
4. Always take care while opening the Lid, making sure to open slowly and away from you.
To Close the Appliance Lid
1. Always use the top handle for closing and locking the Appliance Lid.
2. To close, slowly lower the Lid down, using the top handle, until the Lid meets the Appliance Base.
3. Rotate the top handle clockwise until the Lid handle arrow meets the lock symbol.
4. Always take care while closing the Lid, making sure not to close too quickly.
IMPORTANT - Do not attempt to unlock the Lid while the Appliance is in operation
(i.e. Pre-Heating, Sensing or Preserving) as indicated by the illuminated red or
orange lights on the display panel.
12
HOW TO USE THE APPLIANCE
Pre-Heating Empty Jars
1. While you’re preparing your favorite recipe, the Appliance can pre-heat your clean
empty jars. To pre-heat, first remove Inner Pot from Appliance. Remove Rack and set
aside. Next, fill your empty inner pot with hot/warm tap water to the fill line. Volume of water to be filled: 48 oz or 6 cups water, marked by the fill line on the Inner Pot.
2. Return Inner Pot, with water up to the fill line, to the Appliance by slowly lowering
the pot back into the Appliance Base. Place Rack back into Inner Pot with the wire
base facing down contacting the Inner Pot base. Place jars atop Rack. Set preserving
lids and bands aside in your work space. Ensuring the gasket is secure in place,
lower the Lid. Close and lock Appliance Lid. See section for Opening and Closing
Your freshTECH Appliance Lid on page 12.
3. PRESS the Pre-Heat button on the touch-pad, the red light will start flashing.
Now press Start and the red Pre-Heating light will remain illuminated. The
Appliance will automatically begin sensing the internal temperature to pre-heat
your jars. In the meantime, you can continue preparing your recipe.
4. Jars will be pre-heated (in approximately 12 minutes) indicated by the flashing
green Ready light, and the green status bars on the display are fully illuminated
from left to right. Keep jars in Appliance with Lid closed until you’re ready to fill
them with your freshly prepared food. You will notice the display screen reverts
to the Welcome message. The green light will continue to flash until you program
it for preserving.
5. As long as the Appliance Lid is closed, but not locked, the pre-heated empty jars
should stay warm for at least 1 hour. Do not, however, allow the pre-heated jars
to stay longer than 1 hour in the Inner Pot as the Appliance will eventually cool
and the internal pre-heat temperature could fall below a safe threshold. Simply
pre-heat empty jars a second time if 1 hour elapses from initial pre-heating.
Preserving Freshly Made Food
1.Prepare your food as per the recipe instructions in the freshTECH Recipe Book.
By now your empty jars must be pre-heated and ready to be filled, indicated by
the flashing green Ready light.
IMPORTANT NOTE WHEN FILLING PRE-HEATED JARS WITH FRESHLY PREPARED
FOOD: To maximize efficiency, and to minimize temperature difference between your
pre-heated jars and hot foods when filling, we recommend the following process
when filling jars with food:
•Open the Appliance Lid and remove only ONE EMPTY JAR AT A TIME while filling,
keeping the Lid closed as much as possible. This prevents additional heat loss and
temperature reduction.
•Fill the first jar with food using a Ball® brand canning funnel, adjust two piece cap on to the jar and place it back in the Inner Pot.
•Then remove the second empty jar, close Appliance Lid and fill with food. Place
back inside the Inner Pot, and so on. DO NOT take all empty pre-heated jars out
of the Inner Pot at once – as that will cool the jars quicker to room temperature.
13
2. UNLOCK and open Appliance Lid. Remove one pre-heated hot jar. Close the
Appliance Lid, without locking it, to keep remaining jars hot. Ladle hot food into hot
jar, leaving the recommended headspace as per recipe. Wipe any food from the rim of the jar. Center new lid on jar. Twist on band until fingertip tight. Return filled jar onto Rack in Inner Pot.
3. REPEAT step 2 until all jars are filled with food and returned to Inner Pot.
Close and lock Lid.
4. Once you have all your freshly prepared food in jars inside the Inner Pot, you’re
ready to auto-preserve with the touch of a button. Close the Appliance Lid, lock it.
Press the Food Category button, there will be a confirmatory beep and the button
will remain backlit. Next, press the recipe program number button (1-6) for that
recipe according to the Recipe Book, you will hear a confirmatory beep and the
number button will remain backlit. Press Start to initiate the process of auto-sensing
and preserving. The orange light indicator for sensing will turn on. You’ve set it and now you can forget it! SmartPRESERVE™ Technology will take care of optimizing the temperature and time needed for the specific recipe to be perfectly preserved.
5. The process will seamlessly move from the SENSING phase to PRESERVING
(both indicated by the orange lights). The green status bar will illuminate from left
to right throughout the process, indicating the overall progress. Once Preserving
is complete, the timer will read 00:00 and there will be an extended audible tone
indicating the successful accomplishment of fresh food preservation has taken
place. Furthermore, the status bar will be fully illuminated and the display will read
Preserving Complete. The green light will start flashing indicating the Appliance
has cooled to a safe temperature for unlocking the Appliance Lid and removing
preserved jars. Using the included Ball® brand Jar Lifter, remove all jars from
Inner Pot and place upright on a towel. Allow to cool, undisturbed, for
12 to 24 hours.
6. Allow Inner Pot to cool to the touch before removing from the Appliance Base.
Once removed, carefully pour out hot water from the Inner Pot and allow the
empty Inner Pot to cool to room temperature (usually 5 minutes). Once cool,
re-assemble the Inner Pot back into the Appliance Base.
7. If you plan to make another batch, refer to section Pre-Heating Empty Jars
to start the process again.
Preparing the FreshTECH Automatic Home Canning
System for Another Batch
1.After removing jars, push the Stop / Reset button once to clear end of
process indicators.
2. A message indicating “Clean Vent” will appear. All other indicators
(“00:00”, “Preserving Complete”) will disappear from the display. Please refer
to section Cleaning Your Steam Vent for further instruction. The Green Ready
light will change from flashing to steady illuminated light. (This is the only instance when the green light is not flashing.)
3. After the Steam Vent has been cleaned, push Stop / Reset again to clear the
“Clean Vent” message. The display will return to the home screen, the green Ready
light will be illuminated indicating the Appliance is ready to preserve another batch.
14
Process Termination and Resetting
1. At any time, if a process needs to stop abruptly, the Appliance can
terminate all function by simply pressing Stop / Reset once.
2. Once stopped (intentionally or due to power outage), the display will
indicate error “E12.” This indicates the sensing / preserving process has
experienced an unexpected interruption and can no longer execute the
current program. This built-in safety measure protects users from under
processed foods which could result in food safety and/or spoilage concerns.
IMPORTANT NOTE: DO NOT ATTEMPT TO OPEN APPLIANCE LID IF
STEAM IS STILL EXHAUSTING OR IF THE APPLIANCE LID IS DIFFICULT
TO UNLOCK OR OPEN. Exercise caution when opening the Appliance Lid
while hot. Open slowly and away from you.
3. If a process is terminated pre-maturely, i.e. before the completion of
preserving a recipe,and is caught within 1 minute of the termination, you can
immediately Reset and Restart the program. After 1 minute, reprocess the food
immediately following the instructions on page 21 of the freshTECH Recipe Book.
4. To reset the Appliance, press and hold Stop / Reset for 2 seconds.
To RESET Food Category or Recipe Program
Number BEFORE PROCESS Initiation
1. If you realize you made an error in pressing the appropriate recipe program
button, before the Start / Status button is pushed, the program settings can
be reset to ensure the desired correct program. If you press a food category or recipe program and then wish to change your selection prior to pressing Start,
you may either:
•Press the Stop / Reset button once to cancel the selection and start from
the beginning,
- OR •Simply press the correct button you intended to choose (food category
or recipe program) and the Appliance will revert to that new selection.
2. Program can be reset ONLY during the programming stage. Once the
Appliance operation is initiated with the Start button, resetting will NOT occur.
3. Check Frequently Asked Questions on pages 18-20 for detailed instructions
on what to do if you already initiated the Preserving process.
15
Care and maintenance
Cleaning Your Appliance after Each Use
WARNING! As with all cooking appliances, the metal parts and even some
plastic parts – can become extremely hot to touch. Always let the appliance
cool completely – usually 20 to 30 minutes – before cleaning.
1.
ALWAYS unplug your Automatic Home Canning Appliance from the power
source once you have completed preserving your foods. Allow the Appliance
to cool before cleaning.
2. Remove any water left in the Inner Pot, water that may have collected in the
Drip Cup, water remaining in the drainage channel around the Appliance Lid
and water that remains on the inside surface of the Lid.
3.
The Inner Pot and Jar Rack can be washed in the dishwasher or with hot soapy
water, rinsed and dried. The Drip Cup can be washed in the dishwasher, top
rack only or with hot soapy water, rinsed and dried.
4. Do not use abrasive cleaning compounds or scouring pads on any freshTECH
parts. If there’s any stubborn residue, a cloth, sponge or rubber spatula
will usually remove it. Vinegar can be added to the Inner Pot water during
processing to help reduce hard water build up.
5. Clean the inside of the Lid, Steam Vent, Vent Filter, Lid Gasket, Water Drainage
Channel and Lift Valve Assembly with a soft cloth and warm soapy water. Wipe
dry or let air-dry. Do not use abrasive cleaning pads or chemical cleaners other
than vinegar and dish soap.
16
CLEANING THE STEAM VENT
1.
After each use, it is recommended
to clean the Steam Vent and Vent
Filter on the inside of the Appliance
Lid to prevent potential clogging
due to hard water scaling or
trapped food particles.
2. Always use the supplied Vent
Cleaner when performing
this function. (figure A) 3.
Start by opening the Appliance
Lid to access the Vent Filter.
Gently remove the Vent Filter
by gripping and pulling the case
away from the Lid. Ensure the
Appliance Lid is held secure
during the removal of the
Vent Filter. (figure B)
4. Once removed, clean the Steam
Vent by inserting the straight end
of the Vent Cleaner into the
vent hole. You should be able to
gently insert the Vent Cleaner all
the way into the vent hole. The
cleaner is designed to go in only
up to the finger hold so it does not
damage internal components.
(figure C)
5. With an in and out motion, push
and pull the Vent Cleaner in and
out of the vent hole, lightly scraping
the sidewall of the vent. Be careful
not to bend the Vent Cleaner steel
while cleaning, as this could lead
to a jam.
figure A
figure B
figure C
6. D
O NOT LEAVE THE VENT CLEANER INSIDE THE VENT FILTER HOUSING
DURING OPERATION. PLACE BACK INTO THE SUPPLIED ZIP BAG
ATTACHED TO THE BACK OF THE RECIPE BOOKLET FOR SAFE KEEPING.
To replace your Vent Cleaner, Contact 1-800-240-3340 for Consumer Service.
Hours of Operation: Monday – Friday, 8.30 am – 4.30 pm EST.
7.
Push the Vent Filter back onto the Vent Filter Clip. You should hear
a “snap” and the Vent Filter should remain in place.
8. It is also recommended to add a few teaspoons of vinegar to the process water.
This helps to break up hard minerals and clean your vent while the unit is in use.
17
Frequently asked questions
Is it normal for the appliance to create fumes during first use?
Yes, in some cases the appliance could have residual oils that were used to aid in the
fabrication of components. It is normal for these oils, when heated, to create some
fumes. This will likely end after first use.
How much water should I put in the Inner Pot for Pre-Heating or Preserving?
A fill line on the Inner Pot indicates the appropriate water level required (48 oz
or 6 cups). Remove the Jar Rack before filling hot/warm tap water to the fill line.
Only then place the Jar Rack and finally the Jars.
Do I need to heat the jar lids and bands during Pre-Heating?
No, the lids and bands do not have to be pre-heated. Set them aside. While Preserving
jars with food, the lids and bands must be on as recommended.
Must I always pre-heat the jars in the Appliance?
We do not recommend any alternative way of pre-heating empty jars while using your
freshTECH Automatic Home Canning System.
How many canning jars does this Appliance pre-heat/preserve in one batch?
Please refer to the recipe instructions in the included freshTECH Recipe Book
or visit www.freshTECHAutoCanner.com.
Can I use my own recipes in the Appliance?
No. Only tested recipes in the freshTECH Recipe Book should be used. They are
optimized to perfectly preserve the best taste and nutrition. Refer to the freshTECH
Recipe Book for section on The Importance of Using Tested Recipes for more
information.
How do I restart the Appliance after cleaning the Vent?
After the Steam Vent has been cleared, push Stop / Reset to clear the “Clean Vent”
message. The Display will return to the home screen, the green Ready light will be
illuminated indicating the Appliance is ready to preserve another batch.
18
What to do if I press the wrong recipe number/program? For example, I want to
preserve my freshly made Salsa Verde. So I press Salsa Category button, but then,
in error, I pressed the program # that corresponds to Salsa Fiesta instead of the
correct program number corresponding to Salsa Verde?
Here’s a quick way to resolve this:
•If the wrong button is pushed while choosing the food category or the recipe program (Before pressing the Start button), you can simply press Stop to cancel the previous incorrect choice, then press the correct category or recipe
number button. Then press Start to initiate preserving process.
•If you realize you pressed the wrong button within one minute of starting the
process (i.e. Sensing or Preserving), press the Stop button to stop the process.
An error message (E12) will appear on the display screen to indicate the process
was interrupted before completion. Then Reset the Appliance (by holding the
Stop/Reset button for 2 seconds) and start over.
However, if you realize you pressed the wrong category or recipe program
button, and more than one minute has already passed since you pressed
Start then we recommend you stop the process and instead use the food
within a week with refrigeration. Restarting the preservation process could
lead to overprocessing.
How should I wash the outside of my Appliance?
Always disconnect the Appliance before cleaning. Care should be given when
washing both the inside and outside of your Appliance. Use a slightly damp cloth
to wipe down the inside and outside surfaces. Never immerse the Appliance in water.
Can I move the Appliance while it is in operation?
No. Once the Appliance is plugged in, it should not be moved, especially if it has
water and jars inside.
I lost the Vent Cleaner that was provided, what can I use to clean the vent?
Only use genuine freshTECH replacement parts when using the Appliance.
Using other objects or articles to clean your vent can lead to very dangerous
vent clogs. Using non-approved parts could void the warranty. Call freshTECH
Consumer Service for help. Two Vent Cleaners will be included with the
appliance when purchased.
How do I know that jar lids have sealed?
Refer to the section for checking jar lids for seals in the freshTECH Recipe Book.
Can I cook food in my unit?
No. The Appliance is only designed for canning/fresh preserving based on
SmartPRESERVE™ Technology. Using anything other than the process water
in the Inner Pot can void the warranty.
19
Where can I find more canning/fresh preserving recipes?
More recipes are added on the website constantly. Only use recipes
approved for the freshTECH Automatic Home Canning Appliance.
Can I use any brand/model of Mason jar?
(e.g. French Canning jars?)
No. Refer to the section Choose The Jar That Fits Your Needs
in the freshTECH Recipe Book.
I did not hear the Appliance BEEP when ready indicating
completion of Preserving. How long is it safe to leave the jars in
the Appliance once Preserving is complete?
We recommend removing the jars of preserved food when the
green Ready light is flashing.
Can I use the Inner Pot as a regular pot on the stove-top?
No, the Inner Pot is only designed for use with the freshTECH appliance.
Using for any other reason will void the warranty.
What happens if I experience a power interruption during
a preserving cycle?
Your automatic unit is equipped with sensors to determine if
a power interruption has occurred. Refer to the troubleshooting table
for error code E10.
Where can I find replacement parts for my automatic unit?
Please call the Consumer Service telephone number at Jarden Home Brands
or visit our website www.freshTECHAutoCanner.com.
Can I use my Appliance outdoors?
Please contact Consumer Service at 1-800-240-3340 or visit
www.freshTECHAutoCanner.com.
Who can I contact if I have any more questions?
Contact freshTECH Consumer Service at 1-800-240-3340
Monday – Friday, 8.00 am to 4.30 pm EST.
20
Troubleshooting GUIDE
Appliance
Observed Issue
Cause
What To Do
The freshTECH
Appliance will not
turn on when I
push the buttons.
The cord is not fully
plugged in.
Ensure the cord is plugged in at both
ends.
Refer to page 9 for instructions.
The Lid will not
fully close or
rotate and lock
after the
Pre-Heat stage.
After the Pre-Heat stage,
steam is emitted from
the hot water inside the
cooking pot. This results in
a pressure build up when
trying to close the Lid.
Place the Lid down to close, but do not
rotate the handle – do not force the Lid
closed.
Wait a moment for the pressure to
equalize.
Once the “hissing” sound has stopped,
rotate the lid to the locked position.
The Display is
showing Error
“E1”.
Inner Pot is not seated
properly on the heater of
the Appliance.
Press and hold the Stop/Reset button
for 2 seconds. Unplug the Appliance,
open Lid and allow the Appliance to
cool for 30 minutes.
Check that the Inner Pot is correctly
seated onto the heating element.
See User Manual.
No water present within
the Inner Pot.
Water in the Inner Pot was
added significantly below
the fill line or water was
added with the Jar Rack
and Jars already inside the
Inner Pot. Pot may have
boiled dry.
The Display is
showing Error
“E2”.
The Appliance Lid was
opened before the process
was completed and the
green Ready light was
illuminated.
Check that there is sufficient water
inside the Inner Pot. Carefully remove
jars and Jar Rack. Hot tap water should
be filled to indicated fill line on the Inner
Pot. Add water as needed.
Return Inner Pot to Appliance. Place Jar
Rack back into Inner Pot. Place jars on
Rack. Follow the recipe instructions to
restart the program.
Be sure to only open the Lid after the
green Ready light is illuminated. If the
lid is opened during the sensing or
preserving phase and is caught within 1
minute, you can immediately Reset and
Restart the program.
After 1 minute, reprocess the food
immediately following the instructions
on page 21 of this book or refrigerate
product immediately and consume
within 1 week.
The Display is
showing Error
“E3” / “E4” / “E5”.
Sensor failure.
Unplug Appliance. Please contact our
Fresh Preserving Helpline at 1-800-2403340.
The Display is
showing Error
“E6” / “E7” / “E8”.
Safety precaution.
Unplug Appliance. Do not try to open
Lid. Please contact our Fresh Preserving
Helpline at 1-800-240-3340.
21
Observed Issue
The Display is
showing Error “E9”.
Cause
What To Do
The Lid was not locked.
Ensure the Lid was locked properly.
See User Manual.
Cold water was added to
the Inner Pot and filled to
the indicated fill line.
Always add hot tap water to indicated
fill line on the Inner Pot.
Cold food product was filled
into the hot jars instead of
hot food product.
Always follow the recipes provided in the
included Recipe Book. Hot food should
be added to the hot jars, one jar at a time,
immediately after cooking the recipe
provided in this Recipe Book.
Regardless of the cause, you should
reprocess the food following the instructions
in the Reprocessing Jars section of the
freshTECH Recipe Book.
There may be residue on
the bottom of the Inner
Carefully remove Inner Pot and check bottom
to ensure clean. If not, wait for Pot to cool
and wipe off any residue.
The Display is
showing Error
“E10”.
Power interruption.
In case the Preserving process of your
freshly prepared foods is terminated due to
power interruption, please remove the food
from the appliance and do not re-process.
Place the jars in the refrigerator to consume
food within one week.
The Display is
showing Error “E11”.
Safety precaution.
Please contact our Fresh Preserving
Helpline at 1-800-240-3340.
The Display is
showing Error
“E12”.
Process was interrupted
by pushing the “Stop/Reset” button before the end
of the process.
You can immediately Reset by pressing
Stop/Reset button. However if the process
interruption continues beyond 1 minute,
we recommend you stop the process
and use the food within one week with
refrigeration.
Reprocess the food immediately following
the instructions on page 21 of this book.
There is a crackling
sound and smoke
is emitted from the
bottom of the Inner
Pot.
There is residual food that
has spilled onto the heat
plate.
Press and hold the Stop/Reset button
for 2 seconds and then unplug the power
cord.
Remove pot, wait for components to
cool and wipe off any residue left on the
heating element.
If the problem persists please contact
our Fresh Preserving Helpline at
1-800-240-3340.
At the end of the
process I cannot
get the Appliance
to default back
to the Welcome
display screen.
The Reset sequence was
not followed at the end of
the program.
Once the “Preserving Complete” text is
illuminated and the green Ready light is
flashing, the Appliance is indicating that
it is safe to remove the jars.
Once the jars are removed, press the
Stop/Reset button once, displaying the
“Clean Vent” message.
Proceed to clean the vent with the vent
cleaner and press the Stop/Reset button
again. This will prompt the home screen
to appear.
For more troubleshooting information, visit freshTECHAutoCanner.com.
22
SERVICE AND MAINTENANCE
Replacement Parts
• Inner Pot, Jar Rack, Drip Cup, Vent Cleaner: Call 1-800-240-3340
To assist in serving you better, please have the freshTECH Automatic Home Canning
System model number and date of purchase available when you call. The model
number is located on the bottom of the appliance base and on the cover page of
this instruction manual.
US Consumer Service: 1-800-240-3340
Hours of Operation: Monday - Friday, 8:30 am - 4:30 pm EST
You may also visit our website at www.freshTECHAutoCanner.com
for service information.
We welcome your questions, comments or suggestions. In all your communications,
please include your complete name, address and telephone number and a description
of the problem.
Visit our website at www.freshTECHAutoCanner.com and discover the secret to
making and fresh preserving a perfect batch of homemade jams & jellies, tomatoes,
salsas, sauces, fruits and pickles. You will also find a lip-smacking assortment of
gourmet recipes, entertaining tips and the latest information on freshTECH products.
Register Your freshTECH Appliance
To register your freshTECH Automatic Home Canning System for warranty
coverage, retain proof of purchase along with product ID and visit
www.freshTECHAutoCanner.com.
23
WARRANTY INFORMATION
1-YEAR LIMITED WARRANTY
Hearthmark, LLC doing business as Jarden Home Brands, 14611 W Commerce Road,
Daleville, IN 47334, warrants that for a period of one year from the date of purchase this
product will be free from defects in material and workmanship. Jarden Home Brands,
at its option, will repair or replace this product or any component of the product found
to be defective during the warranty period. Replacement will be made with a new or
remanufactured product or component. If the product is no longer available, replacement
may be made with a similar product of equal or greater value. This is your exclusive warranty.
DO NOT attempt to repair or adjust any electrical or mechanical functions on this product.
Doing so will void its warranty.
The warranty is valid for the original retail purchaser from the date of initial retail purchase
and is not transferable. Keep the original sales receipt. Proof of purchase is required to obtain
warranty performance.
This warranty does not cover normal wear of parts or damage resulting from any of the
following: negligent use or misuse of the product, use on improper voltage or current, use
contrary to the operating instructions, disassembly, repair or alteration by anyone other
than Jarden Home Brands or an authorized Jarden Home Brands service center. Further, the
warranty does not cover: Acts of God, such as fire, flood, hurricanes and tornadoes.
What are the limits on Jarden Home Brands’ Liability?
Jarden Home Brands will not be liable for any incidental or consequential damages caused
by the breach of any express, implied or statutory warranty or condition.
Except to the extent prohibited by applicable law, any implied warranty or condition of
merchantability or fitness for a particular purpose is limited in duration to the duration of
the above warranty.
Jarden Home Brands disclaims all other warranties, conditions or representations, express,
implied, statutory or otherwise.
Jarden Home Brands shall not be liable for any damages of any kind resulting from the
purchase, use or misuse of, or inability to use the appliance including special, consequential
or similar damages or loss of profits, or for any breach of contract, fundamental or
otherwise, or for any claim brought against purchaser by any other party.
How to Obtain Warranty Service
In the U.S.A., this warranty is offered by Hearthmark, LLC doing business as Jarden Home
Brands located in Daleville, Indiana 47334.
If you have a question regarding this warranty, would like to obtain warranty service, or
have a claim in connection with this product, please call our Consumer Affairs Department
at 1-800-240-3340.
PLEASE DO NOT RETURN THIS PRODUCT TO THE PLACE OF PURCHASE.
24
NOTES
25
NOTES
26
NOTES
27
©2013 Hearthmark, LLC doing business as Jarden Home Brands.
All rights reserved. Distributed by Heartmark, LLC, Daleville, IN 47334.
Hearthmark, LLC is a subsidiary of Jarden Corporation (NYSE:JAH)
and Ball® are trademarks of Ball Corporation, used under license.
This product is not manufactured by, or affiliated with, Ball Corporation.
US Consumer Service: 1-800-240-3340
Visit us online at www.freshTECHAutoCanner.com for more exciting ideas,
entertaining tips and delicious recipes!
Rev 1.2
Printed in China
SPR-082113-409P
Model FTAC-13-10
P.N. 139741