1
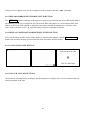
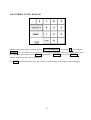
Date: 28 Aug 2010
Document Part Number: 51683
Revision: (X2)
flexOptometer ™
Single/Multi-Channel Radiometer
User’s Manual
Revision #
Changes Made
X1
Initial release.
X2
Updated for rev 2.0 firmware
Effective Date
11 Nov 09
28 Aug 10
Prepared by:
8581 Aero Drive, San Diego, CA 92123-1722
858-279-8034 ·• FAX (858) 576-9286
www.gamma-sci.com
ECN #
This page intentionally left blank.
COPYRIGHT INFORMATION
Copyright © 2010 Gamma Scientific, LLC. All rights reserved. No part of this publication may be
reproduced, transmitted, transcribed, stored in a retrieval system, or translated into any language or
computer language, in any form or by any means, electronic, mechanical, magnetic, optical, chemical,
manual or otherwise, without the prior written permission of Gamma Scientific, LLC, 8581 Aero Drive,
San Diego, CA 92123.
DISCLAIMER
Gamma Scientific, LLC, makes no representations or warranties with respect to the contents hereof and
specifically disclaims any implied warranties of merchantability or fitness for any particular purpose.
Further, Gamma Scientific reserves the right to revise this publication and to make changes from time to
time in the content hereof without obligation of Gamma Scientific to notify any person of such revision or
changes.
If any one has comments or suggestions regarding this manual, its format, content, or otherwise, please direct them to:
Technical Publications Coordinator
Gamma Scientific
8581 Aero Drive
San Diego, CA 92123
(800) 637-2758
or
www.gamma-sci.com
Your input is appreciated
This page intentionally left blank.
INSTRUMENT CERTIFICATION
Gamma Scientific, LLC, certifies that this instrument was thoroughly tested, inspected and found to meet
its published specifications when it was shipped from the factory. Gamma Scientific further certifies that
its calibration measurements are traceable to the U. S. National Institute of Standards and Technology
(NIST) formerly National Bureau of Standards to the extent permitted by the Bureau’s calibration facility.
WARRANTY AND CUSTOMER SERVICE
All products manufactured by Gamma Scientific are warranted to be free from defects in material or
workmanship subject to the following terms and conditions. All other products sold by Gamma Scientific
are warranted only to the extent of that offered by the manufacturer.
PERIOD OF WARRANTY:
This warranty shall terminate one year after the date of shipment.
REPAIR OR REPLACEMENT:
Seller’s obligations under this clause shall be limited to repair or correction of any defect of material or
workmanship in any such product or to replacement of any defective product or part or unit thereof, notice
of which shall have been given to Seller within the warranty period specified in subdivision (a) above.
LIMITATION AS TO REPLACEABLE COMPONENTS WHOSE LIFE IS A FUNCTION OF
USAGE TIME:
Since the life of such components is a function of the customer’s usage of them, all electron tubes and
photomultiplier tubes are warranted only to the extent that the original manufacturer’s warranty applies.
Claims are limited to those presented within 30 days after occurrence of any failure.
CANCELLATION OF WARRANTY:
This warranty shall not apply if modifications not authorized in writing by Seller are made.
The warranties set forth in this clause are in lieu of any other warranties, expressed or implied, which the
purchaser or others might have under or arising from this agreement, by statute, at law, in equity, or
otherwise, INCLUDING ANY WARRANTY OR MERCHANTABILITY OR FITNESS. Goods sold
subject to above warranty only, and Seller expressly denies any other warranties or representations,
statutory, legal or equitable, expressed or implied.
Gamma Scientific, LLC, provides repair services for all Gamma products. A complete, modern Service
Department, Stock Room and Calibration Facility are employed at the factory.
In the event the instrument does not function properly or is damaged, Gamma Scientific should be
contacted with regard to the specific symptoms of the problem.
NOTE
For all service requirements, please ask for the Customer Service Department.
Gamma Scientific must be contacted prior to any return shipment of equipment.
Failure to do so will result in delayed return to the customers.
This page intentionally left blank.
TABLE OF CONTENTS
SECTION 1 OVERVIEW ................................................................................................................ 1
SECTION 2 SYSTEM REAR PANEL CONNECTIONS ................................................................. 2
2.1 POWER CONNECTOR (12 VDC IN) ....................................................................................................................................2
2.2 USB INTERFACE.....................................................................................................................................................................2
2.3 RS-232/RS-485 SERIAL INTERFACE ...................................................................................................................................2
2.3.1 SERIAL INTERFACE DB-9 CONNECTOR PINOUT......................................................................................................2
2.3.2 MULTI-DROP (MULTIPLE FLEXOPTOMETERS ON A SINGLE SERIAL PORT).....................................................2
2.4 IEEE-488 INTERFACE............................................................................................................................................................3
SECTION 3 ANALOG CHANNEL CONNECTIONS ...................................................................... 4
3.1 ANALOG IN ..............................................................................................................................................................................4
3.2 ANALOG OUT..........................................................................................................................................................................4
3.3 TRIGGER INPUT/OUTPUT ...................................................................................................................................................4
3.4 HIGH VOLTAGE (HV)............................................................................................................................................................5
3.5 CONTROL CONNECTOR ......................................................................................................................................................5
SECTION 4 TOUCH SCREEN FRONT PANEL INTERFACE ....................................................... 6
4.1 SINGLE-CHANNEL CONFIGURATION .............................................................................................................................6
4.2 MULTIPLE CHANNEL CONFIGURATIONS .....................................................................................................................6
4.3 CHANNEL OPTIONS ..............................................................................................................................................................8
4.4 HOLD BUTTON .......................................................................................................................................................................9
4.4.1 GLOBAL HOLD (ALL CHANNELS) ...............................................................................................................................9
4.4.2 INDIVIDUAL CHANNEL HOLD......................................................................................................................................9
4.5 RNG-/RNG+ BUTTONS (RANGE SELECTION) ..............................................................................................................10
4.6 AUTO BUTTON (AUTORANGING ON/OFF) ...................................................................................................................10
4.7 ZERO BUTTON......................................................................................................................................................................10
4.8 CHAN BUTTON (CHANNEL CONFIGURATION) ..........................................................................................................11
4.8.1 CAL BUTTON (CALIBRATION SELECTION) .............................................................................................................12
4.8.1.1 DETECTOR SELECTION SCREEN........................................................................................................................12
4.8.1.2 CALIBRATION SELECTION SCREEN..................................................................................................................12
4.8.1.3 USER RESPONSIVITY BUTTON ...........................................................................................................................13
4.8.2 ACCESSORIES BUTTON/DETECTOR & CALIBRATION DETAILS ........................................................................13
4.8.3 WAVELENGTH λ SELECTION BUTTON.....................................................................................................................14
4.8.4 DARK CURRENT (DC) BUTTON ..................................................................................................................................14
4.8.5 OFF BUTTON...................................................................................................................................................................14
4.8.6 RESET MIN/MAX (Rst MIN/MAX) BUTTON...............................................................................................................14
4.8.7 AVERAGING....................................................................................................................................................................15
4.8.8 RATIO, NORM, AND CONST BUTTONS (RATIO MODE).........................................................................................15
4.8.9 TRIGGER ..........................................................................................................................................................................17
4.8.10 SHUTTER........................................................................................................................................................................17
4.8.11 REFERENCE LAMP.......................................................................................................................................................17
4.8.12 HIGH VOLTAGE (HV) BUTTON .................................................................................................................................17
4.8.13 THERMOELECTRIC COOLER (TEC) BUTTONS ......................................................................................................18
4.9 SYS BUTTON (SYSTEM CONFIGURATION)...................................................................................................................18
4.9.1 PRESET BUTTON (PRESET STORE & RECALL) ........................................................................................................18
4.9.2 SERIAL BUTTON (SERIAL INTERFACE CONFIGURATION) ..................................................................................19
4.9.3 IEEE-488 ADDRESS/MULTI-DROP UNIT ID BUTTON ..............................................................................................20
4.9.4 DISPLAY CONSTRAST & BRIGHTNESS, INVERT BUTTON ...................................................................................20
4.9.5 CAL TOUCH PANEL BUTTON ......................................................................................................................................20
4.9.6 1CH, 2CH, 3CH, 4CH BUTTONS ....................................................................................................................................20
4.10 NUMERIC ENTRY KEYPAD .............................................................................................................................................21
SECTION 5 MAKING ENERGY (PULSE INTEGRATION) MEASUREMENTS .......................... 22
5.1 STARTING AND STOPPING EACH PULSE INTEGRATION CYCLE.........................................................................23
5.2 TIMED INTEGRATION (GATE TIME)..............................................................................................................................23
5.3 USING THE TRIGGER AS AN OUTPUT TO CONTROL THE PULSE SOURCE.......................................................23
SECTION 6 ASCII COMMAND SET............................................................................................ 24
6.1 ACC
SHOW ACCESSORIES LIST ...............................................................................................................................25
6.2 AVG
SET AVERAGING MODE....................................................................................................................................25
6.3 BEE
BEEP.........................................................................................................................................................................25
6.4 CAL
SELECT CALIBRATION......................................................................................................................................25
6.5 CHA
SELECT CHANNEL..............................................................................................................................................26
6.6 DCA
DOWNLOAD DETECTOR CALIBRATIONS ...................................................................................................27
6.7 DCD
ADJUST DARK-CURRENT DAC ........................................................................................................................27
6.8 DET
SELECT DETECTOR ............................................................................................................................................27
6.9 DPX
SET DUPLEX (CHARACTER ECHO) ................................................................................................................28
6.10 GTI
SET ENERGY MEASUREMENT GATE (INTEGRATION) TIME................................................................28
6.11 HLD
HOLD .....................................................................................................................................................................29
6.12 HLDA
HOLD ALL CHANNELS..................................................................................................................................29
6.13 HVO
SET HIGH VOLTAGE ........................................................................................................................................29
6.14 MAX
GET CURRENT MAXIMUM ............................................................................................................................29
6.15 MIN
GET CURRENT MINIMUM ...............................................................................................................................29
6.16 NRG
SET ENERGY MEASUREMENT (PULSE INTEGRATION) MODE...........................................................30
6.17 PRE
LOAD USER PRESET..........................................................................................................................................30
6.18 RAT
SET RATIO MODE..............................................................................................................................................31
6.19 REA
READ CHANNEL’S CURRENT VALUE (TAKE READING).......................................................................31
6.20 REP
READ PARALLEL (ALL CHANNELS) ............................................................................................................32
6.21 REF
SET THE REFERENCE LAMP OUTPUT ........................................................................................................33
6.22 RMM
RESET MIN/MAX..............................................................................................................................................33
6.23 RNG
SET RANGE .........................................................................................................................................................33
6.24 RNGA
ENABLE AUTORANGING .............................................................................................................................34
6.25 RSP
SET USER RESPONSIVITY................................................................................................................................34
6.26 RUN
RUN........................................................................................................................................................................34
6.27 RUNA
RUN ALL CHANNELS.....................................................................................................................................34
6.28 SHU
SET SHUTTER OUTPUT....................................................................................................................................34
6.29 SPR
SAVE USER PRESET...........................................................................................................................................34
6.30 SRT
SET SAMPLE RATE ............................................................................................................................................35
6.31 TRG
SET EXTERNAL TRIGGER MODE.................................................................................................................36
6.32 UCA
UPLOAD DETECTOR CALIBRATIONS.........................................................................................................36
6.33 WAI
WAIT FOR END OF ENERGY MEASUREMENT CYCLE...........................................................................36
6.34 WVL
SELECT WAVELENGTH (CONTINUOUS CALIBRATION)......................................................................37
6.35 ZER
ZERO OUT CHANNEL .......................................................................................................................................37
APPENDIX A SPECIFICATIONS ................................................................................................ 38
This page intentionally left blank.
flexOptometer User’s Manual
SECTION 1 OVERVIEW
The UDTi/Gamma Scientific flexOptometer™ is a one- to four-channel electrometer amplifier
(radiometer) with a touch-screen graphic LCD display and computer interface over RS-232, RS-485,
USB, or IEEE-488 interfaces. Each analog channel can accommodate a variety of detectors complete with
multiple calibrations, as well as optionally providing high voltage for photomultiplier tubes and support
for thermoelectric (Peltier) coolers as used in high-precision temperature-stabilized applications.
The electrometer amplifiers used in the flexOptometer have eight DC gain ranges of up to 1010 (ten
billion) enabling the accurate measurement of femtoAmperes through milliAmperes, and also have four
analog energy measurement (pulse integration) ranges with a total charge capacity of 2.5 nanoCoulombs
through 2.5 microCoulombs providing measurements of tens of femtoCoulombs through microCoulombs.
A 24-bit analog-to-digital converter samples the analog signal 1,000 times per second and processes the
data down to calibrated absolute units, displayed at a rate of 4 samples/second and available over the
computer interface at up to 250 samples/second. Autoranging, averaging, linear and logarithmic ratios to
either a constant or to another channel, min/max, digital zeroing, analog dark-current null, digital hold,
timed pulse integration period, and external trigger capability are available.
In addition, each analog channel has a shutter driver and 30 mA reference lamp output.
Complete configurations can be stored and recalled via 12 separate programmable user presets for each of
the channels individually or for all channels together.
1
SECTION 2 SYSTEM REAR PANEL CONNECTIONS
2.1 POWER CONNECTOR (12 VDC IN)
The flexOptometer requires 12 volts DC, 1 Amp minimum. Multiple-channel configurations employing
high-voltage and thermoelectric coolers require proportionally more current as is required to support these
options. The connection is a standard 2.1 mm pin, center-positive coaxial DC power jack.
2.2 USB INTERFACE
The USB type A connector provides a standard USB interface to the host computer. This is typically done
through FTDI™’s Virtual COM Port driver (http://www.ftdichip.com) for the FT232R. The USB
interface always takes priority over the RS-232/RS-485 interface if both are connected at the same time.
2.3 RS-232/RS-485 SERIAL INTERFACE
A DB-9 connector provides a serial interface connection to the host computer at standard baud rates
between 300 baud and 115,200 baud. The baud rate (default: 115,200 baud) and the choice of RS-232 vs.
RS-485 (default: RS-232) are selected via the touch screen ( SYS SERIAL buttons). Note that in
RS-485 mode, the user is responsible for any required line termination.
2.3.1 SERIAL INTERFACE DB-9 CONNECTOR PINOUT
PINOUT OF DB-9 CONNECTOR IN RS-232 MODE
pin 2 TRANSMIT DATA (to host computer)
pin 3 RECEIVE DATA (from host computer)
pin 5 GROUND
PINOUT OF DB-9 CONNECTOR IN RS-485 MODE
pin 2
pin 8
pin 3
pin 7
pin 5
TRANSMIT DATA - (to host computer)
TRANSMIT DATA + (to host computer)
RECEIVE DATA - (from host computer)
RECEIVE DATA + (from host computer)
GROUND
2.3.2 MULTI-DROP (MULTIPLE FLEXOPTOMETERS ON A SINGLE SERIAL PORT)
The RS-232/RS-485 interfaces of multiple flexOptometers may be connected together in parallel and
controlled via a single serial port. An individual flexOptometer is selected by sending the “#” character
followed by the desired flexOptometer’s unit ID (the IEEE-488 address) and a carriage return; all of the
other unselected flexOptometers will disable their serial port transmitters and wait for the next “#” unit
selection string to determine which flexOptometer is to become active.
2
2.4 IEEE-488 INTERFACE
The IEEE-488 interface is provided primarily for backward-compatibility with the UDT model S370 and
S380 optometers. The IEEE-488 address is configured via the touch screen ( SYS IEEE-488
buttons), and the default address is 4.
3
SECTION 3 ANALOG CHANNEL CONNECTIONS
3.1 ANALOG IN
Accepting photocurrent from the detector, this is the zero-impedance input to the transimpedance
amplifier stage of the analog channel. Maximum input current is +/- 2.5 mA.
3.2 ANALOG OUT
This is the output of the transimpedance amplifier and represents the analog input multiplied by the
current DC gain range (103 through 1010) and converted to Volts (maximum output swing is +/- 10V,
although the range usable by the flexOptometer is +/- 2.5V and levels outside this range will be displayed
as *OVER*). Note that during energy measurements (pulse integration), this output will reflect the
accumulation of charge in real time but will change to 0V when the channel is placed in the HOLD state,
as the charge-integration capacitor is placed in the discharge state immediately after the final quantity has
been sampled & digitally stored.
3.3 TRIGGER INPUT/OUTPUT
An external trigger signal may be used to control the RUN/HOLD state of the channel, and is particularly
useful for energy (pulse integration) measurements in that the integration cycle can be controlled at much
higher speeds than possible by manually operating RUN/HOLD via the touch-screen interface. Also,
during energy measurements, the trigger will briefly output a logic 0 for one millisecond signaling the
start of each integration cycle, with the charge integration beginning precisely at the falling edge of the
pulse.
4
This input accepts a TTL signal (0 – 5V) but can accommodate voltages up to +/- 24V. An internal pullup resistor establishes a logic 1 state in the absence of any input signal; thus merely grounding the input
(via a switch or open-collector output) is sufficient to switch the state of the trigger signal from logic 1 to
logic 0.
The polarity of the trigger input is either positive (RUN when logic 1, HOLD when logic 0) or negative
(RUN when logic 0, HOLD when logic 1), configured either via the touch screen ( CHAN button) or
via computer interface (TRG command). Note that if configured for negative trigger polarity the channel
will be stuck forever in the HOLD state if nothing is connected to the trigger input.
The trigger input is sampled 1,000 times per second giving a trigger response latency of 1 ms maximum.
3.4 HIGH VOLTAGE (HV)
This provides a connection for the output of the optional High Voltage Module which can be programmed
to supply voltages of up to -2000V for photomultiplier tubes and so forth. The desired voltage can be set
via the HV button (found under the CHAN screen), or via the computer interface HVO command.
3.5 CONTROL CONNECTOR
This DB-25 connector provides a variety of interconnects for the analog channel:
pin 1
pin 2
pin 3
pin 4
pin 5
pin 6
pin 7
pin 8
pin 9
pin 10
pin 11
pin 12
pin 13
pin 14
pin 15
pin 16
pin 17
pin 18
pin 19
pin 20
pin 21
pin 22
pin 23
pin 24
pin 25
ground
ground
reserved
reserved
reserved
+15V
-15V
ground
shutter “A” connection
shutter “B” connection
30 mA reference lamp source + connection
30 mA reference lamp source – connection
thermoelectric cooler #1 + connection
thermoelectric cooler #1 – connection
thermoelectric cooler #2 + connection
thermoelectric cooler #2 – connection
binary range select output, bit 0
binary range select output, bit 1
binary range select output, bit 2
thermoelectric cooler #1 temperature sensor
thermoelectric cooler #2 temperature sensor
+5V
no connection
ground
no connection
5
SECTION 4 TOUCH SCREEN FRONT PANEL INTERFACE
4.1 SINGLE-CHANNEL CONFIGURATION
DETECTOR
SERIAL NUMBER
DETECTOR
MODEL
SELECTED
CALIBRATION
GAIN RANGE (3 - 10) &
MANUAL/AUTO GAIN
SELECT INDICATION
CHANNEL
OPTIONS
Front panel screen example, single channel unit.
4.2 MULTIPLE CHANNEL CONFIGURATIONS
Front panel screen example, dual channel unit.
6
Front panel screen example, three-channel unit.
Front panel screen example, four-channel unit.
For multiple-channel systems, each channel is assigned its own button ( CH1
CH2 etc.) in order to
allow you to select which channel subsequent touch-screen operations will affect. For the four-channel
example above, pressing the RNG- or RNG+ buttons will change the range for channel 4, since that
is the channel currently selected.
The HOLD and SYS buttons do not apply to any particular channel so the currently selected
channel does not matter for these.
7
4.3 CHANNEL OPTIONS
With the CHAN button, the channel can be configured to enable various functions and features, and the
following informational text will appear in the lower left corner of the channel’s display.
•
•
•
•
•
•
•
•
•
ZR indicates that the channel has been zeroed (valid for the currently selected range only), either
via the ZERO button or via the computer interface ZER command.
XXXnm is the currently selected wavelength (applicable to a continuous calibration only). If the
current calibration is a single-point calibration, the wavelength will not appear, nor will the λ
wavelength selection button be visible on the CHAN screen. Wavelength selection may also be
performed via the computer interface WVL command.
A1S, A2S, A5S indicate that one-, two-, or five-second moving boxcar averaging is being
applied , in order to quite down noisy signals. The averaging mode may be selected via the
CHAN screen or via the computer interface command AVG.
RatC, RatCn indicates that the channel has been configured to display a ratio, either to a constant
(RatC) or to another channel (for example, RatC2 would indicate a ratio to channel #2). If the
linear ratio has been selected, the current reading’s units display will show an exponent (E3, E-6),
and if the logarithmic ratio mode is enabled, the units will instead show dB (decibels). The ratio
mode, ratio constant or ratio channel may be selected via the CHAN screen or via the computer
interface RAT command.
ET+, ET- indicate that the external trigger input has been enabled and that the polarity is either
positive (a logic 1 level on the TRIGGER input means RUN, a 0 level means HOLD) or negative
(a 0 level on the trigger input means RUN, a 1 level means HOLD). The external trigger mode
may be selected via the CHAN screen or via the computer interface TRG command.
SH indicates that the shutter output is activated. The shutter state may be controlled via the
CHAN screen, or via the computer interface SHU command.
RL indicates that the 30 mA reference lamp output is activated. The reference lamp output may be
controlled via the CHAN screen, or via the computer interface REF command.
DC indicates that the dark-current cancellation circuit is engaged and is injecting an equal-butopposite current intended to cancel the excessive dark current that can be encountered with
photomultiplier tubes and the like. The dark current can be controlled via the DC and the off
buttons on the CHAN screen, or via the computer interface DCD command.
GT indicates that a fixed integration time (Gate Time) is in effect, meaning that an integration
cycle will automatically terminate after a programmed time interval (energy measurements only).
8
4.4 HOLD BUTTON
4.4.1 GLOBAL HOLD (ALL CHANNELS)
Pressing the HOLD
button will toggle all of the channels between RUN and HOLD states. Note that
when a channel has been placed into the HOLD state via the touch-screen interface (either via HOLD
button, or individually on a per-channel basis as described below), both the HOLD
reading will be displayed in inverse video.
button and current
If the channel is operating in energy measurement (pulse integration) mode, placing it in the HOLD state
has the additional effect of sampling, displaying, and subsequently dumping the final charge accumulated
on the charge-integrating capacitor. Placing the channel back into the RUN state will enable the channel
to once again begin accumulating charge.
Globally controlling all channels’ RUN/HOLD states in unison can also be performed via the computer
interface commands RUNA and HLDA.
4.4.2 INDIVIDUAL CHANNEL HOLD
While the HOLD button affects all channels at once, it is possible to toggle individual channels
between the RUN and HOLD states by pressing directly on the channel’s current reading display.
PRESS
Channel 2 placed in HOLD state.
Here channel #2 has been placed in the HOLD state by directly pressing the reading itself (1.65170).
If the channel is operating in energy measurement (pulse integration) mode, placing it in the HOLD state
has the additional effect of sampling, displaying, and subsequently dumping the final charge accumulated
on the charge-integrating capacitor. Placing the channel back into the RUN state will enable the channel
to once again begin accumulating charge.
9
The channel’s RUN/HOLD state may also be controlled over the computer interface via the RUN and
HLD commands.
4.5 RNG-/RNG+ BUTTONS (RANGE SELECTION)
In DC measurement mode, pressing the RNG- RNG+ buttons will change the selected channel’s
gain one gain step in either direction. The minimum gain is 103 and the maximum gain is 1010. Note that
decreasing the range RNG- represents an increase in gain (the exponent will increase), since at the
higher gain setting the channel’s overall input range has decreased by a factor of ten in favor of ten times
greater sensitivity.
If autoranging was previously enabled, pressing the RNG- RNG+ buttons will disable autoranging
and the range display will be revert to MAN. Also, any zero currently being applied to the channel will be
deactivated, requiring you to press the ZERO button again to re-zero the channel on its new range.
In energy measurement (pulse integration) mode, pressing the RNG- RNG+ buttons will select
amongst the four charge-integration capacitors, ranging between the largest (10-6 Farads, or 1 μF) and the
smallest (10-9 Farads, or 0.001 μF, or 1 nF, or 1,000 pF).
The channel’s range may also be selected via the computer interface RNG command.
4.6 AUTO BUTTON (AUTORANGING ON/OFF)
In DC measurement mode, pressing the AUTO button will toggle the selected channel between manual
range selection ( RNG- RNG+ buttons) and autoranging. With autoranging enabled, the channel
will automatically change to the optimum gain for the current input signal level.
Autoranging is not available if the channel is operating in energy measurement (pulse integration) mode.
Autoranging can also be enabled via the computer interface command RNGA.
4.7 ZERO BUTTON
Pressing the ZERO button will store the channel’s current reading, which will then be subtracted from
all future readings while the zero function remains in effect (ZR will appear in the channel’s Channel
Options area). Pressing the ZERO button a second time will turn off the zero function.
The channel may also be zeroed via the computer interface ZER command.
10
4.8 CHAN BUTTON (CHANNEL CONFIGURATION)
The CHAN button will bring up the currently selected analog channel’s configuration screen:
SELECT WAVELENGTH
(CONTINUOUS
CALIBRATIONS ONLY)
SET ENERGY MEASUREMENT
(PULSE INTEGRATION) MODE
DISPLAY ACCESSORIES
LIST AND OTHER
CALIBRATION DETAILS
SELECT AVERAGING
(NOISE REDUCTION) TIME
SELECT DETECTOR
AND CALIBRATION
ACTIVATE/CANCEL
DARK CURRENT
NULLING CIRCUIT
SET REFERENCE
LAMP OUTPUT
ON/OFF
RESET MIN/MAX TO
CURRENT READING
SET SHUTTER
OUTPUT
ON/OFF
SET HIGH VOLTAGE
(OPTIONAL MODULE)
SET THERMOELECTRIC
COOLER(S) (OPTIONAL
MODULE)
NORMALIZE
CURRENT
READING TO 1.0
DISPLAY RATIO TO
A CONSTANT OR TO
ANOTHER CHANNEL
SET EXTERNAL
TRIGGER POLARITY
The CHAN screen.
11
4.8.1 CAL BUTTON (CALIBRATION SELECTION)
The CAL button is used to select which of the provided calibrations to apply to the current detector. If
more than one detector is available (i.e. the unit has been programmed to support multiple detectors),
pressing the CAL button will first bring up a detector selection screen:
4.8.1.1 DETECTOR SELECTION SCREEN
Detector selection screen.
Here one of five different detectors is available. Pressing on one of the five detector names will select that
detector and proceed to the calibration selection screen. Note that if the unit has been configured for only
one detector, the detector selection screen will be skipped and the CAL button will proceed directly to
the calibration selection screen:
4.8.1.2 CALIBRATION SELECTION SCREEN
Calibration selection screen.
12
For Model 2153 detector S/N 51014, one of three different calibrations are available. Press on the
desired calibration name to switch to that calibration.
4.8.1.3 USER RESPONSIVITY BUTTON
You may enter your own responsivity value for the detector. The User Responsivity button will
bring up the numeric keypad screen, showing the current responsivity and allowing you to type in a
different one. The responsivity corresponds to
Amps
Units
such that a responsivity of 1.0 would result in a direct readout in Amps.
When a user responsivity is in effect, the calibration is shown as User Responsivity and the units are
shown as (user) .
While the user responsivity may not be saved as a standard calibration, it is possible to store & recall it by
using one of the available user presets (see the section on presets and the SYS PRESET screen).
User responsivity may also be set via the computer interface RSP command.
4.8.2 ACCESSORIES BUTTON/DETECTOR & CALIBRATION DETAILS
The ACC button will bring up a screen showing all of the details related to the currently selected
calibration, most importantly a list of accessories that must be attached to the detector in order for the
calibration to be valid. In the example below, the currently selected calibration of footLamberts requires
the photometric filter and Lumilens to be used with the Model 2153 detector.
The ACC screen.
13
4.8.3 WAVELENGTH λ SELECTION BUTTON
For a continuous (multi-point) calibration, the desired wavelength may be selected via the λ button.
This button will bring up the numeric keypad screen, showing the currently selected wavelength and
allowing you to type in a different one. The currently selected wavelength will always be shown in the
Channel Options area as XXXnm.
If a single-point calibration is in effect, the λ button does not appear.
The wavelength may also be selected via the computer interface WVL command.
4.8.4 DARK CURRENT (DC) BUTTON
Pressing the DC button will activate the dark-current null circuit, and this “equal-but-opposite” current
(range: ±250 nA) will be automatically set to the appropriate value to best zero the current input reading.
When the DC button is pressed, the display will briefly show Nulling Dark Current, Please
Wait… as the dark current injection circuit is iteratively adjusted until the minimum reading is obtained.
When the dark current circuitry is engaged, DC will be shown in the channel’s Channel Options area.
Press
off
to disengage the dark-current-injection circuit.
The dark-current-injection circuit may also be adjusted via the computer interface DCD command.
4.8.5 OFF BUTTON
The off button turns off the Dark Current Injection circuit ( DC
button).
4.8.6 RESET MIN/MAX (Rst MIN/MAX) BUTTON
The channel’s minimum and maximum readings are always being maintained, and can be shown
displayed in real time (updated every ½ second) on the CHAN screen. Pressing the Rst MIN/MAX
button will reset both the current minimum and current maximum to the channel’s latest reading.
The channel’s minimum and maximum readings may also be queried via the computer interface MIN
and MAX commands, and reset via the RMM command.
14
4.8.7 AVERAGING
For noisy signals, a one-, two-, or five-second “moving boxcar average” may be applied. This means that
the displayed value represents a running average of the last one, two, or five seconds worth of readings.
This slows the response time of the channel significantly, but allows for more stable measurements to be
made.
When averaging has been enabled, A1S, A2S, or A5S will displayed in the channel’s Channel Options
area.
Averaging can also be controlled via the computer interface AVG command.
4.8.8 RATIO, NORM, AND CONST BUTTONS (RATIO MODE)
The channel may be configured to display a linear or logarithmic ratio to either a constant or to another
channel.
The CONST button (shown when Ratio to Constant has been selected) will bring up the numeric
keypad screen, displaying the current ratio constant (denominator) and allowing you to type in a different
one.
The NORM button is a shortcut that will normalize the channel’s current output reading to 1.0 by
activating linear ratio mode and storing the channel’s current reading as the ratio constant. If logarithmic
ratio is currently enabled when the NORM button is pressed, the channel will remain in logarithmic
ratio mode and the display will be normalized to 0 dB instead.
When logarithmic ratio display mode is enabled:
•
•
•
•
In the case of a logarithmic ratio to the constant 1.0, the ratio will be displayed with the units as
dB(units).
In the case of a logarithmic ratio to the constant 0.001 (1.0E-3), the ratio will be displayed with the
units as dBm(units).
In all other cases when displaying a logarithmic ratio (either to any other constant, or to another
channel), the ratio will be displayed with the units simply as dB.
The logarithm is always computed and displayed as 10LOG10, never 20LOG10.
The ratio mode & constant can also be controlled via the computer interface RAT command.
15
Linear Ratio to the constant π: RatC appears and the display
units changes to an exponent.
Logarithmic Ratio to the contant 1.0: RatC appears and the display
units changes to dB(units).
Logarithmic Ratio to the constant 0.001 (1.0E-3): RatC appears and the display
units changes to dBm(units).
16
4.8.9 TRIGGER
The channel’s RUN/HOLD state can be configured to be controlled via the external TRIGGER input,
either
•
•
Extern+ positive polarity: a logic 1 level or no input at all (floating) at the TRIGGER input
means RUN, a logic 0 level/ground means HOLD, or
Extern- negative polarity: a logic 0 level/ground at the TRIGGER input means RUN, a logic 1
level or no input at all (floating) means HOLD.
The external trigger is especially useful for operating the channel in energy measurement (pulse
integration) mode, in that it will directly control the integrate/charge accumulation state (RUN) and the
final sample+hold+charge dump state (HOLD) allowing pulse measurements to be performed dozens of
times per second, particularly in conjunction with the computer interface serial port command WAI C.
The External Trigger mode can also be set via the computer interface TRG command.
4.8.10 SHUTTER
This controls any external shutter that may be connected to the analog channel. When the shutter is in the
activated state, SH will be shown in the channel’s Channel Options area.
The shutter may also be controlled via the computer interface SHU command.
4.8.11 REFERENCE LAMP
This controls any external reference lamp that may be connected to the analog channel. When the
reference lamp output is activated (30 mA constant-current source), RL will be shown in the channel’s
Channel Options area.
The reference lamp may also be controlled via the computer interface REF command.
4.8.12 HIGH VOLTAGE (HV) BUTTON
If the channel has been configured with the High Voltage option, pressing the HV button will bring up
the numeric keypad screen, showing the current high-voltage setting and allowing you to type in a
different one. If High Voltage is not available on the channel, the HV button does not appear.
The High Voltage may be set between 0 and -2000V, and can also be set via the computer interface HVO
command.
17
4.8.13 THERMOELECTRIC COOLER (TEC) BUTTONS
If the channel has been configured with the Thermoelectric Cooler(s) option (single or dual coolers),
pressing the corresponding TECx button will bring up the numeric keypad screen, showing the current
setpoint and allowing you to type in a different one. If the Thermoelectric Cooler(s) option is not available
on the channel, the TECx button(s) do not appear.
4.9 SYS BUTTON (SYSTEM CONFIGURATION)
The SYS screen.
The SYS button allows configuration of the front-panel display contrast & brightness, the RS-232/RS485/USB serial port, and the IEEE-488 address. Also, one of twelve user presets may stored or recalled,
setting one or all channels to a predetermined state. Finally, the flexOptometer may be temporarily
reconfigured to display fewer or more channels than are actually present.
4.9.1 PRESET BUTTON (PRESET STORE & RECALL)
The PRESET screen.
18
Up to twelve different user presets may be stored and recalled, either for a single channel individually or
for all channels as a group. For each channel, the following information is stored and recalled as part of a
user preset:
•
•
•
•
•
•
•
•
•
•
•
•
•
•
Detector
Calibration
Range
Energy Measurement Mode
Energy Measurement Gate Time
Auto- vs. Manual ranging
Averaging mode
External Trigger mode
Ratio mode, including any ratio constant
User Responsivity
High Voltage
Thermoelectric Cooler(s) setpoint(s)
Reference Lamp state
Shutter State
To recall a preset, press one of the twelve preset buttons (after choosing Selected Channel vs. All
Channels). To store a preset, first press the STORE button, then press one of the twelve preset
buttons.
Note that preset #0 is special in that the unit will always load preset #0 for all channels at power on; thus
you can define the initial default state of the entire system by storing it as preset #0.
Presets can also be recalled via the computer interface PRE command.
4.9.2 SERIAL BUTTON (SERIAL INTERFACE CONFIGURATION)
The SERIAL screen.
The serial port may be configured for RS-232 or RS-485 operation at standard baud rates of between 300
and 115,200 baud. Additionally, character echo (full duplex) may be optionally enabled.
19
Serial port echo (duplex) may also be configured via the computer interface DPX command.
4.9.3 IEEE-488 ADDRESS/MULTI-DROP UNIT ID BUTTON
The IEEE-488 button will bring up the numeric keypad screen, showing the current IEEE-488 address
and allowing you to type in a different one. The default IEEE-488 address is 4. Note that the IEEE-488
address is also used as the unit ID for multi-drop operation (multiple flexOptometers with their serial
ports wired in parallel, see the # unit addressing serial port command for details).
4.9.4 DISPLAY CONSTRAST & BRIGHTNESS, INVERT BUTTON
Two vertical sliders provide control of the display’s contrast and brightness, and the Invert Screen
button will switch the display between black-on-white and white-on-black modes.
4.9.5 CAL TOUCH PANEL BUTTON
Touch the three targets in succession to recalibrate the touch panel.
4.9.6 1CH, 2CH, 3CH, 4CH BUTTONS
These buttons will temporarily reconfigure the flexOptometer to display more or fewer channels than are
actually installed in the unit.
20
4.10 NUMERIC ENTRY KEYPAD
The numeric entry keypad.
Whenever a numeric input is required such as User Responsivity , wavelength λ , ratio constant
CONST , etc., the numeric entry keypad screen will appear with the current value shown. Either enter a
new value (you don’t need to press Clear first) and press ENTER , or just press ENTER to
continue with the current value as displayed.
The EXIT button will discard any value you have entered and leave the original value unchanged.
21
SECTION 5 MAKING ENERGY (PULSE INTEGRATION)
MEASUREMENTS
Use the CHAN button to configure a channel to make energy measurements:
Energy Measurement Mode: the range changes to Farads (integration
capacitor) and the suffix ·s (for seconds) appears.
Energy measurements are made by accumulating photocurrent on an internal integration capacitor. Since
1 Coulomb of charge delivered into 1 Farad of capacitance will yield a potential of 1 Volt, the voltage
appearing on the integrating capacitor is a direct measure of the total charge delivered. There are four
pulse integration capacitors in the flexOptometer, the largest is 1 μF (10-6 Farads) and the smallest is
0.001 μF (10-9 Farads).
An energy measurement/pulse integration cycle consist of three phases:
1. Charge accumulation (integrate), as a pulsed or otherwise varying energy source delivers
photocurrent into the selected integration capacitor;
2. Integration hold, where the flexOptometer samples the final voltage appearing on the capacitor
and digitally stores & displays the result; and
3. Charge dump, in which the capacitor is discharged in preparation for the next integration cycle.
Step 3 always happens automatically after step 2 has completed (6 ms are required for the final sample to
be taken, and 6 ms are required to dump the accumulated charge before the next integration cycle can be
started).
22
5.1 STARTING AND STOPPING EACH PULSE INTEGRATION CYCLE
There are three ways to control the pulse integration cycle:
1. Use the front panel touch screen to manually start and stop the integration. Pressing directly on a
channel’s output level display will toggle the channel between integration mode (RUNning,
accumulating charge) and the final sample, display, and charge dump states (HOLDing). In this
way, you can manually start the integration cycle, cause the source to emit the pulse, and then stop
the integration when the pulse event has completed to obtain the final reading.
2. Use the computer interface serial port RUN and HLD commands. The WAI command can be
issued after the HLD command to wait for the final sample to be taken and display the result
(similar to the REA command but waits for the end of the integration cycle before outputting the
result).
3. Enable the external trigger input (either Extern+ or Extern-) and provide a TTL-level control
signal to the flexOptometer’s TRIGGER input to start and stop the integration.
5.2 TIMED INTEGRATION (GATE TIME)
The flexOptometer can be configured to automatically terminate the integration cycle at the end of a
predetermined time delay. This delay is referred to as the Gate Time and can be set to any interval
between 1 millisecond and 65,535 milliseconds.
When Gate Time is enabled (set to a non-zero value), the channel will automatically enter the hold state
upon expiration of the Gate Time delay. Set the Gate Time with either the GAIT button or with the
computer interface GTI command.
Note that if the external trigger input is enabled, the trigger input becomes edge-sensitive instead of levelsensitive - - - it can only start the integration cycle and cannot stop it - - - only the expiration of the
integration time delay will place the channel into the HOLD state. Also, if the trigger input is held in the
RUN state (logic 1 for Extern+, logic 0 for Extern-) continuously, the channel will free-run
integration cycles back-to-back, with only a 12 ms pause to sample the value and dump the charge each
cycle. The computer interface serial port WAI C command (Wait Continuous) becomes especially
useful in this case in that the flexOptometer will wait for the end of each integration cycle and output each
reading continuously until commanded to stop. The flexOptometer’s TRIGGER output can be used in this
case to slave the apparatus under test to the flexOptometer’s integration cycle.
5.3 USING THE TRIGGER AS AN OUTPUT TO CONTROL THE PULSE
SOURCE
While the trigger is usually an input to the flexOptometer, during the start of each integration cycle the
trigger briefly outputs a logic 0 pulse one millisecond in duration. The falling edge of this pulse precisely
marks the beginning of each integration cycle, and may be used to fire the pulse event of the apparatus
being measured.
23
SECTION 6 ASCII COMMAND SET
(in alphabetical order)
Commands are issued to the flexOptometer over the RS-232, RS-485, or USB interfaces by first sending
the three-character code identifying the command, followed by an optional argument (or arguments)
preceded by a space (or spaces), terminated by a carriage return <CR>, linefeed <LF>, or a carriage
return/linefeed pair <CR>/<LF>.
If the command is performed without error and no value is returned by the command, the unit will
respond simply
<CR> <LF> Ok <CR> <LF>
If an error occurred, an error message will be displayed instead.
If a value is returned by the command, it will be output in a similar fashion:
<CR> <LF> value <CR> <LF>
1. Commands that apply to a specific channel will act on the channel currently selected via the CHA
command; this is independent of the channel selection made via the front panel touch-screen.
2. Alternately, a command may be preceded by a single digit 1 through 4, this has the same effect
as first selecting the channel via the CHA command, then issuing the subsequent command for
that channel. For example, 2REA will return the current reading of channel #2.
3. In general, issuing a command without an argument will return the current value of the parameter
that would be set by the command, were an argument provided.
4. The baud rate may be changed via the touch panel SYS SERIAL buttons. The default baud
rate is 115,200 baud.
5. Characters are buffered as they are received and can be sent as fast as the current baud rate will
allow. This allows for the possibility of “getting ahead” of the unit when a fast baud rate is
employed, as multiple commands can become queued up faster than the unit can process them. To
stay synchronized with the radiometer in this case, always wait for the Ok response before issuing
the next command.
6. Sending an empty command line (<CR> by itself) will always produce the Ok response.
7. The unit will accept and properly handle backspaces.
8. Sending an <ESC>, the escape character, will re-execute the previous command.
9. Commands are not case-sensitive.
24
6.1 ACC
SHOW ACCESSORIES LIST
This command will show a list of the accessories that must be attached to the currently selected detector
in order to make the currently selected calibration valid.
Example:
ACC
Photometric Filter S/N 33428
Lumilens S/N 33429
6.2 AVG
SET AVERAGING MODE
Sets the channel’s moving boxcar average to one of 0 (off), 1, 2, or 5 seconds.
Syntax:
AVG [0|1|2|5]
6.3 BEE
BEEP
This will sound a 1 second beep.
6.4 CAL
SELECT CALIBRATION
Selects one of the available calibrations for the channel to apply for the current detector. Note that if the
unit has been configured to support more than one detector, a detector must first be selected via the DET
command before a calibration can be chosen (enter DET by itself to see which detector is currently
selected).
Syntax:
CAL [n]
Where [n] is the number of the desired calibration to use. Entering CAL by itself will display the
currently selected calibration. For a list of the available calibrations, enter
CAL *
25
Example:
CAL *
ask for a list of the available calibrations
1 W 350-1100nm 00408AI
2 W/cm2 350-1100nm 00415AA
3 fL 00520AI
CAL 3
Ok
CAL
3 fL 00520AI
6.5 CHA
select calibration #3, footLamberts
query the currently selected calibration
SELECT CHANNEL
Indicates which channel subsequent ASCII commands will be applied to. This is separate from the front
panel touch-screen channel select buttons and applies only to commands issued over the computer
interface. Note that alternately you can always specify which channel to act upon by preceding each
ASCII command with a single digit 1 through 4, thus avoiding the need to select the channel via the
CHA command first.
Syntax:
CHA [1|2|3|4]
Example:
CHA 4
Ok
HLD
Ok
CHA 1
Ok
REA
1.48373E-3
2REA
145.3214
4RUN
Ok
select channel #4
place channel #4 in HOLD state
select channel #1
get channel #1’s latest reading
get channel #2’s latest reading
channel #4 back to RUN state
26
6.6 DCA
DOWNLOAD DETECTOR CALIBRATIONS
Causes the flexOptometer to output the complete set of detectors and detector calibrations as specially
formatted ASCII text. This text can be captured, for example by Hyperterminal’s
TRANSFER/CAPTURE TEXT… feature, and stored as a file for backup or for reference.
Example:
DCA
%(94RZ639:%27@QSahjn\k$2=JFJBOa]
*/Yd.=DCDDPS56%/DG/=]c>Cgh6AVdGH
VRRTBMP[34]bFJ,2KMjnAHfhNQFK1510
eobiUVMKM[EI.:/>(0,4'.akifVUiiST
--/2chP_an&09HJO4:ia2<^[]\aaZ[_b
ABSU<9VZZb*.TYMSGNBJMGJEHDGDGEHG
JJMNQSVY\`ch+14;>FLN[^`^QLOKOOKR
…
…
6.7 DCD
ADJUST DARK-CURRENT DAC
When dark-current compensation is being applied, this command will directly set the digital-to-analog
converter (DAC) controlling the amount of current being injected into the input (in order to null excessive
dark current coming from the detector).
Syntax:
DCD [nnnnn]
Where [nnnnn] is a positive integer between 1 and 65,535 covering the full range of the dark-current
injector circuit from -250 nA (1) to +250 nA (65535), with 0 nA nominally in the middle (32,768). Note
that the value 0 disables the dark-current injection circuitry completely and physically disconnects it from
the input.
6.8 DET
SELECT DETECTOR
If the unit has been configured to support multiple detectors, this command is used to choose which
detector is to be used.
Syntax:
DET [detectorS/N]
where [detectorS/N] is the serial number of the detector to assign to the channel. For a list of
available detectors, enter
27
DET *
Example:
DET *
ask for a list of the available detectors
S2575R S/N 15143
221 S/N 08041
19830-2L S/N NE114
2153 S/N 51014
221 S/N 5C026
2153 S/N 05053
DET 5C026
Ok
select the detector by using its serial number
This selects the Model 221 detector S/N 5C026.
6.9 DPX
SET DUPLEX (CHARACTER ECHO)
Enables or disables character echo (full duplex) over the RS-232, RS-485, and USB interfaces.
Syntax:
DPX [0|1]
where 0 will disable character echo (half duplex) and 1 will enable it (full duplex). This setting will not be
stored, however, and the unit will revert back to the state as defined in the SYS SERIAL screen the
next time it is powered on.
This command is provided as an alternative to enabling local character echo in a terminal program such as
Hypertrm.exe; if you can’t see what you’re typing, you may enable character echo by issuing DPX 1 to
the flexOptometer.
6.10 GTI
SET ENERGY MEASUREMENT GATE (INTEGRATION) TIME
When making energy measurements, the flexOptometer can be programmed to stop the charge
accumulation and display the final result after a predetermined time has elapsed since the start of the
cycle. The gate time is specified in milliseconds and has a range of 1 ms through 65,535 ms (65.535
seconds) . A gate time of 0 ms disables the timer and the pulse integration phase is instead controlled via
external means (front panel touch screen, computer interface serial port commands, or an external trigger
signal connected to the TRIGGER input).
28
6.11 HLD
HOLD
Pauses (holds) the channel indefinitely, and if the channel is operating in energy measurement (pulse
integration) mode, also has the effect of taking the final reading of the accumulated charge, digitally
storing the result, and dumping the charge on the integration capacitor.
Issuing the RUN command will resume operation, and start a new pulse integration cycle if pulse
integration mode is enabled.
6.12 HLDA
HOLD ALL CHANNELS
Same as above but operates on all channels simultaneously.
6.13 HVO
SET HIGH VOLTAGE
If the channel is equipped with the High Voltage option, this command is used to set the output voltage to
between 0 and -2000 volts.
Syntax:
HVO [voltage]
6.14 MAX
GET CURRENT MAXIMUM
The flexOptometer is always maintaining the minimum & maximum readings for a channel, this
command is used to query the current maximum. Note that the RMM command is used to reset the
minimum and maximum values to the channel’s current reading.
6.15 MIN
GET CURRENT MINIMUM
The flexOptometer is always maintaining the minimum & maximum readings for a channel, this
command is used to query the current minimum. Note that the RMM command is used to reset the
minimum and maximum values to the channel’s current reading.
29
6.16 NRG
SET ENERGY MEASUREMENT (PULSE INTEGRATION) MODE
Switches between DC radiometer mode and energy measurement (pulse integration) modes.
Syntax:
NRG [0|1]
Turns energy measurement off (0) or on (1).
Example:
disable energy mode
NRG 0
Ok
UNI
CD/M2
NRG 1
Ok
UNI
CD/M2*S
6.17 PRE
query current measurement units
units are shown to be candelas per square meter (nits)
enable energy mode
query current measurement units again
units are now candelas per square meter seconds
LOAD USER PRESET
This command will load one of the twelve user presets, either for a single channel or for all channels at
once.
Syntax:
PRE [nn] [A]
Example:
PRE 1
Ok
PRE 3 A
Ok
loads preset #1 for the currently selected channel only
loads preset #3 for all channels at once
30
6.18 RAT
SET RATIO MODE
This command is used to select linear or logarithmic ratio mode and to indicate whether the ratio is to a
constant or to another channel.
Syntax:
RAT [LIN|LOG|OFF] [CH1|CH2|CH3|CH4|const]
Example:
RAT LIN CH2
Ok
RAT LOG -10.24
Ok
RAT OFF
Ok
6.19 REA
enables linear ratio to channel #2
enables logarithmic ratio to the constant -10.24
disables ratio mode and returns the channel to absolute readings
READ CHANNEL’S CURRENT VALUE (TAKE READING)
This will return the channel’s latest reading in absolute units. If linear or logarithmic ratio has been
enabled, this command will return the computed ratio instead.
If a sample is available it will be displayed immediately; this means that the reading can be up 1/5th of a
second old (at the base/default sample rate of 5 samples/second).
If a sample has already been read via the REA command, it will not be available to be read out a second
time; rather, any subsequent REA command will wait until the next sample is available from the channel
before outputting the result. Note that if the flexOptometer is currently sitting in the REA state waiting
for the next sample to become available, other ASCII commands may be issued at any time to cancel the
read operation and proceed to other tasks.
The reading will be preceded by a “-“ sign if negative. The reading is reported as true floating-point and,
especially for very low readings, report resolution far in excess of what is being output on the front-panel
LCD display, which is always shown with a fixed decimal place. Also, the flexOptometer will return
“*OVER*” if the channel is overranging (select a lower gain range, or decrease the input signal level in
this case).
Syntax:
REA [nnnn|C]
where [nnnn] is an optional integer between 1 and 65,536 indicating the number of successive
readings to take and output. If [nnnn] is not supplied, a single reading will be made. REA C will
output readings continuously. Note that if multiple readings are requested, they will be output at the
current sample rate as set by the SRT command, which allows for readings to be output at a rate as high
as 250 readings per second (the default sample rate is 5 reading per second).
31
Sending any character to the flexOptometer while multiple readings are being output will immediately
terminate the readings and allow processing of the next ASCII command.
Examples:
take a single reading
REA
84.141E-6
REA 5
83.141E-6
84.8171E-6
83.1272E-6
85.038E-6
84.6417E-6
6.20 REP
take five readings at the current sample rate
READ PARALLEL (ALL CHANNELS)
In multi-channel systems, all of the channels may be read at once. The individual channel readings will be
output separated by commas.
Syntax:
REP [nnnn|C]
where [nnnn] is an optional integer between 1 and 65,536 indicating the number of successive
readings to take and output. If [nnnn] is not supplied, a single reading of all the channels will be
made. REP C will output readings continuously. Note that if multiple readings are requested, they will
be output at the current sample rate as set by the SRT command, which allows for readings to be output
at a rate as high as 250 readings per second (the default sample rate is 5 reading per second), although
serial port bandwidth limitations reduce the maximum workable sample rate depending on the number of
channels (for example, 50 samples/second is a reasonable maximum at 115,200 baud for a four-channel
system).
Also, if different sample rates are chosen for different channels, the readings will be output at the rate of
the channel with the slowest sample rate.
Sending any character to the flexOptometer while multiple readings are being output will immediately
terminate the readings and allow processing of the next ASCII command.
REP
take a single reading of all four channels
0.466876,824.937E-9,57.8121E6,758.482E-9
REP 5
take five readings of four all channels
0.464839,824.951E-9,57.8096E6,758.49E-9
0.465159,824.96E-9,57.8095E6,758.518E-9
0.464504,824.956E-9,57.8093E6,758.518E-9
0.466828,824.952E-9,57.8095E6,758.496E-9
0.466597,824.948E-9,57.8098E6,758.518E-9
32
6.21 REF
SET THE REFERENCE LAMP OUTPUT
This command will enable or disable the 30 mA reference lamp output.
Syntax:
REF [0|1]
6.22 RMM
RESET MIN/MAX
The flexOptometer is always maintaining the minimum & maximum readings for a channel, this
command is used to reset the minimum and maximum values to the channel’s current reading.
6.23 RNG
SET RANGE
This command is used to set the channel’s range to either one of eight DC gains (103 through 1010) when
operating in DC radiometer mode, or to select one of the four integration capacitors (10-6 through 10-9
Farads) when operating in pulse-integration (energy) mode.
Syntax:
RNG [exp]
where [exp] is the exponent representative of the desired range, either 3 through 10 for DC radiometer
mode, or -6 through -9 for energy measurement (pulse integration) mode.
If autoranging is currently enabled, AUTO will be added at the end of the response. Setting a new range
(or setting the same range) will disable autoranging.
Example:
RNG 5
Ok
RNG
5
RNGA
Ok
RNG
7 AUTO
NRG 1
Ok
RNG
-6
RNG -8
Ok
select range 5 (105 gain)
query current range
range is displayed as 5
enable autoranging (see below)
query current range
range has automatically changed to 7and AUTO is shown
enable energy measurement mode
query current range
range is now -6 Farads (1 μF)
rselect range -8 Farads (.01 μF)
33
6.24 RNGA
ENABLE AUTORANGING
This command will enable the channel’s autoranging feature. Note that this command is not available for
pulse integration modes.
6.25 RSP
SET USER RESPONSIVITY
This command allows the user to enter their own responsivity for the detector.
Syntax:
RSP [rsp]
where [rsp] is a floating-point number representing the detector’s responsivity relative to Amps.
Entering
RSP
by itself will display the channel’s current responsivity.
6.26 RUN
RUN
This command is used to re-start the channel after having been paused via the HLD command. If
operating in pulse-integration (energy) mode, this will also have the effect of allowing charge to once
again start accumulating on the selected integrating capacitor.
6.27 RUNA
RUN ALL CHANNELS
Same as above but operates on all channels simultaneously.
6.28 SHU
SET SHUTTER OUTPUT
This command controls the shutter output.
Syntax:
SHU [0|1]
6.29 SPR
SAVE USER PRESET
Either a single channel’s configuration, or all channels taken together, may be saved to one of twelve user
presets. Note that preset #0 is special in that the flexOptometer will always load this preset at power-up,
enabling you to define the default power-on state of the unit.
34
Syntax:
SPR [nn] [A]
Example:
SPR 5
Ok
SPR 0 A
Ok
6.30 SRT
stores currently selected channel’s state in preset #5
stores the state of all channels in preset #0, sets the default power-on configuration
SET SAMPLE RATE
While the front-panel display is updated four times per second, it is possible to take a channel’s readings
much faster over the computer interface, at up to 250 readings per second. This command is to select the
internal sample rate at which readings will be made over the computer interface.
Syntax:
SRT [nn]
where [nn] is a number between 5 and 250. The flexOptometer will respond with a number
representing the actual physical sample rate, as best the system can provide.
Example:
SRT 5
4.99907
SRT 10
9.99814
SRT 25
24.9954
SRT 125
124.976
set the sample rate to 5 samples/second
actual sample rate shown to be 4.99907 samples/second
set the sample rate to 25 samples/second
actual sample rate shown to be 24.9954 samples/second
set the sample rate to 25 samples/second
actual sample rate shown to be 24.9954 samples/second
set the sample rate to 125 samples/second
actual sample rate shown to be 124.976 samples/second (no AC ripple rejection!)
For 50/60 Hz AC power-line interference rejection, restrict the sample rate to one of 5, 10, 20 (60 Hz
only), or 25 (50 Hz only) samples/second, otherwise AC power line interference can appear in your data,
especially when using the higher gain ranges.
Note that, except for the default sample rate of 5 samples/second, boxcar averaging [AVG command] will
not apply to the readings made over the computer interface.
35
6.31 TRG
SET EXTERNAL TRIGGER MODE
Syntax:
TRG [+|-|0]
Sets the External Trigger mode to + positive polarity (RUN when logic 1 input), - negative polarity
(RUN when logic 0 input), or 0 disables External Trigger input completely.
6.32 UCA
UPLOAD DETECTOR CALIBRATIONS
This command is used to upload a new set of detector calibrations from a specially formatted ASCII text
file. To upload the file, enter
UCA
and the flexOptometer will respond with
Begin upload of calibration file. Enter 'z' to terminate.
At this point you can transmit the file to the flexOptometer, for example by using the TRANSFER Æ
SEND TEXT FILE… feature of Hyperterminal. At the end of the transmission, the flexOptometer should
respond
Upload successful.
Note: it is important not to transmit the text file too quickly; either use one of the slower baud rates, or
configure your terminal program to add a delay (~100 milliseconds) between lines (for example, in
Hyperterminal you can configure the line delay using FILE Æ PROPERTIES Æ SETTINGS Æ ASCII
SETUP).
6.33 WAI
WAIT FOR END OF ENERGY MEASUREMENT CYCLE
When the flexOptometer is configured for energy measurements (pulse integration), this command
outputs a channel’s reading in a manner identical to the REA command, except that instead of waiting
for each reading to become available at the channel’s sample rate, WAI will wait until the end of an
integration/energy measurement cycle before outputting the final reading without displaying any of the
intervening samples as the charge is accumulating.
Syntax:
WAI [C]
WAI by itself will wait for the end of the next integration cycle and output the result.
36
Entering WAI C will continuously wait for the end of each integration cycle and output the final reading
repeatedly until the flexOptometer receives any ASCII character at which time it will terminate the WAI
command and allow processing of the next ASCII command.
Example:
WAI
23.6152E-6
WAI C
24.085E-6
23.7881E-6
23.9813-6
24.1533E-6
6.34 WVL
wait for integration cycle to complete
the final integrated charge is displayed
continuously wait for integration cycles to complete
result of first integration cycle
result of second integration cycle
…and so on
SELECT WAVELENGTH (CONTINUOUS CALIBRATION)
If a continuous calibration is in effect, this command is used to select the operating wavelength.
Syntax:
WVL [w/l]
where [w/l] is an integer representing the desired wavelength in nanometers. Entering
WVL
by itself will display the current wavelength selected.
6.35 ZER
ZERO OUT CHANNEL
This command will store the channel’s current reading and subtract it from all future readings, thus
zeroing out the channel. Note that the zeroing operation applies only to the currently selected range;
changing the range will cancel the zeroing feature, requiring you to re-zero the channel once the new
range has been selected.
37
APPENDIX A
SPECIFICATIONS
Electronic
Integrator
Eight Photometric/Radiometric Ranges
Range-to-Range Linearity <0.1% for most ranges (<0.25% for most
sensitive range)
-15
-3
Sensitivity: 10 to 10 Amps
-15
Resolution: 1x10 Amps
Dark Current Suppression: 250 nA Max
-15
Noise: <3x10 Amps
Frequency Roll-off: 12 Hz on most sensitive range
A-to-D converter: 24-bit for each decade
Four Integrate Ranges
Range-to-Range Linearity <0.1% for most ranges (<0.25% for most
sensitive range)
-14
-3
Sensitivity: 10 to 10 coulomb
Decay Error: analog-approx. 0.01% / sec
Digital-holds reading indefinitely
6.35.1.1
6.35.1.2
Radiometric/Photometric Ranges
Ranges
6.35.1.3 Radiometric Units*
Irradiance (Watts/cm²)
Irradiance (Watts  sec/cm²)
Radiance (Watts/cm²/steradian)
-15
-3
-8
4
Range :10 to 10
-14
-6
Range : 10 to 10
-14
-2
Range : 10 to 10
6.35.1.4 Photometric Units*
6.35.1.5
Luminous Intensity (Candela)
Illuminance (Ft-Candle)
Illuminance (Lux or Lumen/m²)
Luminance (Ft-Lambert)
Luminance (candela per square meter)
Illuminant Energy (Ft-Candle-seconds)
Illuminant Energy (Lux-seconds)
Range : 10 to 10
-10
3
Range : 10 to 10
-8
4
Range : 10 to 10
-7
5
Range : 10 to 10
-7
5
Range : 10 to 10
-9
0
Range : 10 to 10
-8
1
Range : 10 to 10
*Ranges based on system configured with a 1 square centimeter silicon detector and corresponding accessories
General
Automatic/Manual ranging
Microprocessor Controlled Functions
High Voltage circuit for photomultipliers (300-1500 Volts)
Thermo-electric coolers for detector and filter stabilization
USB, RS-232, RS-485 and IEEE-488.2 Communications
Analog Output
Power Input: 12.0 volts DC
Operating Temperature Range: 0 to 50° C
Humidity: 0% to 95% RH non-condensing
38