1
WARNING! This device should NOT be used on an individual who has a
heart pacemaker or other electrically powered implant fitted
IMPORTANT INFORMATION!
PLEASE READ THIS PAGE CAREFULLY
Origin: OKB RITM, Joint-Stock Company, 99, Petrovskaya, Taganrog, 347900, Russia
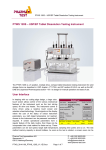
Model: SCENAR-1-NT
Classification: Type of protection against electric shock – Internally powered equipment (3 batteries each of 1.5V ) Degree of protection against electric shock – Type BF.
NOTE: Type BF denotes electrodes that are protected to a standard limit of
leakage current. The symbol appearing on the device, denoting this rating is:
Waterproofing: No special protection against liquid ingress provided (IPX0).
Cleaning & Disinfecting: Wipe electrode area with cotton swab dampened with surgical spirit
before treating each new client. Clean casing with damp (not soaking) cloth and mild soap solution. Allow to dry before use.
Clinical environment: NOT suitable for use in the presence of flammable anaesthetic mixtures
with air, oxygen or nitrous oxides.
Physiological effects: Do not use on clients who have a heart pacemaker or other electrically
powered implant (see Contraindications for details).
Add-on probes: Only insert extension probes supplied by the manufacturer that are suitably
suppressed from electromagnetic radiation. Only insert extension probes in the socket provided.
DO NOT REMOVE the upper casing – this access is for the use of service personnel only.
Transport & Storage: Packaging – Always ship in special carrying wallet within appropriate cardboard boxes with built-in foam package protection. Temperature – minus 50ºC to plus 50ºC (but
not in unheated aircraft holds). Humidity – less than 80% at 20º C, less than 60% at 40ºC. After
transportation and/or storage in extreme conditions allow device to reacclimatize to operating
conditions for 24 hours before use.
Batteries: Remove battery from device if not in use for an extended period. Connect correctly.
DO NOT TRY TO RECHARGE disposable batteries! Dispose of used batteries responsibly. Use
good quality, within-date long-life, 1.5V ALKALINE Type LR6 (AA) batteries.
NOTE: Total battery removal should be used during storage and transportation to avoid
battery drain. The device should NOT be operated with the battery cover removed, as this
exposes the operator to live battery circuits in contravention of the Safety Regulations.
Oper_Manual_1-NT_ver_03
Version 1.2 of December 23, 2005
CONTENTS
1 PURPOSE ................................................................................... 5
2 SPECIFICATIONS .................................................................... 5
3 DELIVERY SET ........................................................................ 6
4 DEVICE COMPONENTS AND CONTROLS........................ 7
5 PREPARING DEVICE FOR OPERATION ........................... 8
6 USING SCENAR-1-NT.............................................................. 9
7 MAINTENANCE SERVICE................................................... 16
8 TROUBLESHOOTING........................................................... 16
9 WARRANTY ............................................................................ 16
10 TRANSPORTATION ............................................................ 17
APPENDIX A .............................................................................. 18
4
Oper_Manual_1-NT_ver_03
Version 1.2 of December 23, 2005
1 PURPOSE
SCENAR-1-NT (version 03) – portable transdermal electroneurostimulator with graphic display, digital, light and audible indications
with a built-in electrode for determining optimum zones, time and therapeutic effect of stimulation (hereinafter – the device) – is intended for
delivering general therapeutic non-invasive treatment to the physiological
systems of the organism via human skin areas in order to treat various
pathologies.
The device is intended to treat and rehabilitate people and can be used
by medical professionals in medical-prophylactic institutions, hospitals,
emergency care units as well as at home according to the doctor’s prescription.
The device should be stored and used in temperatures between 10°C and
35°C with relative humidity not to exceed 80% at a temperature of 25°C.
Potential risk from the device usage refers to Class 2a of GOST R
51609-2000.
Perceived mechanical effects of the device refer to group 2 of GOST
R 50444-92, consequences of failures – to class V of GOST R 50444-92.
The device complies with the standards set by the Russian Government GOST R 50267.0–92, GOST R 50267.10–93 for internally powered
equipment, type BF, which classifies it as a safe device for personal use.
2 SPECIFICATIONS
2.1 Supply voltage – from 3.3 up to 4.8V (three 1.5V alkaline batteries).
2.2 Maximum supply current – not greater than 300mA.
2.3 Basic modes of operation:
2.3.1 subjectively-dosed mode (also called ‘constant mode’) (the duration of
stimulation for each skin area and the duration of the whole procedure is determined by the therapist in accordance with the User Manual provided with
the device);
2.3.2 individually-dosed mode (the duration of stimulation for each treatment
area is automatically determined by the device);
2.4. Basic modes of stimulation:
2.4.1 Continuous mode with a fixed frequency that can be selected among
15, 60, 120, and 350Hz ± 5%;
2.4.2. Modulated modes:
5
Oper_Manual_1-NT_ver_03
Version 1.2 of December 23, 2005
2.4.2.1 frequency modulation (variable frequency) with the following
settings:
variation range – (30..120)Hz±5%
variation period – (7.5±1) sec
2.4.2.2 Amplitude modulation (pulse energy variation):
duration of pulse advancing at a set energy, sec: (1, 2, 3, 4, 5)±0.5
duration of pulse advancing at the minimum energy, sec: 1±0.5
2.5 The duration of the pulse’s 1st phase is controlled within the range,
mcsec: 2..500±1.
2.6 Amplitude of the stimulating pulse at a standard load:
minimum amplitude (at the energy of 1 unit) – not greater than
2.5V
maximum amplitude (at the energy of 250 unit) – not greater than
150V
2.7 Device automatic turn-off time when not active – 0.5-20 min.
2.8 Device’s weight – not greater than 0.4kg.
2.9 Overall dimensions – not greater than 182×62×32mm.
2.10 Average nonfailure operating time – not less than 1000 hours.
2.11 Average service life – not less than 4 years.
3 DELIVERY SET
Each complete delivery set of the devices includes (Table 1):
Article
Documents
Portable transdermal electroneurostimulator with graphic display,
digital, light and audible indications with a built-in electrode for
determining optimum zones, time
and therapeutic effect of stimulation ‘SCENAR-1-NT version 03’
Add-on probes:
face probe
skull probe
LTBG.941514.003-03
Table 1
Quantity
(units)
1
LTBG.943132.001
LTBG.943132.002
1
1
6
Oper_Manual_1-NT_ver_03
Version 1.2 of December 23, 2005
point probe
LTBG.943132.003
1
Alkaline battery
Included
3
Case
LTBG.466946.003
1
Operating Manual
LTBG.941514.003-03 PS
1
User Manual
LTBG.941514.003 IP
1
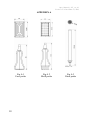
Note – Add-on probes are delivered on request of the Customer
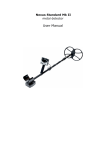
The attached probes are shown in Appendix A.
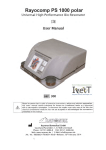
4 DEVICE COMPONENTS AND CONTROLS
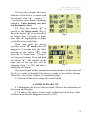
4.1 The device is illustrated in Fig. 1. The device has an upper cover
1 with a screen 8, case with a built-in electrode 9 and a battery cover 2.
All components except for the batteries are located on the printed circuit
board inside the device’s case.
4.2 The LCD screen 8 (on the upper cover of the device) displays the
results of measuring, settings and device’s state.
4.3. The device has the following controls on the upper side 1 of its case:
button 6 (" ") − is used to switch the modes and exit the standby
mode;
button 11 ("") – is used to rotate the picture displayed on the
screen;
button 7 ("+") − is used to increase the energy strength or value of a
selected setting;
button 5 ("–") − is used to decrease the energy strength or value of a
selected setting;
switch button 10 – is used to switch on/off the device;
7
Oper_Manual_1-NT_ver_03
Version 1.2 of December 23, 2005
Fig. 1
4.4 On the lateral surface of the case there are: jack 3 – to connect attached (add-on) probes, and a technological jack 4.
ATTENTION! Jack 4 shall not be used during the device’s operation.
4.5 The device is powered from 3 alkaline batteries.
5 PREPARING DEVICE FOR OPERATION
5.1 Before every procedure disinfect the electrode with a cotton wad
wetted in a 3% hydrogen peroxide solution with the addition of 0.5 %
solution of an approved cleaning liquid. Allow to dry up thoroughly before treating.
5.2 Open the battery compartment cover and install the batteries.
Switch the device on using the switch button on the front panel. A message containing the information about the device’s name and version and
its software’s release date (e.g. "SCENAR-1-NT v3 01.12.05") will be
displayed for 2 seconds and a beep will sound.
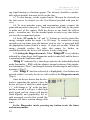
5.3 Then the device will switch to the basic mode (hereinafter called “B”
mode), and the major parameters of stimulation will be displayed (Fig.2).
8
Oper_Manual_1-NT_ver_03
Version 1.2 of December 23, 2005
The first line contains the timer,
indicator of the device’s contact with
the patient’s skin (“●” – contact, “○”
– no contact), and a battery discharge
indicator. Upon pressing any button the timer is reset.
5.4 Press the button " " to
switch to the Menu mode (Fig.3).
Press the button " " at an interval of
Fig.2
no longer than 2 seconds to make
sure that the highlighting switches
cyclically between the lines.
Then wait until the device
switches to the “B” mode (this will
happen in 2 seconds after the latest
pressing of the button " "), then
press the "–" button once. A long (1
sec) beep will sound. Press and hold
the button "+". The number in the
right part of the top line will be
Fig. 3
changing from 1 to 250, and then a
long beep will sound.
If you performed all the operations mentioned above in this item and
the device works as described, the device is ready to be used for therapy.
Otherwise, refer to the Chapter 8 (Troubleshooting).
5.5 Switch off the device using the switch button.
6 USING SCENAR-1-NT
6.1 Manipulate the device with one hand. Observe the indications on
the screen and beeping.
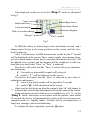
6.2 A chart of the device’s basic states is illustrated in the Fig. 4 (dotted lines mean that the Diagnostics mode is ON).
9
Oper_Manual_1-NT_ver_03
Version 1.2 of December 23, 2005
Energy setting / operation
no buttons
pressed within button
2 seconds
no buttons
pressed within
2 seconds
buttons "+","-"
Menu
button
Diagnostics
no buttons
pressed within
2 seconds
Fig.4
In the “B” mode the device will stimulate at the settings displayed
on the screen. After being switched on, the device is always in the “B”
mode. Use the "+" and "–" buttons to control the energy strength of
stimulation. Use the button to switch the device to the Menu mode.
In the Menu mode you can set any parameter except for the energy
strength. (For detailed description of the parameters see the items 6.10–
6.13). A current parameter is highlighted inversely. Use the "+" and "–"
buttons to change the current parameter’s value. Use the button to
move down the menu, use the "" button to move up the menu. If no
buttons are pressed within 2 seconds, the device will switch to the “B”
mode, or, if the diagnostic mode is on, the device will switch to the Diagnostics mode.
To activate the Diagnostics mode, set the “Diag” parameter to 1 in
the menu.
10
Oper_Manual_1-NT_ver_03
Version 1.2 of December 23, 2005
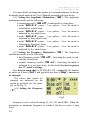
Fig. 5a
Fig. 5b
6.3 The device can display information on the screen in 3 possible directions: horizontal (Fig.5a), vertical for the right hand and vertical for the left
hand (Fig.5b). This may be convenient, for example, when operating with
the left and the right hands alternately. To rotate the image on the screen,
press the "" button in the “B” mode or in the Diagnostics mode.
6.4 There is a battery discharge indicator in the right upper corner of the
screen (for the horizontal location – in the right upper corner of the left half).
The degree of its infill shows the battery’s charge. If the indicator is blank,
remove all 3 batteries and install 3 new ones.
6.5 When switching on the device, the following values of the parameters are set:
the energy strength of the stimulating pulse is set to the minimum
setting (“1”);
diagnostics is switched off (“off”)
amplitude modulation is switched off (“off”)
frequency modulation is switched off (“off”)
intensity is set to the minimum setting (“1”)
pulse frequency is set to “60”Hz
Attention! To avoid painful sensations when treating the most
sensitive areas on the patient’s body, it is recommended that the
energy strength is decreased to minimum before the treatment by
pressing and holding the "–" button until a long beep sounds).
6.6 Set the energy strength to minimum and apply the electrode on
the skin on the zone to be treated. A short beep will sound indicating that
the electrode is contacting the skin. And the “●” symbol will be displayed
on the screen. Make sure that patient isn’t experiencing unpleasant sensations. Press and hold down the "+" button till the first signs like prick-
11
Oper_Manual_1-NT_ver_03
Version 1.2 of December 23, 2005
ing, light burning or vibrations appear. The intensity should be comfortable and not painful, but must be felt on the skin.
6.7 To start therapy, set the required mode. Then put the electrode on
the skin area to be treated (see the User Manual provided with your device).
6.8 To treat auricular zones and acupuncture points, connect the
point add-on probe to the jack 3. Touch any area of the body by the probe
to make sure of the contact. Hold the device in one hand, the add-on
probe – in another one. Wet the attached probe in water every time before
you treat the acupunctural points.
6.9 In the “B” mode the "+" and "–" buttons are used to control the
energy strength within the range 1 to 250 units. To control the energy
strength you can either press the buttons ‘step by step’ or press and hold
the appropriate button (which is faster, 16 steps per second). When the
energy strength reaches the value that cannot be further increased/decreased, the device will indicate it with a long beep.
6.10 Setting the Diagnostics mode. When “Diag off” is set (which is
indicated by a long beep), the Diagnostics mode is turned off, and the device
is operating in the continuous mode.
“Diag 1” (indicated by a short beep) activates the individually-dosed
mode (hereinafter – IDM) with the adaptive integral criterion of the stimulation termination (“Dose”) and integral criterion of achieving the null relative
dynamics (“Zero”).
After “Diag 1” has been selected (it is highlighted), if no buttons are
pressed within 2 seconds, the device will switch to the Diagnostics mode
(Fig.6).
Once the device detects that the electrode is contacting the patient’s skin, the
device will give a short low pitch signal
(“○” will change to “●” in the top line),
and in a second it will give a short high
pitch signal and the screen will display
(both digitally and graphically) the results measured over the first second (the
Fig.6
diagram will show reaction change with
time).
In the Diagnostics mode, pressing any button resets the timer
and measurements.
12
Oper_Manual_1-NT_ver_03
Version 1.2 of December 23, 2005
Data displayed on the screen for the “Diag 1” mode are illustrated
in Fig.7.
Timer
Initial reaction
Initial shape factor
Current shape factor
Current reaction
Reaction diagram
Rate of reaction change
“Dosage” symbol
“Zero” symbol
Fig.7
In IDM the values of initial shape factor and initial reaction won’t
change and will stay in the same positions on the screen until the electrode is taken up.
After 1 second more, in IDM measurement results for the 2nd second
will be displayed on the screen. Then, current results of measuring (time,
rate of reaction change, shape factor, reaction) illustrated in the Fig.7 will
be updated every second, and the diagram will be completed. It will continue this way until either “Dose” or “Zero” is achieved.
The device will notify that the “Dose” is achieved by two simultaneous indications:
2-second two-tone audible signal will be played
symbol “ * ” will be displayed on the screen.
The device will notify that the “Zero” is achieved by two other simultaneous indications:
series of low pitch sounds will be played for 2 seconds
symbol “@” will be displayed on the screen
Once you take the device up from the patient’s skin, “●” will change to
“○” in the top line, and all other information will stay the same on the screen.
If the automatic turn-off of the device is enabled (see p.6.17.1), in the
“Diag 1” mode, when there is no contact with the patient’s skin within
30 seconds, the device will automatically switch to the lowest power consumption mode (i.e. standby mode). And this will be accompanied by a
long beep, message, and screen darkening.
To resume the device operation, press the button.
13
Oper_Manual_1-NT_ver_03
Version 1.2 of December 23, 2005
For more detail on diagnostic modes see recommendations for the individually-dosed mode in the User’s Manual provided with your device.
6.11 Setting the Amplitude Modulation (“AM”). The amplitude
modulation modes are the following:
continuous mode (“AM off”) is indicated by a long beep
mode “AM=1:1”: pause – 1 sec, pulses – 1 sec, the mode is
indicated by a short beep
mode “AM=2:1”: pause – 1 sec, pulses – 2 sec, the mode is
indicated by two short beeps
mode “AM=3:1”: pause – 1 sec, pulses – 3 sec, the mode is
indicated by three short beeps
mode “AM=4:1”: pause – 1 sec, pulses – 4 sec, the mode is
indicated by four short beeps
mode “AM=5:1”: pause – 1 sec, pulses – 5 sec, the mode is
indicated by five short beeps.
6.12 Setting the Frequency Modulation (“FM”). The frequency
modulation modes are the following:
fixed frequency mode (“FM off”). Activating the mode is indicated by a short beep.
variable frequency mode (“FM on”). Activating the mode is
indicated by a two-tone beep. In this mode the device ignores
the “F” mode’s settings.
Also keep in mind that for SCENAR-1-NT, version 03, the number
of pulses in a burst (“Int”) and gap between them (“Gap”) can never
be changed.
The values that cannot be
changed are indicated on the
screen by asterisks (as, for example, in the Fig. 8).
6.14 Setting the Frequency
(“F”).
Fig.8
Frequency can be selected among 15, 60, 120, and 350Hz. When the
maximum or minimum frequency is reached, the device emits a long
beep.
14
Oper_Manual_1-NT_ver_03
Version 1.2 of December 23, 2005
6.14 To switch off the device, use the switch button on the front
panel. The settings are NOT SAVED after switching off.
6.15 To switch the device to the standby mode, press simultaneously
the buttons " " and "". To resume operation, press the button " ".
6.16 If the automatic turn-off is enabled (see p. 6.17.1), and when Diagnostics is OFF, and no buttons have been pressed within several minutes
(the time is set in the parameter “AOff” in the Service menu), the device
automatically switches to the standby mode. When Diagnostics is ON, the
device will automatically switch to the standby mode if there is no contact
with the patient’s skin for 30 seconds. In both cases the device saves all settings when its operation is resumed by the " " button.
6.17 The device has a Service menu. To enter the Service menu, press
the buttons “ ” and “+” simultaneously (Fig.9). The parameters of the Service menu are selected and set in the same way as in the device’s main Menu
(to select a parameter, use the buttons “ ” and “”, and to set the required
value, use the buttons “+” and “-”). When no buttons are pressed within 2
seconds, the device switches to the previous mode, and the value of the highlighted parameter is saved in the permanent memory of the device. If the
value has been changed, then a multitone beep will sound.
Fig. 9
6.17.1 The “AOff” parameter is the time to expire before the device
turns off automatically, when no buttons are pressed and no contact with
the patient’s skin has been detected within the time set in “AOff” (minutes). When the “AOff” is set to off, the automatic turn-off is disabled.
(Attention! This may cause faster battery exhaustion when you leave
the device switched on for a long time).
15
Oper_Manual_1-NT_ver_03
Version 1.2 of December 23, 2005
6.17.2 The “Lght” parameter is the time of screen backlighting for
the following events – pressing any button, achieving the “Dose” or
“Zero”, expiration of the first second of measuring in the Diagnostics
mode or expiration of every 30 seconds in the continuous mode.
6.17.3 The “Cont” parameter allows to control the picture contrast.
6.17.4 The “Save scr” parameter allows to change the direction of
the picture displayed on the screen and save it in the permanent memory
of the device.
6.17.5 The “Lng” parameter allows to select a language (two languages are available – Russian and English).
7 MAINTENANCE SERVICE
7.1 The device shall be serviced and repaired only by the manufacturer.
8 TROUBLESHOOTING
8.1 If the device is not operating properly, identify the problem and refer
to the following trouble shooting chart for suggested solutions as indicated in
the following Table 2.
Table 2.
Problem
Possible cause
Suggested solution
Some adjustments don’t Processor mal- Switch off the device, and in
work or after the battery is function.
5..10 sec switch it on. Check
replaced, the requirements
if the requirements of p.5.4
of 5.4 are not fulfilled.
are fulfilled.
After the device is switched The battery is Replace the batteries.
on, the picture on the LCD discharged.
periodically disappears or
is distorted.
8.2 Other malfunctions shall be repaired only by the manufacturer.
9 WARRANTY
9.1 The manufacturer guarantees that the device complies with this
document when operated properly.
9.2 Warranty period is 18 months from the date or purchase.
16
Oper_Manual_1-NT_ver_03
Version 1.2 of December 23, 2005
9.3 In case of malfunction during the warranty period the device with
this Operating Manual shall be returned to the manufacturer.
9.4 The warranty repair is not performed in case of device’s Operating Manual absence or seal violation.
9.5 The device is repaired at the expense of the owner in the following cases:
♦ the device was operated improperly
♦ the manufacturer’s seals are broken
♦ mechanical failure of the device
♦ the warranty period expired
10 TRANSPORTATION
10.1. The transportation of the devices to a customer is carried out by
all kinds of covered vehicles, except the plane compartments that have no
heating, at the air temperature from –50 to +50° C and relative humidity
not to exceed 80% at a temperature of 20° C, 60% at 40º C with a protection from a direct atmospheric precipitation.
10.2. After transportation at negative temperatures, the device should
be kept in the transport container under normal climatic conditions for not
less than 24 hours.
17
Oper_Manual_1-NT_ver_03
Version 1.2 of December 23, 2005
APPENDIX A
Fig А.1
Face probe
18
Fig А.2
Skull probe
Fig А.3
Point probe