1
User Manual
for Version 4.3
Revision: 1.6
Date of Change: 21.09.2013
Particulars relating to Copyrights and Brands
The information contained herein may be changed at any time without prior notification. Other than one printout for
personal use, no part of this document may be duplicated or made use of for any purpose without express written
permission by the K-iS Systemhaus consortium.
Copyright © 2005-2012 K-iS Systemhaus GmbH & Co. KG Germany, Copyright © 2008-2012
K-iS Systemhaus
GmbH (Switzerland). All rights reserved.
The product contains software that was developed by The Apache Software Foundation
(http://www.apache.org/).
Acknowledgement of Brands
steadyPRINT is a registered trademark of the K-iS Systemhaus consortium in Germany.
Microsoft, Microsoft Windows, Windows Media, Windows Server, Windows NT, Win32 and Active Directory are
brands or registered trademarks of the Microsoft Corporation in the United States and/or other countries.
Citrix, ICA (Independent Computing Architecture), Program Neighborhood and Citrix Online Plug-in are brands or
registered trademarks of Citrix Systems, Inc. in the United States and/or other countries.
Content
3
Table of Contents
Part I Welcome
6
Part II steadyPRINT in Overview
8
1 steadyPRINT's
...................................................................................................................................
Objective
8
2 Overview
................................................................................................................................... 8
3 The Technology
................................................................................................................................... 9
4 Features
................................................................................................................................... 10
Part III Installation
12
1 Installing
...................................................................................................................................
the Database
12
2 Installing
...................................................................................................................................
the Program Components
14
Com bined Installation
..........................................................................................................................................................
Steps
14
Com ponent Selection
..........................................................................................................................................................
for Installation
17
Com pleting the
..........................................................................................................................................................
Installation
19
Part IV steadyPRINT Center
22
1 Print ...................................................................................................................................
Server Administration
22
2 Assigning
...................................................................................................................................
Printers
24
3 Dashboard
...................................................................................................................................
and Monitoring
29
4 Taking
...................................................................................................................................
Inventory of Local Printers
30
5 Search
...................................................................................................................................
and Find
31
Part V steadyPRINT Reliability
34
1 The Backup
...................................................................................................................................
Print Server
34
2 Scenario:
...................................................................................................................................
Print Server Failure
36
3 Activating
...................................................................................................................................
the Master or Backup Print Server
38
4 Setting
...................................................................................................................................
Printers into Service Mode
39
Part VI Print Server Replication and Migration
42
1 View ................................................................................................................................... 42
2 Carrying
...................................................................................................................................
Out a Replication or Migration
45
3 User Migration
................................................................................................................................... 46
Part VII Settings
49
1 Agent-Profiles
................................................................................................................................... 49
2 Default
...................................................................................................................................
Printer Performance
50
3 Dashboard
...................................................................................................................................
and Monitoring
50
© 2013 K-iS Systemhaus Unternehmensgruppe
3
4
steadyPRINT User Manual
4 Performance-Profile
................................................................................................................................... 51
5 License
................................................................................................................................... 53
55
Part VIII User-Side Administration Options
Part IX Citrix Client Printer (Citrix Universal Printer
Driver) with steadyPRINT
58
Part X Support
61
Part XI Contact
63
Part XII Annex
65
1 Upgrade
...................................................................................................................................
to a Higher Version
65
© 2013 K-iS Systemhaus Unternehmensgruppe
Part
I
6
1
steadyPRINT User Manual
Welcome
The steadyPRINT team wishes you a warm welcome. With steadyPRINT, data loss due to printer
failure now belongs to the past. In the event of a print server failure, print jobs are redirected to a backup
print server by means of a centralized printer management system. This allows administrators to direct
their attention to the defective system without ruffle or excitement as users are able to continue printing
despite the failure. Not a single print job will be lost. Particularly when it comes to complex printing
environments, steadyPRINT is the ideal solution while also making an expensive cluster system
superfluous. In addition, further-reaching possibilities are put at your disposal when it comes to
overseeing your printers - as in job monitoring, for example.
This user manual introduces you to the basic installation process with its individual components as well
as to steadyPRINT’s mode of operation. It highlights the fundamental technology employed by
steadyPRINT together with its various functions. The following section provides some tips and
suggestions for the establishment and possible consolidation of your printer environment.
Information
Please read the accompanying readme.txt file before beginning with a
possible installation. It will provide additional topical information and
references concerning - in particular - the current version of
steadyPRINT.
Additional information is also available in the Internet at
www.steadyPRINT.com:
Registration option, to receive a regular newsletter, for example,
free downloads for test versions and individual components of
steadyPRINT,
current patches and hot-fixes with a listing of changes,
announcements and roadmaps for the steadyPRINT product line,
technical problem solutions,
frequently asked questions (FAQ).
© 2013 K-iS Systemhaus Unternehmensgruppe
Part
II
8
2
steadyPRINT User Manual
steadyPRINT in Overview
steadyPRINT is a software that simplifies the administration of printing environments and enhances
certain core functions. The benefit of using steadyPRINT increases with the complexity of the printing
environment in which it is deployed. Particularly in the terminal server domain, special challenges may
arise an administrator has to deal with.
2.1
steadyPRINT's Objective
steadyPRINT helps you to meet these challenges. The software enables comprehensive and central
printer management. You can directly access local user and Citrix (or Microsoft-based) terminal server
sessions. The aspect of session location remains transparent when it comes to the administration of the
printing environment.
With steadyPRINT‘s integrated reliability, the risk of a central failure point is reduced. In the event that a
print server is no longer available, the users’ printer connections are shifted to a backup server. In this
way, printer availability continues to be maintained for the users. The administrators can now calmly
concentrate on the problem at hand without encountering bottlenecks and unnecessarily stressful
situations.
To implement the points mentioned in a computerized environment, steadyPRINT has various
components at its command. More details will be given in the following subchapters Overview and The
Technology.
2.2
Overview
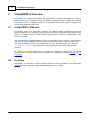
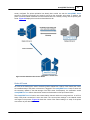
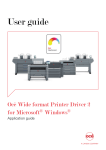
steadyPRINT is composed of several software components that are distributed in the environment.
Figure 1 illustrates a simplified overview of software distribution in a network.
© 2013 K-iS Systemhaus Unternehmensgruppe
steadyPRINT in Overview
9
Figure 1: Overview of the steadyPRINT Components
The master print server holds the printer shares. An additional print server monitors the master print
server and, in case of a failure, takes over this printer sharing responsibility. The servers and
workstations with their user sessions must ultimately administer steadyPRINT’s printing environments.
The administration takes place using network tools which communicate with the other components and
services.
2.3
The Technology
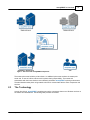
Among other things, steadyPRINT comprises two service components that run as Windows services on
the servers and workstations. The following table provides an overview:
© 2013 K-iS Systemhaus Unternehmensgruppe
10
steadyPRINT User Manual
Process/Service Installation Location
Description
steadyPRINT
Agent
Terminal Servers and
Workstations
Serves as printer administration on terminal servers
and workstations. The steadyPRINT Agent sets up
the printer connection according to the configuration
as predefined by the administrator and/or user.
steadyPRINT
Center
Print Servers
Serves as the central administration point of your
printing environment. Ideally, this is installed on
every print server.
steadyPRINT
Server
Master and Backup
Print Server
Serves as the central administration point of your
printing environment. Ideally, this is installed on
every print server.
steadyPRINT
Service
Terminal Servers and
Workstations
Service for the remote administration of the printing
environment.
Table 1: Overview of steadyPRINT Components
Additionally, a background process runs during every user session, which establishes a communication
channel to the steadyPRINT Service. A database on Microsoft SQL Server basis serves as data
storage. Using the free SQL Server Express version is also possible.
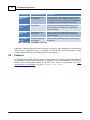
2.4
Features
steadyPRINT offers several necessary features for the management of a printing environment. Moreover,
the functionality of the Windows print servers is extended by many useful operations. You will find an
overview of the most important features in the most recent version of steadyPRINT under http://
www.steadyprint.com/download/ in the area Documentation > Key Features.
© 2013 K-iS Systemhaus Unternehmensgruppe
Part
III
12
3
steadyPRINT User Manual
Installation
To install steadyPRINT you will need the installation package. It is available for download in the
download area at www.steadyPRINT.com. Please note that it is absolutely necessary to back up your
data before beginning with the installation. Details will follow in Chapter Installing the Database.
System Requirements
The following requirements must be met in order to run steadyPRINT on client and server side:
At least one print server running Microsoft Windows Server 2003, 2008 or 2008R2 (32 or 64 bit),
Active Directory as of Microsoft Windows Server 2003,
Microsoft SQL data base as of version 2005 (the Express version is possible),
Client operating system as of Microsoft Windows XP Prof. (32 and 64 bit) as well as .NET
Framework 3.5 at least.
Important:
Upgrade Guide
Please consult the Upgrade Guide in chapter Upgrading to a higher version.
Backup the steadyPRINT Database before you upgrade in case it might
need to be restored due to an error!
3.1
Installing the Database
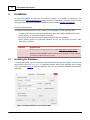
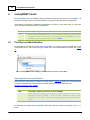
A running data storage system is absolutely indispensible when applying steadyPRINT. The set-up is
done with the help of the CreateSteadyDB application provided. Start up this application with a double
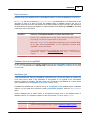
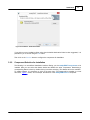
click. The following Figure 2 shows the application after start up with filled-in database and credential
information.
Figure 2: Installing the Database with CreateSteadyDB
© 2013 K-iS Systemhaus Unternehmensgruppe
Installation
13
Data Connection
Enter the name of the database server or the database instance on which the database is to be set up.
An SQL-Login with the corresponding System Administrator (sa) authorization on the SQL Server is also
necessary in order to be able to access the database server or database instance and set up a
database. Enter the user name and password in the fields provided. During this process pay attention to
the particularities of setting up a database on a Microsoft SQL Server Data Engine (MSDE) as described
in the annex of this user manual.
Important
Setting up a steadyPRINT Database as system administrator (sa)
Enter the user credential data of an SQL Server Administrator (sa) in order to
successfully conclude full implementation of the process.
Here, the CreateSteadyDB application expects the user credential data
of an SQL Server Administrator or an equivalent account with
"sysadmin" server role status.
You can find further details concerning this (technical back ground) at the
steadyPRINT website
www.steadyPRINT.com under
FAQ/Technical
Support.
Database Users for steadyPRINT
At this juncture, the entry of a separate database user for the steadyPRINT Database will be made
(PrinterMap). The entered user is automatically created and later necessary for Installing the Program
Components.
Installation Type
In the penultimate step, the type of installation is selected. Here, you have two options to choose from,
to be more precise, either a new installation of steadyPRINT or an upgrade of the steadyPRINT
Database currently in operation. The latter carries out a conversion of the database to a newer version
that is equivalent to the steadyPRINT Components currently in use.
Provided that a database has not yet been set up for steadyPRINT on the database server or database
instance, or if you would like to discard an existing steadyPRINT Database, select the New Installation
option.
Should a database from an earlier version of steadyPRINT already exist on the database server or
database instance, it is possible to update it to the current version. To do so, select Upgrade.
Important
Upgrade Guide
Please read the Upgrade Guide in Chapter Upgrade to a Higher Version.
© 2013 K-iS Systemhaus Unternehmensgruppe
14
steadyPRINT User Manual
Selecting the Version
Select here the version of steadyPRINT you would like to install. In case no current indication of the
version number is visible in the CreateSteadyDB Tool, select the highest version number that is available
for selection.
Starting the Database Installation
After the necessary entries have been made, you can initiate the creation of the database with a click to
the Install button.
3.2
Installing the Program Components
In this chapter we are going to address the various installation procedures for steadyPRINT
Components – both on client and on server side. The following components are available to choose
from:
Client
Management
Server
All three installation types will be shown and described using step-by-step instructions in the following
subchapters.
Important
Installing server roles for print servers
Installing steadyPRINT Server components makes it necessary to have the
"Print Server" role installed on a Windows server (the designation can vary
depending on the Windows server versions being used).
Note
Program components
The installation of the program components for workstations, clients and the
servers, as well as for management components, takes place by starting the
installation using the accompanying MSI package steadyPRINT.msi.
Tip
Installation location for the management components
The steadyPRINT team recommends that the management components be
installed on the corresponding print server.
3.2.1
Combined Installation Steps
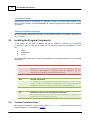
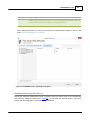
After starting the installation routine, you will see the welcome screen with the words “Welcome to the
InstallShield Wizard for steadyPRINT,“ Figure 3.
© 2013 K-iS Systemhaus Unternehmensgruppe
Installation
15
Figure 3: Installation - The Welcom e Screen
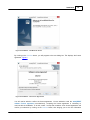
By clicking on the Continue button, you will progress to the next dialog box. This displays the license
agreement, Figure 4.
Figure 4: Installation - The License Agreem ent
You will now be asked to confirm the license agreement. You are advised to read the steadyPRINT
software license agreement conscientiously. Accepting the license agreement is necessary to
continue with the installation. To do this, select “I accept the conditions of the license agreement“ and
confirm your selection by clicking on the Continue button, thus bringing you to the user information
© 2013 K-iS Systemhaus Unternehmensgruppe
16
steadyPRINT User Manual
particulars.
By declining to accept the license agreement, the installation routine ends.
Important
Accepting the license agreement
In order to install the steadyPRINT program components you must agree to the
software license contract. The installation cannot continue should you
decide not to accept the license agreement.
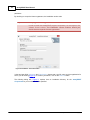
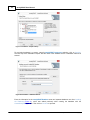
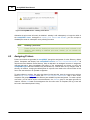
Figure 5: Installation - User Inform ation
In the two input fields User Name and Organization, please enter your full name and the organization for
which you are working (Figure 5). To confirm your entries, click on the Continue button.
The following dialog box, Figure 6, requires that an installation directory for the steadyPRINT
Components on your local hard drive be specified.
© 2013 K-iS Systemhaus Unternehmensgruppe
Installation
17
Figure 6: Installation - Destination Folder
If you wish to use an installation folder other than the default destination folder location suggested, it is
possible for you to do this using the Edit button.
Then click on the Continue button to configure the components for installation.
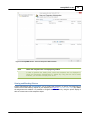
3.2.2
Component Selection for Installation
The following is a user-defined installation interface offering you the steadyPRINT Components to be
installed. Here you can select the feature desired and disable the other components. Deselecting a
corresponding feature is done by double-clicking it and then selecting “This feature will not be available.”
To enable a feature, it is necessary to click on the menu item “This feature will be installed on a local
hard drive.” Figure 7 shows, as an example, the selection of the steadyPRINT Server component.
© 2013 K-iS Systemhaus Unternehmensgruppe
18
steadyPRINT User Manual
Figure 7: Installation – Adapted Setup
To conclude the adapted - or custom - setup for steadyPRINT Component selection, click on Continue.
The next step of the installation requires that the name of the database server or database instance be
entered.
Figure 8: Installation – Database Server
Enter the information for the steadyPRINT Database server and separate database user from Installing
the Database (Figure 8), which was added previously while creating the database with the
CreateSteadyDB application. Then click on Continue to proceed.
© 2013 K-iS Systemhaus Unternehmensgruppe
Installation
19
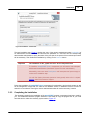
Figure 9: Installation - Credentials
The next installation step, Figure 9, requires the entry of the domain authentication data (credentials) of
an administrator account. For this, the name and the password of a user who has the corresponding
administrative authorization to query the status of the print jobs in the queue of the monitored print server
will be necessary. Then finalize the installation by clicking on the Continue button.
Important
The installation of the „system account“ server components fails
To install the steadyPRINT Server components you will need to have adequate
administrative authorization (Catchword: System account authorization).
Alternatively, enter user name localsystem and leave password space empty to
continue this installation step.
You will find further information (technical back ground) about this in chapter
Support under FAQ/Technical Support.
During the installation of steadyPRINT Agent components for workstations and terminal servers as well
as for management components, the name of the database servers or database instance will also be
asked for once selected. Entering the domain authentication data will not be necessary, however.
3.2.3
Completing the Installation
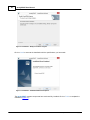
The necessary entries for the installation of the steadyPRINT program components have been made by
you. The InstallShield Wizard’s program assistant is now ready to copy the program files to your local
hard drive and to make the necessary system entries, Figure 10.
© 2013 K-iS Systemhaus Unternehmensgruppe
20
steadyPRINT User Manual
Figure 10: Installation - Ready to Install the Program
Click on Install to execute the installation with the specifications you have made.
Figure 11: Installation - InstallShield Wizard Com pleted
The steadyPRINT program components have now been fully installed. Click on Finish to complete the
installation (Figure 11).
© 2013 K-iS Systemhaus Unternehmensgruppe
Part
IV
22
4
steadyPRINT User Manual
steadyPRINT Center
The steadyPRINT Center is available to help you administer the printer environment in steadyPRINT. All
functions necessary for the central administration of your printers have been brought together here.
The following will explain the individual program steps to be taken for the initial setup of a new print
server using the administrative tools in steadyPRINT.
Note
License necessary
When starting steadyPRINT Center, the license will be verified. At least one Test
or Express License is necessary in order to work with steadyPRINT. For more
information concerning licensing, see section License.
4.1
Print Server Administration
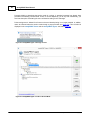
To administer print servers and printers with steadyPRINT, it is necessary to first integrate them in the
steadyPRINT Center. This is done using the context menu at the administrative tool’s tree view, Figure
12.
Figure 12: steadyPRINT Center – Setting up a New Print Server w ith the Context Menu
Importing Print Servers and Printers
Now the name of a print server is entered in the window seen in Figure 13 allowing its connected printers
to be listed. Disabled print servers can be re-enabled here by entering the name (also see
Disabling and Deleting Print Servers).
Note
Importing a disabled print server from the database
Please note when importing that all existing printer assignments remain set to
disabled ("lock ed") by default in order to avoid accidentally making printer
connections to the clients. Otherwise, these assignments would have a direct
impact.
To administer your printers with steadyPRINT, select them and then continue by clicking on the Import
button.
© 2013 K-iS Systemhaus Unternehmensgruppe
steadyPRINT Center
Tip
23
Organizing printers in folders
Organize your printer environment in a clearly arranged folder structure. This can
be done either by following or directly during printer import.
After completing this action, the new print server with the selected printers appears in the tree view
under Printer Administration > Print Server.
Figure 13: steadyPRINT Center – Importing a Print Server
Disabling and Deleting Print Servers
Removing a previously imported print server is possible using the context menu of the corresponding
print server. By adding the check mark in Figure 14, you will erase the selected system - with all its
printers and their assignments - irrevocably from the database.
© 2013 K-iS Systemhaus Unternehmensgruppe
24
steadyPRINT User Manual
Figure 14: steadyPRINT Center – Deleting a Print Server
Otherwise the print server will merely be disabled - whereby it will subsequently no longer be visible in
the steadyPRINT Center. Analogous to Importing Print Servers and Printers, you can re-import a
disabled print server for subsequent use by entering the name.
Note:
Disabling a print server
Please note that only one disabled print server with the same name is allowed in the
database. After disabling an additional print server, however, you can overwrite the
existing one.
4.2
Assigning Printers
Printer connections are generated in steadyPRINT through the assignment of Active Directory objects
(Users, Computers and Groups) from steadyPRINT Center’s User and Computer-Administration. All
objects stem from Windows‘ Active Directory, which is depicted in an analogous structure. If assignment
changes take place, these immediately take effect on the workstations and clients on which the
steadyPRINT Agent has been installed. They are notified on a continual basis of any changes made. In
this way, for instance, changing the default printer for a specific user leads to the communication of this
fact to the user and also to an updated configuration.
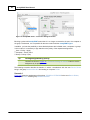
To assign objects to a printer, first select the printer from the tree view, open the context menu and then
select Assign Printer. Figure 15 shows the User and Computer Administration view in which users,
computers and groups from your Active Directory are available for printer assignment. To create a printer
connection, you can add an object to be administered – the Webinar group on the upper right side, for
instance - with the Add button to the assignment list. Once this action is completed, the log in item will
be found in the selected printer’s listing.
© 2013 K-iS Systemhaus Unternehmensgruppe
steadyPRINT Center
25
Figure 15: steadyPRINT Center - User and Com puter Adm inistration
Note
Users and computers are not displayed by default
In order to optimize the loading time, users and computers are not displayed in
Users and Computers Administration by default. By using the two check marks
available, you can elect to display them or not.
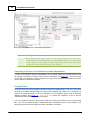
Sharing and Blocking Printers
Printers administered with steadyPRINT can be shared and blocked in a precise, fine-tuned way by
means of the Active Directory objects at your disposal (see Figure 16 – the first check mark). By default,
all assignments are enabled. It is possible to configure the share either by using the printer display or
with the context menu of the respective object.
© 2013 K-iS Systemhaus Unternehmensgruppe
26
steadyPRINT User Manual
Figure 16: steadyPRINT Center – Connection Settings for Printer
Blocking a printer with steadyPRINT means that it is no longer connected to the user, the computer or
the group. Furthermore, it is not possible for the user to add it with the steadyPRINT Agent.
In addition, you have the possibility to share blocked printers with individual users, computers or groups.
In this context, it is necessary to pay attention to the priority of the respective assignments:
User = Priority 1 (high),
Computer = Priority 2 and
Group = Priority 3 (low).
Tip
Sorting assignments by priority
Use the first column of Figure 16 - Connection Settings for Printer in order to sort the
assignment by its priority.
The following scenarios describe the behavior in various constellations with the user Dennis Richter
being in the group Domänen-Benutzer and working on computer PC001.
Scenario 1
Figure 16a shows the assignments of the printer TOSHIBA e-STUDIO853 for the user Dennis Richter,
the computer PC001 and the group Domänen-Benutzer.
© 2013 K-iS Systemhaus Unternehmensgruppe
steadyPRINT Center
27
Figure 16a: steadyPRINT Center - Scenario 1 for Assignm ent
Scenario 2
Figure 16b shows the assignment of the printer TOSHIBA e-STUDIO853 for the user Dennis Richter and
the computer PC001. This printer is not available to the other users of the group Domänen-Benutzer.
Figure 16b: steadyPRINT Center - Scenario 2 for Assignm ent
Scenario 3
Figure 16c shows the assignment of the printer TOSHIBA e-STUDIO853 for the group DomänenBenutzer. The user Dennis Richter as well as all other users working on computer PC001, have not
acces to the printer.
© 2013 K-iS Systemhaus Unternehmensgruppe
28
steadyPRINT User Manual
Figure 16c: steadyPRINT Center - Scenario 3 for Assignm ent
Tip
Deleting manually created printer connections
Using Settings under Agent Profile, you can select whether or not the printer
connections not being administered by the steadyPRINT Agent are to be deleted at
startup. With this, it is possible to automatically remove printers that were added
manually by the user with the Windows printer directory.
Connecting to Printers on Terminal Servers and/or Workstations
For every Active Directory object in steadyPRINT, you can decide whether the assigned printer should
be specially connected to a terminal server and/or a workstation (see Figure 16 – second and third
check mark). This allows the creation of distinct and varying kinds of printer connections for the user’s
local as well as terminal server sessions.
Setting IP Filters
An IP filter allows the making available of printers for selected IP address areas. If the user’s client does
not have an IP address that falls within the range of the configured filter, neither can a connection be
made to the respective printer nor will it be displayed in the steadyPRINT Agent. Only an optionally
definable exception (see Figure 16 – fourth check mark) allows the suspension of the IP filter for
individual login items (users, computers and groups).
You can configure IP filtering for print servers, folders and printers (accessible over the corresponding
tab settings of the respective view). Established IP filters automatically pass on their settings to the
objects lying below until these objects are either overwritten or rescinded.
© 2013 K-iS Systemhaus Unternehmensgruppe
steadyPRINT Center
Tip
29
Location-based printer assignments
Display your business locations in steadyPRINT Center in the form of folders
and define their respective IP address areas. On the basis of IP filters, you then
let the printers be displayed and connected based upon their location.
Setting Default Printers
Setting the default printer is done over the properties of the respective login item and is possible for
users, computers and groups. Additionally, steadyPRINT offers the possibility of defining a default
printer for folders and print servers (accessible over the respective tab Settings of the respective view).
It is possible to define several default printers for every login item. If this is the case, a selection dialog
box automatically appears for the user. The user can then select a particular default printer from among
the defined printers.
Important
Observe the settings for default printer performance
Observe the setting possibilities for default printer performance in order to attain
the desired configuration.
You can find additional information about this in chapter Default Printer
Performance.
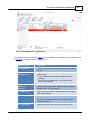
4.3
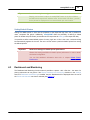
Dashboard and Monitoring
The Dashboard and Monitoring function makes it possible to capture - with a flat view - the state of a
printing environment at one glance. If the Display Dashboard and Monitoring checkbox in the Settings
section of Dashboard and Monitoring is enabled, then the Dashboard will be displayed when the root of
the Printer Administration tree view is selected (see Figure 17).
© 2013 K-iS Systemhaus Unternehmensgruppe
30
steadyPRINT User Manual
Figure 17: steadyPRINT Center - Dashboard
Using the Dashboard and Monitoring functionality requires the installation of the steadyPRINT Server
component on print servers, which keep printers administered by steadyPRINT on stand-by.
Additionally, these print servers must be added to the Printer Administration tree view, must not be
disabled, and the printers to be monitored must already be imported into steadyPRINT. The
steadyPRINT Server component is responsible for the monitoring - or recording - as well as storage of
printer statuses in the database.
The monitoring or recording of printer statuses can be disabled for the respective print server or printer. If
the monitoring or recording of printer statuses is disabled for a print server, this will also lead to the
monitoring deactivation for all the printers administered with steadyPRINT for this print server.
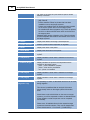
The Dashboard primarily displays errors and warnings. Additional, more detailed, information is shown
over the Display Details. The errors and warnings to be displayed can be selected using a filter at the
upper edge of the Dashboard.
Note
Printer errors and warnings
The availability and interpretation of printer errors and warning information depend
upon the respective printer drivers. Therefore, steadyPRINT is not able to provide
reliable information for some printers.
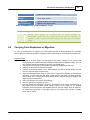
4.4
Taking Inventory of Local Printers
Taking inventory allows you to have a comprehensive view of the local printers connected to clients.
These include printers which have been connected per USB or LPT interface. Currently excluded here
are thin clients.
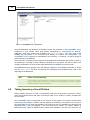
The steadyPRINT Agent is responsible for the inclusion of the printers. The inventory process takes
place every time the Agent is started. After the gathering of information, local printers can be found in
the steadyPRINT Center under the separate Local Printer tree node. To guarantee this overview of the
respective printers, they are assigned to the client and the IP network. The network address is
determined by the client’s IP address and the subnet mask available. If the client has more than one
© 2013 K-iS Systemhaus Unternehmensgruppe
steadyPRINT Center
31
network adapter and IP address, the steadyPRINT Agent creates a separate entry for every network.
Additional information like logged on users and other diverse details can be found under the detail view of
the respective device (please see Figure 18: steadyPRINT Center – Local Printers).
Figure 18: steadyPRINT Center – Local Printers
To enable the inventory process for local printers, the “include local printers connected to the client and
save in the database” setting must be enabled under Settings > Dashboard and Monitoring in the
steadyPRINT Center. You can also set the maximum data storage size and configure a display filter for
the steadyPRINT Center here. Add the printers to the filter that you wish to mask out.
Note
Clients without printer
To ensure a better overview, clients without printers are not displayed by the
steadyPRINT Center in the tree node.
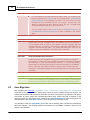
4.5
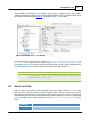
Search and Find
There are many search buttons in the steadyPRINT Center with identical functions. You can simply
search for terms or perform a wildcard, positive or negative search. With this, objects can be quickly
and effectively selected from their Active Directory Structure and print environment. The search itself is
performed within the respective object description and its visible properties (e.g. columns or tooltip-texts)
in the steadyPRINT Center. Some examples for the view User and Computer Management are given
below.
Search term
Description
PC
Selects all Active Directory Objects whose object name is "PC" or
© 2013 K-iS Systemhaus Unternehmensgruppe
32
steadyPRINT User Manual
where the term "PC" appears in one of the visible properties (search
for whole words only).
PC*
Selects all Active Directory Objects whose object name or one of the
visible properties start with “PC”.
*PC
Selects all Active Directory Objects whose object name or one of the
visible properties end in “PC”.
*PC*
Selects all Active Directory Objects whose object name or one of the
visible properties contain the term "PC".
!PC
Selects all Active Directory Objects whose object name or one of the
visible properties do not contain the term “PC” .
!PC*
Selects all Active Directory Objects whose object name or one of the
visible properties do not start with „PC“.
!*PC
Selects all Active Directory Objects whose object name or one of the
visible properties do not end in „PC.
It should be noted that the column Active Directory Path is excluded from the search within the view
User and Computer Management as this would lead to undesirable results e. g. with the terms „cn“,
„ou“, „dc“, „=“. Figure 19: steadyPRINT – Search for AD-objects ending in "pc" visualizes again the
search for Active Directory Objects whose names end in „pc“.
Figure 19: steadyPRINT – Search for AD-objects ending in "pc"
© 2013 K-iS Systemhaus Unternehmensgruppe
Part
V
34
5
steadyPRINT User Manual
steadyPRINT Reliability
steadyPRINT offers failure security for your printing environment. This means that should a print server
failure occur a backup system can take over for the duration of the failure. The user-side printer
connections run over the second system up to the time that the responsible administrator puts the
primary print server (referred to as the Master Print Server below) back into operation.
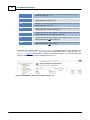
5.1
The Backup Print Server
The backup print server constitutes an exact copy of the first print server for steadyPRINT. With the help
of the steadyPRINT Center, you port the existing network printers from the master to the backup print
server. It is possible to consign a backup print server for every master print server in the steadyPRINT
Center.
Specifying a New Backup Print Server
In the settings section of the respective print server (Settings tab) you can specify the desired server.
With the takeover of the backup print server, the registered server is saved in the database. The
steadyPRINT Center checks if the steadyPRINT monitoring service is installed and active on this server.
A comparison of the installed network printers also takes place. In the event that a network printer is
missing on the backup server, a status window points out this circumstance. In this case, it is
absolutely necessary to commence with a manual printer replication of the servers in the steadyPRINT
Center. Otherwise, smooth running operations of the backup print server with all printer connections
cannot be guaranteed.
Note
Activating RPC
For replicating the printers to the backup print server, it is necessary that the Allow
Print Spooler to accept client connections policy permits access.
The following entry in the Windows Registry should have the 1:
GPO: Allow Print Spooler to accept client connections
Key: HKLM\Software\Policies\Microsoft\Windows NT\Printers
Value: RegisterSpoolerRemoteRpcEndPoint (REG_DWORD)
Access should nevertheless be allowed by default, whereby a subsequent
activation will not be necessary.
Specifying Script Files
Under the print server settings (Settings tab), it is possible for you to deposit script files for the installed
print servers in the SteadyPRINT Center, which are configurable for a print server swap from master to
backup print server or vice versa (see Figure 20).
When specifying a script file for a print server, the set script is saved in the steadyPRINT Database. As
long as the script is not disabled in the steadyPRINT Center, it will be called up from the steadyPRINT
Database and executed one time during the next print server change by the steadyPRINT Service on
the respective system – this can also be a terminal server or workstation.
Should interaction between the script and the Windows user interface (Windows GUI) be necessary, an
© 2013 K-iS Systemhaus Unternehmensgruppe
steadyPRINT Reliability
35
adjustment to the steadyPRINT Service on the respective system will be needed to ensure the script is
properly executed. To this end, please see the reference at the end of the text passage.
Figure 20: steadyPRINT Center – Specifying Script Files
Note
Adjusting the steadyPRINT Service for interaction with the Windows GUI
For data exchange between service and desktop during script execution, it is
necessary that the service be configured for access.
The following entry under the service properties area of the steadyPRINT Service
needs to be enabled:
Datenaustausch zwischen Dienst und Desktop zulassen.
Access is not allowed by default, thus making a subsequent activation
necessary.
Email Notification
This option allows you to add email addresses which will be used for notification purposes in the event of
a print server failure. These notifications will only be sent during the swap from master to backup print
server.
Print Server Replication
Change to Replicating a Print Server in the detail view using the Printer Replication tab (see Figure 21:
steadyPRINT Center – Print Server Repliation).There you will have an overview of all master and backup
print server printers as well as the necessary replications.
© 2013 K-iS Systemhaus Unternehmensgruppe
36
steadyPRINT User Manual
Figure 21: steadyPRINT Center – Printer Replication
The various network printers seen in the steadyPRINT Center view are marked with different colors. Red
means that the printer on the target system is not available. Green, on the other hand, represents a
printer that has already been installed on the target system.
Note
See details
Highlight an entry in the list to have more information displayed about a printer in
the lower area. You can also hover the mouse pointer above the respective control
element to get additional information.
To ensure reliability with steadyPRINT, print server replication is absolutely necessary and must be
carried out successfully. A complete replication is distinguishable by the circumstance that all printers
have been provided with a green symbol. Keep reading under Print Server Replication and Migration to
get more detailed information about the respective control elements used in the Replication View.
5.2
Scenario: Print Server Failure
Should steadyPRINT determine the failure of the master print server, a specific series of actions will
then be carried out in order to swap the printer connections to the backup print server.
Initial Situation
Your master print server (primary print server) has a steadyPRINT backup print server (secondary print
© 2013 K-iS Systemhaus Unternehmensgruppe
steadyPRINT Reliability
37
server) configured. The printer replication has already been carried out and the steadyPRINT Server
service for monitoring the primary print server is running on the secondary print server. In addition, the
printer connections were created for the user sessions which are currently running over the primary print
server. Figure 22 displays the scenario as described thus far.
Figure 22: Initial Situation before Printer Failure
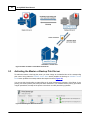
Order of Events
As soon as the backup print server’s monitoring service determines a failure of the master print server,
an immediate swap of the printer connections is triggered. The steadyPRINT Server service carries out
the necessary updates in the data storage of the SQL server. Subsequently, the notification service
steadyPRINT Service informs the terminal servers and workstations of the print server failure.
The steadyPRINT Service has its own communication channels within the running sessions. A call for a
swap of the printer connections is sent over these. The current printer settings in the network remain
unchanged in the process. Figure 23 shows the course of the events leading to a swap of the printer
connections as just described.
© 2013 K-iS Systemhaus Unternehmensgruppe
38
steadyPRINT User Manual
Figure 23: After the Failure of the Master Print Server
5.3
Activating the Master or Backup Print Server
To enable the master or backup print server you must change to the detailed view of the corresponding
print server. Using either the ENABLE Service Mode button (enables the backup) or DISABLE Service
Mode button (enables the master) enables the respective server (Figure 24).
You can use this function after a system failure or for server maintenance purposes. If the failure of your
primary print server (master print server) has been redressed in your network and the primary print server
is again operational, the swap of the printer connections can take place during operation.
Figure 24: Activating the Master Print Server
© 2013 K-iS Systemhaus Unternehmensgruppe
steadyPRINT Reliability
5.4
39
Setting Printers into Service Mode
steadyPRINT has the capability of setting printers in service mode for carrying out maintenance work,
for instance. To do this, proceed as follows:
You can move a particular printer to service mode by using either the mouse context menu or the
“Activate” button in the printer’s detail view (the area on the right), see Figure 25: steadyPRINT Center –
Activating the Service Mode for Printers.
Figure 25a: steadyPRINT Center - enable maintenance mode for the printer
Figure 25b: steadyPRINT Center - enable maintenance mode for the printer
© 2013 K-iS Systemhaus Unternehmensgruppe
40
steadyPRINT User Manual
Proceed similarly to deactivate the service mode for a printer. A standard message has already been
provided in the following “Service Mode” screen. It can be adapted by you at any time. Additionally, you
also have the option of activating the user confirmation setting for this message.
Printer assignment is deleted for all users so that accidental printing is no longer possible. In addition,
users are informed about the service mode through a pop-up window (see figure 26). This will also be
displayed in the steadyPRINT Center and the steadyPRINT Agent, see related figure 27.
Figure 26: steadyPRINT Agent – Message for User
Figure 27: steadyPRINT Agent – Printer in Service Mode
© 2013 K-iS Systemhaus Unternehmensgruppe
Part
VI
42
6
steadyPRINT User Manual
Print Server Replication and Migration
steadyPRINT provides replication and migration functions to copy printers from a source to a target print
server. The former allows simple copying of the printers to another print server with the same operating
system. Migration, on the other hand, provides additional options. These make it possible to copy
printers between different operating systems, for instance from Windows Server 2003 to Windows Server
2008 R2.
For both functions, steadyPRINT copies the given port, the print processors (1), the drivers (2) and the
settings (3) for the selected printer and then installs the printer on the target system.
Print Server Replication and Migration can be accessed over the respective print server view in the
steadyPRINT Center. A separate screen with which the various processes are executed opens for each
function.
Figure 28: steadyPRINT Center – Selection Print Server Replication and Migration
Alongside print server migration, steadyPRINT also allows you to migrate users to the new print server.
Read more under User Migration.
Note
Declaring the backup print server
A backup print server is necessary for replication and migration and must be declared
in the steadyPRINT Center. Proceed as described in The Backup Print Server.
6.1
View
Basically, the same components can be found in both the replication and migration screens. The
following explanation will be in reference to the migration view as it also contains special supplementary
operations in addition to the standard ones. References will be made at the appropriate junctions as to
which functions will not be available in the replication screen.
© 2013 K-iS Systemhaus Unternehmensgruppe
Print Server Replication and Migration
43
Figure 29: steadyPRINT Center – Migration View
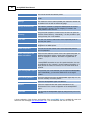
First please find below a legend (see table 2) with an explanation of the individual control elements found
in Figure 29: steadyPRINT Center – Migration View.
Control element
Description
1 – Refresh View
Loads the necessary data from the print server and refreshes
the view.
2 – Perform Analysis
(migration only)
Analyzes the printers for migration and highlights them with
various colors:
- Orange: Different driver versions on target and source
systems.
- Red: No matching printer driver - with regard to name found on both systems.
3 – Start
Replication/
Migration
Starts the replication or migration process. This can last
several minutes or even hours, depending on the number of
printers, drivers, etc. to be copied.
4 – Install Drivers
Opens the dialog screen to install an additional printer driver
(only possible locally).
5 – Source System
Displays the name and the version of the source system.
Tip: Click on the name of a print server to open a remote
desktop connection.
6 – Target System
© 2013 K-iS Systemhaus Unternehmensgruppe
Displays the name and the version of the target system.
44
steadyPRINT User Manual
Tip: Click on the name of a print server to open a remote
desktop connection. .
7 – Filters
Filters for the printer displays:
- [Off]: Filter off
- Printers installed: Filters for printers that have been
installed on source and target systems.
- Printers not installed: Filters for printers that are installed
on the source system but not on the target system.
- No suitable driver found (migration only): Filters for printers
for which no drivers with the same name can be found on
the target system.
Disparate driver versions (migration only): Filters for printers
for which disparate driver versions are located on the source
and target systems.
8 – Details
Displays the details concerning a selected printer.
a – Printer Selection
Selects a printer for either replication or migration.
b – Name
Displays the name of the printer.
c – Driver Name
Displays the driver name of the printer.
d – x86 (Source)
Displays whether a 32-bit driver is installed on the source
system.
e – x64 (Source)
Displays whether a 64-bit driver is installed on the source
system.
f – Installed (target)
Displays whether the printer and its dependencies are
installed on the target system:
- green – printer installation complete
- yellow – driver and/or port different
- red – printer not installedt
g – x86 (Target)
Displays whether a 32-bit driver is installed on the target
system.
h – x64 (Target)
Displays whether a 64-bit driver is installed on the target
system.
i – Alternative Drivers
(migration only)
The possibility to select an alternative driver that can be used
during migration.
This column is predefined after an analysis if the same
printer already exists on the target system with another
driver.
Should there not be a 64-bit driver on the source or target
systems, you will be requested to select an alternative driver
for the migration so that the process can be completed
successfully.
Please note: All available drivers for the respective target
system are listed for selection. They can be viewed under
Printer Administration > Print Server > [COMPUTER] >
© 2013 K-iS Systemhaus Unternehmensgruppe
Print Server Replication and Migration
45
Drivers on the Windows Print Server.
j – Applying Default
Settings
Indicates whether the printer's default settings can be applied
on the target system.
k – Applying
Advanced Settings
Indicates whether the printer's advanced settings can be
applied on the target system.
Table 2: steadyPRINT Center - Replication/Migration Legend
Note
Application of Modified Printer Settings
Modified printer settings are recognized but not visually displayed by
steadyPRINT. Simply select the required printer and carry out replication or
migration, in order to apply the modified settings from the source to the target
system.
6.2
Carrying Out a Replication or Migration
To carry out a replication or a migration of a printer please proceed as described below. It is important
here to define the replication/migration configuration that will eventually be used during the said process.
Execution Steps
0. Querying of the print servers and displaying of the printers available on the source print
server (carried out automatically when opening the Replication and Migration View). You can
also manually execute and repeat this process over Update View.
1. Carrying out of an analysis for the migration (available in the Migration View only).
2. Selection of the printers to replicate or migrate.
3. Selection of the printer drivers to use. Select whether you wish to use the drivers from the
source or from the target for the process.
4. Select an alternative printer driver for the process, if applicable, (available in the Migration
View only). This will stem from the target system and be used when installing the printer
there. Please note: To display and use the desired drivers, they will need to be added to the
target print server beforehand.
5. Select the takeover of the printer driver settings.
6. Start the replication or migration process.
7. Optional: Repeat the replication or migration, if necessary. Under certain circumstances, it
can happen that the Windows printer spooler needs time to gather all the updated
information for the new printers now available and thus does not display them as expected.
Tip: Restart the print spooler on the target system or on the print server. Usually an update
of the view will suffice.
© 2013 K-iS Systemhaus Unternehmensgruppe
46
steadyPRINT User Manual
Important
Migrating from Windows Server 2003 to 2008
For most migrations from Windows Server 2003 to 2008, it is necessary that
the print processor file localspl.dll lies in the shared folder \\[COMPUTER]
\prnproc$\w32x86\ on the migrating print server. If an error occurs, the error
message will look somewhat like this, for example: "Internal error. The
attempt to add print processor WinPrint failed. The file "\\chd-w2k3-x86
\prnproc$\w32x86\localspl.dll\" could not be found."
You can simply copy the file localspl.dll from C:\WINDOWS\system32 to
C:\WINDOWS\system32\spool\prtprocs to make it available in the shared
folder.
Important
Using Incompatible Printer Drivers
Please make sure that compatible drivers are available and used for migration. If
an incompatible driver is used for the migration, the error message will look
something like this, for example: "The attempt to add printer IBM 2380 Plus to
computer chd-w2k3-x86 has failed - the printer IBM 2380 Plus could not be
installed on print server BOREAS: The printer driver is unknown".
Important
Using Incompatible Print Processors
Please make sure that compatible print processors are used for the migration.
The attempt to migrate “old” and incompatible processors will lead to the following
error message: „[…] The print processing is unknown […].“ To solve the problem,
please select the print processor winprint on the source system for the affected
printers. After that, the migration should run through. After successful process
completion, a subsequent adjustment of the print processor on the target system
is possible.
Note
The Print Server's Operating System is not Shown in the Display
For the correct display of the operating system in the display of the respective
views it must be ensured that WMI queries are allowed on the affected systems.
6.3
User Migration
User migration (see Figure 28: steadyPRINT Center – Selection Print Server Replication and Migration)
is possible at any time provided a backup print server has been installed. During this process, the
master print server becomes the backup server and vice versa. Consequently, the migration of all printer
connections for users, groups and computers also takes place. Please note that a migration of the
assignments will only function for those present in the steadyPRINT Database. After the migration has
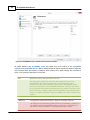
been executed in the steadyPRINT Center, it will be necessary to restart the clients.
It is possible to have the steadyPRINT Agent take over all existing printer connections automatically
before the migration. The following explains the procedure for all available connections which are not
present in the database:
© 2013 K-iS Systemhaus Unternehmensgruppe
Print Server Replication and Migration
47
1. First import to the steadyPRINT Center the desired print servers with all available printers to add
these to the steadyPRINT Database. Please note that the steadyPRINT Agent only recognizes
the connections to the respective printers that also exist in steadyPRINT
2. Then enable the “recognize printer connections added manually in Windows and automatically
map to a user in steadyPRINT“ option under Settings > Printer Connections in the steadyPRINT
Center.
3. Make sure to disable the “delete network printer connections not administered by steadyPRINT at
Agent startup“ option under Settings > Printer Connections in the steadyPRINT Center.
Otherwise steadyPRINT will get rid of these, making a subsequent acquisition no longer
possible.
4. Configured in this way, the steadyPRINT Agent acquires all printer connections at start up and
adds these to the database.
Please note: Automatically generated printer connections for the respective printers are always
found directly below the print server in the steadyPRINT Center.
Important
Printer Availability on Master and Backup Print Server
It is necessary to ensure the availability of all printers on both print servers
beforehand in order to guarantee a smooth transition.
Important
Printer Driver Integrity
Please note that after migration the printer drivers stem from another print
server and may thus need to be reinstalled for printer connection
generation.
This circumstance can be corrected by activating the administrative printer
driver installation function in the steadyPRINT Center.
Note
User Migration and Reliability
To ensure that reliability remains intact after user migration, the
steadyPRINT Server service must be installed on the new backup print
server (formerly master print server) before this system begins service. This
is necessary for monitoring.
Note
Availability of the steadyPRINT Agent on Clients for User Migration
The installation of the steadyPRINT Agent on the clients is absolutely
necessary for the migration for users, groups and computers.
© 2013 K-iS Systemhaus Unternehmensgruppe
Part
VII
Settings
7
49
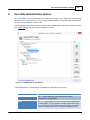
Settings
To adjust the steadyPRINT program settings, open the Settings window. You will find this in the
steadyPRINT Center via file > settings. Here, the management of settings of the steadyPRINT Center,
the Behavior of Default Printers, the Dashboard and Monitoring or even the License are available.
Functions and settings that require a detailed explanation are described in the following sub-chapters.
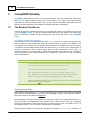
7.1
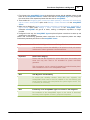
Agent-Profiles
With the Agent-Profiles it is possible to define user-, group- and computer-specific settings for the
behavior of the steadyPRINT Agent. Initially, there is a „Standard“ profile providing a basic configuration
for the Agent which is adjustable, but cannot be deleted or disabled. To restrict the functions for specific
users, you can, for example, define a new safety profile for one group.
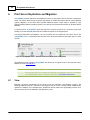
All profiles presented in Figure 30: steadyPRINT Center - definition of Agent-Profiles are processed in
the steadyPRINT Agent according to their prioritization, with 1 being of highest priority. The profile that
matches the user, group or computer will be processed first.
Figure 30: steadyPRINT Center - definition of Agent-Profiles
The profiles defined in the steadyPRINT Center are loaded once at the startup of the steadyPRINT
Agent. New or deleted profiles as well as adjusted users, groups and computers are only processed
when the Agent is restarted. When exactly which profile settings are processed is shown in the
respective functional description in the profile.
© 2013 K-iS Systemhaus Unternehmensgruppe
50
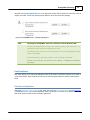
7.2
steadyPRINT User Manual
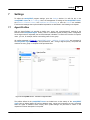
Default Printer Performance
Under the Default Printer Performance category you can determine the configuration for the application
order of the default printers. With the priority list you decide what type of default printer will be active in
steadyPRINT and which one will be given priority in case of multiple connections. For instance, it is
possible that for a given session one default printer has been determined for the user and another one
has been determined for his computer. Figure 31 shows an example in which default printers have been
enabled for users, computers, groups, folders and print servers. Moreover, the default printer for a user
always has priority as in this case the user enjoys the highest priority.
Figure 31: steadyPRINT Center – Priority List for Default Printers
7.3
Dashboard and Monitoring
Warning
Beta Dashboard and Monitoring
The Dashboard and Monitoring functionality is currently in the beta phase. The
stability of this functionality can be impaired or it can even be unavailable. If
you do not feel confident about using Dashboards and Monitoring then you
should not do so. Dashboard and Monitoring is disabled by default.
Using the Threshold option under the Dashboard and Monitoring category, you can set the time interval
for which data is acquired for all printers on a particular print server administered by steadyPRINT. The
more printers to be covered in a certain time interval, the higher the load on the print server;
© 2013 K-iS Systemhaus Unternehmensgruppe
Settings
51
correspondingly, the load will also be higher the shorter the time interval for a certain number of printers
is. If the time interval is lengthened, the load decreases. A shorter time interval causes the load to
increase. The time interval should be adjusted in such a way that the load on the print server is
moderate.
Note
The time interval
It is recommended that the time interval not be shortened to a value below 10
seconds as this can lead to instability in the steadyPRINT server or print
server.
It is also recommended that the default time interval for monitoring not be
decreased for more than 100 printers on a print server. If an overload occurs,
printers or print servers for monitoring should be disabled or the time interval
should be increased.
Note
Errors during data acquisition
Some printer drivers cause problems or errors during data acquisition. This can
lead to delays in some cases, thus causing the time interval setting to fail. After
repeated errors have affected the steadyPRINT Server run time, these printers are
excluded from the data acquisition process and are logged by the Windows Event
Viewer.
7.4
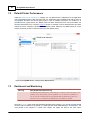
Performance-Profile
The performance profiles enable the configuration of time-related components of the steadyPRINT Agent
and the steadyPRINT Service. Initially, there is a „default“-profile providing a basic configuration for the
Agent and Service. It is adjustable, but it cannot be disabled or deleted. In order to restrict the respective
configuration to special IP addresses, a new performance profile could be defined for a separate IP
range.
All profiles from Figure 32: steadyPRINT Center - definition of performance profiles are processed in the
steadyPRINT Agent and the steadyPRINT Service according to their prioritization with 1 being of
highest priority. In doing so, the profile which, due to the IP address of the computer, matches the
defined IP address range will be processed first.
© 2013 K-iS Systemhaus Unternehmensgruppe
52
steadyPRINT User Manual
Figure 32: steadyPRINT Center - Definition of Performance-Profiles
All profiles defined in the steadyPRINT Center are loaded once at the start-up of the steadyPRINT
Agent and the steadyPRINT Service. New or deleted profiles as well as adjusted IP address ranges are
only processed when the program is restarted. When exactly which profile settings are processed is
shown in the respective description in the profile.
Note
WAN-Connections and Performance-Profile
The performance profiles have especially been developed for the use of
steadyPRINT in the WAN connection area. This feature allows you to
determine how often the steadyPRINT Agent and the steadyPRINT Service
look for new information in the steadyPRINT Database. The longer the interval
for the respective time-related components lasts, the smaller is the load on the
WAN connections. However, please note that dependent on the defined profile
values, any modified information might be available on the Client computer with
a delay.
Warning
Configuration Performance-Profile - Expert knowledge required
All settings in the performance profile should only be handled by experts or in
consultation with the steadyPRINT Support. An incorrect configuration can
generate an undesired behavior of the steadyPRINT Agent and the
© 2013 K-iS Systemhaus Unternehmensgruppe
Settings
53
steadyPRINT Service.
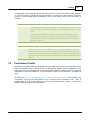
7.5
License
The License category allows you to initialize the required license. This is available in the form of an XML
file. License data needed for an issuance include a valid first and last name, the complete company
name as well as the name of the database including instance name, if applicable.
A valid license must be indicated in any case when starting the steadyPRINT Center. This can be a free
or an acquired license or a test license. If the license is invalid and steadyPRINT is not in demonstration
mode, execution will not be possible.
Note
License volume
Please note that the number of licensed objects must not exceed the license
volume. Otherwise the license will be identified as invalid.
For questions concerning licensing, please contact the steadyPRINT-Support (see
Chapter Support).
© 2013 K-iS Systemhaus Unternehmensgruppe
Part
VIII
User-Side Administration Options
8
55
User-Side Administration Options
The steadyPRINT functions described thus far have been shown from a server-side, administrative
perspective. We would now like to show you the following additional client-side printer administration
functions that steadyPRINT is able to offer.
The steadyPRINT Agent offers special functions for printer administration that can be carried out by the
user. Figure 33 shows the main window intended for the user.
Figure 33: steadyPRINT Agent – Main Window
In the following table you will find functions available for client-side use by the user:
Function
Description
Add
The Add button allows the user to add network printers
administered by steadyPRINT.
Delete
The Delete button allows the user to remove printers administered
by steadyPRINT. This only applies to network printers which have
been connected per user-based assignment. If printer in question
has been connected per Group or Computer Assignments, the
© 2013 K-iS Systemhaus Unternehmensgruppe
56
steadyPRINT User Manual
user cannot remove this network printer.
Set Default Printer
The Default button allows the user to set a printer as a default
printer.
Settings
This allows the user to enable (disable) the notification window and
the taskbar icons as well as set the language.
Change Default Printer
This makes it possible to change the default printer for the site
where the user is located. The site mapping is located in the
steadyPRINT’s folder structure.
Open Windows Printer
Directory
Using the local computer’s context menu, the user can open the
Windows Printer Directory. Alternatively, it is also possible to open
it using the tray icon in the taskbar.
Print Jobs
The user can use the context menu of the respective printer to
open the print queue.
Set as Default Printer
Using the context menu of the respective printer, the user can
designate it as default printer.
Printer Properties
The user can use the context menu of the respective printer to
open its properties.
Printer Description and
Status Information
When the user holds the mouse cursor over a particular printer, an
additional description and the current status information of the
device is displayed. In addition, the status is signaled with a
symbol.
If steadyPRINT ascertains an error for a particular device, the user
can determine by his or herself - using the status information - if a
paper jam has occurred, for instance, or if the toner needs to be
replaced.
Open steadyPRINT Agent
Using the tray icon in the task bar you can open the steadyPRINT
Agent. Alternatively, you can also double-click on the Agent
symbol.
Reconnecting Printers
Using the context menu from the steadyPRINT Agent tray icon, the
user can manually reconnect printers.
Open User Manual
Opens the steadyPRINT Agent User Manual.
Support
Opens the support window with useful information for the
administrator on the current configuration of the steadyPRINT
Agent.
Terminate
You can stop the steadyPRINT Agent by using the tray icon in the
task bar.
A short explanation of the functions and handling of the steadyPRINT Agent is available for users as a
handout on the homepage www.steadyPRINT.com. You can download it for use as a PDF file.
© 2013 K-iS Systemhaus Unternehmensgruppe
Part
IX
58
9
steadyPRINT User Manual
Citrix Client Printer (Citrix Universal Printer Driver) with
steadyPRINT
Citrix offers the possibility and technology to transfer a client printer into the terminal server session
without having to install additional manufacturer drivers on the Citrix XenApp Server. In this way, this
feature offers a compression of the print data stream. To ensure the functionality, Citrix-owned drivers
and services that are locally installed on the Citrix XenApp Server are required and used. Citrix
describes the entire subject in the following document: http://support.citrix.com/servlet/KbServlet/
download/32205-102-691166/Printing%2520Planning%2520Guide.pdf
Procedure for using Citrix Client Printers with steadyPRINT
Installing the steadyPRINT Agent on the workstation and the Citrix XenApp Server is a prerequisite for
the automatic set-up and transfer of client printers to the terminal server session by using the Citrix
Universal Printer Driver. The printers can also be used on the client without Agent, the management of
the client-printer connection, however, has to be done manually.
Steps:
1. Activate the option Use Citrix Universal Printer Driver (UPD) on XenApp-Server under AgentProfiles in the steadyPRINT Center settings.
2. Add a printer assignment to the client or the Citrix XenApp Server via the steadyPRINT Agent or
to a user, a group or a computer via the steadyPRINT Center.
3. The steadyPRINT Agent on the client connects the required printer for the effected printer
assignment.
4. Finally, the steadyPRINT Agent on the Citrix XenApp Server creates the client printer using the
Citrix Universal Printer Driver.
5.
Note
Connection period of Citrix Client Printers
In case the printer is not directly available on the client, the set-up of the client
printer on the Citrix XenApp Server may take a moment and is thus available
after a short waiting period.
Note
Disabling the option for administrative driver installation on a terminal
server
Make sure that the option Administrative Driver Installation on a Terminal Server
is disabled. Otherwise the manufacturer driver is automatically installed from
the print server to the Citrix XenApp Server by the steadyPRINT Agent.
Note
Use of preinstalled manufacturer drivers
When installing the printer connection, the steadyPRINT Agent at first tries to
use the manufacturer driver. Only if this is not available and the option
Administrative Driver Installation on a Terminal Server is disabled, the
steadyPRINT Agent used the Citrix Universal Printer driver for installing the
session printer.
© 2013 K-iS Systemhaus Unternehmensgruppe
Citrix Client Printer (Citrix Universal Printer Driver) with steadyPRINT
Note
59
Restoration of old session printers
By default, a restoration of old session printers is done by means of a predefined Citrix guideline. Thus, the user might see the client printer multiple
times resulting from different user sessions. To prevent this effect, you can
disable the corresponding Citrix guideline and assign it to the respective users.
You will find the guideline itself in the Citrix AppCenter under [guideline] > ICA
> Print > Client Printer > Stored and Restored Client Printers (see Figure 34).
Figure 34: Citrix Guideline – Restore Client Printer
© 2013 K-iS Systemhaus Unternehmensgruppe
Part
X
Support
10
61
Support
Our customer service will gladly assist you with technical problems occurring during the installation or
use of steadyPRINT.
This naturally also includes any possible errors with steadyPRINT when operating under various ITsystem environments.
You can always reach our Support during business hours between 9:00 and 18:00 at 0271/31370-30.
Should you have concluded a special maintenance contract with us, please use the telephone number
indicated in your contract.
Alternatively, you have the possibility of reaching us around the clock per email. Our service staff will
contact you as soon as possible during our support hours. To reach us, please use the email address
[email protected].
Please also use our Support Search function for frequently asked questions and technical problem
solutions on the steadyPRINT website at www.steadyPRINT.com/support.
For further information about the steadyPRINT product, visit our website at www.steadyPRINT.com.
FAQs and Technical Problem Solutions
A well-engineered architecture and easily applicable modules make it possible for you quickly and
efficiently deploy steadyPRINT in your printer environment. Should you have problems with
steadyPRINT, you will find technical help here. Alternatively, you can use the Support Search function
on the steadyPRINT website at www.steadyPRINT.com/support.
© 2013 K-iS Systemhaus Unternehmensgruppe
Part
XI
Contact
11
63
Contact
If you have questions, criticism or suggestions, you can reach us at:
The hotline for K-iS Systemhaus consortium is always available for you at +49 271 313 70 (in Germany)
and +41 55 617 00 90 (in Switzerland). You can also reach as per email, of course: [email protected].
We are certain that our software will support you with your tasks and would be pleased to receive any
Feedback you wish to give us.
For detailed information about steadyPRINT, please visit our website at http://www.steadyPRINT.com.
© 2013 K-iS Systemhaus Unternehmensgruppe
Part
XII
Annex
12
Annex
12.1
Upgrade to a Higher Version
65
The Upgrade Guide gives a short summary of information and procedures to consider when upgrading
steadyPRINT to a newer version.
Important
Important information when updating from 4.2.0 or lower to 4.3.0 and
higher
Before upgrading from steadyPRINT 4.2.0 (or lower) to version 4.3.0 and higher,
please note the following:
steadyPRINT Agent:
- All settings for the Agent in the steadyPRINT Center (File > Settings > Agent,
Default printer behavior (user functions), printer connections) get lost and are
reset to the predefined default values.
- After the update, an adjustment is possible via File > Settings > Agent-Profile.
- Excluded from this are configured printer assignments, default printers etc.!
steadyPRINT Center:
- All settings under File > Settings > Agent, Default printer behavior (user
functions) and printer connections get lost.
- All settings mentioned above are reset to predefined default values after the
update.
Finally, an adjustment can be done via File > Settings > Agent-Profile .
Important
Important information when updating from 4.3.1 or lower to 4.3.2 and
higher
-
-
Before upgrading from steadyPRINT 4.3.1 (or lower) to version 4.3.2 and higher,
please note the following:
An internal change of the user management in the steadyPRINT Database might
lead, in individual cases, to a loss of user assignments. The background is the
use of double entries for user objects which are deleted during the update
process and internally converted to the new structure.
Important: In any case, one entry (the latest version) will be maintained
including its assignments! The possible loss of assignments only occurs
with multiple entries for users!
Old and new versions of the steadyPRINT Agent can run in parallel. However, an
upgrade should be done as quickly as possible.
During the upgrade of steadyPRINT 4.3.1 (or lower) to version 4.3.2 and higher,
please note the following:
The update process dissolves users, computers and groups into SIDs (Security
Identifier). Should a dissolution fail (e. g. an object was deleted in the Active
Directory), the tool CreateSteadyDB under
C:\Users\[USER]\AppData\Local\Temp\CreateSteadyDB - Update SID error.csv
© 2013 K-iS Systemhaus Unternehmensgruppe
66
steadyPRINT User Manual
creates a CSV-file with an overview on all objects not to be dissolved. In this file,
there are also instructions for a manual correction. Moreover, you will receive the
information from the message under Figure 35.. If this message does not
appear, the update process was successful and a manual intervention is not
necessary!
If you have any questions, please contact the steadyPRINT Support.
Review of double entries by select instruction
In order to validate which users are affected by the problem mentioned above,
the following SQL-instruction can be executed in advance. Double user entries
will be listed.
select * from PrinterMap.dbo.Users T1, PrinterMap.dbo.Users T2
where T1.LoginName = T2.LoginName and T1.LoginDom = T2.LoginDom
and T1.Num <> T2.Num
Step 1: Updating the Database
First of all make a backup of the steadyPRINT Database (PrinterMap)!
Before you begin with the new client roll-out and the Management Console installation, the steadyPRINT
Database must be updated to the current version. Use the CreateSteadyDB program for this and follow
the directions given in the Installation Chapter about updating the database.
Step 2: Installing the Management Console (steadyPRINT Center)
Deinstall the old version of the Management Console and then carry out a regular new installation as
described in the Installation Chapter.
Step 3: Installing the Reliability Service (steadyPRINT Server)
Uninstall the old steadyPRINT backup components and then carry out a regular new installation as
described in the Installation Chapter.
Step 4: Installing the Client (steadyPRINT Agent)
Uninstall the old version of the steadyPRINT Agent and then carry out a regular new installation as
described in the Installation Chapter or carry out your normal client rollout procedure.
© 2013 K-iS Systemhaus Unternehmensgruppe
Annex
Figure 35 - Error message - change to SID
© 2013 K-iS Systemhaus Unternehmensgruppe
67