1
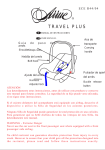
User Manual
G4 Ultralight Pack
Recommendations for Use
Initial Packing
To see if the G4 will work for you and maintain your ability to return it for a refund if you decide it will not,
in accordance with our return policy, load it up with your normal gear and try it on around the house
and/or around the block. The main concepts in packing the G4 are to keep the pack "full", maintain a high
center of gravity, and keep items accessed most often nearer the top. First, stow the sleeping bag in the
bottom of the pack. Since the G4 seams are not sealed, we recommend using a trash compactor bag or
mylar turkey roasting bag (on the inside of the pack) for protecting your sleeping bag and clothes. We
recommend dispensing with the weight of a stuff sack and just stowing the sleeping bag directly into the
trash compactor or mylar bag in the pack. Since it has a limited "trame", the G4 carries better when "full".
Thus, it works better to leave your sleeping bag packed more loosely so it can take up space. When you
need additional space, like right after a resupply, you can pack the sleeping bag a little tighter. The
bottom of the pack is expanded to provide area for your sleeping bag and minimize loss of loft from overcompression. Packing the sleeping bag on the bottom helps raise the center of gravity. Next pack your
clothes, also within the protective turkey or trash bag. Next put in your other gear and finally your food.
Comfort is improved by keeping hard objects away from your back, but heavy items are best placed
closer to the back to minimize the pull on the shoulders. Next, pack the shoulder straps and waist belt
either with clothing items normally unused during the day, like sleeping socks, gloves, etc, or with the
foam inserts provided. Since the foam inserts are used for several different packs, some minor snipping
of the foam may be necessary for use in your pack. The foam can be cut with normal household
scissors. Then insert your sleeping pad in the pad holders. We recommend a NightLighFM torso pad or
a Z-Lite TMpad cut down to six sections (30") in length. (Note - the Z-Llte TM pad "dimples" do compress
with use, so you will end up periodically replacing the pad), but almost any pad that is 20" wide will work.
Before putting the pack on, loosen the shoulder straps and unbuckle the waist belt. Use the haul loop to
lift the pack, and put it on. Tighten the waist belt first, securing the pack around your waist/hips where
you find it most comfortable. Then tighten the shoulder straps. With the pack on, see how it fits your
particular body type and load.
On the Trail
For packing, sit on your pad and stow the sleeping bag. When you take off your sleeping socks, stuff
them into the shoulder straps for padding. You may be wearing your hat and gloves to start, and may
have nothing to put in the waist belt. However, if it is cold, you will be wearing your jacket, which provides
padding. If you start out early in the morning, you may be wearing most of your clothes. Loading your
pockets with food for the morning will allow you not to have to stop to remove food from your pack. When
the day warms up and you stop to strip clothing, we recommend putting the clothing below the food, since
the clothing is usually less dense, and packing the clothes below the food will raise the center of gravity.
If your tarp/tent/ground cloth is damp, it can be placed in the large back pocket. Placing the wet tarp in
the outside pocket will keep it away from your dry gear, and it may dry a little. The side pockets are
designed to store water (the Platypus Hoser2@fits nicely), first aid kit and "ten essential" items that you
want to have ready access to. Once your pack is packed, you can get up, fold up your pad, and slip it
into the back of the pack. Under normal loads and in clear weather, fold the top of the extension collar
over, and pull the shock cord through the webbing loop in the bottom center of the pack. You can either
loop the shock cord back up and loop it over the toggle, or just slide the toggle up snug against the
bottom loop to hold the top. When carrying a full load after a large resupply or taking another hiker's gear,
just cinch up the toggle on the shock cord. For inclement weather, your G4 comes with a top strap. Roll
the top of the extension collar away from the shoulder straps two or three times, like rolling the top of a
potato chip bag. Clip the top strap into the buckle near the haul loop and pull down to tighten. The strap
can also be used to carry a winter sleeping pad or similar bulky item on top of the pack. Keep in mind
that the seams are not sealed, so even with the roll top, you will need an additional method to protect
against persistent rain.
Fit
For the best fit, we recommend loosening the shoulder straps and waist belt each time you take off the
pack. When you put the pack on, fasten the waist belt, hike the pack up on your hips, tighten the waist
belt then tighten the shoulder straps. This will avoid stressing the pack and help it last longer, and get
you the best possible fit each time. Most people find that the best size of pack for them is one that results
in the shoulder straps being level or slightly up from the shoulders. Some people find that a sternum
strap helps the G4 fit them better. Users that didn't order a G4 with a sternum strap have approximated
one by using a small carabiner or a tied bandanna between the two thumb loops.
Care
Your G4 pack is constructed of very lightweight materials. One of the tradeoffs of designing with
extremely lightweight materials is durability. The design and materials have been tested over hundreds of
trail miles, but your G4 pack requires a higher standard of care than other packs. The G4 will not last as
long or endure the same abuse as other packs. If you want it to last, you need to 'baby' it. With the best
of care it may still need to be repaired or replaced after a few months on the trail. Each time you head out
on a trip, check over your pack carefully and repair or reinforce any areas showing wear. The ripstop
nylon is very susceptible to abrasion. If you put down the pack with the ripstop nylon on rocks, your pack
will shred. Pay attention when you are ducking under barbed wire fences and squeezing between rocks
or through prickly brush. If you do a lot of these activities, the G4 is probably not the pack for you. When
you pick up or take off your full pack, always use the haul loop. When setting it down, be sure that the
pack is resting on the heavier oxford material on the back and the bottom. Never sit or rest on a loaded
pack.
Personal Customizing/User Tips
There are several things you may want to consider to personalize your pack. For more rainy climes, you
might consider seam-sealing the inside seams. For 1.1 oz. ripstop (an option on the semi-custom packs),
use a 50/50 mixture of silicon caulking and white gas, and paint it on. For the 2.2 oz. ripstop, use
conventional seam sealer. If your hiking clothes don't have a lot of pockets, you could order some Iycra
mesh and sew small pockets onto the shoulder or waist straps to carry small items that you want to have
handy. To save weight, you should trim the waist belt to size. Be sure to take into account that you may
be wearing additional layers, and don't cut it too short. After cutting, seal the end with a flame, and sew
back over on itself to prevent it from slipping through the buckle. Also in the interest of minimizing weight,
you are encouraged to trim off straps you don't use. If you only use a drinking tube on the right side, trim
off the loops on the left side. If you don't use a drinking tube or thumb loops, trim the loops off.
If you use a larger Thermarest@ inflatable type pad, some people use the "great circle" method of
packing. Open the valve, and loosely roll the pad inside the pack, with the center open, and the valve up.
Stuff the rest of your gear in the middle of the roll. Then give a puff or two on the valve to tighten up the
pad and close the valve. This results in a "stiffer" pack and more load transfer to the waist belt.
Another way to transfer load to the waist belt is inserting rods into the folds of the Z-LiteTMpad. These
instructions were provided by customer Barry Teschlog...
I bought some 114" fiberglass rod (Google 'tap plastics' - several stores up and down the west
coast, plus mail order) for a couple of bucks. I was inspired by myoId pack, which uses a FG
rod for the frame. I cut two pieces of rod, just shorter than a Z-rest is wide and sanded the ends
over into semi-spheres. I cut off 4 segments of a Z-Rest (as one piece). I taped the FG rods
into the Z-rest, 1 each just inboard of each of the two outer fold seams. Use about a 4" piece of
tape (athletic or duct), cut slits about 1" from the end so this 1" piece of tape can be wrapped
around the rod, leaving a flat tape 'tab'. This tab then goes over the end of the z-rest, onto the
other side, locating the rod 'vertically' in the pad. Folding the outer two panels of the Z-rest over,
the rods were fully enclosed in padding. Being taped into place, they won't slip up or down, and
being near the fold seams, they're pretty much contained laterally.
Note: these instructions were based on using a thermarest inside the pack for sleeping. Others have
found that when carrying a Z-Lite TM, the rods can be just placed in the folds, and the bumps keep them in
place without taping. Tent poles (like for the TarptentTM),and aluminum arrow shafts are other possible
materials.
Design Insights
The goal of this section is to give you insights as to the various design features of the G4 pack. It may
not exactly suit the way you backpack. but may give you ideas, or at least answer some questions you
have about the various aspects of the pack.
Employing "dual use" technologyobviouslyfiguredhighlyin the designof the G4. Weight is minimizedby
usingyour sleepingpad as a "frame",and unusedsocks and clothingas paddingfor the shoulderstraps
and waist belt. Designingthe pad to be on the outsideof the pack allowsyou to be sittingon it in the cold
morningas you are packingup, as it can be the last thing you pack. It also permitseasy removalduring
the day for sitting on during rest stops, or lying on for naps, as you wait for your more heavily-laden
friends to catch up.
Because the pack was developed on the west coast in semi-arid conditions, it is designed to be
"hydration bladder friendly", with holders on the shoulder straps for drinking tubes. Some users have
used a "V" to connect two bladders to one tube, so they drink water from two bladders simultaneously. If
a large bladder is going to be carried on one side, it can usually be balance by located the food bag,
inside the pack, towards the opposite side of the pack. Because the pack is designed for carrying larger
water loads, the side pockets were not designed to be accessible for water bottles.
The shock cord drawstring closure is to allow quick insertion of shed clothing articles into the top of the
pack without having to loosen the closure. This applies if you are not using the strap closure, but are
simply stretching the drawcord down and putting the cord lock into the bottom lashing loop.
So get out there, and enjoy the lightness of your G4 ultralight pack! Please forward any suggestions, and
send us any user tips that can be added to the website.