1
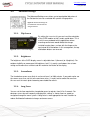
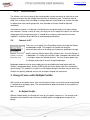
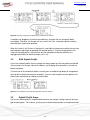
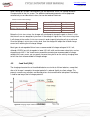
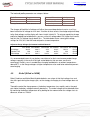
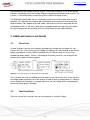
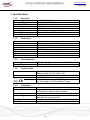
www.ebikes.ca/satiator
[email protected]
+1(604) 569-0902
IMPORTANT SAFETY INSTRUCTIONS
INSTRUCTIONS IMPORTANTES CONCERNANT LA SECURITE
1. SAVE THESE INSTRUCTIONS: This manual contains important safety and operating
instructions for battery charger Model GC360-6008.
CONSERVER CES INSTRUCTIONS: Ce manuel contient des instructions importantes
concernant la sécurité et le fonctionnement du chargeur.
2. Before using battery charger, read all instructions and cautionary markings on battery
charger, battery, and product using battery.
3. CAUTION: Risk of electric shock- connect only to properly grounded outlets. Do not
expose to rain when charging. Charge only rechargeable lithium, NiMH, or sealed leadacid batteries with correct voltage and current settings. Other battery types or incorrect
settings may damage battery, with risk of fire and personal injury. Never charge a frozen
battery.
AVERTISSEMENT: Risque de decharge electrique. Connecter uniquement a des prises
à la terre. Ne pas exposer à la pluie lors de la charge. Recharger uniquement des
batteries rechargeables au lithium, au nimh ou au plomb-acide scellees, avec des
parametres de tension et courant adequats. Tout autre type de batterie ou tout
parametre incorrect peut endommager la batterie et causer des risques d'incendie et
blessures. Ne jamais charger une batterie gelée.
4. WARNING: The device is not to be used by persons (including children) with reduced
physical, sensory or mental capabilities, or lack of experience and knowledge, unless
they have been given supervision or instruction. Children must not play with the charger.
5. DANGER: Do not open charger- there are no user serviceable parts inside. Only operate
charger in a dry location with the battery pack located a safe distance from combustible
materials. Do not leave batteries charging unattended. Only charge lithium batteries that
have an onboard Battery Management System (BMS).
FCC NOTICE: This charger has been tested and found to comply with Part 15 of the
FCC rules, which governs the emission limits for a Class B digital device. These limits offer
reasonable but not guaranteed protection against electrical interference between your charger
and TV’s, radios, and other radio-frequency communication devices. If electrical interference is
still detected, which can be confirmed by turning the charger off and on, possible corrective
actions include:
•
•
•
•
Reorienting or relocating the receiving antenna of your device
Increasing the separate distance between the charger and receiver
Connecting the charger into a different AC outlet circuit as the receiver
Consulting a dealer or radio/TV technician for help
-1-
www.ebikes.ca/satiator
[email protected]
+1(604) 569-0902
Table of Contents
1.
2.
3.
4.
5.
Basic Overview ___________________________________________________________ 3
1.1.
Getting Started _____________________________________________________________ 4
1.2.
Setting up your First Profile __________________________________________________ 4
1.3.
Charging Process ___________________________________________________________ 5
1.4.
Terminating Charge _________________________________________________________ 6
1.5.
Screen Saver _______________________________________________________________ 7
Satiator Setup Menu _______________________________________________________ 7
2.1.
Editing the Profile List _______________________________________________________ 8
2.2.
Advanced Settings___________________________________________________________ 9
2.3.
Connect to PC _____________________________________________________________ 11
Charge Process with Multiple Profiles _______________________________________ 11
3.1.
No Default Profile __________________________________________________________ 11
3.2.
With Default Profile ________________________________________________________ 12
3.3.
Default Profile Usage _______________________________________________________ 12
Charge Profile Details ____________________________________________________ 13
4.1.
Lithium___________________________________________________________________ 13
4.2.
Lead Acid (SLA) ___________________________________________________________ 14
4.3.
Nickel (NiCad or NiMH) ____________________________________________________ 15
Additional Features and Details ____________________________________________ 17
5.1.
Force Start ________________________________________________________________ 17
5.2.
Fault Conditions ___________________________________________________________ 17
5.3.
Cell Balancing _____________________________________________________________ 18
5.4.
Thermal Rollback __________________________________________________________ 19
5.5.
Exposure to Rain___________________________________________________________ 19
5.6.
Orientation and Vent _______________________________________________________ 19
5.7.
Thermistor ________________________________________________________________ 19
5.8.
Upgrading Firmware _______________________________________________________ 19
6.
Complete Navigation Map _________________________________________________ 20
7.
Specifications ___________________________________________________________ 21
-2-
www.ebikes.ca/satiator
[email protected]
+1(604) 569-0902
Congratulations on acquiring a Cycle Satiator universal charger, for use with all kinds of 24-48V
nominal battery packs. We hope that this one device serves you and your batteries for years to
come.
1. Basic Overview
The Satiator was designed with a compact and narrow form factor so that it could be used either
as a portable stand-alone charger, or mounted to the frame of your bike/vehicle as an onboard
charger. It has an AC input power port on the side, (100-240V AC), a DC output cable to
connect the charger to the battery, a graphical display screen for showing the current charging
status, and a pair of buttons to navigate the charger menu.
Figure 1: Satiator Model and Features
While most battery chargers are limited to charging one specific battery type and voltage, the
Satiator is programmable so that you can choose between a number of battery charge
behaviours. You could use it to charge a 24V lead acid pack one day, and a 48V lithium ebike
battery the next.
This adjustability is useful. It means a separate charger is no longer needed for each of your
batteries, and when you upgrade to a new pack, the Satiator can be configured to match it even
if the voltage and chemistry are different. It also allows you to select between rapid charge rates
for top-up convenience and conservative overnight charging to maximize battery life.
-3-
www.ebikes.ca/satiator
[email protected]
+1(604) 569-0902
1.1.
Getting Started
The Satiator does not have an ON/OFF switch, so it
will turn on whenever there is power present on the
AC input port. The 3-pin IEC connector is the familiar
standard for personal computers, and if the included
cable does not match your country's outlet standard
Figure 3: Connect
AC Power to Turn
On
1.2.
then there should be no problem finding one locally.
Just be sure to use a grounded 3-pin outlet.
Figure 2: Splash Screen
after power applied,
shows Model and
Firmware Version
Setting up your First Profile
If the Satiator was purchased by itself without a battery, then it will usually arrive out of the box
without a profile activated. Before you can use it to charge a battery, you will need to select an
output appropriate for your pack. The display will say NO PROFILES ACTIVE after briefly showing a
splash screen.
Figure 4: Setting up the first profile on a new Satiator device
Pressing the up or down button will let you scroll through a number of preset profiles. When you
see the profile for your battery, press and hold the lower button to select it. A screen will ask you
to confirm the selection.
Figure 5: First profile confirmation
The preset profiles are shown in the table below and cover the majority of lithium and lead acid
batteries encountered in ebike applications
Title:
Subtitle:
Bulk Amps:
Full Volts:
36V Lithium
Fast Charge
36V Lithium
Stnd Charge
36V Lithium
80% Charge
36V LiFePO4
Fast Charge
36V LiFePO4
Stnd Charge
8.0 A
42.0 V
4.0 A
42.0 V
4.0 A
40.5 V
8.0 A
43.2 V
4.0 A
43.2 V
-4-
www.ebikes.ca/satiator
[email protected]
+1(604) 569-0902
Title:
Subtitle:
Bulk Amps:
Full Volts:
48V Lithium
Fast Charge
7.0 A
54.5 V
48V Lithium
Stnd Charge
4.0 A
54.5 V
48V Lithium
80% Charge
4.0 A
52.6 V
Title:
Subtitle:
Bulk Amps:
Full Volts:
Float Volts
24V SLA
Fast Charge
8.0 A
28.8
27.0
36V SLA
Stnd Charge
4.0 A
43.2
40.5
48V SLA
Stnd Charge
4.0 A
57.6
54.0
48V LiFePO4
Fast Charge
7.0 A
57.6 V
48V LiFePO4
Stnd Charge
4.0 A
57.6 V
If none of the presets are appropriate for your battery, then you have the option to add a custom
profile as well with the Create New Profile screen at the end of the list. Custom profile creation is
detailed in Section 2.1.3.
1.3.
Charging Process
With just one profile active, the Satiator will start charging the battery whenever it is connected
to a pack that isn't fully charged. If there is no battery attached, the display screen will say
CONNECT BATTERY along with a summary of the charge profile. Once it detects a pack has been
plugged in, then the charger will automatically start the charge process, and the display will
show the charging status in real time.
Figure 6: Display screen before battery connected and after start of charge cycle
The ability to see the actual amp-hours put into the pack can be of great value in understanding
the health of a battery system and allowing the user to rest confident that it has received a full
charge.
A title bar across the top provides additional information, including the output watts, the casing
temperature, and the target full charge voltage. The target voltage is useful to confirm that the
correct profile is selected even after the charge process has begun. In the case of NiCad / NiMH
batteries, the title bar will also show the battery temperature and the remaining top-up time
during top up mode (see section 4.3)
-5-
www.ebikes.ca/satiator
[email protected]
+1(604) 569-0902
1.4.
Terminating Charge
The charge process can be stopped by allowing the charge to finish, unplugging the battery, or
by aborting charge.
1.4.1.
Charge Complete
If the battery is left charging until reaching a full charge, the display bar
will invert and say CHARGE COMPLETE allowing you to see from a distance
that the cycle has finished. You will also see a summary of the elapsed
charge time and amp-hours delivered to the battery.
Figure 7: On charge complete,
voltage, time, and amp-hours still visible
With batteries that have a constant voltage end of charge mode, it is possible for small currents
to continue flowing into the battery when the output says complete. CHARGE COMPLETE does not
mean that the output is disabled, just that the full voltage has been reached and the charge
current has decayed below the Complete Amps threshold specified for the profile.
1.4.2.
Pack Disconnect
You can also stop the charge by simply disconnecting the battery from the charger. Once the
battery is removed, the screen will return to saying CONNECT BATTERY. Be aware that you cannot
see the elapsed amp-hours and charge time when the battery is disconnected. If the battery is
plugged back in within 5 seconds, then it will resume charging from the previous amp-hours and
time, but if the delay is longer then it will start a new charge cycle and the previous charge
statistics will be lost.
1.4.3.
Abort Charge
Finally, it is possible to stop the charge process while charging is underway without unplugging
the battery by pressing and holding the top button until Abort Charge pops up. The Satiator will
return to the active profile list allowing you to scroll through and select a different charge profile.
Figure 8: Aborting Charge, hold top button to disable output and return to profile list
-6-
www.ebikes.ca/satiator
[email protected]
+1(604) 569-0902
This feature is useful in the case of onboard installations where the battery terminals are
permanently wired to the charger, and physically disconnecting the pack is difficult.
1.5.
Screen Saver
After several minutes with no button activity, the Satiator will go into a screen saver mode,
where the key charge statistics and status are instead shown in a small text box that moves
around the display. The screen saver will preserve the life and brightness of the OLED display
pixels and ensures that they have a uniform intensity.
Figure 9: Screen saver views, with no battery connected (left), during charge (middle),
after charge complete (right). The screen saver text will move around the display.
Pressing either button will exit the screen saver and return to the most recent display window.
2. Satiator Setup Menu
The Satiator setup menu allows you to edit the profile list, set advanced parameters, and
connect the Satiator to a computer. The setup menu is accessed by pressing and holding down
both buttons until you see the Enter Setup message.
Figure 10: Access the setup menu by pressing and holding both buttons
The navigation of the setup menu with just two buttons will be very intuitive from the following
principles:
•
Briefly press the up or down buttons to cycle through a list or toggle through a value
being edited.
•
Press and Hold the lower button to select an option.
•
Press and Hold the upper button to escape and go to the previous screen.
-7-
www.ebikes.ca/satiator
[email protected]
+1(604) 569-0902
2.1.
Editing the Profile List
The profile list shows all preset and custom charge profiles that have been loaded into memory.
The circle on the left is a radio button indicating if the profile is active or not.
2.1.1.
Activating New Profiles
If you scroll through the list and see another profile that you want, press and hold the lower
button to edit it. Then press and hold the button again when Active? - NO is selected, and this
will change to YES. After exiting the edit menu by selecting Done, you will return to the profile
selection screen and will see that the active radio button is now checked.
Figure 11: The active status of a profile is seen via the radio button
You can activate as many or as few profiles as you like. If you want a profile that isn't one of the
presets, then you can create up to 20 custom profiles as described in Section 2.1.3.
2.1.2.
Setting a Default Profile
In addition to activating or hiding profiles, you also have the ability to set one profile as your
default. This state is indicated by the bold letter D under the active button.
Figure 12: Making a profile Default
A default profile will be pre-selected when the Satiator is
turned on and will start charging when a battery is connected
even with no button interaction.
Figure 13: Letter "D" indicates default
status
-8-
www.ebikes.ca/satiator
[email protected]
+1(604) 569-0902
2.1.3.
Creating Custom Profiles
If a desired output is not available in the preset profiles, you can setup your own custom charger
output with the Create New Profile screen at the end of the profile list.
Figure 14: Creating a new profile
You will then select between one of three basic classes of chemistry and associated charge
algorithms. The up and down buttons will scroll through the list of parameters, and pressing and
holding the lower button will allow you to then edit the specific field one digit at a time. The list of
parameters depends on the particular chemistry selected.
Figure 15: Full list of parameters available for custom Lithium, Lead and NiMH/NiCad batteries
Once all the parameters are set and Save Profile executed, then a new profile will be added to
the profile list with the name CUSTOM, along with the general chemistry and charge voltage and
current. A more detailed discussion of the specific parameters for each chemistry and their
associated charge algorithm is included in Section 4.
2.1.4.
Modifying Custom Profiles
Once a custom profile has been added to the list, it can be either edited or deleted from the list
entirely using the button menu. Editing or deleting the preset profiles or personalizing the name
of a custom profile is only possible with a computer connection. See Section 2.3
Figure 16: Custom profiles
can have their parameters
modified and can also be
deleted from the list. But
preset profiles cannot.
-9-
www.ebikes.ca/satiator
[email protected]
+1(604) 569-0902
2.2.
Advanced Settings
The Advanced Settings menu allows you to tweak global behaviors of
the Satiator that are not associated with specific charge profiles.
Figure 17: Advanced Settings List
has additional customization for
charger behavior
2.2.1.
Flip Screen
Figure 18: Screen rotated 180 degrees
2.2.2.
By setting Flip Screen to YES, you can invert the orientation
of the OLED module so that it reads upside down. This is
useful in many onboard vehicle applications where
mounting convenience would dictate the charger
installed hanging from a surface with the flange on the
top instead of on the bottom. In this arrangement, the top
and bottom buttons are reversed.
Brightness
The brightness of the OLED display screen is adjustable from 1 (dimmest) to 9 (brightest). For
outdoors legibility we recommend full brightness, but if it is mostly used indoors then a lower
setting can be more than sufficient and will maximize the lifetime of the display.
2.2.3.
ScreenSaver
The time before screen saver kicks in can be set from 1 to 9999 minutes. If you prefer not to see
the screen saver, then set this to the maximum value (~1 week), but be aware that over time
this can result in certain pixels becoming more faded than others.
2.2.4.
Long Press
You can set the time required for a long button press to register, from 0.2 to 2 seconds. For
dexterous users who are frequently changing their settings, a shorter time can speed up
navigation through the menu system. A long value is more appropriate for most situations to
reduce likelihood of inadvertent changes and menu access.
- 10 -
www.ebikes.ca/satiator
[email protected]
+1(604) 569-0902
2.2.5.
Cable Resistance
The Satiator uses the resistance of the charging cable in order to account for cable losses and
estimate more precisely the voltage at the terminals of the battery pack. The default value of
0.086 Ohm is correct for the included 1m charge cable, but if you lengthen or shorten the leads,
or replace them with heavier gauge wire, then the cable resistance should be adjusted
accordingly.
If the cable resistance is set too high, the Satiator may charge the battery to a higher voltage
than intended. Too low a value (or zero), will simply result in a longer time spent in the constant
voltage part of the charge termination. If in doubt when using any cable other than the one
supplied, it should be set to 0.00 Ohm to avoid damaging the battery.
2.3.
Connect to PC
The Connect to PC option in the Setup Menu allows you to put the Satiator
into bootloader mode. This prepares the Satiator for computer
communications either for installing new firmware or updating the charge
Figure 19: Screen will
go blank on entering
bootloader mode
profiles from the Satiator Setup Utility software suite. Once the Satiator is
in bootloader, it is waiting for instructions from a computer connection and
is no longer responsive to button presses. You must remove power from
the Satiator and restart it to return to regular operation.
Bootloader mode can also be accessed by pressing and holding the lower button while the
Satiator is being powered on, and the OLED display will remain blank rather than showing the
splash display. This method is essential if an interruption during the firmware transfer leaves the
Satiator only partially updated, and you can no longer navigate the setup menu.
3. Charge Process with Multiple Profiles
With more than one profile active, care must be taken to make sure that the correct output mode
is selected when charging a pack. The selection behavior depends whether or not a profile has
been set as default:
3.1.
No Default Profile
Without a default profile, the Satiator will start up in the profile selection list. You need to scroll
through the active profiles and select from available options the appropriate charge for the
battery.
- 11 -
www.ebikes.ca/satiator
[email protected]
+1(604) 569-0902
Figure 20: Starting a charge with multiple active profiles but no defaults
If a battery was plugged in at the time the profile was selected, then the charge will begin
immediately. Otherwise, the charger will say CONNECT BATTERY, showing the profile summary
and waiting for a pack to be detected.
When the CONNECT BATTERY text is displayed, it is possible to change active profiles by pressing
and holding the top button to repeating the selection process. Once the charge process has
started, the charge profile is fixed and can only be changed to a different profile by first
unplugging the battery or aborting charge (see 1.4.3)
3.2.
With Default Profile
If you have a default profile, then the charger will always power on with that profile preselected.
You can plug in the charger, connect the battery, and charging will automatically start with no
button interaction.
To select one of the non-default profiles instead, press and hold the top button to escape back
to the profile list before you connect the battery. You can scroll through the active profiles and
choose your desired one by holding the lower button.
Figure 21: Hold top button to escape default profile and select another
3.3.
Default Profile Usage
The use of a default profile is recommended whenever the charger is being used with only one
type of battery pack. For instance, you may want a default which provides a standard overnight
- 12 -
www.ebikes.ca/satiator
[email protected]
+1(604) 569-0902
charge that only gives a 80% charge level at a modest current in order to maximize battery
cycle life, but on occasion you may want to do a rapid 8A charge for quick top-up, or give it the
full 100% charge when maximum range is needed. Since the one battery is compatible with all
of these profiles, it is safe to have a default that will start charging automatically.
If you routinely switch between non-compatible batteries (different voltages or chemistries), then
you should not use the default profile feature. That way you will always need to explicitly select
the correct output for the battery being charged.
4. Charge Profile Details
When creating custom battery profiles it is important to understand the charge algorithm for the
chemistry at hand. This is intended as an introductory explanation, but further research from
your battery supplier would be recommended for creating a profile ideally suited for their packs.
4.1.
Lithium
The lithium battery has a straightforward charge strategy. The battery is bulk charged at a
constant current until the full charge voltage is reached. At that point, the charger maintains the
full voltage while the charging current naturally decreases in an exponential decay. Once the
current gets close to zero amps, the battery is full and the charger says Charge Complete.
If the lithium battery is deeply discharged but not so deep as to cause permanent cell damage
(typically between 2.0-2.7 V/cell), then it is advisable to start the charging process at a low
trickle current until a safe voltage is reached, and only then switch to the full bulk charge
current. If the battery is deeply discharged to a point where any individual cell is dangerously
low (typically less than 1.5-2.0V/cell), then a recharge should not be attempted. The low cells
may appear to recover, but can exhibit reduced capacity, internal leakage currents, high
impedance, and a propensity to catch fire.
Figure 22: Charging Graph of a 36V Lithium Pack
- 13 -
www.ebikes.ca/satiator
[email protected]
+1(604) 569-0902
When setting up a custom Lithium profile, you are required to set the Full Voltage and Bulk
Charge current on the first screen. The additional advanced parameters will be populated
automatically to sensible default values, but can be tweaked if desired:
Lithium Custom Profile Settings
Basic Parameters:
Full Volts
Bulk Amps
Range
12-60V
0.2-8.0A*
*Charger will limit to 8A or 360W, whichever is least
Advanced Parameters:
Trickle Start Voltage
Trickle Amps
Bulk Start Voltage
Complete Amps
Default
50% of Full Volts
0.2 A
70% of Full Volts
0.15 A
Below the Trickle Start Voltage, the charger will not attempt to charge the pack as there is a risk
that the cells are at a dangerously low level. If the voltage is higher than Trickle Start Voltage then
it will charge at the smaller Trickle Amps current in order to gently bring the cells to a safe level.
Once the voltage is at Bulk Start Voltage level, then the charger will output the full bulk charge
current until reaching the full charge voltage.
Most types of rechargeable lithium have a recommended full charge voltage of 4.2V / cell,
although LiFePO4 are fully charged at a lower 3.5-3.8V, while certain newer chemistries can be
charged up to 4.35 V. You should never exceed the manufacturer recommended full charge
voltage, but it many cases you can greatly increase the cycle life on the cells by charging them
to less than their recommended full charge voltage.
4.2.
Lead Acid (SLA)
The charging characteristics of Lead Acid batteries are similar to Lithium batteries, except that
after a full charge is complete, the output potential is reduced slightly to a float voltage. This
prevents unnecessary reactions and electrolyte loss that can otherwise take place if the battery
is held for too long at the full charge potential.
Figure 23: Charging Graph of 36V Lead Acid Battery
- 14 -
www.ebikes.ca/satiator
[email protected]
+1(604) 569-0902
The lead acid profile parameters are setup as follows.
Basic Parameters:
Full Volts
Bulk Amps
Range
12-63V
0.2-8.0A*
*Charger will limit to 8A or 360W, whichever is less
Advanced Parameters:
Float Volts
Full Volts Max Time
Compete Amps
Default
94% of FullV
4 hrs
0.15A
The charger will hold the full voltage until either the current drops below Complete A, or it has
been held at the full voltage for FullV MaxT. At either of these events, the charger output will drop
to the float voltage, and the display will show CHARGE COMPLETE. To setup an equalizing charge
profile for flooded lead acid batteries, you can set the full voltage about 10% higher than normal,
and limit the Full Voltage time to about 2hrs. The table below shows some typical voltage
settings for 24V, 36V, and 48V lead acid packs at room temperature.
Reference Charge Voltages for Common Lead Acid Batteries
Full Voltage
Equalize FullV
Float Voltage
24V Sealed 24V Flooded
28.0 V
29.6 V
N/A
31.0 V
26.4 V
26.4 V
36V Sealed 36V Flooded
42 V
44.4 V
N/A
46.5 V
39.6 V
39.6 V
48V Sealed 48V Flooded
56.0 V
59.2 V
N/A
62.0 V
52.8 V
52.8 V
It is recommended to consult your battery manufacturer for their exact recommended charge
voltage, especially in the case of Gel type sealed batteries that are more sensitive to
overcharge. Similarly, care is needed when charging lead batteries at ambient temperatures
above 30oC, as the charge voltages at higher temperatures also need to be reduced to prevent
overcharging.
4.3.
Nickel (NiCad or NiMH)
Nickel Cadmium and Nickel Metal Hydride batteries are unique in that their voltage rises and
then falls again during the charge cycle, so the strategy of charging to a fixed voltage does not
work.
Toward the end of the charge process, the battery temperature rises rapidly, and as the pack
gets hotter the battery voltage eventually decreases. The end of charge can be detected either
by monitoring the battery temperature or by looking for the moment when the voltage starts to
decrease, known as -DeltaV.
- 15 -
www.ebikes.ca/satiator
[email protected]
+1(604) 569-0902
Figure 24: Charging Graph of 36V NiMH / NiCad Pack
Charging based on a temperature sensor is preferred and should always be used when a
temperature sensor is available. After the temperature rise is detected, the battery is about 95%
charged and the current is greatly reduced while charging is continued for a short amount of
time to reach 100% charged status. This is known as the topping charge. If charging at full
current is carried on to the –DeltaV point, then the pack has already been somewhat
overcharged and there isn't as much need for this additional topping current.
The custom parameters for NiMH/NiCad packs are quite different than for the other chemistries.
In the basic setup, the nominal rather than the full charge voltage is specified, and is mostly
used for pre-populating the advanced parameters and generating the profile name.
NiMH / NiCad Custom Profile Parameters
Basic Parameters: Range
Nominal Volts
12-48 V
Bulk Amps
1.0-8.0* A
Thermistor?
Yes / No
Advanced Parameters:
Trickle Amps
Bulk Start Voltage
DeltaV
Max Temperature*
dT/dt*
Top-Up Amps
Top-Up Time
Max Volts
Default
0.5 A
80% of Nominal Volts
-0.2V
o
50 C
1 deg / min
0.5 A
1.0 hr
1.4*Nominal VOlts
After any of the charge termination methods are detected, then the charger output current
reduces to TopUp Amps for the fixed duration of TopUp Time in order to bring the pack to a 100%
full charge.
- 16 -
www.ebikes.ca/satiator
[email protected]
+1(604) 569-0902
We recommend a bulk charge current of at least 1/4 the battery capacity, as the end of charge
indicators (Temperature Rise and Voltage Drop) are not pronounced at low charge currents. For
instance, a 12Ah nickel battery should have at least a 3A bulk charging current.
The NiMH/NiCad profile does not run a continuous trickle current into the pack after charge is
complete. This technique was common with NiCad batteries to counteract self-discharge and
keep the battery 100% topped up, but with NiMH a continuous trickle for a long length of time
will damage the cells. If you want a pack to be fully topped up prior to usage, then you should
time your charging so that the charge will finish shortly before you will need the battery.
5. Additional Features and Details
5.1.
Force Start
In some situations, you may have a battery attached to the charger but the charger still says
CONNECT BATTERY. For instance, this can happen if the battery has been drained so low that the
battery management system's (BMS's) protection circuit inside your pack has shut off and
disabled the battery output. If there is no voltage on the battery terminals, the charger will be
unaware that a pack has been plugged in.
Figure 25: Force Start if battery not detected from tripped BMS
In this situation, pressing and holding the lower button on the CONNECT BATTERY screen will force
the charger output to go active for a few seconds in order to begin a charge process. If it detects
current flowing into the battery at a voltage higher than the start voltage for the selected profile,
the normal charge process will begin.
5.2.
Fault Conditions
There are several fault scenarios that you may encounter in using the Satiator.
- 17 -
www.ebikes.ca/satiator
[email protected]
+1(604) 569-0902
5.2.1.
Over Voltage
If the connected battery voltage is higher than the max voltage for the profile, then the display
will produce a voltage too high error. This error screen will persist until the battery is removed
5.2.2.
Short Circuit
If the Satiator senses that the output pins are either shorted together or have a reverse polarity
voltage, then display will show a short circuit fault. This will clear once the short circuit or
reverse polarity is removed from the output plugs. If you see a short circuit fault even when no
battery is attached, then that could also be a sign that water or other conductive residue has
contaminated the charging connector and is bridging the pins.
5.2.3.
Power Stage Fault
In certain situations, it is possible for the Satiator’s onboard over-current protection to trip. When
this happens, the Satiator will not be able to output any current, so if you plug in a battery it will
show the battery voltage correctly and attempt to charge but it will display 0 amps. This
condition is reset by powering the Satiator off and on again.
5.2.4.
OLED Screen Glitch
If the AC input to the Satiator is quickly interrupted and restored while the Satiator is charging a
battery pack, then it is possible to corrupt and freeze the OLED display even though the Satiator
is still charging fine in the background. Pressing either button will reset the display, as will
waiting for it to enter screen saver mode.
5.3.
Cell Balancing
With lithium packs, it can happen that the battery stops charging abruptly because the BMS
circuitry has tripped from a cell overvoltage fault. If the battery's management circuit does cell
balancing, then this high voltage cell will be bled down to a release voltage and then the
charging will resume again. This process can sometimes repeat many times, especially if the
pack was largely unbalanced. Even though the charger says "Charge Complete", it will still
resume the top up charges as the BMS circuitry allows so that the pack can fully balance out.
- 18 -
www.ebikes.ca/satiator
[email protected]
+1(604) 569-0902
5.4.
Thermal Rollback
The Cycle Satiator operates with much higher efficiency than standard ebike chargers (94-95%
versus 80-85%). But it also packs twice the power output into a smaller footprint and eliminates
active fan cooling, so the casing will still get quite warm during use. At full output power in a
room temperature environment, it will typically reach about 55-60 degrees Celsius. This will feel
hot to the touch but is not a cause for concern.
We recommend placing the charger in a location where it is exposed to free air in order to help
dissipate this heat. If the charger is in an enclosed space (like a pannier bag), or is used in a hot
environment and starts to overheat, then it will automatically scale back the output power so that
the internal temperature does not get beyond 70 Celsius. This will not affect its ability to
complete a charge cycle, but it will take longer as charging current will be reduced.
5.5.
Exposure to Rain
The Cycle Satiator has a sealed enclosure and can handle rain, road spay, and other incidental
water exposure when it is not powered up. However, when plugged in and charging it is
important to be in a dry environment outside the rain. The input and battery connectors are not
waterproof and there is risk of both corrosion and electric shock if powered up in wet conditions.
5.6.
Orientation and Vent
In general, the Cycle Satiator is easiest to operate when right side up, but it
will run and function fine in any orientation. The only caveat is that the
membrane vent on the input end of the charger should not be covered in
water, so if it is mounted vertically care should be taken that it is not done in
such a way that water pools around this vent area.
Figure 26: Membrane vent
5.7.
Thermistor
The 3rd pin of the XLR charge plug can be used in conjunction with a thermistor for sensing
pack temperature. This is recommended with NiMH and NiCad batteries. The charger expects a
thermistor with 10kOhm resistance at room temperature, and a Beta constant between 38004000. This thermistor spec is common in industry with nickel based packs.
5.8.
Upgrading Firmware
The firmware and stock profile list on the Satiator can both be updated via an optional USB
adapter plug that connects to the charge port and a computer. Details on re-flashing the
firmware are explained in the help menu of the Satiator Setup Utility, available for Windows,
Mac OS, and Linux from https://www.ebikes.ca/satiator/
- 19 -
www.ebikes.ca/satiator
[email protected]
+1(604) 569-0902
6. Complete Navigation Map
The diagram below shows the menu system and navigation layout for the User Interface, along
with the conditions and/or button presses that cause the Satiator to go from one display to
another.
- 20 -
www.ebikes.ca/satiator
[email protected]
+1(604) 569-0902
7. Specifications
7.1.1.
Electrical
Input Range
Max Output Range
Operating Efficiency
Power Factor
No Load AC Power
Input/Output Isolation
Grounding
Parasitic Drain from Battery
7.1.2.
Mechanical
Dimensions
Weight
Vibration
Chassis Material
AC Input Connector
AC Input Cable
DC Output Connector
DC Output Cable
7.1.3.
-30⁰C to +50⁰C (Output Power Derated >30⁰C)
-40⁰C to +60⁰C
Certifications
Safety
Emissions
Immunity
7.1.5.
237 x 78 x 48 mm
1.06 kg (1.33 kg with AC-DC cords)
SAE J1455-1994 Category 2, UL458 / CSA 107.2
Powdercoated Aluminum
IEC320-C14
2m with IEC320-C13 / NEMA-15 plugs
IP67 10A MULTICOMP/SINGATRON 2CT3002-W03400
1m with 3-Pin Neutrik XLR, (1=DC+, 2=DC-, 3=Signal)
Environmental
Operating Temperature
Storage Temperature
7.1.4.
100-240VAC 50-60Hz
12-63V, 0-8A, 0-360 Watts
95% @ 230V, 94% @ 120V
>99%
<1 Watt
Reinforced Insulation, Tested to 3.75 kV
Grounded Chassis, DC Output Floating
<0.1 mA (600 kΩ Impedance, less than 1Ah / year)
UL 1012, CSA - C22.2 No.107.2-01 (R2011) & UL1012
(Edition 8):2010, CE / IEC 60335-1/2-29
FCC Part 15 B, EN55014, EN 61000-3-2, EN 61000-3-3
EN 61000-4-2/-3/-4/-5/-6/-11
Labtest Certification Inc., UL/CSA/CE
Grin Technologies, CEC Small Battery Charger
Protection
Output Short Circuit
Reverse Battery
Over-Voltage
Under-Voltage
Over-Current
Over-Temperature
Requires manual power reset
Output disabled when reverse voltage detected. Internal
fuse protection if output disable overridden
Output disabled if battery voltage exceeds Max Setpoint
Output disabled if battery voltage less than Min Setpoint
(with option for manual override)
Charger output disabled if current exceeds Max Setpoint
Output current reduced to limit internal temp to <70⁰C
- 21 -


![ATP [ADAPTIVE TRAINING PISTOL]](http://vs1.manualzilla.com/store/data/005720818_1-b7f6edc22efccf3f89f6755e5b5913c9-150x150.png)