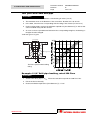
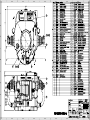
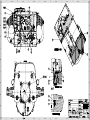
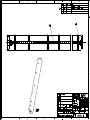
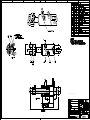
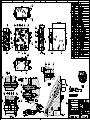
1
BX3, BX4-50, BX4-75, BX5 USER’S MANUAL Hydraulic elevator This Manual is applicable to the following BX elevators: BX3 pn 203300Y30 with serial number NL0112881 onwards BX4-50 pn 50000640Y: All elevators BX4-75 pn 50000650Y: All elevators BX5 pn 50004000Y30 with serial number NL0108849 onwards Refer to Manual pn 203200-345-MAN-001 for the following BX elevators: BX3 pn 203300Y30 with serial number NL0112880 and below BX4-50 pn 203290Y30: All elevators BX4-75 pn 203200Y30: All elevators BX5 pn 50004000Y30 with serial numbers NL0108848 and below Original Instructions REFERENCE BX3, BX4-50, BX4-75, BX5 REFERENCE DESCRIPTION Hydraulic elevators This document contains proprietary and confidential information which is the property of National Oilwell Varco, L.p, its affiliates or subsidiaries (all collectively referred to hereinafter as "NOV"). It is loaned for limited purposes only and remains the property of NOV. Reproduction, in whole or in part, or use of this design or distribution of this information to others is not permitted without the express written consent of NOV. This document is to be returned to NOV upon request or upon completion of the use for which it was loaned. This document and the information contained and represented herein is the copyrighted property of NOV. DOCUMENT NUMBER 50000802-MAN-001 www.nov.com VarcoBJ BV Nijverheidsweg 45 4879 AP Etten-Leur P.O. Box 17 4870 AA Etten-Leur The Netherlands Tel + 31-76-5083000 Fax + 31-76-5046000 www.nov.com REV B June 2010 User’s Manual BX3, BX4-50, BX4-75, BX5 This Manual is applicable to the following BX elevators: BX3 pn 203300Y30 with serial number NL0112881 onwards BX4-50 pn 50000640Y: All elevators BX4-75 pn 50000650Y: All elevators BX5 pn 50004000Y30 with serial number NL0108849 onwards Refer to Manual pn 203200-345-MAN-001 for the following BX elevators: BX3 pn 203300Y30 with serial number NL0112880 and below BX4-50 pn 203290Y30: All elevators BX4-75 pn 203200Y30: All elevators BX5 pn 50004000Y30 with serial numbers NL0108848 and below REFERENCE BX3, BX4-50, BX4-75, BX5 REFERENCE DESCRIPTION Hydraulic elevators This document contains proprietary and confidential information which is the property of National Oilwell NOV, L.P., its affiliates or subsidiaries (all collectively referred to hereinafter as "NOV"). It is loaned for limited purposes only and remains the property of NOV. Reproduction, in whole or in part, or use of this design or distribution of this information to others is not permitted without the express written consent of NOV. This document is to be returned to NOV upon request or upon completion of the use for which it was loaned. This document and the information contained and represented herein is the copyrighted property of NOV. www.nov.com NOVBJ BV Nijverheidsweg 45 4879AP Etten-Leur Tel: +31-76-5083000 Fax: +31-76-5046000 DOCUMENT NUMBER REV 50000802-MAN-001 B Document number Revision Page 50000802-MAN-001 B 2 of 110 Revision History B June 2010 Update A Oct 2009 Update - Oct 2009 Issued for Implementation Rev Date Reason for issue This document is PDM-link controlled Change Description Revision Change Description - First Issue A Drawings updated, typo’s removed. B Rating of BX bushings changed, information added about translations, SMX partnumbers changed. © Copyright 2010 NOV, NOV LP. All rights reserved. Patent Pending. NOV®, Varco® is a registered trademark of NOV, Varco I/P reg. U.S. Patent & Trademark Office. This publication is the property of, and contains information proprietary to NOV, Varco International, Inc. No part of this publication may be reproduced or copied in any form, or by any means, including electronic, mechanical, photocopying, recording or otherwise, without the prior written permission of NOV, Varco IP®. All product, brand, or trade names used in this publication are the trademarks or registered trademarks of their respective owners. Information in this manual is subject to change without notice. www.nov.com Document number Revision Page 50000802-MAN-001 B 3 of 110 Table of Contents General information . . . . . . . . . . . . . . . . . . . . . . . . . . . . . . . . . . . . . . . . . . . . . . . . . . . 9 Instructions . . . . . . . . . . . . . . . . . . . . . . . . . . . . . . . . . . . . . . . . . . . . . . . . . . . . . . . 9 How to use this manual . . . . . . . . . . . . . . . . . . . . . . . . . . . . . . . . . . . . . . . . . . . . . 11 Special information . . . . . . . . . . . . . . . . . . . . . . . . . . . . . . . . . . . . . . . . . . . . . 11 Intended audience . . . . . . . . . . . . . . . . . . . . . . . . . . . . . . . . . . . . . . . . . . . . . . 11 Conventions . . . . . . . . . . . . . . . . . . . . . . . . . . . . . . . . . . . . . . . . . . . . . . . . . . . . . 11 Notes, Cautions, and Warnings . . . . . . . . . . . . . . . . . . . . . . . . . . . . . . . . . . . . 11 Note: . . . . . . . . . . . . . . . . . . . . . . . . . . . . . . . . . . . . . . . . . . . . . . . . . . . . . . . . 12 Caution: . . . . . . . . . . . . . . . . . . . . . . . . . . . . . . . . . . . . . . . . . . . . . . . . . . . . . . 12 Warning: . . . . . . . . . . . . . . . . . . . . . . . . . . . . . . . . . . . . . . . . . . . . . . . . . . . . . 12 Illustrations . . . . . . . . . . . . . . . . . . . . . . . . . . . . . . . . . . . . . . . . . . . . . . . . . . . . . . 12 Safety Requirements . . . . . . . . . . . . . . . . . . . . . . . . . . . . . . . . . . . . . . . . . . . . . . . 12 General System Safety Practices . . . . . . . . . . . . . . . . . . . . . . . . . . . . . . . . . . . . . 12 Personnel Training . . . . . . . . . . . . . . . . . . . . . . . . . . . . . . . . . . . . . . . . . . . . . 13 Recommended Tools . . . . . . . . . . . . . . . . . . . . . . . . . . . . . . . . . . . . . . . . . . . 13 Replacing Components . . . . . . . . . . . . . . . . . . . . . . . . . . . . . . . . . . . . . . . . . . 13 Routine Maintenance . . . . . . . . . . . . . . . . . . . . . . . . . . . . . . . . . . . . . . . . . . . 13 Proper Use of Equipment . . . . . . . . . . . . . . . . . . . . . . . . . . . . . . . . . . . . . . . . 13 Lifting . . . . . . . . . . . . . . . . . . . . . . . . . . . . . . . . . . . . . . . . . . . . . . . . . . . . . . . . 13 BX Elevator limitations . . . . . . . . . . . . . . . . . . . . . . . . . . . . . . . . . . . . . . . . . . 13 Design safety factor. . . . . . . . . . . . . . . . . . . . . . . . . . . . . . . . . . . . . . . . . . . . . 13 Limited warranty . . . . . . . . . . . . . . . . . . . . . . . . . . . . . . . . . . . . . . . . . . . . . . . 14 Identification numbers . . . . . . . . . . . . . . . . . . . . . . . . . . . . . . . . . . . . . . . . . . . 14 Warning plates . . . . . . . . . . . . . . . . . . . . . . . . . . . . . . . . . . . . . . . . . . . . . . . . 14 CE marking . . . . . . . . . . . . . . . . . . . . . . . . . . . . . . . . . . . . . . . . . . . . . . . . . . . 16 BX major components . . . . . . . . . . . . . . . . . . . . . . . . . . . . . . . . . . . . . . . . . . . . . . 17 BX hydraulics . . . . . . . . . . . . . . . . . . . . . . . . . . . . . . . . . . . . . . . . . . . . . . . . . . . . 18 Elevator Closing Sequence . . . . . . . . . . . . . . . . . . . . . . . . . . . . . . . . . . . . . . . 18 Elevator Opening Sequence . . . . . . . . . . . . . . . . . . . . . . . . . . . . . . . . . . . . . . 18 General specifications . . . . . . . . . . . . . . . . . . . . . . . . . . . . . . . . . . . . . . . . . . . . . . . . 23 Upgrade BX-elevator . . . . . . . . . . . . . . . . . . . . . . . . . . . . . . . . . . . . . . . . . . . . 23 Existing BX-4 Bushings . . . . . . . . . . . . . . . . . . . . . . . . . . . . . . . . . . . . . . . . . . 23 General specifications, requirements & sizes . . . . . . . . . . . . . . . . . . . . . . . . . . . . 23 Load ratings . . . . . . . . . . . . . . . . . . . . . . . . . . . . . . . . . . . . . . . . . . . . . . . . . . . 23 Bushing overview . . . . . . . . . . . . . . . . . . . . . . . . . . . . . . . . . . . . . . . . . . . . . . . . . 24 BX3-Bushings . . . . . . . . . . . . . . . . . . . . . . . . . . . . . . . . . . . . . . . . . . . . . . . . . 24 BX4-Bushings . . . . . . . . . . . . . . . . . . . . . . . . . . . . . . . . . . . . . . . . . . . . . . . . . 25 BX5-Bushings . . . . . . . . . . . . . . . . . . . . . . . . . . . . . . . . . . . . . . . . . . . . . . . . . 28 Calculating the safe working load . . . . . . . . . . . . . . . . . . . . . . . . . . . . . . . . . . . . . 30 Examples . . . . . . . . . . . . . . . . . . . . . . . . . . . . . . . . . . . . . . . . . . . . . . . . . . . . . . . . 30 Example 1: Square shoulder tubular . . . . . . . . . . . . . . . . . . . . . . . . . . . . . . . . 30 Minimum required tool joint diameters* . . . . . . . . . . . . . . . . . . . . . . . . . . . . . . 32 Replaced parts . . . . . . . . . . . . . . . . . . . . . . . . . . . . . . . . . . . . . . . . . . . . . . . . 33 www.nov.com Document number Revision Page 50000802-MAN-001 B 4 of 110 Table of Contents Lubrication & Maintenance. . . . . . . . . . . . . . . . . . . . . . . . . . . . . . . . . . . . . . . . . . . . 39 Safety . . . . . . . . . . . . . . . . . . . . . . . . . . . . . . . . . . . . . . . . . . . . . . . . . . . . . . . . . . 39 Recommended hydraulic fluid . . . . . . . . . . . . . . . . . . . . . . . . . . . . . . . . . . . . . 39 Recommended General Purpose EP grease . . . . . . . . . . . . . . . . . . . . . . . . . 39 Greasing the inserts and insert slots. . . . . . . . . . . . . . . . . . . . . . . . . . . . . . . . 39 Maintenance . . . . . . . . . . . . . . . . . . . . . . . . . . . . . . . . . . . . . . . . . . . . . . . . . . . . . 40 Daily inspection schedule(when BX is in use) cat II . . . . . . . . . . . . . . . . . . . . 40 Daily operational check (cat II) . . . . . . . . . . . . . . . . . . . . . . . . . . . . . . . . . . . . 41 Daily lubrication (cat II) . . . . . . . . . . . . . . . . . . . . . . . . . . . . . . . . . . . . . . . . . 41 Weekly maintenance . . . . . . . . . . . . . . . . . . . . . . . . . . . . . . . . . . . . . . . . . . . . 43 Monthly maintenance . . . . . . . . . . . . . . . . . . . . . . . . . . . . . . . . . . . . . . . . . . . 43 Six monthly inspection (cat III) . . . . . . . . . . . . . . . . . . . . . . . . . . . . . . . . . . . . 43 3 monthly inspection (cat III) on RIG . . . . . . . . . . . . . . . . . . . . . . . . . . . . . . . . 43 6 monthly inspection (cat III) on RIG . . . . . . . . . . . . . . . . . . . . . . . . . . . . . . . . 43 Annual (1 year) inspection (cat IV) . . . . . . . . . . . . . . . . . . . . . . . . . . . . . . . . . 43 Maintenance procedures . . . . . . . . . . . . . . . . . . . . . . . . . . . . . . . . . . . . . . . . . . . 44 API recommended practice RP 8B . . . . . . . . . . . . . . . . . . . . . . . . . . . . . . . . . 44 Recommended inspections . . . . . . . . . . . . . . . . . . . . . . . . . . . . . . . . . . . . . . . 44 Tool joint wear data drill-pipe . . . . . . . . . . . . . . . . . . . . . . . . . . . . . . . . . . . . . 45 Example: 5 1/2” Drill pipe bushing, rated 350 Tons . . . . . . . . . . . . . . . . . . . . 45 Center-bore 18° taper profile inspection . . . . . . . . . . . . . . . . . . . . . . . . . . . . . 46 Acceptance criteria for MPI . . . . . . . . . . . . . . . . . . . . . . . . . . . . . . . . . . . . . . . 46 Hydraulic filter maintenance procedure . . . . . . . . . . . . . . . . . . . . . . . . . . . . . . . . 47 Filter in manifold block . . . . . . . . . . . . . . . . . . . . . . . . . . . . . . . . . . . . . . . . . . 47 Tests . . . . . . . . . . . . . . . . . . . . . . . . . . . . . . . . . . . . . . . . . . . . . . . . . . . . . . . . . . . 48 Load test . . . . . . . . . . . . . . . . . . . . . . . . . . . . . . . . . . . . . . . . . . . . . . . . . . . . . 48 Cylinder seal test . . . . . . . . . . . . . . . . . . . . . . . . . . . . . . . . . . . . . . . . . . . . . . 48 Wear data/criteria . . . . . . . . . . . . . . . . . . . . . . . . . . . . . . . . . . . . . . . . . . . . . . . . . 49 Repair data . . . . . . . . . . . . . . . . . . . . . . . . . . . . . . . . . . . . . . . . . . . . . . . . . . . 49 Bushing/pin wear data . . . . . . . . . . . . . . . . . . . . . . . . . . . . . . . . . . . . . . . . . . 49 Bushing / pin repair parts . . . . . . . . . . . . . . . . . . . . . . . . . . . . . . . . . . . . . . . . . . . 49 BX3 . . . . . . . . . . . . . . . . . . . . . . . . . . . . . . . . . . . . . . . . . . . . . . . . . . . . . . . . . 49 BX4-50 & 4-75 . . . . . . . . . . . . . . . . . . . . . . . . . . . . . . . . . . . . . . . . . . . . . . . . 49 BX5 . . . . . . . . . . . . . . . . . . . . . . . . . . . . . . . . . . . . . . . . . . . . . . . . . . . . . . . . . 50 Wear data hinge pins . . . . . . . . . . . . . . . . . . . . . . . . . . . . . . . . . . . . . . . . . . . . . . 51 BX3 . . . . . . . . . . . . . . . . . . . . . . . . . . . . . . . . . . . . . . . . . . . . . . . . . . . . . . . . . 51 BX4-50 & 4-75 . . . . . . . . . . . . . . . . . . . . . . . . . . . . . . . . . . . . . . . . . . . . . . . . 52 BX5 . . . . . . . . . . . . . . . . . . . . . . . . . . . . . . . . . . . . . . . . . . . . . . . . . . . . . . . . . 53 Wear data elevator closing mechanism . . . . . . . . . . . . . . . . . . . . . . . . . . . . . . . . 54 Wear data position pins for elevator bushings . . . . . . . . . . . . . . . . . . . . . . . . . . . 55 BX3 . . . . . . . . . . . . . . . . . . . . . . . . . . . . . . . . . . . . . . . . . . . . . . . . . . . . . . . . . 55 BX4-50&4-75 . . . . . . . . . . . . . . . . . . . . . . . . . . . . . . . . . . . . . . . . . . . . . . . . . 55 BX5 . . . . . . . . . . . . . . . . . . . . . . . . . . . . . . . . . . . . . . . . . . . . . . . . . . . . . . . . . 55 Locating pins . . . . . . . . . . . . . . . . . . . . . . . . . . . . . . . . . . . . . . . . . . . . . . . . . . 56 www.nov.com Document number Revision Page 50000802-MAN-001 B 5 of 110 Table of Contents Wear data trigger shaft . . . . . . . . . . . . . . . . . . . . . . . . . . . . . . . . . . . . . . . . . . . . . 57 Wear dat lock shaft . . . . . . . . . . . . . . . . . . . . . . . . . . . . . . . . . . . . . . . . . . . . . 58 Wear data link ear . . . . . . . . . . . . . . . . . . . . . . . . . . . . . . . . . . . . . . . . . . . . . . 59 Installation and commissioning . . . . . . . . . . . . . . . . . . . . . . . . . . . . . . . . . . . . . . . . 63 General procedure . . . . . . . . . . . . . . . . . . . . . . . . . . . . . . . . . . . . . . . . . . . . . . . . 63 Installation . . . . . . . . . . . . . . . . . . . . . . . . . . . . . . . . . . . . . . . . . . . . . . . . . . . . 63 System requirements check . . . . . . . . . . . . . . . . . . . . . . . . . . . . . . . . . . . . . . 63 Install instrumentation in driller’s console acc. to HUK drawing. . . . . . . . . . . . 63 Cabinets . . . . . . . . . . . . . . . . . . . . . . . . . . . . . . . . . . . . . . . . . . . . . . . . . . . . . 63 Universal Rotator . . . . . . . . . . . . . . . . . . . . . . . . . . . . . . . . . . . . . . . . . . . . . . . 64 Installing the Hook Up Kit . . . . . . . . . . . . . . . . . . . . . . . . . . . . . . . . . . . . . . . . . . . 64 Hose kit pn50004140 . . . . . . . . . . . . . . . . . . . . . . . . . . . . . . . . . . . . . . . . . . . 64 Commissioning . . . . . . . . . . . . . . . . . . . . . . . . . . . . . . . . . . . . . . . . . . . . . . . . . . . 64 Before connecting the BX . . . . . . . . . . . . . . . . . . . . . . . . . . . . . . . . . . . . . . . . 64 After connecting the BX . . . . . . . . . . . . . . . . . . . . . . . . . . . . . . . . . . . . . . . . . . 65 Operations . . . . . . . . . . . . . . . . . . . . . . . . . . . . . . . . . . . . . . . . . . . . . . . . . . . . . . . . . 69 Intended usage . . . . . . . . . . . . . . . . . . . . . . . . . . . . . . . . . . . . . . . . . . . . . . . . . . . 69 Installing the elevator and rotator in the links. . . . . . . . . . . . . . . . . . . . . . . . . . 69 Fitting the rotator to the elevator. . . . . . . . . . . . . . . . . . . . . . . . . . . . . . . . . . . 69 Selecting the correct bushing . . . . . . . . . . . . . . . . . . . . . . . . . . . . . . . . . . . . . 70 Installing bushings in elevator . . . . . . . . . . . . . . . . . . . . . . . . . . . . . . . . . . . . . 70 Bushing storage frame. . . . . . . . . . . . . . . . . . . . . . . . . . . . . . . . . . . . . . . . . . . 73 Connecting the hoses to the elevator. . . . . . . . . . . . . . . . . . . . . . . . . . . . . . . . 73 Operations . . . . . . . . . . . . . . . . . . . . . . . . . . . . . . . . . . . . . . . . . . . . . . . . . . . . . . . 74 Assembly and dis-assembly . . . . . . . . . . . . . . . . . . . . . . . . . . . . . . . . . . . . . . . . . . . 77 Elevator Disassembly . . . . . . . . . . . . . . . . . . . . . . . . . . . . . . . . . . . . . . . . . . . . . . 77 Removing manifold block from elevator . . . . . . . . . . . . . . . . . . . . . . . . . . . . . . . . 77 Disassembly hydraulic manifold block. . . . . . . . . . . . . . . . . . . . . . . . . . . . . . . 77 Removal cylinder package . . . . . . . . . . . . . . . . . . . . . . . . . . . . . . . . . . . . . . . . . . 78 Disassembly cylinders . . . . . . . . . . . . . . . . . . . . . . . . . . . . . . . . . . . . . . . . . . . 78 Exchanging seals . . . . . . . . . . . . . . . . . . . . . . . . . . . . . . . . . . . . . . . . . . . . . . 79 Disassembly latch-doors-lever package . . . . . . . . . . . . . . . . . . . . . . . . . . . . . . . . 79 Disassembly latch . . . . . . . . . . . . . . . . . . . . . . . . . . . . . . . . . . . . . . . . . . . . . . 79 Disassembly control brackets . . . . . . . . . . . . . . . . . . . . . . . . . . . . . . . . . . . . . 79 Disassembly bushing lock assembly . . . . . . . . . . . . . . . . . . . . . . . . . . . . . . . . 79 Disassembly latch lock assembly . . . . . . . . . . . . . . . . . . . . . . . . . . . . . . . . . . 80 Replacement lever wear bushings . . . . . . . . . . . . . . . . . . . . . . . . . . . . . . . . . 80 Replacement of hinge-pin wear bushings. . . . . . . . . . . . . . . . . . . . . . . . . . . . 80 Elevator assembly . . . . . . . . . . . . . . . . . . . . . . . . . . . . . . . . . . . . . . . . . . . . . . . . . 81 General note . . . . . . . . . . . . . . . . . . . . . . . . . . . . . . . . . . . . . . . . . . . . . . . . . . 81 Cylinder adjustment . . . . . . . . . . . . . . . . . . . . . . . . . . . . . . . . . . . . . . . . . . . . . 81 Latch Cylinder Adjustment. . . . . . . . . . . . . . . . . . . . . . . . . . . . . . . . . . . . . . . . 82 Trouble shooting . . . . . . . . . . . . . . . . . . . . . . . . . . . . . . . . . . . . . . . . . . . . . . . . . . . . 85 Overview possible problems . . . . . . . . . . . . . . . . . . . . . . . . . . . . . . . . . . . . . . . . . 85 www.nov.com Document number Revision Page 50000802-MAN-001 B 6 of 110 Table of Contents 1. Open elevator does not close while pipe enters the elevator (see drawing 50004050-3). . . . . . . . . . . . . . . . . . . . . . . . . . . . . . . . . . . . . . . . . . . . . . . . . . . . . . . . 85 2. Elevator will close but not latch. (NO CLOSED SIGNAL) . . . . . . . . . . . . . . 86 3. Closed elevator will not open while commanded to open. . . . . . . . . . . . . . 87 4. Elevator is hesitating to open. . . . . . . . . . . . . . . . . . . . . . . . . . . . . . . . . . . . 88 5. The elevator opening / closing operation is slow. . . . . . . . . . . . . . . . . . . . . 88 6. Elevator closes immediately. . . . . . . . . . . . . . . . . . . . . . . . . . . . . . . . . . . . 88 7. Rotated elevator will not close/latch. . . . . . . . . . . . . . . . . . . . . . . . . . . . . . . 89 Test kit BX-elevator + power slip p/n 202539 . . . . . . . . . . . . . . . . . . . . . . . . . . . . 90 Appendixes . . . . . . . . . . . . . . . . . . . . . . . . . . . . . . . . . . . . . . . . . . . . . . . . . . . . . . . . 95 Risk assessment acc. to EN14121-1 . . . . . . . . . . . . . . . . . . . . . . . . . . . . . . . . . . 95 Conclusion Risk Assessment . . . . . . . . . . . . . . . . . . . . . . . . . . . . . . . . . . . . . 95 Applicable standards: . . . . . . . . . . . . . . . . . . . . . . . . . . . . . . . . . . . . . . . . . . . 95 Transport, handling & preservation. . . . . . . . . . . . . . . . . . . . . . . . . . . . . . . . . . . . 95 Torque values (US) for bolts grade 8 . . . . . . . . . . . . . . . . . . . . . . . . . . . . . . . 96 Torque values (metric) for bolts grade 8 . . . . . . . . . . . . . . . . . . . . . . . . . . . . . 97 Frequently asked questions . . . . . . . . . . . . . . . . . . . . . . . . . . . . . . . . . . . . . . . . . 98 What is the weight of an BX-elevator? . . . . . . . . . . . . . . . . . . . . . . . . . . . . . . 98 How does a BX-elevator function? . . . . . . . . . . . . . . . . . . . . . . . . . . . . . . . . . 98 Is it safe working on an elevator without disconnecting the hoses? . . . . . . . . 98 What should I do when the elevator doesn’t functions well? . . . . . . . . . . . . . 98 Why can’t I use parts from NOV origin ? . . . . . . . . . . . . . . . . . . . . . . . . . . . . . 98 I know how to operate an elevator. Do I need to read this manual ? . . . . . . . 98 Why can’t I use tool joint compound/pipe-dope as a lubricant ? . . . . . . . . . . . 98 Spare parts . . . . . . . . . . . . . . . . . . . . . . . . . . . . . . . . . . . . . . . . . . . . . . . . . . . . . . . . 101 Spare parts BX Manifold #50004050-11 . . . . . . . . . . . . . . . . . . . . . . . . . . . 101 BX3 Commissioning spares #203300-12 . . . . . . . . . . . . . . . . . . . . . . . . . . . 101 BX3 Operational spare parts #203300-11 . . . . . . . . . . . . . . . . . . . . . . . . . . 102 BX4 Commissioning spare parts #50000640-12 . . . . . . . . . . . . . . . . . . . . . 102 BX4 Operational spare parts #50000640-11 . . . . . . . . . . . . . . . . . . . . . . . . 103 BX5 commissioning spares #50004000-12 . . . . . . . . . . . . . . . . . . . . . . . . . 104 BX5 Operational spare parts #50004000-11 . . . . . . . . . . . . . . . . . . . . . . . . 105 Drawings & test procedures . . . . . . . . . . . . . . . . . . . . . . . . . . . . . . . . . . . . . . . . . 109 Test procedures . . . . . . . . . . . . . . . . . . . . . . . . . . . . . . . . . . . . . . . . . . . . . . 109 Dimensional drawings . . . . . . . . . . . . . . . . . . . . . . . . . . . . . . . . . . . . . . . . . . 109 Drawings . . . . . . . . . . . . . . . . . . . . . . . . . . . . . . . . . . . . . . . . . . . . . . . . . . . . 109 www.nov.com BX3, BX4-50, BX4-75, BX5 1-General Information REFERENCE BX3, BX4-50, BX4-75, BX5 REFERENCE DESCRIPTION Hydraulic Elevators This document contains proprietary and confidential information which is the property of National Oilwell Varco, L.P., its affiliates or subsidiaries (all collectively referred to hereinafter as "NOV"). It is loaned for limited purposes only and remains the property of NOV. Reproduction, in whole or in part, or use of this design or distribution of this information to others is not permitted without the express written consent of NOV. This document is to be returned to NOV upon request or upon completion of the use for which it was loaned. This document and the information contained and represented herein is the copyrighted property of NOV. www.nov.com VarcoBJ BV Nijverheidsweg 45 4879AP Etten-Leur Tel: +31-76-5083000 Fax: +31-76-5046000 DOCUMENT NUMBER REV 50000802-MAN-001 B 1: General Information Document number Revision Page 50000802-MAN-001 B 9 of 110 General information Instructions Original Instructions are published in English; in the event the end-user may wish to obtain a translation of these in the official language of the country in which the machinery is to be used please contact your local NOV representative. Please note that this service may not be free of charge. Original Instruction can be downloaded from www.NOV.com/drilling ; , , , , NOV. , , . : www.NOV.com/drilling Pvodní návod je zveejn!n v angli"tin!; pokud si koncový uživatel peje získat peklad návodu v úedním jazyce zem!, ve které se zaízení bude používat, mže se obrátit na místního zástupce spole"nosti NOV. Upozor#ujeme, že tato služba nemusí být zdarma. Pvodní návod je k dispozici ke stažení na adrese www.NOV.com/drilling Juhendi originaal on avaldatud inglise keeles. Kui lõppkasutaja soovib tõlget selle riigi ametlikus keeles, kus seadmeid kasutatakse, palume pöörduda NOV-i kohaliku esindaja poole. Palume silmas pidada, et see teenus ei pruugi olla tasuta. Juhendi originaali saab alla laadida veebisaidilt www.NOV.com/drilling. Instrukcij$ originalas yra skelbiamas angl$ kalba. Jei galutinis vartotojas nor%t$ gauti ši$ instrukcij$ vertim& ' šalies, kurioje 'rengimai turi b(ti naudojami, oficiali&j& kalb&, reik%t$ kreiptis ' vietin' NOV atstov&. Prašome atkreipti d%mes', kad ši paslauga gali b(ti mokama. Instrukcij$ original& galima parsisi$sdinti iš tinklalapio www.NOV.com/drilling Šo nor)d*jumu ori+in)lvaloda ir ang0u valoda; gad*jum), ja j(s k) gala lietot)js v1laties sa2emt nor)d*jumu tulkojumu t)s valsts ofici)laj) valod), kur) š* maš*na tiks lietota, l(dzu, sazinieties ar viet1jo „NOV” p)rst)vi. L(dzu, 2emiet v1r), ka šis var neb(t bezmaksas pakalpojums. Nor)d*jumus ori+in)lvalod) varat lejupiel)d1t no vietnes www.NOV.com/drilling A használati utasítások eredetileg angol nyelven kerülnek kiadásra. Amennyiben a végfelhasználó meg szeretne kapni azon ország hivatalos nyelvén készült fordításukat, ahol a gépet használni fogják, akkor kérjük, vegye fel a kapcsolatot a NOV helyi képvisel3jével. Kérjük, vegye figyelembe, hogy ezt a szolgáltatást esetleg nem tudjuk díjmentesen nyújtani. Az eredeti használati utasítás a www.NOV.com/drilling oldalról tölthet3 le. Oryginalne instrukcje zosta4y wydane w j5zyku angielskim. Aby uzyska6 t4umaczenie tych instrukcji na j5zyk kraju, w którym urz&dzenie ma by6 u7ywane, nale7y skontaktowa6 si5 z lokalnym przedstawicielem firmy NOV. Nale7y pami5ta6, 7e taka us4uga jest p4atna. Oryginaln& instrukcj5 mo7na pobra6 na stronie www.NOV.com/drilling As Instruções Originais são publicadas em inglês; se o utilizador final pretender obter uma tradução destas instruções no idioma oficial do país onde a maquinaria vai ser utilizada, deverá contactar o representante local da NOV. Chamamos a atenção para o facto de este serviço poder não ser gratuito. As Instruções Originais podem ser transferidas a partir do site www.NOV.com/drilling www.nov.com Document number Revision Page 50000802-MAN-001 B 10 of 110 1: General Information Instruc8iunile originale sunt publicate în limba englez9; în eventualitatea în care utilizatorul final dore<te s9 ob8in9 o traducere a acestora în limba oficial9 a 89rii în care se vor folosi utilajele, v9 rug9m s9 lua8i leg9tura cu reprezentantul NOV local. V9 rug9m s9 re8ine8i c9 este posibil ca acest serviciu s9 nu fie gratuit. Instruc8iunile originale pot fi desc9rcate de pe www.NOV.com/drilling Pôvodný návod je vydaný v anglickom jazyku. Ak si koncový používate= želá získa> preklad v úradnom jazyku štátu, v ktorom sa stroj bude používa>, obrá>te sa na miestneho zástupcu spolo"nosti NOV. Upozor#ujeme, že táto služba nemusí by> bezplatná. Originálny návod je k dispozícii na prevzatie zo stránky www.NOV.com/drilling. Originalna navodila so objavljena v angleš"ini; "e kon"ni uporabnik želi prevod teh navodil v uradnem jeziku države, kjer se bodo stroji uporabljali, se obrnite na lokalnega predstavnika podjetja NOV. Ta storitev mogo"e ne bo brezpla"na. Originalna navodila lahko prenesete s spletne strani www.NOV.com/drilling De originale anvisninger er udgivet på engelsk. Måtte slutbrugeren ønske at få en oversættelse af disse i det officielle sprog af det land, hvor maskineriet skal bruges, henvises der til den lokale NOV-repræsentant. Bemærk venligst at denne service måske ikke er gratis. De originale anvisninger kan downloades fra www.NOV.com/drilling Die Originalanleitung erscheint in englischer Sprache. Wünscht der Endverbraucher eine Übersetzung dieser Anleitung in der offiziellen Sprache des Landes, in dem die Maschine benutzt werden soll, dann wenden Sie sich bitte an Ihren örtlichen NOV-Vertreter. Bitte beachten Sie, dass diese Dienstleistung möglicherweise nicht kostenlos ist. Die Originalanleitung können Sie unter folgendem Link herunterladen: www.NOV.com/drilling. Las instrucciones originales son publicadas en inglés. En el caso de que el usuario final quiera obtener una traducción en el idioma oficial del país donde la maquinaria será utilizada, debe ponerse en contacto con su representante local de NOV. Tenga en cuenta que este servicio puede conllevar gastos. Es posible descargar las instrucciones originales desde www.NOV.com/drilling. Alkuperäiset ohjeet on julkaistu englannin kielellä; mikäli loppukäyttäjä haluaa saada niiden käännöksen sen maan virallisella kielellä, jossa konetta käytetään, on otettava yhteys paikalliseen NOV-edustajaan. On mahdollista, että tästä palvelusta peritään maksu. Alkuperäiset ohjeet voi ladata osoitteesta www.NOV.com/drilling Les consignes originales sont publiées en anglais; dans le cas où l’utilisateur final demande une traduction de ces consignes vers la langue officielle du pays dans lequel la machine doit être utilisée, veuillez contacter le représentant NOV sur place. Le service de traduction peut être payant. Les consignes originales peuvent être téléchargées du site www.NOV.com/drilling. Foilsítear Treoracha bunúsacha sa Bhéarla; i gcás ar mian leis an úsáideoir aistriúchán a fháil i dteanga oifigiúil na tíre ina bhfuil an t-innealra le húsáid déan teagmháil le d'ionadaí áitiúil NOV le do thoil. Bíodh a fhios agat gur féidir nach bhfuil an tseirbhís sin saor in aisce. Is féidir Treoir Bhunúsach a íoslódáil ag www.NOV.com/drilling www.nov.com 1: General Information Document number Revision Page 50000802-MAN-001 B 11 of 110 How to use this manual This manual is divided into 9 sections + 1 product specific chapter (drawings). When applicable, each section includes: 1. A table of contents, or an illustrated view index showing: Major assemblies, system or operations Page references to descriptions in text 2. Disassembly / assembly information and tools 3. Inspection information 4. Testing / trouble shooting information 5. Repair information 6. Adjustment information 7. Torque values Special information Detailed descriptions of standard workshop procedures, safety principles and service operations are not included. Please note that this manual may contain warnings about procedures which could damage equipment, make it unsafe, or cause PERSONAL INJURY. Please understand that these warnings cannot cover all conceivable ways in which service (whether or not recommended by NOV might be done, or the possible hazardous consequences of each conceivable ways. Anyone using service procedures or tools, whether or not recommended by NOV, must be thoroughly satisfied that neither personal safety nor equipment safety will be jeopardized. All information contained in this manual is based upon the latest product information available at any time of printing. We reserve the right to make changes at any time without notice. Intended audience This manual is intended for use by field engineering, installation, operation, and repair personnel. Every effort has been made to ensure the accuracy of the information contained herein. NOV, Varco® 2009, NOV LP, will not be held liable for errors in this material, or for consequences arising from misuse of this material. Conventions Notes, Cautions, and Warnings Notes, cautions, and warnings provide readers with additional information, and to advise the reader to take specific action to protect personnel from potential injury or lethal conditions. They may also inform the reader of actions necessary to prevent equipment damage. Please pay close attention to these advisories. www.nov.com Document number Revision Page 50000802-MAN-001 B 12 of 110 1: General Information Note: The note symbol indicates that additional information is provided about the current topics. Caution: The caution symbol indicates that potential damage to equipment or injury to personnel exists. Follow instructions explicitly. Extreme care should be taken when performing operations or procedures preceded by this caution symbol. Warning: The warning symbol indicates a definite risk of equipment damage or danger to personnel. Failure to observe and follow proper procedures could result in serious or fatal injury to personnel, significant property loss, or significant equipment damage. Illustrations Illustrations (figures) provide a graphical representation of equipment components or screen snapshots for use in identifying parts or establishing nomenclature, and may or may not be drawn to scale. For component information specific to your rig configuration, see the technical drawings included with your NOV documentation. Safety Requirements NOV equipment is installed and operated in a controlled drilling rig environment involving hazardous situations. Proper maintenance is important for safe and reliable operation. Procedures outlined in NOV manuals are the recommended methods of performing operations and maintenance. CAUTION: To avoid injury to personnel or equipment damage, carefully observe requirements outlined in this section. General System Safety Practices The equipment discussed in this manual may require or contain one or more utilities, such as electrical, hydraulic, pneumatic, or cooling water. CAUTION: Read and follow the guidelines below before installing equipment or performing maintenance to avoid endangering exposed persons or damaging equipment. Isolate energy sources prior to beginning work. Avoid performing maintenance or repairs while the equipment is in operation. Wear proper protective equipment during equipment installation, maintenance, or repair. www.nov.com Document number Revision Page 1: General Information 50000802-MAN-001 B 13 of 110 Personnel Training All personnel performing installation, operations, repair, or maintenance procedures on the equipment, or those in the vicinity of the equipment, should be trained on rig safety, tool operation, and maintenance to ensure their safety. CAUTION: Personnel should wear protective gear during installation, maintenance, and certain operations. Contact the NOV training department for more information about equipment operation and maintenance training. Recommended Tools Service operations may require the use of tools designed specifically for the purpose described. NOV recommends that only those tools specified be used when stated. Ensure that personnel and equipment safety are not jeopardized when following service procedures or using tools not specifically recommended by NOV. Replacing Components Verify that all components (such as cables, hoses, etc.) are tagged and labeled during assembly and disassembly of equipment to ensure correct installation. Replace failed or damaged components with NOV certified parts. Failure to do so could result in equipment damage or injury to personnel. Routine Maintenance Equipment must be maintained on a routine basis. See this manual for maintenance recommendations. CAUTION: Failure to conduct routine maintenance could result in equipment damage or injury to personnel. Proper Use of Equipment NOV equipment is designed for specific functions and applications, and should be used only for its intended purpose. Lifting The lifting procedures should carefully be observed and carried out according to the manual. BX Elevator limitations The BX Elevator is designed to be used as an elevator for lifting tubular goods in the gas and oil well drilling environment, and must not be used for any other purpose. Design safety factor. The design-safety factor and design verification of the elevators is in accordance with requirements of API specification 8C. During manufacturing the elevator is proof load tested to 1.5 times the rated load. www.nov.com Document number Revision Page 50000802-MAN-001 B 14 of 110 1: General Information Limited warranty The warranty will be void if the BX Elevator or parts were either: unauthorized modified, repaired or serviced replacement parts not manufactured by NOV were utilized not properly stored or maintained Identification numbers You will find the serial number of the tool stamped into the body. Warning plates WARNING: Warning plates must be present on the BX Elevator. Do not remove the plates. When a warning plate has disappeared, it must be replaced. Warning plate part. nr.201646 Be careful: Keep hands out of range of moving parts. Do not touch the elevator Warning plate part. nr.202829 Read the manual prior to use Warning plate part. nr.201647. Be careful: Falling load or parts can cause severe injury or death. Keep out of range. www.nov.com Document number Revision Page 1: General Information BX3 Not allowed 18° part no 50000684 90° MAX 350 sT 318 mT 50000802-MAN-001 B 15 of 110 WARNING: Verify bushing for maximum rating. Rate tag part. no. 50000684 Allowed Load-Ratings for different types of tubular BX3 BX4-50 MAX 500 sT 453 mT 18° part no 50000686 90° MAX 500sT 453mT WARNING: Verify bushing for maximum rating. Rate tag part. no. 50000686 Allowed Load-Ratings for different types of tubular BX4-50 BX4-75 MAX 500 sT 453 mT 18° part no 50000687 90° MAX 750 sT 680 mT WARNING: Verify bushing for maximum rating. Rate tag part. no. 50000687 Allowed Load-Ratings for different types of tubular BX4-75 BX5 MAX 1000 sT 907 mT MAX 750 sT 680 mT 18° part no 50000688 90° WARNING: Verify bushing for maximum rating. Rate tag part. no. 50000688 Allowed Load-Ratings for different types of tubular BX5 www.nov.com Document number Revision Page 50000802-MAN-001 B 16 of 110 1: General Information Warning plate part. nr.203263. Be careful: Keep hands out of range of moving parts. Do not touch the elevator. Read the user’s manual prior to using the equipment. Manuals for this product are available from www.nov.com or your local NOV Service Center. National Oilwell Varco, P.O. Box 17, Etten-Leur, The Netherlands pn 50000125 Rev - Equipment Type Model Number Serial number NL Size Range Rating Weight Date of Mfg. Kg. Lbs. Ex Part Number 50001003 Information plate 50000125. URL to user’s manuals and read manual prior to use. Manufactured by National Oilwell Varco, P.O. Box 17, Etten-Leur, The Netherlands Universal name plate 50001003. CE marking The BX-elevator complies with the Machinery Directive 98/37/EC, 2006/42/EC and the Directive 94/9/EC “Equipment and protective systems in potentially explosive atmospheres” The marking is as follows: Ex II 2G cT5 WARNING: Care should be taken to avoid creating possible ignition sources, like sparks, due to improper use of the tool in combination with other equipment. www.nov.com 1: General Information Document number Revision Page 50000802-MAN-001 B 17 of 110 BX major components The BX elevator is a hydraulic operated double door elevator, which is equipped with replaceable bushings to handle various styles and sizes of tubular. The elevator will automatically close when the pipe hits the body bushing. Opening of the elevator is remote controlled. The BX-elevator has a vertically spring loaded bushing in the right hand door, which, pushed downwards under load, will activate a mechanical latch lock to prevent accidental opening of the elevator while lifting load. By detecting the return signal-pressure (XP-line) from the elevator it is determined that the elevator is properly closed and latched. The elevator is contains an easy removable cylinder pack, manifold block and bushing set. Door Door Latch valve Bushing lock pin (4 places) Latch Latch lock pin Quick Disconnectors Manifold block (under cover) Cylinder pack (under cover) Trigger pin www.nov.com Warning, rating and and identification plates Document number Revision Page 50000802-MAN-001 B 18 of 110 1: General Information BX hydraulics Elevator Closing Sequence P=2,000 Psi / 13,789 KPa Xp= 0 Psi / KPa (armed to close) Reference is made to BX4 hydraulic schematic 50004050-3. When looking at the schematic, the elevator is open, door cylinder and latch cylinders are in. Valve F is in the middle position. When pipe is coming in the trigger activates valve L allowing pressure on line 5. Valve F then shifts allowing pressure on line 7 which moves the door cylinder out. At the same time the retract plunger is retracted inside the elevator bore, and is making room for the pipe coming in. The elevator starts to close. When the door cylinder piston passes the signal port lines 10 is pressurized piloting valve K open. This allows flow from line 7 to line 11 to start closing the latch cylinder. When the latch cylinder piston passes the signal port line 12 is pressurized which allows valve G to be piloted open. This allows flow from line 7 to line 24. Pilot line 10 opens valve X, allowing line 24 to connect to line 40 via latch valve Z with line 4 once the latch is closed. Valve D reduces the system pressure in line 13 to 1,000 Psi / 6,895 KPa which passes through valve C via XP to the Pressure Switch mounted on the Top-Drive. This gives the driller the ‘elevator closed’ indication. Pressures elevator closed: Xp=1,000 Psi / 6,894 KPa Float=P=2,000 Psi / 13,789 KPa T=Max 200 Psi / 1,379 KPa Elevator Opening Sequence P=2,000 Psi / 13,789 KPa Xp=2,200 Psi / 15,168 KPa (armed to close) When giving command to open by pressurizing XP with system pressure (must be greater than the set value of 1,500 Psi / 10,340 KPa and 200 Psi / 1,379 KPa or greater than P) , valve E opens and line 6 is pressurized. This causes valve F to shift to its mid position. Line 7 is relieved of pressure and line 8 is pressurized. At the same time the retract plunger is relieved. Due to line 6 being pressurized valve M is piloted open allowing flow from line 8 to line 14 causing the latch cylinder to move inwards. As soon as the latch cylinder piston passes the signal port line 12 is pressurized which pilots open valve H allowing flow from line 14 to line 9. At the same time the trigger is being pushed back in the elevator bore. The door cylinder starts to move inwards. The elevator has now unlatched and the doors are open. When the trigger finger no longer contacts the pipe the cam valve shifts which depressurizes line 5. The command to open i.e. XP pressurized can now be removed and the elevator is armed to close. Pressures elevator open: Xp=2,200 Psi / 15,168 KPa P= 2,000 Psi / 13,789 KPa Float=0 Psi / 0 KPa T=Max 200 Psi / 1,379 KPa www.nov.com 1: General Information Document number Revision Page 50000802-MAN-001 B 19 of 110 . Latch valve Manifold Trigger pin Latch cylinder Door cylinder www.nov.com Document number Revision Page 50000802-MAN-001 B 20 of 110 1: General Information www.nov.com BX3, BX4-50, BX4-75, BX5 2-Specifications REFERENCE BX3, BX4-50, BX4-75, BX5 REFERENCE DESCRIPTION Hydraulic Elevators This document contains proprietary and confidential information which is the property of National Oilwell Varco, L.P., its affiliates or subsidiaries (all collectively referred to hereinafter as "NOV"). It is loaned for limited purposes only and remains the property of NOV. Reproduction, in whole or in part, or use of this design or distribution of this information to others is not permitted without the express written consent of NOV. This document is to be returned to NOV upon request or upon completion of the use for which it was loaned. This document and the information contained and represented herein is the copyrighted property of NOV. www.nov.com VarcoBJ BV Nijverheidsweg 45 4879AP Etten-Leur Tel: +31-76-5083000 Fax: +31-76-5046000 DOCUMENT NUMBER REV 50000802-MAN-001 B Document number Revision Page 2: Specifications 50000802-MAN-001 B 23 of 110 General specifications Upgrade BX-elevator The existing BX-elevators, designed in the mid 1990’s, have been replaced mid 2009 with upgraded models. Major improvements are: The hydraulic system is simplified, new bushings (BX4 only) have been introduced & now all elevators have a removable backplate for easy access. Refer to the end of this chapter (Replaced Parts) for more details. Existing BX-4 Bushings Existing BX4 bushings are suitable for the upgraded elevators.The upgraded BX4 elevators can also carry the previous bushings. See the BX4 bushing overview in this chapter. General specifications, requirements & sizes Subject Description Weight and dimensions Weight and dimensions BX3 Elevator with Bushings BX3 Elevator without Bushings BX4-50 Elevator with Bushings BX4-50 Elevator without Bushings BX4-75 Elevator with Bushings BX4-75 Elevator without Bushings BX5 Elevator with Bushings BX5 Elevator without Bushings Hydraulic system Minimum working pressure Weight and dimensions Maximum working pressure Tbg. and hose sizes Maximum oil temperature Specification of hydraulics Temperature Up to 2,445 lbs / 1,100kg 2,165 lbs / 975 kg Up to 2,278 lbs / 1,033 kg 2,025 lbs / 919 kg Up to 2,292 lbs / 1,040 kg 2,047 lbs / 929 kg Up to 3,100 lbs / 1,400 kg 2,875 lbs / 1,290 kg 2,000 psi (13,789 kPa) and 5 gpm (19 l/min) flow at elevator and rotator 2,500 psi (17,236 kPa) and 7 Gpm (26.5 l/ min) at elevator and rotator All Tbg. and hoses that connect the elevator to the power unit main ring need to have a minimum nominal size of ½” diameter 140°F (60°C) SAE AS 4059 class 9 ISO 4406: 1999 Class 19/17/14 NAS 1638 class 8 Filter to be applied in the hydraulic 50 micron supply line Minimum allowed ambient temperature -4°F (- 20°C) Maximum allowed ambient temperature 104°F (+ 40°C) In case the ambient temperature is outside this range, please contact NOV for guidance Load ratings www.nov.com Maximum load rating for the elevator Link size Type Part no. Size range [inches] 90° Coupling [sTon/mTon] 18° Tool Joint [sTon/mTon] Min Max [inches] [inches] BX3 BX4-50 BX4-75 BX5 203300Y10 50000640Y 50000650Y 50004000Y10 9.5/8” - 20” 2.3/8” - 9.3/4” 2.3/8” - 9.3/4” 3.1/2” - 11” 350 / 318 500 / 453 750 / 680 1000 / 907 not allowed 500 / 453 500 / 453 750 / 680 2.3/4” 2.3/4” 3.1/2" 4.3/4” 3.1/2” 4.3/4” 4.3/4” 5.1/2" Document number Revision Page 50000802-MAN-001 B 24 of 110 2: Specifications Bushing overview BX3-Bushings Casing Size 9.5/8" Csg. 9.7/8" Csg. 10.3/4" Csg. 10.5/8”Csg. 11.3/4" Csg. 11.7/8" Csg. 12.3/4" Csg. 12.7/8" Csg. 13.3/8" Csg. 13.5/8" Csg. 14" Csg. 16" Csg. 16.3/4" Csg. 18" Csg. 18.5/8” Csg. 20” Csg. Part number 203310Y141 203310Y649 203310Y142 203310Y453 203310Y143 203310Y729 203310Y345 203310Y676 203310Y144 203310Y596 203310Y690 203310Y145 203310Y664 203310Y723 203310Y146 203310Y147 Max. Rating [sTon/mTon] 350 / 318 350 / 318 350 / 318 350 / 318 350 / 318 350 / 318 350 / 318 350 / 318 350 / 318 350 / 318 350 / 318 350 / 318 350 / 318 350 / 318 350 / 318 350 / 318 Approx. Weight [kg / lbs] 204 / 450 202 / 445 196 / 432 182 / 401 182 / 401 182 / 401 182 / 401 182 / 401 182 / 401 182 / 401 182 / 401 158 / 348 158 / 348 140 / 308 134 / 295 108 / 238 Max. Rating [sTon/mTon] 150 / 136 150 / 136 150 / 136 Approx. Weight [kg / lbs] 163 / 360 163 / 360 163 / 360 DC plain w/ lifting plug Size 10" DC Plain 10.1/2" DC Plain 11" DC Plain Part number 203312Y228 203312Y229 203312Y230 www.nov.com Document number Revision Page 2: Specifications 50000802-MAN-001 B 25 of 110 BX4-Bushings WARNING: In some cases the BX4-bushing may handle higher loads than the elevator is rated for. E.g. 8” Riser handling Bushing with part number 203214Y757 fits in the BX4-50 elevator, which can safely handle 500 sTon only while the Bushing can handle up to 750 sTon! BX4-50: up to 500 sTon / 453 mTon for 18° Tool Joint and 90° coupling. BX4-75: up to 500 sTon / 453 mTon for 18° Tool Joint BX4-75: up to 750 sTon / 680 mTon for 90° coupling Drill Collar w/Zip Lift Bushing size and type 5.1/4" DC w/Zip lift 5.1/2" DC w/Zip lift 6.1/4" DC w/Zip lift 6" DC w/Zip lift 6.1/2" DC w/Zip lift 6.3/8" DC w/Zip lift 4.3/4" DC w/Zip lift 5" DC w/Zip lift 8" DC w/Zip lift 7.3/4" DC w/Zip lift 7.1/4" DC w/Zip lift 7" DC w/Zip lift 6.3/4" DC w/Zip lift 8.1/4" DC w/Zip lift 10" DC w/Zip lift 9.3/4" DC w/Zip lift 9.1/2" DC w/Zip lift 8.1/2" DC w/Zip lift 9" DC w/Zip lift 8.3/4" DC w/Zip lift 4.1/8" DC w/Zip lift 3.1/2" DC w/Zip lift 4.1/4" DC w/Zip lift 3.1/8" DC w/Zip lift 3.3/8" DC w/Zip lift Previous Part number 203211Y179 203211Y180 203211Y337 203211Y362 203211Y373 203211Y409 203211Y435 203211Y530 203211Y336 203211Y339 203211Y357 203211Y361 203211Y387 203211Y422 203211Y195 203211Y367 203211Y370 203211Y426 203211Y427 203211Y553 203211Y177 203211Y625 203211Y674 203211Y735 203211Y736 Current Part number 50000677Y179 50000677Y180 50000677Y337 50000677Y362 50000677Y373 50000677Y409 50000677Y435 50000677Y530 50000677Y336 50000677Y339 50000677Y357 50000677Y361 50000677Y387 50000677Y422 50000677Y195 50000677Y367 50000677Y370 50000677Y426 50000677Y427 50000677Y553 203211Y177 203211Y625 203211Y674 203211Y735 203211Y736 Previous Part number 203210Y158 203210Y159 203210Y160 203210Y161 203210Y162 203210Y163 203210Y164 203210Y165 203210Y867 203210Y868 Current Part number 203210Y158 203210Y159 203210Y160 203210Y161 203210Y162 203210Y163 203210Y164 203210Y165 203210Y867 203210Y868 Rating [sTon/mTon] 150 / 136 150 / 136 150 / 136 150 / 136 150 / 136 150 / 136 150 / 136 150 / 136 150 / 136 150 / 136 150 / 136 150 / 136 150 / 136 150 / 136 150 / 136 150 / 136 150 / 136 150 / 136 150 / 136 150 / 136 150 / 136 150 / 136 150 / 136 150 / 136 150 / 136 Approx. Weight [kg / lbs] 98 / 216 94 / 207 86 / 189 92 / 202 88 / 193 86 / 193 88 / 194 86 / 189 86 / 189 88 / 193 87 / 191 86 / 193 88 / 193 86 / 193 79 / 173 81 / 178 83 / 182 85 / 187 87 / 191 85 / 187 86 / 189 88 / 194 86 / 193 88 / 194 88 / 194 Tubing Bushing size and type 2.3/8" Csg./plain Tbg. 2.3/8" OD.EU. Tbg. 2.7/8" plain Tbg. 2.7/8" OD. EU. Tbg. 3.1/2" Csg./plain tub. 3.1/2" OD. EU. Tbg. 4" OD. plain Tbg. 4" OD. EU. Tbg. 2.88" special gun tube Bushing 3.50" special gun tube Bushing www.nov.com Rating [sTon/mTon] 500 / 453 500 / 453 500 / 453 500 / 453 500 / 453 500 / 453 500 / 453 500 / 453 500 / 453 500 / 453 Approx. Weight [kg / lbs] 86 / 189 86 / 189 84 / 185 84 / 185 82 / 180 82 / 180 80 / 176 80 / 176 90 / 198 90 / 198 Document number Revision Page 50000802-MAN-001 B 26 of 110 2: Specifications Casing Bushing size and type Previous Part number 4.1/2" Csg./ plaine Tbg. 203210Y129 5" Csg. 203210Y131 5.1/2" Csg. 203210Y132 6" Csg. 203210Y134 6.5/8" Csg. 203210Y135 7" Csg. 203210Y136 7.5/8" Csg. 203210Y137 8.5/8" Csg. 203210Y139 9.5/8" Csg. 203210Y141 4.1/2" OD. EU. Tbg. 203210Y167 6.1/4" Csg. 203210Y505 7-1/4" Csg - 1/16 bevel 203210Y563 9.7/8" Csg. 203210Y649 7.3/4" Csg. 203210Y705 8" Csg. 203210Y757 8.3/4" Csg. 203210Y804 4.1/2" Csg./ plane Tbg. 203210Y848 6.7/8" 55",45'',35'' taper 203210Y834 7" Hydrill 521 #26 w/Lift plug 203210Y854 9.1/8" Csg. 203210Y883 Current Part number 50000676Y129 50000676Y131 50000676Y132 50000676Y134 50000676Y135 50000676Y136 50000676Y137 50000676Y139 50000676Y141 50000676Y167 50000676Y505 50000676Y563 50000676Y649 50000676Y705 50000676Y757 50000676Y804 50000676Y848 50000676Y834 50000676Y854 50000676Y883 Rating [sTon/mTon] Approx. Weight [kg / lbs] 750 / 608 750 / 608 750 / 608 750 / 608 750 / 608 750 / 608 750 / 608 750 / 608 750 / 608 750 / 608 750 / 608 750 / 608 750 / 608 750 / 608 750 / 608 750 / 608 750 / 608 750 / 608 750 / 608 750 / 608 91 / 200 91 / 200 91 / 200 97 / 213 97 / 213 97 / 213 97 / 213 49 / 108 49 / 108 91 / 200 97 / 213 97 / 213 49 / 108 97 / 213 49 / 108 49 / 108 91 / 200 97 / 213 97 / 213 49 / 108 Rating [sTon/mTon] Approx. Weight [kg / lbs] 750 / 608 750 / 608 500 / 453 500 / 453 500 / 453 500 / 453 89 / 196 81 / 179 99 / 218 97 / 213 97 / 213 95 / 209 Square Shoulder Drill Pipe Bushing Bushing size and type 5" IEU sq.shoulder DP 5.1/2" IEU sq.shoulder DP 2.7/8" EU sq.shoulder DP 3.1/2" IU sq.shoulder DP 3.1/2" EU sq.shoulder DP 4" IU sq.shoulder DP Previous Part number 203212Y106 203212Y107 203212Y101 203212Y102 203212Y103 203212Y104 Current Part number 50000675Y106 50000675Y107 203212Y101 203212Y102 203212Y103 203212Y104 Riser Handling Bushing Bushing size and type 6.5/8" Riser Handling 7.1/4" Riser Handling 8" Riser Handling 8.3/4" Riser Handling 8.5/8" Riser Handling 9.5/8" Riser Handling 7" Riser Handling Special 55deg, 8.5/8" riser Current Part number 50000676Y333 50000676Y885 50000676Y884 50000676Y783 50000676Y784 50000676Y788 50000676Y790 50000676Y869 Previous Part number 203214Y333 203214Y563 203214Y757 203214Y783 203214Y784 203214Y788 203214Y790 203210Y869 Rating [sTon/mTon] Approx. Weight [kg / lbs] 750 / 608 750 / 608 750 / 608 750 / 608 750 / 608 750 / 608 750 / 608 750 / 608 108 / 238 102 / 224 96 / 211 90 / 198 84 / 185 80 / 176 70 / 154 77 / 169 www.nov.com Document number Revision Page 2: Specifications 50000802-MAN-001 B 27 of 110 Drill Pipe Bushings Bushing size and type 2.7/8" IU DP 2.7/8" EU DP 3.1/2" IU DP 3.1/2" EU DP 4" IU DP 4" EU & 4.1/2" IEU DP 4.1/2" EU & 5" IEU DP 5.1/2" IEU DP 5.1/2" IF IEU DP 6.5/8" IEU DP 5.7/8" DP 18degr (6" EU max.) 4" DP with 4.1 max upset 6.5/8" DP 7.1/8" upset Previous Part number 203212Y117 203212Y118 203212Y119 203212Y776 203212Y777 203212Y778 203212Y779 203212Y780 203212Y781 203212Y782 203212Y789 203212Y798 203212Y823 Current Part number 50000675Y117 50000675Y118 50000675Y119 50000675Y776 50000675Y777 50000675Y778 50000675Y779 50000675Y780 50000675Y781 50000675Y782 50000675Y789 50000675Y798 50000675Y823 Rating [sTon/ mTon] 500 / 453 500 / 453 500 / 453 500 / 453 500 / 453 500 / 453 500 / 453 500 / 453 500 / 453 500 / 453 500 / 453 500 / 453 500 / 453 Previous Part number 203213Y349 203213Y354 203213Y135 203213Y338 203213Y348 203213Y334 203213Y346 203213Y347 203213Y356 203213Y580 203213Y201 203213Y203 203213Y205 203213Y206 203213Y207 203213Y209 203213Y211 203213Y519 203213Y548 203213Y795 Current Part number 50000678Y349 50000678Y354 50000678Y765 50000678Y338 50000678Y348 50000678Y334 50000678Y346 50000678Y347 50000678Y356 50000678Y580 203213Y201 203213Y203 203213Y205 203213Y206 203213Y207 203213Y209 203213Y211 203213Y519 203213Y548 203213Y795 Rating [sTon/ mTon] 150 / 136 150 / 136 150 / 136 150 / 136 150 / 136 150 / 136 150 / 136 150 / 136 150 / 136 150 / 136 150 / 136 150 / 136 150 / 136 150 / 136 150 / 136 150 / 136 150 / 136 150 / 136 150 / 136 150 / 136 Approx. Weight [kg / lbs] 110 / 242 110 / 242 104 / 230 104 / 230 98 / 217 98 / 217 97 / 215 104 / 230 104 / 230 84 / 186 104 / 230 98 / 217 84 / 186 Drill Collar Plain Bushing Bushing size and type 6" DC plain 4.3/4" DC plain 6.1/2" DC plain 6.3/4" DC plain 6.1/4" DC plain 8" DC plain 9.1/2" DC plain 8.1/4" DC plain 9" DC plain 8.1/2" DC plain 2.1/2" DC plain 2.3/4" DC plain 3" DC plain 3.1/8" DC plain 3.1/4" DC plain 3.1/2" DC plain 3.3/4" DC plain 4.1/8" DC plain 4.1/4" DC plain 3.3/8" DC plain www.nov.com Approx. Weight [kg / lbs] 96 / 210 88 / 194 96 / 210 96 / 210 96 / 210 90 / 198 90 / 198 90 / 198 90 / 198 90 / 198 92 / 204 92 / 204 92 / 204 92 / 204 92 / 204 92 / 204 92 / 204 92 / 204 92 / 204 92 / 204 Document number Revision Page 50000802-MAN-001 B 28 of 110 2: Specifications BX5-Bushings Casing Bushing Bushing size and type 4.1/2” Csg. 4.3/4” Csg. 5” Csg. 5.1/2” Csg. 5.3/4” Csg. 6” Csg. 6.5/8” Csg. 7” Csg. 7.5/8” Csg. 7.3/4” Csg. 8.5/8” Csg. 9.5/8” Csg. 9.7/8” Csg. 10.3/4” Csg. Part number 50004010Y129 50004010Y130 50004010Y131 50004010Y132 50004010Y133 50004010Y134 50004010Y135 50004010Y136 50004010Y137 50004010Y705 50004010Y139 50004010Y141 50004010Y649 50004010Y142 Rating [sTon/mTon] 750 / 680 750 / 680 750 / 680 750 / 680 750 / 680 750 / 680 750 / 680 750 / 680 750 / 680 750 / 680 750 / 680 750 / 680 750 / 680 750 / 680 Approx. Weight [kg / lbs] 116 / 255 114 / 251 112 / 246 110 / 242 108 / 238 106 / 233 104 / 229 102 / 224 100 / 220 98 / 216 96 / 211 94 / 207 92 / 202 90 / 298 Part number 50004011Y435 50004011Y362 50004011Y337 50004011Y373 50004011Y387 50004011Y339 50004011Y336 50004011Y422 50004011Y426 50004011Y427 50004011Y370 50004011Y367 50004011Y195 50004011Y527 50004011Y419 Rating [sTon/mTon] 150 / 136 150 / 136 150 / 136 150 / 136 150 / 136 150 / 136 150 / 136 150 / 136 150 / 136 150 / 136 150 / 136 150 / 136 150 / 136 150 / 136 150 / 136 Approx. Weight [kg / lbs] 89 / 196 82 / 180 80 / 176 76 / 167 72 / 158 70 / 154 67 / 147 65 / 143 62 / 136 60 / 132 56 / 123 52 / 114 46 / 101 42 / 93 40 / 88 Part number 50004012Y766 50004012Y777 50004012Y778 50004012Y779 50004012Y780 50004012Y781 50004012Y782 50004012Y789 Rating [sTon/mTon] 750 / 680 750 / 680 750 / 680 750 / 680 750 / 680 750 / 680 750 / 680 750 / 680 Approx. Weight [kg / lbs] 122 / 268 122 / 268 120 / 264 122 / 268 118 / 260 116 / 255 104 / 229 114 / 251 Drill Collars ZIP-lift Bushing size and type 4.3/4” DC w/ ZIP lift 6” DC w/ ZIP lift 6.1/4 “ DC w/ ZIP lift 6.1/2” DC w/ ZIP lift 6.3/4” DC w/ ZIP lift 7.3/4” DC w/ ZIP lift 8” DC w/ ZIP lift 8.1/4” DC w/ ZIP lift 8.1/2” DC w/ ZIP lift 9” DC w/ ZIP lift 9.1/2” DC w/ ZIP lift 9.3/4” DC w/ ZIP lift 10” DC w/ ZIP lift 10.3/4” DC w/ ZIP lift 11” DC w/ ZIP lift Drill Pipe Bushing size and type 3.1/2” DP IEU 18° 4” DP IU 4” DP EU & 4.1/2 “ IEU 4.1/2” DP EU & 5” IEU 5.1/2” DP IEU 18° 5.1/2” DP IF 6.5/8” DP IEU Drill 5.7/8” DP EU www.nov.com Document number Revision Page 2: Specifications 50000802-MAN-001 B 29 of 110 Drill Collars Plain (Lift-plug) Bushing size and type 4.3/4” Plain DC 5.1/4” Plain DC 6.1/4” Plain DC 6.1/2” Plain DC 8” Plain DC 8.1/4 ” Plain DC 8.1/2” Plain DC 9” Plain DC 9.1/2” Plain DC 10” Plain DC 10.1/2 “ Plain DC 11” Plain DC Part number 50004013Y354 50004013Y219 50004013Y348 50004013Y135 50004013Y334 50004013Y347 50004013Y357 50004013Y356 50004013Y346 50004013Y228 50004013Y229 50004013Y230 Rating [sTon/mTon] 150 / 136 150 / 136 150 / 136 150 / 136 150 / 136 150 / 136 150 / 136 150 / 136 150 / 136 150 / 136 150 / 136 150 / 136 Approx. Weight [kg / lbs] 89 / 196 82 / 180 80 / 176 76 / 167 72 / 158 70 / 154 67 / 147 65 / 143 62 / 136 60 / 132 56 / 123 52 / 114 Part number 50004014Y757 Rating [sTon/mTon] 1000 / 907 Approx. Weight [kg / lbs] 100/220 50004014Y783 1000 / 907 92/202 50004014Y784 1000 / 907 85/187 50004014Y788 1000 / 907 80/176 Special square shoulder Bushing size and type 8” Special square shoulder 8.3/4” Special square shoulder 8.5/8” Special square shoulder 9.5/8” Special square shoulder www.nov.com Document number Revision Page 50000802-MAN-001 B 30 of 110 2: Specifications Calculating the safe working load Safe working load (SWL) = Design Load - Dynamic load. Design load equals the Rating. WARNING: The safe working load (SWL) is determined by the weakest link in the chain comprising the elevator, bushing & pipe (cross section and grade). Examples Below examples are for information only. It gives some guidelines for calculation of the SWL of elevators and bushings, but gives no information about the SWL of the pipe. NOV does not know the SWL of a pipe, but in general one will use the yield strength of the tubular. This is calculated by multiplying the cross section of the tubular with the grade. In all cases: Check with the pipe manufacturer! Example 1: Square shoulder tubular In this example: BX4-75 with 2.875” tube Rating bushing: 500 sTon Rating elevator: 750 sTon Minimum yield on elevator bushing: 110,000 Psi 3.400” 3.079” 2.953” 3.400” 1. Measure Tool joint or coupling OD (or get from datasheet for new tubular), in this case 3.4” 2. Measure elevator bore (get from data sheet for new bushing), in this case 3.079” 3.Calculate (projected) bearing area. π ( D²- d²) = π (3.400² - 3.079²) = 1.63 sq. inch 4 4 4. Calculate SWL of elevator based on contact area. Allowable force: Area x Yield = Lbs 1.633 x 110,000 = 179,630 Lbs Allowable SWL: 179,630 Lbs = 89.8 sTons 2000 5. Check tubular manufacturer data for restrictions on contact or bearing stress for specific tubular www.nov.com Document number Revision Page 2: Specifications 50000802-MAN-001 B 31 of 110 Example 2: 18° Drill pipe In this example: BX4-75 with 3.1/2” drill pipe Rating bushing: 500 sTon Rating elevator: 500 sTon Minimum yield on elevator bushing: 110,000 Psi 5.000” 3.875” 5.000” 1. Measure Tool joint or coupling OD (or get from datasheet for new tubular), in this case 5” 2. Measure elevator bore (get from data sheet for new bushing), in this case 3.875” 3.Calculate (projected) bearing area. π ( D²- d²) = π (5.000² - 3.875²) = 7.842 sq. inch 4 4 4. Calculate SWL of elevator based on contact area. Allowable force: Area x Yield = Lbs 7.842 x 110,000 = 862,620 Lbs Allowable SWL: 862,620 Lbs =431.3 sTons 2000 5. Check tubular manufacturer data for restrictions on contact or bearing stress for specific tubular Example 3: Casing In this example: BX4-75 with 7” casing Rating bushing: 750 sTon Rating elevator: 750 sTon Minimum yield on elevator bushing: 110,000 Psi 9” 7.25” 7.125” 9” 1. Measure Tool joint or coupling OD (or get from datasheet for new tubular), in this case 9” 2. Measure elevator bore (get from data sheet for new bushing), in this case 7.25” 3.Calculate (projected) bearing area. π ( D²- d²) = π (9² - 7.25²) = 22.33 sq. inch 4 4 4. Calculate SWL of elevator based on contact area. Allowable force: Area x Yield = Lbs 22.33 x 110,000 = 2,456,300 Lbs Allowable SWL: 2,456,300 Lbs = 1228.2 sTons, to heavy for bushing, thus not allowed. 2000 5. Conclusion: The SWL is limited to 750 sTon due to rating of bushing. 6. Check tubular manufacturer data for restrictions on contact or bearing stress for specific tubular www.nov.com Document number Revision Page 50000802-MAN-001 B 32 of 110 2: Specifications Minimum required tool joint diameters* ns To 0 50 ons T s 0 n 35 To 0 25 ns To 0 15 0/781 s 0 10 n To s on 0T 35 s on 0T 10 0 To n s 15 0 To n s 25 The lines represent the Bushing ratings. 780 781 *For reference only; always consult pipe manufacturer for actual values! www.nov.com 2: Specifications Document number Revision Page 50000802-MAN-001 B 33 of 110 Replaced parts The previous elevators with part number 203300Y30 (BX3), 203290Y30 (BX4-50), 203200Y30 (BX4-75) & 50004000Y30 (BX5) can be modified with the new manifold block and cylinders according to below list. Replaced parts BX4-50 pn203200Y30 & BX4-75 pn203290Y30 Cylinders Ass'y door cylinder BX4-50&BX4-75 Ass'y latch cylinder BX4-50&BX4-75 Door cylinder BX4&3 Latch cylinder BX Bushing BX Cylinder Bushing BX Cylinder Pin latch cylinder BX Seal Kit BX cylinders Cylinder kit BX4-50&BX4-75,20320(9)0y30 Manifold BX4 tube port 40 to latch valve BX4 tube float sign. to latch valve BX4 tube, float bracket BX4 tube, XP BX4 tube, P BX4 tube, Tank Manifold ass'y. BX 3,4 & 5 1/2-14 UNC BOLT Washer, lock-regular.1/2" Elbow, 90' swivel int 37' /37' Locknut, bulkhead UNION,BULKHEAD 37 DEG Reducer, int 37'/37' Elbow, O-ring Boss /37' Tee, swivel int 37' /37' /37' Sun pilot to open check valve QD bracket 'XP-'line' Check-valve bracket Tbg., check-valve to signal port Hydr. tube, steel fittings.1/4" Tbg., check-valve to 'XP' QD Nipple, straight, BSP to JIC Reducer Line mount body (sun) type 'ECV' Washer, flat Screw, cap-Hex. HD (UNC-2A) Manifold Kit BX4-50&BX4-75,20320(9)0Y30 www.nov.com Previous part number 203220-1 50004151 50004150 203220-5 203220-2 Previous part number 50003974 50003975 50003982 50003983 50003984 50003985 50004048-1 50008-40-C8D 979785-12 56518-4-4-S 56547-6-S 56538-6-6-S 56517-6-4-S 56519-4-4-S 56525-4-4-S 93547-1B30N 203270-14 203270-15 50004045 50003973 203270-17 979532-4-4 979852-8-4 979940-ECV 50805-N-C 50005-12-C8D - Current part number 50000667 50000668 50000667-10 50000668-10 50000669 50000669-1 50000673 50000667-1 50000644-1 Current part number 50003974-100 50003975-100 50003982-100 50003983-100 50003984-100 50003985-100 50004050-1 50008-22-C8D 50908-C no longer required no longer required no longer required no longer required no longer required no longer required no longer required no longer required no longer required no longer required no longer required no longer required no longer required no longer required no longer required no longer required no longer required 50000644 Document number Revision Page 50000802-MAN-001 B 34 of 110 2: Specifications Replaced parts BX5 pn 50004000Y30 Cylinders Ass'y door cylinder BX5 Ass'y latch cylinder BX5 Door cylinder BX5 Latch cylinder BX5 Bushing BX Cylinder Bushing BX Cylinder Pin latch cylinder BX Seal Kit BX5 cylinders Cylinder kit BX5, 50004000Y30 Manifold BX5 tube port 40 to latch valve BX5 tube float sign. to latch valve BX5 tube, float bracket BX5 tube, XP Previous part number 50004020 50004153 50004021 50004152 203220-2 Previous part number 50004066 50004067 50004068 50004069 Current part number 50000680 50000681 50000680-10 50000681-10 50000669 50000669-1 50000673 50000680-1 50000645-1 Current part number 50004066-100 50004067-100 50004068-100 50004069-100 BX5 tube, P 50004070 50004070-100 BX5 tube, Tank Manifold ass'y. BX 3,4 & 5 1/2-14 UNC BOLT Washer, lock-regular.1/2" Elbow, 90' swivel int 37' /37' Locknut, bulkhead UNION,BULKHEAD 37 DEG Reducer, int 37'/37' Elbow, O-ring Boss /37' Tee, swivel int 37' /37' /37' Sun pilot to open check valve QD bracket 'XP-'line' Check-valve bracket Tbg., check-valve to signal port Hydr. tube, steel fittings.1/4" Tbg., check-valve to 'XP' QD Nipple, straight, BSP to JIC Reducer Line mount body (sun) type 'ECV' Washer, flat Screw, cap-Hex. HD (UNC-2A) 50004071 50004048-1 50008-40-C8D 979785-12 56518-4-4-S 56547-6-S 56538-6-6-S 56517-6-4-S 56519-4-4-S 56525-4-4-S 93547-1B30N 203270-14 203270-15 50004045 50003973 203270-17 979532-4-4 979852-8-4 979940-ECV 50805-N-C 50005-12-C8D 50004071-100 50004050-1 50008-22-C8D 50908-C no longer required no longer required no longer required no longer required no longer required no longer required no longer required no longer required no longer required no longer required no longer required no longer required no longer required no longer required no longer required no longer required no longer required www.nov.com 2: Specifications Document number Revision Page 50000802-MAN-001 B 35 of 110 Replaced parts BX3 pn 203300Y30 Cylinders Ass'y door cylinder BX3 Ass'y latch cylinder BX4-50&BX4-75 Door cylinder BX4&3 Latch cylinder BX Bushing BX Cylinder Bushing BX Cylinder Pin latch cylinder BX Seal Kit BX cylinders Cylinder kit BX3, 203300y30 Manifold BX3 tube port 40 to latch valve BX3 tube float sign. to latch valve BX3 tube, float bracket BX3 tube, XP BX3 tube, P BX3 tube, Tank Manifold ass'y. BX 3,4 & 5 1/2-14 UNC BOLT Washer, lock-regular.1/2" Elbow, 90' swivel int 37' /37' Locknut, bulkhead UNION,BULKHEAD 37 DEG Reducer, int 37'/37' Elbow, O-ring Boss /37' Tee, swivel int 37' /37' /37' Sun pilot to open check valve QD bracket 'XP-'line' Check-valve bracket Tbg., check-valve to signal port Hydr. tube, steel fittings.1/4" Tbg., check-valve to 'XP' QD Nipple, straight, BSP to JIC Reducer Line mount body (sun) type 'ECV' Washer, flat Screw, cap-Hex. HD (UNC-2A) Manifold Kit BX3, 203300Y30 www.nov.com Previous part number 203318-1 50004151 50004150 203220-5 203220-2 Previous part number 50003926 50003927 50003928 50003929 50003930 50003931 50004048-1 50008-40-C8D 979785-12 56518-4-4-S 56547-6-S 56538-6-6-S 56517-6-4-S 56519-4-4-S 56525-4-4-S 93547-1B30N 203270-14 203270-15 203270-18 50003973 203270-17 979532-4-4 979852-8-4 979940-ECV 50805-N-C 50005-12-C8D - Current part number 50000682 50000668 50000667-10 50000668-10 50000669 50000669-1 50000673 50000667-1 50000643-1 Current part number 50003926-100 50003927-100 50003928-100 50003929-100 50003930-100 50003931-100 50004050-1 50008-22-C8D 50908-C no longer required no longer required no longer required no longer required no longer required no longer required no longer required no longer required no longer required no longer required no longer required no longer required no longer required no longer required no longer required no longer required no longer required 50000643 Document number Revision Page 50000802-MAN-001 B 36 of 110 2: Specifications www.nov.com BX3, BX4-50, BX4-75, BX5 3-Lubrication and maintenance REFERENCE BX3, BX4-50, BX4-75, BX5 REFERENCE DESCRIPTION Hydraulic Elevators This document contains proprietary and confidential information which is the property of National Oilwell Varco, L.P., its affiliates or subsidiaries (all collectively referred to hereinafter as "NOV"). It is loaned for limited purposes only and remains the property of NOV. Reproduction, in whole or in part, or use of this design or distribution of this information to others is not permitted without the express written consent of NOV. This document is to be returned to NOV upon request or upon completion of the use for which it was loaned. This document and the information contained and represented herein is the copyrighted property of NOV. www.nov.com VarcoBJ BV Nijverheidsweg 45 4879AP Etten-Leur Tel: +31-76-5083000 Fax: +31-76-5046000 DOCUMENT NUMBER REV 50000802-MAN-001 B 3: Lubrication and maintenance Document number Revision Page 50000802-MAN-001 B 39 of 110 Lubrication & Maintenance NOTE: The owner and user together with the manufacturer should jointly develop and update inspection, maintenance, repair and remanufacture procedures consistent with equipment application, loading, work environment, usage and operational conditions. These factors may change as a result of new technology, product improvements or fundamental changes in service conditions. NOV recommends using the Periodic inspection and maintenance Categories and Frequencies as mentioned in API RP8B Table 1. Detailed instructions for maintenance according to API RP8B Table 1 are outlined in this chapter. Safety WARNING: It is not allowed to weld on elevators. Please contact an authorized NOV repair facility. Recommended hydraulic fluid Castrol Chevron Exxon Gulf Mobil Shell Texaco Union Above -20 C / -4° F Below -20 C / -4° F Hyspin AWS-46 AW Hyd oil 46 Nuto H 46 Harmony 46AW DTE 25 Tellus 46 Rando oil HD 46 Unax AW 46 Hyspin AWS-32 AW Hyd oil 32 Nuto H 32 Harmony 32AW DTE 24 Tellus 32 Rando oil HD 32 Unax AW 32 Recommended General Purpose EP grease Lube code description Above -20 C Below -20 C Castrol Chevron Exxon Gulf Mobil Shell Texaco Union MP grease Avi-Motive Lidok EP2 Gulfcrown EP2 Mobilux EP2 Alvania EP2 Multifak EP2 Unoba EP2 n/a Avi-Motive W Lidok EP1 Gulfcrown EP1 Mobilux EP1 Alvania EP1 Multifak EP1 Unoba EP1 Greasing the inserts and insert slots. NOTE: To reduce the chance of inserts seizing in the insert slots, NOV recommends to remove the inserts after each job, coat the insert slot with light machine oil, EP-2 grease or any other fluid that does not affect the friction coefficient with string weight compared to a none coated insert slot. WARNING: No grease or pipe dope should be used for lubricating the inserts and insert slots as this will reduce the friction coefficient resulting in higher loads on the slip toe and thus higher stress. www.nov.com Document number Revision Page 50000802-MAN-001 B 40 of 110 3: Lubrication and maintenance Maintenance WARNING: Ensure that all hydraulic lines are disconnected before ANY work is performed on the elevator. It’s not always sufficient to isolate the hydraulic lines by using a ball valve, as the hoses might function as an accumulator, which could generate movement of the elevator. The ball-valve is installed to ease connecting and disconnecting the QD with pressure still on the line and for disconnecting the elevator from the power source. Daily inspection schedule(when BX is in use) cat II Procedure Daily Inspection (cat II) Visually inspect and repair when needed 1. Check for worn and damaged parts OK 2. Check for loose and missing parts OK 3. Check condition of mechanical latch lock 4. Check for kink, burr, pitting and crack free mechanical latch lock spring & trigger springs. 5. Check for leakage free fittings, tubes, hoses, valves & cylinders. 6. Check proper locking of all bushing lock bolts and nuts 7. Check that all bushings are well seated and retained in body and doors. 8. Check that all bushings are locked by secondary safety snaps. 9. Check hoses for signs cracks, wear or abrasion. 10.Check the wear-buttons for wear. 11.Check rotator: OK • Bending or cracking of rotary link blocks • Cracking or bending of the stop pins • Cracking or bending of the stop brackets. OK OK OK OK OK OK OK OK OK OK Daily Inspection (cat II) Visually inspect and repair when needed Check the proper locking of: 1. Bolts and nuts OK 2. Safety chains OK 3. Slotted nuts & cotter pins OK 4. Lock tabs & lock bars OK 5. Roll pins and dowel pins OK 6. Snap rings OK 7. Cotter pins OK www.nov.com 3: Lubrication and maintenance Document number Revision Page 50000802-MAN-001 B 41 of 110 Daily operational check (cat II) Procedure Daily Inspection (cat II) Visually inspect and repair when needed 1) Check the functioning of the latch mechanism. 2) Open and close 10 times. Elevator should close and latch completely at each cycle 3) Check for proper right hand (spring-loaded) door bushing movement by pressing bushing down and the proper functioning of the mechanical latch lock pin 4) Check proper functioning of the trigger mechanism OK OK OK OK Daily lubrication (cat II) Procedure Daily Lubrication. Apply prescribed grease to all grease points until grease is coming out of the bores 1. Grease hinge pin Left Hand door Top + Bottom 2. Grease hinge pin Right hand door Top + Bottom 3. Grease hinge pin latch Top + Bottom 4. Grease trigger 5. Grease latch lock (2x) 6. Grease contact surfaces links (when elevator combined with rotator every 6 hours!) 7. Grease back of bushings and the elevator bore and load-shoulder. 8. Grease bushing lock-pins 9. Brush grease on all bushing backs 10. Lubricate latch valve. For this purpose 2 nipples are available, it is sufficient to lubricate one of them. 6 (2plc) 3 OK OK OK OK OK OK OK OK OK OK 10 8 (4plc) 5 www.nov.com Document number Revision Page 50000802-MAN-001 B 42 of 110 3: Lubrication and maintenance 2 1 4 10. Grease nipple latch valve on inside of door 10. Grease nipple latch valve on outside of door www.nov.com 3: Lubrication and maintenance Document number Revision Page 50000802-MAN-001 B 43 of 110 Weekly maintenance Procedure Weekly maintenance Perform the cylinder adjustment test Monthly maintenance Procedure Preservation. Use prescribed grease only Fill space between springs and pins with grease Six monthly inspection (cat III) Procedure Six montly inspection Check orientation of elevator doors and latch (no visible drop allowed) Check easy and full closing of latch onto its lug contact surface without touching bottom or top of lug 3 monthly inspection (cat III) on RIG Procedure Procedure on rig; drill pipe bushings Depending on frequency and load pattern of strings handled with the elevator drill pipe bushings, it is recommended to decrease the time intervals for MPI inspection (ref 6 monthly inspection category III on Rig) to be carried out on a 3 monthly basis as per critical area drawing CA-254. 6 monthly inspection (cat III) on RIG Procedure Procedure on rig; elevator MPI exposed critical areas according drawings CA-251, 252, 253 and 254. Check if indications are out of acceptance standard If indications out of acceptance standard, remove elevator of service. The elevator needs repair at the nearest authorized repair facility. Please contact NOV for guidance Annual (1 year) inspection (cat IV) Procedure Annual (1 year) Inspection (cat IV) Follow procedures according chapter “Repair” Magnetic Particle Inspection; please contact a NOV repair center for guidance Check for correct condition of cylinder seals www.nov.com Document number Revision Page 50000802-MAN-001 B 44 of 110 3: Lubrication and maintenance Maintenance procedures API recommended practice RP 8B NOTE: NOV recommends maintenance acc. to API RP8B Recommended inspections The user/owner of the equipment should develop schedules of inspection based on experience, the manufacturer's recommendations, and one or more of the following factors: environment; load cycles; regulatory requirements; operating time; testing; repairs; remanufacture. Alternatively, NOV recommends using the Periodic inspection and maintenance Categories and Frequencies as mentioned in API RP8B Table 1. Long-term planning shall be adjusted in order not to interfere unnecessarily with the running operations. Category I. This category involves observing the equipment during operation for indications of inadequate performance. When in use, equipment shall be visually inspected on a daily basis for cracks, loose fits or connections, elongation of parts, and other signs of wear, corrosion or overloading. Any equipment found to show cracks, excessive wear, etc., shall be removed from service for further examination. The equipment shall be visually inspected by a person knowledgeable in that equipment and its function. Category II. This is Category I inspection plus further inspection for corrosion, deformation, loose or missing components, deterioration, proper lubrication, visible external cracks, and adjustment. Category III This is Category II inspection plus further inspection, which should include NOT of critical areas and may involve some disassembly to access specific components and to identify wear that exceeds the manufacturer's allowable tolerances. Category IV This is Category III inspection plus further inspection for which the equipment is disassembled to the extent necessary to conduct NDT of all primary-load-carrying components as defined by manufacturer. Equipment shall be: disassembled in a suitably-equipped facility to the extent necessary to permit full inspection of all primary-load-carrying components and other components that are critical to the equipment; inspected for excessive wear, cracks, flaws and deformations. Corrections shall be made in accordance with the manufacturer's recommendations. Prior to Category III and Category IV inspections, all foreign material such as dirt, paint, grease, oil, scale, etc. shall be removed from the concerned parts by a suitable method (e.g. paintstripping, steam-cleaning, grit-blasting). www.nov.com Document number Revision Page 3: Lubrication and maintenance 50000802-MAN-001 B 45 of 110 Tool joint wear data drill-pipe Procedure 1. Determine the center bore diameter of the bushing in inches (size X) 2. The maximum wear on the diameter of the center bore: Nominal size + 0.25 inch 3. In the table, follow the line corresponding with the rating of the elevator (in short tons) 4. On the left hand side, read out the minimum required tool joint diameter (Y) in inches that can be handled safely with the elevator. 5. As soon as the tool joint diameter falls below the corresponding rating line, the bushing or the pipe must be changed. *until wear groove is gone Tool joint Y X x Wear grooves 1/8” The lines represent the bushing rating. Y Example: 5 1/2” Drill pipe bushing, rated 350 Tons Procedure 1. Actual center bore (X) is 5 13/16. Follow the vertical line up until the “350 Tons” line. 2. Follow the line horizontally. 3. Read out minimum required tool joint diameter (Y) = “6 ¾“ www.nov.com Document number Revision Page 50000802-MAN-001 B 46 of 110 3: Lubrication and maintenance Center-bore 18° taper profile inspection Daily inspect the bushings visually. When in doubt, measure with contour gauge. Procedure If the measured bore diameter, exceeds the max allowable bore diameter, the bore is not to be welded in. Instead please contact your nearest authorized NOV repair facility for guidance. 1. Superimposed actual pattern of bushing-bore. Press upper section of contour gauge against an unworn section of the bushing upper bore 2. If superimposed elevator angle falls below 16º remove elevator from service 3. In case of undercutting, X is the angle to be superimposed Magnetic Particle Inspection Acceptance criteria for MPI See also the critical area drawings in chapter “Drawings”. Max. Permitted degree Type Discontinuity descriptions Critical areas Non critical areas I II III IV V Hot tears, cracks Shrinkage Inclusions Internal chills and chaplets Porosity None Degree 2 Degree 2 Degree 1 Degree 1 Degree 1 Degree 2 Degree 2 Degree 1 Degree 2 NOTE: Only a NOV authorized repair facility is allowed to remanufacture BX Elevators which have indications outside the acceptance criteria. www.nov.com 3: Lubrication and maintenance Document number Revision Page 50000802-MAN-001 B 47 of 110 Hydraulic filter maintenance procedure Depending on the quality of the hydraulic fluids on the rig it is important to check the condition of the inline-filters on a regular basis. The filters are designed to stand for at least 1-year service in conditions as required in this manual (see chapter 2). However, rig conditions may differ from these required conditions, or change by contamination, incidents, repairs etc. Depending on the actual conditions it is important to conduct regular checks on the filters in the manifold block. For this reason the manifold block, the hoses and couplings need to be checked and cleaned thoroughly. It is advised to conduct the check at least after 1 month of service, after 6 months service and after one year of service. Depending on the results of the checks the interval between checks can be increased or decreased. Filter in manifold block Procedure 1. XP-line filter on the side (p/n 979796-25-S) 2. Check filters. 3. Clean filters when needed (rinse with a solvent) Filter set: Spring (not shown) (p/n 980252) and Cartridge (p/n 979796-25-S) www.nov.com Document number Revision Page 50000802-MAN-001 B 48 of 110 3: Lubrication and maintenance Tests Load test The BX Elevators are load tested after manufacture or repair to 1.5 times their rating. WARNING: BX Elevators which have experienced wear or are found to have cracks must be replaced or repaired by a Varco BJ authorized repair facility. WARNING: Only original NOV parts must be used. BX Elevators are produced from cast alloy heat treated steel and must not be welded in the field. Improper welding can cause cracks and brittleness in heat-affected areas which can result in dramatic weakening of the part and possible failure. Repairs involving welding and/or machining should be performed only by a NOV authorized repair facility. Using a BX Elevator that has been improperly welded or repaired is dangerous. Cylinder seal test Checking for the condition of the seals in the BX-cylinders is to be carried out once a year. Procedure Remove cylinders from elevator Try to remove any remaining fluid from the cylinders by stroking them in and out manually a few times Plug off the Xp (barrel) port. Put system pressure (2,500 psi) on the rod side of the cylinder. CAUTION: Ensure cylinder cannot spray any leaking oil via the open port into air causing damage or injury to anyone. On the piston side of the cylinder appr. 2 cubic centimeter/min (about a table spoon) is allowed to leak. If there is considerable more leakage, replace seals. www.nov.com 3: Lubrication and maintenance Document number Revision Page 50000802-MAN-001 B 49 of 110 Wear data/criteria Repair data NOTE: In case the guidelines given in this chapter, conflict with the guidelines as set out in the NOV Repair manual, the guidelines set out in the NOV Repair manual shall prevail. The wear data as given in the table(s) are for accepting the equipment in the field. The criteria that determine if equipment needs to be repaired are more stringent. After repair, the equipment must have wear allowance. Therefore on a repaired tool the Hinge & Latch Pin to Bore clearance should generally not exceed 50% of the maximum wear allowance. Bushing/pin wear data Allowed repair clearance Hinge & Latch pins. Max 0.023” Allowed in-service clearance Hinge & Latch pins Max 0.045” Allowed in-service clearance Lever & Bracket pins Max 0.015” Allowed in-service clearance Bushing Position pins & Bushings (Inserts) Max 0.300” Bushing / pin repair parts BX3 Cylinder bracket bushing ½” Door/Latch lever bushing ½” Door hinge-pin assembly 1. Door hinge-pin wear-bushing in body 2. Latch hinge-pin wear-bushing in door 3. Body hinge-pin wear-bushing in door 4. Latch hinge-pin wear-bushing Latch-pin assembly Trigger shaft Trigger shaft wear bushing Part number Qty 203260-1 203247-1 203206-1 979770-65 979770-62 979770-65 979779-64 203207-1 203238 979771-2520 4* 10 ** 2 8 4 8 2 1 1 1 BX4-50 & 4-75 www.nov.com Description Part number Qty Bracket pin bushing 0.5” Bracket pin bushing 0.75:” x 0.472” Bracket pin bushing 0.75:” x 0.750” Trigger shaft Trigger shaft wear bushing Doorhinge-pin assembly Latch-pin assembly 1.Body hinge-pin wear-bushing in door 2.Body hinge-pin wear-bushing in door 2. Latch hinge-pin wear-bushing 203254 50005325 50005326 50000661 979771-2520 50000670-1 50000671-1 979770-65 979770-66 979770-64 4 14 3 1 2 2 1 2 6 2 Document number Revision Page 50000802-MAN-001 B 50 of 110 3: Lubrication and maintenance BX5 Cylinder bracket bushing ½” Door/Latch lever bushing ½” Latch lock lever bushing Door hinge-pin assembly with bushings 1. Door hinge-pin wear-bushing in body 2. Latch hinge-pin wear-bushing in door 3. Body hinge-pin wear-bushing in door 4. Latch hinge-pin wear-bushing 5. Latch hinge-pin wear-bushing Latch-pin assembly with bushings Trigger shaft Trigger shaft wear bushing Part number Qty 203260-1 203247-1 203247-1 40004006-1 979770-7050 979770-6040 979770-7050 979779-6040 979779-6030 50004007-1 50004038 979771-2520 8 4 2 2 8 4 8 2 2 1 1 2 www.nov.com Document number Revision Page 3: Lubrication and maintenance 50000802-MAN-001 B 51 of 110 Wear data hinge pins BX3 Hinge Pins Door Hinge Pins BX3 #203206-1 Hinge pin doors diameter new Min 2.1642” Hinge pin doors worn Min 2.1392” Door bushing ID (fitted) new Max 2.1683” Door bushing ID worn Max 2.1933” Door bushing fitment bore Max 2.3640” Latch Pins BX3 #203207-1 Latch pin diameter new Min 1.9673” Latch pin diameter worn Min 1.9423” Latch bushing ID (fitted) new Max 1.9710” Latch bushing ID worn Max 1.9960” Latch bushing fitment bore Max 2.1672” 1 BODY www.nov.com 2 3 DOOR 4+5 LATCH 3 DOOR 1 BODY Document number Revision Page 50000802-MAN-001 B 52 of 110 3: Lubrication and maintenance BX4-50 & 4-75 Hinge Pins Door Hinge Pins #50000670-1 Hinge pin doors diameter new Min 2,1636” Hinge pin doors diameter worn Min 2.1542” Hinge pin body bore diameter new Min 2,1664” Hinge pin body bore diameter worn Max 2,3634” Door pin Bushing #979770-65 & 66 Door bushing ID (fitted) new Max 2.1642” Door bushing ID worn Max 2.2142” Door bushing ID fitment bore Max 2.3640” Latch Pins #50000671-1 Size (inch) Latch pin diameter new Min 1.9670” Latch pin diameter worn Min 1,9570” Latch pin door bore new Min 1,9695” Latch pin door bore worn Max 2,195” Latch pin bushings #979770-64 Latch bushing ID (fitted) new Max 1.9673” Latch bushing ID worn Max 1.9773” Latch bushing ID fitment bore Max 2.16742” 1 Bore Body 3 2 Bore Door Bore Latch Door Body www.nov.com Document number Revision Page 3: Lubrication and maintenance 50000802-MAN-001 B 53 of 110 BX5 Hinge Pins Doors Hinge Pins BX 5 50004006 Hinge pin doors diameter new Min 2.7547” Hinge pin worn Min 2.7297” Door bushing ID (fitted) new Max 2.7588” Door bushing ID worn Max 2.7838” Door bushing fitment bore Max 2.9546” Latch Pins BX 5 #50004007 Size Latch pin diameter new Min 2.3610” Latch pin diameter worn Min 2.3360” Latch bushing ID (fitted) new Max 2.3651” Latch bushing ID worn Max 2.3901” Latch bushing fitment bore Max 2.5608” 1 BODY www.nov.com 2 3 DOOR 4+5 LATCH 3 DOOR 1 BODY Document number Revision Page 50000802-MAN-001 B 54 of 110 3: Lubrication and maintenance Wear data elevator closing mechanism Levers Pins & Bushings Size (inch) Lever pins 0.500 Nominal diameter, new Min 0.4950 Lever pins 0.500 Nominal diameter, worn Min 0.4880 Lever pins fitment bore Max 0.5050 Bushing 0.500 ID #50005325 Lever bushings 0.500 ID new Max 0.5017 Lever bushings 0.500 ID worn Max 0.5035 Lever bushing fitment bore Max 0.5940 Bracket Pins & Bushings Size (inch) Bracket pins 0.750 Nominal diameter new Min 0.7492 Bracket pins 0.750 Nominal diameter worn Min 0.7380 Bracket pins fitment bore Max 0.7512 Bushing 0.750 ID #203254 Bracket bushings 0.750 ID (fitted) new Max 0.7521 Bracket bushings 0.750 ID worn Max 0.7650 Bracket bushings fitment bore Max 0.8762 Cylinder bracket LH-door Support bracket Latch bracket LH-door Bushing 4plc Latch lever Door lever Cylinder bracket RH-door Latch lever Bushings www.nov.com 3: Lubrication and maintenance Document number Revision Page 50000802-MAN-001 B 55 of 110 Wear data position pins for elevator bushings BX3 Sizes (inches) Position Pins Top #203317 1.4961” Nominal diameter, new Min. 1.4911 Position Pins Top #203317 1.4961” Nominal diameter, worn Min. 1.4561 Pin press-fit end in Body / Door BX 3 Min. 1.4971 Pin fitment hole in Body / Door BX 3 Max. 1.4970 Position Pins Bottom #203238. 0.8660” Nominal diameter, new Min. 0.8655 Position Pins Bottom #203238. 0.8660” Nominal diameter, worn Min. 0.8460 Pin fitment hole in Body / Door BX 3 Max. 0.8710 Locating hole in Elevator bushing (Insert). BX 3 Max. 1.0500 BX4-50&4-75 Sizes (inches) Position Pins Top #203234 - 0.8660” Nominal diameter, new Min. 0.8655” Position Pins Top #203234 - 0.8660” Nominal diameter, worn Min. 0.8260” Pin press-fit end in Body / Door Min. 0.8665” Pin fitment hole in Body / Door Max. 0.8668” Locating hole in Elevator bushing (Insert) Max.1.0600” Position Pins Bottom Body #50000660: 0.8660” Nominal diameter, new Min. 0.8655” Position Pins Bottom Body #50000660: 0.8660” Nominal diameter, worn Min. 0.8460” Position Pins Bottom Door #50000660-1: 0.8660” Nominal diameter, new Min. 0.8655” Position Pins Bottom Door #50000660-1: 0.8660” Nominal diameter, worn Min. 0.8460” Pin fitment hole in Body / Door: 1.000” - 0.999” BX5 Sizes (inches) Position Pins Top #50004034. 1,2598” Nominal diameter, new Min. 1.2548 Position Pins Top #50004034. 1,2598” Nominal diameter, worn Min. 1.2148 Pin press-fit end in Body / Door BX 5 Min. 1.2601 Pin fitment hole in Body / Door BX 5 Max. 1.2608 Position Pins Bottom #203238. 0.8660” Nominal diameter, new Min. 0.8655 Position Pins Bottom #203238. 0.8660” Nominal diameter, worn Min. 0.8460 Pin fitment hole in Body / Door BX 5 Max. 0.8710 Locating hole in Elevator bushing (Insert). BX 5 Max. 1.0500 www.nov.com Document number Revision Page 50000802-MAN-001 B 56 of 110 3: Lubrication and maintenance Locating pins Locatings pin top BX3: 203317 BX4: 203234 BX5: 50004034 Top locating pins Locating pins bottom BX3: 203258 BX4: Body: 50000660 BX4: Door: 50000660-1 BX5: 203258 Bottom locating pin body Bottom locating pin door BX4 typical www.nov.com 3: Lubrication and maintenance Document number Revision Page 50000802-MAN-001 B 57 of 110 Wear data trigger shaft Trigger sizes (inches) Trigger Shaft #50004051 in trigger shaft assembly #50004051-1 in manifold Trigger shaft Nominal diameter new Max 0.8653” Trgger shaft bushing #979771-2520 Trigger shaft bushing ID Max 0.8645” (soft surface) Trigger shaft bushing ID worn Max 0.8661” (d1) Trigger shaft bushing fitment bore Max 0.9851” Initiator pin #203272 Initiator pin Diameter new Max 0.3150’ Initiator pin 203272 www.nov.com Bushings 979771-2520 Trigger shaft 50004051 Document number Revision Page 50000802-MAN-001 B 58 of 110 3: Lubrication and maintenance Wear dat lock shaft Lock shaft bushings (inches) Latch lock shaft #203248 & Bushing Size (inch) Latch Lock shaft 0.500 Nominal diameter, new Min 0.4950 Latch Lock shaft 0.500 Nominal diameter, worn Min 0.4880 Latch Lock shaft fitment bore Max 0.5050 Lock Lever bushings 0.500 ID (fitted) new Max 0.5017 Lock Lever bushings 0.500 ID worn Max 0.5035 Lock Lever bushing fitment bore Max 0.5940 Spring #980251 Length new.2.303” Min. 2.180 Pin 203230 Lever BX3 & 4: 203231-2 BX5: 50004031-1 Shaft 203248 Spring 980251 Bushing BX3 & 5: 59000010-0808 2plc BX4: 50005225 2plc Repair kit latch lock: BX3: #203231-13 BX5: #50004031-13 www.nov.com 3: Lubrication and maintenance Document number Revision Page 50000802-MAN-001 B 59 of 110 Wear data link ear “Y” “A” “E” “A” “X” Detail EAR ” s “R diu Ra Take dimension of link ears at pick-up point (left & right) www.nov.com Dimension (inch) BX3 BX4-50 BX4-75 BX5 “X” min. new “X” min. worn “Y” min. new “E” “R” 5.00 4.63 5.00 43.5 2.50 5.00 4.36 5.00 30.75 2.50 6.00 5.72 6.00 30.75 2.50 7.25 0.88 7.25 36.00 2.875 Document number Revision Page 50000802-MAN-001 B 60 of 110 3: Lubrication and maintenance www.nov.com BX3, BX4-50, BX4-75, BX5 4-Installation and commissioning REFERENCE BX3, BX4-50, BX4-75, BX5 REFERENCE DESCRIPTION Hydraulic Elevators This document contains proprietary and confidential information which is the property of National Oilwell Varco, L.P., its affiliates or subsidiaries (all collectively referred to hereinafter as "NOV"). It is loaned for limited purposes only and remains the property of NOV. Reproduction, in whole or in part, or use of this design or distribution of this information to others is not permitted without the express written consent of NOV. This document is to be returned to NOV upon request or upon completion of the use for which it was loaned. This document and the information contained and represented herein is the copyrighted property of NOV. www.nov.com VarcoBJ BV Nijverheidsweg 45 4879AP Etten-Leur Tel: +31-76-5083000 Fax: +31-76-5046000 DOCUMENT NUMBER REV 50000802-MAN-001 B 4: Installation & commissioning Document number Revision Page 50000802-MAN-001 B 63 of 110 Installation and commissioning General procedure A range of control manifolds and hook up kits to control the elevator or elevator/rotator combination are available. The control manifolds also protect the elevator and rotator against overload. Installation WARNING: Make sure that all hydraulic lines are disconnected before ANY work is performed on the elevator. When the lines are connected the elevator doors will close when the bushing / trigger mechanism is hit which can cause serious injury to personnel.It’s not always sufficient to isolate the hydraulic lines by using a ball valve, since the hoses might function as an accumulator, which could generate movement of the elevator System requirements check Procedure Initial checks system requirements Check whether all tubing and hoses that connect the BX-elevators to the power unit or rig main ring have a minimum of ½” nominal diameter. Check maximum system-oil temperature: Maximum 140°F (60°C). Check that the maximum back-pressure on the return line does not exceed 250 psi. Check availability of correct control panel & control functions Check hoses on damage and free movement. Check the minimum – maximum pressure: 2,000 – 2,500 psi (13,790 - 17,237 kPa) and 5 Gpm (19 l.min) Check the pressure on the XP-line: When the elevator is commanded to open, the pressure should be about 200 psi (1,378 kPa) higher than in the P-line. OK OK OK OK OK OK OK Install instrumentation in driller’s console acc. to HUK drawing. Three different forms of instrumentation are possible: 1. Instrumentation in driller’s console. 2. Certified J-box. 3. Integrated instrumentation in existing J-box. Check the proper functioning of the control lights and switches on the control panel after electrical hooking up. WARNING: Ensure the switches for operating the BX-elevator always switch back to the OFF position after being commanded. This is to prevent the elevator will be triggered to make unexpected movements after a electric or hydraulic power failure. Cabinets Available are two types of Hook Up Kits, with the control manifold for BX-elevator OR the combination BX-elevator/rotator. In case of a NOV top drive a control manifold will be mounted on the top drive (no drawing added). www.nov.com Document number Revision Page 50000802-MAN-001 B 64 of 110 4: Installation & commissioning Universal Rotator Please refer to of the Universal Rotator User’s Manual pn 50004130-14 for information about the Universal Rotator. Installing the Hook Up Kit Drawing gives guidelines for the installation of the Hook Up Kits. When customer has a new NOV Top Drive, the hose kit 50004140 need to be used: Hose kit pn50004140 NOV Part Number Qty. Description 50004350 203120 203121 203122 203123 203124 203125 1x 1x 1x 1x 1x 1x 1x PRV upgrade kit BX Hook up kit Hose connection from Hose connection from Hose connection from Hose connection from Hose connection Hose connection NOTE: Protect hoses against freezing when applied in circumstances below 0° C (32°F). Fit control manifold close to the hydraulic supply of the top drive on the fingerboard level. Commissioning Commissioning must be carried out according the TSEL-0066 “COMMISSIONING SPECIFICATION BX-ELEVATOR & ROTATOR”. This specification describes all tests and checks to be carried out by the NOV installation-engineer after rigging-up the equipment. Before connecting the BX Before use 1.Move the Right Hand door bushing by pushing it 5 times vertically down to see whether it moves freely. 2.Check whether all linch pins are correctly in place. 3.Apply grease to all grease points until grease is visible coming out of the bores. 4. Put switch in “ELEVATOR CLOSE” position on control panel. 5. Connect the tool to the hydraulic lines (P, T and XP (and if using rotator; Float).) Install Pressure-Gauges at the gauge-connectors on the manifold. 6. Start Power Unit 7. Measure the pressure: Min 2000 psi (13,790 kPa)n at rotator and elevator QD’s. OK OK OK OK OK OK www.nov.com 4: Installation & commissioning Document number Revision Page 50000802-MAN-001 B 65 of 110 After connecting the BX Elevator without rotator: Exercise each control on the drillers console. Put switch in “ELEVATOR OPEN” position. Elevator opens (XP = 2,000 psi / 15,168 kPa) (200 psi > P) Put switch in “ELEVATOR CLOSE” position (XP = 0 psi / 0 kPa) Be aware of risks taken by the next step. Keep out of range of moving parts. Trigger the door body bushing by pulling the bushing, standing on the manifold side of the elevator Elevator closes. (When latch is closed, XP = 1000 psi / 6,895 kPa) Get feedback that elevator is closed; Signal Lamp on control panel lit. OK OK OK OK OK OK OK Additional for elevator with rotator: Exercise each control on the drillers console. 1. Open elevator. 2. Turn rotator to 45°angle, minimum. Be aware of risks taken by the next steps. Keep out of range of moving parts. 3. Trigger the body bushing by pulling the bushing, standing on the manifold side of the elevator 4. Elevator closes. 5. Get feedback that the elevator is closed; Signal Lamp on control panel. 6. Elevator tilt will float and elevator will turn to horizontal position. 7. Open elevator 8. Turn rotator to 45° angle, minimum. 9. Push both rotator buttons on control panel. 10. Elevator tilt will float and elevator will turn into horizontal position. OK OK OK OK OK OK OK OK OK OK OK Final test elevator with or without rotator 1. Pick up a single lift sub. 2. Check locking of the latch with load in the elevator. The locking pin must prevent the latch from being opened when the elevator is under load. Clear the area around the elevator. No personnel allowed on the rig floor 3. Shut of the hydraulic power supply (with pipe in elevator). Allow time to bleed-off pressure. 4. Start-up the hydraulic power supply again. 5. Elevator must stay closed. 6. The signal “elevator closed” must be visible, WITH SWITCH IN “ELEVATOR CLOSE” POSITION. www.nov.com OK OK OK OK OK OK OK Document number Revision Page 50000802-MAN-001 B 66 of 110 4: Installation & commissioning www.nov.com BX3, BX4-50, BX4-75, BX5 5-Operation REFERENCE BX3, BX4-50, BX4-75, BX5 REFERENCE DESCRIPTION Hydraulic Elevators This document contains proprietary and confidential information which is the property of National Oilwell Varco, L.P., its affiliates or subsidiaries (all collectively referred to hereinafter as "NOV"). It is loaned for limited purposes only and remains the property of NOV. Reproduction, in whole or in part, or use of this design or distribution of this information to others is not permitted without the express written consent of NOV. This document is to be returned to NOV upon request or upon completion of the use for which it was loaned. This document and the information contained and represented herein is the copyrighted property of NOV. www.nov.com VarcoBJ BV Nijverheidsweg 45 4879AP Etten-Leur Tel: +31-76-5083000 Fax: +31-76-5046000 DOCUMENT NUMBER REV 50000802-MAN-001 B 5: Operation Document number Revision Page 50000802-MAN-001 B 69 of 110 Operations Intended usage The BX-elevator is designed to RUN IN HOLE (RIH) and to PULL OUT OF HOLE (POOH) of various drill-stem tubulars and casing in the oil and gas well drilling environment.. WARNING: Ensure that all hydraulic lines are disconnected before ANY work is performed on the elevator. It’s not always sufficient to isolate the hydraulic lines by using a ball valve, as the hoses might function as an accumulator, which could generate movement of the elevator. The ball-valve is installed to ease connecting and disconnecting the QD with pressure still on the line and for disconnecting the elevator from the power source. Installing the elevator and rotator in the links. Procedure 1. Lift the elevator by the lifting ears only 2. Bring the elevator as near to the well center as possible. 3. Remove both lock bolt assemblies 4. Lower both the link blocks 5. Push the links in position and close the link blocks. 6. Fit the lock bolt assemblies. 7. Do not forget the cotter pin NOTE: Clean the hydraulic couplings thoroughly prior to connecting 8. Connect the hydraulic hoses to the elevator. Fitting the rotator to the elevator. Procedure 1. Lift the elevator/rotator combination only by the lifting ears of the elevator and never by the rotator lifting eyes. NOTE: Lift the rotator by its lifting eye only to prevent damage. NOTE: Check if the correct size wear guide is fitted in the link clevis. NOTE: For the rotators to fit on 500 Ton links, the rubber liners should be removed. 2. Bring the rotator to the drill-floor. 3. Remove the original link block from the elevator and replace it by the rotator link block BX3 & BX4-50 & BX4-75: p/n 50004100-340, for BX5 pn 50004100-50. 4. Remove lock bolt assembly www.nov.com Document number Revision Page 50000802-MAN-001 B 70 of 110 5: Operation 5. Hook a tugger line in the rotator lifting eye bolt 6. Bring rotator into position 7. Install the upper bolt 8. Install the lower bolt 9. Connect the elevator and rotator hoses (picture shows loose rotator actuators without 10. Check quick disconnect couplings for proper positioning links and hoses. 11. Lift elevator from the drill floor. Selecting the correct bushing Procedure 1. Verify the load to be run. 2. Select the correct bushing segment (load rating stamped in the bushing), e.g 203213Y201 has a load rating of 500 sTons / 454mTons) 3. Take into account dynamic loads applied to the bushing due to e.g. movement of the ship. 4. Install the bushing segments Installing bushings in elevator Procedure 1. Open the doors. 2. Make sure that all hydraulic lines are disconnected before ANY work is performed on the elevator. Disconnect the lines as follows: a. Give command-to-close and close elevator b. Switch off the hydraulic power supply. c. Close the ball valve in P line and disconnect the P-line. d. Remove the XP-line NOTE: Last (!) remove the tank line to avoid pressure build up in elevator. e. It’s not always sufficient to isolate the hydraulic lines by using a ball valve, since the hoses might function as an accumulator, which could generate movement of the elevator. 3. Apply grease to the back of the bushings, the locating-holes and load-shoulder. 4. Locating holes 5. Load-shoulder 6. Remove bushing-lock Rue rings (4 x). www.nov.com Document number Revision Page 5: Operation 50000802-MAN-001 B 71 of 110 5. Locating holes 6. Apply grease to load shoulder Rue rings (4 plc) 2. Fit 1. Slide in 4. Optional lock 3. Remove www.nov.com Document number Revision Page 50000802-MAN-001 B 72 of 110 5: Operation 7. Pick up a door bushing segment from the bushing support frame and place it horizontally in to the elevator. 8. The bushing spring lock is pushed away when the segment is pushed into position 9. Lock the bushings with the bushing-lock rue-rings after assembly. 10. Repeat the above operation for all the bushing segments. 11. Attach the safety cables to the bushing segments (4x). www.nov.com Document number Revision Page 5: Operation 50000802-MAN-001 B 73 of 110 Bushing storage frame. Use the storage frame to keep the bushing set complete and for safe transport. Connecting the hoses to the elevator. Signal (XP) 1/4” Male QD www.nov.com Pressure line (P) 3/8” Female QD Return (T) 1/2” Female QD Float 1/4” Female QD Document number Revision Page 50000802-MAN-001 B 74 of 110 5: Operation Operations WARNING: Never exceed the load rating of the elevator, bushings and pipe at any given time in any situation. WARNING: The Driller should be checking the latch indication is on and off every time the elevator is latched and unlatched. The frequency of checking for proper functioning of the latch should be at least daily and at the beginning of every trip. Procedure 1. Check that the elevator, pipe/lifting tool, links and link adapter are all properly loaded and aligned to prevent unequal loading of any of these parts. Especially in case of increasing loads this may become critical, when the load is ditributed in an uneven way, the stress pattern in the elevator may change. This might affect the load rating of the elevator. 2. Ensure the latch feedback indication is on and off everytime the driller latches or unlatches the elevator. This test should be carried out at least daily and at the beginning of every trip. 3. Never attemp to hoist a pipe without having received a positive signal “ elevator closed”. 4. Never give the command “open elevator” while there is still load suspended in the elevator. 5. Never give the command “ open slips” while there is still load suspended in the slips. 6. Use preferably a system, interlocking the BX-elevator with the Slips in the rotary in order to prevent the slips to open when the elevator is open and vice versa. 7. Releasing a load from the elevator into the Slips. a. Ensure the slips in the rotary are set. Verify the presence op “Slips Set” signal b. Lower the elevator. Observe hook load decrease an ensure load is transferred to slips completely. c. Slightly lower hook (2 inch max) in order to release latch lock pin from elevator d. Command elevator to open. 8. Picking up a load with the elevator. a. Ensure elevator is commanded “armed to close”. b. Engage pipe with elevator. c. Elevator closes automatically. d. Observe indication “elevator closed”. e. Pick up weight of pipe. Observe hook load to ensure this happens. 9. Now open slips and handle the pipe. 10. The sum of the static and dynamic load in the elevator shall never exceed the lowest value of: the load rating of the elevator (verify load rating plate of elevator) the load rating of the bushing (verify load rating stamped in bushing) 11. Verify pipe-load shoulder area for maximum contact stresses (verify according to examples in chapter “ SPECIFICATION, Load ratings”). 12. Ensure the heave-compensating system, if applicable, is in good working order. 13. Ensure all linking parts (links, block, top drive etc) are equaly capable of holding the load. www.nov.com BX3, BX4-50, BX4-75, BX5 6-Assembly REFERENCE BX3, BX4-50, BX4-75, BX5 REFERENCE DESCRIPTION Hydraulic Elevators This document contains proprietary and confidential information which is the property of National Oilwell Varco, L.P., its affiliates or subsidiaries (all collectively referred to hereinafter as "NOV"). It is loaned for limited purposes only and remains the property of NOV. Reproduction, in whole or in part, or use of this design or distribution of this information to others is not permitted without the express written consent of NOV. This document is to be returned to NOV upon request or upon completion of the use for which it was loaned. This document and the information contained and represented herein is the copyrighted property of NOV. www.nov.com VarcoBJ BV Nijverheidsweg 45 4879AP Etten-Leur Tel: +31-76-5083000 Fax: +31-76-5046000 DOCUMENT NUMBER REV 50000802-MAN-001 B Document number Revision Page 6: Assembly 50000802-MAN-001 B 77 of 110 Assembly and dis-assembly Elevator Disassembly NOTE: Before the elevator and / or rotator can be disassembled make sure that: Doors are open, elevator is placed on a steady underground, lifting equipment is available for handling heavy parts. WARNING: Ensure that all hydraulic lines are disconnected before ANY work is performed on the elevator. It’s not always sufficient to isolate the hydraulic lines by using a ball valve, as the hoses might function as an accumulator, which could generate movement of the elevator. The ball-valve is installed to ease connecting and disconnecting the QD with pressure still on the line and for disconnecting the elevator from the power source. Prior to disassembly, clean the elevator thoroughly with a steam-cleaner in order to prevent the disassembled parts from getting contaminated with dirt, mud etc. Removing manifold block from elevator Procedure 1. Disconnect the hydraulic lines . 2. Plug-off hoses, cylinders and manifold ports. 3. Remove trigger end-cap and springs. 4. Remove the bolts of the manifold block 5. Remove the manifold block 6. Clean manifold prior to further disassembly. Disassembly hydraulic manifold block. NOTE: Ensure that the work area is clean and dust free. Clean the manifold thoroughly before disassembly. Procedure 1) Bleed off all hydraulic fluid. 2) Remove the cartridges, plugs and socket and nipples. 3) Remove the cotter pins, nuts and washers of the retracting mechanism. 4) Gently remove the retracting plungers on the backside of the manifold block. 5) Remove filter plugs, filters and filter springs NOTE: Be aware that the spring will force the filter out of its cavity. www.nov.com Document number Revision Page 50000802-MAN-001 B 78 of 110 6: Assembly Removal cylinder package Procedure 1. Remove cotter pins 2. Unscrew nuts 3. Remove screws, washers and bolts (3x) 4. Remove the cylinder package Disassembly cylinders Procedure 1. Remove bolts and lockwire. 2. Remove washer and rod end. 3. Use a plastic mallet to remove the cylinder top. Remove piston and sleeve. 4. Seals should always be inspected and -when damaged- replaced before assembly of the cylinder 5. Piston: Comprises a seal-ring with “O”ring and 2 Glyd-rings and a wear ring in the inner bore. 6. Cylinder top: Comprises a dust wiper, a O-ring and a a rod-seal. The door cylinder contains an additional ring (pos 15) with O-ring (pos 8). Door cylinder Latch cylinder www.nov.com Document number Revision Page 6: Assembly 50000802-MAN-001 B 79 of 110 Exchanging seals Procedure 1. The 0-ring seal can be replaced by hand. 2. The Glyd-rings are flexible and can be exchanged by carefully bending. CAUTION: DO NOT OVER STRETCH the seals. Just slip it over the piston after lubricating the seal-ring with fresh hydraulic fluid. Disassembly latch-doors-lever package Procedure 1. Remove the back plate of the elevator 2. Remove the hinge-pin lock bars (3x) 3. Remove the bracket pins from the brackets on the rear side (3x). 4. Remove the left and right door hinge pins. 5. Pull the left door with levers and latch out of the body 6. Pull the right door with the levers out of the body. Disassembly latch Procedure 1. Remove the latch hinge pin 2. Remove the rings on top of the latch (2 plc) 3. Remove the latch with the lever 4. Remove the bolt from the latch. 5. Remove the lever-disc package Disassembly control brackets Procedure 1. Remove the lock rings, plugs and bracket pins from underneath the elevator 2. Remove the hinge pins from the brackets 3. Remove the brackets Disassembly bushing lock assembly Procedure 1. Remove the rue rings pin 2. Loosen the lock washer. 3. Turn the nut counterclockwise until it is loose. 4. TURN the assembly out of the hole. www.nov.com Document number Revision Page 50000802-MAN-001 B 80 of 110 6: Assembly Disassembly latch lock assembly Procedure 1. Remove the lock ring, plug and pin. 2. Pull-out the latch-lock pivot-pin 3. Remove the latch-lock lever. 4. Remove the push-pin 5. Remove the lock-pin and spring Replacement lever wear bushings Procedure 1. Remove the lever-wear bushings with a hammer and proper sized drift. 2. Insert new wear bushings with a correct sized bolt or rod 3. carefully press-fit the wear bushing into place Replacement of hinge-pin wear bushings. Procedure 1. Place the bushings and a correct sized drift over the bushing journal 2. Carefully drive the bushing into place www.nov.com Document number Revision Page 6: Assembly 50000802-MAN-001 B 81 of 110 Elevator assembly General note NOTE: Use the proper torque for assembly parts. Cartridges could be easily damaged by applying too much torque. Apply 30-36 Ft Lbs (40 - 49 Nm) on cartridges MAX. Procedure 1. Assembly can be done by doing disassembly in reverse sequence. 2. Lock all parts as indicated on the assembly drawings. 3. Check the elevator according the Test Procedure (see TSEL-0048). Cylinder adjustment Procedure After re-assembly of the elevator it might be necessary to adjust the cylinder package. When cylinders are found to be out of adjustment, follow the procedures as described below. Check first whether bolts and lockwire are still in good condition. When necessary replace bolts before doing the re-adjustment. Lockwire afterwards. 1. Hook-up the elevator to a Hydraulic Power-Unit using Varco BJ test kit #202539, or to its HUK. Connect pressure gauges to the appropriate gauge ports for ’P’ and ‘XP’ on the elevator manifold 2. Open the doors and close again, placing a 1.1/2” thick steel bar between the doors, preventing the doors from fully closing. Connect (‘Tee-off”) a pressure gauge to the barrelport of the door cylinder. 3. NO signal (equal to ‘P’ pressure) may occur on the barrel-port gauge. Latch may NOT start to close. 4. When a signal (equal to ‘P’ pressure) out of the barrel-port is present (latch will start to close) then turn the rod-clevis OUT. (Elongate the Cylinder) 5. Then remove the bolt or bar. 6. Power the doors to close fully. 7. When the doors are fully closed, (Tip of the doors MUST close against each other, NO gap allowed.) , a signal (equal to ‘P’ pressure) out of the barrel-port MUST occur. (Latch will start to close) 8. When NO signal occurs, turn the rod-end IN. (Shorten the Door-Cylinder) 9. With the elevator open, check whether doors are making contact with their Hard Stops (see picture on next page). If not, turn rod-end clevis IN. (Shorten the Door cylinder.) 10. REPEAT this procedure until the proper barrel-port signals occur at the correct moment. www.nov.com Document number Revision Page 50000802-MAN-001 B 82 of 110 6: Assembly Latch cylinder Door cylinder Rod clevis Latch Cylinder Adjustment. Procedure 1. After Door cylinder adjustment is found to be OK, the latch cylinder must be adjusted according the following procedure. 2. Power the elevator to close and latch 3. Check whether the closed latch is in contact with it’s hard stop on the left-hand door. Stop is located on the inside (back) of the bottom latch strap. You may need to use markingpaint (Blue-Dye) to get a proper indication, as this hard stop is difficult to reach with a feeler gauge. When latch does not contact hard-stop IN, turn rod-end clevis OUT. (lengthen Cylinder) 4. In the condition described in item 2, the elevator closed signal on port ‘XP’ MUST be present. (1,000 Psi / 6,895 KPa) When NO “elevator-closed-signal” (1,000 Psi / 6,895 KPa on “XP”) Is present, turn rod-end clevis IN.(Shorten Cylinder) 5. Open the elevator and check whether latch is in contact with its Hard-stop for the open position. If not turn the rod-end clevis IN. (Shorten Cylinder) 6. REPEAT these steps until OK. 7. As a final check, close the elevator with the mechanical latch lock pin in its UP position. In this condition the latch will be prevented from closing fully by the Lock-pin. NO elevator closed signal (1,000 Psi / 6,895 KPa) on line ‘XP’ may occur. . 8. When BOTH the door-cylinder and latch-cylinder are adjusted correctly, lock both rod ends with their lock nut and SS lock-tabs. Do not to use the same folded part of the lock-tab twice. Replace lock-tabs with cracks or other damage preventing proper locking. 9. Finally check the elevator with the test procedure (TSEL-0048) of this user manual. WARNING: Ensure that all hydraulic lines are disconnected before ANY work is performed on the elevator. www.nov.com BX3, BX4-50, BX4-75, BX5 7-Trouble shooting REFERENCE BX3, BX4-50, BX4-75, BX5 REFERENCE DESCRIPTION Hydraulic Elevators This document contains proprietary and confidential information which is the property of National Oilwell Varco, L.P., its affiliates or subsidiaries (all collectively referred to hereinafter as "NOV"). It is loaned for limited purposes only and remains the property of NOV. Reproduction, in whole or in part, or use of this design or distribution of this information to others is not permitted without the express written consent of NOV. This document is to be returned to NOV upon request or upon completion of the use for which it was loaned. This document and the information contained and represented herein is the copyrighted property of NOV. www.nov.com VarcoBJ BV Nijverheidsweg 45 4879AP Etten-Leur Tel: +31-76-5083000 Fax: +31-76-5046000 DOCUMENT NUMBER REV 50000802-MAN-001 B 7: Trouble shooting Document number Revision Page 50000802-MAN-001 B 85 of 110 Trouble shooting NOTE: When no solutions are available below, please contact an authorized NOV repair facility for further information. WARNING: Ensure all hydraulic lines are disconnected before any work is performed to the elevator NOTE: Use drawings 50004050-1 “manifold assy” & 50004050-3 “hydraulic schematic”. Overview possible problems Prior to trouble shooting a problematic elevator, check the following: P C P R O L Check the Pressure to the hook up manifold is at least 2,000 psi (600 kPa). Check that all hoses and connectors are properly Connected and that QD’s are not blocked. Check that elecrrical Power is available Check that the Return line pressure does not exceed 250 psi (1,725 kPa) Ckeck for Oil leakage Check Lubrication status of the BX 1. Open elevator does not close while pipe enters the elevator (see drawing 50004050-3). P = system pressure T = close to 0 psi XP = close to 0 psi (Control Switch in “Close” position.) 1. Does pipe hit the trigger / body bushings properly ? Check elevator rotation angle, adjust if necessary. Check if links are tilted sufficiently for pipe to engage body bushings, adjust if necessary. Check if the body bushings are properly installed and can move freely to hit trigger 2. Is the trigger valve line marked with # 5 pressurized when pipe hits body bushings? Check functioning of valve L. Cartridge pn979997 3. Does gauge on “T” gauge connector read out extremely high pressure (e.g.400 psi / 2,760kPa or higher) ? www.nov.com Tank line blocked, check QD’s and replace if necessary. Document number Revision Page 50000802-MAN-001 B 86 of 110 7: Trouble shooting 4. Is the pressure on the line #6 close to system pressure ? Component E (108087-1OAN) probably blocks flow back to tank, check cartridge for dirt or malfunctioning, replace if necessary . 5. Is the pressure on the line #7 close to system pressure ? Component F (pn 979880-8) not shifted to the right despite of pressure on #5 and NO pressure on #6: Cartridge stuck, check functions and mounting torque, replace if necessary. 6. Is the pressure on the line #9 close to 0 psi ? Component H (pn 93547-1B75N) probably stuck in closed position, check functions and replace if necessary 2. Elevator will close but not latch. (NO CLOSED SIGNAL) P = system pressure (min 2,000 psi / 13.789kPa) T = close to 0 psi XP = close to 0 psi 1. Do both doors close completely to hard stops (welded on inside contact area between doors and body lugs)? Check if something is stuck between doors. Remove object Check if cylinders have sufficient stroke to close doors completely, adjust if necessary.. Lock cylinder rods with bolts and lockwire after adjustment. 2. Is the pressure on line #11 (“latch-out”) close to system pressure ? Check cylinder signal in line #10 to be close to system pressure, adjust cylinder stroke if signals are not fully present. Component K (pn 107029-175N) probably stuck, replace if necessary. 3. Is the pressure on the line marked with #14 close to 0 psi ? If pressure reads high component M (pn 93547-1B75N) probably stuck, check and replace if necessary. 4. Does the latch cylinder mal-function , is it stuck ? Check Cylinder, Disassemble Replace cylinder if necessary. 5. If elevator is closed and latched & elevator “Floats”, is a XP signal of 1000 psi / 6,894 kPa present? www.nov.com 7: Trouble shooting Document number Revision Page 50000802-MAN-001 B 87 of 110 Check Pressure in line 12 to be close to system pressure, adjust cylinder stroke if signal not fully present. No signal at all is faulty cylinder, replace cylinder if necessary. 6. If elevator is closed and latched. & indicator- light at control Panel is ON? Check XP Pressure 1000 psi / 6,894 kPa at the HUK control manifold. Check pressure switch on HUK Elevator control manifold for pressure setting being too high. Check setting of bleed-off valve on HUK manifold. 3. Closed elevator will not open while commanded to open. P = system pressure. T = close to 0 psi. XP = P + 200 psi (1378 kPa) = Max 2,500 psi (17236 kPa) 1. Is tool joint/coupling set on the spring-loaded door bushing and so activating the mechanical elevator latch lock? Lower the elevator until the spring loaded door bushing releases the latch lock and allows the latch to open. 2. Is the moveable door-bushing stuck? Or is the latch locking mechanism stuck (broken spring)? Check latch lock mechanism for proper function. Take out moveable bushing and clean and grease back of bushing, reassemble 3. Is XP line pressure equal or higher than the P–line pressure, check this at the elevator manifold? Check ‘XP’ QD for correct function. Check XP-line filter for correct function. Adjust PRV “PC1” at the HUK control manifold until XP pressure is 200 psi > P line pressure, if necessary. 4. Is the pressure on the line marked with #6 equal to XP line pressure ? Check pressure setting of component E (pn 108087-10AN) to be 1,500 psi / 10,340 kPa, inspect it for dirt/malfunction and replace if necessary. 5. Is the pressure on the line marked with #8 equal to P line pressure ? Check component F (pn 979880-8), inspect it for dirt/malfunction and replace if necessary. 6. Is the pressure on the line marked with #14 equal to P line pressure ? www.nov.com Check component M (pn 93547-1B75N), inspect it for dirt/malfunction and replace if necessary. Document number Revision Page 50000802-MAN-001 B 88 of 110 7: Trouble shooting 7. Is the pressure on the line marked with #11 close to 0 psi (Tank pressure)? Check component K (pn 107029-175N), probably stuck in closed position, check functions and replace if necessary 4. Elevator is hesitating to open. P = System pressure T = close to 0 psi XP = P + 200 psi (1378 kPa) 1. Is component E (pn 108087-10AN) set at 1,500 psi / 10,340 kPa? Set component E (DPBO-LAN) at 1,500 psi / 10,340 kPa. 2. Is system pressure 2,000 psi / 13,789 kPa min & 2,500 psi / 17,236 kPa max. at the elevator? Adjust system pressure to 2,000 psi / 13,789 kPa at the elevator. 5. The elevator opening / closing operation is slow. 1. Is the flow (partly) blocked in one of the QD’s (check for damage) ? Replace damaged QD 2. Is one of the filters A and/or B clogged with dirt Clean filters with a solvent. Replace filters if necessary. 3. Is one of the restrictors (pn 109105-08) build in in nipple 109106-4S-S in lines #7 and #11 (partly) blocked with dirt ? Remove dirt. 6. Elevator closes immediately. Elevator closes immediatelly when Control Switch is put into “armed to close” without (pipe) operating the trigger. 1. Is the trigger stuck, activating valve L (PD-10-40-NS-110) continuously? Check proper functioning of the trigger mechanism. Check body bushing for free movement on their locating pins. Check pressure in line #5, should read out to 0 psi.(Tank pressure) when trigger is deactivated. www.nov.com 7: Trouble shooting Document number Revision Page 50000802-MAN-001 B 89 of 110 2. Is line 7 pressurized immediately after putting the Control Switch into “armed to close” position? Check proper functioning of valve F (DCCC-XXN) Valve probably stuck in controlled position, replace if necessary. 7. Rotated elevator will not close/latch. Rotated elevator will not close/latch onto pipe being presented under an angle. Does rotator stop at an angle different from the pipe angle ? Adjust the stop pin’s of the rotator to get a proper alignment of the elevator and the pipe Check whether a correct bushing size is fitted. Go thru item 1 of this paragraph Procedure 1. Before trouble shooting connect 4 pressure gauges to the standard gauge connectors that are mounted on the BX manifold. The connectors can be found on dwg #50004050-3 + 500004050-1. “T”: Tank line, right-hand side of the manifold, middle left connector. “P”: Pressure line, right-hand side of manifold, bottom right connector. “XP” Signal pressure, right-hand side of the manifold, top left connector. “Float” : Front side of manifold, upper right connector. 2. Check that the hydraulic power supply is providing 2,000 psi / 13,790 kPa minimum at the elevator. The hydraulic power-unit pressure may need to be set higher at the power unit to ensure that 2,000 psi / 13,790 kPa (2,500psi / 17,236 kPa MAX) is available at the BXelevator. 3. Check hose-size to be ½” nominal diameter and flow being 5 gpm /19 l/min 4. Check Quick disconnects for dirt or malfunctioning, replace if necessary 5. Check that XP-line pressure (when elevator is commanded to open, is 200 psi > P-line pressure. 6. Check the pressure in the return (Tank) line. Pressure may not exceed 250 psi / 1,724 kPa. www.nov.com Document number Revision Page 50000802-MAN-001 B 90 of 110 7: Trouble shooting Test kit BX-elevator + power slip p/n 202539 This test kit can be used for trouble shooting and functional testing of the BX elevators and rotators and PS 21/30 power slip. Its contents will allow in line pressure measurements to determine the cause of a problem. NOTE: Advised is to do the trouble shooting in the shop instead of the drill floor because of the possible danger of falling parts down the hole The special hose assembly for the BX elevator will allow testing in the shop and only requires a “pressure” and “return” line from the power unit. The way the kit is designed a “Xp” signal can be generated by operating two ball valves. Contents: parts for pressure measurements hose assembly for testing BX elevator hose assembly for testing PS 21/30 storage boxes (2x) for small parts storage box with complete kit in it that can be hand carried this document DRAWING and parts list of all parts in kit Caps, plugs, fittings, hydraulic sealant On the DRAWING is described how the hose assembly must be hooked up to the power unit. How the elevator can be controlled is also described. Fig.1 shows the hose assembly for testing the BX elevator and rotator. Refer to drawing 202539 sh.1 (included in kit) that shows the assembly in a schematic. On the left side you see 3 lines that must be connected to the elevator (pressure, return and signal Xp). On the right side there are 2 lines that must be connected to the power unit (pressure and return). To the top and to the right there is a PRV (pressure regulating valve) mounted. With this valve the pressure to the elevator can be set to any desired value allowed by the HPU press . Fig 1 www.nov.com 7: Trouble shooting Document number Revision Page 50000802-MAN-001 B 91 of 110 Fig 2 Fig.2 shows most of the parts that are in the kit. Ref. Drawing 202539. It has spare pressure gauges and hoses. The plate that contains 3 gauges can be used for checking the 3 pressures on the elevator that are most important (pressure, return and XP signal). The hoses need to be connected to the gauges and to the elevator standard connectors on the elevator manifold. On the assembly drawing of the manifold the location of these connectors can be found. They can also be recognized by the little cap and chain that covers the end of the connector. The plate has an extra side plate on the back which makes it easy to clamp it onto the top flange at the back of the elevator. Fig 3 Fig.3 shows the box that contains the complete kit. The box is made of strong shock resistant material and can be locked. Weight of total kit with box is 31 lbs (14 kg).The box contains 2 smaller boxes that are used for storage of smaller hydraulic components. www.nov.com Document number Revision Page 50000802-MAN-001 B 92 of 110 7: Trouble shooting Fig 4 Fig.4 shows the hose assembly that can be used for checking sagging of the slips on the power slips PS 21/30. Refer to drawing 202539 sh.2 (included in kit) that shows the hose assembly in a schematic. On the drawing itself there is a description of the testing procedure. Fig 5 Fig.5 shows how to connect and disconnect the 2 hoses when testing has begun. www.nov.com BX3, BX4-50, BX4-75, BX5 8-Appendixes REFERENCE BX3, BX4-50, BX4-75, BX5 REFERENCE DESCRIPTION Hydraulic Elevators This document contains proprietary and confidential information which is the property of National Oilwell Varco, L.P., its affiliates or subsidiaries (all collectively referred to hereinafter as "NOV"). It is loaned for limited purposes only and remains the property of NOV. Reproduction, in whole or in part, or use of this design or distribution of this information to others is not permitted without the express written consent of NOV. This document is to be returned to NOV upon request or upon completion of the use for which it was loaned. This document and the information contained and represented herein is the copyrighted property of NOV. www.nov.com VarcoBJ BV Nijverheidsweg 45 4879AP Etten-Leur Tel: +31-76-5083000 Fax: +31-76-5046000 DOCUMENT NUMBER REV 50000802-MAN-001 B 8: Appendixes Document number Revision Page 50000802-MAN-001 B 95 of 110 Appendixes Risk assessment acc. to EN14121-1 Conclusion Risk Assessment In general, crew must: Wear personal safety protection like safety glasses, hard hat etc Follow instructions as stated in the manual Have knowledge of rig procedures Must have been instructed for safe use of the BX Always use secondary retention as established and implemented by NOV. Rely on signals “elevator closed and latched” on drillers console. Do not rely on visual signals “elevator closed and latched” from deckhand etc. Applicable standards: EN-982: Hydraulic Safety requirements for fluid power systems and their components EN-1127-1: Explosion prevention and protection EN-14121-1: Risk assessment EN-13463-1 & 5: Non electrical equipment for potentially explosive atmospheres EN-ISO 12100-1 Safety of machinery ATEX-directive 94/9/EC Machinery Directive: 98/37/EC & 2006/42/EC API ISO 13535:2000 8C Transport, handling & preservation. See TSEL-0194 www.nov.com Document number Revision Page 50000802-MAN-001 B 96 of 110 8: Appendixes Torque values (US) for bolts grade 8 Bolts Lubricated with Light Machine Oil Dia. Threads per inch Min. Torque (ft lb) Max. Torque (ft lb) Clamp force (lb) Bolts lubricated with Antiseize compound Min. Torque (ft lb) Max. Torque (ft lb) Clamp force (lb) Coarse Thread Series, UNC 1 /4” 20 11.4 12.6 2860 8.6 9.5 2860 5/ ” 16 18 24 26 3720 17.8 19.7 3720 3 /8” 16 43 47 7000 32 35 7000 7 /16” 14 67 74 9550 50 55 9550 1 /2” 13 105 116 12750 78 87 12750 9 /16” 12 143 158 16100 107 118 16100 8” 11 209 231 20350 157 173 20350 3/ ” 4 10 361 399 30100 271 299 30100 7 9 570 630 41600 428 473 41600 5/ /8” 1” 8 855 945 54500 641 709 54400 1 1/8” 7 1216 1344 68700 912 1008 68700 1 1/4” 7 1729 1911 87200 1297 1433 87200 3 1 /8” 6 2261 2499 104000 1696 1874 104000 1 1/2” 6 3002 3318 126500 2252 2489 126500 Tensile Strength = 150,000 psi to 1” dia. Proof Strength = 120,000 psi Dia. Threads per inch Bolts Lubricated with Light Machine Oil Bolts lubricated with Antiseize compound Min. Torque (ft lb) Min. Torque (ft lb) Max. Torque (ft lb) Clamp force (lb) Max. Torque (ft lb) Clamp force (lb) Fine Thread Series, UNF 1 /4” 28 13.3 14.7 3280 10 11 3280 5 /16” 24 24 26 5220 17.8 19.7 5220 3/ ” 8 24 48 53 7900 36 39 7900 7/ ” 16 20 76 84 10700 57 63 10700 1 /2” 20 114 126 14400 86 95 14400 9 /16” 18 162 179 18250 121 134 18250 8” 18 228 252 23000 171 189 23000 33600 5/ 3 /4” 16 399 441 33600 299 331 7/ ” 8 14 627 693 45800 470 520 45800 1” 14 950 1050 59700 713 788 59700 1 1/8” 12 1368 1512 77000 1026 1134 77000 1 1/4” 12 1900 2100 96600 1425 1565 96600 1 3/8” 12 2584 2856 118400 1938 2142 118400 1 1/2” 12 3382 3738 142200 2537 2804 142200 Tensile Strength = 150,000 psi to 1” dia. Proof Strength = 120,000 psi www.nov.com Document number Revision Page 8: Appendixes 50000802-MAN-001 B 97 of 110 Torque values (metric) for bolts grade 8 Bolts Lubricated with Light Bolts lubricated with AntiMachine Oil seize compound Dia meter Threads per inch Min. Torque (Nm) Max. Torque (Nm) Clamp force (N) Min. Torque (Nm) Max. Torque (Nm) Clamp force (N) Coarse Thread Series, UNC 1 /4” 20 15.5 17.1 12870 11.7 12.9 12870 5/ ” 16 18 32.6 35.4 16740 24.2 26.8 16740 3 /8” 16 58.5 64 32500 43.5 47.6 31500 7 /16” 14 91.1 100.6 42980 68 92.5 42980 1 /2” 13 143 158 57380 106 118 57380 9 /16” 12 195 215 72450 145.5 160 72450 8” 11 284 314 91580 213.5 235 91580 3/ ” 4 10 491 542 135450 368 407 135450 7 9 775 857 187200 582 643 187200 5/ /8” 1” 8 1163 1285 245250 872 965 245250 1 1/8” 7 1654 1828 309150 1240 1370 309150 1 1 /4” 7 2351 2598 382400 1764 1949 392400 3 1 /8” 6 3075 3398 468000 2306 2549 468000 1 1/2” 6 4082 4512 569250 3062 3385 569250 Bolts Lubricated with Light Bolts lubricated with AntiMachine Oil seize compound Dia meter Threads per inch Min. Torque (Nm) Max. Torque (Nm) Clamp force (N) Min. Torque (Nm) Max. Torque (Nm) Clamp force (N) 14760 Fine Thread Series, UNF 1 /4” 28 18.1 20 14760 13.6 15 5/ ” 16 24 32.6 35 23490 24.2 26.8 23490 3/ ” 8 24 65.3 72 35550 49 53 35550 7 /16” 20 103 114 48150 77.5 86 48150 1 /2” 20 155 171 64800 117 129 64800 9 /16” 18 220 239 82130 165 182 82130 5/ 8” 18 310 343 103500 232 257 103500 3/ ” 4 16 542 600 151200 406 450 151200 7 14 853 943 206100 639 707 206100 1” 14 1292 1428 268650 970 1071 268650 1 1/8” 12 1860 2056 346500 1396 1542 346500 1 1/4” 12 2584 2856 434700 1938 2128 434700 3 1 /8” 12 3514 3884 532800 2635 2913 532800 1 12 4599 5083 639900 3450 3813 639900 /8” 1 /2” Tensile Strength = 1,034,214KPa to 1” dia. Proof Strength = 827,370 kPa www.nov.com Document number Revision Page 50000802-MAN-001 B 98 of 110 8: Appendixes Frequently asked questions What is the weight of an BX-elevator? This depends on the type of bushing, the heaviest bushing bout 70 kg (155 Lbs),. Guideline: BX 4-50 Elevator without bushings 2,039 lbs / 924 kg BX 4-75 Elevator without bushings 2,047 lbs / 928 kg BX 4-50 Elevator with bushings Up to 2,239 lbs / 1,015 kg BX 4-75 Elevator with bushings Up to 2,247 lbs / 1,019 kg A rotator weights appr. 150 kg (330 Lbs). How does a BX-elevator function? The basic idea is to give the elevator a possibility to close ONLY when the trigger is hit by a pipe. This will start the closing cycle. When the latch is properly closed the elevator will give a high pressure signal generated by the supply line, through the signal line. This will generate the signal “elevator closed and latched”. When the elevator starts lifting the spring powered bushing will be pushed down and will power the mechanical latch lock. As long as weight is in the elevator, the elevator CANNOT be opened. Is it safe working on an elevator without disconnecting the hoses? The hoses could function as an accumulator and supply enough energy to start the closing cycle when the trigger is hit (e.g. by the man working on the elevator). This could result in injury of death. Hence it is required to disconnect hoses before starting any work on the BX. What should I do when the elevator doesn’t functions well? Start with conducting the possible causes as outlined in the chapter trouble shooting. When no solutions at hand PLEASE contact an authorized NOV repair facility. They will help you with finding a solution. When you start adjusting the elevator without exactly knowing what you are doing, you might increase the problem, even when the basic problem is a very simple one. Why can’t I use parts from NOV origin ? All NOV parts are tested and are traceable on vendor, material, strength etc. When using not original parts one might use parts which are not strong enough for the purpose, which might result in breaking of parts from the elevator. I know how to operate an elevator. Do I need to read this manual ? It’s highly recommended to read this manual as the elevator, even though you feel you have sufficient knowledge on how to operate one. It can be used to prevent problems and solve problems when they occur. When following the maintenance advice you will have a reliable tool with a long operational life. Why can’t I use tool joint compound/pipe-dope as a lubricant ? Tool joint compound is a sealant to prevent fluids from escaping out off the drill-pipe. This means it is a sticky compound with basically the opposite result as required: It sticks parts, but doesn’t make parts break loose easily (except from tool joints). www.nov.com BX3, BX4-50, BX4-75, BX5 9-Spare parts REFERENCE BX3, BX4-50, BX4-75, BX5 REFERENCE DESCRIPTION Hydraulic Elevators This document contains proprietary and confidential information which is the property of National Oilwell Varco, L.P., its affiliates or subsidiaries (all collectively referred to hereinafter as "NOV"). It is loaned for limited purposes only and remains the property of NOV. Reproduction, in whole or in part, or use of this design or distribution of this information to others is not permitted without the express written consent of NOV. This document is to be returned to NOV upon request or upon completion of the use for which it was loaned. This document and the information contained and represented herein is the copyrighted property of NOV. www.nov.com VarcoBJ BV Nijverheidsweg 45 4879AP Etten-Leur Tel: +31-76-5083000 Fax: +31-76-5046000 DOCUMENT NUMBER REV 50000802-MAN-001 B Document number Revision Page 9: Spare Parts 50000802-MAN-001 B 101 of 110 Spare parts Spare parts BX Manifold #50004050-11 Part number Description Qty 53201 50004051-1 203272 979997 980252 108087-1OAN 107029-175N 109858-1BN 51300-110-B 51300-113-B 51301-110 51301-113 56529-4-4-S 979798-1 93547-1B75N 94536-130N 979512-10 979796-25-S 979880-8 50004056 50004054 979771-2225 Fitting,grease,straight Trigger shaft ass'y. Initiator pin manifold Piloted 3-way spool, external vent COMPRESSION SPRING D-253 Sun dir. control valve cartridge Pilot to open check valve Pressure reducing valve, O-ring I.D. 357/.367 thick.100/.106 O-ring I.D. 544/.554 thick Ring,back up-O-ring Ring,back up-O-ring Connector, O-ring Boss /37' Pressure gauge connector Sun pilot to open check valve Sun check valve cartridge Plug 7/8" -14" UN O-ring socket typ Filter element for BX Manifold Sun 3/4 cartridge Support ring, trigger spring Trigger retract plunger Trigger bushing manifold 1 1 1 1 2 1 3 1 1 1 1 2 6 4 3 1 3 2 1 1 1 2 BX3 Commissioning spares #203300-12 Part number Name Quantity 979796-25-S 203251 203313 203268 51402-12 51435-14 979785-10 979785-12 979855-4 979878-66 980293-4 7903 203239 203240 948042-85 948051-2 Filter element for BX Lock ring 0.875” x 1.625” Lock bar Lock ring 0.75” x 1.50” Pin, cotter Pin, cotter Tab washer, long tab and wing Tab washer, long tab and wing Snap, standard with closed eye Chain, fishing Connection link ¼” Crosby Pull loop Pull loop Lock ring 1.19” x 2.13” Machine chain straight S-hook 2 3 3 2 8 4 4 4 2 2 2 2 4 4 4 4 www.nov.com Document number Revision Page 50000802-MAN-001 B 102 of 110 9: Spare Parts BX3 Operational spare parts #203300-11 Part number Name Quantity 53201 203268 979770-62 979770-64 979770-65 979796-25-S 980252 980292 51425-8 203239 203240 980250 948042-85 948051-2 203251 980251 203313 203261 50514-C 51435-14 979771-2520 203254 51402-12 979785-10 Grease fitting Lock ring 0.75” x 1.50” 50x55x40 mm plain bearing 50x55x60 mm plain bearing 55x60x40 mm plain bearing Filter element for BX Compression spring D-253 Compression spring D311 Pin, cotter Pull loop Lock ring 1.19” x 2.13” Compression spring D210 Machine chain straight S-hook Lock ring 0.875” x 1.625” Compression spring D-294 Lock bar Link Bock Bolt Nut, Hex slotted 7/8-9 UNC Pin, cotter Trigger bushing Bushing ¾” Pin, cotter Tab washer, long tab 7 4 4 2 16 2 1 1 2 4 4 4 4 4 3 1 3 4 4 4 1 4 8 4 BX4 Commissioning spare parts #50000640-12 Part number Description Qty 979796-25-S 203251 50000218 51402-12 51435-14 979855-4 979438-3 979437-3 50002646 979485-13 55908-4-4 55909-4-4 55908-6-6 55909-6-6 55908-8-8 55909-8-8 Filter element for BX Manifold Lock ring 0.875" X 1.625" Lockplate hinge pin latch BX Pin, cotter Pin, cotter Snap standard with closed eye S.S WIRE ROPE 7X7 DIA.3MM BR.LOAD 500KG WIRE CLAMP Safety cable, ass'y Lock washer SS. din 432 - 13 - A2 Valved coupler, quick disconnect in Valved nipple, quick disconnect/ in Valved coupler, quick disconnect in Valved nipple, quick disconnect/ in Valved coupler, quick disconnect/ i Valved nipple, quick disconnect/in 2 3 3 8 4 2 4 10 4 4 2 2 1 1 1 1 www.nov.com 9: Spare Parts Document number Revision Page 50000802-MAN-001 B 103 of 110 BX4 Operational spare parts #50000640-11 www.nov.com Part number Description Qty 53201 979770-64 979770-65 979770-66 979796-25-S 980252 203251 980251 203261 50514-C 51435-14 979771-2520 203254 51402-12 50508-C 55908-8-8 55909-8-8 55908-6-6 55909-6-6 55908-4-4 55909-4-4 979855-4 980293-4 203276-1 50005337 980474 980475 979485-13 50002646 979437-3 203246 50000673 50000669 50000669-1 50000667-1 203234 50005325 50005326 50004056 979438-3 Fitting,grease,straight 50X55-60mm hinge/ latchpin bushing 55X60-40mm hinge/ latchpin bushing 55X60-50MM HINGE/LATCH PIN BUSHING Filter element for BX Manifold COMPRESSION SPRING D-253 Lock ring 0.875" X 1.625" Compressionspring D-294 Link block bolt Nut, Hex.-slotted (UNC-2B) Pin, cotter Trigger bushing Bushing 3/4" Pin, cotter Nut, Hex.-slotted (UNC-2B) Valved coupler, quick disconnect/ i Valved nipple, quick disconnect/in Valved coupler, quick disconnect in Valved nipple, quick disconnect/ in Valved coupler, quick disconnect in Valved nipple, quick disconnect/ in Snap standard with closed eye S.S CONNECTING LINK 1/4" CROSBY G-335 Hydraulic hose Hydr. hose, steel fittings 1/4" Compressionspring D-270 Compressionspring D-320 Lock washer SS. din 432 - 13 - A2 Safety cable, ass'y WIRE CLAMP Bracket lever pin Pin latch cylinder BX4-50/75 Busch BX4-50/75 Busch BX4-50/75 Seal Kit BX cylinders Position pin bushing lock top Alu/bronze journal bearing L=0.472 Alu/bronze journal bearing L=0.750 Support ring, trigger spring WIRE ROPE 7X7 DIA.3MM BR.LOAD 500KG 7 2 2 6 2 2 1 1 4 4 4 2 4 8 9 1 1 1 1 2 2 2 2 6 2 1 1 10 6 10 6 1 1 2 2 6 14 3 1 4 Document number Revision Page 50000802-MAN-001 B 104 of 110 9: Spare Parts BX5 commissioning spares #50004000-12 Part number 979796-25-S 203251 51402-12 51435-14 979785-12 979785-10 979485-13 979855-4 980293-4 979856-2 979860-2 203239 203240 59001008-5 948051-2 980254 948042-85 948051-2 203240 203239 51403-12 980251 948038-19 979770-6030 980474 203276-1 980250 979855-4 55909-4-4 50508-C 979770-6040 980293-4 979856-2 55909-8-8 980249-7 979785-10 51402-12 203254 979771-2520 51435-14 948042-416 55908-4-4 55908-6-6 51425-8 979485-13 979785-12 203251 979796-25-S 979860-2 Part Description Qty Filter element for BX Manifold Lock ring 0.875" X 1.625" Pin, cotter Pin, cotter Tab washer, long tab and wing Tab washer with long tab and wing Lock washer SS. din 432 - 13 - A2 Snap standard with closed eye S.S CONNECTING LINK 1/4" CROSBY G-335 Ring welded 1/4" - 1.1/4" Lynch pin 6mm Pull loop Lock ring 1.19" X 2.13" Chain, straight link, short, dia 5 S-hook Polon PTFE piston seal ass'y. BX 5 links-0.11M S-hook Lock ring 1.19" X 2.13" Pull loop Pin, cotter Compressionspring D-294 S HOOK ACCO#63-15/16 I.LG 60X65-30mm hinge/ latchpin bushing Compressionspring D-270 Hydraulic hose Compressionspring D-210 Snap standard with closed eye S.S Valved nipple, quick disconnect/ in Nut, Hex.-slotted (UNC-2B) 60X65-40mm hinge/ latchpin bushing CONNECTING LINK 1/4" CROSBY G-335 Ring welded 1/4" - 1.1/4" Valved nipple, quick disconnect/in Nut,bulkhead 1.3/16"-12" UNF Tab washer with long tab and wing Pin, cotter Bushing 3/4" Trigger bushing Pin, cotter 14 links-0.24M Valved coupler, quick disconnect in Valved coupler, quick disconnect in Pin, cotter Lock washer SS. din 432 - 13 - A2 Tab washer, long tab and wing Lock ring 0.875" X 1.625" Filter element for BX Manifold Lynch pin 6mm 2 3 8 4 4 4 8 2 2 2 4 4 4 0.44 4 2 4 4 4 2 4 1 2 1 2 6 4 2 2 8 7 2 2 2 4 12 9 4 2 2 2 2 1 1 16 4 3 1 6 www.nov.com 9: Spare Parts 55909-6-6 979878-611 980252 53201 979770-7050 980475 50506-C Document number Revision Page 50000802-MAN-001 B 105 of 110 Valved nipple, quick disconnect/ in 11 links-0.5M COMPRESSION SPRING D-253 Fitting,grease,straight 70X75-50mm hinge/ latchpin bushing Compressionspring D-320 Nut, Hex.-slotted (UNC-2B) 1 2 2 6 16 1 2 BX5 Operational spare parts #50004000-11 Part number Part Description 948042-416 979878-611 979860-2 979785-12 979796-25-S 203251 51402-12 51435-14 979785-10 980293-4 203239 948042-85 51403-12 948038-19 948051-2 979855-4 203240 979856-2 www.nov.com 14 links-0.24M 11 links-0.5M Lynch pin 6mm Tab washer, long tab and wing Filter element for BX Manifold Lock ring 0.875" X 1.625" Pin, cotter Pin, cotter Tab washer with long tab and wing CONNECTING LINK 1/4" CROSBY G-335 Pull loop 5 links-0.11M Pin, cotter S HOOK ACCO#63-15/16 I.LG S-hook Snap standard with closed eye S.S Lock ring 1.19" X 2.13" Ring welded 1/4" - 1.1/4" Qty 2 2 6 4 2 3 8 2 12 2 4 4 4 2 4 2 4 2 Document number Revision Page 50000802-MAN-001 B 106 of 110 9: Spare Parts www.nov.com BX3, BX4-50, BX4-75, BX5 10-Drawings REFERENCE BX3, BX4-50, BX4-75, BX5 REFERENCE DESCRIPTION Hydraulic Elevators This document contains proprietary and confidential information which is the property of National Oilwell Varco, L.P., its affiliates or subsidiaries (all collectively referred to hereinafter as "NOV"). It is loaned for limited purposes only and remains the property of NOV. Reproduction, in whole or in part, or use of this design or distribution of this information to others is not permitted without the express written consent of NOV. This document is to be returned to NOV upon request or upon completion of the use for which it was loaned. This document and the information contained and represented herein is the copyrighted property of NOV. www.nov.com VarcoBJ BV Nijverheidsweg 45 4879AP Etten-Leur Tel: +31-76-5083000 Fax: +31-76-5046000 DOCUMENT NUMBER REV 50000802-MAN-001 B Document number Revision Page 10: Drawings 50000802-MAN-001 B 109 of 110 Drawings & test procedures Test procedures Number Name PSEL-0012 TSEL-0140 TSEL-0066 TSEL-0194 Pre installation sheet Test specification manifold BX3,4-50, 4-75, 5 Test specification frame + rotator Handling, storage and preservation Dimensional drawings Number Name DD-203300-30 DD-50000640 DD-50000650 DD-50004000-30 DD-50004130-7 Dimensional drawing BX3 Dimensional drawing BX4-50 Dimensional drawing BX4-75 Dimensional drawing BX5 General Arrangement BX + rotator Drawings www.nov.com Number Name 203300-30 50000640 50000650 50004000-30 203206-1 203207-1 50000670-1 50000671-1 50004006-1 50004007-1 50000682 50000667 50000680 50000668 50000668 50000681 203236-1 50004036-1 203200-1 50004050-1 50000553-1 50000520-1 BX3 final assembly BX4-50 final assembly BX4-75 final assembly BX5 final assembly Hinge pin assembly door BX3 Hinge pin assembly latch BX3 Hinge pin assembly door BX4 Hinge pin assembly latch BX4 Hinge pin assembly door BX5 Hinge pin assembly latch BX5 Door cylinder assembly BX3 Door cylinder assembly BX4 Door cylinder assembly BX5 Latch cylinder assembly BX3 Latch cylinder assembly BX4 Latch cylinder assembly BX5 Bushing lock assembly BX4 Bushing lock assembly Pressure shut valve Manifold BX Frame 4 Diagram BX + Rotator Mountingplate BX&Rotator EEXD 24V/DC ATOS 50004050-3 Hydraulic schematic BX-frame 4 50000538 50000538-1 202539 50004051-1 CA-251 Installation schematic BX-elevator & rotator 3 free ports on TDRH General hook-up kit drawing BX-elevator with rotators Test kit BX elevator + PS Trigger shaft assembly Critical areas body BX - elevator Document number Revision Page CA-252 CA-253 CA-254 50000802-MAN-001 B 110 of 110 10: Drawings Critical areas doors BX - elevator Critical areas latch BX - elevator Critical areas bushings BX - elevator www.nov.com 4 PRE-INSTALLATION SHEET HOOK-UP KIT BX-elevator To operate the BX Hydraulic Elevator a hook up kit is required. In order to define the requirements we request this PSEL be completed by either the customer or project team and returned to NOV, Etten-Leur, the Netherlands, preferably ahead or together with customer purchase order. This information helps to ensure that our customers and NOV are working with the same information and will help avoid that nothing is overlooked or assumed prior to installation. Drilling Company name :______________________________ Rig name :______________________________ Oil Company name :______________________________ Surveyor name :______________________________ Date of survey :______________________________ In event further clarification or contact required: NOV Project Manager: E-mail address: Mobile phone no.: Or: Rig Manager: Tool Pusher: Rig Maintenance Supervisor: Company Man: Casing Company: ORIGINAL DOCUMENT Name: L. Sonneveld Date: 11 June 07 Drawing type: PS National Oilwell Varco Varco BJ B.V. Nijverheidsweg 45 4879 AP Etten-Leur The Netherlands Tel: +31-76-5083000 Fax: +31-76-5046000 Name Date ECN Revision: - Document No.: PSEL0012 LATEST REVISION L. Sonneveld 11 June 07 700414 Description: Hook-up Kit BX-elevator Sheet: 1 of 2 THIS DOCUMENT CONTAINS PROPRIETARY AND CONFIDENTIAL INFORMATION WHICH IS THE PROPERTY OF NATIONAL OILWELL VARCO, L.P., ITS AFFILIATES OR SUBSIDIARIES (ALL COLLECTIVELY REFERRED TO HEREINAFTER AS "NOV"). IT IS LOANED FOR LIMITED PURPOSES ONLY AND REMAINS THE PROPERTY OF NOV. REPRODUCTION, IN WHOLE OR IN PART, OR USE OF THIS DESIGN OR DISTRIBUTION OF THIS INFORMATION TO OTHERS IS NOT PERMITTED WITHOUT THE EXPRESS WRITTEN CONSENT OF NOV. THIS DOCUMENT IS TO BE RETURNED TO NOV UPON REQUEST OR UPON COMPLETION OF THE USE FOR WHICH IT WAS LOANED. THIS DOCUMENT AND THE INFORMATION CONTAINED AND REPRESENTED HEREIN IS THE COPYRIGHTED PROPERTY OF NOV. 1) Type of Drilling rig: 2) Type of Equipment: W BX Elevator 3/4/5 without Rotator Actuator W BX Elevator 3/4/5 to be used with Rotator Actuator W BXS Elevator only without Rotator Actuator W BXS Elevator to be used with Rotator Actuator Are other BX Elevators installed/in use on rig W No W Yes 3) Type/Brand Top Drive: 4) Number of free hydraulic ports on Top drive Swivel: 5) Type and Thread size of free hydraulic ports on Top Drive Swivel: 6) Operating control system in Drillers Cabin (planned or available) for BX-elevators: Remote I/0-controlled interface: □ Cyber base; □ V-ICIS; □ Amphion; □ Other brand I/0-controlled interface: If above box is checked then NOV Etten-Leur will not supply the controls for the Drillers cabin If no operating/control system, NOV Etten-Leur can supply the following, check box required: □ Control Switch Box. □ Control Plate to integrate in existing operating console. 6.1) Electric Power Supply: W 24 V/DC W 110-120 V/AC W 220-240 V/AC 6.2) Is BX Elevator operation with existing Air Operation Elevator control valve required: W Yes W No 7) Electric cable Is NOV Etten-Leur to supply the Electrical cables: W YES W NO If yes specify required cable lengths. Cable from control plate to control switch box in “Drillers cabin”, (10 cores, 1.5mm2): L=……… Power cable for control switch box, (3 cores, 1.5mm2): L=……… National Oilwell Varco Varco BJ B.V. Nijverheidsweg 45 4879 AP Etten-Leur The Netherlands Tel: +31-76-5083000 Fax: +31-76-5046000 Revision: - Document No.: PSEL0012 Description: Hook-up Kit BX-elevator Sheet: 2 of 2 THIS DOCUMENT CONTAINS PROPRIETARY AND CONFIDENTIAL INFORMATION WHICH IS THE PROPERTY OF NATIONAL OILWELL VARCO, L.P., ITS AFFILIATES OR SUBSIDIARIES (ALL COLLECTIVELY REFERRED TO HEREINAFTER AS "NOV"). IT IS LOANED FOR LIMITED PURPOSES ONLY AND REMAINS THE PROPERTY OF NOV. REPRODUCTION, IN WHOLE OR IN PART, OR USE OF THIS DESIGN OR DISTRIBUTION OF THIS INFORMATION TO OTHERS IS NOT PERMITTED WITHOUT THE EXPRESS WRITTEN CONSENT OF NOV. THIS DOCUMENT IS TO BE RETURNED TO NOV UPON REQUEST OR UPON COMPLETION OF THE USE FOR WHICH IT WAS LOANED. THIS DOCUMENT AND THE INFORMATION CONTAINED AND REPRESENTED HEREIN IS THE COPYRIGHTED PROPERTY OF NOV. 4 TEST SPECIFICATION BX-Elevators # 3, 4 & 5 Configuration : Part Description : BX-elevator_______________ Part Number : Serial Number : NL Shop Order :______________________________ 3rd Party Witness Agency :______________________________ 3rd Party Witness Name :______________________________ 3rd Party Witness Signature :______________________________ Test Date :______________________________ ORIGINAL DOCUMENT Name: N. de Keijzer Date: 23 July 04 Drawing type: TS Varco BJ B.V. Nijverheidsweg 45 4879 AP Etten-Leur The Netherlands Tel: +31-76-5083000 Fax: +31-76-5046000 Name Date ECN Revision: C Document No.: LATEST REVISION Leon Sonneveld 19 Jun 09 701042 Description: Sheet: TSEL- Inspection criteria 1 of 11 0140 for (name product) THIS DOCUMENT CONTAINS PROPRIETARY AND CONFIDENTIAL INFORMATION WHICH IS THE PROPERTY OF NATIONAL OILWELL VARCO, L.P., ITS AFFILIATES OR SUBSIDIARIES (ALL COLLECTIVELY REFERRED TO HEREINAFTER AS "NOV"). IT IS LOANED FOR LIMITED PURPOSES ONLY AND REMAINS THE PROPERTY OF NOV. REPRODUCTION, IN WHOLE OR IN PART, OR USE OF THIS DESIGN OR DISTRIBUTION OF THIS INFORMATION TO OTHERS IS NOT PERMITTED WITHOUT THE EXPRESS WRITTEN CONSENT OF NOV. THIS DOCUMENT IS TO BE RETURNED TO NOV UPON REQUEST OR UPON COMPLETION OF THE USE FOR WHICH IT WAS LOANED. THIS DOCUMENT AND THE INFORMATION CONTAINED AND REPRESENTED HEREIN IS THE COPYRIGHTED PROPERTY OF NOV. This specification defines the production testing of the BX elevators. Each unit is to be tested according to the following procedure. Any defect is cause for stopping the test until the defect has been eliminated. All defects found during the test will be noted and signed off by the testtechnician on the front page of this test-sheet. In the event of a major defect whose repair would affect items previously inspected or tested, these affected items shall also be re-tested or re-inspected after the defect has been eliminated. 1.0 SEMI-FINISHED BEFORE LOAD-TEST Initials: 1. Check symmetric closing of doors. Hard-Stops ______ 2. Push doors fully closed; check that latch clears the the latch lug and can open freely. ______ 3. Place wedges between closed doors, verify position of the doors by measuring bore diameter. Check that latch does not interfere with right door. ______ 4. Check latch / latch lug for 75 % surface contact. Use Blue Dye. ______ 5. Check symmetric door-opening by measuring at the top between both doors. Door-opening should be: drawing BX3 : 22 1/2" - 23 1/2" 203300-30-AS BX4-35 : 9“ – 9 3/8” 50005300-AS BX4-50&-75 : 12 3/8" - 12 5/8" 50000640-AS/50000650-AS BX5 : 12 3/8" - 12 7/8" 50004000-30-AS ______ 6. Check minimum door-opening by measuring at the bottom of the Bushing bore between both doors in the front, and by the hinge points. Door-opening should be: BX3 : 20 1/4" - 21 1/2" BX4-35 : 7 3/8” – 7 5/8” BX4-50 & -75 : 9 7/8" - 11" BX5 : 11 1/4" - 11 5/8" ______ THIS DOCUMENT CONTAINS PROPIETARY INFORMATION AND SUCH INFORMATION MAY NOT BE DISCLOSED TO OTHERS FOR ANY PURPOSE NOR USED FOR MANUFACTURING PURPOSES WITHOUT THE WRITTEN PERMISSION OF THE OWNER. Document No.: TSEL 0140 Title: HYDRAULIC BX ELEVATOR FRAME III/IV/V (with latch valve detection) Sheet: 2 of 11 (Rev. C) 7. Open and close latch, check for smooth operation and correct contact with Hard-Stops. ______ 8. Open and close both doors; check for smooth operation and correct contact with Hard-Stops. ______ 9. Install test-bushing segment in elevator. Check for body and both doors, that bushing is in contact with the elevator load-shoulder (note: frame V has two load-shoulders (top & bottom), use 0.006” feeler-gauge. ______ 10. Check that both body test-bushing segments can fully hinge around their position pins. ______ For BX 5 check that body-bushing can be pulled towards the centerline of the elevator the full length of the slotted hole in the lower lug of the test bushing. ______ 11. Fill in the table for Heat-numbers, Part-number and Elevator Serial number on page 8 ______ 12. Before Load-Test; verify that semi-finished elevator is assembled according to assy’ drawing “SEMI-FINISHED” and that TSEL items 1.1 thru 1.10 have been checked ______ 13. Check that elevator has been load tested. ______ 14. Check that elevator has been MPI inspected. ______ THIS DOCUMENT CONTAINS PROPIETARY INFORMATION AND SUCH INFORMATION MAY NOT BE DISCLOSED TO OTHERS FOR ANY PURPOSE NOR USED FOR MANUFACTURING PURPOSES WITHOUT THE WRITTEN PERMISSION OF THE OWNER. Document No.: TSEL 0140 Title: HYDRAULIC BX ELEVATOR FRAME III/IV/V (with latch valve detection) Sheet: 3 of 11 (Rev. C) 2.0 Latch (valve) adjustment. 1. Unblock tank line, so pressure in BX can bleed of (otherwise latch won’t open manually). 2. Open latch (manually). 3. Close latch (manually) and check if the latch valve is set at correct height. See picture below. 4. Again close latch (manually) and check where latch valve is activated by latch. At this point grind radius (max. 0.25”) at latch. 5. Make sure Latch valve lever has no interference with latch. ______ THIS DOCUMENT CONTAINS PROPIETARY INFORMATION AND SUCH INFORMATION MAY NOT BE DISCLOSED TO OTHERS FOR ANY PURPOSE NOR USED FOR MANUFACTURING PURPOSES WITHOUT THE WRITTEN PERMISSION OF THE OWNER. Document No.: TSEL 0140 Title: HYDRAULIC BX ELEVATOR FRAME III/IV/V (with latch valve detection) Sheet: 4 of 11 (Rev. C) 3.0 FINAL ASSEMBLY INSPECTION. 1. Check smooth functioning of the 4 bushing lock pins (see page 9). ______ 2. Functioning of the mechanical latch-lock (page 10). Check height of pushpin in elevator-bore 0.24” min / 0.3”max. Install test-bushing and push fully down. Check engagement of lock-pin in front of latch 0.32” min. Check latch-lock spring is not “coil-bound” (end-of-stroke) Release and check latch clears lock-pin. ______ 3. Check functioning of moveable door bushing (see page 10). ______ 4. Functional inspection of lever-mechanism: Check that no lever-mechanism parts act as a stop for doors and latch. 1/8” minimum clearance with casting ______ 5. Check that doors and latch, in open and closed position, are in contact with their hard stops. (Cylinders should not be end of stroke) ______ 6. Place both body bushings in the elevator. After controlling each body bushing segment, the trigger-shaft should retract completely in the body (when hooked up to the hydr. power-unit). Check this for both body-bushings. ______ 7. With the elevator hydraulically commanded to open. Check for clearance between bushings and trigger-shaft. (reference-height of the trigger-shaft into the elevator-bore. 0.26”min. / 0.30”max. measured at the centerline of the elevator bore) For BX5 pull bushing forward towards elevator-centerline. Use a 0.006” feeler gauge.(minimum thickness) ______ THIS DOCUMENT CONTAINS PROPIETARY INFORMATION AND SUCH INFORMATION MAY NOT BE DISCLOSED TO OTHERS FOR ANY PURPOSE NOR USED FOR MANUFACTURING PURPOSES WITHOUT THE WRITTEN PERMISSION OF THE OWNER. Document No.: TSEL 0140 Title: HYDRAULIC BX ELEVATOR FRAME III/IV/V (with latch valve detection) Sheet: 5 of 11 (Rev. C) 8. Pressure Test. Grease all greasing points before (cycle)testing! 1: Hinge pins. 2: Latch pin. 3: Latch Lock pin and Push-pins 4: Trigger shaft manifold. ______ Hook-up elevator to Power Unit. Set system-pressure to 2000psi and flow-rate at 3 GPM. (11L/min) The hydraulic elevator shall be tested in 4 different conditions (Reference document: Hydraulic schematic drawing 50004050-3): Test Port 1=P 2=T 3 = XP 4 = FLOAT TRIGGER Result : 1. 2. 3. 4. X NP X NP elevator open X NP NP NP elevator open X X NP NP 1000 psi X 2000 psi NP controlled controlled elevator elevator closed open Initials : X = add system pressure (2000 psi) NP = measure no pressure (50 psi back pressure max.) TRIGGER controlled = pipe in elevator Note: if XP signal-elevator-closed is not 1000 psi, adjust PRDB-LBN Check setting of adjustable cartridge E, DPBO-LAN, for elevator open cycle. Start with a closed elevator. Verify 1500 psi pressure setting by starting with a low (1000psi) system pressure command-to-open on XP. Slowly increase HPU system-pressure. Once pressure is increased to 1500 psi the closed elevator shall open. 9. If not, adjust valve DPBO-LAN, repeat this until OK. THIS DOCUMENT CONTAINS PROPIETARY INFORMATION AND SUCH INFORMATION MAY NOT BE DISCLOSED TO OTHERS FOR ANY PURPOSE NOR USED FOR MANUFACTURING PURPOSES WITHOUT THE WRITTEN PERMISSION OF THE OWNER. Document No.: TSEL 0140 Title: HYDRAULIC BX ELEVATOR FRAME III/IV/V (with latch valve detection) ______ Sheet: 6 of 11 (Rev. C) 10. Hammer a wedge between doors (check latch/latch-lug contact) Check 1000psi XP signal-elevator-closed. ______ Remove wedge and open elevator. Trigger elevator to close, prevent full closing with obstacle placed between the doors. Start with ¾” size and increase with ¼” increments each time, 1 ½” max, until latch does not close (no XP elevator-closed-signal). 11. Which obstacle-size prevents latch to close (no XP signal)? If obstacle size is over 1 ½”, re-adjust door-cylinder, repeat test item 10. ______inch Response Time. At 3 GPM.(11L/min) and 2000 psi, the elevator must respond as follows: 12. Elevator cycle-to-open: 3-6 sec. max. BX 3 3-6 sec. max. BX 4 3-6 sec. max. BX 5 ______ 13. Elevator cycle-to-close: 3-6 sec. max. BX 3 3-6 sec. max. BX 4 3-6 sec. max. BX 5 ______ Cycle Test. The elevator shall be opened / closed for 250 times minimum. Hydr. system pressure set at 2000 psi, flow-rate 3 GPM (11 l/min). Each cycle the elevator needs to open, close and latch completely in proper order. Closing must be initiated by operating the body bushings. If elevator fails during cycle-test, the test must be restarted after the defect has been eliminated. 14. Check for loose parts, cotter pins, lock-tabs etc. ______ 15. Inspect for wear on movable parts / hoses after cycle test. ______ THIS DOCUMENT CONTAINS PROPIETARY INFORMATION AND SUCH INFORMATION MAY NOT BE DISCLOSED TO OTHERS FOR ANY PURPOSE NOR USED FOR MANUFACTURING PURPOSES WITHOUT THE WRITTEN PERMISSION OF THE OWNER. Document No.: TSEL 0140 Title: HYDRAULIC BX ELEVATOR FRAME III/IV/V (with latch valve detection) Sheet: 7 of 11 (Rev. C) 16. When check items 3.9 thru 3.15 are OK. Increase system-pressure to 3000 psi and keep elevator closed for 5 minutes minimum. Repeat this with elevator opened for 5 minutes minimum. No leakage shall occur. ______ 17. Verify NAS class 8 oil cleanliness ______ 4.0 FINAL INSPECTION 1. Verify that the elevator is assembled according to the latest revision of the final assembly drawings. ______ 2. Verify that all bolts and nuts are tightened to the correct torque-value and secured by lock wire, lock tabs or cotter pins. ______ 3. Verify that all grease points are greased. ______ 4. Verify that latch and hinge pins are properly locked. ______ 5. Verify that correct Quick Disconnects are installed. ______ 6. Verify presence and correctness of markings. ______ THIS DOCUMENT CONTAINS PROPIETARY INFORMATION AND SUCH INFORMATION MAY NOT BE DISCLOSED TO OTHERS FOR ANY PURPOSE NOR USED FOR MANUFACTURING PURPOSES WITHOUT THE WRITTEN PERMISSION OF THE OWNER. Document No.: TSEL 0140 Title: HYDRAULIC BX ELEVATOR FRAME III/IV/V (with latch valve detection) Sheet: 8 of 11 (Rev. C) 5.0 SERIALNO’s, PARTNO’s and HEATNO’s. Elevator NL number: __________ Partno: __________ Body Part Number: __________ Foundry: __________ Heat Number: __________ Heat Code: __________ Left Door __________ __________ __________ __________ Right Door __________ __________ __________ __________ Latch __________ __________ __________ __________ Back Plate __________ __________ __________ __________ Hinge Pin __________ __________ Hinge Pin __________ __________ Latch Pin __________ __________ Manifold Part No. _________ THIS DOCUMENT CONTAINS PROPIETARY INFORMATION AND SUCH INFORMATION MAY NOT BE DISCLOSED TO OTHERS FOR ANY PURPOSE NOR USED FOR MANUFACTURING PURPOSES WITHOUT THE WRITTEN PERMISSION OF THE OWNER. Manifold Serial Number Document No.: TSEL 0140 __________ Title: HYDRAULIC BX ELEVATOR FRAME III/IV/V (with latch valve detection) Sheet: 9 of 11 (Rev. C) fig 1. Check functioning of bushing lock-pins and proper fitting of bushings. THIS DOCUMENT CONTAINS PROPIETARY INFORMATION AND SUCH INFORMATION MAY NOT BE DISCLOSED TO OTHERS FOR ANY PURPOSE NOR USED FOR MANUFACTURING PURPOSES WITHOUT THE WRITTEN PERMISSION OF THE OWNER. Document No.: TSEL 0140 Title: HYDRAULIC BX ELEVATOR FRAME III/IV/V (with latch valve detection) Sheet: 10 of 11 (Rev. C) fig 2. Check functioning of moveable door-bushing and proper functioning of latch-lock. THIS DOCUMENT CONTAINS PROPIETARY INFORMATION AND SUCH INFORMATION MAY NOT BE DISCLOSED TO OTHERS FOR ANY PURPOSE NOR USED FOR MANUFACTURING PURPOSES WITHOUT THE WRITTEN PERMISSION OF THE OWNER. Document No.: TSEL 0140 Title: HYDRAULIC BX ELEVATOR FRAME III/IV/V (with latch valve detection) Sheet: 11 of 11 (Rev. C) Rig name :_____________________________________ Part Description :_____________________________________ Part Number :_____________________________________ Serial Number :_____________________________________ Customer ref. Number :_____________________________________ Varco BJ sales order Number :_____________________________________ Varco BJ rep. Name/ Job title :_____________________________________ :_____________________________________ Varco BJ Witness Signature :_____________________________________ Reviewed manual revision/ Date :_____________________________________ Commissioning date :_____________________________________ Remarks :_____________________________________ ________________________________ TEST SPECIFICATION ( Field Commissioning and Instruction procedure ) Prepared Checked Approved Name: P. Dekker A. Dekkers L. Sprey Date July 5th 99 July 5th 99 July 5th 99 THIS DOCUMENT CONTAINS PROPRIETARY INFORMATION AND SUCH INFORMATION MAY NOT BE DISCLOSED TO OTHERS FOR ANY PURPOSE NOR USED FOR MANUFACTURING PURPOSES WITHOUT THE WRITTEN PERMISSION OF THE OWNER. D 701048 B 589301 A 545001 Rev. ECN L.Sonneveld P. Dekker. P. Dekker. Name Document No.: Title: TSEL 0066 th Jule 10 2009 May 2nd 2000 July 5th 1999 Date Field Commissioning procedure BX Elevator Frames 3, 4-50, 4-75 & 5 N. de Keijzer A. Krijnen A. Dekkers Checked Sheet: 1 of 11 During commissioning, all of the following rig personnel need to be present for witnessing. Please check and have them signed for their presence during the complete commissioning procedure. Rig company man : . O.I.M : . Tool pusher : . Rig mechanic : . (Assistant) Driller(s) : . After successful completion of the commissioning procedure, the following people need to sign for approval: Rig company man : . O.I.M : . Tool pusher : _____ . After final approval, hand over copies of the completed TSEL to all attendees. ( FIELD COMMISIONNING ROTATOR SEE TSEL-0089 latest Revision.) THIS DOCUMENT CONTAINS PROPRIETARY INFORMATION AND SUCH INFORMATION MAY NOT BE DISCLOSED TO OTHERS FOR ANY PURPOSE NOR USED FOR MANUFACTURING PURPOSES WITHOUT THE WRITTEN PERMISSION OF THE OWNER. Document no.: Title: TSEL 0066 Field commissioning & Instruction procedure for BX Frames 3, 4-50, 4-75 & 5 Sheet: 2 of 11 (Rev. D) General Warnings; MAKE SURE A SAFE WORKING ENVIRONMENT IS PROVIDED WHEN FIELD COMMISSIONING THE BX ELEVATOR. CLEANING REQUIREMENT OF THE SYSTEM BEFORE CONNECTING SYSTEM 21 PRODUCTS. Clean, purge and pickle all hydraulic piping during and after installation and prior to hooking up Varco System 21 equipment. The installation’s hydraulic pressure line from the hydraulic power unit is to be looped to the installation’s hydraulic return line back to the hydraulic power unit and hydraulic fluid is to be run through this loop for a period of 1 hour minimum, before hooking up pressure and return lines to system 21 equipment. REQUIRED (PLC input) FUNCTIONS IN DRILLERS CONSOLE AS SUPPLIED BY DRILLERS CONSOLE MANUFACTERER. Operating the BX Elevator. On the driller’s console the following control functions need to be provided; “Open” BX Elevator. “Armed-to-Close” BX Elevator. These functions can for instance be controlled with a two-position switch, One position of the switch being the “Open” function, the other position being “Armed-to-Close”. Another option can be a spring-return push button. Releasing the push-button acts as “Armed-to-Close” position for the BX elevator. To help prevent inadvertently opening the Elevator it is recommended to program the PLC function so, that two pulses, (“double-click”), from the BX control button are needed to generate a (timed, ~10secs duration) open command to the BX control manifold. After timed function resets, BX Elevator returns to “Armed-to-Close” state. The (PLC outputs) Output function controls a solenoid operated Hydraulic valve Situated on the Top-drive or inside the Hydraulic BX control cabinet situated in the derrick at finger board level. This valve is designated “DV1” and the line designation is “S2” (see general HUK schematic #203447 in (BX) manual) S2 S2 S2 Pressurized @2000 De-Pressurized Pressurized @1000 BX Open command BX Armed to close command BX closed and latched feed-back signal Closed-Feedback Signal from BX Elevator is converted into Electrical signal input for PLC or Drillers console indicating light, through a pressure switch mounted near the BX control Manifold. THIS DOCUMENT CONTAINS PROPRIETARY INFORMATION AND SUCH INFORMATION MAY NOT BE DISCLOSED TO OTHERS FOR ANY PURPOSE NOR USED FOR MANUFACTURING PURPOSES WITHOUT THE WRITTEN PERMISSION OF THE OWNER. Document no.: Title: TSEL 0066 Field commissioning & Instruction procedure for BX Frames 3, 4-50, 4-75 & 5 Sheet: 3 of 11 (Rev. D) PROCEDURE 1. General. After unpacking BX Elevator verify presence of all parts and size components of the Elevator, necessary to fully hook-up to the Top-drive and BX controls (see manual) OK Go through section 4 “Elevator Inspection” prior to bringing the equipment to the rig-floor. This can aid in saving time on the rig-floor during commissioning. Before proceeding with other tests. (See User manual Universal Rotator.) OK Review BX Elevator Manual with customer representatives, as mentioned on page 2, during commissioning procedure. Show all attendees the Operations part of the Elevator, as a minimum. Get agreement on the manual’s contents. OK Show the location of the BX Elevators Instruction chart in the driller’s cabin and get agreement on the content. OK Show location of; - BX Elevator - Hook up Control manifold and Solenoids - Controls in driller’s cabin OK OK OK 2. Hydraulic controls: Explain general functioning of the BX Elevator and its controls using the Varco installation and hook-up drawings and general schematic inside manual. OK Verify that pressure, and tank lines from the Hook Up manifold are connected to the hydraulic power unit. And verify that hydraulic lines from this manifold are connected the right way with the correct QD’s to the BX Elevator according the Varco installation and hook up drawings. Minimum is ½” nominal hose size, for all lines. OK Verify that a ball-valve is fitted into Hydr. Pressure-Line near the BX Elevator. Verify that any Steel hoist cables, Hoses etc. hanging in the derrick structure do not interfere with the Hydraulic hoses and Quick disconnects to the BX Elevator. This to prevent these items rubbing against each other and causing damage / malfunction. (A tugger-line rubbing against the sliding ring of a Quick disconnect can cause this to disconnect and block oil-flow to and from the tool!) OK THIS DOCUMENT CONTAINS PROPRIETARY INFORMATION AND SUCH INFORMATION MAY NOT BE DISCLOSED TO OTHERS FOR ANY PURPOSE NOR USED FOR MANUFACTURING PURPOSES WITHOUT THE WRITTEN PERMISSION OF THE OWNER. Document no.: Title: TSEL 0066 Field commissioning & Instruction procedure for BX Frames 3, 4-50, 4-75 & 5 OK Sheet: 4 of 11 (Rev. D) Point out the location of these items (valves, Q-D’s, pressure switches/junction boxes, etc.) shown in these drawings, to Driller, Tool-pusher and Rig-Mechanic. OK Hand over these Drawings and Operations Manual to the Rig-Mechanic / Tool-pusher, get signature for receipt: Rig Mechanic Drawing / Manual receipt: . Verify oil quality meets NAS class 8 requirements. Take a sample from the pressure line between ring line and inlet on control manifold. In case not, prior to continuation of the commissioning, continue the process cleaning, purging and pickling of the hydraulic circuit until all requirements are met. OK Demonstrate how to clean hydraulic quick disconnects prior to connection. Explain that non-removed dirt on the quick disconnects will enter the hydraulic circuit and clog up the filters, resulting in a malfunctioning system. OK Demonstrate that malfunctioning Quick disconnects can work as a check-valve preventing flow in one direction. Emphasize the risks of severe equipment damage and possible personnel injury, due to uncontrolled overpressure, should this occur! OK Verify that the hydraulic flow to the hook up kit manifold is sufficient to get the adequate response times for the BX Elevator. ( 5GPM at BX QD’s ) OK System Pressure at the BX Elevators Quick disconnects must be between 2,000 psi and 2,500 psi. OK System- Pressure is; :………..……psi. Pressure on “P”-line must be slightly lower than the pressure on “XP” line for this a Pressure reduce kit #50004350 is available to place in-line with “P” to the BX elevator. XP- Pressure is; :………..……psi. Check all quick-disconnects are opening easily and are not damaged or leaking. If not, replace these with items out of the Spare parts kit for Commissioning OK THIS DOCUMENT CONTAINS PROPRIETARY INFORMATION AND SUCH INFORMATION MAY NOT BE DISCLOSED TO OTHERS FOR ANY PURPOSE NOR USED FOR MANUFACTURING PURPOSES WITHOUT THE WRITTEN PERMISSION OF THE OWNER. Document no.: Title: TSEL 0066 Field commissioning & Instruction procedure for BX Frames 3, 4-50, 4-75 & 5 Sheet: 5 of 11 (Rev. D) 3. Electrical controls. Let the rig mechanic/electrician verify that all electrical wiring is connected according to the Varco Installation and Hook-Up drawings. OK 4. BX Elevator Inspection. Before bringing the BX Elevator to the rig-floor. Make sure that all hydraulic lines are disconnected before ANY repair or inspection work is performed on the elevator. When the lines are connected the elevator doors will close when the bushing / trigger mechanism is hit, which can cause serious injury to personnel. The following tests can be done with the BX Elevator as “stand-alone” and disconnected from it’s controls, provided the elevator is placed OPEN. Before doing these checks. Verify that all bolts, nuts and pins are locked with lock tabs or cotter pins, and latch and hinge pins are properly locked. OK Verify that all lynch pins, safety chains / cables and secondary bushing shackles are (or can be) correctly installed. OK Verify that all grease points are greased. 1: Hinge pins. 2: Latch pin. 3: Latch Lock pins and Push-pins 4: Trigger shaft manifold. 5: Elevator bore and back of bushings 6: Rotator Link-blocks and Bail contacts. Functioning of the mechanical latch-lock (page 6). Install bushing segment in right-hand door and push fully down. Check engagement of lock-pin in front of latch 0.32” min. Release and check latch clears lock-pin. OK Install all 4 bushing segments in elevator. Check for body and both doors, that bushing can be properly seated onto elevator load-shoulder. OK Check that both body bushing segments can fully hinge around their locating pins. For BX 5 pull bushing towards centerline of elevator-bore. OK THIS DOCUMENT CONTAINS PROPRIETARY INFORMATION AND SUCH INFORMATION MAY NOT BE DISCLOSED TO OTHERS FOR ANY PURPOSE NOR USED FOR MANUFACTURING PURPOSES WITHOUT THE WRITTEN PERMISSION OF THE OWNER. OK Document no.: Title: TSEL 0066 Field commissioning & Instruction procedure for BX Frames 3, 4-50, 4-75 & 5 Sheet: 6 of 11 (Rev. D) With the elevator open. Check for clearance between body bushings and trigger-shaft. Use 0.006” feeler gauge. BX 5; pull bushing towards centerline of elevator-bore. OK After controlling each body (trigger) bushing segment, the elevator’s trigger must be pushed in until flush with elevator bore, no interference or ‘malfunction’ of bushing and trigger may occur. Check this for both segments. OK With the elevator open. Check for clearance between body bushings and trigger-shaft. Use 0.006” feeler gauge. BX 5; pull bushing towards centerline of elevator-bore. OK With the elevator’s doors fully opened; Check “Pipe-Opening” of the Door Bushings, Verify for each bushing set that the correct pipe can enter the elevator, without interfering the door-bushing. OK Repeat these items for all delivered bushing sets. OK THIS DOCUMENT CONTAINS PROPRIETARY INFORMATION AND SUCH INFORMATION MAY NOT BE DISCLOSED TO OTHERS FOR ANY PURPOSE NOR USED FOR MANUFACTURING PURPOSES WITHOUT THE WRITTEN PERMISSION OF THE OWNER. Document no.: Title: TSEL 0066 Field commissioning & Instruction procedure for BX Frames 3, 4-50, 4-75 & 5 Sheet: 7 of 11 (Rev. D) 5. FUNCTION TESTING. (See Manual Section Operation) Bring BX elevator to the rig-floor fitted with an insert set and Hook it up to the elevator’s controls. Connect the Hydraulic hose(s) to the BX Elevator’s Quick-disconnects. Verify adequate free play in the length of each hose as it runs down the length of the Link. No interference with other equipment or stretching of the hoses may occur when the Link-tilt function is used forward and backward, full stroke. OK Make sure that all hydraulic lines are disconnected before ANY repair or inspection work is performed on the elevator. When the lines are connected the elevator doors will close when the bushing / trigger mechanism is hit, which can cause serious injury to personnel. Pressure Tests. The elevator shall be tested in 4 different conditions. Reference documents: Hydraulic diagram 50004150-3 & 50000553-1: Condition► 1. Control Port▼ 1=P 2=T 3 = XP 4=FLOAT TRIGGER CONTROL SWITCH CLOSED INDICATOR LIGHT Result : 2. 3. 4. X NP X NP OPEN X NP NP NP CLOSE X NP 1000 psi X-out ACTIVATED CLOSE X NP X NP ACTIVATED OPEN OFF OFF Elevator open Elevator open & “armed to close” ON OFF Elevator closed Elevator open & latched. “Floating” Initials : X = add system pressure (2000-2500 psi) X-out = system pressure out signal NP = measure no pressure (Tank-line pressure max. ~75psi) TRIGGER controlled = pipe in elevator THIS DOCUMENT CONTAINS PROPRIETARY INFORMATION AND SUCH INFORMATION MAY NOT BE DISCLOSED TO OTHERS FOR ANY PURPOSE NOR USED FOR MANUFACTURING PURPOSES WITHOUT THE WRITTEN PERMISSION OF THE OWNER. Document no.: Title: TSEL 0066 Field commissioning & Instruction procedure for BX Frames 3, 4-50, 4-75 & 5 Sheet: 8 of 11 (Rev. D) Depending on circumstances it may be wise to start with the commissioning tests for the BX Rotator at this point, before going further with the tests for the Elevator. Response Times. Elevator cycle-to-open: 3-6 sec. ________sec. OK ________sec. OK Elevator cycle-to-close: 3-6 sec. Command elevator to close, leave closed and hydraulically pressurized for 15 minutes minimum. After this, elevator must open without hesitation i.e. normal response times. OK With hydraulics pressurized: Check for oil leakage. OK With complete system hooked up, check correct functioning of the “Closed-feedback Signal” feature of the BX elevator (and “Float” for Universal rotator, see TSEL-0089) as controlled by the BX Control Manifold mounted at the Top-drive or near Fingerboard level. Start with BX (and Rotator) fully hooked-up, hanging in the vertically positioned Links Steps to take to verify this function; Open BX Elevator. Rotate BX Elevator Doors UP full rotation. (If rotators installed) Set BX in “armed to close” (close) mode. Close the BX Elevator manually. Verify “Closed-feedback-Signal” functions correct. Verify the manual “FLOAT” function when BX elevator is opened by using the Rotator controls Located in the driller’s console. (Only if rotators installed) OK OK OK OK OK OK After completing it’s close sequence the BX puts out a high pressure (1000psi ) signal via line XP (S2) to the control manifold for signaling / interlocking purposes. THIS DOCUMENT CONTAINS PROPRIETARY INFORMATION AND SUCH INFORMATION MAY NOT BE DISCLOSED TO OTHERS FOR ANY PURPOSE NOR USED FOR MANUFACTURING PURPOSES WITHOUT THE WRITTEN PERMISSION OF THE OWNER. Document no.: Title: TSEL 0066 Field commissioning & Instruction procedure for BX Frames 3, 4-50, 4-75 & 5 Sheet: 9 of 11 (Rev. D) At the same time the BX elevator sends out a high pressure (equal to system pressure) signal to the “Float-manifold located at / near the Pipe handler frame via line B5, to port. “X” in the Float manifold. This B5 “Float” Signal will activate valves inside the Float Manifold that will overrule all Manual Rotate commands given by the Operator. So after the last step of the “Closed-Signal” (and “Float”) test sequence is done, i.e. “Elevator closed and latched”, the Rotator will start Floating the BX Elevator to it’s normal near level position. OK Verify correct functioning of Elevator - Power-slip Interlock. OK If not installed, inform customer that this is recommended, details available at nearest Varco BJ office. OK 6. Operational Test. After successful completion of all above mentioned items and after successful completion of all commissioning tests for the BX Rotator (TSEL-0089) proceed with this tests, have all attendees a mentioned on the first page of this document available for witnessing this test. Have BX ( and Universal Rotator) hooked-up and operational. Have a stand/joint of tubular (preferably 18degr drillpipe) available to run tests with. Present tubular to BX. When Rotators installed, Rotate BX to angle of presented pipe. Adjust rotation angle if necessary. Pick up pipe with BX . After BX is closed and latched around pipe, verify “Closed” (& “FLOAT”) function. Hoist pipe into derrick, with TDS / Blocks Reverse this sequence to LD pipe. OK THIS DOCUMENT CONTAINS PROPRIETARY INFORMATION AND SUCH INFORMATION MAY NOT BE DISCLOSED TO OTHERS FOR ANY PURPOSE NOR USED FOR MANUFACTURING PURPOSES WITHOUT THE WRITTEN PERMISSION OF THE OWNER. Document no.: Title: TSEL 0066 Field commissioning & Instruction procedure for BX Frames 3, 4-50, 4-75 & 5 Sheet: 10 of 11 (Rev. D) fig 1. Check functioning of moveable door-bushing and proper functioning of latch-lock. THIS DOCUMENT CONTAINS PROPRIETARY INFORMATION AND SUCH INFORMATION MAY NOT BE DISCLOSED TO OTHERS FOR ANY PURPOSE NOR USED FOR MANUFACTURING PURPOSES WITHOUT THE WRITTEN PERMISSION OF THE OWNER. Document no.: Title: TSEL 0066 Field commissioning & Instruction procedure for BX Frames 3, 4-50, 4-75 & 5 Sheet: 11 of 11 (Rev. D) This document can be used for any VarcoBJ B.V. tool except the RST rotary support tables. Refer to TSEL-0191 for the RST preservation procedure. Preservation Procedure. TOOL DESCRIPTION:____________________________ SERIAL NUMBER:_______________________________ SHOP ORDER:__________________________________ WITNESS by: ___________________________________ _______________________________________________ WITNESS DATE + SIGNATURE: ____________________ _______________________________________________ REMARKS: _____________________________________ _______________________________________________ REFERENCE REFERENCE DESCRIPTION This document contains proprietary and confidential information which belongs to National Oilwell Varco; it is loaned for limited purposes only and remains the property of National Oilwell Varco. Reproduction, in whole or in part; or use of this design or distribution of this information to others is not permitted without the express written consent of National Oilwell Varco. This document is to be returned to National Oilwell Varco upon request and in any event upon completion of the use for which it was loaned. © Copyright National Oilwell Varco - 2008 www.nov.com Varco BJ BV Nijverheidsweg 45 4870 AA Etten-Leur The Netherlands 4879 AP Etten-Leur Phone +31 76 508 3000 Fax +31 76 5046000 www.nov.com DOCUMENT NUMBER REV TSEL-0194 C Document number Revision Page TSEL-0194 C 2 of 10 REVISION HISTORY C 21.10.2010 For what tools applicable added P.F. R.M. NdK B 14.04.2009 Preservation changed, Tool data info R.M. P.F. A.K. A 13.01.2009 Name changed R.M. P.F. A.K. - 15.11.2008 First issue Rev Date (dd.mm.yyyy) Reason for issue CHANGE DESCRIPTION Revision A B C Change description n/a Name/Title changed Presevation changed, Tool data Info block added For what tools applicable added www.nov.com PGF RM AK Prepared Checked Approved Document number Revision Page TSEL-0194 C 3 of 10 TABLE OF CONTENTS 1 2 3 INTRODUCTION ................................................................................................................. 4 1.1 Purpose..................................................................................................................... 4 1.2 Definition ................................................................................................................... 4 1.3 Procedure ................................................................................................................. 4 1.4 Safety........................................................................................................................ 4 SHOP-PRESERVATION & RE-PRESERVATION ............................................................. 5 2.1 Shop-Preservation during manufacturing................................................................. 5 2.2 Optional: Long term storage. .................................................................................... 5 2.3 Re-Preservation........................................................................................................ 5 INSTALLATION .................................................................................................................. 6 3.1 Welding ..................................................................................................................... 6 3.2 Installation period...................................................................................................... 6 4 RECOMMENDED PRESERVATIVES (OR EQUIVALENT):.............................................. 6 5 PRESERVATION SPECIFICATION RECORDS ................................................................ 7 6 PRESERVATION CHECKS RECORDS............................................................................ 8 7 DE-PRESERVATION .......................................................................................................... 9 8 PRESERVATION LABEL ................................................................................................. 10 www.nov.com Document number Revision Page 1 TSEL-0194 C 4 of 10 INTRODUCTION 1.1 Purpose The purpose of this procedure is to provide information involving handling, storage and preservation of the PRODUCT. All the outlined procedures in this Preservation Record shall be governing for the entire period from manufacturing until installation. 1.2 Definition Shop-Preservation: Preservation in the manufacturer’s plant during final assembly and before transport. Re-preservation: Any preservation carried out AFTER Shop-Preservation. De-preservation: Removal of any preservative materials. Preservation record: The Preservation log + the log of any Re-preservation carried out. Preservation label: The label attached to the PRODUCT to be filled in when preservation activities are carried out. Preservation period: The period AFTER shipping the PRODUCT from manufacturer’s plant. 1.3 Procedure This document must be kept with the PRODUCT at final assembly. The Preservation record shall be filled in by assembly-crew. Prior to shipment from manufacturer’s plant, a copy of this document must be attached to the PRODUCT, ensuring availability at receipt of the PRODUCT. The original document shall be filed in the DATA book at manufacturers Document Control Dept. Prior to shipment from manufacturer’s plant, a Preservation label shall be attached to the PRODUCT. The label reflects the most recent preservation work carried out. PURCHASERS RESPONSIBILITY: After shipment, any preservation action must be logged in the preservation-log. 1.4 Safety Handling of the PRODUCT involves lifting operations. Only certified lifting gear shall be used. To avoid any injury of personnel and damage to the PRODUCT, the lifting procedure must be followed. Forklift handling may be used when the PRODUCT is in it’s wooden crate. Personnel familiar with PRODUCT-handling procedures are the only personnel that shall be allowed to enter the lifting operation area. Shop-Preservation, re-preservation and de-preservation may involve usage of solvents that may be harmful. Personnel performing this type of work should be wearing personnel protection equipment. www.nov.com Document number Revision Page 2 TSEL-0194 C 5 of 10 SHOP-PRESERVATION & RE-PRESERVATION 2.1 Shop-Preservation during manufacturing. The preservation-records will be signed off by the assembly crew, indicating that the checks are carried out. The PRODUCT leaves the factory in undamaged and new condition. It is recommended the consignee organisation checks the PRODUCT after reception. 2.2 Optional: Long term storage. Optional long term storage preservation can be ordered from NOV; this will guarantee the correct preservation for a period of 12 months. Procedure in case long term preservation is ordered: o Check PRODUCT immediately after reception. o Carry out interval checks according to preservation. o If found required, re-preservation shall be carried out. Use the check records in this document. 2.3 Re-Preservation Carry out according to the preservation-records. Any anomaly shall be rectified. The hydraulic piping system on the PRODUCT is sealed off by the manufacturer. All fittings shall remain plugged or capped to avoid ingress of material that may contaminate the piping and the fluid in the system. Non metallic plugs shall not be used. All hydraulic components are flushed with clean hydraulic oil prior to storage and transport. All non-terminated cable ends shall be fitted with shrinking shroud. IN CASE DENSO-TAPE PROTECTION ORDERED BY CUSTOMER: All fittings, as well as any extended rod end are covered with Denso tape to avoid corrosion. They shall be checked for damage of the Denso tape. The Denso tape must not be allowed to dry. If the Denso tape oil/grease vapourizes the result is corrosion underneath the tape. Replace the Denso tape or add oil/grease to the tape. www.nov.com Document number Revision Page 3 TSEL-0194 C 6 of 10 INSTALLATION 3.1 Welding The PRODUCT must be protected from spatter of welding and grinding with suitable protective sheets. Any black steel spatter on stainless steel material shall be removed with suitable method to avoid pitting corrosion and to re-establish Pre surface quality. 3.2 Installation period The procedures as outlined in this document shall continue during installation and after installation onboard until taken into operation. 4 RECOMMENDED PRESERVATIVES (OR EQUIVALENT): 1. Castrol Rustilo DWX 32: For medium to long term protective for use in severe conditions where a high degree of protection is required: Leaves a soft greasy protective film (to be used on dynamic surfaces e.g. cylinder rods & static surfaces e.g. blank steel surfaces) 2. Dow Corning Molykote® 1000 Paste: Anti-seize compound for application on bolts and nuts (to be used when bolts/nuts have to be released on a regular basis, e.g. hatches). 3. Denso Ltd, Densotape: Flexible anti corrosion tape (to be used for application on hydraulic fittings, e.g. sockets) 4. Autol Top 2000 grease: Lubricant for general purpose, OLF-complient (to be used mandatory for all bowls and slips lubrication applications). 5. Paint repairs: Frame & top cover acc. to NOV paint specification P-002, except scratch marks, small damages surface < 5 cm2, for which NOV paint specification P-001 is acceptable. All other parts acc. to P-001. 6. Castrol Hyspin AWH-M 32: Hydraulic fluid (to be used for the hydraulic system, see also user's manual for details). 7. Plugs / caps: Plastic/steel plugs/caps (to be used for plugging/capping open fittings/QD's) 8. EP2: General multi purpose grease 9. Eoniromonpastax: Anti-galvanic corrosion paste (to be used on stainless steel threads). www.nov.com Document number Revision Page 5 TSEL-0194 B 7 of 10 PRESERVATION SPECIFICATION RECORDS Record page 1 of 2 Serial No:…………………………….. Shop-preservation Standard ShopPreservation (sign) Long term Preservative (optional) Activity No.: Intervals (Months) Description 1 4 All unpainted static steel surface and flanges. Rustilo DWX 32 Rustilo DWX 32 2 4 All unpainted dynamic steel surfaces. Rustilo DWX 32 Rustilo DWX 32 3 4 Extended cylinder rods Rustilo DWX 32 Rustilo DWX 32 + Denso Tape 4 4 Bolts and nuts (head ) - Rustilo DWX 32 5 4 Bolts and nuts (threads; removable): e.g. Hatches, retainers, adjustment rods etc Molykote® 1000 Molykote® 1000 6 na Bolts and nuts (threads; non removable) EP2 EP2 7 4 Plugs / caps Plugs / caps + Denso tape 8 4 - Denso tape 9 4 Stainless steel threads e.g fittings Eoniromonpastax Eoniromonpastax 10 na Bearings EP2 EP2 11 na Hydraulic system; pre-filled and drained Hyspin AWH-M 32 Hyspin AWH-M 32 Hydraulic/pneumatic/grease fittings (open-end). Hydraulic/pneumatic/grease fittings (non open-end). Comments: Shop-Preservation Performed by: Date/Sign: ________________________________ www.nov.com Standard Preservative Customer's responsibility Long term ShopPreservation (sign) Date/Sign RePreserved (1) Date/Sign RePreserved (2) Date/Sign RePreserved (3) Document number Revision Page 6 TSEL-0194 B 8 of 10 PRESERVATION CHECKS RECORDS Record page 2 of 2 Serial No:…………………………….. Activity No.: Intervals (Months) Description 12 na All non-terminated cable ends fitted with shrinking shroud. 13 na J-boxes seals present and correctly fitted 14 na J-boxes checked for proper closing 15 na Inspect internals for moisture (must be dry) 16 na All spare cable entrances plugged 17 18 19 20 21 22 Comments: Shop-Preservation Performed by: Date/Sign: ________________________________ www.nov.com Shop-preservation Standard ShopPreservation (sign) Customer's responsibility Date/Sign RePreserved (1) Date/Sign RePreserved (2) Date/Sign RePreserved (3) Document number Revision Page 7 TSEL-0194 B 9 of 10 DE-PRESERVATION De-preservation must be done after installation and prior to commissioning. The commissioning activities comprise checking, functional activities and operational activities. The following activities shall be performed to achieve de-preservation: Remove all protection structure and protective cloths. Extended cylinder rods to be washed with dissolving agent to remove preservation. Remove preservative from all unpainted steel surfaces and flanges. Remove (if applicable) Denso-tape of all parts necessary. Remove plugs or caps for all open-end fittings, which shall be available during operation. www.nov.com Document number Revision Page 8 TSEL-0194 B 10 of 10 PRESERVATION LABEL REAR OF LABEL www.nov.com FRONT OF LABEL This pin is for BX3 This pin is for BX3 This drawing has number 50004006-1 This drawing has number 50004007-1 THis item is also for BX3