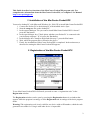
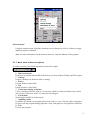
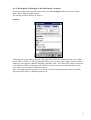
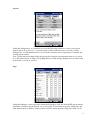
1
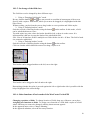
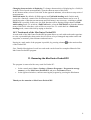
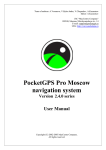
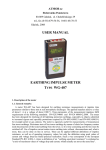
JSC "MacCentre Company"
109240, Moscow, Nikoloyamskaya str., 14
Info: [email protected]
Support: support@ pocketgps.ru
URL: http://www. pocketgps.ru
MacCentre PocketGPS
Quick Start Guide
Copyright (C) 2003-2004 MacCentre Company.
All Rights Reserved.
1
This Guide describes key functions of the MacCentre PocketGPS program only. For
comprehensive information about the MacCentre PocketGPS, see complete User Manual.
http://www.pocketgps.ru/.
1. Installation of the MacCentre PocketGPS
You need a desktop PC with Microsoft Windows 9x, 2000, XP to install MacCentre PocketGPS.
1. Connect the Pocket PC to the desktop PC with installed Active Sync.
2. Start the setup.exe file on the desktop PC.
3. In the opened dialogue "Do you want to install MacCentre PocketGPS 2.0.0 now?"
press the Yes button.
4. In the open dialogue box "Check please whether your Pocket PC is connected with
your desktop computer.” If it is press the Yes button.
5. In the dialogue box "Install to the default directory?" press the Yes button.
6. Wait, while the program files will load to the device.
7. Finaly, the installation of MacCentre PocketGPS is completed. In the main menu, a
shortcut for starting the MacCentre PocketGPS appears.
2. Registration of the MacCentre PocketGPS
To use MacCentre PocketGPS in full mode you need to enter a “registration code” in the
Registration window.
The Registration window can be open by pressing the Registration button in a window that
appears while the program is starting, or in the Registration tab in settings of the basic program
mode.
Warning! The registration code is only valid for one device with an ID number, which the code
generation was made for. Using it with other device is impossible.
2
3. Work with the MacCentre PocketGPS program
4.1. Basic mode of the MacCentre PocketGPS.
A basic mode is designed for displaying various data obtained from the GPS receiver, for
example: speed, altitude above sea level, driving direction, average speed etc. (There are
35 values in total. They are described in the complete Manual). At once after starting, the
PocketGPS is in this mode.
4.1.1. Shortcut menu of the basic mode
To open the shortcut menu for any field, hold stylus on this field during 0.5 seconds. The
appeared shortcut menu consists of two parts. A top menu part located above of a separator is the
same for all functions. A bottom part located below a separator is unique for each function.
3
Shortcut menu.
Using the shortcut menu, functions of buttons can be changed, as well as it allows to apply
additional options of buttons.
Note: For more information on the shortcut menu see complete Manual of the program.
4.1.3. Basic mode toolbar description.
A toolbar consists of the following buttons (from left to right):
1. Full-screen mode
It allows to work with PocketGPS in the full-screen mode without Toolbar and Tasks panel.
2. Settings
It opens a dialogue of the basic mode’s settings.
3. Eraser
It erases borders of the fields.
4. Pen
It draws borders of the fields.
5. Consecutive change of layouts
Cyclic searching of all files with an .fl extension, which are in the currentdirectory. In this
case, layouts of the basic mode are consecutively changed.
6. Track mode
Switching PocketGPS to a track mode.
7. Night/Day mode
It switches the interface from night to day mode, and vice versa. The day mode is designed
for work with the program during light time of day, and night one is designed for dark time.
8. Exit
It closes the program.
4
4.1.4. Description of dialogue of the basic mode’s settings
To access settings of the program basic mode, press the Settings button on the main toolbar.
Tabs of the settings dialogue appear.
The settings dialogue tabs are as follows:
General
Using this tab, it is possible to specify, where the PocketGPS should take the data: from COM
port (COM1-COM9) (i.e. directly from the GPS receiver) or from a previously written .nm file);
language of the interface (Russian/English); night/day mode. The current GPS values can also be
set to default (if GPS is connected, you will not see an effect from pressing this button, as the
reset values will be replaced with current ones).
Note: If reading data from a .nm file is selected, a .nm file settings button becomes accessible.
By pressing this button, a NMEA log tab opens.
5
Layout
Using this dialogue box, it is possible to access the following functions: Create a new layout,
Open a layout, Save, Save as... a current layout (.fl files) and current sets (.set files). In this
dialogue box, a confirmation before reset of various counters can be requested, for example: the
average speed counter.
Note: All the data concerning fields, their properties (location, measurement units etc.) is saved
in .fl files and refers to as layout. Everything that is set with settings dialogue boxes of basic and
track modes, is saved in .set files.
Logs
Using this dialogue, a user log can be customized. During a work, the PocketGPS can record the
data about a location, speed, altitude, etc. in a log files. It is possible to specify, which data, and
with what frequency, shall be written in these log files, and a quantity of log files (from 0 to 4).
6
If zero is specified for one of log files (Log1-Log4) as a Frequency parameter, or none checkbox
is not set for this log, then recording in this log file is not carried out. (If the Frequency
parameter for…..) The log files are saved in a folder specified in the Paths tab, in the Custom
Logs item, with log1.csv, log2.csv, log3.csv and log4.csv names. Further, it is possible to
overview contents of these files in MS Excel. If the files with such names do not exist in the
specified directory, they are created when starting the PocketGPS. If such files exist already, the
recording continues.
Waypoints
This dialogue is a Waypoints Editor. It consists of a waypoint list in bottom part of the tab, and a
button list in top part of that.
Waypoint list is a list which all created waypoints are listed in. With this list, information about
each open waypoint can be viewed: comment, fixed comment, geographic longitude and latitude,
altitude of a point, a file, from which it was open, as well as date and time specified for the
waypoints.
Track
Description of this dialogue is given in the detailed program Manual.
7
NMEA log
Using this dialogue, options connected with reading and writing the NMEA format data can be
set.
Warning! When writing the NMEA log, the file size will increase approximately by a hundred
bytes during each second.
Paths
The paths to folders used with the program are specified in this dialogue:
8
Defaults
Using this dialogue, some default functions can be set. It is necessary, as when assigning a new
function to a field, a part of functions requires the additional data. For example: when assigning
the “Orientation to a waypoint" function, a field that is already oriented to a certain waypoint
appears on the screen. The waypoint by default is a MacCentre building.
Add Waypoint
This dialogue is designed for fast addition of waypoints during movement. For convenience of
using this dialogue, it is recommended to create an Add Waypoint button in one of fields in the
main program window. It will allow to open this dialogue quickly. When opening the dialogue,
data of the current user’s location are displayed in edited fields.
9
10.1.5. On change of the field sizes
The field sizes can be changed by three different ways:
1. Using a “Dragging field border” mode.
Be sure, that the buttons
and
are not pressed on a toolbar in bottom part of the screen.
Specify with a stylus a field border, which you want to be dragged (it is highlighted with dark
blue colour).
Without tearing a stylus from the screen, drag border to a new position and lift the stylus.
2. Using a "Drawing borders" mode.
Switch to a mode of drawing borders using the button
on the toolbar. In this mode, a field
can be subdivided into two ones.
Tap with stylus in a point, where the border should be laid, or draw it on the screen. It is
important that it did not overstep the limits of the subdivided field.
Note: Size of all interface fields is multiple to a field with the size 80 × 45 dots. The field of such
size cannot be subdivided.
3. Using a "Deleting borders" mode.
Switch in a mode of deleting borders using the button
on the toolbar.
Click on a border which should be removed or drag a stylus on it.
This border can be dragged neither to the left, nor to the right.
This border can be dragged to the left and to the right.
Determining whether the stylus is pressed against the left or right border side is possible with the
help of highlight of the selected edge.
10.1.6. Other functions of basic mode of the MacCentre PocketGPS
Changing a position of fields. To change location of fields, drag any of them to a new place.
Assigning new functions to fields. To assign a new function to a field, hold a stylus on a field
whose function you want to be changed, until the shortcut menu appears.
In the appeared menu, select “Change Meaning.”
In the appeared submenu, select the necessary function.
10
Changing characteristics of displaying. To change characteristics of displaying for a field (for
example: unit of speed measurements), open the shortcut menu of this field.
In the shortcut menu, select a Units item. In the appeared submenu, select the necessary units of
measurements.
Full Field mode. By default, all fields appear in a Field with heading mode. In this mode,
except for a function, a name of the field and unit of function measurements can be seen. If
displaying units of function measurements and field name is not necessary, switching to a Full
Field mode is possible. In this case, the field function will be displayed larger than in a Field
with heading mode. To switch in a Full Field mode, select the Full Field item from the shortcut
menu of this field. After that, a tick will be set near a line. To switch back in a Field with
heading mode, remove this tick by taping on that line.
10.2. Track mode of the MacCentre PocketGPS
A track mode of the MacCentre PocketGPS program allows to work with tracks and waypoints:
to write, open and display them on the device screen, to lay a bitmapped map under tracks and
waypoints, to measure passed distance and much more.
Passing in a track mode of the program is possible, by pressing a button
of the PocketGPS.
on the main toolbar
Note: Detailed description of work in a track mode can be found in a complete Manual of the
MacCentre PocketGPS program.
11. Removing the MacCentre PocketGPS
The program is removed with a way usual for Pocket PC:
•
•
In the control panel (Start > Settings > Remove Programs > Programs in storage
memory), select MacCentre PocketGPS, and press the Remove button
In the appeared window, confirm removing the program by pressing the Yes button.
Thank you for attention to MacCentre PocketGPS!
11