1
VBS2™ VTK
Administrator Manual
1.03
Table of Contents
1. Installation ....................................................................................... 3
1.1 System Requirements ................................................................. 3
1.2 Pre Installation............................................................................. 3
1.3 Armed Assault ............................................................................. 5
1.4 Installing ...................................................................................... 6
2. HASP Authentication Keys ............................................................ 9
2.1 Single License USB Key ............................................................. 9
2.2 Network License USB Key .......................................................... 9
3. Program Execution ....................................................................... 10
3.1 Starting VBS2 ............................................................................ 10
4. Menu Options ................................................................................ 13
4.1 Training Menu ........................................................................... 13
4.2 Networking Menu ...................................................................... 14
5. Mission Editor ............................................................................... 19
6. After Action Review (AAR) ........................................................... 20
6.1 Recording an AAR file ............................................................... 20
6.2 AAR Playback ........................................................................... 21
7. Library Menu .................................................................................. 25
8. Options Menu ................................................................................ 26
8.1 Video Options ............................................................................ 26
8.2 Audio Options ............................................................................ 28
8.3 Difficulty Settings ....................................................................... 28
8.4 Controls ..................................................................................... 31
9. Dedicated Server Reference ........................................................ 34
10. Troubleshooting guide ............................................................... 36
11. Command Line Options.............................................................. 39
12. Appendix 1 – VBS2 Controls ..................................................... 42
13. Appendix 2 - Command Menu ................................................... 44
14. Appendix 3 - Support .................................................................. 45
VBS2
VBS2™ Admin Manual
© 2008 Bohemia Interactive Australia Pty. Ltd., All rights reserved.
Page 2 of 45
1. Installation
This section of the manual is designed for Network Administrators with a high level of PC literacy and
is solely concerned with the installation and administration of VBS2. For a comprehensive guide on
user interaction within the simulator please refer to the “User manual”. This manual covers
administration of both VBS2 and VBS2 Lite.
1.1 System Requirements
Before installation, ensure your machine(s) meet the minimum system requirements. For optimum
performance VBS2 should be run under the recommended specifications.
Minimum
CPU
2 GHz
RAM
1 GB
Video Card
Pixel Shader 2 compliant video card with at least 256MB of RAM (GeForce
6700GT or equiv).
If PhysX is required then a GeForce 8-Series or higher card is needed.
Free HD space
7 GB
Free USB slot
1
Software
Windows XP or 2000 and DirectX 9
Recommended
CPU
3 GHz
RAM
2 GB
Video Card
Pixel Shader 3 compliant video card with at least 512MB of RAM (GeForce 8800GT or equiv
updated with GeForce Release 178 drivers or later for PhysX support)
Free HD space
14 GB
Free USB slot
1
Software
Windows XP or 2000 and DirectX 9
1.2 Pre Installation
Before installing the VBS2 software ensure you have the following peripherals and cables.
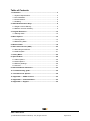
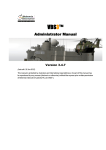
1.2.1 HASP USB License Key
VBS2 uses HASP USB keys for license verification. These may be either single-user or network USB
keys. (The colour-coded USB keys are explained further in the section “"HASP Authentication Keys "
on page 9”.) Aladdin HASP USB drivers will be installed automatically as part of the VBS2 installation.
Do not insert the USB key until after VBS2 (and therefore the HASP drivers) have been
installed.
VBS2 Lite Only: VBS2 Lite does not require a HASP USB key.
VBS2
VBS2™ Admin Manual
© 2008 Bohemia Interactive Australia Pty. Ltd., All rights reserved.
Page 3 of 45
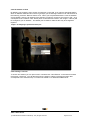
Image 1-1: Inserting a USB license key into a spare slot
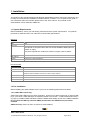
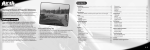
1.2.2 Network Cable
If you are running a network verify your network cables are securely plugged into all stations. A
Windows local area network is required if you wish to run VBS2 in-multi user mode. It is
recommended that all firewalls are disabled (to prevent interference with VBS2 network traffic).
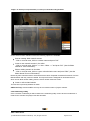
Image 1-2: An audible “click” is heard when the Network Cable is inserted correctly
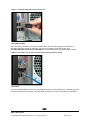
1.2.3 Audio
If you are using headsets, ensure they are plugged correctly into the proper ports. Generally the Pink
socket is for Audio In (microphone), and the Green socket is for Audio out (earphones or speakers).
VBS2
VBS2™ Admin Manual
© 2008 Bohemia Interactive Australia Pty. Ltd., All rights reserved.
Page 4 of 45
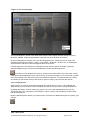
Image 1-3: Headphones add immersion by providing stereo sound and voice-over IP capability
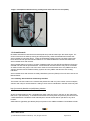
1.3 Armed Assault
Be aware that Bohemia Interactive has developed two products based upon the same engine. For
serious users there is VBS2 (a training and analytical tool), whilst the entertainment market has
Armed Assault (a computer game). There are similarities between the two, but each product has
been tailored to their specific intended audience. The VBS2 installation includes both VBS2 and
Armed Assault units and vehicles.
Armed Assault Add-ons consist of a range of additional US Army BLUEFOR and Eastern European
OPFOR unit and vehicle representations. Armed Assault units and vehicles may not be as realistic
as VBS2 content and „player color‟ will not be visible for Armed Assault units. Only VBS2 units and
vehicles will have NATO standard military symbols and only VBS2 vehicles will have working
indicators.
Armed Assault units and vehicles are easily identified by the text (Game) in front of their name in the
Mission Editor.
1.3.1 Installing Armed Assault Community Add-Ons
There exist numerous sites on the Internet that publish free add-ons (new content such as weapons,
vehicles and units) for Armed Assault. A listing of such sites is maintained in the BIS community wiki:
http://community.bistudio.com/wiki/News_Websites
All Armed Assault add-ons are compatible with VBS2. Add-ons come in the form of „pbo‟ files (files
that have a .pbo extension). To install Armed Assault community add-ons place the pbo files into the
<VBS2 installation>\ca\addons folder. Do not place Armed Assault add-on pbo files in any other
location.
VBS2 add-ons (generally provided by BIA) are placed in the <VBS2 installation>\vbs2\addons folder.
VBS2
VBS2™ Admin Manual
© 2008 Bohemia Interactive Australia Pty. Ltd., All rights reserved.
Page 5 of 45
VBS2 Lite Only: VBS2 Lite does not support the use of community add-ons. Contact Bohemia
Interactive if you wish to use 3rd-party add-ons with VBS2 Lite as they must be specially configured.
Important:
1. BIA does not support community add-ons, and community add-ons may corrupt your VBS2
installation. If you are experiencing technical difficulties BIA support staff will ask if you are running
community add-ons, and ask you to remove them prior to providing assistance.
2. Please read and adhere to end-user license agreements (EULAs) packaged with community addons.
1.4 Installing
1.4.1 Setup Wizard
Insert the VBS2 installation disc into your DVD drive (the installation will not run from a CD
drive).
Click Start on the taskbar, then My Computer.
Double click on your DVD drive icon to browse the contents of the VBS2 DVD.
Double click on VBS2_Setup.exe and follow the on-screen instructions.
The Setup wizard will be launched and step you through the installation process. After the installation
of the core is complete, you will be shown the Aladdin HASP drivers installation notification; you do
not need to do anything as the drivers will automatically install (simply click “Ok” when notified).
The installation will also automatically install the latest version of Microsoft DirectX. The DirectX setup
process will only replace obsolete files, so if you already have 9.0c on your machine no change will
occur. DirectX is an official Microsoft product so for more information visit:
http://www.microsoft.com/windows/directx/
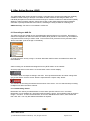
When the VBS2 Setup wizard is complete you will observe the following screen:
VBS2
VBS2™ Admin Manual
© 2008 Bohemia Interactive Australia Pty. Ltd., All rights reserved.
Page 6 of 45
Image 1-4: Installation complete notification
OpenAL sound drivers will also be copied to the VBS2 installation directory during Installation.
OpenAL is a cross-platform 3D audio API appropriate for use within game engines and many other
types of audio applications. OpenAL drivers are installed as part of the VBS2 package to enhance the
audio experience.
For more information please visit: http://www.openal.org/
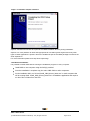
1.4.2 Manual Installation
It is possible to install VBS2 without running the installation program on every computer.
Install VBS2 on one computer using the DVD(s) provided.
Once the installation is complete copy the entire VBS2 folder to other computers.
On the installation DVD, run „Drivers\Install_VBS2_drivers_latest.exe‟ on each computer that
will be running VBS2. Install_VBS2_drivers_latest.exe is a standalone application and requires
no other files or folders from the DVD.
VBS2
VBS2™ Admin Manual
© 2008 Bohemia Interactive Australia Pty. Ltd., All rights reserved.
Page 7 of 45
Image 1-5: Run Install_VBS2_drivers_latest.exe on all computers if you install VBS2 manually
VBS2
VBS2™ Admin Manual
© 2008 Bohemia Interactive Australia Pty. Ltd., All rights reserved.
Page 8 of 45
2. HASP Authentication Keys
The process of starting VBS2 will depend on the type of license you have purchased. If you are using
VBS2 Lite please skip straight to “"Program Execution" on page 10” below.
2.1 Single License USB Key
If you have been provided with a blue or purple (not time-limited), or black (time-limited) USB key,
insert the USB key into the computer you want to operate VBS2. Go to “"Program Execution" on page
10”
2.2 Network License USB Key
If you have been provided with a red USB key, insert the USB key into a computer where VBS2 has
been previously installed. The computer should be on a Windows network connected to the other
workstations that will be running VBS2 (preferably with no firewalls operating).
You now need to execute the HASP license manager on the computer where you inserted the USB
key:
Click Start
Point to Programs
Point to Bohemia Interactive
Point to VBS2
Point to HASP
Click on HASP Network License Manager
The License Manager will coordinate VBS2 licenses as different computers on the network start
VBS2. Only one license manager (and therefore one network USB key) is required per network.
Now go to “"Program Execution" on page 10”
VBS2
VBS2™ Admin Manual
© 2008 Bohemia Interactive Australia Pty. Ltd., All rights reserved.
Page 9 of 45
3. Program Execution
3.1 Starting VBS2
After initializing the USB key you are ready to execute the program.
Click Start.
Point to Programs.
Point to Bohemia Interactive.
Point to VBS2 and then click the appropriate shortcut. (User version is VBS2 User and
Administrator version is VBS2 Admin, note that VBS2 Lite does not offer separate Admin and
User modes).
3.1.1 Admin and User Modes
VBS2 can be started in either admin or user mode. Admin mode allows full access to video, audio
and difficulty settings and has a more advanced player setup interface. To start VBS2 in admin mode
the command line argument –admin is required (or run the VBS Administrator shortcut). For a full list
of command line options, please refer to "Command Line Options" on page 39.
When VBS2 is started in 'user mode', the player is prohibited from changing video, audio and difficulty
settings. The player login screen is also modified - players will be expected to enter an identification
number and nickname rather than register using the player login screen that is available to
administrators (see "Administrator Login" on page 11). The identification number is used as a key for
saving configuration settings, player data, and custom control settings. The nickname sets the ingame player name (how the user is identified in-game).
Player color allows each participant to set the color for their in-game armband, which can be used for
easier in-game identification. Each member of a squad might be a different color, for example.
The most important distinction between user and admin mode is that the Real Time Editor
(RTE) is only available if VBS2 is started in admin mode. In user mode the Command and Control
(C2) editor is available instead.
User profiles are stored in <My Documents>\VBS2 on the computer where VBS2 is run. Configuration
settings are stored on a per-user basis (including custom key controls). It is therefore very important
that users (especially trainees) use the same identification number each time they use VBS2 (as
previous settings will have been saved).
VBS2 Lite Only: VBS2 Lite always starts in Admin mode.
VBS2
VBS2™ Admin Manual
© 2008 Bohemia Interactive Australia Pty. Ltd., All rights reserved.
Page 10 of 45
Image 1-6: VBS2 Main Menu screen in Admin mode
3.1.2 Administrator Login
When logging in as an administrator the process of setting up player details is more complicated. The
two „service number‟ and „nickname‟ boxes will be replaced with a single „User‟ button. Click on the
name shown to move into the player profiles screen.
Important: Deleting a profile will also remove all associated saved games and custom created
missions assigned to the “deleted” profile.
You may edit user profiles by selecting a name in the profiles list and clicking “Edit”. The edit player
screen will appear:
VBS2
VBS2™ Admin Manual
© 2008 Bohemia Interactive Australia Pty. Ltd., All rights reserved.
Page 11 of 45
Image 1-7: The user profile screen accessible when in admin mode
Either creating a new profile or editing an existing one will give the same available options ie change
name, select face, select speaker, and select pitch.
“Speaker” is the voice selection that will be audible whenever the character issues a command or
comments in game, pitch affects how that voice sounds.
Important: The concept behind admin and user mode is to prevent users from changing key
configuration settings and speed up the process of getting a scenario started (without users playing
around with what their in-game face might look like or whether or not they wear sunglasses).
VBS2
VBS2™ Admin Manual
© 2008 Bohemia Interactive Australia Pty. Ltd., All rights reserved.
Page 12 of 45
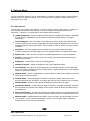
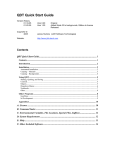
4. Menu Options
The large icons running vertically down the left hand area of the screen are your main menu options.
The top right corner icon, representing an “X” has a similar function to the windows “X”, as it
terminates the program. Unlike the windows version however, pressing the “X” icon in VBS2 will
terminate the program immediately without any further warnings or options.
4.1 Training Menu
Enter the single participant training area by selected the “Training” icon with a single-click of your Left
Mouse Button (LMB).
Immediately after selecting this option you will be brought to the training menu and be presented with
the following screen.
Image 1-8: Select single player missions via the training screen
Depending on your version of VBS2 you will be presented with a number of tutorials missions as
shown above. To engage these tutorial missions simply select the mission with your LMB so the text
is highlighted by orange shading and then select “Start” from the right hand panel.
After a short time of loading you will be presented with a briefing screen for the training mission. Here
you will be given your mission objectives, mission parameters and any other important information
required to complete the objectives.
Once you are ready to enter the simulation, click on the “Start” button with your LMB.
VBS2
VBS2™ Admin Manual
© 2008 Bohemia Interactive Australia Pty. Ltd., All rights reserved.
Page 13 of 45
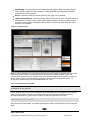
4.2 Networking Menu
Enter the multi-participant training area by selected the “Networking” icon with a single-click of your
Left Mouse Button (LMB).
Immediately after selecting this option you will be taken to the networking session browser and be
presented with the following screen. You will be able to join or host a session.
Image 1-9: Host a network session
4.2.1 Sorting
Filters at the top of the session list allow you to sort the sessions using a different property. Clicking
any of these, for example “Host”, will sort the sessions by this property in ascending order. Pressing it
again will sort them in descending order instead.
4.2.2 Session browser titles
(Far left column) Whether the session is password protected or not
(Host) Host name
(Type) Type of mission
(Status) Status of the server (i.e. creating session, debriefing, in game etc.)
(Participants) Number of players currently in the session / maximum amount of players for this
session
(Ping) A measurement of the quality of your connection to this host, measured in milliseconds
– the lower the better
4.2.3 Passwords
Session passwords are deactivated in VBS2.
VBS2
VBS2™ Admin Manual
© 2008 Bohemia Interactive Australia Pty. Ltd., All rights reserved.
Page 14 of 45
4.2.4 IP Address of Host
By default, your browser is set to search for sessions on the LAN. If you want to specifically define
which IP address VBS2 should connect to (perhaps you are starting a session over a WAN such as
the Internet), press the “Remote” button once. When you are presented with the “Host IP Address”
screen (below), enter the IP address of the session you want to connect to and click on “OK”. As a
consequence, the “Address: LAN” button (back on the sessions browser, see Image 1-9 above) will
be changed to your IP address. The default port for VBS2 is 2302 but this may be changed as
required.
Image 1-10: Assigning a specific host IP and port
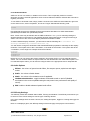
4.2.5 Hosting a session
To host a new session you can press “New” or double-click “Host Session” in the session browser
(see Image 1-9 above). You will then be given the option to select a map and a mission that
corresponds to the selected map. You have now started a non-dedicated VBS2 server.
VBS2
VBS2™ Admin Manual
© 2008 Bohemia Interactive Australia Pty. Ltd., All rights reserved.
Page 15 of 45
Image 1-11: Select your map and mission, or create your own mission using the Editor
On the server mission selection screen the following options are available:
Start an existing VBS2 network scenario
- Click on a terrain area, click on a mission name and press “OK”.
Create a new network scenario in the editor
- Click on a terrain area, click on “<< New – Editor >>” and press “OK”. (See the Editor
Manual for more information).
Edit an existing scenario in the editor
- Click on a terrain area, click on a green colored mission name and press “Edit”. (See the
Editor Manual for more information).
Note that yellow colored missions are those that have been „Exported to Network Scenarios‟ from the
Mission Editor and they cannot be edited. This export function is designed for dedicated servers
which do not allow mission editing from the server mission selection screen.
Create or edit a wizard mission
This function is presently disabled in VBS2.
VBS2 Lite Only: Note that VBS2 Lite may have a limited number of players allowed.
4.2.6 Networking Lobby
Once a mission is selected you will be taken to the networking lobby screen where unit selection is
made for the scenario and player roles are allocated.
VBS2
VBS2™ Admin Manual
© 2008 Bohemia Interactive Australia Pty. Ltd., All rights reserved.
Page 16 of 45
Image 1-12: The networking lobby
The four rectangular, colored icons listed under the title “Side” display the total number of human
BLUFOR, OPFOR, Civilian and Resistance units that may be involved in the mission.
Directly underneath the side bar is the unit role designation area. Listed here are all of the units
available in the particular mission (“Officer, group leader”, “Rifleman – M16A4” etc). As participants
are allocated to roles their names will appear under the unit roles.
If human players are not allocated to a playable slot then that unit will be controlled in game by
artificial intelligence (AI), but this may be disabled by clicking the following button:
(note that you may disable all AI roles by clicking on this same button at the top of the screen)
Participants names depicted in red in the pool have not yet been assigned a role. Those with a yellow
name have picked a role, but have not yet confirmed their readiness. Participants whom are ready
and waiting for the session to begin are shown in green. Pressing “OK” launches the session.
4.2.7 Assigning roles
Assign players to roles by left-click and dragging their names from the “Pool” to an available role.
Alternatively you may left click a name, and then left-click the role you want to assign that player to.
By default the session host can assign any player to any role, while individual players may only
assign their own role. If the session host assigns a role to a player, then that player will be „locked‟
into the allocated slot.
Note the following button allows you (as the server) to prevent any additional players from joining your
session:
VBS2
VBS2™ Admin Manual
© 2008 Bohemia Interactive Australia Pty. Ltd., All rights reserved.
Page 17 of 45
When ready, click with LMB on the “OK” box in the far right hand screen and after loading you will be
sent to either the multi-participant briefing screen or directly into the multi-participant session.
You are now hosting a networked session of VBS2.
VBS2
VBS2™ Admin Manual
© 2008 Bohemia Interactive Australia Pty. Ltd., All rights reserved.
Page 18 of 45
5. Mission Editor
This button opens the mission editing interface. Please refer to the “VBS2 VTK Editor Manual” as this
subject is quite comprehensive.
VBS2
VBS2™ Admin Manual
© 2008 Bohemia Interactive Australia Pty. Ltd., All rights reserved.
Page 19 of 45
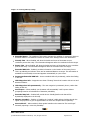
6. After Action Review (AAR)
The VBS2 AAR (After-Action Review) provides a comprehensive recording and playback capability,
suitable for either training or analysis. The VBS2 recorder collates a wide range of data, from
individual participant movements and actions through to collective measures of effectiveness (MOE).
Within the realm of military training, after-action review via the VBS2 playback system facilitates
evaluation of participant decisions and actions, extending the utility of VBS2 as a training tool.
VBS2 Lite Only: The AAR is not available in VBS2 Lite.
6.1 Recording an AAR file
The AAR can only be started once a multi participant network session is in progress. Recording is
started and stopped from within the Real Time Editor (RTE) interface. The RTE is only accessible on
computers that are running in admin mode. To access the RTE, press the Esc key and then select
„Real Time Editor‟ (see the image on the below),
or simply press the „M‟ key. Image 1-13 below describes AAR functions accessible from within the
RTE interface.
AAR recording can be started and stopped from any RTE station on the network.
At the top right hand corner there is a circular button next to a timer display:
This button starts and stops recording in the AAR. Once pressed the button and timer change from
grey to red and the circular “record” button is replaced with a square “stop” button:
The scenario is now being recorded to the hard drive of the server. You can start and stop recording
multiple times within the same scenario.
6.1.1 Bookmarking Events
Bookmarks are used by an Administrator to record when specific events occur in a mission.
Bookmarks can be added at any time when AAR recording is active. The bookmark panel is shown in
Image 1-13 below. To add a new bookmark, click on the „Add Bookmark‟ button, enter details and
then click “OK”. You may also delete bookmarks as required.
VBS2
VBS2™ Admin Manual
© 2008 Bohemia Interactive Australia Pty. Ltd., All rights reserved.
Page 20 of 45
Image 1-13: AAR functions accessible in the RTE
6.1.2 Saving your AAR file
Once the red “stop” button is pressed a save dialog box is displayed. Enter an appropriate name for
the AAR recording and click “OK”. If you exit the mission without saving the AAR file will automatically
be saved as “[<date>] LastMission”.
AAR files are saved in <My Documents>\VBS2\AAR on the server. They can be copied and replayed
on any installation of VBS2 (user or administrator).
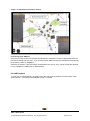
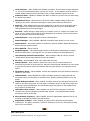
6.2 AAR Playback
To view your recorded AAR file, navigate back to the main menu and select the menu option “After
Action Review”. You will be presented with Image 1-14 below.
VBS2
VBS2™ Admin Manual
© 2008 Bohemia Interactive Australia Pty. Ltd., All rights reserved.
Page 21 of 45
Image 1-14: The AAR selection screen
The top part of the window displays a list of available servers and their respective after-action review
files. The bottom part of the window list after-action review files that are held on the local machine.
To download an AAR file from a server, click on the server name, click on the server file and then
click “Download”. The mission will be transferred to the local AAR list in the bottom part of the
window.
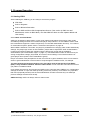
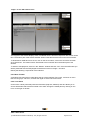
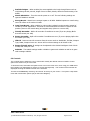
To start an AAR playback, select it in the “Mission” window and click “OK”. Once the AAR loads you
will be presented with the AAR playback interface as shown in Image 1-15 below.
Identify the following components of the interface:
6.2.1 Menu Toolbar
A windows-style menu bar is visible along the top of the interface (File, View). Left-click on menu
items to bring up a sub-menu, and left click again to select sub-menu items.
6.2.2 Tools Panel
On the left is a tools panel that presents information (help text, statistics) and also allows you to
access bookmarks that have been saved in the AAR. Change the visible panel by clicking on the
icons on the right of window.
VBS2
VBS2™ Admin Manual
© 2008 Bohemia Interactive Australia Pty. Ltd., All rights reserved.
Page 22 of 45
Image 1-15: The AAR playback screen
6.2.3 Editor Object Tree
The panel on the top right contains the Editor Object Tree. This displays the various editor objects
that are currently active in the AAR.
6.2.4 AAR Playback Toolbar
The slider and four buttons under the menu bar comprise the „AAR Playback Toolbar‟.
Much like any playback system you will note “play”, “forward”, “reverse” and “return to start” buttons in
the top right corner. Along the top is a play progress meter bar that allows you to move time forward
and back within the AAR playback. Holding down the slider bar icon with your LMB will allow you to
move time forward and back.
To start playing the AAR, click the
icon with your LMB.
6.2.5 Using the AAR Interface
The AAR interface in VBS2 is very similar to the Offline Mission Editor and Real Time Editor
interfaces (see the Editor Manual for a complete description). Use the help panel for a reminder of the
various shortcut keys available.
VBS2
VBS2™ Admin Manual
© 2008 Bohemia Interactive Australia Pty. Ltd., All rights reserved.
Page 23 of 45
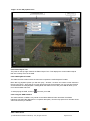
6.2.6 2D/3D View Window
The background of the interface contains either a 2D map or a 3D view of the terrain area that is
loaded. Press the M key to switch between 2D and 3D view.
6.2.7 Navigating around the virtual environment
In 2D map mode you can zoom in/out using the mouse wheel, and „drag‟ the map by holding down
the right hand mouse button and moving the mouse.
In 3D camera mode you can move the camera using the W, A, S and D keys and you can change the
camera‟s direction by holding down the right hand mouse button and moving the mouse. Q and Z
changes the camera‟s altitude. In 3D view, you can use the I key to hide/unhide the user interface to
clear up the screen.
At any time you can lock the camera onto the currently selected object, or the object the mouse
pointer is currently over, by pressing the L key. Press the L key again to return to free camera mode.
6.2.8 Exiting the AAR
To exit the AAR press the Esc key or click on “File” and then “Exit”
VBS2
VBS2™ Admin Manual
© 2008 Bohemia Interactive Australia Pty. Ltd., All rights reserved.
Page 24 of 45
7. Library Menu
The library gives the user a chance to familiarise themselves with various weapons and vehicles
found in the simulator. Rather than an online slideshow, it is an interactive experience where the user
is able to try the weapons and vehicles in mini-simulations.
This component is fully described in the VBS2 VTK Users Manual.
VBS2
VBS2™ Admin Manual
© 2008 Bohemia Interactive Australia Pty. Ltd., All rights reserved.
Page 25 of 45
8. Options Menu
This menu selection allows you (as an administrator) to change the default controls, audio and video
settings and also the difficulty settings. The user is only able to change the default controls as all
other options are locked.
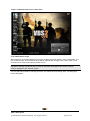
8.1 Video Options
To access the Video options click “Options” in the main menu and then “Video Options”. Initially you
are presented with the basic video settings; to show all settings (including advanced), select
“Advanced”. Following is an explanation of the available options settings.
Quality preference - selection of preset default options for balanced performance depending
on your system's capabilities (note: this influences all other settings that you can adjust
individually)
Terrain Distance - This is the visible “view” distance in meters. Higher view distances are
useful for training roles such as Forward Observers and Forward Air Controllers but can have a
negative impact on system performance. This is limited to 10km by default, for higher ranges
see below.
Resolution - select the optimal screen resolution for your system. Generally a higher
resolution equates to a sharper image, but it can negatively affect your system performance.
Aspect ratio – select one from a number of possible Aspect Ratios to suit your hardware.
Refresh - choose the best refresh rate for your screen (only refresh rates suitable for your
monitor will be shown).
Brightness - use the slider to vary the overall brightness.
Gamma correction – similar to brightness, with a more significant effect.
Terrain Detail - the higher the terrain detail, the more subdivisions each terrain square will
have. This results in smoother and more natural terrain. Higher settings have a more negative
impact on system performance.
Objects detail - sets the overall quality of object models, so with a lower setting you may see
lower Levels of Detail for objects.
Texture detail - the overall quality of textures in the game. A lower setting may cause
blurrier textures but can be useful if your video card does not have a large amount of memory.
Shading detail - affects all of the special shading techniques used in the game.
Postprocess effects - turning on/off the depth of field blur. The depth of field blur simulates
how the human eye focuses more sharply on the objects it looks at directly and blurs those in
the background.
Anisotropic filtering - a method of enhancing the quality of textures on surfaces that are far
away and on a small angle to the camera. Improves visual quality for a small performance hit.
Shadow detail - detailed shadows can make a scene come alive, but also demand a lot from
your hardware. If you experience performance issues, try lowering this option. Disabling it
entirely can be useful on lower-end systems.
VBS2
VBS2™ Admin Manual
© 2008 Bohemia Interactive Australia Pty. Ltd., All rights reserved.
Page 26 of 45
Antialiasing - this technique tries to minimize aliasing (jagged edges) caused by showing
high-resolution content at lower resolutions. Using anti-aliasing can significantly degrade
performance on some systems.
Blood – affects the amount of blood visible in game, high, low or disabled.
Object Draw Distance - distance at which objects may come into view. This slider allows an
administrator to specify a much greater object drawing distance. Previously objects further
than 3km from the camera viewpoint were not drawn, but this new slider allows this draw
distance to be modified.
Image 1-16: Video Options
Note: If you are experiencing poor graphics performance, there could be a problem with your video
card accepting the Shader 3 model video drivers. By placing the switch variable –sm2 in the
command line properties of your VBS2 shortcut, you will force VBS2 to use the previous version of
Shader model drivers. This should assist older video cards to render the graphics engine. i.e.
{C:\program_files\Bohemia_Interactive\VBS2\VBS2.exe –sm2}
8.1.1 Terrain distance over 10km:
Note: Advanced Users only: This may make VBS2 less stable due to the greater demand on system
performance so use with care.
Terrain distance may now also be increased to up to 20km (previously the maximum was 10km) by
editing the vbs2.cfg file. This file can usually be found at c:\documents and settings\admin\my
documents\vbs2\vbs2.cfg. Edit the file by adding the following parameter and value:
MaxViewDistance=20000.000000;
Save the file and restart VBS2, now within Options/Viedo Options Terrain Distance can be raised to
20km.
VBS2
VBS2™ Admin Manual
© 2008 Bohemia Interactive Australia Pty. Ltd., All rights reserved.
Page 27 of 45
8.1.2 Windowed Mode
VBS2 can be run in a window, in addition to full screen. This is especially useful for scenario
designers and when external applications such as those related to DIS/HLA activities also need to be
regularly monitored.
To run VBS2 in windowed mode, simply create a shortcut to the VBS2.exe executable file, right click
on the shortcut icon, select "Properties", and in the "Target" field add the following code :
-window
Preconfigured shortcuts are available through the windows Start Menu for VBS2 Administrator
(Windowed) and VBS2 User (Windowed) modes.
Note : Some users may be familiar with the VBS1 extensions "-x=n -y=n" for manually setting the
window resolution in the shortcut. That method has been deprecated and is no longer functioning in
VBS2. This is due to the more robust display definitions available in VBS2.
To set the window display resolution, you will need to edit the following file :C:\Documents and
Settings\<USERNAME>\My Documents\VBS2\vbs2.cfg
You will need to change the winW/winH and winDefW/winDefH properties to manually set the display
resolution. The W pairs refer to the X orientation, or the width of the window. The H pairs refer to the
Y orientation, or the height. An example would be as follows :
winW=1024;
winH=768;
winDefW=1024;
winDefH=768;
Note that you can not change the window resolution from within VBS2, you must manually edit the
values. You can however select an Aspect Ratio from the default lists in the VBS2 Video Options. For
non-standard aspect ratios, you will need to configure them in the appropriate user's vbs2profile file
8.2 Audio Options
Effects - the volume of general sound effects, like weapon reports, explosions and engine
noises.
Radio - the volume of radio chatter.
Music - the volume of in-simulation music if applicable.
Hardware Acceleration - toggle hardware accelerated sounds on and off (disabled
acceleration is the most compatible setting but may mean lower performance and quality of
sound).
EAX- enable or disable advanced spatial audio effects.
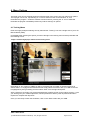
8.3 Difficulty Settings
Two difficulty modes are available within VBS2, Training and Realistic. The difficulty menu allows you
to fine-tune most of their settings to suit the type of training desired.
In the list of settings there are three columns, the setting description, toggle for Training and toggle for
Realistic.
Note: In a multiplayer game, the difficulty settings of the host apply to all players in that session.
VBS2
VBS2™ Admin Manual
© 2008 Bohemia Interactive Australia Pty. Ltd., All rights reserved.
Page 28 of 45
Image 1-17: Tailoring difficulty settings
Extended Armor - The enabling of this option simulates the addition of extra armor plates to
armored vehicles. This allows the vehicle to sustain more damage before total destruction.
Friendly TAG - When Enabled, will show the health and name of the Avatar as your
crosshairs point at the entity. The information disappears after the crosshairs leave the target.
Enemy TAG - When Enabled, will show the health and name of the Avatar as your crosshairs
point at the entity. The information disappears after the crosshairs leave the target.
Extended HUD info - Enabled, provides information on the location of the enemy forces.
This is provided by an indicator arrow and an estimated distance to target. This information is
available from all friendly sources and appears automatically on your screen.
Permanent Extended HUD info - shows extended HUD info persistently, rather than fading
in and out.
HUD Waypoints info – Waypoints are shown “floating” above their location with an icon and
distance indicator.
HUD Waypoints info permanently – The next waypoint is persistently shown, rather than
fading in and out.
Auto Report – When enabled, your character will automatically „radio‟ reports without
prompting based on AI calculations of detection probability
Extended Map info – Enabled will provide known friendly/hostile units that will be
dynamically displayed on the 2D map.
Weapon CrossHair – Enables or Disables the „crosshair‟ visible without looking through the
sights. Its purpose is to give an approximation of where the weapon barrel is pointing.
Auto Guide AT – When enabled, allows guided missiles to be treated as “fire and forget”.
Generally reporting a 100% hit probability.
VBS2
VBS2™ Admin Manual
© 2008 Bohemia Interactive Australia Pty. Ltd., All rights reserved.
Page 29 of 45
Clock Indicator – When enabled, this indicator provides a „Clock method‟ of target indication.
i.e. The clock will be displayed with “ Enemy at 3 o‟clock” . It only appears when an enemy is
located. Disable setting removes this feature and no target indication is given by the AI.
3rd Person View – Enables or Disables the ability to adopt a 3rd person view port while using
the Avatar in the game.
Rifle Bullet Tracers – Allows tracers to be used in battle. Disable setting will deny the
“lighting of the tracer” ammunition although the tracer ammunition can still be fired.
Super AI – When Enabled offers a greater intelligence to the AI. The AI will perform with a
higher degree of cunning and awareness. Disabled returns the AI to the normal difficulty
setting allocated by the scenario designer.
Auto Aim - Assists aiming by softly locking your weapon cursor on a target as you pass your
cursor over the target, firing during the lock, distinguised by a change in colour from white to
dark red, ensures a direct hit on the target.
Unlimited saves - Save single player mission unlimited times.
Death Messages – When disabled, VBS2 will not display „death quotes‟ on your screen.
Network Stats – This setting enables or disables the network statistics display accessible by
players during a network session.
Show VOIP ID - Shows VOIP ID
Seagull Respawn – This setting toggles between a dead player respawning as a seagull
above the battle field, or receiving the “You are dead” message on a black background.
Use Game Map instead of C2 interface – When enabled, VBS2 will use the old-style
„Armed Assault‟ game map instead of the new C2 Interface.
AI voices – When disabled, all AI voice radio traffic will cease.
Analog Throttle – When enabled, requires the user to set the required speed via a
successive key presses of the throttle key. When the desired speed is attained, the user ceases
to press the key and the vehicle will maintain that set speed until the user stipulates a new
speed.
3D Soldiers names – When disabled, removes the health bar and name field from above the
soldiers on your team.
Unlimited Fuel – When disabled, the vehicle will adopt normal fuel usage rates and will
eventually require refueling from an external source. Enabled, allocates limitless fuel to the
avatar.
Simple Helicopter Model – When enabled, the flight model of the helicopter becomes less
reliant on the users flying skills. The helicopter is extremely easy to fly and will not crash into
the ground. Speed and Elevation are controlled by single key presses on the keyboard and
don‟t require to be held down.
Helicopter follow contour – When enabled, this will force the helicopter to follow the
contours of the ground, adopting a „tactical flying‟ attitude. It will gain/decrease altitude
according to the lay of the land.
Show Grenade Trajectory – When enabled, shows the approximate trajectory line for the
throwing of grenades and 40mm grenade launcher.
Suppression of Player – When enabled, the player will be effectively suppressed by
incoming fire. The player will notice a „white out‟ flashing of the screen, momentarily loosing
focus on the current FOV.
VBS2
VBS2™ Admin Manual
© 2008 Bohemia Interactive Australia Pty. Ltd., All rights reserved.
Page 30 of 45
Realistic Fatigue – When enabled, the stress applied to the body through factors such as
weight being carried, wounds, length of time in battle, directly affect the Morale setting of an
Avatar.
Morale Simulation – Turns the morale system on or off. The two following settings are
ignored if disable is selected.
Strong Morale – Morale has a stronger impact on AI skills. Disabled equates to moral having
less of an effect on AI conduct in battle.
Long Term Morale – When enabled, a units morale is judged over 60 seconds, instead of
second by second adjudication. This tends to smooth and slow the effects of morale in both
positive (slower to feel morale drop) and negative ways (slower to recover skill).
Friendly Surrender - Blufor will surrender if conditions are met.(If you are playing Blufor
then this means your side)
Enemy Surrender - Opfor will surrender if conditions are met. (If you are playing Opfor then
this means your side)
Hide UI - Removes unit info resources from the screen such as: Health Bar, Fuel Bar, Weapon
Type, Radar, Weapon Cursor etc. Server will force these settings on all clients in MP.
Enemy/Friendly units- AI settings can be adjusted to the desired intelligence level of both
friendly and enemy AI units.
Subtitles - The subtitle settings enable or disable in-game main subtitles as well as in-game
radio message subtitles.
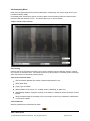
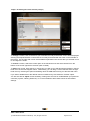
8.4 Controls
The controls section allows the user to view and/or modify the default controls of VBS2. Control
options are saved on a per-user basis.
To enter this area, first select the Options menu icon on the main menu, then using your LMB select
the Controls icon (depicted by a graphic of mouse and keyboard). The controls screen will then be
displayed showing the default controls of the simulator.
This list can be filtered by selecting “All controls” at the top of your screen. This opens a drop down
menu with various filter options (as per the below diagram).
VBS2
VBS2™ Admin Manual
© 2008 Bohemia Interactive Australia Pty. Ltd., All rights reserved.
Page 31 of 45
Image 1-18: Filtering the control choices by category
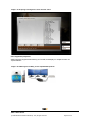
To change a control, click on the action you would like to modify and another screen will be displayed
showing the keyboard/mouse controls that are currently associated with the action on the left side of
the screen. On the right side is a list of all available keyboard/mouse controls that you are able to use
to reconfigure the action.
To remove a control, select the current option in the left hand menu and select “delete” from the
bottom of the screen (repeat if more than option is listed).
To add a new control, press the key or mouse key you wish to use and this will then appear in the left
hand menu as the new mapped control. Alternatively, you can drag a control selection from the right
hand menu by selecting the option and holding down the LMB whilst moving it to the left hand menu.
If you wish to revert back to the default controls of VBS2 at any time select the “Default” option.
You are also able to adjust mouse sensitivity, floating zone and axis or enable/disable your preferred
controller (Joystick, steering Wheel etc). It is recommended to leave these values in their default
settings.
VBS2
VBS2™ Admin Manual
© 2008 Bohemia Interactive Australia Pty. Ltd., All rights reserved.
Page 32 of 45
Image 1-19: Preparing to reconfigure the “Move Forward” action
8.4.1 Supported peripherals
VBS2 inherently supports head tracking via TrackIR, and display on multiple screens via
TripleHead2Go.
Image 1-20: VBS2 supports TrackIR4_Pro and TripleHead2Go products
VBS2
VBS2™ Admin Manual
© 2008 Bohemia Interactive Australia Pty. Ltd., All rights reserved.
Page 33 of 45
9. Dedicated Server Reference
The previous section discussed starting a non-dedicated server within VBS2. A non-dedicated server
is one that is started through the Networking main menu button. This section provides an overview of
using a dedicated server. For more information visit:
http://community.bistudio.com/wiki/ArmA:_Dedicated_Server
A dedicated server is a server that is started in Windows rather than through VBS2. Dedicated
servers typically perform better under load because they have no in-game interface. VBS2 clients can
„log in‟ to the dedicated server as required to configure settings, commence or end a scenario etc.
To start a dedicated server selected the „VBS2 Dedicated Server‟ option from within the VBS2 section
of the Windows Start Menu.
Once a dedicated server has been created it will be visible on the session menu (accessible by
clicking on Networking on the Main Menu) by all computers on the Windows network. Clients can now
join the dedicated server using the usual method (click on the dedicated server in the server list, and
click “Join”).
The minimum system requirements for a dedicated server are a 2 GHz machine with 512 MB of RAM.
The main differences between a non-dedicated and dedicated server are:
1.
You cannot edit a network scenario if using a dedicated server (the “<< New – Editor >>”
option is not available on the mission listing).
2.
You can only execute scenarios that reside in the <VBS2 Installation>\MPMissions on the
server. You need to „Export to Network Scenarios‟ on the server from the Offline Mission Editor
or manually copy scenario folders to this location in Windows.
3.
The network administrator must use server commands (see below) to change the state of the
server (restart the mission, start a new mission etc).
Note: it is now possible to record an AAR on a dedicated server.
9.0.1 Command-line Options
The following command line options are available for dedicated servers. To add command line
options right-click on the „VBS2 Dedicated Server‟ shortcut and add additional options to the target
box.
-config=<filename>
server configuration file
-mod=<path1;path2;...pathn>
mods directories (bin and dta subdirectories are searched in)
-netlog
Command to record traffic from the game server in BI format
-port=<number>
select port
-world
Start another default terrain area
-sm2
Use Shader Model 2, (for low end graphics cards)
-sm3
Use Shader Model 3, (for shader 3 compliant cards) default setting.
For example:
VBS2.exe -server -config=server.cfg -netlog -port=2302
VBS2
VBS2™ Admin Manual
© 2008 Bohemia Interactive Australia Pty. Ltd., All rights reserved.
Page 34 of 45
9.0.2 Configuration Settings
You may define an optional configuration file to set a range of very specific settings. For a complete
reference visit http://community.bistudio.com/wiki/server.cfg.
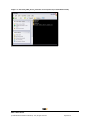
9.0.3 Multi-participant Server Commands
When using a dedicated server at least one participant should log in as network administrator. To
become the network administrator you send the relevant server command via the VBS2 console. To
send a server command press the / key, and then type #login admin and press enter. You will now
control the scenario (almost as if you had started a non-dedicated session).
The following network commands are available (press the forward slash / key and then type the
command:
Administration Commands
#login password
Log in as the admin
#logout
Admin log out
#vote admin (name or ID)
Users can vote an admin to control the server
#mission filename
Select mission with known name
#missions
Select mission
#restart
Restart mission
#reassign
Start over and reassign roles
#kick (name or ID)
Allows you to kick the nickname
#shutdown
Shuts down the server
#init
Reload server config file loaded by –config option
#monitor (interval in sec)
Shows performance information of the server. Interval 0 stops monitoring
#debug (command) (interval)
Commands can be checkfile, console, totalsent, usersent, userinfo, userqueue
#exitAll
Shuts down VBS2 on all computers in the network.
User Commands
#vote missions
Users can vote for the mission selection
#vote mission (name)
Users can vote on a particular mission (named) to play
#vote kick (name/ID)
Users can vote to kick off an individual
#vote restart
Vote to restart the mission
#vote reassign
Vote to reassign
#userlist
Displays a list of users on the server (use PAGE UP to scroll up)
VBS2
VBS2™ Admin Manual
© 2008 Bohemia Interactive Australia Pty. Ltd., All rights reserved.
Page 35 of 45
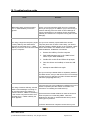
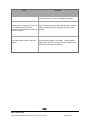
10. Troubleshooting guide
Issue
Solution
VBS2 fails to start, and the message
'Error 7: VBS2 USB key not found.'
Appears
Ensure you have inserted a HASP key in the computer
where you are trying to run VBS2 or (if you are running a
network USB key) ensure a HASP License Manager is
running somewhere on the network (and a red network
USB key is inserted on the computer running the License
Manager).
I am using a single-license (blue, purple
or black) USB key and VBS2 fails to
start with the message 'Error 7: VBS2
USB key not found.' and I have the USB
key in the computer.
A) If you have manually copied VBS2 from another
computer (and have not done a full install), you need to
manually install the HASP drivers on the computer. HASP
drivers are located in the 'HASP Drivers' folder of your
VBS2 installation. Installation is as follows:
1.
Remove the USB key from the computer
2.
Find 'HASPUserSetup.exe' in the 'HASP Drivers'
folder of your VBS2 installation.
3.
Double click on this file and follow the prompts.
4.
Once the drivers are installed, re-insert the USB
key
5.
Attempt to start VBS2 once again.
B) If you have fully installed VBS2 or separately installed
the HASP drivers, and you still receive this error message
it is likely that your USB key has failed. Contact Bohemia
Interactive ([email protected]).
A) Ensure that you have installed the HASP drivers on the
remote computers (See the solution to Problem 2 for
instructions on installing the HASP drivers).
I am using a network USB key, and the
HASP License Manager is running on
the computer where the USB key is
inserted. However, VBS2 is not starting
on the remote computers and the error B) Check that the firewall software on both the host and
client computers is not blocking VBS2. Note that
message 'Error 7: VBS2 USB key not
Windows XP SP2 has an inbuilt firewall that may cause
found.' appears.
these types of problems.
C) Ensure that the host computer can be 'seen' by the
VBS2
VBS2™ Admin Manual
© 2008 Bohemia Interactive Australia Pty. Ltd., All rights reserved.
Page 36 of 45
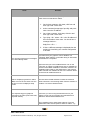
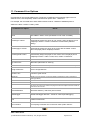
Issue
Solution
client machines. The following technique can be used to
check if the host machine is visible:
1.
On the host computer, click Start, click Run and
then type 'cmd'. Press enter.
2.
At the command prompt type 'ipconfig' and press
enter. Note the IP address.
3.
On a client computer, click Start, click Run and
then type 'cmd'. Press enter.
4.
Type 'ping <IP>' where <IP> is the IP address of
the host machine. Press enter. You should see a
message similar to:
Reply from <IP>: ...
5.
I am receiving DirectX error messages
soon after starting VBS2.
If there a different message is displayed then the
problem is most likely your network configuration
or firewall.
A) Confirm that your graphics card is Shaders 2.0
compliant. Most graphics card made during or after 2005
are Shaders 2.0 compliant.
B) Ensure that you have installed DirectX 9.0c on the
computer. An option to install DirectX 9.0c is available at
the end of the VBS2 installation. Otherwise, DirectX 9.0c
installation files reside on the VBS2 DVD in the 'DirectX'
folder. Double click 'DXSETUP.exe' in the 'DirectX' folder
on the DVD to install DirectX 9.0c.
I start a multiplayer game from within
VBS2, but none of the clients can see
the server on the multiplayer setup
screen!
Check that the firewall software on both the host and
client machines is not blocking VBS2. See the solution to
Problem 3 to resolve firewall issues.
I am experiencing poor graphical
performance in-game (slow frame rate,
graphical 'stutter').
A) Ensure you are running the latest drivers for your
graphics card. Visit your graphic card manufacturer‟s
website to download the latest drivers.
B) Try adjusting the in-game video options. From the
VBS2 main menu select 'Options' and then 'Video'. Try
VBS2
VBS2™ Admin Manual
© 2008 Bohemia Interactive Australia Pty. Ltd., All rights reserved.
Page 37 of 45
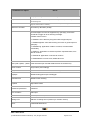
Issue
Solution
lowering the resolution, or selecting 'Advanced' and
selecting 'Normal' or "Low' for all graphical settings.
While playing in multiplayer I receive an This is a known issue that shall be addressed in a future
error message similar to „add-on
release. Simply press OK, and game play will not be
depends on downloadable content that affected.
has been deleted‟.
I can‟t adjust video, audio or difficulty
settings.
You are starting VBS2 in User Mode. To start VBS2 in
Admin Mode, use the command line option -admin (see
the section Command Line Options).
VBS2
VBS2™ Admin Manual
© 2008 Bohemia Interactive Australia Pty. Ltd., All rights reserved.
Page 38 of 45
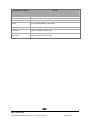
11. Command Line Options
Command lines are typically added in the 'Target' box of VBS2 shortcut properties (right click on a
VBS2 shortcut, click Properties). Added command line options after ...VBS2.exe"
For example, the command line to start VBS2 in admin mode in a window of 800x600 pixels is:
VBS2.exe -admin -window -x=800 -y=600
Command Line Option
Result
admin
start VBS2 in admin mode (will default to user mode if omitted)
autoassign=<name>
Automatically assign the player to unit <name> when the player joins a
multiplayer session. <name> is defined in mission editor (add unit
dialog)
autoassigngrp=<name>
Automatically assign the player to the group with the leader <name>
when the player joins a multiplayer session.
autoassignside=<side>
automatically assign the player to side <side> when the player joins a
multiplayer session. <side> is east, west, civilian or resistance.
avrs
start AVRS mode
cfg=<filename>
alternative placement for vbs2.cfg
cnr
Enables CNR connection in AAR. [Alternative command line for this is -EnableCNR].
config=<filename>
server configuration file
connect=<IP>
connect to given server
disableVON
disable voice over network. (It can bring stability to situations the VON is suspected of
causing problems.)
epeAllowHWScene
allow simulation on the PhysX hardware
forceRender
VBS2 will continue to draw the scene even if the VBS2 window has lost focus.
forceSimul
VBS2 will continue to draw the scene and run the simulation even if the VBS2 window has
lost focus. This can be very useful if GUI plugins are used or multiple instances of VBS are
executed on the same PC.
GenerateShaders
Generate shaders (*.shdc files) into bin folder
hidedebugger
disable debubgger detection - useful for crash report debugging
host
create normal server
init=command
run scripting command once in the main menu (often used as -
VBS2
VBS2™ Admin Manual
© 2008 Bohemia Interactive Australia Pty. Ltd., All rights reserved.
Page 39 of 45
Command Line Option
Result
init=playMission[,'01SteelTheCar.ABEL']
limitfps
specifies the maximum FPS the engine will use. Only network update will be performed in
the remaining time.
lvc
starts LVC Game version of VBS2. (Note: there is no separate VBS2_LVC.exe available
anymore, since version 1.19 5630.).
maxmem=<number>
limit memory allocation (in MB)
MinErrLevel = <number>
Errormessages can now be suppressed by specifying a minimum
Errorlevel to trigger an error/ warning message.
Possilbe values are 0-5.
0 = EMNote: errors that may be ignored with marginal impact
1 = EMMissingData: some data missing error with no great impact on
gameplay
2 = EMWarning: application is able to continue, but with limited
functionality
3 = EMError: application is not able to perform requested task, but is
able to continue
4 = EMCritical: application is not able to continue
5 = EMDisableAll: no error level, disable all errors
mod=<path1;path2;...pathn> mods directories (bin and dta subdirectories are searched in)
name=<name>
player name (user settings)
netlog
Dedicated Server: Command to record traffic from the game server in BI format
nofptraps
disable floating point traps in debugger
nofreezecheck
disable freeze checking
nosplash
skip initial screens
password=<password>
Password
port=<number>
select port
profiles=
alternative placement for per-user content
ranking=<IP>
address of ranking server (used only in Korean version)
server
create dedicated server
VBS2
VBS2™ Admin Manual
© 2008 Bohemia Interactive Australia Pty. Ltd., All rights reserved.
Page 40 of 45
Command Line Option
Result
sm2
use Shader Model 2
sm3
default setting: Use Shader Model 3, (for shader 3 compliant cards).
tws
Start Tactical weapon mode (Hardware integration like shooting on screens or Q3d)
window
run in window (default - Full Screen)
world
Dedicated server: Start another default terrain area
x=<number>
screen resolution / window size
y=<number>
screen resolution / window size
VBS2
VBS2™ Admin Manual
© 2008 Bohemia Interactive Australia Pty. Ltd., All rights reserved.
Page 41 of 45
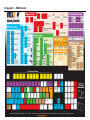
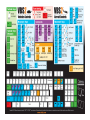
12. Appendix 1 – VBS2 Controls
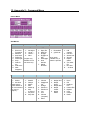
13. Appendix 2 - Command Menu
Parent Menu
Sub Menus
1
2
3
Move
1.
2.
3.
4.
5.
6.
7.
8.
9.
7
Action
1. Salute
2. Sit down
(Other actions
appear based on
your environment.
e.g. pick up
weapon.)
1.
2.
3.
4.
5.
6.
7.
7.
8.
Stealth
Danger
Aware
Safe
Stand up
Stay
crouched
Go prone
Keep low
Mount
9
3.
4.
5.
6.
7.
8.
9.
Column
Staggered
Col.
Wedge
Echelon L.
Echelon R.
Vee
Line
Column
(compact)
Delta
1.
2.
3.
4.
5.
6.
7.
8.
Call
support
Fuel low
Ammo Low
Injured
Report
status
I‟m under
fire
One less
…is down
0
Formation
1.
2.
Status
Open fire
1. Disembark
Hold fire
2. Vehicle at
Engage
...
Engage at
Menu option
Will
Disengage available only if
vehicle is present
Scan
Horizon
Watch
direction
8
Combat Mode
1.
2.
3.
4.
5.
6.
5
Engage
Return to
1. No target
Formation
2. Unt at ...
Advance
3. Unit at ...
Stay back
4. More
Flank left
Flank right (Targets only
available if unit
Stop
can see them)
Wait for
me
Find cover
Next
Waypoint
6
4
Target
Assign
1.
2.
3.
4.
5.
Assign Red
Assign
Green
Assign Blue
Assign
Yellow
Assign
White
Reply
1.
2.
3.
4.
5.
6.
7.
8.
Done
Fail
Ready to
Fire
Cannot Fire
Repeat
Copy
Custom
Radio
14. Appendix 3 - Support
For any type of assistance with VBS2, please use the following support email and we will respond to
your query with urgency.
[email protected]
The BIA VBS2 support forums are located at:
http://www.support.vbs2.com/phpbb2
The VBS2 website contains a range of media and handouts relating to VBS2:
http://www.vbs2.com
The BI Community Wiki is the main repository of knowledge pertaining to the BI Game Engine:
http://community.bistudio.com
PhysX
Integration of the PhysX physics engine into VBS2 VTK has commenced. For more information on
PhysX visit the Nvidia site.
http://www.nvidia.com/object/nvidia_physx.html
VBS2
VBS2™ Admin Manual
© 2008 Bohemia Interactive Australia Pty. Ltd., All rights reserved.
Page 45 of 45