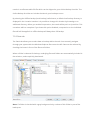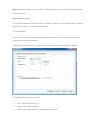
1
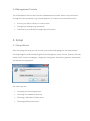
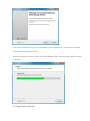
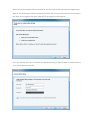
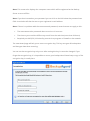
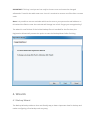
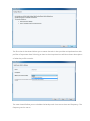
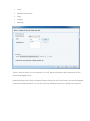
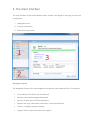
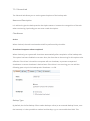
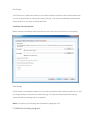
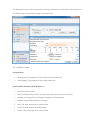
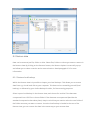
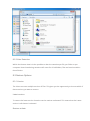
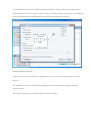
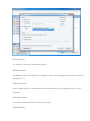
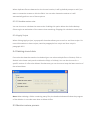
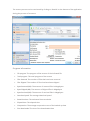
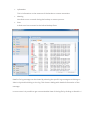
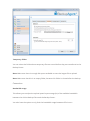
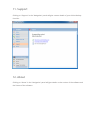
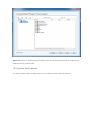
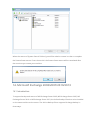
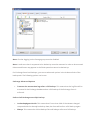
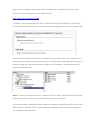
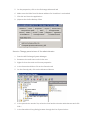
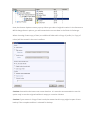
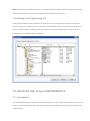
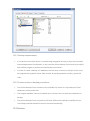
Online Backup Client User Manual Windows 1. Product Information Product: Online Backup Client Version: 4.3.5 1.1 System Requirements Operating System Hardware Resources Required software Windows XP Windows Vista, Windows 7, Windows 8 Windows Server 2003 / 2008 / 2008 R2 / 2012 PC with 1 Gigahertz (GHz) or higher processor clock speed recommended 1 GB memory 25 MB of disk space Internet connection (e.g. ADSL, SDSL) Microsoft .Net framework 4.0 Note: A separate manual is available for the Online Backup Client for Linux and Mac OS X. Note: A separate version, 4.3.1 is available for Windows 2003, which runs on .Net 2.0. There are two types of accounts: Workstation and Server. The difference between features and Operating Systems are: Workstation (Home): A user can backup and restore file data and System State. Server (Professional): A user can backup and restore file data, System State, MS Exchange and MS SQL Server, as well as creating a mapped network drive in the client. Operating System Workstation Server Windows XP, all editions, 32bit + 64 bit X X Windows Vista, all editions, 32bit + 64 bit X X Windows 7, all editions, 32bit + 64 bit X X Windows 8, all editions, 32bit + 64 bit X X Windows Server 2003, all editions, 32bit + 64 bit X Windows Server 2008, all editions, 32bit + 64 bit X Windows Server 2008 R2, all editions, 64 bit X Windows Server 2012, all editions, 64 bit X Client 4.3.4 is officially compatible with Windows 7 and Windows 8. 2. Features 2.1 Application plug-ins The Online Backup Client makes it very easy to backup Microsoft Outlook, Outlook Express, Favorites and Windows System State, containing e.g. Windows Registry, Active Directory, System and Boot Files. 2.2 Scheduled backup You can make one or more scheduled backup tasks. You can schedule the tasks multiple times a day, weekly or monthly. After the tasks are created, they will run through their schedule automatically. After completion of a backup, a report is sent by e-mail. You are always up-todate on the status of your backups. 2.3 Management Console The Online Backup Service also includes a Management Console, which can be accessed through an internet browser (e.g. Internet Explorer or Firefox). It has several functions: Access your data to restore or remove a file Change user settings (e.g. password) Overview of your backups through logs and reports 3. Setup 3.1 Setup Wizard After executing the setup you can choose your preferred language for the Setup Wizard. Currently English (United States), English (United Kingdom), Dutch, French, Spanish, German, Italian, Polish, Danish, Norwegian, Hungarian, Portuguese, Romanian, Japanese, Vietnamese and Russian are supported. The next steps are: Accepting the license agreement Choosing an installation directory Choosing a Start Menu folder name Selecting preferred shortcuts If the .Net framework (4.0) is not yet installed on your computer, you can retrieve this freely from the Microsoft download site. When the completion screen shows, the Online Backup Client is successfully installed on your computer! 3.2 Registration Wizard When the Online Backup Client is started for the first time, it will start with the Registration Wizard. The Registration Wizard guides you to fill in the account information and encryption key. With the encryption key your data will be encrypted and decrypted. First, you need to fill in the username and password that you have created or obtained from your Online Backup Provider. Note: This screen also displays the computer name which will be registered at the Backup Server to store all files. Note: If you don’t remember your password you can click on the link below the password text field. A reminder will then be sent to your registered e-mail address. Note: If there is a problem with the username and password, several causes can apply to this: The username and/or password does not exist or is incorrect The time on your machine differs very much from the real time (more than 24 hours) Required port 443 (SSL) is blocked by an anti-virus program or firewall on the network The next wizard page will ask you to set an encryption key. This key encrypts all backup data and decrypts data when restoring. You can set the encryption key only once. After setting this key it cannot be changed. If you forget the encryption key, it is impossible to access your backup data. Please keep a copy of the encryption key in a safe place. IMPORTANT: This key is unique and can only be chosen once and cannot be changed afterwards. Treat this key with great care, since it is required to restore your files after a system crash. Note: It is possible to store a reminder which can be sent to your personal e-mail address. In this wizard the field to enter the reminder will change into a link: ‘Forgot your encryption key?’ The wizard is now finished. If the Online Backup Client is installed for the first time, the Registration Wizard will present the option to start the ‘Backup Wizard’ after finishing. 4. Wizards 4.1 Backup Wizard The Backup Wizard provides a clear and friendly way to detect important data for backup and makes configuring a first backup task very easy. The first view in the wizard allows you to name the task. It also provides a dropdown box with profiles of important data. Selecting an item in the drop down box will also show a description of what the profile contains. The next view will allow you to schedule the backup task. You can set time and frequency. The frequency can be set as: Once Multiple times a day Daily Weekly Monthly There is also an option to turn retention on or off. More information about retention can be found in paragraph 8.3.4. Now the backup task is fully configured. When clicking on the ‘Finish’ button the task will appear in the Online Backup Client. You can also click the ‘Advanced’ button to specify more options. 4.1.1 Advanced options The advanced options consist of two extra steps in the wizard to configure filters and backup location. Filter The first view allows you to filter the data in the task. You have to add a filter and determine if the filter ignores the files (‘except files’) or allows only the files in the filter and ignores all other files (‘only files’). Local Backup The next view of ‘Advanced’ will allow you to determine if the backup has to be performed online or locally (offline backup). If you choose to backup locally, you need to specify the destination location for the backup (a local folder on the pc or an external medium). When you enable compression, the result will be put in a zip archive. This can take a while to complete. If you leave this option disabled, compression on the individual files will still be applied but they will not be placed in a zip archive. Tip: A removable hard disk can be selected as a local backup location. 4.2 Restore Wizard The Restore Wizard provides a clear and friendly way to restore your data. Click on Restore Wizard in the ‘Home’ view of the Online Backup Client. In the next view you can see the data on the Backup Server. Here you can select the data that needs to be restored. Next, you can specify the location where the restored data must be placed and what to do with duplicate files. Next to that you can choose to calculate the restore size. Enabling this option allows the Online Backup Client to give an estimation of the restore time remaining. Skipping this calculation saves time. In the next view you can choose to filter out specific files or folders during the restore. By clicking ‘Start’ in the last screen, the restoration of your files will begin. 5. The client interface The main interface of the Online Backup Client, shown in the figure on the right, consists of 3 components: 1. Navigation Panel 2. Account Information 3. Main Panel (e.g. Home) Navigation panel The Navigation Panel is the main navigation through the Online Backup Client. The options: Home: Monitor the status and use Wizards Backup: Create and manage backup tasks Restore: Restore your remote backup data Reports and Logs: View status information of executed backups Options: Configure program settings Support: View contact information for support About: Additional information about the Online Backup Client Account Information Shows account details, such as: Account Name Amount of Remote Storage Program Status Usage of your Remote Storage Main Panel The Main Panel is the working space of the Online Backup Client. This panel will change its view, while navigating through the Online Backup Client. 6. Home view Overall status When starting the Online Backup Client, the program will show the Home view. This view can also be accessed through the Navigation Panel. On top of the Home view you can see the overall status of the backup service. Wizards Right beneath the overall status, you can start Wizards to help you with registration, creation of backup tasks and restoration of data. Task statuses At the bottom of the Home view the latest five backups are shown. Next to the task names you can see the status and the date/time they finished. Below the table the next scheduled backup task is shown including the start date and time. 7. Backup 7.1 Manage backup tasks By clicking on ‘Backup’ in the Navigation Panel, you can manage your backup tasks. By selecting a task in the task list, you can examine its specifications. You can manually run, edit or delete the task. It is also possible to create new tasks. 7.2 Creating a backup task To create a backup task, click on ‘New task’ below the task list in the Backup view. ‘Task Properties’ will pop up; it allows you to configure the task. If you cancel Task Properties, the task will not be saved. Read more about how to configure a task with Task Properties in paragraph 8.3. 7.3 Task Properties Task Properties appears when creating a new task, or editing an existing task. It allows you to configure the settings of the task. Task Properties contains 5 tabs: General: Task Name, Description and Backup Type Data: Select data resources for backup Schedule: Time and Frequency, Retention Filter: Exclude files and folders from backup Advanced: Volume Shadow Copy, Pre- and Post-Scripts 7.3.1 General tab The ‘General’ tab allows you to set the general options of the backup task. Name and Description It is advised to give the backup task a descriptive name to increase the recognition of the task when monitoring. Optionally you can enter a task description. Checkboxes Active When checked, the task is activated and will be performed by schedule. Shutdown Computer when completed When checked, your system will shut down automatically after completion of the backup task. This option has been disabled on servers. Also, the client has to be running for this option to be effective. If the client is closed the computer will not shutdown, to prevent unexpected shutdowns. In case a shutdown is desired even if the client is not running, you can add the following post script in the backup task: Shutdown -s -t 600 Backup Type By default, the Online Backup Client makes backups online (to an external Backup Server, over the Internet). It is also possible to make a local backup, e.g. to a removable hard disk. This results in a self-extractable ZIP file which can be shipped to your Online Backup Provider. The Online Backup Provider can include the data in your backup account. By selecting the ‘Offline backup (local backup)’ radio button, a default local backup directory is displayed in the ‘Location’ textbox. It is possible to change this location by browsing to an additional directory. When you enable Compression, the result will be put in a zip archive. This can take a while to complete. If you leave this option disabled, compression on the individual files will still be applied. An offline backup will always be a full backup. 7.3.2 Data tab The ‘Data’ tab allows you to select data to backup within the task. You can easily navigate through your system with the Windows Explorer-like tree at the left. Data can be selected by checking the boxes in front of the files and folders. When a folder is selected for backup, underlying files and folders are automatically included in the selection, unless explicitly deselected. Note: If a folder is checked with a grey background only a subset of this folder is part of the backup set. Note: A light grey square in front of a file or folder means that it is not possible adopt that item in the backup set Map network drives You can map additional network drives, by clicking on ‘Map Drive’. A drive letter will be added to the data tree, which can be selected for backup. 7.3.3 Schedule You can set a schedule for the backup task in the ‘Schedule’ tab. A task can be scheduled by setting a start time and frequency. By default, the schedule is set to a daily backup at the time the task originally is created. The following frequencies can be set: Once: Task is performed once Daily: Task is performed daily Weekly: Task is performed one or multiple days a week Monthly: Task is performed once a month 7.3.4 Set Retention Retention allows you to set the number of days your backup data will be kept before it is removed. Data will be removed after set number of days in the following situations: If an existing full backup is replaced by a new full backup Example: A full backup takes place when data is backed up for the first time, or when the difference in data is more than 66%. If a new full backup is made, the old full backup will be automatically removed after the set number of days. If the data is no longer located at the original location Example: If you made a backup of certain folder and you remove, rename or replace that folder on your computer, the backup of the folder will be deleted after set number of days. You can also choose to not remove the selected backup data, in which case all backups of the data will be kept. Note: When the task is set as an offline backup type (local backup), the option to set retention will be grayed out. Note: The retention value is changed for all files in the task, no matter whether they still exist on the user’s computer or not. 7.3.5 Filter The ‘Filter’ tab offers the possibility to exclude files and folders from the backup set. You can also choose to include hidden files by checking the checkbox. Filter options: No file filtering Filter out files on file name/extension (‘Except specific files and folders’) - (default) Filter out all files except with certain file name/extension (‘Exclude all but specific files’) Filter out folders by path pattern (e.g. Temp, Cookies, etc). Note: To specify a filter, regular search expressions can be inserted: Filter document (.doc) files: *.doc Filter files starting with hello: hello* Filter a specific file: ntuser.dat 7.3.6 Advanced tab Enable Volume Shadow Copy When checked, the task will backup files that are in use (open files). Pre-Script A Pre-Script is an advanced option to run certain operations before starting the backup task. You can simply browse a command or batch file (e.g. C:\scripts\command.bat) which will be executed prior to the start of the backup task. Continue if Pre-Script fails When checked, the backup will be performed, even if the pre-script did not run properly. Post-Script A Post-Script is an advanced option to run certain operations after a backup task has run. You can simply browse a command or batch file (e.g. C:\scripts\command.bat) which will be executed after the backup task is completed. Note: The options for Exchange are explained in paragraph 15.2 7.4 Monitor backup progress The backup process can be monitored by clicking on ‘Details’ on the bottom of the application. The ‘Details’ bar is only shown during a backup process. 7.4.1 Details screen Progress bars File progress: The progress of the backup of the indicated file Total progress: The progress of the total backup task Details table (shown on click ‘Details>>‘) Full: Full backed up files Patch: Patched backed up files (incremental backup patch over last backup) NoNeed: Unchanged files (unchanged compared to last backup) Skipped: Skipped files (details in the logs) Done: The total amount of processed data Total: The total amount of selected data %Done: The percentage of processed data Other information Avg.upl.speed: The average upload speed Remaining time: The estimated remaining time Elapsed time: The elapsed time Compression: The average compression rate of the backed up data Size uploaded: The size of the uploaded data Total size: The total size of the selected data 8. Restore 8.1 View stored data Your remotely stored data can be accessed by clicking ‘Restore’ in the Navigation Panel. The ‘Restore’ view allows you to restore this remote data to your computer. The Windows Explorer-like view shows one or more computers, because the data is related to the source computer. When you open a computer node, you will notice that all data kept the same structure as it was on your computer. 8.2 Restore data Data can be restored per file, folder or drive. Select files, folders or drives you want to restore in the Restore view. By clicking on the ‘Restore’ button, the ‘Restore Options’ screen will pop up and allows you to select a version and a restore location. Read paragraph 9.3 for more information. 8.2.1 Restore local backup Within the Restore view it is possible to import your local backups. This allows you to restore data from e.g. a local hard disk to your computer. This data can be created by yourself (local backup), or delivered by your Online Backup Provider, for fast restoring purposes. Select ‘Import local backup’ in the Restore view, and choose for ‘archive’ if the data was compressed into a ZIP file or choose ‘folder’ if the data was uncompressed (besides the standard compression that takes place). Keep in mind that you need to select the root folder of the folder structure you want to restore. Once the local backup is loaded in the tree of the Restore view, you can restore the data in the same way as your remote data. 8.2.2 Alter Retention Within the Restore view it is also possible to alter the retention per file, per folder or per computer. Note that altering retention will count for all subfolders, files and versions within those folders. 8.3 Restore Options 8.3.1 Version The client can store multiple versions of files. This gives you the opportunity to choose which of these versions you want to restore. Latest version To restore the latest version, keep the version setting unchanged. This means that the ‘Latest version’ radio button is selected. Restore at date It is possible to restore a file or folder at a selected date in history. Select the ‘Older versions’ radio button. Now you can select a date in history. The latest backed up versions of the selected files or folder before that date will be restored (if that backup version exists). Restore specific version A specific version of a stored file can be selected. To do so, select the ‘Specific version’ radio button. The available versions of the file will be displayed in the dropdown box. Simply select the favored version. This option only works for individual files and not for folders. 8.3.2 Location The location is where the files will be restored. Default location The Default location is predefined. The default location can be changed in the Options view (see paragraph 11.7). Original location When ‘Original location’ is selected, the files will be restored to their original location on your computer. Selected location If you want to browse a location, choose this option. Duplicate Files When duplicate files are detected on the chosen location, it will by default prompt to ask if you want to overwrite, rename or skip the file(s). You can also change the setting so it will automatically perform one of these options. 8.3.3 Calculate restore size You can choose to calculate the restore size. Enabling this option allows the Online Backup Client to give an estimation of the restore time remaining. Skipping this calculation saves time. 8.3.4 Apply Scripts When clicking ‘Apply scripts’, a popup will show that allows you to use Pre- and Post-scripts. For more information on these scripts, read the paragraphs ‘Pre-script’ and ‘Post-script’ in paragraph 8.3.5. 8.4 Deleting stored data First select the data that needs to be deleted (you can select multiple files or folders). Click on ‘Delete’ in the lower main panel to delete the file(s) or folder(s). You can also choose for a specific version of a file to be deleted. Furthermore you can choose to keep the latest version of the selected data. Note: When deleting a folder containing many files, the details windows will show the progress of the deletion. It can take some time to delete all files. 8.5 Monitor restore process The restore process can be monitored by clicking on ‘Details’ on the bottom of the application during the process of a restore. Progress information File progress: The progress of the restore of the indicated file Total progress: The total progress of the restore Files Restored: The number of files that have been restored Files Skipped: The number of files that have been skipped Bytes Restored (MB): The amount of restored files in Megabytes Bytes Skipped (MB): The amount of skipped files in Megabytes Bytes Received (MB): The amount of received files in Megabytes Download speed: The average download speed Remaining time: The estimated time remaining Elapsed time: The elapsed time Compression: The average compression rate of the backed up data Size downloaded: The size of the downloaded data Total size of restore: The total size of the selected data 9. Reports and Logs 9.1 Reports The “Reports”-view shows a history of reports. You can view the status of past backups and restores. Details of a report can be viewed by selecting the report and clicking on ‘View’ or by doubleclicking the report. This report will also be sent to you by e-mail after a task is completed. 9.2 Logs The ‘Logs’ view shows a history of log files. Three types of events can occur: Information This is information on the progress of the backup or restore procedure Warning Non fatal errors occurred during the backup or restore process. Error A fatal error has occurred in the Online Backup Client. Details of a log message can be viewed by selecting the specific log message and clicking on ‘View’ or by double-clicking on the log. This shows a dialog with detailed information of the message. In some cases it is possible to get a more detailed view of the log file by clicking on ‘Details >>’. 9.3 Cleaning Reports and Logs In a few steps it is possible to clean the reports or logs list. In the list of reports or logs, you can make a selection (using ctrl and shift). To clear the list, click on ‘Delete Selection’. You can also choose to send a notification report of this log to the provider. An e-mail will be send to the provider containing this log file. 10. Options You can change program and process settings in the Options view, which can be accessed through the ‘Options’ button in the Navigation Panel. The Options view contains the following tabs: General Backup and Restore Advanced Exchange Server SQL Server 10.1 General tab In the General tab, you can set general options of the Online Backup Client. Self-explaining checkboxes can be used to configure the program settings. Next to that you can set the language of the Online Backup Client. You can also change your password of your backup account. Note: It might not be possible to change your password in the Online Backup client, since your Online Backup Provider can disable this option. 10.2 Backup and Restore tab In the Backup and Restore tab, you can set options that are specific for backing up and restoring with the Online Backup Client. Backup Start backup of missed task When this setting is enabled, the missed tasks will automatically start the next time the service of the Online Backup Client is started. Request confirmation when starting a missed task When this option is enabled you get a pop up box where you can choose to start the missed backup task(s). Compression Settings You can add file extensions that should never be compressed during backup. You can add multiple extensions separated with commas. Minimum file size (bytes): Smaller files will not be compressed Maximum file size (bytes): Larger files will not be compressed. (0 = no maximum file size) Data Retention The default setting is set to ‘Automatically remove backup data’ with a value of 30 days. You can change the value of days or you can set data retention to ‘Never remove backup data’. The default setting will apply for every new task which is created henceforward. Restoring The textbox contains the default restore location. This is the folder where data is restored by default when you don’t choose a specified folder. 10.3 Advanced tab Advanced Backup- and restore-privileges This overrules access rights for administrators for backup purposes. Add Backup/Restore reports to windows logs Used to track errors in the backup or restore processes. Enable the diagnostics Diagnostics is a logging system for error tracking. Temporary folder You can select the folder where temporary files are stored before they are transferred to the Backup Server. Note: Make sure there is enough disk space available to store the largest file to upload. Note: Make sure that this is an empty folder, because this folder is cleared after the backup. Connection Bandwidth usage This allows you to adjust the upload speed in percentage (%) of the available bandwidth between the Online Backup Client and the Backup Server. You also have the option to only limit the bandwidth usage between office hours. 11. Support Clicking on “Support” in the "Navigation" panel will give contact details of your Online Backup Provider. 12. About Clicking on “About” in the "Navigation" panel will give details on the version of the software and the license of the software. 13. Windows System State 13.1 System State backup When creating or editing a backup task, you have the option to select and include System State as part of your backup data. Below the ‘Data’ tab, you will see a box for System State you can enable. After enabling System State, you will see an overview of the sections of System State that will be included in the backup. Note: Make sure to disable Volume Shadow Copy at the ‘Advanced’ tab when creating the backup task for System State. 13.2 System State restore To restore System State, simply select it in the restore screen and click ‘Restore’. When the restore of System State is finished, you will be asked to restart in order to complete the System State restore. If you choose ‘No’, the System State restore will be completed after the next time you restart your machine. 14. Microsoft Exchange 2003/2007/2010/2013 14.1 Introduction To support backup and restore of MS Exchange Server 2003, MS Exchange Server 2007, MS Exchange Server 2010 or MS Exchange Server 2013, the Online Backup Client has to be installed on the same machine as the server. The Online Backup Client supports Exchange backup in three ways: Through an ESE plug-in for Exchange 2003 mail store backup. Through an VSS plug-in for Exchange 2007 (and newer versions) mail store backup Through the folder level backup option (enables backup of separate mailboxes). Note: ESE is the API of Exchange allowing backup applications to make a consistent and reliable backup. Note: Folder Level backup is not available for Exchange 2010/2013. 14.2 Backup on mail store level (ESE & VSS plug-in) To enable backup of mail stores, this option must be activated first. This can be done by checking ‘Activate Exchange backup’ in the ‘Exchange Server’ tab in the ‘Options’ view. Now the plug-in is activated, complete Servers, Storage Groups and single Stores can be selected for backup, in the Data tab in Task Properties. Apart from the requirements listed below, performing a backup of an Exchange item is not different from doing backups of regular files and does not involve any further user actions. Note: ‘Circular logging’ on the Storage group must be disabled. Note: A mail store that is requested to be backed up must be mounted in order to be accessed. Dismounted Stores may appear in the folder-pane but cannot be backed up. For Exchange Store level backups, you can set advanced options in the ‘Advanced’ tab of the backup task. The following options can be set: Exchange Advanced Options Truncate the transaction logs after a full backup: This means that the log files will be truncated in the Exchange database when a full backup of the Exchange Store is enforced. Enforce Full Exchange store/SQL Backup Let BackupAgent decide: This means that if more than 66% of the dataset changed compared with the already backed up data, the client will enforce a full back up again. Always: This means the Online Backup Client will always enforces a full backup. Never: This means that there will never be a full back up again, other than the first backup. 14.2.1 Backup requirements MS Exchange Server must be installed and running on the local machine in order to perform backups. The user that performs a backup must be assigned backup and restore privileges. Circular logging must be disabled. Note: The Online Backup Client performs full or incremental backups. However, since incremental backups require a continuous series of log files, it is not possible to use third party software when the Online Backup Client is used to schedule backups of Exchange. This also holds vice versa. Third party software can cause data loss, since some programs remove logs. 14.3 Restore on mail store level Backups of mail stores are listed in the ‘MS Exchange Server’ folder in the ‘Restore’ view. This folder holds sub folders for every Exchange Server that has been backed up. The restore can be performed in the same way as a normal data restore. Read chapter ‘Restore’ for more details on restoring from the Restore view. The complete restore procedure has been defined in a separate Whitepaper because this is a delegate task. You can download it from our support site: https://kb.acronis.com/node/55322 14.4 Backup on folder level The ‘folder level backup’ option is meant to backup separate mailboxes and its subfolders. This option offers an alternative to a full backup of MS Exchange 2003 and enables you to perform small restores of parts of the mail stores. Note: Due to significant architectural difference between Exchange 2003 and Exchange 2007, there’s no direct support for the Exchange 2007 folder level backup implemented in the Client in this release. However it is now possible to perform the Exchange 2007 folder level backup from a remote computer, if Exchange 2007 is installed onto a Windows 2003 Server 64 bit system. For more information, please follow this link: https://kb.acronis.com/content/53888 To enable a folder level backup, the option ‘Activate Exchange server backup on folder level’ must be checked. This checkbox can be found on the ‘Exchange Server’ tab in the Options view. When folder level backup is activated a new ‘MS Exchange (folder level)’ node is added to the selection tree of the Data tab in Task Properties. This node can be expanded and allows you to browse through and select all mail stores, mailboxes and subfolders. Selected items will be added to the backup task. Note: For ease of use and overview it is recommended to create a separate task for Exchange folder level backup. Do not mix this data with files to prevent confusion. You are now ready to backup Exchange mailboxes. A backup of mailboxes works similar to the backup of files and folders. Next to that, Additional metadata concerning mailbox properties and settings are also uploaded. Note: Please make sure that the temp-folder of the Online Backup Client is set to a path with enough available temporary disk space, since folder level backup can require a comprehensive amount. 14.4.1 Backup Requirements Additional requirements MS Exchange 2003 Service pack 2 must be installed Windows 2003 must be installed Hot fix KB908072 for Exchange 2003 must be installed: https://kb.acronis.com/content/53954 Security settings The ‘SystemMailbox’-user must not be hidden from the Exchange address list The local and/or domain administrator must have ‘receive as’ and ‘send as’ permission to the mail store(s). How-to: Un-hide SystemMailbox-user 1. Start the Active Directory management application 2. On the parent node for all users, right-click and choose ‘Find users…’ 3. In the ‘Find Users’-dialog, type ‘SystemMailbox’ in the ‘Name’ field and click ‘Find…’: 4. Select the user and open its properties 5. On the properties, click on the ‘Exchange Advanced’ tab 6. Make sure the ‘Hide from Exchange address list’ checkbox is unchecked 7. Click OK and close the application 8. (Re)start the Online Backup Client How-to: Change permissions of the administrator 1. Start the MS Exchange System Manager 2. Browse to the mail store node in the tree 3. Right-click on the node and choose properties 4. In the Properties dialog, click on the Security-tab 5. On the Security-tab, click on the Advanced-button 6. In the ‘permission entries’ list, select the local and/or domain administrator and click ‘Edit…’ 7. In the Permission Entry dialog browse through the list of permissions 8. Check the ‘receive as’ checkbox permission in the ‘allow’ column 9. Check the ‘send as ‘ checkbox permission in the ‘allow’ column 10. Click Ok and close the application 11. (Re)start the Online Backup Client Note: If the Exchange Server is a Domain Controller, then the Domain Administrators must also have permission for ‘Send As’ and ‘Receive As’. 14.5 Restore on folder level Once mailboxes are backed up on the Backup Server, restoring is possible on any Exchange server. You can browse for mailbox items in the ‘Restore’ view. To restore, simply select one or more items and then click on ‘Restore’. Now, the Restore Options screen pops up. When you select ‘Original Location’ in the ‘Restore to MS Exchange Server’ options, you will overwrite the current data in the folder in Exchange. When choosing ‘Create copy of item’, an additional folder with a ‘Copy of’-prefix (i.e. ‘Copy of Inbox’) will be created in the user’s mailbox. Caution: Overwriting the items may cause data loss. It is strongly recommended to use this option only in case the original mailbox is empty or contains old data. Caution: If you restore in ‘Copy of item’ mode, be aware that this copy might be part of next backup if the complete mailbox is selected for backup. Note: For ease of use and overview it is recommended to create a separate task for Exchange folder level backup. Do not mix this data with files to prevent confusion. 14.6 Backup of Exchange using VSS Finally Online Backup Client supports VSS and this can force Exchange to write a consistent backup copy of the .edb-file and the stm file to the shadow volume. Therefore selecting these files is a reliable way of making a daily full backup, which will be patched as a file by Online Backup Client to upload only the changes. 15. Microsoft SQL Server 2005/2008/2012 15.1 Introduction The Online Backup Client supports backup and restore of SQL Server 2005, 2008 and 2012. This option can be activated by selecting 'Activate SQL Server Backup' in the ‘SQL-Server’ tab in the Options view. If there is more than one instance of SQL Server installed onto the computer running the Online Backup Client, you can choose to back up the data from all of them. It is required to enter the user credentials per instance. 15.2 Backup When a connection to the SQL Server is established, the ‘MS SQL Server’ icon will be visible in the Folder pane of the ‘Data’ tab in the Task Properties. The databases are child-nodes. Select databases to add them to the backup task, so they will be backed without any further user intervention. 15.2.1 Backup requirements A connection to the SQL Server is created using Integrated Security or by a user provided username/password combination. In any case the Online Backup Client must be provided with sufficient rights to perform the SQL backup procedures. In order to create a backup of a database, the user that connects to the SQL Server must be assigned the sysadmin Server Role and the db_backupoperator and dbo_owner DB roles. 15.2.2 Further notes on backup procedures The Online Backup Client connects to the local MS SQL Server so only backups of local databases can be performed. The tempdb database cannot be backed up or restored. Do not select this database for backup. The Online Backup Client can perform 'full' and 'differential' backups on MSSQL Server. The backup method that will be used is chosen automatically. 15.3 Restore Databases that are available for restore can be found in the ‘MS SQL Server’ folder in the ‘Restore’ view. This folder contains the ‘SQL Server’ folder, which contains the backed up databases. These databases can be selected for restore. When the restore procedure is started you are asked for a destination folder of the database files. Please note that this location will be the location where MS SQL Server will mount the restored database. The default location that is used by MS SQL Server to store database files is C:\Program Files\Microsoft SQL Server\MSSQL\Data. The Online Backup Client will try and download the database that is to be restored and insert it into the local instance of MS SQL Server. If a database with the same name already exists on the computer, it will be overwritten. You can choose to create a copy or to overwrite the original database. Caution: NEVER overwrite a database that is in production 15.3.1 Restore requirements The Online Backup Client must be provided with correct permissions to perform the restore operation. According to Microsoft the user that connects to the Server must have the sysadmin and dbcreator Server roles and db_owner DB role assigned to it. More information: http://msdn.microsoft.com/en-us/library/ms187048.aspx A restore of the master database can only be performed when the Server is in single user mode. SQL Server can be started in single user mode from the command line using the -m command line option: "\Program Files\Microsoft SQL Server\MSSQL\Binn\sqlservr" -m. Note: The Online Backup Client connects to the local MS SQL Server so only restores into the local computer can be performed. 16. Hyper-V 16.1 Introduction Hyper-V is a native hypervisor that enables platform virtualization on x86-64 systems. Through a plugin in the client it is possible to backup and recover virtual machines. This plugin is enabled by default. To be able to backup and restore a Hyper-V virtual machines, make sure the client is installed on a machine that runs the Hyper-V environment. 16.2 Hyper-V Backup To make a backup of a Hyper-V environment it is simply a matter of choosing the virtual machine(s) you want to backup through the Data view. 16.3 Hyper-V Restore To restore the Hyper-V environment you choose the Hyper-V virtual machine or hard disk you want to restore in the restore screen. Select the latest or a specific version in order to restore it to the original location. During restore the current Hyper-V virtual machine will be unavailable until the restore has finished mounting the image.