1
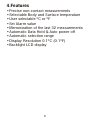
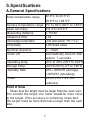
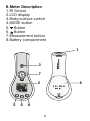
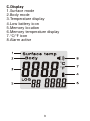
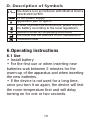
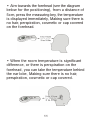
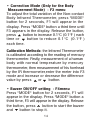
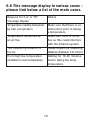
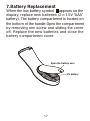
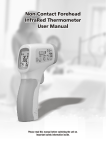
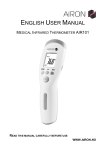
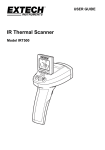
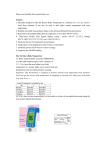
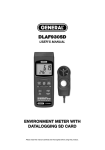
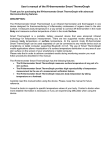
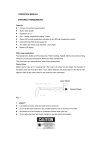
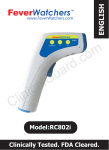
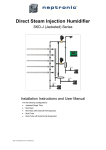
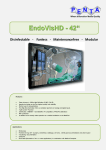
Non-Contact IR Thermometer
User Manual
Please read this manual before switching the unit on.
Important safety information inside.
Contents
1.General Description..............................3
2.Safety information................................3
3.Importance..........................................5
4.Features...............................................6
5.Specifications.......................................7
A.General Specifications.....................7
B.Meter Description............................8
C.Display...........................................8
D.Description of Symbols...................10
6.Operating instructions..........................10
7.Battery Replacement............................17
8.Longevity Use......................................18
9.Advice.................................................18
10.Maintenance and Cleaning..................18
11.This appliance conforms
to the following standards.......................19
2
1.Considerations and Warnings
Congratulations on your purchase of the IR
Infrared Thermometer. This thermometer is
specially designed to take the body temperature,
but can also used to measure the surface
temperature like food, baby-bottle, room
temperature, etc.
2.Safety information
• This device must only be used for the
purposes described in this instruction
manual
• This device must only be used in an ambient
temperature range between +10ºCto +40ºC
• Do not expose this thermometer to electric
shocks
• Do not expose this thermometer to extreme
temperature conditions of>50ºC or <-20ºC
• Do not use the device in relative humidity
higher than 85%
• Do not use the device near large
electromagnetic fields such as found with
cordless or cell phones.
• Keep the device away from water and heat,
including direct sunlight.
3
• Do not drop or knock the device, and do not
use if damaged
• It may affect the accuracy of measurements
when the forehead is covered by hair,
perspiration, cap or scarf.
• Keep the measuring distance as 5cm—15cm
(2in-5.9in)
• When the body infrared thermometer should
be left in that room during 15 to 30 minutes
before using,
• It may affect the accuracy of measurements
when the forehead is covered by perspiration
or other factors, please take the temperature
behind the ear lobe
• Do not immerse this meter in the water, it is
non-waterproof.
4
3.Importance
• Set "Body" mode for body temperature
measurement and "Surface" mode for
surface temperature measurement.
• Please use the right type of battery and pay
attention to the battery polarity, to protect
the meter from being damaged.
• Before taking of the temperature make sure
to remove hair and perspiration from the
forehead.
• Use of this thermometer is not intended as
a substitute for consultation with your
physician.
• Should a problem occur with your device,
please contact your retailer.
• Do not attempt to repair the device yourself.
• According the EMC standard, the medical
electronic products should be maintained
specially.
5
4.Features
•Precise non-contact measurements
•Selectable Body and Surface temperature
•User selectable ºC or ºF
•Set Alarm value
•Memorization of the last 32 measurements
•Automatic Data Hold & Auto power off
•Automatic selection range
•Display Resolution 0.1ºC (0.1ºF)
•Backlight LCD display
6
5.Specifications
A.General Specifications
32.0°C to 42.5°C/
89.6°F to 108.5°F
Surface temperature range 0°C to 60°C(32°F to 140°F)
Basic accuracy
±0.3°C/±0.6°F
Measuring distance
5-15CM
Response time
0.5s
Overrange indication
LCD will show “HI”/”Lo”
Emissivity
0.95 fixed value
Spectral response
8~14um
Power off
Automatically shut off after
approx. 7 seconds
Operating temp.
10°C to 40°C (50°F to 104°F)
Storage temp.
-20°Cto 60°C(-4°F to 140°F)
Humidity Rate
10%~90%RH (storage),
<80%RH (operating)
Power
DC 3V ( 2×1.5V “AA”
batteries)
Body temperature range
Field of View
Make that the target must be larger than the spot size.
The smaller the target, the meter should be more close
to the target. If the accuracy is extremely important,
the target must be more than twice larger than the spot
size.
7
B.Meter Description
1.IR Sensor
2.LCD display
3.Body/surface switch
4.MODE button
5. Button
6. Button
7.Measurement button
8.Battery compartment
1
3
7
8
2
5
4
6
8
C.Display
1.Surface mode
2.Body mode
3.Temperature display
4.Low battery icon
5.Memory location
6.Memory temperature display
7.°C/°F icon
8.Alarm active
9
D. Description of Symbols
The device is in accordance with Medical Device
Directive93/42/EEC
3V DC power supply
Application part of type B
In order to protect the environment, please recycle
the battery according to the local regulations
Attention,consult accompanying documents
The name and the address of the manufacturer
Production date
6.Operating instructions
6.1 Use
• Install battery
• For the first use or when inserting new
batteries wait between 2 minutes for the
warm-up of the apparatus and when inserting
the new batteries.
• If the device is not used for a long time,
once you turn it on again, the device will test
the room temperature first and will delay
turning on for one or two seconds.
10
• Aim towards the forehead (see the diagram
below for the positioning), from a distance of
5cm, press the measuring key, the temperature
is displayed immediately, Making sure there is
no hair, perspiration, cosmetic or cap covered
on the forehead.
• When the room temperature is significant
difference, or there is perspiration on the
forehead, you can take the temperature behind
the ear lobe, Making sure there is no hair,
perspiration, cosmetic or cap covered.
11
6.2 Data memory
The meter can record the measured readings
automatically and appears in the lower right
display. To review the logged data points, press
both the and buttons for 2 seconds while
the unit is OFF. Use the or buttons to scroll
through the memory locations. To clear logged
data, select the “0” memory location and press
the MODE button. The unit will beep twice to
indicate memory has been cleared.
6.3 Body or surface temperature mode setting
Surface temperature mode settings
• Temperature Unit setting - F1 menu
Press "MODE" button for 2 seconds, F1 will
appear in the display. Release the button, Press
button for degree Celsius,
button for
degree Fahrenheit.
• Alarm setting - F2 menu
Press "MODE" button for 2 seconds, F1 will
appear in the display. Press "MODE" button a
second time, F2 will appear in the display.
Release the button, press or button to set
alarm value.
12
• Buzzer ON/OFF setting - F3 menu
Press "MODE" button for 2 seconds, F1 will
appear in the display. Press "MODE" button a
third time, F3 will appear in the display.
Release the button, press button to start the
buzzer and button to stop it.
• Exiting the Setting Mode
Keep pressing "Mode" button until the display
is off.
Body Temperature Mode settings
• Temperature Unit setting - F1 menu
Press "MODE" button for 2 seconds, F1 will
appear in the display. Release the button, Press
button for degree Celsius, button for
degree Fahrenheit.
• Alarm setting - F2 menu
Press "MODE" button for 2 seconds, F1 will
appear in the display. Press "MODE" button a
second time, F2 will appear in the display.
Release the button, press or button to set
alarm value.
13
• Correction Mode (Only for the Body
Measurement Mode) - F3 menu
To adjust the total variation of the Non-contact
Body Infrared Thermometer, press "MODE"
button for 2 seconds, F1 will appear in the
display. Press "MODE" button a third time until
F3 appears in the display. Release the button,
press button to increase 0.1°C (0.1°F ) each
time or
button to reduce 0.1°C (0.1°F )
each time.
Calibration Methods: the Infrared Thermometer
is calibrated according to the reading of mercury
thermometer. Firstly, measurement of a human
body with normal temperature by mercury
thermometer, then measurement of his forehead
by the IR thermometer,enter the meter into F3
mode and increase or decrease the difference
value by press or button.
• Buzzer ON/OFF setting - F4menu
Press "MODE" button for 2 seconds, F1 will
appear in the display. Press "MODE" button a
third time, F3 will appear in the display. Release
the button, press button to start the buzzer
and button to stop it.
14
• Exiting the Setting Mode
Keep pressing "Mode" button until the display
is off
6.4 Release the Trigger and the reading will hold
for approximately 7 seconds after which the
meter will automatically shut off.
6.5 In the Body Temperature Mode, if the
temperature goes above 42.5°C or 108.5°F ,
Hi will appear in the display; while goes below
32°C or 89.6°F , Lo will appear in the display.
In the Surface Temperature Mode, if the
temperature goes above 60°C or 140°F, Hi will
appear in the display; while goes below 0°C or
32°F, Lo will appear in the display.
15
6.6 This message display in various cases –
please find below a list of the main cases.
Reasons for "Lo" or "Hi"
message display
Temperature reading hampered
by hair, perspiration
Temperature hampered by
an air flux
The measuring distance is
too far
From high/low temperature
condition to room temperature
Advice
Make sure that there is no
obstruction prior to taking
a temperature.
Make sure there is no air
flux as this could interfere
with the infrared system
Please respect the measuring
distance (between 5 to 15cm)
Waiting for 10-20 minutes
before taking the body
temperature.
16
7.Battery Replacement
When the low battery symbol appears on the
display, replace new batteries (2×1.5V “AAA”
battery). The battery compartment is located on
the bottom of the handle.Open the compartment
by removing one screw and sliding the cover
off. Replace the new batteries and close the
battery compartment cover.
Open the battery over
3V battery
17
8.Longevity Use
The Non-contact Body Infrared Thermometer
was conceived for an intense and professional
use, its longevity is guaranteed for 40000
takings.
9.Advice
The protective glass over the lens is the most
important and fragile part of the thermometer,
please take great care of it.
Don’t expose the thermometer to sunlight or
water.
10.Maintenance and Cleaning
The infrared sensor is the most precise part,
must be protected carefully.
Clean the device with a cotton bud lightly
moistened with 70% isopropyl alcohol.
Don’t clean the device with corrosive detergent.
Keep the device away from water or other liquid.
Store the device in a dry environment, and
keep it away from dust and direct sunlight.
18
11.This appliance conforms to the
following standards:
• ASTM E1965-1998
• EN 980: Graphical symbol for use in the
labeling of medical devices
• EN 1041: Information supplied by the
manufacturer with medical devices.
• EN 60601-1: Medical electrical equipment
part 1: General requirements for safety(IEC:
60601-1: 1998)
• EN 60601-1-1-2: Medical electrical
equipment part 1-2: General requirements for
safety collateral standard electromagnetic
compatibility requirements and test(IEC
60601-1-2: 2001)
19
Rev.110923
6
PS