1
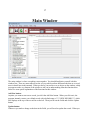
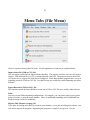
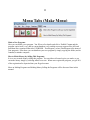
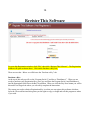
1
New Super Rolodex User Manual
This user manual was originally created for the new Super Rolodex program. This program is so
customizable that the program or website link that brought you to this manual may have been re-named
to something else, meaning that the program may not actually be called Super Rolodex anymore. In
that case, either the original creator of the software, (or a distributor of the software) has re-named the
software and is distributing it or selling it under a different brand name, and that is perfectly acceptable
because that is exactly why this program was created - to be re-designed for different uses and re-sold,
even under different names.
Table of Contents
Main Window
Main Screen
…................................
Page 2
…................................
…................................
…................................
…................................
…................................
…................................
Page 6
Page 8
Page 9
Page 10
Page 11
Page 12
…................................
…................................
…................................
…................................
…................................
…................................
…................................
…................................
Page 14
Page 16
Page 17
Page 19
Page 21
Page 22
Page 23
Page 29
Menu Tabs
File Menu
Run Menu
Design Menu
Database Menu
Make Menu
Help Menu
Windows
Register This Software
Color Preferences
Design
Database Manager
Database Creator
Database Favorites
Make a New Program
How to Make Money
2
Main Window
The main window is where everything comes together. You should familiarize yourself with this
window first. There are menu tabs across the very top which perform different tasks that are covered
more in detail later in this manual. When you hover your mouse over an object on the window, a help
text appears at the very bottom of the window to aid you in understanding what that function does.
Below are some quick explanations of the functions on this window.
Add New button:
Anytime you want to start a new record, just click the Add New button. When you click on it, the
program instantly creates a new blank record with a default name of *** NEW RECORD *** which
also displays at the top of the record list on the left. Then just fill out the fields and click the Update
button.
Update button:
Whenever you make a change to the data in the fields, you will need to update the record. When you
3
click the update button, the record is updated in the database.
Refresh button:
The Refresh button will display all the records in the database and they will always be sorted
alphabetically by the first field (Company Name). You will notice that the record list always displays a
list of records by Company Name.
NOTE: This program is very customizable, so the first field label (Company Name) might have been
re-named to something else. The important thing to remember is the first field (on Tab-1) is what will
always display in the record list on the left. More on Tabs later.
Delete (button):
The Delete button deletes the record that you are currently viewing. You will be asked to confirm the
delete.
Search Field:
The Search field is where you type the word or string of words that you are trying to find. When the
“Search All Fields” box is un-checked, only the first field (Company Name) of all the records will be
searched. Likewise, when the “Search All Fields” box is checked, it will search ALL the fields of all
the records to find a match.
Highlight Word Field:
Use the Highlight Word field if you want to highlight all occurrences of your search word that exists
within the current record. All matches will be highlighted in bold and red-colored font. Also, the
text-box that the found word is in will highlight in light yellow. This is so that if you have a large body
of text and your search word happens to be deep in the field and is not visible because the text-box is
not large enough, you will know to scroll down to see the word.
Grid button:
The Grid button (located at the top left of the record list) allows you to toggle between Grid View and
Record View. The Grid View simply expands the width of the record list so you can see all 10 fields of
Tab-1 of all the records in the list. Click the Grid button again to toggle back to Record View (shrinks
the grid).
NOTE: While in Grid View, ONLY the 10 fields of Tab-1 can be viewed. The database has up to 100
fields, but the grid will only display the first 10, all of which are on Tab-1.
A-Z Column:
The column A-Z (located directly to the left of the record list) is a quick way to display all records that
start with the letter you click on. For example, if you click on the letter “A”, all records that have a
company name that starts with “A” will display in the record list. Click the Refresh button to re-list all
the records again.
Record List:
Click on a record in the list to view the record.
The Record List is where all the records of the database are listed. When you click the “Refresh”
button, ALL the records in the database will be listed. If you perform a search, ONLY the records that
match your search will display in the record list.
4
If you double-click on the record list, it fires the “Grid” button which toggles between Grid View and
Record View.
TAB-PANELS:
You will notice that there are 10 Tabs shown across the top of the fields area. Tab-1 probably does not
say “Tab-1”, it probably says “Company Info” or it might say something else, that's because this
software is completely customizable. There are 10 fields available for each of the 10-tabs, which
means that there are up to 100 fields available (per record). The names of each tab can be changed, and
also the fields and labels can be drag and dropped to position them where you want them to appear on
the Tab Panel, and their sizes can be changed as well. This is handled using the Design tab at the top of
the window. Designing and customizing is covered later in this manual.
5
The next several pages gives you a quick
overview of the menu functions on the
Main window.
6
Menu Tabs (File Menu)
Above is a picture showing the File menu. A brief explanation of each item is explained below.
Import a data file (TAB or CSV) file:
You can import records into the Super Rolodex database. The program will first ask if you are going to
import a TAB delimited file or a CSV (comma separated value) file. The program needs to know this
so it knows how to separate the field data as it imports it. Most other database programs have a way of
exporting records to a TAB or CSV file. It is that file that you would select when Importing into Super
Rolodex.
Export Records to (TAB or CSV) file:
This function exports the Super Rolodex records into a TAB or CSV file to be used by other software.
Print:
You have several different printing configurations. For example, you can print a single record, print a
group of records, or print the entire database. There are additional formatting such as additional linebreaks between records for readability.
Register This Software (see page 14):
If you plan on needing more than 20 records in your database, or you plan on selling this software, you
will need to register the program. Registering the program is a simple 2-step process. See the
7
Registration window for more information.
Check For Updates:
This will launch your browser and take you to our website to see if there is an update. Instead of using
version numbers for every update in our software, we simply use release dates as shown in the image
above. How to actually update your software will be covered on our download page.
View License Agreement:
This window will show you that you have the authorization to copy, distribute, modify and sell the
software as you see fit, provided that you register the program.
8
Menu Tabs (Run Menu)
Run another instance of this program:
This will allow you to launch multiple instances of the program. Each instance can be connected to
different databases which in-turn morph the program to look and function according to the design
layout of the database the program is connected to.
For example, let's say you have two databases that you connect to quite often such as a Vendor database
and a Customer database. And let's assume that you need quick access to both databases. Instead of
constantly switching back and forth between databases, you could simply “Run another instance of this
program”, which is nothing more than launching a 2nd copy of the program. Leave one copy connected
to the Vendor database, and use the 2nd copy to connect to the Customer database. That way you have
both copies running at the same time performing and acting like two different programs. You can also
assign different databases to your “favorites” list, which is covered in the Menu Tabs (Database)
section.
9
Menu Tabs (Design Menu)
Color Preferences (see page 16):
This will allow you to customize the colors, specifically the header background and the label colors. I
have found that if you are in a busy work environment and have multiple databases that you use,
simply changing the header color of each program can help you to distinguish one program from
another.
Design Mode (see page 17):
This is where you access the Design Mode. The Design Mode allows you to completely design the
user interface. For example, in a Customer type database, you would expect to have fields such as
“Name”, “Address”, “Phone” etc. Likewise, in a Vendor Database, you would expect to have fields
such as “Company”, “Price Discounts”, “Order Minimums”, etc.
More on Color Preferences and Design Mode later.
10
Menu Tabs (Database Menu)
Database Manager (see page 19):
The Database Manager allows you to choose a database that you want to connect to.
Database Creator:
The Database Creator allows you to create new databases. When you create a new database, it is
automatically created using a default Super Rolodex“Contacts” style layout which you can completely
re-design using the Design Mode.
Database Favorites:
If you have more than one database that you connect to frequently, use Database Favorites to assign
different databases as a favorite for quick database connections.
11
Menu Tabs (Make Menu)
Make a New Program:
Here you can Make a new program. You fill out a few details and click a “Publish” button and the
program copies itself (.exe), and its current database (.rsd), and the necessary support files (.dll) and
puts them into a separate folder titled “PUBLISH – YourProgram” (where YourProgram is the name of
your program). From there you can distribute your new program by simply copying the folder (and its
contents) to another computer.
How to Make Money (by Selling This Program):
It is so easy to make money selling this program. You can either sell actual copies you make, or you
can make money simply by referring others to our site. When users register the program, you get 50%
of the registration fee deposited into your Paypal account.
More on Making Programs and Making Money Selling the Programs will be discussed later in this
manual.
12
Menu Tabs (Help Menu)
Help (About):
This menu tab will display information about the program such as its name, the release date and links
to help information. It will also have our contact email address.
13
This next section will visually explain
more in detail the functions of the
program and other screens.
14
Register This Software
To get to this Registration window, click “File”, then click “Register This Software”. The Registration
window will open as shown above. Click on the Purchase a Key Tab.
There are two tabs. Below we will discuss the “Purchase a Key” tab.
Purchase a Key:
At the top of this tab you will see the “Program Serial #” and also a “Distributor #”. When you are
ready to purchase your Registration Key, just Copy and Paste the Program Serial # and Distributor #
into the appropriate fields above the Buy Now button. When you click the Buy Now button you will be
directed to our Paypal site where you can safely complete the transaction.
The reason you need to obtain a Registration Key is so that you can register this software which unlocks the 20-record limit and also grants you the right to copy, re-design and sell this program to others
if you wish.
15
Register This Software
To get to this Registration window, click “File”, then click “Register This Software”. The Registration
window will open as shown above. Click on the Registration Tab.
Registration Key:
After we receive your money from Paypal, you will get an email from us within 24 hours. The email
will contain your Registration Key and your Distributor Number. Simply copy them into the fields
shown above on the Registration Tab, and click the “Save” button. You will be greeted with a
confirmation window advising that you have successfully registered the software.
16
Color Preferences
To get to the Color Preferences window, click “Design”, then click “Color Preferences” in the menu
tabs at the top of the main window.
The Color Preferences window allows you to change the color of the header background, and also the
font color of the labels in the header. The color you choose to use will be used throughout the entire
program on all the windows. Click on the rainbow colored buttons to pull up the color-pallet.
The window background color cannot be changed, only the header background and the label font color
can be changed. The label font color (in the window area )will be the same as the header background
color, so it is best to choose one of the dark colors for the header background. Obviously with a dark
color being used as the header background, you will want the label font color (in the header area) to
appear light. Feel free to play around with the color settings. You can always click the “Switch to
Default Colors” button to change them back to original settings. Click the Update button to save.
17
Design
To get to the Design window, click on Design, then click on Design Mode in the menu tabs at the top of
the main window.
Any design changes you save are for the database that you are currently connected to.
Tabs and Tab Captions:
In the header area, you will see a text box labeled “Tab Caption”, and a button called “Apply Caption”.
This is where you set the caption (or title) of each tab. Note that there are 10-Tabs that you can use. In
the example above, only the first tab is being used, which I have named “Company Info”. The other 9Tabs are not being used and so they are blank.
Save / Update Changes:
It is very important to note that when you make a change on a Tab, to click the update button. If you
18
click into another tab without updating, the changes you made to that tab will not be saved.
Rainbow Button:
The rainbow button is a shortcut to the Color Preferences window.
Control Panel:
In the Control Panel, there is a list of “objects” which is basically a list of 10 fields available for the
current tab. The list will always display 10 fields whether you have them set to be “visible” or not.
When you select a field from the list, that particular field will highlight in the design area on the current
tab.
Moving Fields (Drag and Drop):
When a field is selected and is highlighted, it is “active” which means that when you move the mouse
into the design area, the active field will follow the mouse. Click the mouse to drop the field, leaving it
at your desired position in the design area.
Properties (Height and Width sizing of fields):
In the control panel, select the field (text box) that you want to change the size of. When it is
highlighted, click or (hold mouse click) on the Height arrow buttons or the Width arrow buttons to
increase or decrease its size. Remember, when the field is highlighted it is “active” so it will follow
your mouse if you move the mouse into the design area. You can click the “Un-Select” button to unselect a selected field.
Visible Check-Box:
When the “Visible” check box is checked, the selected field is visible. Likewise, when the “Visible”
check box is un-checked, the selected field (and it's caption) are hidden. When you select a field in the
list, it automatically is set to “visible”. To hide a selected field, un-check the Visible check box.
Labels and Label Docking:
After you have positioned a field in the design area, you will want to set the label (such as Company
Name) by typing it into the box in the control panel. Click the “>” button to assign the label. You will
want to also select where you want the label to be docked to the field. Your choices are “Dock at Top
Left” and “Dock at Left”.
File Menu:
The file menu on the Design window offers other object positioning options.
Remember, you have 10 tabs of which to use up to 10 fields on each, which means that if you use all
the fields – you will have 100 fields to work with so you can really have quite an elaborate database
program.
Be sure to click the update button to save any changes
before clicking into another tab or exiting the window.
19
Database Manager
To get to the Database Manager window, click “Database”, then click “Database Manager” in the menu
tabs at the top of the main window.
The Database Manager window has a button called “Browse for a Database”. Click this button to pull
up a file navigation window (as shown below) so you can navigate the file system on your computer
and pick the database you want to connect to. Just select the database and click the “Open” button on
that window and you will be instantly connected to that database and this program will morph into the
design layout that is saved within that database. (See window below).
Please note that you can only connect to databases that were created with this software.
The next window shows how to select a database from the file system on your computer.
20
In this example, I have selected SuperRolodex.rsd as the database I want to connect to. You will note
that I have created other databases for other purposes which also appear in this particular folder. The
CSS.rsd is a database that our Customer Service Support person uses. And the PartsReturns.rsd is a
database we use in the parts department to keep track of parts warranties and returns. When I connect
to any one of the databases, the program morphs into the design layout that was created for that
particular database. So this program is like having an unlimited number of software programs at your
disposal. You can create new databases which is covered in the next section, and design its userinterface according to how you want it to look. You may have lots of database ideas that you want to
use, and that's the reason I wrote this program.
Depending on how your computer is configured, you may or may not see the file extensions (.rsd) on
the end of the file names.
If you have a home network and cannot access the database with the file navigation window, you can
type the path to the database in the text box and click the “Connect” button.
If you need help learning how to use your program and database in a network environment, click the
“How to Network” button. A window will open and explain the simple process. It's probably much
easier than you might think.
21
Database Creator
To get to the Database Creator window, click “Database”, then click “Database Creator” in the menu
tabs at the top of the main window.
The Database Creator is where you create new databases. Think of a name to call your new database,
such as MyContacts or some other descriptive name that makes sense for the database you want to
create. After you enter a name, click the Create New Database button. The program will create a new
database with the name you specified. Anytime you create a new database, the new database will
always be created with the built-in default “Contacts” style design of the original SuperRolodex
program.
You will be asked if you want to connect to the new database that you just created. Assuming that you
do, just click the “Open” button and the program will connect and morph into the design layout of the
new database.
Also, assuming that you want to customize the design layout of your new database, click “Design” and
then select “Design Mode” found in the menu tabs at the top of the main window.
22
Database Favorites
To get to the Database Favorites window, click “Database”, then click “Database Favorites” in the
menu tabs at the top of the main window.
Connecting to a Favorite Database:
To connect to one of your favorite databases in the list, just select it and click the “Connect” button.
Adding a database to your Favorites:
To add a database to your favorites list, simply click the “Add Current Database to Favorites” button.
The current database that you are connected to will be added to the Favorites list.
Removing a Favorite:
To remove a favorite, just select it from the list and click the “Remove Selected Favorite” button. The
“Find a Database” button is just a shortcut to the Database Manager window.
23
Make a New Program
(Distributor Info Tab)
To get to the Make a New Program window, click “Make”, then click “Make a New Program to Sell” in
the menu tabs at the top of the main window.
You can make new programs for yourself or for others, and if you registered this program, you can
actually sell the programs you make or give them away if you want. Selling and making money will be
covered later in this manual.
In a nutshell, all you do is design the layout the way you want as covered earlier in the Design section,
then go to the Make a New Program window as shown above and fill out a few details from each of the
tabs on this window – starting with the Distributor Tab. The Distributor Tab is where you enter your
Name and also your Distributor Number.
24
Note #1:
Your Distributor Number is given to you in the same email we send you containing your Registration
Key to register this software.
Note #2:
Type over the existing name and distributor number with your name and distributor number.
Click the Update button to save the changes, then click into the next tab (Program Name Tab).
25
Make a New Program
(Program Name Tab)
On the Program Name Tab, you just need to type a name for your program. You can also enter a subname and also a design version as well, but those are optional.
Click the Update button to save the changes, then click into the next tab (Publish Tab).
26
Make a New Program
(Publish Tab)
On the Publish Tab you are presented with an overview of the information about the program you are
about to create (or publish).
If you are happy with these settings, click the Publish button. When you click the Publish button, a
copy of the program and its database and all of the support files will be copied to a PUBLISH folder on
your computer inside the same folder where the program lives. In this example, the PUBLISH folder
containing your new program would likely be found in C:\SuperRolodex\PUBLISH-SuperRolodex\
If you have more than one database that you want to include in your publication, you will have to
manually copy/paste them into the PUBLISH folder. Click the Distribute Tab to learn more.
27
Make a New Program
(Distribute Tab)
On the Distribute Tab, you will see two more tabs, “Explanation of Files” and “Inno Setup Program”.
Explanation of Files:
On the Explanation of Files Tab is a list of files that make up your program. The first two files in this
list are just examples so the names might be different from the ones you have. In this example,
MyProgram.exe is the program executable file, and MyProgram.rsd is the database file. Notice how
the name of the program file and the name of the database file are the same (except their file extensions
.exe and .rsd). You want to make sure that the database file is the same name as the program file
because when the program is first run, it always looks for a database of the same name as the program.
If it does not find one, it will create a blank one using the built in Contacts style layout of the original
SuperRolodex database and connect to it. But since you have customized the layout of your program
28
and added your name and distributor number etc... you want the program to connect to that database
when it first runs, so that is why you want the program and at least one of your database(s) to have the
same name.
The rest of the files in the list are .dll files which are support files required by the program that enable it
to run on windows based computers. These files must exist in the same folder as your program file.
Inno Setup Program:
On the Inno Setup Program Tab is an explanation of what Inno Setup is, and where you can obtain it for
free. Inno Setup is a program that you use to compile all of your program files (the ones in the list
shown above) and it compiles them all into a single setup file that you can sell or give away. If you
want a professional and seamless installation for your users to easily install your program, you will
want to use Inno Setup to create your program setup file. Then you can put it on a disk and distribute
to your users, or upload your setup file to the Internet and make it available for download for users on
the web.
Manual Copy/Paste:
If you choose not to use a setup program, you can still distribute your program and it will still run on
other computers, but you will have to distribute the Publish folder (containing all the files). Just have
your users copy the Publish folder to a location on their computer. To run the program, the user just
has to open the Publish folder and double-click on the program exe file. Of course you can re-name the
Publish folder to something else before you distribute it. As long as the program exe file, and the
database .rsd file(s), and the support dll files all exist in the same folder, your program will run on a
windows based computer.
Regardless weather you use a professional program to create your program setup file such as Inno
Setup, or you decide to distribute your program manually using copy/paste, remember to have at least
one database named the same as your program, for example: MyProgram.exe and MyProgram.rsd
where the exe is the program file and the rsd is the database file. As mentioned earlier, these files, plus
the dll support files must all exist in the same folder on the users computer so that when the user first
runs the program, it will successfully connect to the database without error.
Marketing Tab:
The Marketing Tab will give you some ideas on how to market your software and provide some
samples for doing so.
Technical Support:
The Technical Support Tab has a way for you to contact us. We are happy to answer any questions you
might have.
29
How to Make Money
(Getting Money Tab)
To get to the How to Make Money window, click “Make”, then click “How to Make Money” in the
menu tabs at the top of the main window.
Making money with this program is extremely simple. You will need a Paypal account and we need
your email address so that we can send you money through Paypal. When you register this software,
we will use the email address associated with the Paypal account that was used to process the
registration. The screen-shot above visually shows you how you earn your money by selling this
program.
1. You are the distributor of this software.
2. You create your own customized version of this software, or refer people to our website.
3. Users download your program, or they download our version from our site.
30
4. Users register the software with us.
5. When users pay us the registration fee, we send you a 50% sales commission through Paypal.
How do you ensure that you get the 50% sales commission?
When you first registered this program, we emailed you two things...
1. The Registration Key to register this program.
2. Your Distributor Number.
Your Distributor Number is very important. To ensure that you earn a 50% sales commission on every
program that is sold (or referred) by you, it is very important to make sure that you entered your
distributor number on the Distributor Tab of the Make a New Program window as discussed earlier.
Your distributor number is stored in the database that you distribute with your program.
Earning Money (Selling Your Programs):
When a user runs your program on their computer, and they like the program enough to register it like
you have done, they will be entering your distributor number during the registration process just like
when you registered the program, you were asked to enter the distributor number from the Registration
window. That distributor number is stored in the database that the software uses which is distributed
with the software. When we receive a registration fee from that user, your distributor number is tied to
that transaction which prompts a 50% sales commission to be sent to you through Paypal.
Earning Money (Referring People To Our Site):
The same process happens if you choose to refer people to our website (instead of making your own
programs to sell). By the way, you can sell your own programs and/or refer people to our site. Both
ways will produce income for you.
On the Marketing Tab of the Make a New Program window there are some examples of micro ads that
you can place in your email signatures that encourage people to visit our site. Your distributor number
appears in the micro ads that you can use in emails that you send out to people, or posts you make on
social networking sites. People will be curious about what you are doing so they will click on the link
to our site in the micro ad. When a user downloads software from our site and they register it, they will
be inputing your distributor number because that step is required in order to register the software.
When they register the software, that process is what prompts a 50% sales commission to be sent to
you through Paypal.
Please check our website for additional help and information about this topic and others. We will have
a growing Q&A section that may answer questions. Our web address is http://www.primesales.net
And by all means, please send us an email if you have any questions. We will be glad to answer them
and it will also help us grow the Q&A section on our site.
You can send us an email to [email protected]
Thank You,
Prime Sales Customer Service


![ShowMan User Manual [PDF Format]](http://vs1.manualzilla.com/store/data/005637930_1-31cd6ced5af6c2a7a337ddd38fc92d65-150x150.png)