1
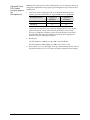
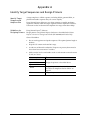
user guide
SYBR® Select Master Mix
Catalog Numbers 4472903, 4472908, 4472918, 4472919, 4472920, and 4472913
Revision Date 3 April 2012 (Rev A)
Publication Part Number 4473367
For Research Use Only. Not intended for any animal or
human therapeutic or diagnostic use.
For Research Use Only. Not intended for animal or human therapeutic or diagnostic use.
Information in this document is subject to change without notice.
LIFE TECHNOLOGIES DISCLAIMS ALL WARRANTIES WITH RESPECT TO THIS DOCUMENT, EXPRESSED OR IMPLIED,
INCLUDING BUT NOT LIMITED TO THOSE OF MERCHANTABILITY OR FITNESS FOR A PARTICULAR PURPOSE. TO
THE FULLEST EXTENT ALLOWED BY LAW, IN NO EVENT SHALL LIFE TECHNOLOGIES BE LIABLE, WHETHER IN
CONTRACT, TORT, WARRANTY, OR UNDER ANY STATUTE OR ON ANY OTHER BASIS FOR SPECIAL, INCIDENTAL,
INDIRECT, PUNITIVE, MULTIPLE OR CONSEQUENTIAL DAMAGES IN CONNECTION WITH OR ARISING FROM THIS
DOCUMENT, INCLUDING BUT NOT LIMITED TO THE USE THEREOF, WHETHER OR NOT FORESEEABLE AND
WHETHER OR NOT LIFE TECHNOLOGIES IS ADVISED OF THE POSSIBILITY OF SUCH DAMAGES.
NOTICE TO PUCHASER: LIMITED LICENSE
End Users are specifically not authorized to and are forbidden from reselling, transferring or distributing any products either as a
stand alone product or as a component of another product.
LIMITED USE LABEL LICENSE: RESEARCH USE ONLY
The purchase of this product conveys to the purchaser the limited, non-transferable right to use the purchased amount of the
product only to perform internal research for the sole benefit of the purchaser. No right to resell this product or any of its
components is conveyed expressly, by implication, or by estoppel. This product is for internal research purposes only and is not
for use in commercial applications of any kind, including, without limitation, quality control and commercial services such as
reporting the results of purchaser’s activities for a fee or other form of consideration. For information on obtaining additional
rights, please contact [email protected] or Out Licensing, Life Technologies, 5791 Van Allen Way, Carlsbad, California
92008.
Human diagnostic uses require a separate license from Roche. The right to human in vitro diagnostics requires a separate license.
For information on obtaining additional rights, please contact [email protected] or Out Licensing, Life Technologies, 5791
Van Allen Way, Carlsbad, California 92008.
TRADEMARKS:
The trademarks mentioned herein are the property of Life Technologies Corporation or their respective owners.
AmpliTaq is a registered trademark of Roche Molecular Systems, Inc.
© 2012 Life Technologies Corporation. All rights reserved.
2
SYBR® Select Master Mix User Guide
Contents
Product Information ....................................................................................................................................... 4
Chemistry Overview ........................................................................................................................................ 6
Contents and Storage ..................................................................................................................................... 8
Required Materials ......................................................................................................................................... 9
Prevent Contamination and Nonspecific Amplification .............................................................................. 11
Methods...................................................................................................................................................... 13
Procedural Overview .................................................................................................................................... 13
Prepare the Template .................................................................................................................................. 14
Set Up the Plate Document .......................................................................................................................... 15
Prepare the PCR Reaction Plate.................................................................................................................. 16
Run the PCR Reaction Plate ........................................................................................................................ 17
Analyze Your Results .................................................................................................................................... 18
Detect Nonspecific Amplification ................................................................................................................ 22
Troubleshoot ................................................................................................................................................. 24
Appendix A ................................................................................................................................................ 26
Identify Target Sequences and Design Primers ......................................................................................... 26
Optimize Primer Concentrations for PCR ................................................................................................... 28
Appendix B ................................................................................................................................................ 31
Safety ............................................................................................................................................................. 31
Documentation and Support ........................................................................................................................ 33
SYBR® Select Master Mix User Guide
3
Product Information
About the Reagent
The SYBR® Select Master Mix, is formulated to provide superior specificity and
sensitivity. It is supplied in a convenient 2X concentration premix to perform
real-time PCR using SYBR® GreenER™ dye. The master mix contains:
•
SYBR® GreenER™ Dye
•
AmpliTaq® DNA Polymerase, UP (Ultra Pure) with a proprietary hot start
mechanism
•
Heat-labile Uracil-DNA Glycosylase (UDG)
•
ROX™ dye Passive Reference
•
dNTP blend containing dUTP/dTTP
•
Optimized buffer components
The user only needs to provide primers, template, and water.
Hot Start
The AmpliTaq® DNA Polymerase, UP is provided in an inactive state to
automate the hot start PCR technique and allow flexibility in the reaction setup,
including pre-mixing of PCR reagents at room temperature.
The polymerase is equipped with a proprietary hot start mechanism that
provides improved specificity. The polymerase is re-activated after a 2 minute
incubation at 95°C.
UDG
SYBR® Select Master Mix contains heat-labile uracil-DNA glycosylase (UDG).
UDG is also known as uracil-N-glycosylase (UNG).
Treatment with heat-labile UDG can prevent the reamplification of carryover
PCR products by removing any uracil incorporated into single- or doublestranded amplicons (Longo et al., 1990). Heat-labile UDG prevents
reamplification of carryover PCR products in an assay if all previous PCR for
that assay was performed using a dUTP-containing master mix. See “Prevent
Contamination and Nonspecific Amplification” on page 11 for more information
about UDG.
PCR products are stable for up to 72 hours post-amplification using master mixes
containing heat-labile UDG. Unlike standard UDG, heat-labile UDG is
completely inactivated prior to amplification.
dUTP/dTTP
A blend of dUTP/dTTP is included to enable UDG activity and maintain optimal
PCR results.
SYBR® GreenER ™
The SYBR® GreenER™ dye detects PCR products by binding to double stranded
DNA formed during PCR (see Chemistry Overview section). The SYBR®
GreenER™ dye provides both higher sensitivity and lower PCR inhibition than
SYBR® Green I dye. It can be used on real-time PCR instruments calibrated for
SYBR® Green I dye without any change of filters or settings.
ROX Passive
Reference
SYBR® Select Master Mix contains ROX™ dye Passive Reference. The ROX™ dye
Passive Reference provides an internal reference to which the reporter-dye
signal can be normalized during data analysis. Normalization is necessary to
correct for fluorescence fluctuations due to changes in concentration or volume.
4
SYBR® Select Master Mix User Guide
Real-Time
Instruments
About This
Protocol
SYBR® Select Master Mix can be used to run experiments on the following Life
Technologies Real-Time PCR Systems:
•
StepOne™ Real-Time PCR System
•
StepOnePlus™ Real-Time PCR System
•
7500 Real-Time PCR System
•
7500 Fast Real-Time PCR System
•
7900HT Real-Time PCR System
•
7900HT Fast Real-Time PCR System
•
ViiA™ 7 Real-Time PCR System
•
QuantStudio™ 12K Real-Time PCR System
This protocol provides:
•
Background information about gene quantification assays
•
A list of equipment and materials for using the SYBR® Select Master Mix
•
Procedures for using the SYBR® Select Master Mix
For details about specific procedures described in this protocol, see “Support
Documents” on page 33.
SYBR® Select Master Mix User Guide
5
Chemistry Overview
How the SYBR®
GreenER ™ Dye
Chemistry Works
The SYBR® GreenER™ dye is used to detect PCR products by binding to doublestranded DNA formed during PCR. The process works as follows:
1.
When SYBR® Select Master Mix is added to a sample, SYBR® GreenER™ dye
immediately binds to all double-stranded DNA.
2.
During the PCR, AmpliTaq® DNA Polymerase, UP amplifies the target
sequence, which creates the PCR product, or “amplicon.”
3.
The SYBR® GreenER™ dye then binds to each new copy of double-stranded
DNA.
4.
As the PCR progresses, more amplicon is created. Because the SYBR®
GreenER™ dye binds to all double-stranded DNA, the result is an increase in
fluorescence intensity proportional to the amount of double-stranded PCR
product produced.
The following figure illustrates this process.
Step 1
The SYBR® GreenER™
dye within the SYBR®
Select Master Mix
immediately binds with
all double-stranded
DNA
Step 2
Step 3
During PCR, AmpliTaq®
DNA Polymerase, UP
amplifies each target.
The SYBR® GreenER™
dye then binds to each
new copy of doublestranded DNA.
Figure 1 Representation of how the SYBR® GreenER™ dye acts on doublestranded DNA during one extension phase of PCR
6
SYBR® Select Master Mix User Guide
Using the Master
Mix in Two-Step
RT-PCR
When performing a two-step RT-PCR reaction, total or mRNA must first be
transcribed into cDNA:
1.
In the reverse transcription (RT) step, cDNA is reverse transcribed from
total RNA samples using random primers from the High-Capacity cDNA
Reverse Transcription Kit or SuperScript® VILO™ cDNA Synthesis Kit (see
page 10).
2.
In the PCR step, PCR products are synthesized from cDNA samples using
the SYBR® Select Master Mix.
Figure 2 Two-step RT-PCR
SYBR® Select Master Mix User Guide
7
Contents and Storage
Contents
Item
The SYBR® Select Master Mix is supplied in a 2X concentration.
Part Number
Contents
Mini-Pack
4472903
One 1-mL tube (100 × 20-µL reactions)
1-Pack
4472908
One 5-mL tube (500 × 20-µL reactions)
2-Pack
4472918
2 × 5-mL tubes (1000 × 20-µL reactions)
5-Pack
4472919
5 × 5-mL tubes (2500 × 20-µL reactions)
10-Pack
4472920
10 × 5-mL tubes (5000 × 20-µL reactions)
Bulk Pack
4472913
One 50-mL tube (5000 × 20-µL reactions)
Storage
8
Store the SYBR® Select Master Mix at 2°C to 8°C.
SYBR® Select Master Mix User Guide
Required Materials
Plates
Instrument
ViiA™ 7 and
QuantStudio™ 12K
systems
StepOne™ system
StepOnePlus™ and
7500 Fast systems
7900HT and
7900HT Fast§
systems
7500 system
Choose the plate appropriate for your real-time instrument.
Plates‡
Catalog
number
MicroAmp® Fast Optical 96-Well Reaction Plate with Barcode
(0.1-mL)
• 20 plates
• 200 plates
MicroAmp® Fast Optical 96-Well Reaction Plate with Barcode
• 20 plates
• 500 plates
MicroAmp® Optical 384-Well Reaction Plate with Barcode
• 50 plates
• 500 plates
• 1000 plates
MicroAmp® Fast Optical 48-Well Reaction Plate, 20 plates
MicroAmp® Fast Optical 96-Well Reaction Plate with Barcode
(0.1-mL)
• 20 plates
• 200 plates
MicroAmp® Fast Optical 96-Well Reaction Plate with Barcode
(0.1-mL)
• 20 plates
• 200 plates
MicroAmp® Optical 96-Well Reaction Plate with Barcode
• 20 plates
• 500 plates
MicroAmp® Optical 384-Well Reaction Plate with Barcode
• 50 plates
• 500 plates
• 1000 platesv
MicroAmp® Optical 96-Well Reaction Plate with Barcode
• 20 plates
• 500 plates
4346906
4366932
4306737
4326659
4309849
4326270
4343814
4375816
4346906
4366932
4346906
4366932
4306737
4326659
4309849
4326270
4343814
4306737
4326659
§
Requires a MicroAmp® Snap-On Optical Film Compression Pad (Cat. no. 4333292) when using the
standard MicroAmp® Optical 96-Well Reaction Plate.
Optical Seals
Seal all plates, except StepOne™ system plates, with MicroAmp® Optical
Adhesive Film.
Seal StepOne™ system plates with MicroAmp® 48-Well Optical Adhesive Film.
Item
MicroAmp® 48-Well Optical Adhesive Film:
• 25 covers
• 100 covers
MicroAmp® Optical Adhesive Film:
• 25 covers
• 100 covers
SYBR® Select Master Mix User Guide
Catalog number
4375928
4375323
4360954
4311971
9
Other Kits
Item
High Capacity cDNA Reverse Transcription Kit:
• 200 reactions
• 200 reactions with RNase Inhibitor
• 1000 reactions
• 1000 reactions with RNase Inhibitor
SuperScript® VILO™ cDNA Synthesis Kit:
• 50 reactions
• 250 reactions
Catalog number
4368814
4374966
4368813
4374967
4453650
4453651
Other
Consumables
Item
Centrifuge with adapter for 96-well plates
Source
Major laboratory supplier (MLS)
Centrifuge with adapter for 384-well plates
Disposable gloves
Microcentrifuge
Pipette tips, with filter plugs
Pipettors, positive-displacement or air-displacement
Polypropylene tubes
Tris-EDTA (TE) Buffer, pH 8.0
Vortexer
MLS
MLS
MLS
MLS
MLS
MLS
MLS
or
10
SYBR® Select Master Mix User Guide
Prevent Contamination and Nonspecific Amplification
Overview
PCR assays require special laboratory practices to avoid false positive
amplifications. The high throughput and repetition of these assays can lead to
amplification of a single DNA molecule.
Using UDG to
Minimize
Reamplification
Carryover
Products
SYBR® Select Master Mix contains heat-labile uracil-DNA glycosylase (UDG).
UDG is also known as uracil-N-glycosylase (UNG). Treatment with heat-labile
UDG is useful in preventing the reamplification of carryover PCR products.
The heat-labile UDG used in the SYBR® Select Master Mix is a 26-kDa
recombinant enzyme derived from the thermolabile UDG gene isolated from
marine bacteria, and expressed in E. coli.
UDG acts on single- and double-stranded dU-containing DNA. It acts by
hydrolyzing uracil-glycosidic bonds at dU-containing DNA sites. The enzyme
causes the release of uracil, thereby creating an alkali-sensitive apyrimidic site in
the DNA. The enzyme has no activity on RNA or dT-containing DNA (Longo et
al., 1990).
Using NTC
Controls
No Template Control (NTC) reactions can be used to identify PCR
contamination. NTC reactions contain all reaction components (SYBR® Select
Master Mix, primers, water) except sample, and therefore should not return a CT
value.
Design Primers to
Avoid PrimerDimers
Use primers that contain dA nucleotides near the 3´ ends so that any primerdimer generated is efficiently degraded by UDG at least as well as any dUcontaining PCR products. The farther a dA nucleotide is from the 3´ end, the
more likely partially degraded primer-dimer molecules can serve as templates
for a subsequent PCR amplification.
Production of primer-dimers could lower the amplification yield of the desired
target region. If primers cannot be selected with dA nucleotides near the ends,
consider using primers with 3´ terminal dU-nucleotides. Single-stranded DNA
with terminal dU nucleotides are not substrates for UDG (Delort et al., 1985) and,
therefore, the primers are not degraded. Biotin-dUMP derivatives are not
substrates for UDG.
For more information about designing primers, see “Guidelines for Designing
Primers” on page 26.
Do not use UDG in subsequent amplifications of dU-containing PCR template,
such as in nested PCR protocols. The UNG degrades the dU-containing PCR
product, preventing further amplification.
PCR Good
Laboratory
Practices
When preparing samples for PCR amplification:
•
Wear a clean lab coat (not previously worn while handling amplified PCR
products or used during sample preparation) and clean gloves.
•
Change gloves whenever you suspect that they are contaminated.
•
Maintain separate areas and dedicated equipment and supplies for:
Sample preparation
PCR setup
PCR amplification
Analysis of PCR products
SYBR® Select Master Mix User Guide
11
PCR Good
Laboratory
Practices,
Continued
12
•
Never bring amplified PCR products into the PCR setup area.
•
Open and close all sample tubes carefully. Try not to splash or spray PCR
samples.
•
Keep reactions and components capped as much as possible.
•
Use a positive-displacement pipette or aerosol-resistant pipette tips.
•
Clean lab benches and equipment periodically with a 10% bleach solution.
SYBR® Select Master Mix User Guide
Methods
Procedural Overview
This diagram is an overview of the procedures for performing gene expression
experiments.
SYBR® Select Master Mix User Guide
13
Prepare the Template
Examine RNA
Template Quality
After isolating the template, examine its quality and quantity and store it
properly.
Before using the SYBR® Select Master Mix, you need to synthesize singlestranded cDNA from total RNA or mRNA samples. For optimal performance,
the RNA should be:
•
Between 0.002 and 0.2 µg/µL
•
Less than 0.005% of genomic DNA by weight
•
Free of inhibitors of reverse transcription and PCR
•
Dissolved in PCR-compatible buffer
•
Free of RNase activity
IMPORTANT! If you suspect that the RNA contains RNase activity, add
RNase inhibitor to the reverse transcription reaction at a final concentration
of 1.0 U/µL.
Examine DNA
Template Quality
Quantitate the
Template
•
Nondenatured
•
IMPORTANT! It is not necessary to denature the RNA. Denaturation of
the RNA may reduce the yield of cDNA for some gene targets.
Use both of the following methods to examine DNA quality:
•
Agarose gel electrophoresis – Purified DNA should run as a single band
on an agarose gel. Agarose gels reveal contaminating DNAs and RNAs, but
not proteins.
•
Spectrophotometry – The A260/A280 ratio should be 1.8 to 2.0. Smaller ratios
usually indicate contamination by protein or organic chemicals.
Spectrophotometry can reveal protein contamination, but not DNA or RNA
contamination.
Template quantitation is critical for successful PCR reactions. The most
common way to determine DNA quantity is to measure the absorbance (optical
density or O.D.) of a sample at 260 nm in a spectrophotometer.
One O.D. unit is the amount of a substance dissolved in 1.0 mL that gives an
absorbance reading of 1.00 in a spectrophotometer with a 1-cm path length. The
wavelength is assumed to be 260 nm unless stated otherwise. A260 values can
be converted into µg/µL using Beer´s Law:
Absorbance (260 nm) = sum of extinction coefficient contributions × cuvette
pathlength × concentration
The following formulas are derived from Beer’s Law (Ausubel et al., 1998):
•
Concentration of single-stranded DNA = A260 × 33 µg/µL
•
Concentration of double-stranded DNA = A260 × 50 µg/µL
•
Concentration of single-stranded RNA = A260 × 40 µg/µL
Note: Absorbance measurements of highly concentrated (O.D. > 1.0) or very
dilute (O.D. < 0.05) DNA or RNA samples can be inaccurate. Dilute or
concentrate the DNA/RNA to obtain a reading within the acceptable range.
Store the
Template
14
Store the templates as follows:
•
Store purified RNA templates at −20°C or −70°C in RNase-free water.
•
Store purified DNA templates at −20°C or −70°C in TE, pH 8.0.
SYBR® Select Master Mix User Guide
Set Up the Plate Document
Select a Plate for
PCR
Select a plate appropriate for your real-time instrument Refer to page 9 for part
numbers of the plates.
Configure the
Plate Document
For information about configuring plate documents when performing real-time
quantification, refer to the appropriate user guides listed in “Support
Documents” on page 33.
SYBR® Select Master Mix User Guide
15
Prepare the PCR Reaction Plate
General
Guidelines
Reminder About
Your Primers
•
For best results, it is recommended to perform four replicates of each
reaction.
•
Reaction mixes can be prepared depending upon your experimental
requirements. Scale the components to be included in the reaction mix
according to the number of reactions to be performed. Include an additional
10% of the reaction mix volume to account for variations in pipetting.
•
If using smaller reaction volumes, scale all components of the reaction mix
proportionally. Reaction volumes <10 µL are not recommended.
Refer to page 26 for information about identifying target sequences and
designing primers.
Note: Separate PCR thermal-cycling conditions are required for primers with a
Tm <60°C
Reagent Handling
and Preparation
Follow these guidelines to ensure optimal PCR performance. Prior to use:
•
Mix the SYBR® Select Master Mix thoroughly by swirling the bottle.
•
Place frozen cDNA samples and primers on ice to thaw. After the samples
are thawed, vortex them, then centrifuge the tubes briefly.
CHEMICAL HAZARD. SYBR® Select Master Mix (2X) may
cause eye, skin and respiratory tract irritation. Read the SDS, and follow the
handling instructions. Wear appropriate protective eyewear, clothing, and
gloves.
Prepare the PCR
Reactions
1.
Prepare the appropriate number of reactions according to the volumes in the
following table:
Component
384-Well Plate
(10 µL/well)
5 µL
Variable
48- Well or 96-Well
Plates (20 µL/well)
10 µL
Variable
SYBR® Select Master Mix (2X)
Forward and Reverse Primers‡
cDNA template + RNase-free
Variable
Variable
water§
Total Volume
10 µL
20 µL
‡
For optimal performance, use a range from 150–400 nM of each primer.
If performing PCR using StepOne™ or StepOnePlus™ Real-Time PCR
Systems, use ≤200 nM of each primer.
§
For optimal performance, use up to 100 ng of cDNA for each reaction.
2.
Mix the components thoroughly, and centrifuge briefly to spin down the
contents and eliminate any air bubbles.
3.
Transfer the appropriate volume of each reaction to each well of an optical
plate.
4.
Seal the plate with an optical adhesive cover, and centrifuge the plate briefly
to spin down the contents and eliminate any air bubbles.
Note: PCR can be performed on the reaction plate at any time up to 72 hours
after completing the reaction setup when kept at room temperature.
16
SYBR® Select Master Mix User Guide
Run the PCR Reaction Plate
Run the plate on a Life Technologies real-time quantitative PCR instrument. See
the appropriate instrument user guide for help with programming the thermalcycling conditions or with running the plate.
To run the plate:
1.
Place the reaction plate in the instrument.
2.
Set the thermal cycling conditions using the default PCR thermal-cycling
conditions specified in the following tables according to the melting
temperature of your primers:
Standard Cycling Mode (Primer Tm ≥60°C)
Step
UDG Activation
AmpliTaq® DNA
Polymerase, UP
Activation
Denature
Anneal/Extend
Temperature
50°C
Duration
2 min
Cycles
Hold
95°C
2 min
Hold
95°C
60°C
15 sec
1 min
40
Standard Cycling Mode Primer Tm <60°C
Step
UDG Activation
AmpliTaq® DNA
Polymerase, UP
Activation
Denature
Anneal
Extend
Temperature
50°C
Duration
2 min
Cycles
Hold
95°C
2 min
Hold
95°C
55–60°C*
72°C
15 sec
15 sec
1 min
40
*Anneal temperature should be set to the melting point for your primers.
3.
Set the instrument to perform a default dissociation step.
Note: A dissociation curve can be performed up to 72 hours after the realtime PCR run if the plate is stored in the dark, or up to 24 hours later if the
plate is stored exposed to light.
4.
Set the reaction volume appropriate for the type of plate being used for
your PCR reaction.
5.
Start the run.
SYBR® Select Master Mix User Guide
17
Analyze Your Results
The general process for analyzing the data from gene expression assays requires
that you:
Baseline and
Threshold Values
18
•
View the amplification plots.
•
Adjust the baseline and threshold values to determine the threshold cycles
(CT) for the amplification curves.
•
Use the standard curve method or the relative quantification (∆∆C T) method
to analyze the results.
Use the software provided with your instrument to automatically calculate or
manually set the baseline and threshold for the amplification curves.
•
Baseline refers to the initial cycles of PCR in which there is little change in
fluorescence signal.
•
The intersection of the threshold with the amplification plot defines the CT
in real-time PCR assays. The threshold is set above the background and
within the exponential growth phase of the amplification curve.
SYBR® Select Master Mix User Guide
View the
Amplification
Plots
The instrument software calculates baseline and threshold values for a detector
based on the assumption that the data exhibit the “typical” amplification curve.
A typical amplification curve, as shown below, has a:
•
Plateau phase (a)
•
Linear phase (b)
•
Exponential (geometric) phase (c)
•
Background (d)
•
Baseline (e)
SYBR® Select Master Mix User Guide
19
Manually Adjust
the Baseline and
Threshold
Experimental error (such as contamination or inaccurate pipetting) can produce
data that deviate significantly from data for typical amplification curves. Such
atypical data cause the software algorithm to generate incorrect baseline and
threshold values for the associated detector.
Reviewing all baseline and threshold values after analysis of the study data is
recommended. If necessary, adjust the values manually as described in the
appropriate instrument user manual.
IMPORTANT! After analysis, you must verify that the baseline and threshold
were called correctly for each well by viewing the resulting amplification plots.
Baseline Settings
See the example amplification plots below to determine whether or not the
baseline and threshold settings were correctly set.
Baseline Set Correctly
The amplification curve begins after the
maximum baseline.
No adjustment necessary.
Baseline Set Too Low
The amplification curve begins too far to
the right of the maximum baseline.
Increase the End Cycle value.
Baseline Set Too High
The amplification curve begins before the
maximum baseline.
Decrease the End Cycle value.
20
SYBR® Select Master Mix User Guide
Threshold Settings
Threshold Set Correctly
The threshold is set in the exponential
phase of the amplification curve.
Threshold settings above or below the
optimum increase the standard deviation
of the replicate groups.
Threshold Set Too Low
The threshold is set below the exponential
phase of the amplification curve. The
standard deviation is significantly higher
than that for a plot where the threshold is
set correctly. Set the threshold up into the
exponential phase of the curve.
Threshold Set Too High
The threshold is set above the exponential
phase of the amplification curve. The
standard deviation is significantly higher
than that for a plot where the threshold is
set correctly. Set the threshold down into
the exponential phase of the curve.
Analyze the
Results
Using the SYBR® Select Master Mix, you can perform two types of quantitation:
relative and absolute.
•
•
Relative
Quantitation
Method
Relative quantitation compares a target against an internal standard. You
can perform relative quantitation using either the standard curve method
or the comparative CT method.
Absolute quantitation compares the CT of an unknown sample against a
standard curve with known copy numbers.
Gene expression can be measured by the quantitation of cDNA relative to a
calibrator sample. The calibrator sample serves as a physiological reference. In a
typical experiment, gene expression levels are studied as a function of a
treatment of cells in culture, of patients, or of tissue type. The calibrator sample
in each case is the cDNA from the untreated cells or patients, or a specific tissue
type.
All quantitations are also normalized to an endogenous control (such as
GAPDH) to account for variability in the initial concentration and quality of the
total RNA, and in the conversion efficiency of the reverse transcription reaction.
Resources for
Data Analysis
For more information about analyzing your data, refer to the appropriate
instrument manual available from the Life Technologies website at:
www.lifetechnologies.com, or contact Technical Support (see page 33 for a list
of support documents).
SYBR® Select Master Mix User Guide
21
Detect Nonspecific Amplification
Because SYBR® GreenER™ dye detects any double-stranded DNA, check for
nonspecific product formation by using dissociation-curve or gel analysis.
Dissociation
Curves
A dissociation curve is a graph that displays dissociation data from the
amplicons of quantitative PCR runs. Change in fluorescence, due to a dye or
probe interacting with double-stranded DNA, is plotted against temperature.
When to Generate Dissociation Curves
Note: Because of the presence of heat-labile UDG, you can generate a
dissociation curve up to 72 hours after the real-time PCR run on any Life
Technologies Real-Time PCR System.
An Example
The dissociation curves below show typical primer-dimer formation. The
specific product is shown with a melting temperature (Tm) of 80.5°C, but the
primer-dimer has a characteristically lower Tm of 75°C.
Primer-dimers are most prevalent in NTC wells and sample wells containing a
low concentration of template.
Figure 3 Example of two dissociation curves
22
SYBR® Select Master Mix User Guide
( Optional) Check
PCR Product
Purity by Agarose
Gel
Electophoresis
Note: Because of the presence of heat-labile UDG, you can verify the absence of
nonspecific amplification using agarose gel electrophoresis up to 72 hours after
amplification.
1.
Load 12 to 15 µL of sample per well on an ethidium bromide-stained
agarose gel made with UltraPure™ Agarose 1000 (Cat. no. 16550-100):
PCR Fragment Size
% Agarose in
TBE Buffer
% Agarose in
TAE Buffer
<100 bp
5%
6%
100–250 bp
3%
4%
CHEMICAL HAZARD. Ethidium bromide causes eye, skin, and
respiratory tract irritation and is a known mutagen (that is, it can change
genetic material in a living cell and has the potential to cause cancer).
Always use adequate ventilation such as that provided by a fume hood.
Read the SDS, and follow the handling instructions. Wear appropriate
protective eyewear, clothing, and gloves.
2.
Run the gel:
For PCR fragments <100 bp, use 80 to 100 V for 45 to 60 min.
For PCR fragments 100 to 250 bp, use 100 to 115 V for 1 to 1.5 h.
3.
Run samples 1/3 to 1/2 the length of the gel, without letting the dye run off
the bottom of the gel. Use a UV lamp to check the migration of the samples.
SYBR® Select Master Mix User Guide
23
Troubleshoot
Observation
High CT values/poor
precision or failed PCR
reactions
Possible Cause
Insufficient cDNA template is
present
Quality of cDNA template is poor
Sample degradation
Incorrect pipetting.
Reduced number of PCR cycles in
the thermal cycler protocol
Primer-dimer formation and
residual polymerase activity
Low ∆Rn or Rn values
Extension time is too short
Primer-dimer formation and
residual polymerase activity
24
Action
Use up to 100 ng of cDNA
template per 20-µL reaction.
• Quantify the amount of
cDNA template.
• Test the cDNA template for
the presence of PCR
inhibitors.
Prepare fresh cDNA, then repeat
the experiment.
Prepare the reactions as described
on page 16.
Increase the number of PCR
cycles to the default setting of 40
(see page 17).
• Prepare the reaction mixes
and the reaction plate on ice.
• To ensure optimal results,
run the reaction plate as soon
as possible after completing
the reaction setup. If you
cannot run a reaction plate
within 2 hours after
completing the reaction
setup, store the reaction plate
at 4°C.
Use the default thermal profile
settings (see page 17).
• Prepare the reaction mixes
and the reaction plate on ice.
• To ensure optimal results,
run the reaction plate as soon
as possible after completing
the reaction setup. If you
cannot run a reaction plate
within 2 hours after
completing the reaction
setup, store the reaction plate
at 4°C.
SYBR® Select Master Mix User Guide
Observation
Rn vs. Cycle plot is not
displayed
Extremely high ∆Rn or Rn
values
Lower ∆Rn values obtained in
early cycles
High variability across the
reaction plate
Possible Cause
ROX™ dye was not selected as the
passive reference when the plate
document was set up
ROX dye was not selected as the
passive reference when the plate
document was set up
Evaporation
CT value is less than 15
ROX dye was not selected as the
passive reference when the plate
document was set up
Evaporation
High variability across
replicates
Reaction mix was not mixed well
Fluorescent intensity too high
(StepOne™ and StepOnePlus™
systems)
Primer concentration is too high
SYBR® Select Master Mix User Guide
Action
Select ROX dye as the passive
reference when you set up the
plate document.
Select ROX dye as the passive
reference when you set up the
plate document.
Make sure that the reaction plate
is sealed completely, especially
around the edges.
Adjust the upper baseline range
to a value less than 15.
Select ROX dye as the passive
reference when you set up the
plate document.
Make sure that the reaction plate
is sealed completely, especially
around the edges.
Mix the reaction mix gently by
inversion, then centrifuge briefly
before aliquoting to the reaction
plate.
Use ≤200 nM of each primer.
25
Appendix A
Identify Target Sequences and Design Primers
Identify Target
Sequence and
Amplicon Size
Guidelines for
Designing Primers
A target template is a DNA sequence, including cDNA, genomic DNA, or
plasmid nucleotide sequence that you want to amplify.
Using Primer Express Software, you design primers to amplify amplicons
(segments of DNA) within the target sequence. Shorter amplicons work best.
Consistent results are obtained for amplicon size ranges from 50 to 150 bp.
Using Primer Express® Software
Design primers using Primer Express Software as described in the Primer
Express® Version 3.0 Getting Started Guide (PN 4362460) and Online Help.
General Guidelines
•
Do not overlap primer and probe sequences. The optimal primer length is
20 bases.
•
Keep the GC content in the 30–70% range.
•
Avoid runs of identical nucleotides. If repeats are present, there must be
fewer than four consecutive G residues.
•
Make sure the last five nucleotides at the 3´ end contain no more than two
G and/or C bases.
If the template is…
Then…
DNA
plasmid DNA
Design the primers as described above.
genomic DNA
cDNA
RNA
26
Design the primers as described above. Also
see “Select an Amplicon Site for cDNA” on
page 27.
Design the primers as described above.
SYBR® Select Master Mix User Guide
Select an
Amplicon Site for
cDNA
Selecting a good amplicon site ensures amplification of the target cDNA
without co-amplifying the genomic sequence, pseudogenes, and related genes.
Guidelines
•
The amplicon should span one or more introns to avoid amplification of the
target gene in genomic DNA.
•
The primer pair must be specific to the target gene; the primer pair does not
amplify pseudogenes or other related genes.
•
Design primers according to Primer Express Software guidelines.
•
Test the amplicons, then select those that have the highest signal-to-noise
ratio (that is, low CT with cDNA and no amplification with no template
control or genomic DNA).
•
If no good sequence is found, you may need to examine the sequence and
redesign the amplicon or to screen for more sites.
If the gene you are studying does not have introns, then you cannot design an
amplicon that amplifies the mRNA sequence without amplifying the genomic
sequence. In this case, you may need to run RT minus controls.
SYBR® Select Master Mix User Guide
27
Optimize Primer Concentrations for PCR
Overview
Quantitate the
Primers
By independently varying the forward and reverse primer concentrations, you
can identify the primer concentrations that provide optimal assay performance.
The primer concentrations you select should provide a low CT and a high ∆Rn
when run against the target template, but should not produce nonspecific
product formation with NTCs.
1.
Measure the absorbance (at 260 nm of a 1:100 dilution) of each primer
oligonucleotide in TE buffer.
2.
Calculate the sum of extinction coefficient contributions for each
primer:
extinction coefficient contribution = Σ(extinction coefficient × number
of bases in oligonucleotide sequence)
See “An Example Calculation of Primer Concentration” on page 28 for
an example calculation.
3.
Calculate the oligonucleotide concentration in µM for each primer:
absorbance at 260 nm = sum of extinction coefficient contribution ×
cuvette pathlength × concentration/100
Rearrange to solve for concentration:
concentration = 100[absorbance at 260 nm / (sum of extinction
coefficient contribution × cuvette pathlength)]
An Example Calculation of Primer Concentration
In this example, the concentration of a primer (in TE buffer, diluted 1:100), with
the sequence CGTACTCGTTCGTGCTGC is calculated using the following
values:
Chromophore
Extinction
Coefficient
A
C
G
T
Total
15,200
7050
12,010
8400
—
Number of Specific
Chromophores in Example
Sequence
1
6
5
6
—
Extinction
Coefficient
Contribution
15,200
42,300
60,050
50,400
167,950
measured absorbance at 260 nm = 0.13
sum of extinction coefficient = 167,950 M-1cm-1 contributions for probe
cuvette pathlength = 0.3 cm
Absorbance (260 nm) = sum of extinction coefficient contributions × cuvette
pathlength × oligonucleotide concentration/100
0.13 = 167,950 M-1cm-1 × 0.3 cm × C/100
C = 258 µM
28
SYBR® Select Master Mix User Guide
Determine the
Optimal Primer
Concentration
CHEMICAL HAZARD. SYBR® Select Master Mix is a
combustible liquid and vapor (keep away from heat and flame). It may cause
eye, skin, and respiratory tract irritation. Read the SDS, and follow the handling
instructions. Wear appropriate protective eyewear, clothing and gloves.
To optimize primer concentrations for PCR:
1.
Prepare a 96-well reaction plate as described below.
Use 10 to 100 ng of genomic DNA or 1 to 10 ng of cDNA template.
The final concentration of SYBR® Select Master Mix is 1X.
Note: The plate configuration accounts for four replicates of each of the
following nine variations of primer concentration applied to both template
and NTC wells:
Reverse Primer
(nM)
2.
Forward Primer (nM)
150
150
150/150
200
200/150
400
400/150
200
150/200
200/200
400/200
400
150/400
200/400
400/400
Calibrate your instrument for SYBR Green Dye, if necessary. Refer to the
instrument user manual for calibration instructions.
Note: It is recommended to calibrate your instrument every 6 months.
Confirm the
Absence of
Nonspecific
Amplification
3.
Load the plate into a Life Technologies real-time PCR system.
4.
Program the thermal-cycling conditions according to the information in
step 2 on page 17.
5.
Run the plate.
6.
Compile the results for ∆Rn and CT, then select the minimum forward and
reverse primer concentrations that yield the maximum ∆R n values and low
CT values.
Dissociation curves help you select the optimal primer concentrations for your
SYBR quantification assays.
1.
Review the linear view of the amplification plot in your NTC wells.
Note: In Figure A-1 on page 30, part a, the strong amplification of the
NTC wells indicates that significant nonspecific amplification is
occurring.
2.
Generate a dissociation curve with your Real-Time PCR System.
Note: In the example dissociation curve data shown in Figure A-1 on
page 30, part b, the melting temperature of the product generated in the
absence of template is lower than the melting temperature of the
specific product generated with template. This variation is typical of
primer-dimer formation, and it indicates that lower primer
concentration may provide optimal results.
SYBR® Select Master Mix User Guide
29
Example of Nonspecific Amplification
Figure A-1 Amplification data using SYBR® Green dye chemistry
(a) Amplification plot (linear view) demonstrating suspected nonspecific
amplification in NTC wells.
(b) Dissociation curve analysis confirming that product in NTC wells has a
melting temperature different from the specific product.
30
SYBR® Select Master Mix User Guide
Appendix B
Safety
Chemical Safety
Guidelines
To minimize the hazards of chemicals:
•
•
•
•
•
Chemical Waste
Safety Guidelines
Read and understand the Safety Data Sheets (SDSs) provided by the
chemical manufacturer before you store, handle, or work with any
chemicals or hazardous materials.
Minimize contact with chemicals. Wear appropriate personal protective
equipment when handling chemicals (for example, safety glasses,
gloves, or protective clothing). For additional safety guidelines, consult
the SDS.
Minimize the inhalation of chemicals. Do not leave chemical containers
open. Use only with adequate ventilation (for example, fume hood). For
additional safety guidelines, consult the SDS.
Check regularly for chemical leaks or spills. If a leak or spill occurs,
follow the manufacturer’s cleanup procedures as recommended in the
SDS.
Comply with all local, state/provincial, or national laws and regulations
related to chemical storage, handling, and disposal.
To minimize the hazards of chemical waste:
•
Read and understand the Safety Data Sheets (SDSs) provided by the
manufacturers of the chemicals in the waste container before you store,
handle, or dispose of chemical waste.
•
Provide primary and secondary waste containers. (A primary waste
container holds the immediate waste. A secondary container contains spills
or leaks from the primary container. Both containers must be compatible
with the waste material and meet federal, state, and local requirements for
container storage.)
•
Minimize contact with chemicals. Wear appropriate personal protective
equipment when handling chemicals (for example, safety glasses, gloves, or
protective clothing). For additional safety guidelines, consult the SDS.
•
Minimize the inhalation of chemicals. Do not leave chemical containers
open. Use only with adequate ventilation (for example, fume hood). For
additional safety guidelines, consult the SDS.
•
Handle chemical wastes in a fume hood.
•
After emptying the waste container, seal it with the cap provided.
•
Dispose of the contents of the waste tray and waste bottle in accordance with
good laboratory practices and local, state/provincial, or national
environmental and health regulations.
SYBR® Select Master Mix User Guide
31
Waste Disposal
If potentially hazardous waste is generated when you operate the instrument,
you must:
•
Characterize (by analysis if necessary) the waste generated by the particular
applications, reagents, and substrates used in your laboratory.
•
Ensure the health and safety of all personnel in your laboratory.
•
Ensure that the instrument waste is stored, transferred, transported, and
disposed of according to all local, state/provincial, and/or national
regulations.
IMPORTANT! Radioactive or biohazardous materials may require special
handling, and disposal limitations may apply.
Biological Hazard
Safety
BIOHAZARD. Biological samples such as tissues, body
fluids, infectious agents, and blood of humans and other animals have the
potential to transmit infectious diseases. Follow all applicable local,
state/provincial, and/or national regulations. Wear appropriate protective
equipment, which includes but is not limited to: protective eyewear, face shield,
clothing/lab coat, and gloves. All work should be conducted in properly
equipped facilities using the appropriate safety equipment (for example,
physical containment devices). Individuals should be trained according to
applicable regulatory and company/institution requirements before working
with potentially infectious materials. Read and follow the applicable guidelines
and/or regulatory requirements in the following:
•
U.S. Department of Health and Human Services guidelines published in
Biosafety in Microbiological and Biomedical Laboratories
http://bmbl.od.nih.gov
•
Occupational Safety and Health Standards, Bloodborne Pathogens (29
CFR§1910.1030;
http://www.access.gpo.gov/nara/cfr/waisidx_01/29cfr1910a_01.html).
•
Your company’s/institution’s Biosafety Program protocols for working
with/handling potentially infectious materials.
Additional information about biohazard guidelines is available at:
http://www.cdc.gov
32
SYBR® Select Master Mix User Guide
Documentation and Support
Support
Documents
You can download the following documents from the Life Technologies website
at: www.lifetechnologies.com
Document
All Systems
Part number
High-Capacity cDNA Reverse Transcription Kit Protocol
Primer Express® Software Version 3.0 Getting Started Guide
Real-Time PCR Systems Chemistry Guide
4375575
4362460
4348358
StepOne and StepOnePlus Systems
Applied Biosystems StepOne™ Real-Time PCR System Getting Started Guide for
Relative Standard Curve and Comparative CT (∆∆CT) Experiments
Applied Biosystems StepOne™ Real-Time PCR System Getting Started Guide for
Standard Curve Experiments
Applied Biosystems StepOne™ Real-Time PCR System Installation, Maintenance, and
Networking Guide
4376785
4376784
4376782
7500 Fast System
Applied Biosystems 7300/7500/7500 Fast Real-Time PCR System Installation and
Maintenance Getting Started Guide
Applied Biosystems 7300/7500/7500 Fast Real-Time PCR System Relative
Quantification Getting Started Guide
Applied Biosystems 7300/7500/7500 Fast Real-Time PCR System Absolute
Quantification Getting Started Guide
4347828
4347824
4347825
7900HT System
Applied Biosystems 7900HT Fast Real-Time PCR System and SDS Enterprise
Database User Guide
Applied Biosystems 7900HT Fast Real-Time PCR System User Bulletin: Performing
Fast Gene Quantification
4351684
4352533
ViiA™ 7 System
Applied Biosystems ViiA™ 7 Real-Time PCR System Getting Started Guides
Applied Biosystems ViiA™ 7 Real-Time PCR System User Guide
4441434
4442661
QuantStudio™ 12K System
Applied Biosystems QuantStudio™ 12K Real-Time PCR System User Guide
Obtaining support
4470050
For the latest services and support information for all locations, go to
www.lifetechnologies.com
At the website, you can:
•
Access worldwide telephone and fax numbers to contact Technical Support
and Sales facilities
•
Search through frequently asked questions (FAQs)
•
Submit a question directly to Technical Support ([email protected])
•
Search for user documents, SDSs, vector maps and sequences, application
notes, formulations, handbooks, certificates of analysis, citations, and other
product support documents
•
Obtain information about customer training
•
Download software updates and patches
SYBR® Select Master Mix User Guide
33
Safety Data Sheets
(SDS)
Safety Data Sheets (SDSs) are available at www.lifetechnologies.com/support.
Certificate of
Analysis
The Certificate of Analysis provides detailed quality control and product
qualification information for each product. Certificates of Analysis are available
on our website. Go to www.lifetechnologies.com/support and search for the
Certificate of Analysis by product lot number, which is printed on the box.
34
SYBR® Select Master Mix User Guide
Headquarters
5791 Van Allen Way | Carlsbad, CA 92008 USA | Phone +1 760 603 7200 | Toll Free in USA 800 955 6288
For support visit www.invitrogen.com/support
www.appliedbiosystems.com/support
or email [email protected]
www.lifetechnologies.com