1
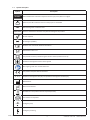
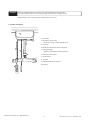
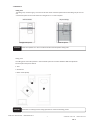
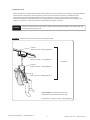
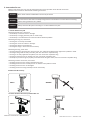
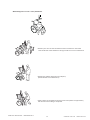
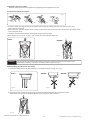
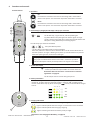
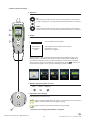
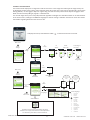
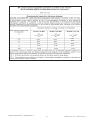
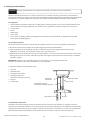
LikoGuard™
Overhead Lift
User Manual
LikoGuard™ L Prod. No. 3301030
LikoGuard™ XL Prod. No. 3301040
7EN121101 Rev. 3
English 2015-05-08
(C)2015. Liko R&D AB. All Rights Reserved.
LikoGuard™ Overhead lift • 7EN121101 Rev. 3
2
www.hill-rom.com I www.liko.com
Table of Contents
1. Introduction.......................................................................................................................... 4
1.1 Symbol description���������������������������������������������������������������������������������������������������������������5
1.2 Product description��������������������������������������������������������������������������������������������������������������6
1.3 Definitions����������������������������������������������������������������������������������������������������������������������������7
2. Safety information���������������������������������������������������������������������������������������������������������������� 8
2.1 Intended use�������������������������������������������������������������������������������������������������������������������������8
2.2 Maximum load���������������������������������������������������������������������������������������������������������������������9
3. Instructions for use������������������������������������������������������������������������������������������������������������� 10
3.1 Check before every lift��������������������������������������������������������������������������������������������������������10
3.2 Move the lift correctly��������������������������������������������������������������������������������������������������������10
3.3 Leave the lift in the correct position after use��������������������������������������������������������������������10
3.4 Choosing the correct Sling�������������������������������������������������������������������������������������������������� 10
3.5 Plan the transfer�����������������������������������������������������������������������������������������������������������������12
3.6 Apply the sling to the patient��������������������������������������������������������������������������������������������� 14
3.7 Connect the sling to the sling bar���������������������������������������������������������������������������������������14
3.8 Before lifting the patient from the surface..........................................................................14
4. Functions and controls�������������������������������������������������������������������������������������������������������� 15
4.1 Hand control�����������������������������������������������������������������������������������������������������������������������15
4.2 Hand control with display��������������������������������������������������������������������������������������������������� 16
4.3 Menus and information �����������������������������������������������������������������������������������������������������17
4.4 Charging the lift battery������������������������������������������������������������������������������������������������������19
4.5 Alternative charging system����������������������������������������������������������������������������������������������� 19
4.6 Limit Switch������������������������������������������������������������������������������������������������������������������������19
4.7 Operation panel on lift�������������������������������������������������������������������������������������������������������20
4.8 Emergency stop������������������������������������������������������������������������������������������������������������������20
4.9 Emergency lowering devices���������������������������������������������������������������������������������������������� 20
4.10 Quick attachment device�������������������������������������������������������������������������������������������������� 20
4.11 Latches on sling bar����������������������������������������������������������������������������������������������������������21
5. Recommended lifting accessories�������������������������������������������������������������������������������������� 21
6. Trouble shooting���������������������������������������������������������������������������������������������������������������� 22
7. Inspection and maintenance ��������������������������������������������������������������������������������������������� 23
7.1 Care and maintenance�������������������������������������������������������������������������������������������������������23
7.2 Service.................................................................................................................................23
7.3 Service agreement��������������������������������������������������������������������������������������������������������������23
7.4 Expected life time���������������������������������������������������������������������������������������������������������������23
7.5 Transport and storage��������������������������������������������������������������������������������������������������������23
7.6 Recycling..............................................................................................................................23
7.7 Product changes�����������������������������������������������������������������������������������������������������������������23
8. Product data....................................................................................................................... 24
8.1 Technical specifications������������������������������������������������������������������������������������������������������24
8.2 Dimensions�������������������������������������������������������������������������������������������������������������������������24
8.3 Electromagnetic emissions������������������������������������������������������������������������������������������������� 25
8.4 Electromagnetic immunity������������������������������������������������������������������������������������������������� 25
9. Cleaning and disinfection��������������������������������������������������������������������������������������������������� 28
9.1 Equipment...........................................................................................................................28
9.2 Cleaning instructions����������������������������������������������������������������������������������������������������������28
9.3 Disinfection instructions�����������������������������������������������������������������������������������������������������28
9.4 Use of cleaning and disinfecting agents on the LikoGuard™ Overhead lift������������������������29
LikoGuard™ Overhead lift • 7EN121101 Rev. 3
3
www.hill-rom.com I www.liko.com
1 Introduction
Thank you for choosing a Liko™ product. With a genuine regard for safety and ease of use, patient handling solutions from
Liko have for decades been greatly appreciated by healthcare facilities worldwide. The LikoGuard™ overhead lift series is a
new generation platform built with experience combined with innovation to meet the future of overhead lift systems. With
powerful performance and enhanced safety design, the LikoGuard Overhead lift is the latest addition to the long line of Liko
quality products, designed and manufactured in Sweden.
Hill-Rom offers training in patient handling techniques in order to ensure that the equipment is used in a safe and effective
way. For training on the use of this product, contact your local Hill-Rom representative.
Manufacturer:
Liko AB
Nedre vägen 100
97592 Luleå
+46 920 - 474700
+46 920 - 474701
LikoGuard™ Overhead lift • 7EN121101 Rev. 3
4
www.hill-rom.com I www.liko.com
1.1 Symbol description
Symbol
WARNING!
Description
Failure to follow the instructions may lead to serious injury to the patient or caregiver.
Overload, the lifts maximum load or its duty cycle are exceeded.
SWL
Important!
Safe working load = maximum load
Failure to follow the instructions may lead to damage to the product.
Service required
Sound signal (audible)
Read the user manual for detailed information.
Intended for indoor use.
The product has extra protection against electric shock (Insulation Class II).
Protection level against electric shock Type BF.
Risk ongoing, read user manual before use.
This product complies with EC directives.
IP N1 N 2
Protection level against dust (N1) and protection level against moisture (N2).
Manufacturer
Date of manufacture.
All batteries in this product must be recycled separately.
The material is recyclable.
�
STOP
Emergency stop
2
Emergency lowering
LikoGuard™ Overhead lift • 7EN121101 Rev. 3
5
www.hill-rom.com I www.liko.com
WARNING!
Read and understand the user manual in its entirety before using the product.
Use of the product without a full understanding of the contents is subject to risk.
Always keep the user manual close at hand for daily user access.
1.2 Product description
1
1. Lift motor.
2
2. Operation panel on lift
- Electronic raising / lowering of lift strap.
3
3. Lift strap.
4. Multi-link; attachment point at lift strap.
6
5
5. Emergency stop
- Mechanical Emergency lowering device.
6. Cable for hand control.
4
9
8
10
7. Hand control.
8. Sling bar.
9. Attachment point at sling bar.
10. Latches.
7
LikoGuard™ Overhead lift • 7EN121101 Rev. 3
6
www.hill-rom.com I www.liko.com
1.3 Definitions
Lifting area
The lifting area, marked in grey, is the area under the actual overhead system where safe lifting may be carried
out.
A overhead system can be constructed as a Straight-rail or a Traverse System.
Traverse system
Straight-rail system
WARNING!
Never lift a patient to or from a location outside of the lift systems lifting area!
Lifting point
The lifting point is the lift's position in the overhead system for transfers between different objectives.
See examples of lift points below:
1. bed
2. wheelchair
3. water closet (toilet).
3.
1.
2.
WARNING!
Remember to always plan the lifting operation to and from the lifting points!
LikoGuard™ Overhead lift • 7EN121101 Rev. 3
7
www.hill-rom.com I www.liko.com
2 Safety information
2.1 Intended Use
The LikoGuard™ Overhead lift is part of a Liko™overhead lift system.
An overhead lift system can be used for:
- Lifting between a bed and a wheelchair and for toileting.
- Lifting to / from the floor.
- Lifting together with a stretcher.
- Rehabilitation training such as walking and standing.
The intended use for the LikoGuard overhead lift does not include any lifting by the patient / person alone. Lifting
and transferring a person shall always be performed with the assistance of at least one caregiver for the patient.
The LikoGuard overhead lift is used as a means to perform the lift but is not in contact with the patient; therefore
we do not go into the various patient conditions in this manual.
Contact your Hill-Rom representative for support and advice.
Expected Life Time
Load Case 1
Load Case 2
Load Case 3
Load Case 4
363 kg (800 Ibs.)
272 kg (600 Ibs.)
200 kg (440 Ibs.)
100 kg (220 Ibs.)
14500
19000
26000
52000
Total normal lifts*
5
years
lifting
frequency
8 lifts/day
10 lifts/day
14 lifts/day
29 lifts/day
7
years
lifting
frequency
5 lifts/day
7 lifts/day
10 lifts/day
20 lifts/day
10
years
lifting
frequency
4 lifts/day
5 lifts/day
7 lifts/day
14 lifts/day
*A normal lift = 70 cm up of which 40 cm with load followed by 70 cm down of which 40 cm with load.
*A normal lift = 27.6 inch. up of which 15.7 inch. with load followed by 27.6 inch. down of which 15.7 inch. with load.
WARNING!
The lift must not be used beyond its expected life time.
WARNING!
The lift must be installed by Hill-Rom trained personnel, in accordance with Liko’s current installation
instructions and recommendations regarding the lift system in question. The lift shall only be installed
into Liko rails intended for Liko overhead systems.
WARNING!
The lift must not be modified under any circumstances. If you have any questions, please
contact Hill-Rom.
The lift may not be used in areas where flammable goods are stored or where flammable mixtures may occur.
Particular care must be taken when using powerful sources of electromagnetic disturbance. In example, when using
diathermy in physical or occupational therapy, the diathermy cables should not be positioned on or near the lift.
If you have any questions, please consult the responsible equipment manager or contact Hill-Rom.
LikoGuard™ Overhead lift • 7EN121101 Rev. 3
8
www.hill-rom.com I www.liko.com
2.2 Maximum load
A Liko™ lift system is a combination of products. Each product has its own maximum load marking. The lowest specified
maximum load of the products that comprises the system sets the maximum load for the complete lift system.
The lift system can contain following products; lift rails, a lift motor, a sling bar, a sling or other recommended
accessories. Identify the maximum load for the complete lift system by reading the maximum load marking on each
product in the system. Contact your Hill-Rom representative for support and advice.
WARNING!
The total maximum load for a lift system is always determined by the product in the system with the
lowest specified maximum load.
Example: Determine the maximum load for the lift system below.
Lift rails
Maximum load: = 300 kg (660 Ibs.)
Lift motor
Maximum load: = 272 kg (600 Ibs.)
Lift system
Sling bar
Maximum load: = 363 kg (800 Ibs.)
Sling
Maximum load: = 200 kg (440 Ibs.)
In this example, the maximum load for the
complete lift system is defined by the sling.
The lift system´s maximum load = 200 kg (440 Ibs.)
LikoGuard™ Overhead lift • 7EN121101 Rev. 3
9
www.hill-rom.com I www.liko.com
3. Instructions for use
Before using the lift, the user must be informed of the correct operation of the lift and accessories.
Read the user manuals for both the lift and lifting accessories.
WARNING!
Never leave children unattended in the vicinity of the lift!
WARNING!
The hand control and cord must always hang free from the lift with no contact with surrounding
objects during movement of a patient.
WARNING!
Always check the lift system according to "3.1 Check before every lift"
3.1 Check before every lift
Reviewing the lift strap, check that:
– the lift strap is free from wear or damage.
– the lift strap is hanging vertically and can move freely.
– the lift strap is not twisted and can enter the lift unit without problem.
Reviewing the sling bar, check that:
– the sling bar is correctly assembled.
– the sling bar is free from wear or damage.
– the sling bar latches are functioning.
– the sling bar hangs in level and can move freely.
Reviewing the sling, check that:
– the sling selected is appropriate in terms of type, size, material and design with regard to the patient’s needs.
– the sling is being used correctly and safely, see user manual for respective sling.
– the sling is correctly applied to the patient, see user manual for respective sling.
– the sling is free from wear or damage, see user manual for respective sling.
– the strap loops of the sling are properly connected to the sling bar hooks, see user manual for respective sling.
Reviewing of other accessories, check that:
– the lifting accessories are properly attached to the lift.
– the lifting accessories are correctly chosen in relation to the patient’s needs.
– the lifting accessories are not damaged.
– the lifting accessories hang vertically and can move freely.
3.2 Move the lift correctly
RIGHT!
WRONG!
3.3 Leave the lift in the correct position after use
WRONG!
RIGHT!
LikoGuard™ Overhead lift • 7EN121101 Rev. 3
10
www.hill-rom.com I www.liko.com
3.4 Choosing the correct sling
Liko has a broad assortment of slings in a variety of models. Our basic models cover the most common lifting needs
while our special designed models are for our users with special needs. All slings have their own unique characteristics
and are available in variety of sizes. To choose the correct model and size of the sling is of highest importance for
safety, function and comfort for the user. For guidance and support in choosing the correct sling, visit www.liko.com or
contact your Hill-Rom representative.
Note! Always read the user manual that comes with Liko´s different sling models for correct and safe use of the sling.
RIGHT!
RIGHT!
WRONG!
If the sling is too big there is a risk that:
The patient can slip out of the sling see Fig. 5.
WRONG!
If the sling is too small there is a risk that:
The patient´s head will not be supported and may end
up close to the sling bar. The sling may seem tight to the
patient, see Fig. 6.
Fig. 5
Fig. 6
LikoGuard™ Overhead lift • 7EN121101 Rev. 3
11
www.hill-rom.com I www.liko.com
3.5 Plan the transfer
It is important to plan the lifting operation so it will be as smooth and safe as possible.
Consider the following points before the lifting operation:
– Always work ergonomically. Use the patient’s ability to actively participate in the operation.
– Make sure the patient is sitting securely in the sling before transferring to another location.
– Never lift a patient higher off of the underlying surface than necessary to complete the lifting and transfer
procedure.
– Never move a patient further than necessary.
WARNING!
Never leave a patient unattended during a lifting situation!
When lifting into or out of bed:
Work from the long side of the bed.
– Lock the bed wheels.
– Raise the bed to a comfortable working height when applying the sling.
– Follow the instructions in the user manual for the respective slings regarding
correct application and use.
– If possible, raise the back of the bed before commencing the lift.
– Lower the bed during the lifting and transferring of the patient in order to
minimize the distance between the patient and the floor during the lifting
operation.
LikoGuard™ Overhead lift • 7EN121101 Rev. 3
12
www.hill-rom.com I www.liko.com
When lifting into or out of a chair/ wheelchair:
– Position your chair so that the distance of the movement is minimized.
Lock the wheels of the wheelchair during transfers to or from a wheelchair.
– Position the patient above the chair lift point,
(Locked wheels on the wheelchair).
– Apply support to the patient’s knees to ensure the patient is supported by
the chair back once lifting is completed.
LikoGuard™ Overhead lift • 7EN121101 Rev. 3
13
www.hill-rom.com I www.liko.com
3.6 Apply the sling to the patient
Read the user manual for the respective sling regarding correct application and use.
3.7 Connect the sling to the sling bar
Fig. 7.
•In order to attach the sling correctly to the patient and the sling bar, always study the user manual for the sling
to be used in that instance.
•Lift the latches to open the sling bar hooks, see Fig. 7, (first attach the upper strap loops and then the leg support loops
to each sling bar hook)
•The sling is correctly attached when the sling bar hangs in level, see Fig. 8
•If the sling bar is not in level, see Fig. 9. refer to the user manual for the sling in use.
RIGHT!
WRONG!
Fig. 8.
Fig. 9.
WARNING!
The sling strap loops must be attached to the sling bar hooks so that the sling bar latches close
completely, preventing involuntary unhooking of the sling strap loops.
3.8 Before lifting the patient from the surface:
1. Check that the lift strap is hanging vertically, is not twisted or askew, see Fig. 10, 11, 12.
RIGHT!
WRONG!
Fig. 10.
WRONG!
Fig. 11.
Fig. 12.
2. Raise the sling bar so that the sling's straps are taut but without lifting the patient from the surface.
Check that the strap loops are properly attached to the sling bar hooks, see Fig. 13.
Fig. 13.
LikoGuard™ Overhead lift • 7EN121101 Rev. 3
14
www.hill-rom.com I www.liko.com
kg/lbs
4 Functions and controls
4.1 Hand control
1. Operation
Up
Lift movement is based on the hand control being held in the direction
shown in the picture. The movement stops when the button is released.
Down
Lift movement is based on the hand control being held in the direction
shown in the picture. The movement stops when the button is released.
3
2
4
kg/lbs
2. Overloading by weight (the lift stops) or Duty cycle exceeded
The lift’s maximum load has been exceeded!
+
1
The lift will stop, a signal sounds, and the symbol lights
up yellow. When the symbol goes out and the signal no longer sounds, the lift can be used again. Check the load and whether the lift system is being affected by surrounding objects.
The lift´s Duty cycle has been exceeded!
The symbol flashes yellow.
-The lift´s time in operating mode has been exceeded!
Lower the patient to a secure surface. Allow the lift to rest for around 40 minutes or
until the symbol is no longer is flashing if any of the up or down buttons are pressed.
When the symbol goes out, the lift can be used again.
Duty cycle
Duty cycle includes the time the lift can be used in continuous operation
and the subsequent inactive period required for the engine to cool down.
3. Service information
Service period! kg/lbs
The symbol lights up yellow.
- contact your Hill-Rom representative for service of the lift.
Read more about service under “7.2 Service and 7.3 Service agreement” on page 23.
The lift may be used as normal during this period.
4. Battery information
The lift’s battery power is indicated by 4 lamps. Example: battery power is 100 % when
all lamps (1 - 4) lights, when only the lamp (1) lights, maximum 25% of battery power
remains. Note! If the lamp (1) blinks and a signal
sounds, the lift should be charged
at once.
1 2 3 4
25%
50%
75%
100%
1 2
5. Charging Information
When the hand control is connected to the wall charger the lights indicates:
5
1 2
Light 1 indicates yellow when the charger is connected to mains connection Light 2 indicates yellow when charging is ongoing
1 2
Light 2 indicates green when the battery is fully charged.
Read more at 4.4 "Charging the lift battery", on page 19.
LikoGuard™ Overhead lift • 7EN121101 Rev. 3
15
www.hill-rom.com I www.liko.com
kg/lbs
4.2 Hand control with display
1. Operation
Up
Lift movement is based on the hand control being held in the direction
shown in the picture. The movement stops when the button is released.
Down
Lift movement is based on the hand control being held in the direction
shown in the picture. The movement stops when the button is released.
2
3
2. Display
Display window consists of two fields.
1
Symbols
Information,
messages or
menus.
The small field: shows symbols
The large field: shows different information,
messages or menus.
Read more on page 18.
When the lift is in use the display window shows remaining battery power. The
battery power is indicated by four fields. Example, battery power is 100% when
all 4 fields are displayed. If only one field is displayed, maximum 25% of battery
power remains. Note! If "Low battery" is displayed and a signal
sounds, the
lift should be charged at once, less than 10% battery power remains.
kg/lbs
3. Manage display information in menus
“Back”
“Select” “Navigate”
4. Information when charging
Indicating lights on hand control:
1 2
4
LikoGuard™ Overhead lift • 7EN121101 Rev. 3
1 2
1 2
Light 1 indicates yellow when the charger is connected to mains connection. Light 2 indicates yellow when charging is ongoing
Light 2 indicates green when the battery is fully charged.
Read more at 4.4 "Charging the lift battery", on page 19.
16
www.hill-rom.com I www.liko.com
4.3 Menus and information
The hand controls display has a usage menu and service menu. In the usage menu two types of usage history can
be displayed. The first is the history of all heavy lifts performed in the past 7 day´s period. A heavy lift is at minimum
200 kg (440 Ibs.). To start gage 7 days from a given day, just reset the 7 day interval at the day for the gage to start.
Read more about heavy lifting at page 8, 2.1 Intended use.
The second usage history is for every lift performed regardless of weight since the lift was taken in use the first time.
In the Service menu, settings of 14 different languages to choose among is available. The Service menu also contain
information regarding when the next service is due.
- To display the menus; Hold down the button
on the hand control for 2 seconds.
Main menu
Usage
Select
“Usage”
to:
“7 days”
7 days
to:
“Usage”
Select
“Yes or No”
to:
“Reset”
7 days
All lifts:
15
Heavy Lifting
3
Totally
Reset
Usage
7 day usage is
now reset
Reset
Reset
7 days
7 days
7 days
No
No
All lifts:
0
Heavy Lifting
0
Yes
Yes
Reset
Select:
“Total”
Service
Back to
Usage menu
Usage
7 days
to:
“Total”
Totally
All lifts
Totally
Main menu
380
Heavy Lifts
18
Select
“Service”
Back to
Main menu
Back to “Usage”
menu
Ex. Lift service
overdue, should
have taken place 3
days ago.
Ex. Lift service
required within
27 days.
Usage
Service
to:
“Service”
Service
to:
“Next”
Next
Next
Due in:
Past due:
27 days
3 days
Next
Language
Language
Advanced
Back to
Main menu
to:
“Language”
•
Advanced Menu
Password
Note!
the Advance Service menu is protected by a password.
Intended use is only by service technician trained by Hill-Rom.
For information, please refer to the Service Manual.
LikoGuard™ Overhead lift • 7EN121101 Rev. 3
choose language:
•
Chinese
•
Danish
•
Dutch
17
•
•
•
•
•
•
•
•
•
•
English
Finnish
French
German
Italian
Japanese
Norwegian
Portuguese
Russian
Spanish
Swedish
www.hill-rom.com I www.liko.com
Battery power information.
When the lift is in use, the battery power status is displayed at the hand control´s display window.
Symbols and Information
A pop-up message is displayed on screen for 5 seconds or until any button on the hand control is pressed.
To Menus
Service required
Overload! (maximum load)
Open menus
press
Service required
Overload
Overload
duty cycle
operating time
Overload!
2 seconds
- To display menus
Usage or Service;
Hold in the
-button
on the hand control for
2 seconds.
Low battery!
The symbol lights yellow.
- Book a time for service,
contact Hill-Rom.
Read more about service
at; 7.2 "Service" and 7.3
"Service agreement" on
page 23.
The lift may be used as
normal during this period.
No contact!
+
The symbol lights yellow
and a signal sounds.
The lift stops.
Check the load and
Check that the lift is not
stucked to any surrounding
objects.
When the symbol goes out
and the sound signal goes
off, the lift can be used
again.
Emergency stop activated!
The symbol flashes yellow.
- The lift’s Duty Cycle has been
exceeded. The lift may be used
to lower the patient to a secure
surface. Allow the lift to rest for
around 40 minutes or until the
message is no longer displayed
when the button or is
pressed.
When the symbol goes out, the
lift can be used again.
Read more about Duty cycle at
pages 15 and 18.
No lifting allowed!
No lifting allowed!
Low battery level
- The battery should
be charged at once.
Overload (Duty Cycle)
- Hand control has
no contact with the lift.
LikoGuard™ Overhead lift • 7EN121101 Rev. 3
- Press in the emergency
stop button on the
underside of the lift to
reset.
�
(marked) STOP
18
- An operational fault has
occurred. No lifting is allowed,
lower the patient to a secure
surface.
Contact your Hill-Rom
representative for service.
www.hill-rom.com I www.liko.com
4.4 Charging the lift battery
It is important that the lift battery is charged regularly. Always activate the lift´s charging system when not in use.
Full charge is achieved after maximum 6 hours. With a fully charged battery approximately 35 normal* lifts with a
load of maximum 100 kg (220 Ibs.) can be carried out. Regular charging is important to maximize battery life.
*A normal lift = 70 cm (27.6 in) up on which 40 cm (15.7 in) is with a load, followed by 70 cm (27.6 in) down
of which 40 cm (15.7 in) is with a load.
NOTE! When the lift is not in use activate the lift charging system. If the charger cannot be used, the emergency stop
function should be activated to prevent draining the battery.
The lift cannot be charged with the emergency stop activated.
Charging with a wall charger (Prod. No. 3305010-3305050)
1. - Check that the lift´s emergency stop is not activated
- Check that the switch on the wall chargers right-hand side is switched on, see Fig.1. (The switch can function as an emergency circuit breaker in the event that a fault occurs).
2. Place the hand control in the wall charger
3. Light (1) on the hand control indicates yellow when the charger is connected to the mains connection, see Fig. 2.
4. The charger starts automatically and the light (2) indicates yellow
when charging is ongoing, see Fig. 2.
1 2
5. When the battery is fully charged the charger
automatically disconnects and the light (2) on the 1 2
hand control indicates green see Fig. 2.
kg/lbs
kg/lbs
kg/lbs
1 2
Fig. 1
Fig. 2
WARNING!
Never use power sources other than the Liko™ recommended. See technical data page 24.
4.5 Alternative charging system.
The Liko In-Rail Charging system is an easy to use charging solution that continuously charges the lift when it is not
in use. When lift is in use, the charging stops and will automatically resume in about 5 min after finished use.
Hand control indicators, see 4.4 Fig 2.
1 2
Light 1 indicates yellow when the charger is connected to mains connection
Light 2 indicates yellow when charging is ongoing
1 2
Light 2 indicates green when the battery is fully charged.
Access to the mains connection shall not be blocked; to pull out the plug can in the event of a fault,
be used as a circuit breaker!
For more information contact your Hill-Rom representative or visit www.liko.com.
4.6 Limit Switch
The lift motion stops by a light touch to the Limit Switch. If the lift strap is fully rewound, pulled sideways or folded
over during lifting so the Limit Switch i activated, the lift motion stops. If the Limit Switch has been activated the lift
can be restarted as soon as an example;the lift strap not activates the limit switch, in these cases a short response
delay is normal during restart.
Be aware that the lift strap must be kept straight and taut when it runs in and out of the lift unit.
LikoGuard™ Overhead lift • 7EN121101 Rev. 3
19
www.hill-rom.com I www.liko.com
4.7 Operation panel on lift
If needed, the lifting motion can also be controlled without the hand control via the respective
buttons on the operation panel.
and
4.8 Emergency stop
Activate emergency stop: Pull out the emergency stop button using the red emergency stop cord.
Reset emergency stop: Push in the emergency stop button.
4.9 Emergency lowering
Mechanical emergency lowering;
1. Pull down and 2. Drop the red emergency stop band, see Fig. 3a and 3b.
Repeat 1 -2 until the patient has been lowered down to solid and secure base, and the lift strap is slack.
Note! Apply load during a functionality check by pulling gently with one hand in the lift strap.
1
Fig. 3a
2
(repetat 1-2 )
Fig. 3b
Electrical Emergency lowering; use hand control or the operation panel at the lift motor. Note! The Emergency
Stop shall not be activated! Press the down button
to lower the patient to secure surface and the lift strap
is slack, see page 20 “4.7 Operation panel on lift”, or page 15 “4.1 Hand control”.
4.10 Quick attachment device
WARNING!
Always check that accessory with a quick attachment device is correctly attached to the lift strap attachment.
Pull out the green button on the Quick-Hook Multi ,see Fig. 4a. Attach the quick hook to the Multi-Link on the lift strap
and release the button. Quick-Hook Multi is now attached and locked to the the lift straps Multi-Link, see Fig. 4b.
Multi -Link
Quick-Hook Multi
fig. 4b
Fig. 4a
LikoGuard™ Overhead lift • 7EN121101 Rev. 3
20
www.hill-rom.com I www.liko.com
4.11 Latches on sling bar
5. Recommended lifting accessories
For guidance and support in choosing the correct sling, visit www.liko.com. or contact your Hill-Rom representative.
WARNING!
To use other lifting accessories than those recommended by Liko™ can entail risk.
Below you find lifting accessories suitable for the LikoGuard™ Overhead lift.
SlingGuard™ 450 with Quick-Hook Multi
Maximum load 363 kg (800 Ibs.)
Prod. No. 3308520
SlingGuard™ 450
Maximum load 363 kg (800 Ibs.)
Prod. No. 3308020
Sling Cross-bar 450
Maximum load 300 kg (660 Ibs.)
(Requires, Fixed kit 4, Prod. No. 3308860 )
Prod. No. 3156021
Sling Cross-bar 670
Maximum load 300 kg (660 Ibs.)
(Requires, Fixed kit 4, Prod. No. 3308860)
Prod. No. 3156018
FlexoStretch™
Maximum load 300 kg (660 Ibs.)
(Requires, Fixed kit 4, Prod. No. 3308860)
Prod. No. 3156057
LikoStretch™ 1900
Maximum load 250 kg (550 Ibs.)
(Requires, Fixed kit 4, Prod. No. 3308860)
Prod. No. 3156051
LikoStretch™ Mod 600 IC
Maximum load 250 kg (550 Ibs.)
(Requires, Fixed kit 4, Prod. No. 3308860)
Prod. No. 3156065
LikoStretch™ Mod 600 IC
(B = wider model)
Maximum load 250 kg (550 Ibs.)
(Requires, Fixed kit 4, Prod. No. 3308860)
Prod. No. 3156065B
OctoStretch™
Maximum load 200 kg (440 Ibs.)
(Requires, Fixed kit 4, Prod. No. 3308860)
Prod. No. 3156055
OctoStretch™
Maximum load 200 kg (440 Ibs.)
(Requires, Fixed kit 4, Prod. No. 3308860)
Prod. No.3156056
LikoGuard™ Overhead lift • 7EN121101 Rev. 3
21
www.hill-rom.com I www.liko.com
LikoScale™ 350 Prod. No. 3156228
(Requires either one of, Quick-Hook Kit 1, Prod. No. 3308810
or Fixed Kit 1, Prod. No. 3308820)
Sling Bar 220 Mini
(Requires, Fixed kit 4, Prod. No. 3308860)
Max. 205 kg (450 Ibs)
Prod. No. 3156005
Universal Twinbar 670
(Requires, Fixed kit 4, Prod. No. 3308860)
Max. 300 kg (660 Ibs.
Prod. No. 3156077
6. Trouble shooting
The lift does not work
1. Check that the Emergency Stop button is not activated.
2. Charge the LikoGuard™ Overhead lift.
3. If the lift still does not work satisfactorily, please
contact Hill-Rom.
A repeated signal can be heard from the lift
1. Charge the LikoGuard™ Overhead lift immediately.
2. If the lift still does not work satisfactorily, please
contact Hill-Rom.
The lift stops in the high position
1. Check that the Emergency Stop button is not activated.
2. Use the mechanical or the electrical emergency lowering
device to lower the patient onto a firm surface.
3. Charge the LikoGuard™ Overhead lift.
4.If the lift still does not work satisfactorily, please
contact Hill-Rom.
The lift does not achieve maximum lifting capacity
1. Charge the LikoGuard™ Overhead lift.
2. If the lift still does not work satisfactorily, please
contact Hill-Rom.
Please contact Hill-Rom.
In the event of excessive noise from the lift!
LikoGuard™ Overhead lift • 7EN121101 Rev. 3
22
www.hill-rom.com I www.liko.com
7 Inspection and maintenance
7.1 Care and maintenance
For trouble-free use, certain details should be checked daily prior to using the lift:
• Inspect the lift and check to make sure that there is no external damage.
• Check the sling bar attachment.
• Check the lift strap for wear and to ensure the strap is not twisted.
• Check the functionality of the latches.
• Check the lifting movement function, up and down, at both hand control and the operation panel at the lift.
• Check to make sure that the electrical emergency lowering is functioning.
• Check to make sure that the mechanical emergency lowering is functioning, see "4.9 Emergency lowering" page 20.
• Charge the batteries each day the lift is used and check to ensure the charger works.
When required, clean the lift by wiping down with a cloth moistened with warm water.
For detailed information regarding cleaning and disinfecting of your Hill-Rom product see the section "Cleaning and disinfection" on pages 28-29.
The lift should not be exposed to running water.
7.2 Service
The LikoGuard™ Overhead lift should be subjected to periodic inspection, at least once a year.
WARNING!
Inspection and maintenance of this product shall be made by personnel trained by Hill-Rom using Liko™
original spare parts and according to the Liko Service Manual.
WARNING!
Replacing the lithium battery can cause injury and shall always be done by Hill-Rom trained personnel.
7.3 Service agreement
Hill-Rom offers service contracts for the maintenance and periodic inspection of your Liko products.
7.4 Expected life time
The product has an Expected Life Time of 10 years when correctly handled, serviced and inspected in accordance with
Liko product instructions. Read more about this product´s Expected Life Time in section "2.1 Intended Use" at page 8.
WARNING!
The product should be used in accordance with the recommendations for Expected Life Time.
WARNING!
Parts that are subject to wear and tear shall be replaced if damaged or if a specific expected life time have
exceeded!
Parts listed below are subject to wear and tear and have specific expected life time:
- Lift strap, expected life times 5 years.
7.5 Transport and storage
The environment where the lift is stored should have a temperature of -25° C to +40° C at a relative humidity up to 93 %, non-condensing. The environment where the lift is transported should have a temperature of -25° C to +70° C at a relative humidity up to 93 %, non-condensing.
WARNING!
During transport and storage the product must be handled according to; 7.5 Transport and storage, at
page 23.
7.6 Recycling
For instructions on how to recycle your Liko product, please visit our website: www.liko.com.
7.7 Product changes
Liko’s products undergo continuous development, which is why we reserve the right to make product changes without
prior notice. Contact your Hill-Rom representative for advice and information about product upgrades.
Design and Quality by Liko in Sweden
Hill-Rom´s Management system are certified in accordance with ISO 9001 and its equivalent for the medical device
industry, ISO 13485. Hill-Rom´s Management system is also certified in accordance with environmental standard ISO 14001.
The LikoGuard™ Overhead lift complies with the Directive 2002/96/EC on waste electrical and electronic
equipment. Old batteries are to be deposited at the nearest recycling facility in accordance with local
regulations or given to personnel trained by Hill-Rom.
LikoGuard™ Overhead lift • 7EN121101 Rev. 3
23
www.hill-rom.com I www.liko.com
8 Product data
8.1 Technical specifications
Maximum load
Emergency lowering Mechanical
device:
Electrical
L: 272 kg (600 Ibs.)
XL: 363 kg (800 Ibs.)
Battery:
Emergency raising:
25.2V / 4.2 Ah
Duty cycle:
10/90 max. 2 min (0 - 272 kg) (0 - 600 Ibs.)
(Intermittent power) 5/95 max. 2 min (.>272 - 363 kg) (.> - 800 Ibs.)
Battery charger: Built-in battery
Power source: Wall charger, Art. No. 3305010 - 3305050
Input: 100-240 VAC, 50/60 Hz, 0.9 A
Output: 33.5 VDC, 1.36 A
IRC charger, Art. No. 3305510 -3305550
Input: 100-240 VAC, 50/60 Hz, 1.2 A
Output: 27.6-29.5 VDC, 1.5 A
5-6 cm/sec with a load between 0 - 100 kg
(2 - 2.3 inch./sec. with a load between 0 - 220 Ibs.)
4-6 cm/sec with a load between 100 kg - SWL
(1.6 - 2.3 inch./sec. with a load between 220 Ibs. - SWL)
Lifting speed:
Lifting interval: Min. 2300 mm
Electrical data:
25.2 V / 30 A
Liftmotor
weight:
14 kg (31 Ibs.)
Electrical
Sound level:
70 dB(A)
Lift motor
Protection class:
IP X4 (humidity resistance)
Hand control
Protection class:
IP X7 (humidity resistance)
Operating forces of
controls:
4.9 N
Surrounding
functional
environment:
Temp. +5 ° C till +40 ° C, relative humidity 15% to
93% non-condensing.
Barometric pressure range of 70 kPa to 106 kPa.
Intended for indoor use.
Protection class against electric shock, Type BF.
WARNING! This product shall only be used in the recommended environment.
8.2 Dimensions
Ceiling
A
Side view
H**
CSP (Central Suspension Point)
D*
L***
Top view
C
B
Measurements in mm.
A
B
C
D*
H**
L***
178
410
250
323
232
2300
Measurements in Inch..
A
B
C
D*
7
16.1
9.8
12.7
H**
L***
9.1
90.6
* Min. distance from ceiling to CSP at max. lifting height.
**
Installation dimensions: the distance between the attachment point for the lift unit on the carriage
and the CSP at max. lifting height.
***Lifting interval: the distance between max. lifting height and min. lifting height measured in CSP.
The product fulfils the requirements of:
ISO10535:2006, IEC60601-1, IEC60601-1-2, IEC60601-1-6 , IEC60601-1-11, ANSI/AAMI ES60601-1, CAN/CSA C22.2 No 60601-1
LikoGuard™ Overhead lift • 7EN121101 Rev. 3
24
www.hill-rom.com I www.liko.com
8.3 Electromagnetic emmision
Guidance and manufacturer’s declaration – electromagnetic emissions
This produt is intended for use in the electromagnetic environment specified below.
The customer or the user of this product should assure that the product is used in such an environment.
Emissions test
RF emissions
CISPR 11
Compliance
Group 1
RF emissions
CISPR 11
Class B
Harmonic emissions
IEC 61000-3-2
Class A
Voltage fluctuations/ flicker emissions
IEC 61000-3-3
Electromagnetic environment - guidance
The use of RF energy is only for its internal
function. Therefore, its RF emissions are
very low and are not likely to cause any
interference in nearby electronic equipment.
Suitable for use in all establishments other than domestic
and those directly connected to the
public low-voltage power supply network that
supplies buildings used for domestic purposes.
Complies
8.4 Electromagnetic immunity
Any unintentially movement by the tested unit is not allowed for a EMC pass criteria.
Guidance and manufacturer’s declaration – electromagnetic immunity
This produt is intended for use in the electromagnetic environment specified below.
The customer or the user of this product should assure that the product is used in such an environment.
Electromagnetic environment guidance
Immunity test
IEC 60601 test level
Compliance level
Electrostatic discharge
(ESD)
IEC 61000-4-2
+/- 6 kV contact
+/- 8 kV air
+/- 6 kV contact
+/- 8 kV air
Electrical fast transient
/ Burst
IEC 61000-4-4
+/- 2 kV for power
supply lines
+/- 1 kV for input/output lines
+/- 2 kV for power supply lines
n/a. for input/output
lines
Mains power quality should be that
of a typical commercial or hospital
environment.
Surge
IEC 61000-4-5
+/- 1 kV differential
mode
+/- 2 kV common mode
+/- 1 kV differential
mode
n/a. for common mode
Mains power quality should be that
of a typical commercial or hospital
environment.
Voltage dips, short
interruptions and
voltage variations
on power supply
input lines
IEC 61000-4-11
<5 % UT
(>95 % dip in UT)
for 0,5 cycle
40 % UT
(60 % dip in UT)
for 5 cycles
70 % UT
(30 % dip in UT)
for 25 cycles
<5 % UT
(>95 % dip in UT))
for 5 sec
Power frequency
3 A/m
3 A/m
(50/60 Hz) magnetic
field
IEC 61000-4-8
NOTE UT is the a.c. mains voltage prior to application of the test level.
LikoGuard™ Overhead lift • 7EN121101 Rev. 3
25
Power frequency magnetic fields
should be at levels characteristic
of a typical location in a typical
commercial or hospital environment
www.hill-rom.com I www.liko.com
Guidance and manufacturer’s declaration – electromagnetic immunity
This product is intended for use in the electromagnetic environment specified below.
The customer or the user of this product should assure that the product is used in such an environment.
Immunity test
IEC 60601 test
level
Compliance level
Electromagnetic environment - guidance
Portable and mobile RF communications
equipment should be used no closer to any
part of the LR, including cables, than the
recommendedseparation distance calculated
from the equation applicable to the frequency
of the transmitter.
Recommended separation distance
Conducted RF
IEC 61000-4-6
3 Vrms
150 kHz to 80 MHz
3 Vrms
150 kHz to 80 MHz
Radiated RF
IEC 61000-4-3
3 V/m
80 MHz to 2,5 GHz
3 V/m
80 MHz to 2,5 GHz
d = 0,29 P
80 MHz to 800 MHz
10 V/m
800 MHz - 2,0 GHz
10 V/m
800 MHz to 2,0 GHz
d = 0,58 P
800 MHz to 2,5 GHz
d = 0,35 P
where P is the maximum output power rating
of the transmitter in watts (W) according to the
transmitter manufacturer and d is the
recommended separation distance in meters (m).
Field strengths from fixed RF transmitters, as
determined by an electromagnetic site survey,
a
should be less than the compliance level in
each frequency range. b
Interference may occur in the vicinity of
equipment marked with the following symbol.
NOTE 1 At 80MHz and 800MHz, the higher frequency range applies.
NOTE 2 These guidelines may not apply in all situations. Electromagnetic propagation is affected
by absorption and reflected from structures, objects and people.
Field strengths from fixed transmitters, such as base stations for radio (cellular/cordless) telephones and
land mobile radios, amateur radio, AM and FM radio broadcast and TV broadcast cannot be predicted
theoretically with accuracy. To assess the electromagnetic environment due to fixed RF transmitters, an
electromagnetic site survey should be considered. If the measured field strength in the location in which
the LR is used exceeds the applicable RF compliance level above, the LR should be observed to verify
normal operation. If abnormal performance is observed, additional measures may be necessary, such as
reorienting or relocating the LR.
a
b
Over the frequency range 150 kHz to 80 MHz, field strengths should be less than 10 V/m.
LikoGuard™ Overhead lift • 7EN121101 Rev. 3
26
www.hill-rom.com I www.liko.com
LikoGuard™ Overhead lift • 7EN121101 Rev. 3
0.12
0.37
0.12
0.37
0.07
0.22
1.17
3.69
1.17
3.69
0.70
2.21
11.67
11.67
7.00
27
www.hill-rom.com I www.liko.com
9. Cleaning and disinfection
WARNING!
Cleaning and disinfection must always be carried out in accordance with this instruction.
All parts must always be kept clean in order to avoid the risk of infection. Necessary precautions must be taken to
eliminate all visible stains and dirt. The cleaning and disinfection methods described are specifically aimed at the lift and
all accessories. It has been designed to save time and contribute to effectively fight healthcare related infections.
9.1 Equipment
•
•
•
•
•
•
Safety equipment should be used (such as rubber gloves, protective glasses, aprons, face masks/protective masks
and overshoes) according to guidelines and routines in your organization and the manufacturer’s instructions.
Clean buckets
Cloths
Soft brushes
Warm water
S ee “9.4 Use of cleaning and disinfecting agents on the LikoGuard™ Overhead lift” on page 28 to find suitable
cleaning and disinfecting agents.
9.2 Cleaning instructions
Cleaning of the lift and accessories should take place regularly based on use or the organizations requirements.
1. Disconnect the lift from the power source before beginning cleaning and disinfection.
2. Clean the lift with a cloth moistened with warm water and a neutral cleaning agent approved within your
organization. A soft brush may be used to remove stains and resistant dirt.
3. Wipe off the entire lift starting from the top and working down. The cloth should not be so damp that it drips. Lower
the sling bar to gain access to the entire lift strap. After cleaning the lift strap make sure that the strap is dry before
raising the sling bar.
IMPORTANT! Do not use any of following agents on the lift strap or on the Emergency stop cord;
CSI, Oxivir Tb, Dispatch, Chlor-Clean, Dismozon Pur or the equivalent.
4. Pay special attention to the following areas:
• Lift strap
• Operation panel
• Emergency stop button
• Emergency stop cord /
Mechanical emergency lowering
• Sling bar
• Hand control
Emergency
stop button
Operation panel
Lift Strap
Emergency stop cord/
Mechanical emergency lowering
Hand control
Sling bar
9.3 Disinfection instructions
Disinfection of the lift and lifting accessories should be carried out with risk of contagion or at regular intervals if
required. Use a suitable disinfectant, see “9.4 Use of cleaning and disinfecting agents on the LikoGuard™ Overhead lift”
on page 29 and repeat 9.2 Cleaning instructions. Follow the manufacturer’s instructions for correct use of disinfectants.
After disinfection wipe off the lift with a cloth moistened with clean water to remove traces of disinfectant.
LikoGuard™ Overhead lift • 7EN121101 Rev. 3
28
www.hill-rom.com I www.liko.com
LikoGuard™ Overhead lift • 7EN121101 Rev. 3
29
www.hill-rom.com I www.liko.com
Hydrogen peroxide (2.5-10%)
Lauryldimethylamine oxide (0-2.5%)
Ethanol (2.5-10%)
Adipic acid 10-30%
Amorphous silica < 1%
Sodium Toluene sulphonate 5-10%
Troclosene sodium 10-30%
Ethanol
Troclosene sodium
*) or equivalent
Magnesium monoperoxyphtalate hexahydrate (50-100%)
Anionic surfactant (5-10%)
Nonionic surfactant (1-5%)
Isopropyl alcohol = 70%
Alcohol
Organic peroxide (type E, solid)
Sodium hypochlorite
Bleach
Benzyl-C12-18-alkyldimethylammonium, chlorides (22%)
2-Phenoxyethanol (20%)
Tridecylpolyethylenglycolether (15%)
Propan-2-ol (8%)
Ortho-Phenylphenol = 3.40%
Ortho-Benzyl-para-Chlorophenol = 3.03
Phenolic
Benzyl-C12-18-alkyldimethylammonium,
chlorides
Hydrogen Peroxide 0.1-1.5%
Benzyl Alcohol: 1-5%
Hydrogen Peroxide 0.1-1.5%
Benzyl Alcohol: 1-5%
Accelerated hydrogen peroxide
n-Alkyl dimethyl benzyl ammonium chlorides = 0.105%
n-Alkyl dimethyl ethylbenzyl ammonium chlorides = 0.105%
Alkyl dimethyl benzyl ammonium chloride = 13.238%
Alkyl dimethyl ethylbenzyl ammonium chloride = 13.238%
Quaternary ammonium chloride
Quaternary ammonium
Didecyl dimethyl ammonium chloride = 8.704%
Alkyl dimethyl benzyl ammonium chloride = 8.19%
Active ingredients
Quaternary ammonium chloride
Chemical class
9.4 Use of cleaning and disinfecting agents on the LikoGuard™ Overhead lift
4-6 when
using
7
5.3 when
using
approx. 8.6
when using
11.5 - 12.5
5.0 – 7.0
12.2
3.1 +/- 0.4
when using
3
9.5 when
using
9.0 – 10.0
when using
pH
(or equivalent)
Chlor-Clean
(or equivalent)
Anioxy-Spray WS
(or equivalent)
Dismozon Pur
(or equivalent)
Terralin Protect
(or equivalent)
CSI
(or equivalent)
Viraguard
(or equivalent)
Dispatch
(or equivalent)
Wexcide
(or equivalent)
Oxivir Tb
(or equivalent)
HB Quat 25L
(or equivalent)
Virex II (256)
Cleaning agent /
Disinfectant *)
Guest Medical Ltd
Anios
Bode
Shülke
Central Solutions Inc.
Veridien
Caltech
Wexford Labs
Johnson/Diversey
3M
Johnson/Diversey
Manufacturer *)
Lift strap, (LikoGuard™)
Emergency stop cord (LikoGuard™)
Lift strap, (LikoGuard™)
Emergency stop cord (LikoGuard™)
Lift strap, (LikoGuard™)
Emergency stop cord (LikoGuard™)
Lift strap, (LikoGuard™)
Emergency stop cord (LikoGuard™)
Lift strap, (LikoGuard™)
Emergency stop cord (LikoGuard™)
May not be used on
the following items:
(C)2015. Liko R&D AB. All Rights Reserved.
www.hill-rom.com I www.liko.com
Liko AB
Nedre vägen 100
SE-975 92 Luleå, Sweden