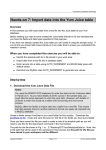
Transcript
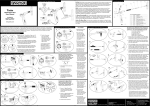
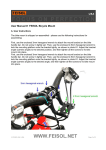
Features of the Tülio Q/R Skewer Multi-Tool
The Tülio Q/R Skewer Multi-Tool replaces standard 130mm and 135mm rear quick release skewers and
provides an integrated 8-function sub-60 gram multi-tool. Each element of the Tülio was carefully selected
to help you get home by providing the essential tools needed to get out of a jam. As an integral part of the
bicycle, you can be sure you will NEVER forget a multi-tool again.
Quick Release Skewer: When installed, the Tülio is no different than a normal quick release rear skewer.
Wheel
installation and removal follow the same steps as a typical quick release skewer wheel. The Tülio is compatible with 130mm
and 135mm dropout spacing and is designed to be installed with lever on non-drive side.
Tülio
Q/R Skewer Multi-Tool
User Manual
Ergonomic Lever/Tool Body:
The lever/tool body is the workhorse of the Tülio. It is designed to make wheel
installation and removal easy and provide a comfortable handle when using any of the Tülio’s 8 tools. The lever/tool body is
easily decoupled from the skewer, allowing the user to remove the lever and use the tools while leaving the skewer
assembly in the hub.
PN 6460310
Revision 1, 04/2011
©2011 Pedro’s Inc.
4mm Hex and Flathead Driver L-Wrench:
Besides handling all 4mm hex bolts and flathead hardware
commonly found on modern bicycles, the L-Wrench is used as the chain tool drive handle and locks the lever/tool body
onto the skewer assembly.
www.pedros.com Getting to know your Tülio Q/R Skewer Multi-Tool
!
WARNING!
Incorrect installation of a quick release wheel can result in
bodily injury or death. Please read all warnings and instructions.
If you are at all unsure, ask a professional for assistance. Always
check wheels for proper installation before riding your bicycle.
YES
The Tülio quick release lever MUST be locked
securely in the “CLOSED” position. Adjust
skewer tension with tension adjusting nut only.
L-Wrench Removal and Installation:
Though the L-Wrench is one of the most basic tools included with the Tülio, it plays a key role in securing the Lever/Tool
Body onto the Skewer Assembly. Much like a Chinese finger trap, the L-Wrench is nearly impossible to remove unless
proper technique is used. This is key to keeping the Tülio safely installed but can be quite frustrating when the wrong
removal technique is used. Using the correct technique, however, you will find L-Wrench removal to be simple and easy!
To remove the L-Wrench, simply push upward on the end of 4mm hex. To reinstall, simply insert the 4mm hex, and push
straight downward on the elbow of the L-Wrench keeping the long leg of the L parallel to the body. Before installing the
Tülio on your bike, make sure to practice removing and installing the L-Wrench a few times.
HELPFUL TIP:
The End Cover may fall out of the body and be lost when L-Wrench is removed. A handy way to keep track of the End Cover is to
slide it over the L-Wrench whenever it is removed from the body. Always install the End Cover before installing the L-Wrench.
YES
L-Wrench Installation
X NO
The chain tool is compatible with most
chains ranging from single speed to 11 speed.
5mm/6mm Hex: This reversible bit handles the common 5mm hex bolts found on everything from stems to crank
bolts and also provides a 6mm hex for many bolts used on suspension frames and other common components such as
pedals. Held in place magnetically, both sizes are quickly accessed when needed.
Emergency 8mm Hex: This hollow 8mm Hex is integrated into the body of the Tülio and houses the 5mm/6mm
Hex. The 8mm Hex comes in handy when a crank bolt or pedal loosens up during a ride and allows you to fix the problem
and finish the ride without damaging expensive components by riding them loose.
IMPORTANT NOTE: 8mm Hex intended for emergency repairs. Do NOT use for installation of components requiring
torque specifications above 25N-m (18.4 ft-lbs).
3.23mm and 3.45mm Spoke Wrenches:
Located on the end of the lever/tool body the two spoke wrench
sizes provide the tools needed to repair broken or loose spokes or true a damaged wheel.
End Cover: Inserted into the end of the body , the end cover protects the chain tool threads from contamination, helps
to secure the L-Wrench, and provides an ergonomic extension to the lever body for opening and closing the Tülio skewer.
Installation of the Tülio Q/R Skewer Multi-Tool
Congratulations! You’ve selected one of the most innovative multi-tools available. Upon opening your
Tülio package, you likely noticed that the Tülio arrives with the Lever/Tool Body separated from the
Skewer Assembly. To ensure proper usage, be sure to take a few minutes to read these instructions and
warnings and get familiar with the key functions and features of the Tülio. With only a few minutes of
practice, your Tülio will be the most reliable and convenient multi-tool you have ever owned. Enjoy the
ride!
L-Wrench Removal
Chain Tool: The Tülio chain tool runs through the center of the lever body.
YES
1. Prior to installing the Tülio Skewer Multi-Tool, read ALL warnings and instructions.
2. Make sure Tülio Lever/Tool Body is coupled to the Skewer Assembly and L-Wrench is properly installed.
3. If present, remove old quick release skewer from wheel.
4. Remove the tension adjust nut and the cone spring next to the tension adjust nut. Add a thin film of grease such as
Pedro’s Bio Grease to the entire skewer rod.
5. Slide the skewer rod through the left side (non-drive side) of the hollow hub axle of the wheel. The Lever/Tool Body
should end up on the left side (non-drive side) of the bike.
6. Slide the removed cone spring back onto the skewer rod. The small end of the cone spring should face the hub.
7. Thread the tension adjust nut onto the skewer.
Non-Drive Side
8. Position the Lever/Tool Body in between the OPEN and CLOSED position so that it is perpendicular to the bicycle frame
and in line with the skewer rod. While holding the Lever/Tool Body in this position with one hand, turn the tension
adjust nut with the other hand until the nut contacts the rear dropout and can no longer be turned.
9. Check to make sure hub axle is fully seated in the dropout.
X NO
10. Pivot the Lever/Tool Body to the CLOSED position. Ensure the Lever/Tool Body is in fully CLOSED position.
NOTE: If the Lever/Tool Body is easily pushed to the CLOSED position, it is NOT secured tightly enough. If this is the
case, pivot the Lever/Tool Body to the OPEN position and tighten the tension adjust nut an additional 1/8-1/4 revolutions
to increase clamping force. Return Lever/Tool Body to the CLOSED position. A properly tensioned Tülio will leave a
slight impression on the palm of your hand. If closing the Lever/Tool Body does not leave an impression, repeat
tightening procedure until the Tülio is properly tensioned.
11. The Lever/Tool Body should always be positioned on the left side (non-drive side) of the bike and positioned between
horizontal and vertical as shown.
12. If you opened your brake to remove the wheel, make sure to close the brake according to the manufacturers instructions
before riding your bike.
13. Always make sure the Lever/Tool Body is in the CLOSED position before riding your bike.
14. NEVER ride bicycle with Tülio Lever/Tool Body decoupled from skewer assembly.
Coupling the Lever/Tool Body and Skewer
YES
L-Wrench MUST always be PROPERLY
INSTALLED when riding a Tülio equipped bicycle.
An important and unique feature of the Tülio is the ability to decouple the Lever/Tool Body from the Skewer Assembly.
This allows usage of the Lever/Tool Body as a stand-alone multi-tool without removal of the Skewer Assembly from the
wheel. Coupling and decoupling the Lever/Tool Body from the Skewer Assembly is simple and easy. Take a few minutes to
look over the following instructions to learn the correct technique.
HELPFUL TIP: The L-Wrench must to be removed whenever coupling or decoupling the Lever/Tool Body.
a. Take Lever/Tool Body and Skewer Assembly together. Make sure the L-Wrench is removed from the Lever/Tool Body
as described above.
b. With the Lever/Tool Body in the “open” orientation, align the fixed skewer nut and skewer rod with the associated
pocket and slot on the Lever/Tool Body. Make sure the cam washer is properly aligned with the Lever/Tool Body.
c. Move the Lever/Tool Body upward onto the fixed skewer nut until the skewer rod bottoms out on the Lever/Tool
Body.
d. Install the L-Wrench as described above. This will lock the Lever/Tool Body onto the Skewer Assembly.
e. Pivot Lever/Tool Body to “closed” orientation. You have now successfully coupled your Tülio! Repeat this process a
few times if desired. You are now ready to install the Tülio on you bike!
X NO!
a
b
Tülio Helpful Tips
Chain Tool Usage: For most chains, the Tülio chain tool can be used by simply holding the Lever/Tool Body as the
chain tool handle and driving the Chain Tool Screw using the L-Wrench. However, some modern bicycle chains require a
high amount of force to press out a pin. If more leverage is needed, simply remove the Skewer Assembly from your wheel,
couple it with the Lever/Tool Body, and use the Skewer Rod as a handle for the Chain Tool. Make sure Chain Tool Screw
threads are frequently cleaned and greased to ensure proper function.
L-Wrench Usage: Besides being used separately from the Lever/Tool Body, the L-Wrench can be positioned in the
body for improved leverage and ergonomics. IMPORTANT NOTE: Be sure to keep track of the End Cover when the LWrench is removed from the body. A handy way to keep track of the End Cover is to slide it over the L-Wrench
whenever it is removed from the body. Always install the End Cover before installing the L-Wrench.
Spoke Wrench Usage:
The Tülio Lever/Tool Body has two sizes of spoke wrench. ALWAYS try fitting the
3.23mm size onto the spoke nipple FIRST. The spoke wrench MUST fit tightly around the nipple to avoid damage to the
Tülio. Tülio spoke wrenches are intended for emergency usage only and should NOT be used for wheel building.
Tightening Rear Wheel when Tülio Lever/Tool Body is Decoupled:
When the Tülio Lever/
Tool Body is decoupled from the Skewer Assembly, the skewer remains in the hub but the wheel is not held securely in
place. For many repairs, such as tightening a stem bolt, this is not an issue. However, if the wheel needs to be held tightly
in dropouts during a repair, simply hand tighten the skewer assembly by holding the fixed skewer nut and turning tension
adjust nut clockwise until wheel is secure.
IMPORTANT NOTE: NEVER ride bicycle with Tülio skewer decoupled and/or hand tightened. Riding a bicycle
with an improperly installed Tülio may result in serious injury or death.
Do NOT attempt to install wheel by rotating the
Tülio quick release lever.
Emergency Tire Lever:
Though not an official feature of the Tülio, in a jam the Skewer Rod can be used to
remove a tire. Simply remove the Skewer from the wheel, decouple the Lever/Tool Body. Using the Fixed Skewer Nut
end, insert the Fixed Skewer Nut under the tire bead, and use the Skewer Rod as a lever to pry the bead off the rim.
Tülio Maintenance
c
X NO!
d
With the Tülio exposed to dirt, water and other elements, it is important to clean and grease key components to ensure
proper function. Once per month, or as needed, clean your Tülio of ingress picked up while riding.
e
Coupling/Decoupling the Lever/Tool Body from Skewer On Bicycle
NEVER ride a Tülio equipped bicycle if L-Wrench is
MISSING or IMPROPERLY INSTALLED.
Coupling/decoupling the Tülio
when installed on a bicycle is
accomplished using the same
steps described above. It may
be slightly more difficult,
however, because the cam
washer position is now limited
by the dropout. If you are
having trouble coupling the
Lever/Tool Body on the bike
you can try the following:
a. Loosen Tension Adjust Nut
to increase space between
Cam Washer and Fixed
Skewer Nut.
b. Remove skewer assembly
from wheel, couple, and then
reinstall.
Couple
Apply Grease Here
1.
Remove each component and wipe clean with a detergent based cleaner such as Pedro’s Green Fizz.
2.
Make sure to remove the Chain Tool Screw, clean the threads, and apply a light coating of grease such as Pedro’s Bio
Grease to the threads to ensure proper chain tool function.
3.
Lastly, apply a light coating of grease to the Fixed Skewer Nut and Skewer Rod. Reassemble.
Tülio Q/R Skewer Multi-Tool Component List
Apply Grease Here
Tülio Q/R Skewer Multi-Tool
PN 6460310
Made in Taiwan
Specifications subject to change without notice.
Pedro’s Inc.
147 Essex Street
Haverhill, MA 01832, USA
Tel: +1 978 657 7101
Decouple
2-YEAR
WARRANTY
Visit pedros.com for details.
Svenska filialen till Sports
Adventures Intl. SA, Schweiz
Västra Granholmen,
185 99 Vaxholm, Sweden
Tel: +46 8 559 21 800