1
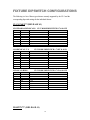
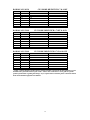
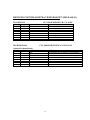
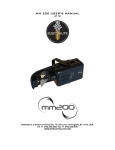
CP-3 PRE-PROGRAMMED or REPLAY
CONTROLLER®
USER’S GUIDE
Elektralite is a division of:
©Group One Ltd.
200 Sea Lane
Farmingdale, NY 11735
U.S.A.
Tel (516)-249-3662
Fax (516)-753-1020
http://www.g1ltd.com
INTRODUCTION
The Elektralite CP-3 is a small but powerful moving light controller, which has two different
modes of operation.
Ø It can be used to playback a preprogrammed light show.
Ø It can be used as a replay controller for a CP-10xt.
It is very important to understand these distinctions as the programming and playback of the
CP-3 does differ for each mode of operation.
Playback of a preprogrammed light show.
If you purchased a CP-3 with a preprogrammed light show installed, then you will have three
different shows for three different fixture types. The shows are referred to as “FAST”, “MED”
and “SLOW”. The terms “FAST”, “MED” and “SLOW” refer to the speed at which chases
and cues occur. So that for fast music you would use the fast show.
The CP-3 with the programmed light show installed, has been programmed to run three
different types of fixtures. The fixtures it will run, are dependent on the ‘chip’ that is fitted into
your CP-3. So if you have Clay Paky release #1 chip, you will be able to run Golden Scan 3s,
Miniscans, or Miniscan HPEs. If you want to run different fixtures then all you need do is
purchase a different preprogrammed chip or you can create your own preprogrammed shows
yourself. To do this you’ll need to create the three shows (“FAST”, “MED” and “SLOW”)
for up to three different fixture types using a CP-10xt. This capability differs completely from
using a CP-3 as a replay controller for a CP-10xt.
In the preprogrammed mode of operation the CP-3 is designed to control up to 8 moving light
fixtures. It is quick and easy to setup and once set up it is simply a button push to getting a light
show that up until now, could only have been achieved by more experienced lighting
programmers.
Replay Controller for a CP-10xt.
If you purchased a CP-3 with a ‘CP-10xt to CP-3’ download chip, then you must create your
light shows on the CP-10xt and download it to the CP-3. This type of show differs from
creating a preprogrammed light show mentioned above in several different ways.
In the replay mode you can
Ø Use all 16 fixtures from a CP-10xt.
Ø Have different fixtures on the same program.
Ø Use all 600 cues and 99 chases from a CP-10xt.
Ø Macros 1, 2 and 3 downloaded from a CP-10xt becoming respectively the
“FAST” button, “MED” button and “SLOW” button on a CP-3.
Please note the method to download from a CP-10xt differs completely from that of the
download in the preprogrammed light show mode.
If you have the replay controller chip fitted then please go to Page 11
of this manual now.
1
SYSTEM SETUP
Unpack the CP-3 controller and save all shipping materials. These shipping materials are
specifically designed to protect the product during transport. If you ever need to return the CP3 for repair or maintenance, you must return it in its original shipping materials. You will be
billed for new shipping materials, if you return the CP-3 in non-factory packing materials.
After unpacking the CP-3, plug in the external power supply and turn on the power switch on
the front panel.
DMX-512
(This unit complies with the USITT DMX-512 S tandard of 1990).
The moving light fixtures are connected to the CP-3 via the DMX-512 jacks on the rear panel.
A standard 5 pin jack and a 3 pin jack is provided. The two jacks are wired in parallel with pin
1 to ground, pin 2 to data minus and pin 3 to data plus.
The CP-3 is designed to control a variety of preset fixtures in a preprogrammed light show
mode and any fixture in replay controller mode. It is capable of outputting up to 128 DMX
channels. In most instances the DMX address for individual fixtures is set in 8 channel intervals
and are shown below, consult your particular fixture’s manual on how to set the starting channel
address on the fixture.
_____________________________
FIXTURE
START ADDRESS
1
1
2
9
3
17
4
25
5
33
6
41
7
49
8
57
_____________________________
2
CONFIGURING FIXTURE TYPES
After the fixtures are connected and the start addresses are set, you must next tell the CP-3
which type of fixture is connected. This is only necessary when running the CP-3 in
preprogrammed light show mode.
Use the DIP switches located on the rear panel of the unit to specify which fixture type you are
running. Refer to the FIXTURE DIPSWITCH CONFIGURATIONS section, on page 15 of
this manual, on how to set the DIP switches for your particular type of fixture.
In replay controller mode, it is unnecessary to touch the dip switch settings for the fixture type.
CONFIGURING THE MAXIMUM NUMBER OF FIXTURES
After the fixture type is configured you can now tell the CP-3 how many fixtures you are
running. To do so select the “Max. Fix.” Dipswitch that pertains to your particular fixture
configuration. This is only necessary when running the CP-3 in preprogrammed light show
mode.
Max. Number of Fixtures
Dipswitches set On
1
2
3
4
5
6
7
8
9
10
11
12
13
14
15
16
NONE
4
3
3&4
2
2&4
2&3
2, 3, & 4
1
1&4
1&3
1, 3, & 4
1&2
1, 2, & 4
1, 2, & 3
1, 2, 3, & 4
3
AUDIO INPUT
If desired you can connect the audio input to a line level output from a mixing console or an
audio preamp. Do not connect this to a power amp or any speaker level source.
If there is an audio signal present at the audio input jack, you can sync any currently running
show to it by pressing the “AUDIO” button located on the front panel. Its LED will illuminate
when engaged.
The audio input sensitivity can be adjusted by altering the “LEVEL” adjustment pot on the rear
panel of the unit.
The audio input works in both modes of operation, preprogrammed light show and replay
controller.
Please note if the “AUDIO” button is turned on and there is no audio signal. The ‘show’ will be
static; the lights will not move because they are ‘waiting’ for an audio input.
MIDI INPUT
The MIDI input jack on the rear panel is used specifically for the uploading new lightshows via
another CP-3, or a CP-10xt or through the use of a personal computer with MIDI SYSX
capability. Lightshows for the latter can be downloaded from the Elektralite website.
(SYSX files are Midi system exclusive files).
SUGGESTED FIXTURE
ARRAYS
The pre-programs within the CP-3 are constructed in a way, which allows for flexible
placement of the lighting fixtures within the venue. While creativity is best left in the hands of the
users, we have listed some suggestions of fixture placements. Please see the following:
(Please note the fixture arrays only apply in the preprogrammed light show mode. The lights
in the replay controller mode would be positioned exactly as per how the program was
created using a CP-10xt).
4
5
PERFORMANCE
In the preprogrammed light show mode, the live performance of the CP-3 involves the calling
up of one of its three lightshows. Pressing one of the three buttons located on the front panel
can access one of the three light shows. The buttons are labeled “FAST”, “MED” and
“SLOW”. Once engaged, the light show will run continuously and loop until another lightshow
is engaged or by pressing the “BLACK” button.
You can also pause any lightshow in the middle of any particular program by pressing the button
a second time. This will not freeze the DMX output but rather pause on the particular program
that is currently running, looping it infinitely until the button is pressed again. The light show’s
LED will flash when in it is in a paused state.
In some instances, you may be required to perform a “lamp strike” on specific fixture types.
This is most commonly associated with fixtures that use discharge style lamps. There may also
be times when fixtures need to be recalibrated or “re-homed”. The CP-3 can perform these
operations for you without the need for powering down your lighting fixtures. See the sections
below on “LAMP STRIKE” and “RE-HOME”.
In the replay controller mode, the buttons labeled “FAST”, “MED” and “SLOW” are
‘perfect copies’ of what was on Macros 1, 2, and 3 of the CP-10xt that was used to do the
original programming. Please note, that at anytime you can change the speed of the program by
using the tempo button.
RE-HOME
There may be situations where the lighting fixtures will need to be re-homed. These situations
will usually be apparent when features of the fixtures seem to travel out of alignment (in other
words: color or gobo images from one fixture are projecting improperly as compared to the
others).
The re-home function is in-built into the preprogrammed light show mode only. Utilizing a rehome function in the replay controller mode would be a function of the programming with the
CP-10xt.
To re-home the fixtures simply press and hold the “BLACK” button for 5 seconds. This will
automatically trigger a re-home cue in the CP-3. The amount of time that is required for
complete re-home will vary from fixture to fixture. Simply press one of the show buttons on the
CP-3 to restart the programs. Your fixtures will automatically resume normal operation after
their re-homing is completed.
If performing a re-home via the CP-3 does not solve the problem then there may possibly be a
more serious problem with the lighting fixture(s). Please refer to the fixture’s user manual for
trouble shooting and repair procedures.
6
LAMP STRIKE
Certain lighting fixtures will require you to remotely strike or turn on the lamps separately from
the fixture’s normal power supply. Please consult the individual manufacturers user manual(s) of
the lighting fixtures that you intend to control for specific information regarding lamp strike.
The lamp strike function is in-built into the preprogrammed light show mode only. Utilizing a
lamp strike function in the replay controller mode would be a function of the programming of
the CP-10xt.
The CP-3 will automatically perform a lamp strike cue when it is powered up. For this reason it
is particularly important to have all of your lighting fixtures cabled, powered up, and finished
with all their respective resets.
BLACK
Pressing the “BLACK” button sets all DMX 512 channels to 0%. It also turns off any currently
running lightshow.
TEMPO
When a lightshow is running, its tempo speed can be manually adjusted by pressing the
“TEMPO” button twice to the beat of the music. The “TEMPO” button’s LED will flash to the
adjusted beat when engaged. If audio is controlling the speed of the lightshow, this button will
have no effect.
AUTO START
When the CP-3 is powered down it will keep track of any lightshow that was running. When
powered up it will restart the lightshow automatically from the beginning of the light show. This
auto start applies to both the preprogrammed light show and the replay controller modes.
7
UPLOADING
PREPROGRAMMED LIGHT
SHOWS VIA THE CP-10XT
CONTROLLER
(PLEASE NOTE THAT THIS IS NOT THE SAME AS USING THE CP-3 AS A
REPLAY CONTROLLER. PLEASE REFER TO THE SECTION OF THE MANUAL
CONCERNING CP-3 AS A REPLAY CONTROLLER, PAGE 11).
The CP-3 has the ability of having programs from an Elektralite CP-10XT controller uploaded
into it via MIDI. This ability makes the CP-3 ideal for applications that require a custom
programmed lightshow with much less operator interaction than would normally be required.
PARAMETERS
There are certain parameters that must be met when programming the CP-10XT controller for
the CP-3 to be used in preprogrammed light show mode. These restrictions are due to
specifically allotted memory space within the EPROM of the CP-3’s memory system and
correlated to specific button presses on the controller. The parameters are as follows:
CP-10XT CONTROLLER
•
CUES 1 through 198
These CUES can be used in any combination to create CHASES.
•
CHASES 1 through 30
It is suggested that Chases 1-10 are used for “fast” programs, Chases 11-20 are used for
“medium” speed programs, and Chases 21-30 used for “slow” programs.
•
MACROS 1 through 3
In the ‘preprogrammed light show’ mode, MACRO 1 will be accessed via the “FAST”
button, MACRO 2 will be accessed via the “MED” button and MACRO 3 will be accessed
via the “SLOW” button.
•
CUE 199 is assigned for specific lamp strike values.
8
This will be required when using fixtures that need to have a DMX lamp strike performed on
them after powering up.
•
CUE 200 is assigned for specific re -home (reset) values.
Please refer to the CP10xt Operator’s Manual for programming procedures.
It is also possible to create chases on the CP-10xt Universal Controller that are fixture specific.
These are chases that contain cues where only one fixture changes per cue. These are usually
mirror flips, iris bursts, dimmer chases, etc.
Since the CP-3 can be configured to run less than 16 fixtures you can set up your programs to
be configured to do the same. This will allow you to create programs for up to 16 individual
fixtures but playback programs for less if needed without having “blank spots” in the programs.
To assign Fixtures to specific Cues perform the following steps:
1) On the CP-10xt press: ENTER - CUE - 996 - ENTER. The display will read:
CP3 FIXT TO CUE
CUE 001 FIXT 00
2) The cursor will be under the Cue number field. Type in the Cue number that you want to
correlate with a specific fixture.
3) Use the “+” key to move the cursor to the Fixt. Field and type in the fixture number that
correlates to the Cue.
4) Use the “+” key to toggle the cursor back to the Cue field and repeat steps 2 and 3 until
finished.
9
MEMORY TRANSFER FROM CP-10XT.
In the preprogrammed light show mode, a MIDI memory dump will transfer the current
memory contents of a CP-10xt to the CP-3. Once you have created your custom lightshow
with the CP-10xt Universal Controller, you are ready to transfer it to the CP-3.
To execute a MIDI Memory Transfer perform the following steps:
1. Plug one end of a MIDI cable into the “MIDI OUT” port of the CP-10xt and connect the
other end into the “MIDI” port on the CP-3
2. Power up both controllers
3. Choose one of the memory banks on the CP-3 via it’s dipswitches by selecting either:
BANK 1: DIPS 7 & 8 DOWN
BANK 2: DIP 7 DOWN & 8 UP
BANK 3: DIP 7 UP & 8 DOWN
(Why three banks? Well, bank 1 can be used for the first fixture type, like Intellabeams. Then
you can go back to the CP-10xt and make a preprogrammed light show for MAC 300s, for
example. This you would download into bank 2. Finally, you could go back to the CP-10xt and
program up third preprogrammed light show for Clay Paky’s Stage Light 300s. This you would
download into bank 3.
So this is how we can load into the CP-3, three different light shows [“FAST, “MED”, and
“SLOW”] for three different fixture types [banks 1, 2 and 3]).
4. On the CP-10xt press: ENTER - CUE - 997 - ENTER
The LCD display of the CP-10xt will read “PRESS GO TO SEND CP3 MEMORY”
5. Press the “GO” button to initiate the memory transfer. The word “SENDING” will be
displayed on the CP-10xt’s LCD display and all of the LEDs on the CP-3 will start to flash.
When the memory dump is finished, the LEDs on the CP-3 will stop flashing and the CP10xt’s display will return to the “PRESS GO TO SEND CP3 MEMORY” display. The
MIDI dump should take approximately 1 ½ minutes to complete.
In the event that the memory transfer fails, you will notice that the CP-10xt’s display will return
to the “PRESS GO TO SEND CP3 MEMORY” screen and the LEDs on the CP-3 will
continue to flash. Simply perform the memory transfer again to complete the procedure
properly. If the problem persists, check your cable connections and retry before contacting
either your local dealer or Elektralite directly for assistance.
10
CP-3 AS A ‘REPLAY CONTROLLER’
FOR A CP-10xt.
If you have just jumped from page 1 then welcome! So the CP-3 is fitted with the ‘CP-10xt to
CP-3’ download chip, then doing a direct download from a CP-10xt is extremely easy.
First create up to three macros (Macro 1,2, and 3) on the CP-10xt. You can use any fixtures.
You can mix and match them as you wish. You can use as many cues and chases as you want,
just make sure that you end up with at least Macros 1and at most Macros 1, 2, and 3. So you
can have as little as one macro and as many as three.
Connect a MIDI cable from the MIDI OUT on a CP-10xt to the MIDI port on a CP-3.
Go to the CP-10xt’s menu and using the + or – keys move round the menu until you get to
“MIDI CHANNEL”. Press enter and make sure that the MIDI channel is set to 1. If
necessary, use the + or – keys, to get to channel 1. Press enter to save the MIDI channel. Now
go back into the menu, use the + and – keys to get to “MIDI MEMORY DUMP”. Press
“ENTER”. Finally, press “GO” to start memory dump from the CP-10xt to the CP-3. The
word “SENDING” will be displayed on the CP-10xt’s LCD display and the LEDs on the CP3 will be flashing. It will take approximately 1½ minutes for the download to be completed.
When the memory dump is finished, the LEDs on the CP-3 will stop flashing. Pressing “FAST”,
“MEDIUM” or “SLOW” will activate Macro 1, 2 , 3 respectively. Viola! You’re done.
In the unlikely event that the memory transfer fails, you will notice that the CP-10xt’s display will
return to the original screen and the LEDs on the CP-3 will continue to flash indefinitely. Simply
perform the memory transfer again to complete the procedure properly. If the problem persists,
turn both controllers off and check your cable connections. Turn both controllers back on again
and retry the memory transfer.
11
TROUBLESHOOTING &
SERVICE
There are no user serviceable parts inside the CP-3. Any internal problem should be referred
to a qualified service technician.
CLEANING AND MAINTENANCE
As with any type of control console, keep drinks away from the CP-3. If you need to clean the
front panel use a soft cloth. If necessary you can spray a small amount of glass cleaner on the
cloth. Do not spray directly on the CP-3. Do not spray electronic cleaners into the faders.
Refer fader and switch maintenance to a service technician.
POWER SUPPLY
If the CP-3 will not turn on, check the external power supply. There is no fuse inside the CP-3.
If the power supply should ever fail or become lost, only replace it with a U.L. or CE approved
one with the same voltage and power rating. The supply must provide 9 volts DC at 500 mA.
The plug has a 2.5 mm hole with + voltage at the center.
DMX-512 (This unit complies with the USITT DMX-512 Standard of 1990).
If your fixtures are not responding correctly to the CP-3, check the dipswitches on the fixtures.
Please refer to the instruction manual for the fixtures to make sure they are set properly. If your
fixtures are not responding at all to the CP-3, still check the dipswitches on the fixtures but also
check your cabling and connectors, for open circuits or short circuits. For example, never
connect the shield of your DMX cable to the shell of the connector. If you are running long lines,
you will need to terminate the last fixture in your DMX512 chain with a special termination plug.
If you don't have one you can make one by taking a 5 pin or 3 pin male XLR plug and soldering
a 120 ohm resistor between pins 2 and 3. Plug this into the unused signal output connector on
the last fixture in your DMX512 chain. Bad cable or incorrectly wired cabling accounts for 90%
of the problems in a system.
Problems are resolved by eliminating one problem at a time. So start with one cable connected
to the first fixture and check this out first. Once you have the first fixture operational move to the
12
next. Do not connect all the fixtures up at once. Then continue on to the next fixture in the loop
until you find the problem.
DMX cabling must be wired in a single loop (serial). You cannot wire up fixtures in parallel.
Also watch out for fixtures that have ‘active’ DMX. Using the correct In and Out connectors in
these types of fixtures is imperative. If you have any doubts about wiring up a DMX loop, then
consult your supplier of the products. A conversation with him could save hours of fault finding
and replacement of cables later.
ELEKTRALITE WARRANTY
Elektralite products are warranted to be free from defects of material and workmanship for a
period of two years from the date of delivery to the original user. Repair will be made at no cost
for labor or materials within this time period. This warranty is void if the product has been
modified without prior authorization or subjected to abuse.
Before sending anything to the factory, be sure to call your Elektralite dealer/distributor for a
Return Authorization Number (RA#). Any goods shipped without an RA# will be refused at
the factory. The contents of each shipping carton from Elektralite should be carefully inspected
for signs of freight damage. If any such damage is found, you need to notify both the shipping
agent and the sales agent immediately. Any damage incurred in shipping is the responsibility of
the carrier. In the case of hidden damage, a claim should be made as soon as discovered and
all packing material retained for inspection. Freight damage claims are invalid for units shipped
in non-factory shipping materials.
Elektralite reserves the right to change product specification at any time without notice.
All warranty repairs should be returned prepaid in their original packing materials to:
©Group One Ltd.
200 Sea Lane
Farmingdale, NY 11735
U.S.A.
13
FIXTURE DIPSWITCH CONFIGURATIONS
The following is a list of fixture types that are currently supported by the CP-3 and the
corresponding dipswitch settings for the individual fixtures.
CLAY PAKY™ (RELEASE #1)
SILVERADO®/MINISCAN® CP-3 MODE DIPSWITCH # 7 & 8 OFF
UNIT #
1
2
3
4
5
6
7
8
DMX CH.
1
9
17
25
33
41
49
57
GOLDENSCAN ‘3’®
UNIT #
1
2
3
4
5
6
7
8
DMX CH.
1
9
17
25
33
41
49
57
MINISCAN-HPE®
UNIT #
1
2
3
4
5
6
7
8
DMX CH.
1
9
17
25
33
41
49
57
DIPSWITCHES ‘ON’
1
1,4
1,5
1,4,5
1,6
1,4,6
1,5,6
1,4,5,6
NOTES
CP-3 MODE DIPSWITCH # 7 OFF & 8 ON
DIPSWITCHES ‘ON’
1
1,4
1,5
1,4,5
1,6
1,4,6
1,5,6
1,4,5,6
NOTES
CP-3 MODE DIPSWITCH # 7 ON & 8 OFF
DIPSWITCHES ‘ON’
1
1,4
1,5
1,4,5
1,6
1,4,6
1,5,6
1,4,5,6
NOTES
MARTIN™* (RELEASE #1)
14
ROBOSCAN P-812®
UNIT #
1
2
3
4
5
6
7
8
DMX CH.
1
9
17
25
33
41
49
57
ROBOSCAN P-218®
UNIT #
1
2
3
4
5
6
7
8
DMX CH.
1
9
17
25
33
41
49
57
ROBOSCAN P-518®
CP-3 MODE DIPSWITCH # 7 & 8 OFF
DIPSWITCHES ‘ON’
1
1,4
1,5
1,4,5
1,6
1,4,6
1,5,6
1,4,5,6
NOTES
CP-3 MODE DIPSWITCH # 7 OFF & 8 ON
DIPSWITCHES ‘ON’
1
1,4
1,5
1,4,5
1,6
1,4,6
1,5,6
1,4,5,6
NOTES
CP-3 MODE DIPSWITCH # 7 ON & 8 OFF
UNIT #
DMX CH.
DIPSWITCHES ‘ON’
NOTES
1
1
1
2
9
1,4
3
17
1,5
4
25
1,4,5
5
33
1,6
6
41
1,4,6
7
49
1,5,6
8
57
1,4,5,6
*NOTE: on these Martin™ products there is usually an adapter required for the data cable that reverses
the DMX-512 3-pin XLR connector pins 2 and 3. Please refer to the fixture’s users guide for specific
product specifications regarding this change. If you require further assistance please contact the Martin
dealer from which the equipment was obtained.
15
HIGH END SYSTEMS/LIGHTWAVE RESEARCH™ (RELEASE #1)
TRACKSPOT®
UNIT #
1
2
3
4
5
6
7
8
DMX CH.
1
9
17
25
33
41
49
57
CP-3 MODE DIPSWITCH # 7 & 8 OFF
DIPSWITCHES ‘ON’
none
4
5
4,5
6
4,6
5,6
4,5,6
TECHNOBEAM®
(reduced/14 channel mode)
UNIT #
1
2
3
4
5
6
7
8
DMX CH.
1
17
33
49
65
81
97
113
NOTES
Personality DIPs 3
Personality DIPs 3
Personality DIPs 3
Personality DIPs 3
Personality DIPs 3
Personality DIPs 3
Personality DIPs 3
Personality DIPs 3
&
&
&
&
&
&
&
&
5
5
5
5
5
5
5
5
ON
ON
ON
ON
ON
ON
ON
ON
CP-3 MODE DIPSWITCH # 7 OFF & 8 ON
DIPSWITCHES ‘ON’
N/A
N/A
N/A
N/A
N/A
N/A
N/A
N/A
NOTES
All addresses are set digitally on Technobeams.
Please refer to the Technobeam operators guide
for instructions on DMX address settings.
16
Please see these other fine products from
ELEKTRALITE.
For further information about other Elektralite products please contact your Elektralite
dealer/distributor or Group One directly.
17