1
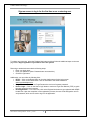
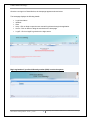
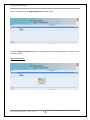
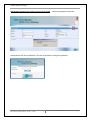
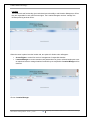
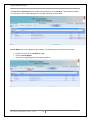
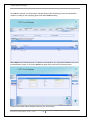
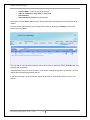
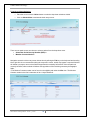
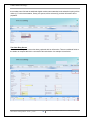
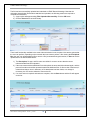
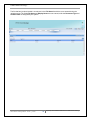
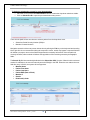
UPMC Dental Advantage
Dental OnLine
Training Manual
Version 1_112010
UPMC Dental Advantage
UPMC Dental Advantage
Table of Contents
How to Log in – By Dentist ............................................................................................................................................ 3
Sign-on screen to log in as a returning user or register for the first time. ................................................................ 4
Begin registration if your Social Security number (SSN) is not in the system. .......................................................... 5
User already exists. ................................................................................................................................................... 6
SSN already entered in the system, but no user ID exists.. ....................................................................................... 7
Social Security Number (SSN) doesn’t exist. ............................................................................................................. 8
Adding Location Managers ........................................................................................................................................... 9
Location. .................................................................................................................................................................. 10
Profile .......................................................................................................................................................................... 14
Profile Page. ............................................................................................................................................................ 15
Verifying and Viewing Patient’s Eligibility ................................................................................................................. 16
Eligibility. ................................................................................................................................................................. 17
Spending Summary Field Descriptions. ................................................................................................................... 22
Submitting a Claim ...................................................................................................................................................... 23
To begin a claim submission. ................................................................................................................................... 27
The Claim Entry Screen............................................................................................................................................ 30
Claim List ..................................................................................................................................................................... 36
Claim List. ................................................................................................................................................................ 37
Uploading an Electronic Claims File............................................................................................................................ 40
Uploading an 837D File. .......................................................................................................................................... 41
Submitting a Pre-Determination ................................................................................................................................ 45
To begin to submit a pre-determination. ................................................................................................................ 46
The Pre-Determination Entry Screen. ..................................................................................................................... 48
Viewing Pre-Determinations Entered Through Dental OnLine (Pre-D List) .............................................................. 53
Pre-Determination List (Pre-D List). ........................................................................................................................ 54
Checking a Pre-Determination Status (Pre-D Status) ................................................................................................ 55
Pre-D Status. ............................................................................................................................................................ 56
Pre-Determination Field Descriptions…………………………………….………………………………………………………………………….58
Payments.................................................................................................................................................................... 59
Using the I – answer Informational Tool..…………………………………………………………………………………………………………….63
Dental OnLine Training Manual Version 1_112010
2
Proprietary and Confidential Information of UPMC Dental Advantage
UPMC Dental Advantage
Dental OnLine provides comprehensive data security with Secure Socket Layer (SSL), Windows
Authentication, Login Management (username and password), Access Rights Allocation, and more, thus
allowing only authorized users to access the application information.
How to Log in – by Dentist
Dentists will access the UPMC website at www.upmchealthplan.com and click on the link Are you a
Dentist? to be directed to the UPMC Dental Advantage login screen.
Dental OnLine Training Manual Version 1_112010
3
Proprietary and Confidential Information of UPMC Dental Advantage
UPMC Dental Advantage
Sign-on screen to log in for the first time or as a returning user
To register as a new user, select the Register Now button and then follow the additional steps on the next
page under: Begin registration if your SSN is not in the system.
Returning or authorized users take the following steps:
• Enter your login name.
• Enter your password. (Note: Passwords are case-sensitive.)
• Click the Login button.
Additionally, you can utilize the following links:
• Reset — Click on the Reset button to clear the details entered in the login screen.
• Home — Click on the Home button. User is redirected to the UPMC website at
www.upmchealthplan.com.
• Forgot Password — Click on Forgot Password to retrieve a forgotten password.
• How to Login — Click on the How to login button to retrieve a Login User Manual (.PDF) to guide
the user across the log-in process.
• New Registration — For a new user, click on the Register Now button to get registered with UPMC
Health Plan. Upon the completion of the registration process, the user will be assigned a user ID
and password, which can be used to log in to the application.
Dental OnLine Training Manual Version 1_112010
4
Proprietary and Confidential Information of UPMC Dental Advantage
UPMC Dental Advantage
Once the user logs in to Dental OnLine, the homepage appears as shown below.
The homepage displays the following details:
•
•
•
•
•
•
Login User Name
Network
Date
Help – Click on Help to open the user manual for guidance through the application.
Home – Click on Home to bring the user back to the homepage.
Logoff – Click on Logoff to go back to the login screen.
Begin registration if your Social Security number (SSN) is not in the system
Dental OnLine Training Manual Version 1_112010
5
Proprietary and Confidential Information of UPMC Dental Advantage
UPMC Dental Advantage
Input your SSN and click on Begin Registration as shown below.
Clicking on Begin Registration initiates the following potential scenarios dictated by the existence of the
data in the system.
User already exists
Dental OnLine Training Manual Version 1_112010
6
Proprietary and Confidential Information of UPMC Dental Advantage
UPMC Dental Advantage
SSN already entered in the system, but no user ID exists. A temporary password is provided.
Write down the user ID and password. (The user will be asked to change the password.)
Dental OnLine Training Manual Version 1_112010
7
Proprietary and Confidential Information of UPMC Dental Advantage
UPMC Dental Advantage
Social Security Number (SSN) doesn’t exist. Registration information entered here will provide a
temporary password as in the screen above.
Dental OnLine Training Manual Version 1_112010
8
Proprietary and Confidential Information of UPMC Dental Advantage
UPMC Dental Advantage
Adding Location Managers
This chapter explains how dentists or their authorized representatives can create users
responsible for individual or multiple office locations. The user will learn:
•
•
•
How to access office locations under their Federal Tax Identification Number.
How to create usernames and passwords for selected employees.
How to grant hierarchal privileges to each individual.
Dental OnLine Training Manual Version 1_112010
9
Proprietary and Confidential Information of UPMC Dental Advantage
UPMC Dental Advantage
Location
The location tab and functionality gives authorized users the ability to add Location Managers to offices
they are responsible for and control access rights. The Location Managers can then “manage” the
dentists practicing at those offices.
When the cursor is placed over the location tab, two options for further action will appear:
• Access Rights to control four levels of management of responsible dentists.
• Location Manager to create usernames and passwords to be given to selected employees to act
as authorized users to manage locations for which they are responsible. Location Manager will be
used first.
Click on Location Manager.
Dental OnLine Training Manual Version 1_112010
10
Proprietary and Confidential Information of UPMC Dental Advantage
UPMC Dental Advantage
By clicking on the Location Manager tab, the locations listed under the practice will populate. The user can
now select a location by clicking on the magnifying glass icon under the User column. In the illustration, only
the last location has no entries in the User ID or Password fields. This designates no Location Manager
has been assigned Rights.
Click on the magnifying glass.
The Add Location Manager entry screen will appear in which a User ID and Password can be entered for
the manager. When satisfied with the entries, click on the Save button.
Dental OnLine Training Manual Version 1_112010
11
Proprietary and Confidential Information of UPMC Dental Advantage
UPMC Dental Advantage
The User ID and Password are now visible in the selected row of the Location. These unique keywords
are to be given to the Location Manager and only that employee for that location.
Access Rights can now be granted to the manager. The following actions will initiate that process:
•
•
•
Pass the cursor over the Location tab again.
Click on Access Rights.
Click on the magnifying glass of the selected location.
Dental OnLine Training Manual Version 1_112010
12
Proprietary and Confidential Information of UPMC Dental Advantage
UPMC Dental Advantage
After clicking the magnifying glass, four check boxes are presented to the user that can be selected to
determine the levels of security to be granted the Location Manager. The four levels and description of
functionality are:
•
•
•
•
Attach Practice allows the manager to attach locations to the practice associated with the Practice
Manager granting privileges.
View Provider Locations allows the manager to view other locations the dentists assigned to the
user’s office but may practice in the other offices listed.
Attach Location to the Provider is used to connect a dentist to a new location or an office he or
she may start to practice in.
Remove Provider from the Location can only be utilized for offices the Location Manager has
access to. This action can be used to disassociate a dentist from an office where he or she no
longer practices.
The main thing to remember is though all Location Managers may work under the same practice, they can
only see the locations and providers they are given access rights to.
When the user has completed granting rights, clicking the Save button causes a message to display that
shows Access Rights saved successfully. The user will click OK to close the message.
Dental OnLine Training Manual Version 1_112010
13
Proprietary and Confidential Information of UPMC Dental Advantage
UPMC Dental Advantage
Profile
This tab enables dentists to enter demographic and other relevant personal information to apply
for credentialing or establish a complete account in Dental OnLine, providing full functionality to
the user.
•
•
•
•
Main Information pertaining to demographic and practice specifics.
Supporting Documentation of dentist’s credentials.
Declarations of dentist’s history.
Review completion of the electronic credentialing form.
Dental OnLine Training Manual Version 1_112010
14
Proprietary and Confidential Information of UPMC Dental Advantage
UPMC Dental Advantage
The Dentist’s Profile and all the associated information can be accessed by the user by simply clicking the
Profile tab. All information is proprietary and protected. Only the user with a unique login can access these
electronic files.
UPMC Dental Advantage has pre-populated the Profile tab with data received on the initial application. If
there are any changes in the contained information that needs to be updated, please do not make changes
directly to the Profile tabs. Changes need to be communicated through the UPMC Dental Advantage
Provider Advocates or Network Managers. UPMC Dental Advantage will notify all dentists when they can
make changes directly to Dental OnLine.
Profile Page
Dental OnLine Training Manual Version 1_112010
15
Proprietary and Confidential Information of UPMC Dental Advantage
UPMC Dental Advantage
Verifying and Viewing A Patient’s Eligibility
In this chapter, the user will learn how to:
•
•
•
•
View subscriber and dependent demographic information, including the dependent
relationship to the subscriber, and group information.
View effective dates of coverage.
View plan benefit information.
View a specific patient’s Spending Summary, which displays benefit limits and amounts
applied/paid towards the patient’s limits.
Dental OnLine Training Manual Version 1_112010
16
Proprietary and Confidential Information of UPMC Dental Advantage
UPMC Dental Advantage
Eligibility
Determining a patient’s eligibility and plan benefits is an important step in the treatment process. Dental
OnLine provides the dentist’s office with the ability to check eligibility online as needed. The information that
is available is driven from the subscriber’s (employee’s) Social Security number. From the Home page,
click on the Eligibility tab to begin the search/view process. Clicking on the Home icon will return the user
to the Dental OnLine Home Screen.
Narrowing the search will speed up the research process on the part of the office or billing staff. To begin
the search process to view a patient’s eligibility and plan information, use the following search tools:
• To view the entire family (subscriber and eligible dependents), enter the subscriber’s SSN.
•
•
Or
To view a specific member’s eligibility record, enter that patient’s first and last name in the
appropriate fileds.
Entering a date of birth will further refine the results of the search.
When entry of the relevant data is complete, click on the Search button to see the results.
Dental OnLine Training Manual Version 1_112010
17
Proprietary and Confidential Information of UPMC Dental Advantage
UPMC Dental Advantage
Once the subscriber and/or dependent data results are displayed, the following actions can be performed
by the user to view plan or demographic information.
•
•
•
•
View a patient’s demographics by clicking on the magnifying glass in the View column.
View the plan information by clicking on the magnifying glass in the View Plans column.
Hide the search boxes by clicking on the Hide Criteria button (the Show Criteria button will
replace the Hide button).
Click on the Reset button to enable entry of new search criteria.
Dental OnLine Training Manual Version 1_112010
18
Proprietary and Confidential Information of UPMC Dental Advantage
UPMC Dental Advantage
The user can now verify the patient’s information. The following actions can now be performed:
• Click on the magnifying glass in the View column to see the patient’s demographic information and
effective and termination dates.
Or
•
Click on the magnifying glass in the View Plans column to see the patient’s benefit plan details,
including coinsurance and deductible information, if applicable.
The patient’s demographic screen is shown below and the additional actions available from this screen are:
• Click on the Plan icon to view the plan benefits information.
• Click on Spending Summary to view the benefit limit amounts and the amounts already used
toward those limits.
• To return to the eligibility search screen, click on the Go Back button.
Dental OnLine Training Manual Version 1_112010
19
Proprietary and Confidential Information of UPMC Dental Advantage
UPMC Dental Advantage
The screen shot below shows the Plan View pop-up box and lists the Benefit Type, Plan, Effective Date
and End Date of the plan.
• Clicking on the Adobe icon under Plan will provide the user with a plan benefits grid for the patient.
• Clicking on the Cancel button will close the pop-up box.
From the View Details screen, click on the Spending Summary button to view the benefit limits and
amounts paid toward those limits.
Dental OnLine Training Manual Version 1_112010
20
Proprietary and Confidential Information of UPMC Dental Advantage
UPMC Dental Advantage
Once the Spending Summary List screen appears, click on the magnifying glass to view the summaries.
Below is an example of a patient’s Spending Summary for the current benefit year. The page that follows
the view gives a description of the fields on the summary. The only additional user action available is the Go
Back button to return to the member demographics page.
Dental OnLine Training Manual Version 1_112010
21
Proprietary and Confidential Information of UPMC Dental Advantage
UPMC Dental Advantage
Spending Summary Field Descriptions
1) Individual Deductible – the annual individual out-of-pocket expense the patient has to satisfy
before his or her plan will reimburse the assigned benefit (patient responsible).
2) Satisfied Individual Deductible – the amount that has been applied to date toward the annual
individual deductible.
3) Family Deductible – the annual family out-of-pocket expense that would need to be satisfied
before the plan will reimburse the assigned benefit (patient responsible).
4) Satisfied Family Deductible – the amount that has been applied to date toward the family annual
cumulative deductible.
5) Individual Out-of-Network Deductible – the annual individual out-of-pocket expense for services
rendered by a non-contracted dentist that the patient has to satisfy before the plan will reimburse
the assigned benefit (patient responsible).
6) Satisfied Out-of-Network Deductible – the amount that has been applied to date for services
rendered by a non-contracted dentist that the patient has to satisfy before the plan will reimburse
the assigned benefit (patient responsible).
7) Family Out-of-Network Deductible – the annual family out-of-pocket expense for services
rendered by a non-contracted dentist that would need to be satisfied before their plan will reimburse
the assigned benefit (patient responsible).
8) Satisfied Family Out-of-Network Deductible – the annual amount that has been applied to date
for services rendered by a non-contracted dentist towards the family annual cumulative deductible.
9) In Network Annual Plan Maximum – the annual amount the plan allows cumulatively for covered
services provided by a contracted dentist. After the maximum has been reached, all services up to
the contracted amount for the remainder of the plan year are the patient’s responsibility.
10) In-Network Benefits Paid – the total of annual benefits paid to date by the member’s plan for
services rendered by contracted dentists.
11) Out-of-Network Annual Plan Maximum – the annual amount the plan allows cumulatively for
covered services provided by a non-contracted dentist. After the maximum has been reached, all
services provided by non-contracted providers for the remainder of the plan year are the patient’s
responsibility.
12) Out of Network Benefits Paid – the total of annual benefits paid to date by the member’s plan for
services rendered by non-contracted dentists.
13) Orthodontia Lifetime Maximum – the plan lifetime maximum for all covered orthodontia services
per child under age 19.
14) Orthodontia Lifetime Benefits Paid – the total to date paid for all covered orthodontia services.
Dental OnLine Training Manual Version 1_112010
22
Proprietary and Confidential Information of UPMC Dental Advantage
UPMC Dental Advantage
Submitting a Claim
This module will demonstrate the thorough steps required to submit a UPMC Dental Advantage
claim. The patient will first be determined to have active coverage with their plan in order to initiate
this process. The tutorial will illustrate:
•
•
•
•
•
•
Selecting the correct subscriber or member.
The population of all required data fields.
Showing what fields will be auto-populated by entering data in the first required fields.
Mechanisms available to select proper coding of services rendered.
The ability to correct data before finalizing a claim submission.
Verifying the completion of a submitted claim.
Dental OnLine Training Manual Version 1_112010
23
Proprietary and Confidential Information of UPMC Dental Advantage
UPMC Dental Advantage
Note:
To submit a claim using Dental OnLine, a location must be set up on the Profile tab. Please review these
steps prior to submitting your first claim:
Click on the Profile tab, and then select the Practice tab.
If a practice name exists with a location, then you may begin submitting claims through Dental OnLine.
When checking the Profile screen, if no practice or location exists (example below), follow these steps to
add your practice and location:
•
•
•
Enter your tax identification number in the Tax ID field and then click the Search button.
Close the No Practice Found Adding New by clicking OK.
Complete the Add Practice as on the following page and continue the steps.
Dental OnLine Training Manual Version 1_112010
24
Proprietary and Confidential Information of UPMC Dental Advantage
UPMC Dental Advantage
If your tax identification number is already pre-loaded, you will be able to select from a list of pre-populated
addresses to assign to the tax identification number. If the applicable address is not within the list, follow the
directions below to add a new address to the tax identification number.
•
If your tax identification number is not loaded, complete the practice screen by filling out the practice
name for the tax identification number and then click on the Save button.
Dental OnLine Training Manual Version 1_112010
25
Proprietary and Confidential Information of UPMC Dental Advantage
UPMC Dental Advantage
Once Save is selected, you will be able to add the physical office address(es) for the tax identification
number by clicking on the magnifying glass under the Location heading.
Select Add from the following screen. If addresses are populated, you may select a location to tie to your
tax identification number. If not, hit the Add button again and you will see the following screen:
Complete the location tab by adding the data for your office location:
Dental OnLine Training Manual Version 1_112010
26
Proprietary and Confidential Information of UPMC Dental Advantage
UPMC Dental Advantage
•
•
•
•
Location Name – name of your physical office
Address 1, Address 2, City, State, and Zip code
Phone Number
Phone Number 2 and Fax are optional fields.
Once added, click the Save button and your office location will automatically be saved under the tax ID
number.
From this screen, please identify your primary office location by clicking the Primary box next to the
location, then click Save.
You may add as many physical locations to this tax ID number as needed by clicking the Add button and
repeating the steps above.
Congratulations! Once your tax ID number is on file with a corresponding practice and location, you may
submit claims directly through Dental OnLine.
If you have more than one tax ID number, repeat the process for each tax ID number you use in your
practice.
Dental OnLine Training Manual Version 1_112010
27
Proprietary and Confidential Information of UPMC Dental Advantage
UPMC Dental Advantage
To begin a claim submission
•
•
Place the cursor over the Claims button to make the drop-down selections visible.
Click on Submit Claim to activate the claim entry screen.
There are two paths a user can choose to select a patient from the drop-down menu.
• Subscriber Social Security Number (SSN) or
• Member Contract Number**
Navigation across the claim entry screen is best done by utilizing the Tab key on the keyboard and traveling
left to right. We do not recommend utilizing the computer’s mouse, as this may bypass a required field that
will initiate a prompt to return to that field and populate the necessary information. Once the patient is
correctly identified, either method will initiate auto-population of the remaining necessary demographic
fields.
**The Member Contract number can be found on the eligibility tab under the View icon. The Member
Contract number is the first 9 characters of the 11-byte Member #.
Dental OnLine Training Manual Version 1_112010
28
Proprietary and Confidential Information of UPMC Dental Advantage
UPMC Dental Advantage
The Search By field is automatically defaulted to the Subscriber SSN(1) option. When this is the selected
method of submission, the user will manually enter the SSN(2) in the field. When the user tabs to the next
field after entry in field 2, the system will auto-populate:
•
Member Name
•
Patient First Name
•
Patient Last Name
•
Patient DOB (Date of Birth)
•
Member #
•
Gender
•
Relationship Code
In this example, the Member Contract # was selected in the Search By drop-down field (1) and the 9-digit
member contract number was input in field (2). By hitting tab after entry, the same demographic information
was auto-populated.
2
The next illustration shows how to select the actual patient from the member name drop-down list. It is
important to select the member name on each claim submission. To do this, click on the drop-down arrow of
Dental OnLine Training Manual Version 1_112010
29
Proprietary and Confidential Information of UPMC Dental Advantage
UPMC Dental Advantage
the member name field and the additional eligible member names attached to the subscriber’s policy will be
visible (1). For this demonstration, Stacey, the spouse, will be selected (2), and her information will be
populated.
The Claim Entry Screen
On this screen the spouse’s name has been populated with her information. There are additional fields at
the header to complete that aid in a successful claim submission. An example is listed below.
Dental OnLine Training Manual Version 1_112010
30
Proprietary and Confidential Information of UPMC Dental Advantage
UPMC Dental Advantage
1) Patient Account Number – not required but helpful in correspondence and office record keeping.
2) Orthodontia – this requires a checkmark if services are orthodontia-related. Once selected,
additional fields will display that are required to be completed.
a. Appliance Banding Date
b. Total Months of Treatment
c. Remaining Months of Treatment
3) Replacement of prosthesis – this requires a checkmark if it is relative to the listed service. Once
selected, an additional field will display that is required to be completed.
a. Prior Placement date
4) Location ID #/Name - The notepad to the right of the field is incorporated for the user to select the
place of service from a multiple location practice. By selecting the location, it will auto-populate the
dentist’s location demographics. Each claim submission must have a Location ID #/Name selected.
The following actions will complete the location selection process:
•
•
•
•
Filter By would be used by
large corporate practices with
many locations. (1)
Description is the same as
Location Name if searching
many locations. (2)
Search is used when filtering
is used or Description
added. (3)
(In this case it wasn’t
necessary because only two
locations exist.)
Location Code is clicked for
the desired location. (4)
5) All data fields designated with the number (5) on the illustration will populate upon selecting the
Location #/Name if that information is appropriate and on file for the dentist.
6) All data fields designated by the number (6) are auto-populated based on the user log on.
7) PWK – this stands for paperwork and is required to be populated with the letters (EB) when the
patient has other dental insurance that is the primary payer.
Dental OnLine Training Manual Version 1_112010
31
Proprietary and Confidential Information of UPMC Dental Advantage
UPMC Dental Advantage
8) Date of Service – the date can be manually entered using the DD/MM/YYYY format, or utilize the
calendar icon to the right of the field to select the date services were provided. Two date selection
methods can be used:
•
•
•
Using the available dropdown box for Month,
Date and Year and clicking OK.
If the visible month is the month desired, click on
the block of the day required.
Either action will populate the date on the form
and automatically close the box.
9) Procedure Code – the procedure code can be manually entered if known, and tabbing to the next
field will populate the description or utilizing the notepad icon to the right of this field will bring up a
complete list of codes for viewing and selection to be populated.
• Filter by CDT CODE and put a partial code in
Description. Click the Search button.
• Filter by CDT Description and put in a partial
description (ex. filling).
• Click on Code of desired procedure to populate
form. That will automatically close the pop-up
box.
Dental OnLine Training Manual Version 1_112010
32
Proprietary and Confidential Information of UPMC Dental Advantage
UPMC Dental Advantage
10) Tooth number can be manually entered if known or utilize the notepad icon to the right of the field
to initiate a look-up box.
• Filter by Tooth Code or Description.
• Enter the corresponding information in the
Description field.
• Click the Search button.
• Click on the desired tooth number as shown
and the look-up box will close automatically
and populate the claim form.
11) Tooth surface can be manually entered if known or utilize the notepad icon to the right of the field
to initiate a look-up box.
• Click the box to the left of the desired tooth
surface.
• Click Save and the look-up box will
automatically close and populate the claim
form.
Dental OnLine Training Manual Version 1_112010
33
Proprietary and Confidential Information of UPMC Dental Advantage
UPMC Dental Advantage
12) Quad/Arch – the quadrant or arch can be manually entered if known or utilize the notepad icon to
the right of the field to initiate a look-up box.
• Click in the box to the left of the desired
Quad Name.
• Click on the Save button.
• The box will automatically close and
populate the claim form.
13) Quantity/units field is auto-populated with 1 unit. The user can change the number and add
additional units if it is appropriate for the procedure billed.
14) Diagnosis Pointer field is auto-populated with one unit and is appropriate to be billed for a single
service.
15) Charge Amount – enter the charge amount for the service.
16) Click the Add button to add the service line to the claim. This process will be repeated for any and
all additional services billed.
17) Lastly, the user can:
• Save the claim if satisfied with all the data elements.
• Reset the form to begin again.
• Cancel to terminate the claim submission.
Dental OnLine Training Manual Version 1_112010
34
Proprietary and Confidential Information of UPMC Dental Advantage
UPMC Dental Advantage
The completed claim form is illustrated next with the added service line at the very bottom. Additional
service lines would be shown below this line with totals for claims and charge amount.
Dental OnLine Training Manual Version 1_112010
35
Proprietary and Confidential Information of UPMC Dental Advantage
UPMC Dental Advantage
Claim List
In this chapter, the user will learn how to:
•
•
•
View all claims submitted online through direct entry in the provider portal and confirm
submission status.
Review claim detail information to ensure the correct data has been submitted.
Maintain a history of submitted claims.
Dental OnLine Training Manual Version 1_112010
36
Proprietary and Confidential Information of UPMC Dental Advantage
UPMC Dental Advantage
Claim List
Dental OnLine provides the ability to submit claims via direct web entry using the Internet. Once a claim has
been submitted, Dental OnLine also provides the user with functionality that lists and displays all claims that
have been submitted through the online portal.
The Claim List function is found under the Claims tab on the home screen of Dental OnLine, and will allow
the user to view all claims that have been submitted (history) displaying the following data:
•
•
•
The date submitted
The patient’s name
The submission status of the claim
This is the Home Screen to which the user can return at anytime during navigation by clicking on the Home
button.
To begin review of submitted claims, place the cursor over the Claims tab and click on Claim List when it
appears in the drop-down list.
Dental OnLine Training Manual Version 1_112010
37
Proprietary and Confidential Information of UPMC Dental Advantage
UPMC Dental Advantage
Clicking on the Claim List button opens the list of claims that have been submitted by the dentist’s billing
office, most recently submitted claims at the top of the list by default. This is referred to as an open search.
Dental OnLine provides the user with the ability to refine the search and narrow the results as described
here:
•
Enter a submitted date range by populating the Date From and Date To fields using the calendar
icon.
OR
•
•
Enter the Patient Last Name and/or Patient First Name in the respective search field.
Click on the Search button after the pertinent information has been populated in the search
field(s).
It is important to note that not all fields have to be populated to initiate a search. Dental OnLine allows the
user to choose one or multiple fields on which a search can be performed. Claims submitted for Joseph
Smith can be viewed by entering Smith or Smi in the Patient Last Name field.
Dental OnLine Training Manual Version 1_112010
38
Proprietary and Confidential Information of UPMC Dental Advantage
UPMC Dental Advantage
Click on the magnifying glass of the claim that you would like view.
This is the View screen which shows the details of the submitted claim. The only available user actions on
this screen are:
• Click on the Procedure Code at the lower left portion of the screen to see a description of the
procedure code entered on the claim for the service performed on this patient (1). Once the
description is displayed, click Close to close the pop-up window.
• Click on the Go Back button when review of the claims detail has been completed (2).
Dental OnLine Training Manual Version 1_112010
39
Proprietary and Confidential Information of UPMC Dental Advantage
UPMC Dental Advantage
Uploading an Electronic Claims File
In this chapter, the user will learn how to:
•
•
Upload/submit a HIPAA-compliant 837D claims/Pre-Determination file.
Check the list of submitted files.
Dental OnLine Training Manual Version 1_112010
40
Proprietary and Confidential Information of UPMC Dental Advantage
UPMC Dental Advantage
Uploading an 837D File
The 837D file can be submitted if the office/practice billing software has the capability to create a
HIPAA-compliant 837 transaction file. This file can be used to submit actual claims, or it can be used to
submit pre-determinations. The benefit of submitting an 837D file for either of these transactions is a
decrease in turnaround time for adjudication of the claim or pre-determination. Electronic transactions have
been proven to expedite the reimbursement request process, enabling the practice to receive claim
determinations more rapidly.
In order to be able to submit an 837D transactional file, the submitter must complete a successful test cycle
with the UPMC Dental Advantage EDI support team to ensure accurate placement of data in these files. In
order to do this, the submitter needs to contact us via e-mail at [email protected] to set up the
testing cycle.
The following functionality will be used for the submission of claims and pre-determinations:
1) Place the cursor over the Claims tab and the three options available will be visible.
2) Click on the 837 File Upload option to view a listing of previous submissions.
3) To find a specific file that has already been submitted, the user can refine the results by entering a
specific date in the Creation Date field.
4) After entering the Creation Date, click on the Search button.
5) To submit/upload a new 837D claims/pre-determination file, click on the Add button.
Once the Add button has been clicked, the user is directed to the Add or Remove screen.
Dental OnLine Training Manual Version 1_112010
41
Proprietary and Confidential Information of UPMC Dental Advantage
UPMC Dental Advantage
The following numbered instructions will guide the user through the process of adding an electronic file for
submission:
1) To attach a new file, click on the upward-pointing arrow that appears on the screen. The user is
then prompted to enter some transaction information.
2) Enter a description that helps to identify the transaction.
3) In the Select Files and Attach pop-up window, enter the Title (name the file) using a simple
naming convention (one that is meaningful to the user), but be consistent with the type of files
submitted (recommended file type or extension is .TXT format). This creates ease of use for
ongoing identification among submissions; Title is a required field.
4) Click Browse to find a file that is stored in the submission software or common folder that may have
been created according to the submitting office procedures.
5) When the user is satisfied the correct file has been selected and is visible in the File 1 field, click on
the Attach button. The user can now click on the Close button.
Dental OnLine Training Manual Version 1_112010
42
Proprietary and Confidential Information of UPMC Dental Advantage
UPMC Dental Advantage
The file has been successfully uploaded and submitted to UPMC Dental Advantage. Now that the
claims/pre-determination file has been attached and uploaded, the following actions are required to
complete the transaction:
1) A pop-up box will appear stating Files Uploaded Successfully. Click the OK button.
2) Click the Close button as the final step.
There is still functionality available in the event claims submission is not complete. Here are the options that
the user can perform, depending on the next task the user wants to perform. After closing the File Upload
Box, the user can upload additional files, remove a file just entered during this session, or Save to exit the
upload session as demonstrated below.
1) The Description, file type, and file name are visible for a user to ensure that the correct
information/data has been uploaded.
2) If the user wants to add an additional file to this upload, the arrow would be selected again, and the
process from above should be repeated to attach the additional files. If, after review of the screen, it
is determined that an error in data entry or file attachment has been made, or a change is
necessary, the “X” can be selected to remove the file.
3) If no more action is required and tasks are complete, click the Save button and the file will appear
on the list.
Dental OnLine Training Manual Version 1_112010
43
Proprietary and Confidential Information of UPMC Dental Advantage
UPMC Dental Advantage
The file that has just been loaded is now shown in the File Name list with the name entered during the
upload process. The fields File Name and Display Name are user entered, while the Document Type and
Creation Date are assigned by the system.
Dental OnLine Training Manual Version 1_112010
44
Proprietary and Confidential Information of UPMC Dental Advantage
UPMC Dental Advantage
Submitting a Pre-Determination
In this chapter the user will learn:
•
•
•
•
•
•
How to select the correct subscriber or member.
The population of all required data fields.
What fields will be auto-populated by entering data in the first required fields.
The mechanisms that are available to select proper coding of services rendered.
To correct data before finalizing a pre-determination submission.
How to verify the completion of a submitted pre-determination.
This chapter demonstrates the thorough steps required to submit a UPMC Dental Advantage
Pre-Determination (Pre-D). It is always recommended that a Pre-D is submitted prior to
scheduling services, especially for services exceeding $250.00.
Dental OnLine Training Manual Version 1_112010
45
Proprietary and Confidential Information of UPMC Dental Advantage
UPMC Dental Advantage
To begin the submission process for a pre-determination
• Place the cursor over the Pre-Determination button to make the drop-down selections visible.
• Click on Submit Pre-D to open the pre-determination entry screen.
There are two paths a user can choose to select a patient from the drop-down menu.
• Subscriber Social Security Number (SSN) or
• Member Contract Number**
Navigation across the claim entry screen is best done by utilizing the Tab key on the keyboard and traveling
left to right. We do not recommend utilizing the computer’s mouse, as this may bypass a required field that
will initiate a prompt to return to that field and populate the necessary information. Once the patient is
correctly identified, either method will initiate auto-population of the remaining necessary demographic
fields.
The Search By field is automatically defaulted to the Subscriber SSN (1) option. When this is the selected
method of submission, the user will manually enter the SSN(2) in the field. When the user tabs to the next
field after entry in field 2, the system will auto-populate:
• Member Name
• Patient First Name
• Patient Last Name
• Patient DOB (Date of Birth)
• Member #
• Gender
• Relationship Code
Dental OnLine Training Manual Version 1_112010
46
Proprietary and Confidential Information of UPMC Dental Advantage
UPMC Dental Advantage
In this example, the Member Contract # was selected in the Search By drop-down field (1) and the 9-digit
subscriber number was input (2) after tabbing over.
The next illustration shows how to select the actual patient from the member name drop-down list. It is
important to select the member name on each claim submission. To do this, click on the drop-down arrow of
the member name field and the additional eligible member names attached to the subscriber’s policy will be
visible (1). For this demonstration, Stacey, the spouse, will be selected (2) and her information will be
populated.
Dental OnLine Training Manual Version 1_112010
47
Proprietary and Confidential Information of UPMC Dental Advantage
UPMC Dental Advantage
The Pre-Determination Entry Screen
The subscriber’s spouse has been populated with her information. The remaining fields to complete a
successful pre-d submission are listed below.
1) Patient Account Number – not required but helpful in correspondence and office record keeping
2) Orthodontia – this requires a check mark if services are orthodontia-related. These additional fields
require information to be entered:
a) Appliance/Banding Date b) Total Months of Treatment c) Remaining Months of Treatment
3) Replacement of Prosthesis – this requires being checked if it is relative to the listed service and the
Prior Placement Date will need added.
4) Location ID #/Name – The notepad to the right of the field is incorporated for the user to select the
place of service from a multiple location practice. By selecting the location, it will auto-populate the
dentist’s location demographics. The following actions will complete the location selection process:
•
•
•
•
Filter By would be used by large
corporate practices with many
locations. (1)
Description is the same as
Location Name if searching many
locations. (2)
Search is used when filtering is
used or Description added. (3)
(In this case it wasn’t necessary
because only two locations exist.)
Location Code is clicked for the
desired location. (4)
Dental OnLine Training Manual Version 1_112010
48
Proprietary and Confidential Information of UPMC Dental Advantage
UPMC Dental Advantage
5) All data fields designated with the number (5) on the illustration will populate upon selecting the
Location #/Name if that information is appropriate and on file for the dentist.
6) All data fields designated by the number (6) are auto-populated based on the user log-on.
7) PWK –this stands for paperwork and is required to be populated with the letters (EB) when the patient
has other dental insurance coverage that is the primary payer.
8) Procedure Code – the procedure code can be manually entered if known and tabbing to the next field
will populate the description or utilizing the notepad icon to the right of this field will bring up a complete
list of codes for viewing and selection to be populated.
• Filter by CDT CODE and put a partial code in
Description. Click the Search button.
• Filter by CDT Description and put in a partial
description (ex. filling).
• Click on Code of desired procedure to
populate the form. That will automatically close
the pop-up box.
Dental OnLine Training Manual Version 1_112010
49
Proprietary and Confidential Information of UPMC Dental Advantage
UPMC Dental Advantage
9) Tooth number can be manually entered if known or utilize the notepad icon to the right of the field to
initiate a look-up box.
• Filter by Tooth Code or Description.
• Enter the corresponding information in the
Description field.
• Click the Search button.
• Click on the desired tooth number as shown
and the look-up box will close automatically
and populate the form.
10) Tooth surface can be populated by utilizing the notepad icon to the right of the field to initiate a look-up
box.
• Click the box to the left of the desired tooth
surface.
• Click Save and the look-up box will
automatically close and populate the form.
Dental OnLine Training Manual Version 1_112010
50
Proprietary and Confidential Information of UPMC Dental Advantage
UPMC Dental Advantage
11) Quad/Arch – the quadrant or arch can be populated by utilizing the notepad icon to the right of the field
to initiate a look-up box.
• Click in the box to the left of the desired
Quad Name.
• Click on the Save button.
• The box will automatically close and
populate the form.
12) Quantity/units field is auto-populated with 1 unit. The user can change the number and add additional
units if it is appropriate for the procedure submitted.
13) Diagnosis Pointer field is auto-populated with one unit and is appropriate to be submitted for a single
service.
14) Charge Amount – amount charged for the service
15) Click on the Add button to add the service line to the claim. The process will be repeated for all
additional services submitted.
16) The user will be able to:
• Save the form if satisfied with all the data elements.
• Reset the form to begin again.
• Cancel to terminate the pre-determination submission.
Dental OnLine Training Manual Version 1_112010
51
Proprietary and Confidential Information of UPMC Dental Advantage
UPMC Dental Advantage
The completed form is illustrated next with the added service line at the very bottom. Additional service lines
will be populated below this line with totals for the forms and charge amounts.
Dental OnLine Training Manual Version 1_112010
52
Proprietary and Confidential Information of UPMC Dental Advantage
UPMC Dental Advantage
Viewing Pre-Determinations Entered Through Dental
OnLine (Pre-D List)
In this chapter the user will learn:
•
•
•
•
How to access all pre-determinations submitted through Dental OnLine (the portal).
How to read the form.
How to view the status of each entered pre-determination.
How to view descriptions of submitted procedure codes on the form.
Dental OnLine Training Manual Version 1_112010
53
Proprietary and Confidential Information of UPMC Dental Advantage
UPMC Dental Advantage
Pre-Determination List (Pre-D List)
The Pre-D List function provides the user with the ability to view all pre-determinations submitted through
Dental OnLine and the submission status of those pre-determinations.
The available user actions are listed below with corresponding numbers on the screen image.
1) Click on Pre-D List (1) under the Pre-Determination tab; this option will appear when the cursor is
placed over the tab; a list of all pre-determinations submitted by this specific user will be populated.
2) To narrow the list of pre-determinations to find specific ones, the user can click Reset (2) to clear
the screen and new search criteria can be entered.
3) The user can refine the search by entering specific Date From (3) and Date To (3), utilizing the
calendar icons available to the right of each date box (these are submission dates).
4) The user can also enter the Patient Last Name (4) and Patient First Name (4).
5) Click the Search (5) button to initiate the search of records.
6) Select the desired pre-determination record by clicking on the magnifying glass (6) in the View
column.
The user actions available are:
1) Click on the Notepad icon (1) to open a pop-up window that displays a description of the procedure
code submitted.
2) View the Procedure Code Description (2); click Close to return to the Details screen.
3) Click the Go Back button to return to the search results (3).
Dental OnLine Training Manual Version 1_112010
54
Proprietary and Confidential Information of UPMC Dental Advantage
UPMC Dental Advantage
Checking a Pre-Determination Status
(Pre-D Status)
In this chapter, the user will learn how to:
•
•
•
Search for the desired pre-determination to view.
Check on submitted services for exact amounts that will be pre-determined for
disbursement to the providers or assigned as a patient responsibility.
Interpret the Explanation of Payment.
*Pre-Determinations do not guarantee payment.
Dental OnLine Training Manual Version 1_112010
55
Proprietary and Confidential Information of UPMC Dental Advantage
UPMC Dental Advantage
Pre-D Status
The pre-determination will inform both the member and dentist how the submitted service will be processed.
From the Home Page, click on the Pre-D Status tab to check the status of a submitted pre-determination
(Pre-D).
To refine the search of submitted pre-determinations:
• Enter Date From and Date To dates using the calendar icon (1) or
• Enter Patient Last Name and Patient First Name (2).
• Click on the Search button after the required information has been entered.
• To view the selected pre-determination, click on the magnifying glass under the View Pre-D
column.
Each pre-determination will have a PreD status. The status codes are:
Submitted and Processed
Submitted will show as the PreD status as soon as the Pre-D is submitted to UPMC Dental Advantage and
will continue to stay in this status until it is fully processed. UPMC Dental Advantage turnaround time is
within 48 hours of submission. If you need assistance with your pre-determination status, please contact the
Dental Benefits Advisory Team at 1-877-648-9609.
Dental OnLine Training Manual Version 1_112010
56
Proprietary and Confidential Information of UPMC Dental Advantage
UPMC Dental Advantage
Once the Pre-D is processed, the Pre-D status will change to Processed. Processed indicates that the
Pre-D is ready to be viewed. The user can click on the View Pre-D magnifying glass to view a copy of the
pre-determination once the status is shown as processed.
The example above shows the submission has been processed.
Below is an example of the explanation of pre-determination that appears when the pre-determination is in
the processed status. The following user actions are available:
• To return to the search results, use the Click here to go back button.
• To navigate across multiple pages, click on the forward and back arrows.
• To increase the size of the view, click on the arrow next to 100% for a drop-down menu of size
options.
• If the drop-down arrow is selected for Select a format, the EOP can be converted to a Microsoft
Excel or Adobe Acrobat document for exporting or printing.
Dental OnLine Training Manual Version 1_112010
57
Proprietary and Confidential Information of UPMC Dental Advantage
UPMC Dental Advantage
Predetermination Field Descriptions
The fields from left to right are:
1) Procedure Description, Procedure Code *Tooth Description* – The exact codes submitted are
listed with their corresponding descriptions.
2) Num of Serv – The number of services submitted for each corresponding submitted code is listed.
3) Provider’s Charge – This field shows the billed amounts for the corresponding codes.
4) Allowance – This field will show the allowed amount per the contractual agreement with UPMC
Dental Advantage for each corresponding service.
5) Approved Amount – This amount represents what is approved for payment for each
corresponding service.
6) Copay Amount – This amount represents the patient copayment for the corresponding services. It
will be the difference between the allowed amount and the approved amount.
7) Ded Amount – This field is populated with an amount applied to the individuals plan deductible if it
has not yet been satisfied for the benefit year. If it has not been satisfied, the approved amount will
be represented here instead of in its field until that deductible has been met.
Dental OnLine Training Manual Version 1_112010
58
Proprietary and Confidential Information of UPMC Dental Advantage
UPMC Dental Advantage
Payments
In this chapter, the user will learn how to:
•
•
View and research payment information made to the provider on behalf of the
member/patient, including claim and check information.
Produce an electronic Explanation of Payments document that can be printed or saved
electronically.
Dental OnLine Training Manual Version 1_112010
59
Proprietary and Confidential Information of UPMC Dental Advantage
UPMC Dental Advantage
Payments
From the Home Screen, click on the Payments tab to view payments/claim determinations that have been
processed.
The user can now review payments made based on claims submitted, but the default list of payments
displayed includes all payments processed for this provider. Dental OnLine provides the user with the ability
to refine the search to yield more defined, specific results. This can be accomplished by using the following
search tools:
1) The search can be refined by entering the Check/EFT No., Payment Date, or the patient name.
2) Click on the Search button after the search criteria have been entered in the selected field(s). The
more data that is entered the more refined the search results will be.
Dental OnLine Training Manual Version 1_112010
60
Proprietary and Confidential Information of UPMC Dental Advantage
UPMC Dental Advantage
Click on the magnifying glass in the Payment Details column that the billing office staff wants to review.
The result of clicking on the magnifying glass is the creation of an Explanation of Payment (EOP), which is
a report of all claims processed on that particular payables run/check number that was selected for review.
•
•
•
•
The EOP provides detail by patient by claim. Each EOP provides cumulative totals that will match
the total amount of the check or electronic payment, labeled EOP Totals.
Navigation through multiple page EOPs can be accomplished by clicking the directional arrows
located under the Click here to go back button.
The EOP can be enlarged for easier viewing by using the drop-down arrow and selecting a size
greater than 100%.
In addition to printing the EOP by using the printer icon, the office staff can elect to save the report
in either an Excel or Acrobat (PDF) format. This provides a means for utilizing electronic storage of
the EOP.
Dental OnLine Training Manual Version 1_112010
61
Proprietary and Confidential Information of UPMC Dental Advantage
UPMC Dental Advantage
When the review and printing/saving of the EOP is complete, the user can navigate back to the Payments
List screen by clicking on the Click here to go back button.
Click the Home button to return to the Home Screen, or select another tab to perform additional tasks.
Dental OnLine Training Manual Version 1_112010
62
Proprietary and Confidential Information of UPMC Dental Advantage
UPMC Dental Advantage
Using the i-answer Informational Tool
In this chapter, the user will learn how to:
•
Access informational documents added regularly as an additional conduit to pass
information on regarding:
o Dental OnLine updates
o Procedural information
o Policies and Procedures
•
Updates and Newsletters that will enhance service to UPMC Dental Advantage members
and our network of dental providers.
Dental OnLine Training Manual Version 1_112010
63
Proprietary and Confidential Information of UPMC Dental Advantage
UPMC Dental Advantage
i-answer
The i-answer tab is a data repository in which UPMC Dental Advantage will upload communication and
tools for our dental community to use in Dental OnLine.
UPMC Dental Advantage will regularly update this repository with pertinent information relating to:
• Frequently Asked Questions
• Contact Information
• UPMC Dental Advantage Policies and Procedures
• Newsletters
• User Concerns and Questions
Users can:
• Select the document type desired.
• Search by description.
• Click on the magnifying icon of the selected document.
Dental OnLine Training Manual Version 1_112010
64
Proprietary and Confidential Information of UPMC Dental Advantage