1
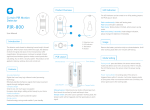
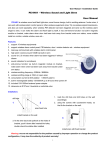
APN Setting
If the SIM card needs a certain APN setting to active GPRS function,
2
Main Device ON/OFF
(0 OFF, 1 ON): 1
Status of Main Device: ON
Status of Main
Device: ON
If SMS is input
mistakenly: SMS format
error!
Operation
succeeded
When fail to on/off the
slave device: Operation
failed!
When sending SMS
command to turn on/off
an inexistent slave
device: This slave device
does not exist.
please follow the steps below:
1. Send text “APN” to the SIM card number of the main device, and you
will receive a SMS menu.
301
(or 302,
303…
315)
Slave Device number : 1
Slave Device ON/OFF
(0 OFF, 1 ON): 1
2. Copy the SMS and input the correct information of APN, user name and
41
(or 42,
43..46)
Timer number : 1①
Timer ON/OFF (0 OFF,
1 ON): 0②
Repeat: 1234567 ③
Time: 00:00④
Action:(0 OFF, 1 ON): 0⑤
Set Timer
successfully
APN
”APN”, “User ”, ”Password”
Set APN
successfully
password (Please consult with the operator/carrier of your SIM card),
then send back to the SIM card number of the main device.
3. The main device will reply a confirmation SMS back and the blue
If SMS is input
mistakenly: SMS format
error!
GPRS Version-SMS Control
If non-smartphone is used, you can control your devices by sending
SMS to the SIM card number in the main device.
Operation: Send SMS command
>
Receive menu SMS
>
Copy and
back
>
-
Note: ① Change the number to 1, 2...or 6, you can set the 2nd,3rd...6th timer accordingly.
② 0 means to deactivate this timer, 1 means to activate this timer.
③ 1234567 mean this timer will activate on ever y Monday, Tuesday...Sunday. If no
number is input, it will act only once when the time is due.
④ Set the time.
⑤ 0 means to power off the main device, 1 means to power on the main device.
edit the menu SMS (Do not change the format of the SMS) and send
Receive confirmation SMS.
Wi-Fi version: Hold the power button on the main device for at least 7
seconds, (you will hear a short beep in the first 3 seconds, do not loose
?
1
Menu SMS
Confirmation
SMS
1.Store phone numbers
2.Main Device ON/OFF
301-315.Slave Device
ON/OFF
41-46.Timing ON/OFF
-
Model No.
E5-PW
cleared. Then the power indicator blacks out; after 2-3 seconds, the
AC Input/Output
AC 100~240V 50/60Hz
AC Input/Output
AC 100~240V 50/60Hz
main device will beep once again to restart, and the power indicator
Maximum Loading Current
13A
Maximum Loading Current
10A
Standby Power
<1W
Working Current
24mA~70mA
Maximum Rated Power
3250W
Maximum Rated Power
2500W
than 7 seconds; it beeps twice to indicate the setting and network
Radio Frequency
868MHz or 915MHz
Radio Frequency
868MHz or 915MHz
connection have been cleared.
Operating Temperature
-20°
C ~+ 55°
C
Wireless range to main device
<80m (in open area)
Storage Temperature
-20°
C ~+ 70°
C
Operating Temperature
-20°
C ~+ 55°
C
Relative Humidity
<80% (no condensing)
Storage Temperature
-20°
C ~+ 70°
C
Housing Material
PC+ABS plastic
Relative Humidity
<80% (no condensing)
Dimensions
136 X 81 X 44mm (not include plug part)
Housing Material
PC+ABS plastic
Dimensions
90 X 90 X 38mm (not include plug part)
lights on.
Pair newly purchased slave device
Press the power button for
Hold the power button for 3
3 times on the main device,
seconds on the slave device,
it beeps once and the blue
then release the button when
indicator will blink fast.
one beep is heard.
Tel:
1.
2.
3.
4.
5.
Store phone
number
successfully.
Error prompt SMS
Timing (For Main Device Only)
-
When using an
un-stored number to
send SMS command:
Phone number
unauthorized!
Slave Device
E5-GPRS; E5-WiFi
More
SMS
command
Main Device
Model No.
it until a long beep is heard), the setting and network connection are
GPRS version: Hold the power button on the main device for more
indicator starts to blink once every 5 seconds, meaning the GPRS
network is connected.
Specifications
Restore to factory setting
Do not want to repeat the
same setting everyday?
The main device and slave device will beep once successively. Now the
Timing function may help you.
pairing succeeds.
Delete all slave devices
Press the power button on the main device for 5 times, it beeps once.
The deletion succeeds.
Quick Guide
For E5 Remote Switch
This product is designed to use in residential buildings only, which
means that it should not be used for equipment or areas that may
cause death or serious damage due to the remote switch, such as
medical equipment, large heaters or freezers.
phone.
Two versions are available: Wi-Fi and GPRS. One main device supports
up to 15 slave devices at the same time. The main device
communicates with slave devices via radio frequency.
To experience this wonderful switch, please follow the instructions in the
user manual. If there is any problem using the product, please feel free
It is recommended to ground home appliances for safety.
to contact us.
The current of the main device for long-term running should be lower
than 13A, for slave device should be lower than 10A. [email protected]
Do not disassemble or modify this product.
www.chuango.com
This product is not water-proof or dust-proof, and it is for indoor use
only. Keep this product and accessories out of children's reach. Do not
insert your fingers or metal into any socket.
1
2
2
Wi-Fi Version-Quick Link
1
Download the App by searching
4
main device and slave device.
keywords “E5 GPRS Plug” from App
Store or Google Play.
Store or Google Play.
2
Main Device
Slave Device
Plug the main device into a socket,
beeps once. The blue indicator blinks
Power Button
then hold the power button for 3
once every 5 seconds to indicate the
2
Socket for Electric Appliance
seconds and release when one
successful GPRS connection.
3
SIM Card Slot (For GPRS Version)
1
2
beep is heard. The blue indicator
Main Device
blinks fast to indicate that E5 has
Tips: GSM card with GPRS function is
entered the network configuration
required.
status.
Wi-Fi Version-Set up Network by AP Mode
Blue LED blinks once every 5s: Connected to Wi-Fi or GPRS network
Blue LED blinks fast: In pairing state or Wi-Fi network setup state
Red LED lights on: Power on
Slave Device
Blue LED lights on: Power on
Blue LED lights off: Power off
Quike Guide x 1
Insert a SIM card into the main device
and then plug into a power outlet; it
Blue LED blinks once every 1s: Searching for network
Check What You Have
Slave Device x 1
Download the App by searching
slave device, so you can know exactly which home appliance is on/off.
3
Warranty Card x 1
3
Log on the App and scan the QR
Input the Wi-Fi passcode on App,
1. Log on your App and choose [AP Mode] at the right bottom.
and tap [Start] to complete
code on the main device to get the
2. Follow the instructions on App:
device ID, you can pair the device
network pairing.
1
Hold the power button of the main device, then plug it into a power
outlet, it beeps once.
Main Device x 1
1
Tap the picture of slave device, you can change a picture and rename the
3
Red LED lights off: Power off
E5 Remote Switch
Smart Life on/off in Your Hand
GPRS Version-App Control
Start to switch on/off your home appliance after plugging them into the
keywords “E5 WiFi Plug” from App
This product complies with national EMC standard. However, it may still
interfere with electronic devices susceptible to wireless signals. So keep
the product away from such electronic devices.
Do not use this product in hazard areas, or areas marked "Turn Off
Wireless Transceiver ” (Hospitals, gas stations or airfields).
1
Network Configuration
2
Choose "E5-WIFI" on the Wi-Fi setting of your smartphone.
3. Input the Wi-Fi name and passcode on the App to start pairing.
with the App now and start to use.
REMOTE SWITCH(GPRS)
MODEL NO.: E5-GPRS
Thank you for choosing E5 Remote Switch, With the help of E5, you are
able to turn on/off your home appliances simply by App on your smart
Overview and Network Setup
INPUT: AC 100V-240V, 50/60HZ
OUTPUT: AC 100V-240V, 15A MAX.
See What You Need to Know
SIM
S/N E5-W14110001
Dear Customers,