1
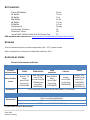
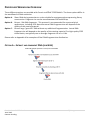
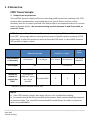
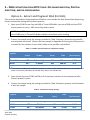
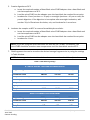
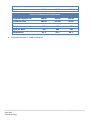
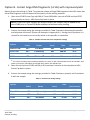
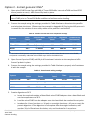
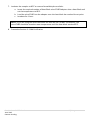
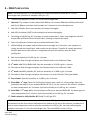
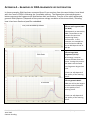
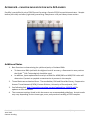
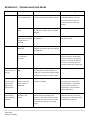
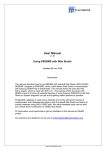
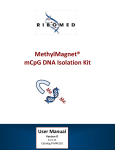
PROTOCOL truXTRAC™ FFPE DNA Kit (25) Adaptive Focused Acoustics™ (AFA) -based DNA extraction and purification from Formalin-Fixed, Paraffin-Embedded Tissue Patent Pending Patent Pending INTENDED USE 2 INTRODUCTION 2 KIT CONTENTS 3 STORAGE 3 SUPPLIED BY USERS 3 PROCEDURE WORKFLOW OVERVIEW 5 1 - PREPARATION 7 FFPE Tissue Sample 7 Buffers 8 Instruments 8 2 – DNA EXTRACTION FROM FFPE TISSUE: DE-PARAFFINIZATION, PROTEIN DIGESTION, AND DECROSSLINKING 10 Option A - Extract and fragment DNA (for NGS) 10 Option B - Extract large DNA fragments (>2 kb) with improved yield 13 Option C - Extract genomic DNA* 15 3 – DNA PURIFICATION 17 APPENDIX A – EXAMPLES OF DNA FRAGMENTS SIZE DISTRIBUTION 18 APPENDIX B – PARAFFIN EMULSIFICATION WITH AFA ENERGY 19 APPENDIX C – TROUBLESHOOTING GUIDE 20 Part Number: 010178 Rev K June 2015 Patents Pending 1|P a g e INTENDED USE The truXTRAC FFPE DNA Kit is intended for use in molecular biology applications. This product is not intended for the diagnosis, prevention, or treatment of a disease. INTRODUCTION The truXTRAC FFPE DNA Kit is designed for the controlled and efficient extraction of DNA from Formalin Fixed, Paraffin Embedded (FFPE) tissue samples with the Covaris Adaptive Focused Acoustics (AFA™). AFA enables the active removal of paraffin from FFPE tissue samples in aqueous buffer, allowing simultaneous tissue rehydration. Compared to traditional passive, chemical-based methods of paraffin removal, this mechanical process is not as limited by the thickness of FFPE tissue sections. The AFA process enables the use of thicker sections, which can increase DNA yield and minimize the impact of increased DNA degradation at the exposed surfaces of a section. The truXTRAC process results in high yields of high-quality DNA well suited for analytical methods such as next-generation sequencing or qPCR. This protocol is optimized for sections up to 25 µm in thickness and cores up to 1.2 mm in diameter. Important Notes on FFPE Samples: The yield of DNA from FFPE tissue blocks is highly variable. Factors such as fixation time, size and thickness of the sections, the ratio of tissue to wax, the type of tissue, and the age of the FFPE block are the main causes for this variability. The quality of DNA isolated from FFPE samples is also highly variable. During the fixation process, DNA is cross-linked to proteins and other nucleic acid molecules to varying degrees. Incomplete reversal of this crosslinking may cause the isolated DNA to perform less well in downstream applications such as PCR and qPCR. In addition, the size of DNA fragments isolated from FFPE samples is generally smaller than that of DNA isolated from fresh or frozen tissues. This is particularly evident in older FFPE sample blocks or sample blocks stored at elevated temperatures. Note for first time users: Given the highly variable yield of DNA from FFPE tissue blocks, we recommend using FFPE blocks that have been well characterized for yield and quality for initial testing of the truXTRAC FFPE kit. Ideally, samples should be extracted immediately after sectioning. Please contact Covaris at Application Support ([email protected]) if you have any questions. Part Number: 010178 Rev K June 2015 Patents Pending 2|P a g e KIT CONTENTS Tissue SDS Buffer B1 Buffer B5 Buffer BW Buffer BE Buffer PB Buffer Proteinase K Purification Columns Collection Tubes microTUBE-130 AFA Fiber Pre-Slit Screw-Cap 10 ml 7.5 ml 7 ml 15 ml 7.5 ml 1.5 ml 30 mg 25 50 25 SDS INFORMATION IS AVAILABLE AT http://covarisinc.com/resources/safety-data-sheets/ STORAGE This kit should be stored at room temperature (18 – 25 °C) upon receipt. After resuspension, Proteinase K should be stored at -20 °C. SUPPLIED BY USERS Covaris Instruments and Parts Required parts Focusedultrasonicator Rack/ Holder/ Insert LE220 E220 & E210 E220 evolution S-Series Rack 24 Place Holder XTU Rack E220e 4 microTUBE Holder PN500414 & Place Screw-Cap (PN microTUBE Insert XTU microTUBE 500308) and Screw-Cap PN500489 Screw Cap Intensifier (PN500339) or Holder-XT (PN500432) (PN500141) PN500358 (*) Centrifuge and Heat Block microTUBE Adapter (PN500406) Rack-XT 24 Place microTUBE Screw-Cap (PN500388) Accessories Optional parts Accessories FFPE tissuePICK (PN520163) FFPE sectionPICK (PN520149) FFPE sectionWARMER (PN500403) (*) This holder has been discontinued Part Number: 010178 Rev K June 2015 Patents Pending M220 3|P a g e Other supplies: Microcentrifuge with 11,000 x g capability Dry heating block such as Eppendorf ThermoMixer or similar with either 1.5 or 2 mL heat block inserts. We recommend two heating blocks, preset at 56°C and 80°C respectively. RNase A (DNase free) at 10 mg/ml e.g., Thermo Scientific (PN EN0531) Ethanol (>96%), MB Grade e.g., Thermo Scientific (PN BP2818-100) 1.5 mL nonstick nuclease free microfuge tubes e.g., Life Technologies (PN AM12450) Part Number: 010178 Rev K June 2015 Patents Pending 4|P a g e PROCEDURE WORKFLOW OVERVIEW Three different options are possible with Covaris truXTRAC FFPE DNA Kit. The three options differ in the workflows for DNA extraction. Option A: Shear DNA during extraction to a size suitable for next-generation sequencing library construction. Fragment size can be tuned between 200 and 400 bp. Option B: Extract ~2kb DNA fragments. This protocol is recommended for most analytical applications, including PCR. Note that actual DNA fragment size will depend of the quality of the starting material. Option C: Extract large “genomic” DNA without any additional fragmentation. Actual DNA fragment size will depend on the quality of the starting material. For high-quality FFPE tissue blocks, we typically see an average fragment size of >= 8 kb. Please refer to Appendix A for examples of final DNA fragment size distribution. OPTION A – EXTRACT AND FRAGMENT DNA (FOR NGS) Part Number: 010178 Rev K June 2015 Patents Pending 5|P a g e OPTION B - EXTRACT LARGE DNA FRAGMENTS (>2 KB)* WITH IMPROVED YIELD * Actual DNA fragment size will depend of the quality of the starting tissue block OPTION C - EXTRACT “GENOMIC” DNA* * Actual DNA fragment size will depend of the quality of the starting tissue block Part Number: 010178 Rev K June 2015 Patents Pending 6|P a g e 1 - PREPARATION FFPE Tissue Sample 1. Sample Input requirements The truXTRAC process is highly efficient at removing paraffin even from relatively thick FFPE sections while simultaneously rehydrating the tissue. Use of thicker sections is often desirable, both for increased yield and since DNA or RNA in the exposed surfaces of a section tends to degrade quickly. We recommend using sections between 15 and 25 µm thick, or cores of 1.2 mm. NOTE: Excess paraffin will adversely affect the yield and quality of DNA and RNA extracted from FFPE. We strongly advise trimming off any excess of paraffin before sectioning a FFPE tissue block, or after the section has been cut from the FFPE block. A ratio of 80% tissue to 20% paraffin or higher is ideal. Size (thickness or diameter) FFPE Sections FFPE Sections Mounted on slide “scrolls” or “curls” 4 to 10 µm Size (length) 7 to 10 µm 7 to 15 µm NA 16 to 25 µm FFPE Cores < 1.2 mm diameter <10 mm (A) Collection tool tissuePICK (B) sectionPICK (B) Maximum number of samples Per Tube* 2x tissuePICK (200 mm2 tissue for a 5 µm section) 2x sectionPICK NA 2 1 1 * Numbers represent trimmed sections only NOTES A. If the FFPE sample is longer than about 10 mm, cut it in half before loading. B. For optimal tissuePICK and sectionPICK performances, tissue section should be mounted on uncoated slides. The tissuePICK and sectionPICK should always be used in conjunction with a sectionWARMER. Part Number: 010178 Rev K June 2015 Patents Pending 7|P a g e WARNING: The total mass of FFPE sample processed per extraction should be between 2 to 5 mg. Lower amounts may result in insufficient yield and higher amounts may cause spin columns to become partially or fully clogged. 2. Tissue Fixation Requirements The yield and quality of DNA extracted from FFPE tissue blocks is highly dependent on tissue collection and paraffin embedding procedures. For good yields of high quality DNA: - Use a maximum fixation time of 24 hours - Use Formalin solution, neutral buffered, 4% - Fix sample tissue sample as quickly as possible after collection Buffers 1. Add ethanol to Buffer B5: Add 28 ml of ethanol (>96%) to Buffer B5 concentrate and mark label on the cap. After preparation, Buffer B5 can then be stored for one year at room temperature. 2. Resuspend Proteinase K: Add 1.35 ml Buffer PB to the lyophilized Proteinase K vial. Proteinase K solution can be stored for 6 months at -20 °C. When re-suspended in the supplied Buffer PB the solution should not freeze when stored at -20 °C. 3. Check Buffer B1 and Tissue SDS Buffer: A white precipitate may form during storage. Incubate the bottles at 50 – 70 °C before use to dissolve any precipitate. Instruments NOTE: For detailed instructions on how to prepare your particular instrument please refer to your instruments User Manual. 1. For S, E and LE-Series Focused-ultrasonicators, fill the water bath, set the chiller temperature as described in Table 1 and allow the system temperature to equilibrate and the water bath to degas. E220 evolution: Load the plate definition “500432 Rack E220e 4 Place microTUBE Screw Cap” and check that the intensifier is in place. E210 or E220: Load the plate definition “500308 Rack 24 Place microTUBE ScrewCap” and check that the intensifier is in place. LE-Series: Load the plate definition “500388 Rack-XT 24 Place microTUBE ScrewCap”. NOTE: If you do not see a plate definition on your system, please contact Covaris technical support at [email protected]. Part Number: 010178 Rev K June 2015 Patents Pending 8|P a g e Table 1 - Focused-ultrasonicator setup Instrument S-Series E-Series & L-Series Water level (Fill/RUN scale) Chiller temperature 15 10 18°C 18°C 2. For M-Series Focused-ultrasonicators, put the Holder XTU and the Insert XTU microTUBE 130 µl (or Holder-XT microTUBE) in place and fill the water bath until the water reaches the top of the holder. Allow system to reach temperature (20°C). 3. Insert the required number of Heat Block microTUBE Adapters into two heat blocks and heat them to 56 and 80°C. Part Number: 010178 Rev K June 2015 Patents Pending 9|P a g e 2 – DNA EXTRACTION FROM FFPE TISSUE: DE-PARAFFINIZATION, PROTEIN DIGESTION, AND DE-CROSSLINKING Option A - Extract and fragment DNA (for NGS) This protocol allows direct fragmentation of DNA to a size suitable for Next Generation Sequencing library construction during the extraction process. 1. Open microTUBE Screw-Cap, add 100 µl Tissue SDS Buffer into microTUBE and load FFPE tissue (section or core). Affix Screw-Cap back in place. NOTE: If the FFPE tissue samples are loose or broken the samples may be added to the microTUBE prior to Tissue SDS Buffer addition to facilitate easier loading. 2. Process the sample using the settings provided in Table 2 below to dissociate the paraffin and rehydrate the tissue. (Please see the example in Appendix B.) During the AFA process it is normal for the solution to turn milky white as the paraffin is emulsified. Table 2 - Paraffin removal and tissue rehydration settings System S220 or E220 S2 or E210 M220 LE220 Duty Factor 10% 10% 20% 30% Peak Incident Power 175 Watts 5 (Intensity) 75 Watts 450 Watts (1) Cycles per burst 200 200 200 200 Treatment Temperature Time (Instrument) 300 sec 20 °C 300 sec 20 °C 300 sec 20 °C 300 sec 20 °C (1) As Covaris LE220 process multiple samples at a time, its PIP is distributed across microTUBEs, and power received by individual microTUBE stays within the 200 W limit. 3. Open Screw-Cap microTUBE, add 20 µl of Proteinase K solution to the sample and affix Screw-Cap back in place. 4. Process the sample using the settings provided in Table 3 below to properly mix Proteinase K with the sample. Table 3 - Proteinase K mixing settings System S220 or E220 S2 or E210 M220 LE220 Part Number: 010178 Rev K June 2015 Patents Pending Duty Factor 10% 10% 20% 30% Peak Incident Power 175 Watts 5 (Intensity) 75 Watts 450 Watts (1) Cycles per burst 200 200 200 200 Time 10 sec 10 sec 10 sec 10 Sec Temperature (Instrument) 20 °C 20 °C 20 °C 20 °C 10 | P a g e 5. Protein digestion at 56°C a. Insert the required number of Heat Block microTUBE Adapters into a Heat Block and set the temperature to 56°C. b. Load the microTUBE into the adapter once the heat block has reached its set point. c. Incubate for 1 hour (sections <= 10 µm) or overnight (sections > 10 µm or cores) for protein digestion. If the digestion is incomplete after overnight incubation, add another 20 µl of Proteinase K solution, mix, and incubate for 1 more hour. 6. Incubate the samples at 80°C to reverse formaldehyde crosslinks: a. Insert the required number of Heat Block microTUBE Adapters into a Heat Block and set the temperature to 80°C. b. Load the microTUBE into the adapter once the heat block has reached its set point. c. Incubate for 1 hour. NOTE: If you are using the same heat block for both the 56°C & 80°C incubations, the microTUBE should be stored at room temperature until the heat block reaches 80°C. 7. DNA fragments size can be tuned to the desired average fragment size by using the settings in Table 4 below. NOTE: If the target size is not achieved then the treatment time should be adjusted. Table 4 - DNA Shearing settings E- and S-Series Focused-ultrasonicator Targeted fragment size 200 bp 300 bp 400 bp Treatment Time 300 sec 110 sec 80 sec PIP (S220 and E220) 175 W 175 W 175 W 5 5 5 Duty Factor 10% 10% 10% Cycle per Burst Temperature 200 20 °C 200 20 °C 200 20 °C Intensity (S2 and E210) M220 Focused-ultrasonicator Targeted fragment size Treatment Time PIP Duty Factor Part Number: 010178 Rev K June 2015 Patents Pending 200 bp 450 sec 75 W 20% 300 bp 200 sec 75 W 20% 400 bp 120 sec 75 W 20% 11 | P a g e Cycle per Burst Temperature 200 20 °C 200 20 °C 200 20 °C LE220 Focused-ultrasonicator 8. Targeted fragment size Treatment Time 200 bp 300 sec 300 bp 150 sec 400 bp 80 sec PIP Duty Factor Cycle per Burst Temperature 450 W (1) 30% 200 20 °C 450 W (1) 30% 200 20 °C 450 W (1) 30% 200 20 °C Proceed to Section 3 – DNA Purification Part Number: 010178 Rev K June 2015 Patents Pending 12 | P a g e Option B - Extract large DNA fragments (>2 kb) with improved yield Option B uses the settings in Table 7 to promote release of large DNA fragments with AFA. Note that actual DNA fragment size will depend of the quality of the starting material. 1. Open microTUBE Screw-Cap, add 100 µl Tissue SDS Buffer into microTUBE and load FFPE tissue (section or core). Affix Screw-Cap back in place. NOTE: if the FFPE tissue samples are loose or broken the samples may be added to the microTUBE prior to Tissue SDS Buffer addition to facilitate easier loading. 2. Process the sample using the settings provided in Table 5 below to dissociate the paraffin and rehydrate the tissue. (Please see example in Appendix B.). During the AFA process it is normal for the solution to turn milky white as the paraffin is emulsified. Table 5 - Paraffin removal and tissue rehydration settings System S220 or E220 S2 or E210 M220 LE220 Duty Factor 10% 10% 20% 30% Peak Incident Power 175 Watts 5 (Intensity) 75 Watts 450 Watts (1) Cycles per burst 200 200 200 200 Treatment Temperature Time (Instrument) 300 sec 20 °C 300 sec 20 °C 300 sec 20 °C 300 sec 20 °C (1) As Covaris LE220 process multiple samples at a time, its PIP is distributed across microTUBEs, and power received by individual microTUBE stays within the 200 W limit. 3. Open Screw-Cap microTUBE, add 20 µl of Proteinase K solution to the sample and affix Screw-Cap back in place. 4. Process the sample using the settings provided in Table 6 below to properly mix Proteinase K with the sample. Table 6 - Proteinase K mixing settings System S220 or E220 S2 or E210 M220 LE220 Part Number: 010178 Rev K June 2015 Patents Pending Duty Factor 10% 10% Peak Incident Power 175 Watts 5 (Intensity) Cycles per burst 200 200 10 sec 10 sec Temperature (Instrument) 20 °C 20 °C 20% 30% 75 Watts 450 Watts (1) 200 200 10 sec 10 Sec 20 °C 20 °C Time 13 | P a g e 5. Protein digestion at 56°C a. Insert the required number of Heat Block microTUBE Adapters into a Heat Block and set the temperature to 56°C. b. Load the microTUBE into the adapter once the heat block has reached its set point. c. Incubate for 1 hour (sections <= 10 µm) or overnight (sections > 10 µm or cores) for protein digestion. If the digestion is incomplete after overnight incubation, add another 20 µl of Proteinase K solution, mix, and incubate for 1 more hour. 6. Incubate the samples at 80°C to reverse formaldehyde crosslinks: a. Insert the required number of Heat Block microTUBE Adapters into a Heat Block and set the temperature to 80°C. b. Load the microTUBE into the adapter once the heat block has reached its set point. c. Incubate for 1 hour. NOTE: If you are using the same heat block for both the 56°C & 80°C incubations, the microTUBE should be stored at room temperature until the heat block reaches 80°C. 7. Process the sample using the settings in Table 7 below to release the DNA with AFA. Table 7 – DNA release with AFA System S220 or E220 S2 or E210 M220 LE220 Duty Factor 10% 10% 20% 30% Peak Incident Power 105 Watts 3 (Intensity) 75 Watts 300 Watts (1) Cycles per burst 200 200 200 200 Time 10 sec 10 sec 10 sec 10 Sec Temperature (Instrument) 20 °C 20 °C 20 °C 20 °C 8. Proceed to Section 3 – DNA Purification Part Number: 010178 Rev K June 2015 Patents Pending 14 | P a g e Option C - Extract genomic DNA* 1. Open microTUBE Screw-Cap, add 100 µl Tissue SDS Buffer into microTUBE and load FFPE tissue (section or core). Affix Screw-Cap back in place. NOTE: if the FFPE tissue samples are loose or broken the samples may be added to the microTUBE prior to Tissue SDS Buffer addition to facilitate easier loading. 2. Process the sample using the settings provided in Table 8 below to dissociate the paraffin and rehydrate the tissue. (Please see the example in Appendix B.) During the AFA process it is normal for the solution to turn milky white as the paraffin is emulsified. Table 8 - Paraffin removal and tissue rehydration settings System S220 or E220 S2 or E210 M220 LE220 Duty Factor 10% 10% 20% 30% Peak Incident Power 175 Watts 5 (Intensity) 75 Watts 450 Watts (1) Cycles per burst 200 200 200 200 Treatment Temperature Time (Instrument) 300 sec 20 °C 300 sec 20 °C 300 sec 20 °C 300 sec 20 °C (1) As Covaris LE220 process multiple samples at a time, its PIP is distributed across microTUBEs, and power received by individual microTUBE stays within the 200 W limit. 3. Open Screw-Cap microTUBE, add 20 µl of Proteinase K solution to the sample and affix Screw-Cap back in place. 4. Process the sample using the settings provided in Table 9 below to properly mix Proteinase K with the sample. Table 9 - Proteinase K mixing settings System S220 or E220 S2 or E210 M220 LE220 Duty Factor 10% 10% 20% 30% Peak Incident Power 175 Watts 5 (Intensity) 75 Watts 450 Watts (1) Cycles per burst 200 200 200 200 Time 10 sec 10 sec 10 sec 10 Sec Temperature (Instrument) 20 °C 20 °C 20 °C 20 °C 5. Protein digestion at 56°C a. Insert the required number of Heat Block microTUBE Adapters into a Heat Block and set the temperature to 56°C. b. Load the microTUBE into the adapter once the heat block has reached its set point. c. Incubate for 1 hour (sections <= 10 µm) or overnight (sections > 10 µm or cores) for protein digestion. If the digestion is incomplete after overnight incubation, add another 20 µl of Proteinase K solution, mix, and incubate for 1 more hour. Part Number: 010178 Rev K June 2015 Patents Pending 15 | P a g e 7. Incubate the samples at 80°C to reverse formaldehyde crosslinks: a. Insert the required number of Heat Block microTUBE Adapters into a Heat Block and set the temperature to 80°C. b. Load the microTUBE into the adapter once the heat block has reached its set point. c. Incubate for 1 hour. NOTE: If you are using the same heat block for both the 56°C & 80°C incubations, the microTUBE should be stored at room temperature until the heat block reaches 80°C. 8. Proceed to Section 3 – DNA Purification Part Number: 010178 Rev K June 2015 Patents Pending 16 | P a g e 3 – DNA PURIFICATION NOTE: Set heat block to 70°C and preheat the required volume of Buffer BE in a 1.5mL microfuge tube: (number of samples x 100 µl x 1.1) 1. Transfer the sample to a clean 1.5 ml microcentrifuge tube. 2. Optional: The sample can be treated with RNase A to remove RNA before DNA purification. Add 5µl of RNase A solution and incubate for 5 minutes at room temperature. 3. Add 140 µl Buffer B1 to your sample and vortex thoroughly. 4. Add 160 µl ethanol (>96%) to the sample and vortex thoroughly. 5. Centrifuge at 10,000 x g for 2 minutes at room temperature. After centrifugation much of the paraffin will have formed a white layer, floating on top of the liquid. 6. Place a Purification Column into a provided Collection Tube. 7. While holding the sample tube at about the same angle as in the rotor, use a pipette to slowly recover the liquid layer, and transfer to the column. Transfer of a small amount of paraffin particles to the column is acceptable and will not interfere with the DNA purification. 8. Spin the assembly at 11,000 x g for 1 minute. 9. Discard the flow-through and place the Column back in the Collection Tube. 10. 1st wash: Add 500 µl Buffer BW. Spin the assembly at 11,000 x g for 1 minute. 11. Discard the flow-through and place the Column back in the Collection Tube. 12. 2nd wash: Add 600 µl Buffer B5. Spin the assembly at 11,000 x g for 1 minute. 13. Discard the flow-through and place the column in a new Collection Tube (provided). 14. Dry column: Spin the assembly at 11,000 x g for 1 minute. 15. Elute DNA - 1st step: Place the Purification Column into a new 1.5 ml microfuge tube (not provided) and add 50 µl pre-warmed Buffer BE (70 °C) to the center of the column. Incubate at room temperature for 3 minutes. Spin the assembly at 11,000 x g for 1 minute. 16. Elute DNA – 2nd step: Add a second aliquot of 50 µl pre-warmed Buffer BE. Incubate again at room temperature for 3 minutes. Spin the assembly at 11,000 x g for 1 minute. 17. DNA is eluted in 100 µl Buffer BE (5mM Tris HCl pH 8.5). NOTE: To increase the concentration of the recovered DNA, perform the second elution with the eluate from the first elution: Reload the first eluate to the top of the column, incubate for 3 min at room temperature and re-spin the assembly at 11,000 x g for 1 minute collecting the sample in the same 1.5 ml microcentrifuge tube. The eluted DNA is now in 50 μl. Part Number: 010178 Rev K June 2015 Patents Pending 17 | P a g e APPENDIX A – EXAMPLES OF DNA FRAGMENTS SIZE DISTRIBUTION In these examples, DNA has been extracted from 10 µm sections from the same kidney tissue block with the Covaris FFPE kit following the 3 available options. The Bioanalyzer electropherograms below represent the fragment size distribution after purification. The size of the non-fragmented, genomic DNA (Option C) depends of the previous storage condition of the tissue block, including how it has been fixed and paraffin embedded. 200, 300 and 400 bp Peaks Option A Extract and fragment DNA (for NGS) Subsequently to extraction, DNA is sheared to a size suitable for Next Gen Sequencing library construction. In this example, one sample has been sheared to 200 bp, one to 300 bp and one to 400 bp. 3 kb Peak Option B Extract large DNA fragments (>2 kb)* AFA energy is used to release the DNA from the tissue. During this process the DNA is also sheared into fragments larger than 2 kb. *Final size will depend of the quality of the starting tissue. Option C Extract genomic DNA* 8 kb Peak DNA size will be the largest possible and will depend on the quality of the starting tissue. *Final size will depend of the quality of the starting tissue Part Number: 010178 Rev K June 2015 Patents Pending 18 | P a g e APPENDIX B – PARAFFIN EMULSIFICATION WITH AFA ENERGY Paraffin is emulsified in microTUBE Screw-Cap using a Covaris S220 Focused-ultrasonicator. Sample before (left side) and after (right side) processing. Sample was a 10 μm kidney tissue section. Additional Notes 1. Best Practices to determining the yield and purity of isolated DNA: To determine DNA yield with the highest level of accuracy, a fluorometric assay such as the Qubit TM (Life Technologies) should be used. In addition, spectrophotometric analysis of DNA for A260/280 and A260/230 ratios will determine if protein or peptide contamination is present in the sample. 2. Tissue Blocks were obtained from: Theresa Kokkat, PhD and Diane McGarvey, Cooperative Human Tissue Network (CHTN), Eastern Division, University of Pennsylvania, USA 3. See following link: http://covarisinc.com/wp-content/uploads/pn_010178.pdf for updates to this document. 4. The treatment settings listed in this document are recommended guidelines. Actual results may vary depending on the tissue type, mass, and previous handling of FFPE samples. Part Number: 010178 Rev K June 2015 Patents Pending 19 | P a g e APPENDIX C – TROUBLESHOOTING GUIDE Issue Cause Solution Low yield of DNA Low tissue to wax ratio in FFPE section. Repeat the procedure using additional sections until desired yield is achieved. Insufficient tissue input Increase FFPE tissue section thickness or use more sections up to 5mg total weight. Proteinase K stored above recommended temperature or expired. Repeat the procedure using fresh Proteinase K. Ethanol not added to buffer B5. Repeat the procedure with fresh samples and ensure ethanol is added to buffer B5. Step 4 of option A, B or C has been omitted. Repeat the procedure DNA concentration is too low Elution volume is too high. Repeat procedure using lower elution volume (50 µl minimum volume is required). Concentrate samples using ethanol precipitation or other means. DNA does not perform well in downstream applications such as qPCR DNA in FFPE sample blocks is severely cross-linked or degraded. Design amplicons to be as small as possible (<100 bp). DNA isolated using Covaris AFA technology is of the highest possible quality. Some FFPE sample blocks may be too degraded or cross-linked for some applications. DNA fragments size too large when following Option A Too much emulsified paraffin in the sample Trim any excess paraffin from tissue blocks before proceeding with protocol. We recommend running a time course at step 7 and to increase the treatment time by 30 seconds steps. Too much emulsified paraffin absorbs some of the acoustic energy and will adversely affect DNA Shearing efficiency. No DNA Part Number: 010178 Rev K June 2015 Patents Pending Comments / Suggestions In your initial use of the truXTRAC FFPE kit, use FFPE blocks that have been well characterized for yield and quality. Always store proteinase K solution at -20°C. Step 4 mixes the Proteinase K with the sample. As PB Buffer contains Glycerol, it falls at the bottom of the microTUBE and won’t be in contact with the sample without this mixing step 20 | P a g e