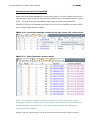
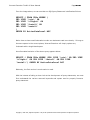
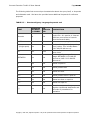
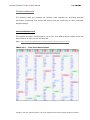
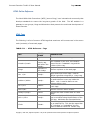
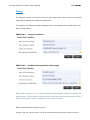
1
SiQuest Corporation 27 - 1300 King Street East Suite 134 Oshawa, ON L1H 8J4 Canada Support: (905) 686-6801 Sales: (905) 686-6801 e-mail: [email protected] web: www.siquest.com Internet Examiner Toolkit v5 Internet Examiner® (Revision 2015.04.07) Copyright © 2004-2015, SiQuest Corporation. Internet Examiner is a registered trademark of SiQuest Corporation. All rights reserved. No part of this publication may be copied without the express written permission of SiQuest Corporation, 1300 King Street East, Unit 27, Suite 134, Ontario, Canada L1H 8J4 Internet Examiner Toolkit v5 User Manual Page 2 of 181 Table of Contents TABLE OF CONTENTS ........................................................................................................................................................... 2 PREFACE ............................................................................................................................................................................. 8 AUDIENCE ............................................................................................................................................................................... 8 DOCUMENTATION CONVENTIONS ......................................................................................................................................... 9 REFERENCES ........................................................................................................................................................................... 9 CONTACTING SIQUEST .......................................................................................................................................................... 10 INTRODUCTION ................................................................................................................................................................ 11 PRODUCT INSTALLATION ...................................................................................................................................................... 11 TM AN INTRODUCTION TO IXTK .......................................................................................................................................... 14 Overview .......................................................................................................................................................................... 14 Internet Examiner: Description........................................................................................................................................ 15 THE USER INTERFACE ................................................................................................................................................................. 16 The Navigator Pane: Overview Tab ................................................................................................................................. 17 Filter: Early Assessment .................................................................................................................................................................. 18 Filter: My Investigation ................................................................................................................................................................... 18 Filter: My Investigation » Live Analysis ........................................................................................................................................... 19 My History ................................................................................................................................................................................... 19 My Snapshots .............................................................................................................................................................................. 20 My Url Downloads....................................................................................................................................................................... 20 My Web Capture ......................................................................................................................................................................... 20 My Artifact Searches ................................................................................................................................................................... 21 My Bookmarks ............................................................................................................................................................................ 21 My Categorized Images ............................................................................................................................................................... 21 My Keywords .............................................................................................................................................................................. 22 My Labels .................................................................................................................................................................................... 22 My Notes ..................................................................................................................................................................................... 22 My Reports .................................................................................................................................................................................. 22 My Scored Evidence .................................................................................................................................................................... 23 My Tagged Records ..................................................................................................................................................................... 23 Filter: Explore Artifacts ................................................................................................................................................................... 23 The Data Pane .................................................................................................................................................................. 25 Copyright © 2004-2015, SiQuest Corporation. May not be reproduced without written permission of SiQuest Corporation. Internet Examiner Toolkit v5 User Manual Page 3 of 181 Table Tab.......................................................................................................................................................................................... 25 Gallery Tab ....................................................................................................................................................................................... 26 Browser Tab ..................................................................................................................................................................................... 27 Real-Time Event Tracking ............................................................................................................................................................ 28 Creating Snapshots ..................................................................................................................................................................... 29 Disk Tab............................................................................................................................................................................................ 31 The Viewer Pane ............................................................................................................................................................... 32 Text Viewer ...................................................................................................................................................................................... 32 HTML Viewer ................................................................................................................................................................................... 34 Hex Viewer ....................................................................................................................................................................................... 35 Using the Built-In Decoder .......................................................................................................................................................... 35 Creating Child Records ................................................................................................................................................................ 36 Database Viewer .............................................................................................................................................................................. 38 Decoding Chrome and Firefox Timestamps ................................................................................................................................ 39 Picture Viewer.................................................................................................................................................................................. 40 Video Viewer.................................................................................................................................................................................... 41 CREATING INTERNET EXAMINER PROJECTS ....................................................................................................................... 42 Overview .......................................................................................................................................................................... 42 Creating a New Project File .............................................................................................................................................. 43 Configuring Options ......................................................................................................................................................................... 44 Time and Date Options .................................................................................................................................................................... 45 Date and Time Format ................................................................................................................................................................ 46 Time Zone Setting ....................................................................................................................................................................... 46 General Preferences ........................................................................................................................................................................ 47 Error Tracking................................................................................................................................................................................... 48 Event Tracking.................................................................................................................................................................................. 49 FaceDNA Configuration.................................................................................................................................................................... 50 Performance .................................................................................................................................................................................... 52 The GUI at a Glance.......................................................................................................................................................... 53 Using SQLite Expert to View .IEP Files .............................................................................................................................. 54 Introduction to PAR Filtering ............................................................................................................................................ 57 OBSERVATIONS ................................................................................................................................................................................ 59 Using PAR as a Filter ........................................................................................................................................................................ 59 FINDING AND IMPORTING EVIDENCE................................................................................................................................ 60 Overview .......................................................................................................................................................................... 60 New Search Window ........................................................................................................................................................ 61 Disk Sectors Search........................................................................................................................................................... 62 Copyright © 2004-2015, SiQuest Corporation. May not be reproduced without written permission of SiQuest Corporation. Internet Examiner Toolkit v5 User Manual Page 4 of 181 Common Search Configuration Options ........................................................................................................................... 64 Time Zone Configuration ................................................................................................................................................................. 65 Device Time and Correct Time ......................................................................................................................................................... 66 Selecting and Mounting Disks .......................................................................................................................................................... 67 Definion of Trace and File Artifacts .................................................................................................................................................. 68 Selecting Artifacts ............................................................................................................................................................................ 69 Selecting and Managing Search Keywords....................................................................................................................................... 70 Managing Keywords......................................................................................................................................................................... 72 Creating or Editing Keywords ........................................................................................................................................................... 73 Carving Options................................................................................................................................................................................ 74 Advanced Options ............................................................................................................................................................................ 75 Email Notification Configuration ...................................................................................................................................................... 77 EXAMINING RECORD DATA ............................................................................................................................................... 79 Overview .......................................................................................................................................................................... 79 THE TABLE AND QUERIES ............................................................................................................................................................ 80 The Active Query (Filter) .................................................................................................................................................................. 81 Query Type .................................................................................................................................................................................. 81 Create a Custom Query .................................................................................................................................................................... 82 My First Custom Query .................................................................................................................................................................... 83 RULE #1: SELECT ALL (Always) .................................................................................................................................................... 83 RULE #2: No Underscores........................................................................................................................................................... 83 SELECTING RECORDS .................................................................................................................................................................. 88 Tagging Table Records ..................................................................................................................................................................... 88 Persistence of Tagged Items ....................................................................................................................................................... 89 TIME ZONES AND UTC ....................................................................................................................................................... 90 Introduction...................................................................................................................................................................... 90 Understanding Coordinated Universal Time (UTC) .......................................................................................................... 92 The International Date Line .............................................................................................................................................. 94 Daylight Time ................................................................................................................................................................... 96 History of Daylight Time in the U.S. ................................................................................................................................. 97 Summer Time (Northern and Southern Hemispheres) ..................................................................................................... 98 Hemispheres and Daylight Saving Time Issues................................................................................................................. 99 Daylight Time (Northern and Southern Hemispheres) ................................................................................................... 101 Formatting Displayed Times and Dates in Internet Examiner ........................................................................................ 105 Setting Time Zone and Daylight Savings Options ........................................................................................................... 105 ActionDateLocal and ActionDateUTC ............................................................................................................................. 107 Copyright © 2004-2015, SiQuest Corporation. May not be reproduced without written permission of SiQuest Corporation. Internet Examiner Toolkit v5 User Manual Page 5 of 181 WEEKLY Timestamps in Internet Explorer ...................................................................................................................... 108 “DST” and “STD” Suffixes ............................................................................................................................................... 109 Multiple Time Zone Analysis: A Case Study................................................................................................................................... 110 Using Dates in Queries ................................................................................................................................................... 111 Date Query #1 ................................................................................................................................................................................ 111 Date Query #2 ................................................................................................................................................................................ 112 Managing the “timezones.sqlite” File ............................................................................................................................ 113 Customizing DST for Select Regions ............................................................................................................................................... 115 UTC_Offset ..................................................................................................................................................................................... 115 STD_Bias ........................................................................................................................................................................................ 115 UsesDST ......................................................................................................................................................................................... 115 Time Zone References ................................................................................................................................................................... 116 www.worldtimezone.com......................................................................................................................................................... 116 www.timeanddate.com ............................................................................................................................................................ 117 www.worldtimeengine.com ..................................................................................................................................................... 118 FACEDNA™ BIOMETRIC FACIAL RECOGNITION ................................................................................................................ 120 GETTING STARTED ................................................................................................................................................................... 120 Introduction.................................................................................................................................................................... 120 Applications for FaceDNA™ ............................................................................................................................................ 120 Crimes Against Children ................................................................................................................................................................. 121 Fraud: Document Forgery Detection ............................................................................................................................................. 121 Online Investigations: Detecting Wanted Persons ........................................................................................................................ 122 MANAGING FACES ................................................................................................................................................................... 122 Manage Faces Window .................................................................................................................................................. 122 Enrolling New Faces ....................................................................................................................................................... 124 Deleting Faces ................................................................................................................................................................ 126 EXTRACTING FACES .................................................................................................................................................................. 127 How To Extract Faces ..................................................................................................................................................................... 127 Detection Accuracy Level .......................................................................................................................................................... 129 Handling Head Rotations .......................................................................................................................................................... 130 Maximum Faces ........................................................................................................................................................................ 130 MATCHING FACES ................................................................................................................................................................... 131 Overview ........................................................................................................................................................................ 131 Matching Faces in Records ............................................................................................................................................. 131 Finding (Matching) Faces in External Files ..................................................................................................................... 132 Find Faces Search Window ............................................................................................................................................................ 133 REBUILDING WEB PAGES ................................................................................................................................................ 134 Copyright © 2004-2015, SiQuest Corporation. May not be reproduced without written permission of SiQuest Corporation. Internet Examiner Toolkit v5 User Manual Page 6 of 181 Tools To Use ................................................................................................................................................................... 134 Overview ........................................................................................................................................................................ 134 HTML Online Reference .................................................................................................................................................. 136 HTML Tags...................................................................................................................................................................................... 136 HTML Attributes............................................................................................................................................................................. 138 Parent Paths .............................................................................................................................................................................. 139 HTML Keywords ............................................................................................................................................................................. 140 Search Expression ..................................................................................................................................................................... 140 Editing Cascading Stylesheets ........................................................................................................................................ 141 Exploring Other Features................................................................................................................................................ 142 CREATING CUSTOM QUERIES .......................................................................................................................................... 144 Tools To Use ................................................................................................................................................................... 144 Overview ........................................................................................................................................................................ 144 USING THE QUERY BUILDER....................................................................................................................................................... 145 Column Name ................................................................................................................................................................................ 146 Condition ....................................................................................................................................................................................... 147 Value(s) .......................................................................................................................................................................................... 148 AND or OR ................................................................................................................................................................................. 149 ORDER BY .................................................................................................................................................................................. 149 ASC or DESC .............................................................................................................................................................................. 149 Using Parentheses to Group Conditions ......................................................................................................................... 150 Using [Square] Brackets in a Query Definition ............................................................................................................... 152 Managing Stored Queries .............................................................................................................................................................. 154 Stored Query Types ........................................................................................................................................................ 155 SELECT Queries .............................................................................................................................................................................. 155 BOOKMARK Queries ...................................................................................................................................................................... 155 KEYWORD LIST Queries .................................................................................................................................................................. 155 VALIDATING QUERIES ......................................................................................................................................................... 157 Validating with the Query Manager .............................................................................................................................. 157 How the Validate Button Works .................................................................................................................................................... 157 Validating Queries with SQLite Expert ........................................................................................................................... 158 ADVANCED QUERIES AND REPORTING ........................................................................................................................... 170 Tools To Use ................................................................................................................................................................... 170 Overview ........................................................................................................................................................................ 170 USING WILDCARDS ............................................................................................................................................................. 171 Using the % wildcard ...................................................................................................................................................... 173 Copyright © 2004-2015, SiQuest Corporation. May not be reproduced without written permission of SiQuest Corporation. Internet Examiner Toolkit v5 User Manual Page 7 of 181 LIVE ONLINE INVESTIGATIONS ........................................................................................................................................ 174 DOMAIN RESEARCH USING DOMAINIQ API ................................................................................................................................. 174 Introduction.................................................................................................................................................................... 174 Accessing the DomainIQ Features .................................................................................................................................. 175 WhoIs and Domain IP WhoIs ......................................................................................................................................................... 175 Reverse IP ...................................................................................................................................................................................... 178 Reverse DNS ................................................................................................................................................................................... 179 Email Report .................................................................................................................................................................................. 180 Name Report .................................................................................................................................................................................. 181 Copyright © 2004-2015, SiQuest Corporation. May not be reproduced without written permission of SiQuest Corporation. Internet Examiner Toolkit v5 User Manual Page 8 of 181 Preface Welcome to the Internet Examiner Toolkit (IXTK) Advanced Bootcamp training course! This course is intended for new and experienced digital forensic practitioners who are looking to become proficient in the use of SiQuest’s Internet Examiner® Toolkit. The course content makes some minimum assumption about an individual’s level of skill or knowledge in the field of Internet forensics and artifacts. If you are in a position that requires you to forensically acquire and examine electronic evidence from computers and mobile devices, and have some preliminary training in this field or exposure to other forensic tools, then that’s a good start. Topics to be covered include the discovery and analysis of various Internet artifacts relating to: social networking, browsing, file sharing, instant chat messaging, email, pictures and video files. Students will be exposed to advanced features in IXTK such as Bookmarking, Labeling, Evidentiary Value Scoring, Tagging, creating Child Records, decoding browser cache artifacts, video frame extraction, web page rebuilding, SQLite database exploring, custom query building and reporting. AUDIENCE This hands-on course is intended for forensic investigators, law enforcement personnel, and security and network administrators who are, or are considering using Internet Examiner Toolkit for their investigation of Internet related evidence. To obtain the maximum benefit from this course, you should meet the following requirements: Read and understand the English language. No previous experience of Internet Examiner required. Have previous experience in forensic investigations. Have a working knowledge of least two of the following browsers: Internet Explorer, Firefox, Opera, Safari and Google Chrome. Copyright © 2004-2015, SiQuest Corporation. May not be reproduced without written permission of SiQuest Corporation. Internet Examiner Toolkit v5 User Manual Page 9 of 181 DOCUMENTATION CONVENTIONS In this documentation, all hexadecimal values are denoted with a 0x. For example, the hex value of “C80000” will be shown as 0xFFFFFF Hexadecimal values can be displayed using uppercase or lowercase letters. In either case, the case of a hex value does not alter its value. Therefore, 0xffffff is the same as 0xFFFFFF. A trademark symbol ( , etc.) denotes a SiQuest trademark. An asterisk (*) denotes a third party trademark. File paths and file names will be represented using a Courier New type font. For example: C:\Documents and Settings\Administrator. The use of opening and closing “< >” brackets are used to denote an unknown value or a value that is determinable by the examination of the evidence. For example, the following path refers to any given Windows user profile: C:\Documents and Settings\<user profile> REFERENCES In addition to the materials presented in this course manual, there is a list of website and online document references, which can be found in APPENDIX A. Copyright © 2004-2015, SiQuest Corporation. May not be reproduced without written permission of SiQuest Corporation. Internet Examiner Toolkit v5 User Manual Page 10 of 181 CONTACTING SIQUEST SiQuest Corporation 1300 King Street East, Unit 27, Suite 134 Oshawa, ON L3X 1X4 Canada US/Canada: (905) 686-6801 World: +1 1 (905) 686-6801 Fax: (905) 686-6801 Email: [email protected] Website: www.siquest.com Copyright © 2004-2015, SiQuest Corporation. May not be reproduced without written permission of SiQuest Corporation. Internet Examiner Toolkit v5 User Manual Page 11 of 181 Module 1 Introduction Before we begin, we will need to prepare our systems by installing IXTK and any required components. PRODUCT INSTALLATION STEP 1: DISABLE THE WINDOWS FIREWALL Please complete the following steps before attempting to install Internet Examiner: 1. Open up the Windows Control Panel, then locate and double-click the Security Center shortcut. 2. Click on the Windows Firewall. 3. If the firewall is not already OFF, then click Off (not recommended). ____________________________________________________________ NOTE: If there are any third party anti-virus programs, firewalls, or malware software currently running on the system, please disable them as well. If you are not able to disable the programs, then be watchful of any popup new firewall rules or messages that prompt you to require your permission to continue. ____________________________________________________________ Copyright © 2004-2015, SiQuest Corporation. May not be reproduced without written permission of SiQuest Corporation. Internet Examiner Toolkit v5 User Manual Page 12 of 181 STEP 2: INSTALL THE KEYLOK DONGLE DRIVER (GREEN DONGLES ONLY) If you have not been provided a USB dongle for this course, then proceed to step 3. 1. Insert the Internet Examiner Training DVD into the DVD drive and open up Windows Explorer to view the contents of the disc. 2. Locate the USBKey.exe installation file and double-click to run the dongle driver installation program. NOTE: Be sure that your dongle is NOT plugged into the computer. 3. When the KeyLok installation window appears, choose the USB Dongle and Standalone options. 4. Click “Begin Installation”. 5. When the installation is complete, INSERT the dongle into an available USB port on your computer. Windows’ “Add Hardware Wizard” will appear after detecting the new device. 6. Allow the default options and Windows will complete the installation of the driver. ____________________________________________________________ NOTE: If you make a mistake and accidentally plug the dongle in before the driver installation is complete, then you will need to unplug the dongle….uninstall the driver….and then repeat the installation process again. ____________________________________________________________ STEP 3: INSTALLING INTERNET EXAMINER TOOLKIT Download the latest version from the SiQuest website’s download page at: http://www.siquest.com/index.php/download-form/ ____________________________________________________________ NOTE: If you encounter any Windows security related messages during the install, or if the installation program encounters an error part way through the installation process, you may not have sufficient security clearance given the Copyright © 2004-2015, SiQuest Corporation. May not be reproduced without written permission of SiQuest Corporation. Internet Examiner Toolkit v5 User Manual Page 13 of 181 current settings for your user profile. The Windows Firewall may also be causing this problem (see Step 1). A sure way to ensure that you do not run into this problem is to run any .EXEcutable files (and desktop shortcuts) using the “Run As…” option. This feature is available using Windows Explorer by right-mouse-clicking on the .EXE and choosing to “Run As Administrator”. ____________________________________________________________ STEP 4: INSTALLING BROWSER SOFTWARE (optional) This course was designed without the requirement to have different browsers installed on the training computer. However, in order to get the maximum benefit out of some of the discussions regarding browser artifacts, it is strongly recommended that the following additional software be installed. Internet Explorer Mozilla Firefox Opera Safari Google Chrome Copyright © 2004-2015, SiQuest Corporation. May not be reproduced without written permission of SiQuest Corporation. Internet Examiner Toolkit v5 User Manual Page 14 of 181 Module 2 An Introduction to IXTKTM Overview On May 12, 2014, Internet Examiner Toolkit v4 was introduced as the next generation implementation of Internet Examiner v3. The new name of the software better reflects the features and functionalities of the software. It is no longer simply a cache and history analysis tool. To the contrary, it is engineered with the focus of becoming the first and only single, comprehensive all-in-one Internet forensics investigation tool. From May 2012 to May 2014, Internet Examiner was completely redesigned from the ground up. In fact, it was a complete rewrite using the latest Microsoft .NET technologies and optimized native C++ libraries for level disk functions. Today, IXTK is exponentially faster, more feature rich, and extensible in so many ways. One could easily argue that Internet Examiner and IXTK are two completely different products. In this section, we will review the new user interface and what special new features and enhancements are available in IXTK v4. If you are accustomed to using various other third party tools to deal with certain types of Internet evidence, you will recognize how Internet Examiner can take their place and simply the investigation process. Moreover, by using Internet Examiner for all facets of Internet investigations, you will be able to maintain better continuity over the evidence in your cases. You will also be able to tap into the many different reporting options to produce compelling reports for disclosure. Copyright © 2004-2015, SiQuest Corporation. May not be reproduced without written permission of SiQuest Corporation. Internet Examiner Toolkit v5 User Manual Page 15 of 181 NOTE: This module is not intended to be an instructional proponent of the course. Rather, it is designed to provide a high-level overview of some of the “more useful” features of Internet Examiner Toolkit. The goal of this module is to provide students with the confidence to maximize their use of all functionalities of the software. Internet Examiner: Description Internet Examiner is a 32-bit Windows application designed as a standalone Internet forensics tool. The software was engineered with the vision of making it a single, comprehensive all-in-one tool for all Internet evidence related investigations. On April 24, 2012, Internet Examiner Version 3.8 was unveiled as the next generation software to the SiQuest CacheBack series product. In versions prior to 3.8, CacheBack used a Microsoft Access database for storage of case data. This had performance issues as well as a capacity limitation of 2GB per project file. With more and more users throwing more and more data at the program, it soon became apparent that the Access days were soon to be over. Internet Examiner was built using the SQLite industry standard which offers an independent file-based data storage solution that is both robust, and scalable (up to 2TB). Switching over to a SQL compliant database opened up many data management options for Internet Examiner. Creating different Views of case data made it possible to reorganize and present data to the user “visually”. By transitioning to SQLite, Internet Examiner was now able to create an extensible hierarchical representation of evidence, organized by “genre”. In Version 3.8, intuitive Overview tab and Case Explorer tabs in the new Navigation Pane now provide immediate access to all types (groups) of data. We will discuss these two particular parts of the user interface in detail. Copyright © 2004-2015, SiQuest Corporation. May not be reproduced without written permission of SiQuest Corporation. Internet Examiner Toolkit v5 User Manual Page 16 of 181 THE USER INTERFACE The user interface is now split into 4 workable areas called Panes. Each pane is re- sizable using the adjacent splitter bars. The four panes include: the Navigator Pane, the Data Pane, the Viewer Pane and the Record Details Pane (or also referred to as the Metadata Pane). In Version 4, it is anticipate that users will have the option to “detach” and “float” a particular pane in its own window. This will provide the ability to maximize any pane within the space of a single LCD -- a treat for users with 2 or more monitors at their workstation. IMAGE 2.1 - The User Interface Copyright © 2004-2015, SiQuest Corporation. May not be reproduced without written permission of SiQuest Corporation. Internet Examiner Toolkit v5 User Manual Page 17 of 181 The Navigator Pane: Overview Tab The Navigator Pane consists of four (4) tabs that are used to navigate evidence in the case. The first (default) tab is the Filter tab. It contains a hierarchical list of filters available that can be used independently or jointly to filter records in the Data Pane. The Dictionary tab contains an alphabetical list of Latin-based keywords found within the case file evidence. The Setting tab provides a quick, linear view of the case settings. This list is Read/Write making it possible to adjust settings within the main window without having to load a separate Options window. Finally, what is not present in the below noted diagram is the new Explorer tab (in v5). It provides a hierarchical representation of devices and file systems available to your workstation. Different Filters are explained in further detail below. IMAGE 2.2 - The Overview Tab Copyright © 2004-2015, SiQuest Corporation. May not be reproduced without written permission of SiQuest Corporation. Internet Examiner Toolkit v5 User Manual Page 18 of 181 Filter: Early Assessment The Early Assessment is a filter category designed to manage preliminary findings (such as found Keywords). It was positioned as the first node in the tree to provide an immediate overview of quickly discovered artifacts such as keywords found during an early search or triage exercise. In the not too distant future, IXTK will feature an Internet Triage™ module that will serve as a more elaborate early assessment tool. The information reported in this category at this time are restricted to keywords found in evidence that has already been imported into the case. IMAGE 2.3 - Early Assessment elements Filter: My Investigation This filter pertains to all of your activities relating to your analysis of the evidence in the case. In particular, it keeps track of your history of “online” LIVE Internet activities. Not only can IXTK examine typical 'deadbox' data from computer hard drives, memory dumps and mobile devices, but it can also investigate and capture evidence from the Internet, live, in real-time. This makes IXTK the first forensic software program to combine both reactive and proactive investigative functionality. As part of your investigation, you will do a number of different things. You might search for keywords, create bookmarks, prioritize evidence, and capture data online (to name but a few). IXTK provides an easy and accessible way to manage these details for you. Copyright © 2004-2015, SiQuest Corporation. May not be reproduced without written permission of SiQuest Corporation. Internet Examiner Toolkit v5 User Manual Page 19 of 181 IMAGE 2.4 - My Investigations features Filter: My Investigation » Live Analysis This section maintains sub-sections (filters) for all online related activities. Most, if not all, are related to the use of the Data Pane's built-in Browser situated on the Browser Tab. My History The Browser Tab within the Data Pane contains a browser control that allow you to navigate the Internet in real-time. Web pages are displayed no differently than using any convential desktop browser program. When you go to a specific Url address, either by typing in the Url into the address box or by clicking on a hyperlink within a browsed web page, IXTK keeps track of the visited Urls including the exact date and time it occurred. This information forms part of the investigator notes and provides an accurate account of your time and activities. Copyright © 2004-2015, SiQuest Corporation. May not be reproduced without written permission of SiQuest Corporation. Internet Examiner Toolkit v5 User Manual Page 20 of 181 My Snapshots While navigating online Internet content using the Data Pane's Browser control, there may be times where you will want to take a snapshot of what is displayed on the screen. In this case, IXTK provides the ability to create a full length Bitmap capture of the entire contents of the browser, even the data that is out of view within the scrollable areas. Snapshots are captured as new Records and added to the case as Live Analysis artifacts which can be managed and reported on like any other record in the case. This section also includes snips taken from the screen using the built-in Snip Tool. My Url Downloads Sometimes, evidence that is parsed or collected may resolve to an actual file situated somewhere on the Internet. One such example is a reference to a Facebook user profile picture. When IXTK is requested to search a disk for Facebook artifacts, quite often the search results will yield potentially hundreds and sometimes even thousands or Facebook Photo Urls. These types of artifacts can usually reveal an intent or authorization to access social media profile information about individuals. This could be relevant to a case and having the ability to see the actual picture to which the recovered urls point to could be invaluable. With IXTK, it is possible to request parsed Urls to be downloaded directly to the case. When this happens, each download image becomes associated as a Child Records to the original Url records. Again, this information is reportable and searchable like any other record. My Web Capture When browsing the Internet live via the built-in browser control, IXTK makes it possible to forensically capture an individual web page, including all embedded or referenced files. The first thing IXTK does is capture the source code for the current web page and adds it to the case as an HTML file. The captured page is then parsed. Any cascading stylesheets, javascript files, pictures, and linked download files such as PDF, ZIP, DOC, XLS, ISO and EXE formats (and many others) are then downloaded as new child records to the captured web page record. Copyright © 2004-2015, SiQuest Corporation. May not be reproduced without written permission of SiQuest Corporation. Internet Examiner Toolkit v5 User Manual Page 21 of 181 My Artifact Searches Each time you search for artifacts within IXTK, you search is saved with a friendly name which later appear in the Filter tree. This section allows you to quickly isolate and report on your search results, separate and apart from other searches. My Bookmarks This section maintains Bookmark Folders that you manage using the Manage Bookmarks window (see View menu). Folders can be nested and there is no limit to how many levels or folders you create. My Categorized Images Project Vic is a collaboration between the International Centre for Missing and Exploited Children (ICMEC) and law enforcement agencies. It proposes a global standard to the way law enforcement agencies identify and categorize electronic images in cases involving child pornography. SiQuest is a vendor partner to this project and has contributed to the initiative by proposing the VICS acronym to encapsulate and better identify this initiative. VICS stands for Video Image Classification Standard (VICS) which is a 5-category grouping system. This system is represented and managed in the My Categorized Images section. The VICS categories are: 0 = Non-Pertinent 1 = Child Abuse Material (CAM) 2 = Child Exploitive (non-CAM) 3 = CGI Animation 4 = Comparison Images 5 = Uncategorized Copyright © 2004-2015, SiQuest Corporation. May not be reproduced without written permission of SiQuest Corporation. Internet Examiner Toolkit v5 User Manual Page 22 of 181 My Keywords When a new case is created, IXTK pre-populates the My Keywords section with common searchable terms such as email addresses and specific Urls. This section features folders that contain one or more keywords. Clicking on any one of these filters will display all records where a field or value in a given record contains the selected keyword. There is no limit to the number of custom keywords or folders that are created. My Labels As you investigate the evidence in your case, you will inevitably want to characterize the evidence in one way or another. Using Labels, it is possible to create and associate any custom keyword(s) to one or more individual records. The words you choose can be anything at all. For example, you could use the term smoking gun or disregard to help isolate stuff that is important or not important. My Notes The really nice thing about IXTK is that you can now include extrinsic evidence within your case, without having to manage notes in a separate program such as Microsoft Word. Notes can be written and saved at the Case level (global) or at the Record level. All notes are timestamped to accurately reflect the case workflow. Notes can be marked as Private. They can also be Deleted or Hidden. Important: notes are never truly deleted. IXTK simply flags a record as deleted but the note itself is never really purged from the case. My Reports Anytime a report is created, a copy of that report is stored inside the <case folder>\Reports folder. From the My Reports filter, it is possible to navigate and select past created reports. Reports are viewable inside the Data Pane's built-in Browser where they can also be Deleted if necessary. In this case, reports that are requested to be deleted are actually, in fact, deleted. Copyright © 2004-2015, SiQuest Corporation. May not be reproduced without written permission of SiQuest Corporation. Internet Examiner Toolkit v5 User Manual Page 23 of 181 My Scored Evidence IXTK v4 introduced the Evidentiary Value Scoring system (EVS) as part of aiding the case workflow process. The EVS system comprises of a scale of 5 values that can be assigned to any record in the case. They are: 0 = Unscored 1 = Not Important 2 = Might Be Important 3 = Important 4 = Very Important 5 = Extremely Important My Tagged Records IXTK makes it possible to Tag (checkmark) records as you review the case evidence. Using the idea of Tagging records, you can feel free to run filter after filter or peruse one record after another and tag records that are important as you go along. When you are ready to do something with the tagged records, this filter makes it easy to reconcile all tagged items into the Data Pane for further processing. Filter: Explore Artifacts Data that is discovered, parsed and then added to the case can often be characterized in a variety of different ways. IXTK uses Categories, Brands or Genres, Types and Sub Types to characterize and group artifacts within the case. It is important to know that some types of artifacts can be found or filtered in more than one section. For example, a Facebook message might be filtered using the Communications > Email Messages > Facebook section. However, it might also be found inside the Social Networking > Facebook > Email Message section. Copyright © 2004-2015, SiQuest Corporation. May not be reproduced without written permission of SiQuest Corporation. Internet Examiner Toolkit v5 User Manual Page 24 of 181 IMAGE 2.5 - Explore Artifacts expanded with Facebook Email Messages selected. Copyright © 2004-2015, SiQuest Corporation. May not be reproduced without written permission of SiQuest Corporation. Internet Examiner Toolkit v5 User Manual Page 25 of 181 The Data Pane The Data Pane is used to navigate the search results provided by one or more selected Filters or Dictionary term selected in the Navigator Pane. Typically, records are examined either in the Table view or the Gallery view tabs. Other tabs are provided with specific functionality not necessarily relating to “records” in the case file, but rather the original evidence at its source location. For example, the Disk tab provides a graphical navigation system to search individual sectors on a fixed or mounted hard disk. The Contents tab provides a file list view of the folder currently selected on the Explorer tab in the Navigator Pane. The Contents tab is also reserved as a “generic” viewer of Data elements from various sources. Table Tab The Table tab presents record data in a matrix format or a workbook format is you are familiar Microsoft Excel. There are over 225 columns associated to a single record of data (evidence) in the case. However, by default, not all 225 columns are displayed at any given time. Only a small number of columns appear and these are considered to be common to most records. At times however, depending on the type of information being examined (or filtered), you may at some point want to show or hide different columns. Most of the time, investigators will spend their time in the Table view navigating through various records. As each individual record is selected (highlighted), IXTK will attempt to display any related “content” for that record in one of the Viewer tabs below. Wherever possible, IXTK will attempt to choose the best viewer for you, depending on the type of artifact you have chosen. If the record selected references a file (e.g., from a browser cache or carved artifact or downloaded from the Internet), IXTK will attempt to load it in the default viewer pane. If it is a picture, then it will choose the Picture tab. If it is a file but the file extension and content are unknown, then IXTK will default to the Hex Viewer. If the record selected does NOT reference a file but simply contains values in various columns for the record, then the data will be displayed in the Text Viewer. Copyright © 2004-2015, SiQuest Corporation. May not be reproduced without written permission of SiQuest Corporation. Internet Examiner Toolkit v5 User Manual Page 26 of 181 IMAGE 2.6 - Table containing various records from Google Chrome Cache Gallery Tab The Gallery tab contains thumbnail representations of records returned by the currently selected Filter(s) or Dictionary term. If a record is a picture file OR has a thumbnail associated to it (e.g., a rebuilt web page), then it will be displayed in the Gallery. Since the Gallery returns all records, it is quite likely that some records won’t have a thumbnail associated to it. In that case, a placeholder image (Thumbnail Not Found) will appear. Like the Table view, records in the Gallery can be tagged, bookmarked and have labels attached to them. Since most of the advanced features for records are managed from the Do Button on the Table viewer, records in the Gallery must first be tagged. Then you can switch to the Table view and Filter on Tagged Records. Copyright © 2004-2015, SiQuest Corporation. May not be reproduced without written permission of SiQuest Corporation. Internet Examiner Toolkit v5 User Manual Page 27 of 181 IMAGE 2.7 - Gallery view with picture metadata showing as a Tooltip Browser Tab The Browser tab features a fully functioning browser control that allows investigators to surf the Internet and collect evidence in real-time. Unlike commercial browsers, this browser has a limited navigation feature set so that information can be managed properly within IXTK. The address bar (box) is a multi-functional search box. By default, if you type something into the box and hit the ENTER key, IXTK will assume the default behavior of “navigation” and attempt to resolve the value as a Url. The dropdown Search button off to its right Copyright © 2004-2015, SiQuest Corporation. May not be reproduced without written permission of SiQuest Corporation. Internet Examiner Toolkit v5 User Manual Page 28 of 181 side allows the address or box value to be submitted to Google Maps, or WhoIs, or Google Translate. On the left hand side, there is a Do Button with some “capture” tools that can help investigators record their activities. Snip, Snapshot, Capture and Download Video are powerful functions that collect online evidence and then add them to the case. Real-Time Event Tracking When this option is enabled (via the case Options window), every time a Url is visited, it is recorded in the case file as a Note along with the date and time. With each revision of IXTK, more and more events will be capable of being recorded. This feature provides a true audit of an investigations actions. It really is a great tool because it saves so much time by writing notes for the investigator. Copyright © 2004-2015, SiQuest Corporation. May not be reproduced without written permission of SiQuest Corporation. Internet Examiner Toolkit v5 User Manual Page 29 of 181 Creating Snapshots The Snapshot feature is perhaps the best means of capturing screen content. They can be obtained from the current browser tab, provided that there are no security conscious javascript impediments to the capturing process. IMAGE 2.8 - Capture options for Browser When a Page Snapshot is successful, you will be presented with a popup window and the option to save the snapshot to your case as shown below. Copyright © 2004-2015, SiQuest Corporation. May not be reproduced without written permission of SiQuest Corporation. Internet Examiner Toolkit v5 User Manual Page 30 of 181 IMAGE 2.9 - Snapshot window Here, you can see that the entire scrollable area of the web page has been captured as one big bitmap image. You now have the choice of adding to the case as a new record OR attaching it to an existing record by defining the Record ID. There is also the option of copying the image to the Clipboard for use elsewhere (e.g., a Word document). Copyright © 2004-2015, SiQuest Corporation. May not be reproduced without written permission of SiQuest Corporation. Internet Examiner Toolkit v5 User Manual Page 31 of 181 Disk Tab The Disk view option enables investigators to navigate the physical sectors of a fixed or mounted disk, one at a time. The graphical representation of sectors helps identify ranges of sectors that belong to partitions, unallocated space, free space or allocated space. The Disk viewer is particularly helpful to investigators who want to validate an artifact or who want to explore very specific areas of the disk (e.g., boot partition, logical partition). IMAGE 2.10 - Disk view In this example, a recently formatted thumbdrive (3GB in size) reveals a single partition. The lower status bar indicates the Physical and Logical Sector locations, the Cluster, Sectors Per Page, the Total number of Sectors, and the name of the physical device as reported by Windows. When an individual sector is selected, its contents are displayed in the Hex Viewer tab below (by default). Copyright © 2004-2015, SiQuest Corporation. May not be reproduced without written permission of SiQuest Corporation. Internet Examiner Toolkit v5 User Manual Page 32 of 181 The Viewer Pane The Viewer Pane consists of a series of tabs that each renders the contents of the selected record (from the Data Pane) in a different manner. Records that reference “files” may render in more than one viewer as is the case with Pictures files. Pictures can be viewed in their native format using the Picture tab. Pictures can also be viewed in the Hex Viewer and while not ideal, the Text Viewer. Other record data such as a Url from a browser history might best be shown in the Text viewer. In fact, almost all records that do NOT reference an actual file in some way, will display in the Text Viewer by default. NOTE: The Text Viewer provides a dropdown list of all the column names belonging to a single individual record. By changing the selected item, the record value for that column name will then be displayed in the Text Viewer. The following screen captures highlight the different Viewer panes and the various toolbar button options available. Text Viewer The Text Viewer displays the contents of the selected record in plain text format and provides some cool features to help “highlight” portions of the text. By colorizing the forecolor and background color of select keywords, it makes it easier for the investigator to zero in on elements of the text that are of importance. The following image illustrates the value of using the Text Viewer to view the source code of an HTML (web) page. By using color highlighting, we can identify elements of interest and then opt to create a Child Record using the Snip Tool to preserve the visual distinctiveness of keywords. Copyright © 2004-2015, SiQuest Corporation. May not be reproduced without written permission of SiQuest Corporation. Internet Examiner Toolkit v5 User Manual Page 33 of 181 IMAGE 2.11 - Color highlighting and the option to Snip the display area to create a new Child Record The Snip Tool is a perfect way to draw attention to specific parts of the evidence by capturing the screen region you define. Once captured, a new record is created and added to the case. Moreover, once you have a new record, you can then add Notes to the record and offer more detailed comments about the evidence. Copyright © 2004-2015, SiQuest Corporation. May not be reproduced without written permission of SiQuest Corporation. Internet Examiner Toolkit v5 User Manual Page 34 of 181 HTML Viewer The HTML Viewer was designed to render web based content in its originally natural, aesthetically pleasing, visual form (layout). The following is a web page that has been rebuilt using the Rebuild button on the toolbar shown below. Once a web page is rebuilt, IXTK makes it possible to switch back and forth from the Original HTML file to the newly rebuilt file. IMAGE 2.12 - HTML Viewer showing a rebuilt web page Copyright © 2004-2015, SiQuest Corporation. May not be reproduced without written permission of SiQuest Corporation. Internet Examiner Toolkit v5 User Manual Page 35 of 181 Hex Viewer The Hex Viewer provides a common hexadecimal view of any file that is selected from the Data Pane above. Not unlike many hex editor programs, the Hex Viewer provides options to decode binary data into different data types (e.g., integers, dates, etc) and to seek specific file offsets. In addition, it is extremely easy to create new Child Records and add them to the case simply by sweeping a range of bytes. The built-in decoder makes it very easy for an investigator to manually validate artifacts against the original source file. Using the Built-In Decoder IMAGE 2.13 - The Google Chrome “index” (map) file is ideal for decoding cache entry objects Copyright © 2004-2015, SiQuest Corporation. May not be reproduced without written permission of SiQuest Corporation. Internet Examiner Toolkit v5 User Manual Page 36 of 181 Creating Child Records IMAGE 2.14 - Use the Hex Viewer to create Child Records from swept bytes Unlike many other forensic tools that use Bookmarks to point to other evidence, IXTK makes it possible to create Child Records so you can further investigate the evidence. A single child record can have its own notes, as well as its own child records. There is no limit to the number of Parent and Child records that you can create. In this next example, notice the METADATA located inside a picture file. Here, we want to capture this information as a new record. See how this is done. Tim Cook, chief executive officer of Apple Inc., speaks during the keynote of the World Wide Developers Conference (WWDC) in San Francisco, California U.S. on Monday, June 10, 2013. … preparing to IMAGE 7 - Creating a Child Record in the Hex Viewer Copyright © 2004-2015, SiQuest Corporation. May not be reproduced without written permission of SiQuest Corporation. Internet Examiner Toolkit v5 User Manual Page 37 of 181 Copyright © 2004-2015, SiQuest Corporation. May not be reproduced without written permission of SiQuest Corporation. Internet Examiner Toolkit v5 User Manual Page 38 of 181 Database Viewer The Database Viewer operates a little differently. Unlike the other viewers that render the evidence based on a selection in the Data Pane, the Database Viewer is used to view SQLite databases at the user’s specific request. This can be accomplished using the Do Button in the Table view and selecting “View Database File” (provided that the record selected is in fact an SQLite database file). Alternatively, an SQLite database file can be loaded directly into this viewer from the File Menu on the main window. In fact, it is not necessary to create a new Case File or open an existing one. You can launch IXTK and proceed directly to load a file from your workstation. IMAGE 2.15 - A sample SQLite database loaded for analysis Notice how the Table objects and the database schema settings are loaded into the tree on the left. As you click on the various Tables in the tree, the contents of the selected table is loaded into a new tab on the right pane. From there, you can filter by keywords, tag and then export records. Copyright © 2004-2015, SiQuest Corporation. May not be reproduced without written permission of SiQuest Corporation. Internet Examiner Toolkit v5 User Manual Page 39 of 181 Decoding Chrome and Firefox Timestamps When examining SQLite database for Chrome and Firefox, you will no doubt come across time and date columns that are represented as milliseconds or microseconds since a given epoch. Trying to work times and dates in this format is pretty much impossible. Thankfully, IXTK lets you decode these columns on the fly by creating a new column with more intelligible date and time values. IMAGE 2.16 - Decoding timestamp columns using right mouse click context menu IMAGE 2.17 - New timestamp column created NOTE: If you attempt to export records to Microsoft Excel from a given tab where a timestamp is shown in milliseconds or microseconds, the timestamps will be altered into Scientific Notation. By creating the “visit_time_decoded” column, the values when exported will not be altered. Copyright © 2004-2015, SiQuest Corporation. May not be reproduced without written permission of SiQuest Corporation. Internet Examiner Toolkit v5 User Manual Page 40 of 181 Picture Viewer The Picture Viewer provides common features like zoom, rotate, stretch and options to redirect the image itself to a new disk file, to the printer, or to the Clipboard. IXTK features a number of useful functions to manipulate the picture including rotation, stretching and resizing. Pictures can also be printed, copied to the Clipboard or saved to disk. Also, resizing (enlarging) poor quality images can often improve the resolution of the image. Copyright © 2004-2015, SiQuest Corporation. May not be reproduced without written permission of SiQuest Corporation. Internet Examiner Toolkit v5 User Manual Page 41 of 181 Video Viewer The Video Player in IXTK is extremely flexible when it comes to playback functionality and natively supports the following movie file formats: AVI, MOV, WMV, FLV, SWF, MPG, MP4, 3GP, 3G2 and VOB. Unlike other tools, IXTK’s video player requires no special third party codecs. The only requirement for playback of select formats is that the latest version of QuickTime Player, DirectX and Adobe Flash Player be installed. Of particular note is the fact that IXTK supports playback of Shockwave Flash files which is a very rare feature to find. In addition, the popular mobile device formats (3gp, 3g2) are included as well. If a video appears to load into the Video Player but nothing happens during playback, then it is likely that one of the above mentioned dependency applications is either missing or not up to date. IMAGE 2.18 - The Video Player with a sample movie trailer file loaded Copyright © 2004-2015, SiQuest Corporation. May not be reproduced without written permission of SiQuest Corporation. Internet Examiner Toolkit v5 User Manual Page 42 of 181 Module 3 Creating Internet Examiner Projects Overview The Project file is a database file that is created “on the fly” whenever a new project is created. The underlying construct of the file conforms to the SQLite 3 database format. This means that a Internet Examiner Project (.IEP) file can be opened directly using popular third party SQLite database management software. We will be showing you how you can leverage the power of such tools to manipulate and manage the data within your project file. This section is also designed to further enhance the discussion about Project files already provided in the Internet Examiner User Manual. Therefore, you may want to have your user manual opened up as we move through this particular module. NOTE: This module is not intended to be an instructional proponent of the course. Rather, it is designed to provide a high-level overview of some of the “less talked about” and “more advanced” features of Internet Examiner. The goal of this module is to prepare students for the following modules that dig deeper into specific topics. Copyright © 2004-2015, SiQuest Corporation. May not be reproduced without written permission of SiQuest Corporation. Internet Examiner Toolkit v5 User Manual Page 43 of 181 Creating a New Project File There are two ways to start a new project file. The first, is by accessing the “New Project” option under the File menu. The second way is to use the New Project button from the Toolbar. IMAGE 3.1 - Using the File Menu option Copyright © 2004-2015, SiQuest Corporation. May not be reproduced without written permission of SiQuest Corporation. Internet Examiner Toolkit v5 User Manual Page 44 of 181 Configuring Options The first step to creating the new file requires that we provide (a) a file name for our project, and (b) a path to our Project Folder. IMPORTANT: The Project folder requires plenty of disk space to store copies of the evidence, including cache temporary files and create thumbnails and reports. IMAGE 3.2 - Getting Started in the global Options Window The Investigation Details and Agency Details options are used for reporting purposes and it is recommended that these steps be completed as part of a ‘best practice’. Since these two steps are self-explanatory, they will not be covered any further. Copyright © 2004-2015, SiQuest Corporation. May not be reproduced without written permission of SiQuest Corporation. Internet Examiner Toolkit v5 User Manual Page 45 of 181 Time and Date Options This tab contains the most important features of the program: 1. Date Format 2. Time Format 3. Time Zone Setting IMAGE 3.3 - The Time and Date settings in the global Options Window Copyright © 2004-2015, SiQuest Corporation. May not be reproduced without written permission of SiQuest Corporation. Internet Examiner Toolkit v5 User Manual Page 46 of 181 Date and Time Format Internet Examiner supports the ability to format how dates and times will appear in the Table and reports. While most users will have their own way or preference in formatting dates and times, it is strongly recommended that the following option be considered so as to avoid confusion in a multi-jurisdictional investigation: TIME = DATE = Hh:Nn:Ss (where Nn is the Windows abbreviation for minutes) yyyy-mm-dd (this ensures that dates can be easily sorted) Time Zone Setting Using this feature, users can configure how ALL timestamps in the Table and reports are calculated (displayed). The time zone setting offers GMT offsets for several different countries and the option to adjust for daylight savings. Time zone settings are saved with the project file and re-applied upon opening an existing file. There is an advanced discussion on Time Zones in Module 9. Use of the PAR value to filter pictures will be explored later on in this module. Copyright © 2004-2015, SiQuest Corporation. May not be reproduced without written permission of SiQuest Corporation. Internet Examiner Toolkit v5 User Manual Page 47 of 181 General Preferences This tab contains some general performance enhancement and database integrity features. They are described below. IMAGE 3.4 - Define a company logo and database maintenance options Copyright © 2004-2015, SiQuest Corporation. May not be reproduced without written permission of SiQuest Corporation. Internet Examiner Toolkit v5 User Manual Page 48 of 181 Error Tracking If you run into problems with the software, you can always enable the Error Tracking features to help troubleshoot the issue. When used, errors that may occur during the searching or general use of the program will be written to a log in great details. These logs are stored off the root of the Case Folder in the \Logs directory. IMAGE 3.5 - Verbose logging features help troubleshoot problems Copyright © 2004-2015, SiQuest Corporation. May not be reproduced without written permission of SiQuest Corporation. Internet Examiner Toolkit v5 User Manual Page 49 of 181 Event Tracking As an investigator, your job is already difficult and time consuming enough. Trying to conduct a forensic investigation involves many different tasks and your job is to somehow document what you do, how you did it, where you did it, and when you did it. Thankfully, there is a much simpler way to record the minutia which at trial time can make all the difference when it comes to the scrutiny of your work. Using the Event Tracking, everything you do can be recorded in behind the scenes and provides a defensible audit trail of what was done during the investigation. IMAGE 3.6 - Event Tracking writes your notes for you. Copyright © 2004-2015, SiQuest Corporation. May not be reproduced without written permission of SiQuest Corporation. Internet Examiner Toolkit v5 User Manual Page 50 of 181 FaceDNA Configuration With the release of Version 5, IXTK now features FaceDNA™ biometric facial recognition technology designed to help fight crimes against children, detect document forger, and identify wanted and missing persons. SiQuest® is the first manufacturer of digital forensic software to incorporate biometric facial recognition in their software. The FaceDNA™ Config option allows you to control the detection accuracy level, the number of faces to identify in a given frame or picture, the head rotation angle, and the size of the thumbnail generated for each extracted face. Faces that are extracted (e.g., from pictures and movie files) can be easily reported and disclosed to other investigators or prosecutors for continued review. More importantly, FaceDNA™ makes it possible to “enroll” known faces (e.g., mugshots, portraits) into a case and then search the evidence for matches. This makes it possible to “quickly” identify victims or suspects in video files in a profoundly shorter period of time than by watching videos in real-time. FaceDNA™ will someday offer FaceDNA™ Hashing™ which will generate a “unique” identifier for faces that match the same individual. This means that IXTK will be capable of “deduping” faces (e.g., from the same video) based on the FaceDNA™ Hash™. Presently, there is NOT a single biometric facial recognition technology that offers this level of precision. FaceDNA™ proposes to change that. Copyright © 2004-2015, SiQuest Corporation. May not be reproduced without written permission of SiQuest Corporation. Internet Examiner Toolkit v5 User Manual Page 51 of 181 IMAGE 3.7 - FaceDNA allows for face identification, extraction and comparison. Copyright © 2004-2015, SiQuest Corporation. May not be reproduced without written permission of SiQuest Corporation. Internet Examiner Toolkit v5 User Manual Page 52 of 181 Performance IXTK uses a lot of colored icons and fonts for visual feedback about the state of records in a case and also to navigate filter options. This can tax any system, especially as the number of records to be displayed in the user interface. In order to improve the “load time” of records in the Table View, IXTK now provides the options to (a) NOT load ANY icons (fastest), OR (b) load “low resolution” (4bpp) icons (faster) to decrease the memory footprint of each graphic. There is also an option to NOT color-code flagged records. Instead, a regular black (default) font color will speed things up as well. IMAGE 3.8 - Options to decrease memory usage for graphics and fonts. Copyright © 2004-2015, SiQuest Corporation. May not be reproduced without written permission of SiQuest Corporation. Internet Examiner Toolkit v5 User Manual Page 53 of 181 The GUI at a Glance The following image identifies the four (4) user panes within Internet Examiner. IMAGE 3.4 - Internet Examiner (main window) Copyright © 2004-2015, SiQuest Corporation. May not be reproduced without written permission of SiQuest Corporation. Internet Examiner Toolkit v5 User Manual Page 54 of 181 Using SQLite Expert to View .IEP Files Internet Examiner was designed to use the SQLite database file format provides users with the extended capability of managing their data manually. By exposing the data store in an environment such as SQLite Expert, users can create custom queries to better examine the evidence. They can also copy pieces of information from within the data store and even create their own custom reports. The following images illustrate the different objects and relationships that are present when viewed inside of SQLite Expert. IMAGE 3.5 - The listing of tables Copyright © 2004-2015, SiQuest Corporation. May not be reproduced without written permission of SiQuest Corporation. Internet Examiner Toolkit v5 User Manual Page 55 of 181 IMAGE 3.6 - The relationships of tables The relationships diagram above illustrates the true “relational design” of the data stored inside each Internet Examiner Project file. The advantage of using a relational database schema is that it is an extremely efficient means of storing “like” data and creating comprehensive search queries. Each segment (line) that starts with SOLID HALF CIRCLE indicates that the Primary Key field (for that table) can be related to “many” children records. For example, a single entry into the “Records” table can be considered the parent in the relationship with “Bookmarks”. All Bookmark records that are found in that given file can be therefore be considered “children” of the parent. Deleting a single Record from the Records table will automatically delete any associated Bookmarks for that (Record) ID. Copyright © 2004-2015, SiQuest Corporation. May not be reproduced without written permission of SiQuest Corporation. Internet Examiner Toolkit v5 User Manual Page 56 of 181 IMAGE 3.7 - Queries (also called “Views”) in the database Copyright © 2004-2015, SiQuest Corporation. May not be reproduced without written permission of SiQuest Corporation. Internet Examiner Toolkit v5 User Manual Page 57 of 181 Introduction to PAR Filtering P.A.R. stands for Photograph Aspect Ratio. It is a special integer value between 0 and 100 that is used by Internet Examiner to dramatically filter pictures in the Gallery based on their height and width. The PAR value is an extension of the Photograph Aspect Ratio Theory that was developed by John Bradley, Chief Technical Officer for SiQuest. The theory identifies a relationship between the height and width properties of photographic images (e.g., in a child exploitation case) and the height and width properties of conventional (printed) photographs (on film). The Theory observes a strong similarity in the aspect ratios of both genre of photographs (images). What is particularly obvious is the fact that digital photographs used in most child exploitation types of offences remain either untouched (not edited), or their original aspect ratios remain unaltered. This allows us to make certain inferences based on the height and width of digital images. The following example further explains this. IMAGE 3.8 - A digital photograph unaltered (400 x 300 pixels) Copyright © 2004-2015, SiQuest Corporation. May not be reproduced without written permission of SiQuest Corporation. Internet Examiner Toolkit v5 User Manual Page 58 of 181 The above photograph measures 400 x 300 pixels. A conventional photograph measures 4 x 6 inches. This would be equivalent as saying: 400 x 600 pixels. Here is where our PAR calculations come into play. 1. The photograph’s longest edge is 400 and therefore we can say that this value represents 100% (the maximum length of any given side). 2. The shorter edge is 300 pixels and therefore represents 75% of the length of the longer edge (400 pixels). 3. The PAR value here would be the difference between the two measurements. 4. Hence, the PAR value for our photograph is 25. If we calculate the PAR value for a 4 x 6 inch photo, then the PAR value would be 33 (400 is 2/3 of 6). Hence the following is a list of common photograph sizes and their calculated PAR values: 1. 5x7 = 29 2. 4x6 = 33 3. 8 x 10 = 20 4. 11 x 14 = 22 While we have confined this discussion to photographs, the resolutions and dimensions of a computer screen often have a play in the dimensions of digital images (photographs) as well. For instance, a web cam may have a standard photo size of 640 x 480 pixels. Other screen resolutions would be equally applicable to the shape of digitally created photographs. As a result, let’s calculate the PAR value for some of the more common screen resolutions: 1. 640 x 480 = 25 2. 800 x 600 = 25 3. 1024 x 768 4. 1280 x 1024 = = 25 20 Copyright © 2004-2015, SiQuest Corporation. May not be reproduced without written permission of SiQuest Corporation. Internet Examiner Toolkit v5 User Manual Page 59 of 181 OBSERVATIONS From examining the dimensions of photographs and computer screen resolutions, a conclusion can be made about our PAR values. The lowest PAR value is 20. The highest PAR value is 33. Using PAR as a Filter Based on our observations in the previous section, we can now apply the use of PAR values as a form of filter for pictures displayed in the Gallery. Q. A. What is the benefit of using PAR values? It provides a means of finding pictures that are most likely digital photographs, as opposed to a graphically designed piece of artwork (e.g., website banner ads, website buttons, web page graphics). By eliminating pictures from our gallery based on a range of PAR values, users are left which a much smaller, and relevant, dataset for examination. Copyright © 2004-2015, SiQuest Corporation. May not be reproduced without written permission of SiQuest Corporation. Internet Examiner Toolkit v5 User Manual Page 60 of 181 Module 4 Finding and Importing Evidence Overview Internet Examiner Toolkit provides the ability to search for Internet artifacts (evidence) on hard drives either logically, at the file level, or physically at the disk sector level. File systems supported include NTFS, FAT12, FAT16, FAT32 and HFS+. Support for Extended FAT and ext3/4 are currently in development. Through its custom Disk Reader library, IXTK can mount and search a variety of common disk image file formats. These include Ex01, E01, Lx01, L01, AFF and Raw/DD. Since IXTK has its own disk mounting capabilities, the discovery of evidence can be expanded to include data from mobile devices (e.g., tablets and cell phones). When it comes to the topic of artifacts, IXTK approaches the discovery process in a very methodical way. artifacts. supported. Beware of some third part tools that boast support for hundreds of It is very common to find stuff using keywords and saying an artifact is It’s an entirely different thing to deconstruct the artifact and interpret meaningful metadata. IXTK features something called the Artifact Framework. The framework is a database of artifact profiles where each is defined very carefully so as to maximize the number of hits while at the same time dramatically reducing the number of false positives. Some third party tools define their artifacts using simple keywords and then collect adjacent data. Data is then parsed (if it’s parsed) using a subjective linear pattern search approach. What does this mean? It means that as an investigator, you have to be mindful of not only WHAT is discovered, but HOW it is discovered. Copyright © 2004-2015, SiQuest Corporation. May not be reproduced without written permission of SiQuest Corporation. Internet Examiner Toolkit v5 User Manual Page 61 of 181 IXTK is rather rigid in its approach to parsing and discovery. IXTK is not programmed to search for an artifact based on loose assumptions about patterns. The Artifact Framework has a modest number of artifacts that have been strictly defined. Additional artifacts are gradually being added but not without undergoing strenuous testing and validation. Due to the sheer volume of devices and bytes that are subject to analysis for many investigators, IXTK has broken down the search process to create a better workflow process. The following demonstrates how IXTK approaches the discovery process. New Search Window IMAGE 4.1 - New Search Window with 4 different search options By separating the locations for searching, IXTK can better tailor the options for each type of search. This potentially decreases search time and helps investigators adopt an efficient workflow process. When specific artifact types (e.g., Trace vs. File) are sought in specific locations, then entire search process is made more efficient because IXTK no longer has to unnecessarily evaluate irrelevant types. At the time of this writing, the MOBILE search option is still being constructed. It will offer similar functionality as the FILES option, but tailored more specifically to mobile devices. Copyright © 2004-2015, SiQuest Corporation. May not be reproduced without written permission of SiQuest Corporation. Internet Examiner Toolkit v5 User Manual Page 62 of 181 Disk Sectors Search The Disk Sectors search is by far the easiest and most widely available search option. Since a file system is not required, IXTK can search physical devices from both Windows and MAC platforms. Technically, this would also include Linux operating systems. A Disk Sector search is denoted (by the Speed graphic) as the fastest search option because it is the most efficient in regards to how a disk is accessed. Each sector is read one after the other, but in groups that collectively have a capacity of a default buffer of 10MB. Reading from sector zero (0) to the very last sector is particularly efficient for spin (platter) disks since the read/write arm will only hit an individual sector one time. In addition, the sectors are align contiguously starting on the outer most tract and winding their way to the center of the platter. The only real caveat to disk sectors searching is that there is no way to accurately locate completely intact files. Since file systems keep track of the fragmented sector ranges for an individual file, there is no way to search for FILE artifacts. Instead, a disk sector search is intended only for TRACE artifact searches or Keyword searches. Since all four types of searches share some common configuration options, those options will be explained only one time below. The following images showcase the “common” configuration options. Since they are relatively self-explanatory, we won’t bother going into strenuous detail. Copyright © 2004-2015, SiQuest Corporation. May not be reproduced without written permission of SiQuest Corporation. Internet Examiner Toolkit v5 User Manual Page 63 of 181 IMAGE 4.2 - Disk Sectors search window Copyright © 2004-2015, SiQuest Corporation. May not be reproduced without written permission of SiQuest Corporation. Internet Examiner Toolkit v5 User Manual Page 64 of 181 Common Search Configuration Options IMAGE 4.3 - COMMON search configuration option (Device Details) The Device Details tab requests the investigator to vaguely describe the ORIGINAL DEVICE from which the data (that is to be searched) originated. If this pertains to a Disk Sectors search, then the device would be hard drive, or USB memory drive, or possibly a MOUNTED disk image file. The fields here are read only. You use the Configure button to load the below noted Device Information Window. Copyright © 2004-2015, SiQuest Corporation. May not be reproduced without written permission of SiQuest Corporation. Internet Examiner Toolkit v5 User Manual Page 65 of 181 IMAGE 4.4 - Device Information Window (COMMON configuration option) Time Zone Configuration IXTK allows you to change the Time Zone information for individual searches which is completely independent of the Global Options Time Zone setting. This provides flexibility with dealing with evidence from multiple jurisdictions (e.g., time zones). Copyright © 2004-2015, SiQuest Corporation. May not be reproduced without written permission of SiQuest Corporation. Internet Examiner Toolkit v5 User Manual Page 66 of 181 Device Time and Correct Time One of the biggest problems or perhaps of the most prevalent nuisances for investigators is having to deal with computer clock discrepancies. Traditionally, investigators would have to conduct their forensic examinations and tender their reports in the decoded time stamps. In a case where the computer’s clock was found to be out of sync with real time, the investigator face the arduous task of “translating” the decoded times into the “device time”. IXTK solves this problem from the get go by prompting the investigator for the Device Time and then the Correct Time. From this point forward, any times associated to artifacts in the case are automatically translated into the Device Time. These translated times are then able to be reported seamlessly alongside the Local and UTC timestamps. Copyright © 2004-2015, SiQuest Corporation. May not be reproduced without written permission of SiQuest Corporation. Internet Examiner Toolkit v5 User Manual Page 67 of 181 Selecting and Mounting Disks IMAGE 4.5 - Selecting a disk to search The following step is another common step with other search options. The only difference in the illustration below is that individual partitions cannot be searched. In fact, IXTK only permits one disk to be searched at a given time. Here, using the Mount Disk… button, any supported disk image file can be mounted natively for searching, also at the disk sector level. Copyright © 2004-2015, SiQuest Corporation. May not be reproduced without written permission of SiQuest Corporation. Internet Examiner Toolkit v5 User Manual Page 68 of 181 IMAGE 4.6 - Mounted disks or logical evidence files (L01, Lx01) are shown in green Definion of Trace and File Artifacts IMAGE 4.7 - Select Artifacts (COMMON search configuration option) If you are searching Disk Sectors only, then the artifacts that are made available for searching will be limited to Trace artifacts. A FILES search will offer both File artifacts and Trace artifacts. The following definitions explain both types of artifacts in more detail. Copyright © 2004-2015, SiQuest Corporation. May not be reproduced without written permission of SiQuest Corporation. Internet Examiner Toolkit v5 User Manual Page 69 of 181 As you can see above, “keywords” (and GREP expressions) are considered “trace” artifacts because the match of a keyword can be made anywhere: in a file or in a sector. Basically Trace artifacts can be found anywhere. Selecting Artifacts Selecting artifacts is very easy. Artifacts are presented in a hierarchical format which contain Groups or Categories, Brands and Genres, and then Types and Sub Types. Choosing artifacts is no more difficult that perusing the different categories and finding a Trace or File artifact of choice. To learn the specifics about an individual artifact before you decide to select it, a Description is made available off to the right side of the window. This feature is adopted from the well know Windows Updates management window. Copyright © 2004-2015, SiQuest Corporation. May not be reproduced without written permission of SiQuest Corporation. Internet Examiner Toolkit v5 User Manual Page 70 of 181 IMAGE 4.8 - Facebook and YouTube trace artifacts selected You will notice that the actual artifact in the tree is described using the naming convention: “ARTID” plus a zero-padded artifact record ID number. The reason IXTK has adopted a rather bland and non-descriptive name is due to the fact that some families of artifacts might have a number of variations of the same artifact. Case in point is Facebook chat messages. Selecting and Managing Search Keywords One of the fastest ways to start locating evidence is by using keywords or GREP expressions. Since keywords are themselves the artifact, there is little time wasted in evaluating adjacent data. The following image demonstrates some of the canned keywords that are generated with each new case file. Keywords can be managed either from the main window’s View menu, or from within this window (see button next to keyword list). Copyright © 2004-2015, SiQuest Corporation. May not be reproduced without written permission of SiQuest Corporation. Internet Examiner Toolkit v5 User Manual Page 71 of 181 IMAGE 4.9 - Select Keywords tab (COMMON search configuration option) Copyright © 2004-2015, SiQuest Corporation. May not be reproduced without written permission of SiQuest Corporation. Internet Examiner Toolkit v5 User Manual Page 72 of 181 Managing Keywords Keyword can be managed either from the Manage List… button on the Select Keywords tab or by the View menu on the main window. As shown below, the Bookmarks Manager Window allows investigators to create, edit, delete and move keywords. IMAGE 4.10 - Managing Keywords By default, keywords are display using a friendly description. Alternatively, it is possible to display the keywords themselves or their GREP expressions. NOTE: At this time, the Import… feature is still in development. Copyright © 2004-2015, SiQuest Corporation. May not be reproduced without written permission of SiQuest Corporation. Internet Examiner Toolkit v5 User Manual Page 73 of 181 Creating or Editing Keywords The following image demonstrates how keywords are created and editing. Notice that IXTK provides support for multiple code pages and supports both GREP expressions and case sensitivity. IMAGE 4.11 - Editing a keyword that locates valid GMAIL addresses IXTK supports 2-byte hexadecimal characters (e.g., \x2d) as well as 4-byte Unicode based hexadecimal characters (e.g., \u002d). Copyright © 2004-2015, SiQuest Corporation. May not be reproduced without written permission of SiQuest Corporation. Internet Examiner Toolkit v5 User Manual Page 74 of 181 Carving Options One of the best features available is Proximity Carving which allows you to define XXX number of bytes to collect before an artifact or keyword hit -- as well as --- XXX number of bytes that follow. Think of this as casting a net over the hit. Here, you define how big the net will bet. In addition, IXTK provides Clean Carving options to minimize garbage data during the collection process. Here’s how it works…If we ask for 2000 bytes BEFORE a keyword hit (e.g., the subject line of an email), and let’s say 10,000 bytes AFTER, then there is a big possibility that we’re going to get a lot of garbage surrounding our found keyword. By using Clean Carving character options (NULL, DOUBLE NULL or Encoding Changes), we are essentially telling IXTK to watch for these values when scanning backwards or forwards from the found keyword. The FIRST encounter of one of the selected characters will SET the starting point of the collection (we like to call it harvest). This tactic applies in both directions. in the event that none are found, then the starting point and end point will be defined using the BYTES BEFORE and the BYTES AFTER values. Copyright © 2004-2015, SiQuest Corporation. May not be reproduced without written permission of SiQuest Corporation. Internet Examiner Toolkit v5 User Manual Page 75 of 181 IMAGE 4.12 - Carving Options Advanced Options The Advanced Options provide the ability to increase or decrease the search buffer size. The default is 10MB. If you wanted to search for 5MB size (high resolution) JPEG images, then increasing the buffer to 50MB or even 100MB would be a good idea. This would mitigate the chances of a single image crossing buffer read boundaries. Option for logging and email notifications are also available. Receiving notifications about search results and search performance could be invaluable in a time sensitive investigation. Copyright © 2004-2015, SiQuest Corporation. May not be reproduced without written permission of SiQuest Corporation. Internet Examiner Toolkit v5 User Manual Page 76 of 181 IMAGE 4.13 - Advanced Options Copyright © 2004-2015, SiQuest Corporation. May not be reproduced without written permission of SiQuest Corporation. Internet Examiner Toolkit v5 User Manual Page 77 of 181 Email Notification Configuration To enable email notifications, IXTK requires a valid Internet connection. Configuration details for this option will persist between searches so that the same information doesn’t have to be re-entered. IMAGE 4.14 - Email configuration window Copyright © 2004-2015, SiQuest Corporation. May not be reproduced without written permission of SiQuest Corporation. Internet Examiner Toolkit v5 User Manual Page 78 of 181 Notice that you can have an entire list of email recipients. This is particularly useful in a team environment or where stakeholders want to be kept abreast of the investigation’s progress. Copyright © 2004-2015, SiQuest Corporation. May not be reproduced without written permission of SiQuest Corporation. Internet Examiner Toolkit v5 User Manual Page 79 of 181 Module 5 Examining Record Data Overview Not surprisingly, the analysis of browser cache and Internet history data can often involve thousands, and sometimes hundreds of thousands of records. Depending on where the data originated, what the data contains, and what data is of forensic interest from an investigative context, Internet Examiner provides a variety of methods to create smaller examinable datasets. The benefits of trying to limit the amount of examinable records are many, the least of which is time saved in an investigation. Through the use of user interface options, filters and queries, users have the capabilities to be very granular in their examination of any evidence. Internet Examiner was designed with the idea of giving the examiner full control over how and what data he or she is examining. This section of the course will explore the advanced options available to query and work with data. We will discuss advance features such as Filters, Quick Queries and the new Query Builder. We will also explore the new Properties Pane which provides a rich list of metadata for easier viewing. We will also look at record selection and record tagging and how this affects the use of Internet Examiner. Copyright © 2004-2015, SiQuest Corporation. May not be reproduced without written permission of SiQuest Corporation. Internet Examiner Toolkit v5 User Manual Page 80 of 181 THE TABLE AND QUERIES The Table is the primary navigation tool used to examine cache and history records within Internet Examiner. The contents of the table are driven by the active query and thus only records that answer the question (posed by the query definition) will be displayed (returned). When we start to use features like Filters, Host Filtering and Bookmark Filters, we start to have to have a much more thorough understanding of how the Table is populated. More importantly, we need to appreciate how each of these act as layers on top of the active (current) query. Whenever a new project file is created within Internet Examiner, the active query is automatically set to the default query (which basically “shows everything”). The default query never changes and it is defined in Structured Query Language (SQL) as follows: SELECT * FROM URLs ORDER BY ActionDateLocal ASC This is the same as saying: 1. Get all columns from all records 2. From the table called “URLs” 3. And sort the results in ASCending order based on the ActionDateLocal column. The definition of the active query is always available by loading the Query Window via the Query Button on the Toolbar. Using the options available through the Query Manager Window, users can create custom queries and manage saved queries. Copyright © 2004-2015, SiQuest Corporation. May not be reproduced without written permission of SiQuest Corporation. Internet Examiner Toolkit v5 User Manual Page 81 of 181 The Active Query (Filter) To understand what criteria is currently being observed in order to display data in the Data Pane, we look to the lower status bar in the main window. This will spell out the entire SQL Statement as shown below. IMAGE 5.1 - Definition of the current or active query / filter Query Type The Query Type for most queries will be of the type “SELECT”. New to Version 2.8 is the ability to create Bookmark Queries. These types of query will be defined as the type “BOOKMARK” or “KEYWORD LIST”. These two new types of queries will not only query the database and return a set number of records, but they will automatically place the results in a special folder (as indicated by the Group Name) column. Bookmark queries will put any returned results into a Group Name folder. The new Keyword List query type will use the Group Name folder in the same way as Bookmark queries. However, the new Return Column value represents the URL Table Column Name that will be used as the returning value(s) from the query. We will discuss queries and the different query types in more detail in Module 11 on Day 3. Copyright © 2004-2015, SiQuest Corporation. May not be reproduced without written permission of SiQuest Corporation. Internet Examiner Toolkit v5 User Manual Page 82 of 181 Create a Custom Query When it comes to examining evidence that contains thousands of records and a variety of content-rich URLs (or web pages), one of the best ways to narrow the amount of examinable data at any given time is through the use of a custom query. Since an Internet Examiner project file is actually a SQLite database file, we can create custom queries and save them for future use. On Day 3 of this course, we will explore custom queries in greater detail. However, for this section, we will introduce you to SQL (Structured Query Language) syntax and show you how easy it is to create your very own queries. Once examiners become familiar and comfortable with creating queries, it then becomes ideal to create libraries of queries in a blank Internet Examiner project (.IEP) file which can then be opened for each new case (and Saved As… a new filename). To start, we need to load the Query Manager Window from the View Menu’s Create Query Builder menu item. The Window presents itself as a wizard type interface, starting with the option Build New Query pre-selected. IMAGE 5.2 - Build New Query Copyright © 2004-2015, SiQuest Corporation. May not be reproduced without written permission of SiQuest Corporation. Internet Examiner Toolkit v5 User Manual Page 83 of 181 My First Custom Query Before we can define our own query within Internet Examiner, there are some very important RULES that “MUST” be observed. Failing to do so may result in unexpected results (or no results)!!! RULE #1: SELECT ALL (Always) Every query must begin with “SELECT * FROM”. This allows Internet Examiner to layer queries (which we will discuss on Day 3). Failing to use this statement will certainly cause serious problems. RULE #2: No Underscores All “reserved” queries begin with an underscore (_). Therefore, any new custom query must NOT use an underscore as the first character in the name that is assigned to the query. Copyright © 2004-2015, SiQuest Corporation. May not be reproduced without written permission of SiQuest Corporation. Internet Examiner Toolkit v5 User Manual Page 84 of 181 To start creating our first custom query, Create a New Condition by filling in the boxes provided and then click on the Add button. Repeat this for as many conditions that must be evaluated for the results to be returned. IMAGE 5.3 - Sample conditions create to search for large pictures NOTE: The SQL Editor tab is independent of all the tabs and can be thought of as the “active canvass” for defining any query. As we create a custom query, the SQL Editor defines the actual SQL statement need for the search. Copyright © 2004-2015, SiQuest Corporation. May not be reproduced without written permission of SiQuest Corporation. Internet Examiner Toolkit v5 User Manual Page 85 of 181 For the purpose of this exercise, we will define a custom query that will look for evidence that a subject was research air fares and hotel accommodations. Therefore, we need to consider the following possible keywords: 1. URLs that contain the keyword “air” OR “flight” OR “travel” 2. URLs that contain “hotel” OR “motel” NOTE: We have elected to use the singular form for our keywords which will ensure that we capture any plural forms as well. Okay, now we’re ready to define our query statement. IMAGE 5.4 - Defining the custom query Copyright © 2004-2015, SiQuest Corporation. May not be reproduced without written permission of SiQuest Corporation. Internet Examiner Toolkit v5 User Manual Page 86 of 181 From the image above, we can see that our SQL Query Statement is defined as follows: SELECT * URL LIKE URL LIKE URL LIKE URL LIKE ) ORDER BY FROM URLs WHERE ( '%air%' OR '%flight%' OR '%hotel%' OR '%motel%' ActionDateLocal ASC Notice how we have used linebreaks to make our statement read more clearly. So long as there are spaces in the correct places, Internet Examiner will simply replace any linebreaks with a single blank space. An unformatted variation of the above query appears below: SELECT * FROM URLs WHERE (URL LIKE '%air%' OR URL LIKE '%flight%' OR URL LIKE '%hotel%' OR URL LIKE '%motel%') ORDER BY ActionDateLocal ASC Obviously, the first version is much easier to read. With the interest of taking a closer look at the development of query statements, we must first understand the various reserved keywords and syntax used to properly format a query statement. Copyright © 2004-2015, SiQuest Corporation. May not be reproduced without written permission of SiQuest Corporation. Internet Examiner Toolkit v5 User Manual Page 87 of 181 The following table lists some unique characteristics about the query itself, or keywords and wildcards used. We have also provided some additional keywords for reference purposes. TABLE 5.5 - Structured Query Language keywords and TEXT RESERVED KEYWORD or SYMBOL IS WILDCA RD DESCRIPTION Records No No Name of our main table in the project file. ALL queries in Internet Examiner must select all records from the Records table. LIKE Yes No Is the same as saying “contains” ‘ (single quote) Yes No Used to delimit (enclose) any string (text) values. This includes dates: ‘YYYY-MM-DD HH:mm:ss’ % Yes Yes Matches “any character” zero or more times BETWEEN Yes No Used to specify a range of dates. Usage: BETWEEN ‘YYYY-MM-DD HH:mm:ss’ AND ‘YYYY-MM-DD HH:mm:ss’ = Yes No Means is equal to > Yes No Means greater than < Yes No Means less than >= Yes No Means greater than or equal to <= Yes No Means less than or equal to <> Yes No Means not equal to No Parentheses are used to group together conditional statements and set order of precedence for evaluation () Yes Copyright © 2004-2015, SiQuest Corporation. May not be reproduced without written permission of SiQuest Corporation. Internet Examiner Toolkit v5 User Manual Page 88 of 181 SELECTING RECORDS So far we have discussed how queries and filters can be used to define the current dataset and make it easier for examiners to work with the evidence. However, there are still times that users may want to select, or work with, only a handful of records. Internet Examiner makes this possible by allow records in the Table or Gallery to be selected in sequence or randomly. This is accomplished by placing a checkmark in the checkbox at the start of each record. Tagging Table Records The following are the different ways to select records in the Table: 1. Use the mouse to specifically and selectively check or uncheck the boxes, in any order. 2. With at least one row highlighted, use the UP and DOWN arrow keys to move from one row to the next. By depressing the SPACE bar, the current row will be checked or unchecked, depending on the state of the checkbox. 3. With at least one row highlighted AND while holding down the SHIFT key, use the UP and DOWN arrow keys to sweep or highlight more than one row. Once a range or rows have been highlighted, right-mouse-click anywhere inside the Table and a context (popup) menu will appear. From the menu, you can then choose to “Tag (Select) highlighted rows” OR “UnTag (Unselect) highlighted rows”. Each time a checkbox is placed next to a row in the Table, it is also “tagging” the record. If you were to look inside the Project (.IEP) file and inside the URLs table, you will see a column (field) called “Tagged”. This column is directly associated with rows that are checked or unchecked in the Table, or the Gallery. Copyright © 2004-2015, SiQuest Corporation. May not be reproduced without written permission of SiQuest Corporation. Internet Examiner Toolkit v5 User Manual Page 89 of 181 Persistence of Tagged Items It is important to understand that items in the Table or the Gallery that are tagged (checkmarked), will remain tagged inside the project file (database) -- even if the active query changes the displayed recordset. This behavior will explain why some records may appear checked whenever a saved project file is first Opened, and/or when the active query changes what records are displayed in the Table or Gallery. Copyright © 2004-2015, SiQuest Corporation. May not be reproduced without written permission of SiQuest Corporation. Internet Examiner Toolkit v5 User Manual Page 90 of 181 Module 6 Time Zones and UTC Introduction When it comes to Internet forensics and browser artifacts, one of the most important components to any analysis is the proper interpretation, conversion, and representation of dates and times. Understanding how each browser stores timestamps is “critical” to an investigation, especially considering the variations imposed by “local time”, “time zones” and “Daylights Savings”. This issue is even further compounded by the fact that different browsers store dates and times differently. Therefore, it is very important for examiners to be able to differentiate between the different formats, and more importantly, be able to manually validate their original binary values. Prior to Internet Examiner Version 2.7, timestamps (for when website URLs were “Last Visited”) were recorded strictly in Greenwich Mean Time (GMT). Furthermore, not all browsers used the same terminology to describe the timestamps that were commonly associated to the action of “visiting” or “accessing”. While storing timestamps in Universal Coordinated Time (UTC) (also known as GMT time) relieved the concerns of having to account for Daylight Savings, it presented a challenge in allowing Internet Examiner users to search for items based on their own local time. For instance, if an activity took place at -0500 EST (Eastern Standard Time), Internet Examiner would store the time as “0000” UTC. Therefore, users would have to take into account various time zone offsets as possibilities in their search, thereby widening their search unnecessarily. More importantly, this behavior of storing time in UTC might not have seemed clear to many users. Copyright © 2004-2015, SiQuest Corporation. May not be reproduced without written permission of SiQuest Corporation. Internet Examiner Toolkit v5 User Manual Page 91 of 181 With the release of IXTK v4, we’ve done away with the “Last Visited” database column. Instead, it has replaced it with a much more meaningful implementation using the descriptors: Action, ActionDateUTC and ActionDateLocal as column names. For instance, if we use the same example noted above, our Action value might be “Visited”, the ActionDateUTC would equal to “0000”, and the ActionDateLocal would logically be “-0500”. This now allows users the option to search by either time zone offset as well as specific “Actions” (NOTE: Actions is discussed later on this manual). What is also very interesting to know is that with the rising popularity of the 64-bit architecture for processors and software, data types, used to store timestamps, previously consisted of 4 bytes and 8 bytes, depending on the browser and meaning of the timestamp. Today, most if not all timestamps utilize a full 16-bytes to store their values. This makes it easier now to store time in seconds, milliseconds, microseconds and nanoseconds. Being able to convert these values into meaningful and accurate timestamps is therefore very critical for any investigation relying on precise time analysis. From a forensic context, most examiners have a general or common understanding of the Windows Registry artifacts relating to Time Zone information, and in particular, a computer’s “time” and “time zone settings”. While the detailed discussion about Registry artifacts is outside the scope of this document, it is simply important to understand that there are two distinct values maintained in the Registry for the purpose of calculating time. The first is the “Active Bias” setting and the “Bias” setting. Both values correspond to the computer’s Time Zone or GMT offset from UTC time (eg: Toronto is 5 hours ahead of UTC or better known as “-05:00” hours). A detailed discussion about how these values impact the calculation of timestamps in Internet Examiner is discussed later on. NOTE: The following sections discuss advanced time related issues that are essential for proper date and time analysis from a forensic context. To ensure that Internet Examiner users are provided with accurate and qualified information, we have referenced materials made available by the Naval Oceanography Portal, copyrighted by the Naval Meteorology and Oceanography Command, situated at 1100 Balch Blvd, Stennis Space Center, MS 39529, United States. Passages that are derived from the Naval Oceanography Portal are indicated by the acronym USNO. Copyright © 2004-2015, SiQuest Corporation. May not be reproduced without written permission of SiQuest Corporation. Internet Examiner Toolkit v5 User Manual Page 92 of 181 Understanding Coordinated Universal Time (UTC) [USNO] The times of various events, particularly astronomical and weather phenomena, are often given in "Universal Time" (abbreviated UT) which is sometimes referred to, now colloquially, as "Greenwich Mean Time" (abbreviated GMT). The two terms are often used loosely to refer to time kept on the Greenwich meridian (longitude zero), five hours ahead of Eastern Standard Time. Times given in UT are almost always given in terms of a 24-hour clock. Thus, 14:42 (often written simply 1442) is 2:42 p.m., and 21:17 (2117) is 9:17 p.m. Sometimes a Z is appended to a time to indicate UT, as in 0935Z. When a precision of one second or better is needed, however, it is necessary to be more specific about the exact meaning of UT. For that purpose different designations of Universal Time have been adopted. In astronomical and navigational usage, UT often refers to a specific time called UT1, which is a measure of the rotation angle of the Earth as observed astronomically. It is affected by small variations in the rotation of the Earth, and can differ slightly from the civil time on the Greenwich meridian. Times which may be labeled "Universal Time" or "UT" in data provided by the U.S. Naval Observatory (for example, in the annual almanacs) conform to this definition. However, in the most common civil usage, UT refers to a time scale called "Coordinated Universal Time" (abbreviated UTC), which is the basis for the worldwide system of civil time. This time scale is kept by time laboratories around the world, including the U.S. Naval Observatory, and is determined using highly precise atomic clocks. The International Bureau of Weights and Measures makes use of data from the timing laboratories to provide the international standard UTC which is accurate to approximately a nanosecond (billionth of a second) per day. The length of a UTC second is defined in terms of an atomic transition of the element cesium under specific conditions, and is not directly related to any astronomical phenomena. UTC is the time distributed by standard radio stations that broadcast time, such as WWV and WWVH. It can also be obtained readily from the Global Positioning System (GPS) satellites. The difference between UTC and UT1 is made available electronically and broadcast so that navigators can obtain UT1. UTC is the basis for civil standard time in the U.S. and its territories. Standard time within U.S. time zones is an integral number of hours offset from UTC. Copyright © 2004-2015, SiQuest Corporation. May not be reproduced without written permission of SiQuest Corporation. Internet Examiner Toolkit v5 User Manual Page 93 of 181 UTC is equivalent to the civil time for Iceland, Liberia, Morocco, Senegal, Ghana, Mali, Mauritania, and several other countries. During the winter months, UTC is also the civil time scale for the United Kingdom and Ireland. One can think of UT1 as being a time determined by the rotation of the Earth, over which we have no control, whereas UTC is a human invention. It is relatively easy to manufacture highly precise clocks that keep UTC, while the only "clock" keeping UT1 precisely is the Earth itself. Nevertheless, it is desirable that our civil time scale not be very different from the Earth's time, so, by international agreement, UTC is not permitted to differ from UT1 by more than 0.9 second. When it appears that the difference between the two kinds of time may approach this limit, a one-second change called a "leap second" is introduced into UTC. This occurs on average about once every year to a year and a half. Copyright © 2004-2015, SiQuest Corporation. May not be reproduced without written permission of SiQuest Corporation. Internet Examiner Toolkit v5 User Manual Page 94 of 181 The International Date Line Time Zones are essential in calculating local time for different parts of the world. We use time zones and adjust our local time based on offsets from UTC (0000). Because the United Kingdom observes UTC throughout the year, it will be our reference hereinafter for the purposes of UTC discussions. The following are common time zone offsets for different countries. These values do NOT take into account Daylight Savings: 1. Toronto, Ontario (Canada): -0500 UTC 2. Los Angeles, California (USA): -0800 UTC 3. Sydney, New South Wales (Australia): +1000 UTC You will notice that the above discussion about offsets was prefaced with the fact that the above examples do NOT take into account Daylight Savings. This is quite important to understand because it precipitates a discussion about “Hemispheres” which is often not discussed in forensic contexts. Hemispheres are critical to the calculation of time zone offsets in conjunction with Daylight Savings for different parts of the world, during special times of the year. [USNO] The International Date Line is the imaginary line on the Earth that separates two consecutive calendar days. That is the date in the Eastern hemisphere, to the left of the line, is always one day ahead of the date in the Western hemisphere. It has been recognized as a matter of convenience and has no force in international law. Without the International Date Line travelers going westward would discover that when they returned home, one day more than they thought had passed, even though they had kept careful tally of the days. This first happened to Magellan's crew after the first circumnavigation of the globe. Likewise, a person traveling eastward would find that one fewer days had elapsed than he had recorded, as happened to Phileas Fogg in "Around the World in Eighty Days" by Jules Verne. Copyright © 2004-2015, SiQuest Corporation. May not be reproduced without written permission of SiQuest Corporation. Internet Examiner Toolkit v5 User Manual Page 95 of 181 The International Date Line can be anywhere on the globe. But it is most convenient to be 180° away from the defining meridian that goes through Greenwich, England. It also is fortunate that this area is covered, mainly, by empty ocean. However, there have always been zigs and zags in it to allow for local circumstances. Eastern Hemisphere Western Hemisphere Tonga: 8 Jul 2009 02:12:48 Samoa: 9 Jul 2009 02:12:48 UTC Copyright © 2004-2015,, SiQuest Corporation. May not be reproduced without written permission of SiQuest Corporation. Internet Examiner Toolkit v5 User Manual Page 96 of 181 Daylight Time [USNO] Starting in 2007, daylight time begins in the United States on the second Sunday in March and ends on the first Sunday in November. On the second Sunday in March, clocks are set ahead one hour at 2:00 a.m. local standard time, which becomes 3:00 a.m. local daylight time. On the first Sunday in November, clocks are set back one hour at 2:00 a.m. local daylight time, which becomes 1:00 a.m. local standard time. These dates were established by Congress in the Energy Policy Act of 2005, Pub. L. no. 109-58, 119 Stat 594 (2005). Not all places in the U.S. observe daylight time. In particular, Hawaii and most of Arizona do not use it. Indiana adopted its use beginning in 2006. • In 2006, daylight time begins on April 2 and ends on October 29. • In 2007, daylight time begins on March 11 and ends on November 4. [New law goes into effect.] • In 2008, daylight time begins on March 9 and ends on November 2. • In 2009, daylight time begins on March 8 and ends on November 1. Many other countries observe some form of "summer time", but they do not necessarily change their clocks on the same dates as the U.S. Copyright © 2004-2015, SiQuest Corporation. May not be reproduced without written permission of SiQuest Corporation. Internet Examiner Toolkit v5 User Manual Page 97 of 181 History of Daylight Time in the U.S. [USNO] Although standard time in time zones was instituted in the U.S. and Canada by the railroads in 1883, it was not established in U.S. law until the Act of March 19, 1918, sometimes called the Standard Time Act. The act also established daylight saving time, a contentious idea then. Daylight saving time was repealed in 1919, but standard time in time zones remained in law. Daylight time became a local matter. It was re-established nationally early in World War II, and was continuously observed from 9 February 1942 to 30 September 1945. After the war its use varied among states and localities. The Uniform Time Act of 1966 provided standardization in the dates of beginning and end of daylight time in the U.S. but allowed for local exemptions from its observance. The act provided that daylight time begin on the last Sunday in April and end on the last Sunday in October, with the changeover to occur at 2 a.m. local time. During the "energy crisis" years, Congress enacted earlier starting dates for daylight time. In 1974, daylight time began on 6 January and in 1975 it began on 23 February. After those two years the starting date reverted back to the last Sunday in April. In 1986, a law was passed that shifted the starting date of daylight time to the first Sunday in April, beginning in 1987. The ending date of daylight time was not subject to such changes, and remained the last Sunday in October. The Energy Policy Act of 2005 changed both the starting and ending dates. Beginning in 2007, daylight time starts on the second Sunday in March and ends on the first Sunday in November. Copyright © 2004-2015, SiQuest Corporation. May not be reproduced without written permission of SiQuest Corporation. Internet Examiner Toolkit v5 User Manual Page 98 of 181 Summer Time (Northern and Southern Hemispheres) The following is a list of territories that observe Summer Time from March to October/November: • Europe • North America • Central America / Carribean • Asia • Africa (Egypt, Morocco, Tunisia) The following is a short list of territories that observe daylight savings opposite to the Northern Hemisphere countries: • Australia / Oceania • South America • Africa • Antarctica Copyright © 2004-2015, SiQuest Corporation. May not be reproduced without written permission of SiQuest Corporation. Internet Examiner Toolkit v5 User Manual Page 99 of 181 Hemispheres and Daylight Saving Time Issues Now that we have an understanding of UTC, the International Date Line (aka: the Prime Meridian), and Daylight Time, it sets the groundwork for discussion about Daylight Saving and how different hemispheres impact date and time analysis from a forensic context. The following scenario introduces some interesting facts about a make-believe investigation, which real-life investigators are likely to encounter in multi-jurisdictional case. FACT #1 You are an F.B.I. agent working in New York City, New York, USA. New York City has a standard UTC offset of -0500. FACT #2 The time now is 8-July-2009 07:05 AM. Since this time falls within the U.S. observed Daylight Time, the offset is now -0400 UTC. Daylight Saving (Summer Time) is in effect. FACT #3 It just so happens that the computer you are examining was shipped to you by a federal law enforcement contact in Sydney, Australia. Apparently the offence took place in Australia and the subject computer was also configured properly for Australian time (with Daylight Savings configured). FACT #4 Evidence in this case (eg: witness statements, events) suggest that the alleged offence date was February 5, 2009 and that Internet activities occurred in or about 09:43 AM. FACT #5 During your forensic analysis of the Internet activity for the subject computer, you come across several browser cache and history URL records for the date of February, 5, 2009. You are using a combination of tools for your analysis, including Internet Examiner. Copyright © 2004-2015, SiQuest Corporation. May not be reproduced without written permission of SiQuest Corporation. Internet Examiner Toolkit v5 User Manual Page 100 of 181 ISSUE In the above scenario, some third party tools (other than Internet Examiner) might erroneously represent timestamps as 08:43 AM because the examiner’s workstation is configured to calculate Daylight Savings, which is based on his location in the Northern Hemisphere. It is an instinctive approach by developers to reference time properties of the local machine and not the evidence origin itself. As a result, this approach would provide a terribly inaccurate time value because the offence time is calculated using the wrong hemisphere as a variable to the equation. Internet Examiner.7 has taken this anomaly into account when reporting / displaying timestamps from different time zones AND from different hemispheres. Using the selected Time Zone and Daylight Saving option within the program, Internet Examiner will not only properly calculate the time zone offset, but take into account the actual daylight saving value for the selected time zone and not the time zone of the examiner’s workstation. Hence, the timestamp for the above example would be reported accurately by Internet Examiner as 09:43 AM. Lastly, as an added validation tool, Internet Examiner reports all timestamps in UTC time as a separate column entitled: “Action Time UTC”. SPECIAL NOTE: Internet Examiner Toolkit calculates the hemisphere attribute for an individual country based on their Northern or Southern hemisphere location, and not their UTC offset (or relevant position to the Prime Meridian). Based on an examiner’s Time Zone selection within Internet Examiner, datestamps are now more properly calculated for all countries, in all time zones. This is reflected in any “displayed” or “reported” time value by the use of the “DST” or “STD” suffix. Copyright © 2004-2015, SiQuest Corporation. May not be reproduced without written permission of SiQuest Corporation. Internet Examiner Toolkit v5 User Manual Page 101 of 181 Daylight Time (Northern and Southern Hemispheres) The following section summarizes the discussion about dates and times in a manner that is easier to remember and understand. We showed you earlier a map of the globe, divided by Eastern and Western hemispheres. We also discussed how time is accurately calculated based on THREE main ingredients: 1. The UTC (GMT) offset for the specific region, 2. The hemisphere in which the specific region is situated, and lastly, 3. Whether or not the specific region observes daylight savings. Let’s take a quick look at the global map one more time, this time, noting the Northern and Southern Hemispheres which are divided by the Earth’s Equator. Diagram -1 – Northern Hemisphere Copyright © 2004-2015, SiQuest Corporation. May not be reproduced without written permission of SiQuest Corporation. Internet Examiner Toolkit v5 User Manual Page 102 of 181 Diagram -1 – Southern Hemisphere For those countries situated South of the Equator, that do observe daylight savings, the start and end of Daylight Savings (season) will be opposite of those countries to the North. see what that really means… Copyright © 2004-2015, SiQuest Corporation. May not be reproduced without written permission of SiQuest Corporation. Let’s Internet Examiner Toolkit v5 User Manual Page 103 of 181 In the following diagram, RED (Northern Hemisphere) outlines where Daylight Saving Time would be in effect on July 28, 2009 2009.. The color BLUE (Southern Hemisphere) indicates where Summer Time would be observed on the same date. The trick to remember is that as we move closer to the East where the sun rises, our UTC offsets move as well! EXAMPLE: Toronto, Canada: Eastern Daylight Time (EDT) -04:00 04:00 UTC London, UK: British Summer Time (BST) +01:00 UTC Sydney, Australia: Australian Eastern Standard Time (EAST) +10:00 UTC Copyright © 2004-2015,, SiQuest Corporation. May not be reproduced without written permission of SiQuest Corporation. Internet Examiner Toolkit v5 User Manual Page 104 of 181 If on the other hand, the date was December 31, 2009, then Daylight Savings would be observed differently: EXAMPLE: Toronto, Canada: Eastern Standard Time (EST) -05:00 05:00 UTC London, UK: Greenwich Mean Time (GMT) +00:00 UTC Sydney, Australia: Australian Eastern Daylight Time (EADT) +11:00 UTC Copyright © 2004-2015,, SiQuest Corporation. May not be reproduced without written permission of SiQuest Corporation. Internet Examiner Toolkit v5 User Manual Page 105 of 181 Formatting Displayed Times and Dates in Internet Examiner With Internet Examiner, users can now configure the way dates and times are displayed and reported using the new Options Window, which is available from the View menu. Users are encouraged to use the default display format (see below) as the value is easily sorted in chronological order, whether as a true date data type, or as a simple string data type. The default format also makes use of the 24 hour clock for added clarity. Example: YYYY-MM-DD Hh:Nn:Ss will produce today as 2009-07-06 11:17:34. Setting Time Zone and Daylight Savings Options By default, Internet Examiner will configure the Time Zone and Daylight Saving preferences to the values recorded in the examiner’s (Internet Examiner user’s) Windows system. This will be reflected inside the Global Tab of the Options Window under the Time Zone Setting area, of the dialogue box. The Options Window is accessed via the View menu on the top menu bar (above the Toolbar). As indicated below, this area allows users to select a specific Time Zone in which all dates and times are to be converted, for displaying and reporting purposes. The “Automatically adjust for daylight savings changes” option is provided in order to address time artifacts that may be influenced by this feature. Some third party forensic tools base their reporting of timestamps using the Daylight Saving setting of the “examiner’s computer”, and not that of the origin of the timestamp (eg: a computer seized in an opposing Hemisphere as discussed earlier). This would result in timestamps being inaccurately reported as either plus or minus one hour. Copyright © 2004-2015, SiQuest Corporation. May not be reproduced without written permission of SiQuest Corporation. Internet Examiner Toolkit v5 User Manual Page 106 of 181 Copyright © 2004-2015, SiQuest Corporation. May not be reproduced without written permission of SiQuest Corporation. Internet Examiner Toolkit v5 User Manual Page 107 of 181 ActionDateLocal and ActionDateUTC These two database columns store URL date related artifacts in a Date format. The ActionDateLocal column holds a converted version of the ActionDateUTC value. The storage and conversion of this timestamp is performed only once during the initial Import process, using the Time Zone Settings found in the Options Window. current Time Zone settings to another time zone, the If a user changes the existing stored values for ActionDateLocal (as it is stored within the project file) will remain unchanged. However, the displayed and reported dates and times for ActionDateLocal, are converted at run-time using the current Time Zone Setting from the Options Window. NOTE: The above distinction about when the database column ActionDateLocal is assigned a value is very important for users who will be conducting custom queries. It is therefore recommended that date-based queries, whenever possible, be conducted using ActionDateUTC instead. The ActionDateUTC column holds the actual (or calculated) UTC version of the primary timestamp associated to a URL. If the URL record being examined (or parsed by Internet Examiner) relates to an activity such as “Visiting” a website, then this timestamp will be used. In addition, the “activity” will be described (stored) in the Action column. NOTE: The use of the Time Zone Settings feature in the Options Window will have no affect on the value stored in the ActionDateUTC as this column is assigned a value only once. This is done at the initial importing and parsing of browser artifacts. Copyright © 2004-2015, SiQuest Corporation. May not be reproduced without written permission of SiQuest Corporation. Internet Examiner Toolkit v5 User Manual Page 108 of 181 WEEKLY Timestamps in Internet Explorer Timestamps for WEEKLY History records (URLs) are stored inside the INDEX.DAT file as the “Local Time” from the computer where the actual URL record entry was created (eg: Australia). Examiners who are importing an IE Weekly index.dat file into Internet Examiner MUST have the Internet Examiner Time Zone option set to the examiner’s own time zone. This is NECESSARY in order for Internet Examiner to properly determine the true UTC time. Once the importing is complete (for any given WEEKLY index.dat file), then the examiner can feel free to re-configure the Internet Examiner Time Zone option as required. IMPORTANT: Since a subject’s computer’s Time Zone and Daylight Saving settings may NOT be set correctly (eg: defaulting to Pacific Standard Time during Windows install), Internet Examiner will initially convert all browser UTC times to local time during the IMPORT stage using the examiner’s workstation time zone settings (eg: Project file default). These UTC timestamps are converted and stored into the ActionDateLocal database column. As of Version 2.7.4, this assignment to the ActionDateLocal column is done ONCE and cannot be altered after import. The logic behind this approach is to allow examiners to conduct custom queries using the ActionDateLocal time that is relative to the time zone in which the investigation is taking place. This also works around the significant possibility that the subject’s computer has not been changed from the Windows installation default of Pacific Standard Time which is -08:00 UTC. All ActionDateLocal times “displayed” (eg: Table view) and “reported” are on-the-fly ActionDateUTC conversions based on the currently selected Project-file-level time zone setting (which is selected via the Options Window). This approach ensures that times are more true than relying on (and having to convert) the subject’s local timestamps. This also allows for the examiner to view the timestamps in any time zone, as often as required, during the course of an investigation. Copyright © 2004-2015, SiQuest Corporation. May not be reproduced without written permission of SiQuest Corporation. Internet Examiner Toolkit v5 User Manual Page 109 of 181 “DST” and “STD” Suffixes Timestamps that are reported and displayed within Internet Examiner can represent any date of a given year. Countries that observe Daylight Savings throughout the year will typically commence Daylight Savings either in the Spring (for countries in the Northern Hemisphere), or the Fall (for countries in the Southern Hemisphere). As a result, examiners have to be cognizant of this fact when reviewing evidence from two different daylight periods. The correct UTC offset has to be taken into account for the daylight period of the evidence, and NOT the daylight period of the examiner! Copyright © 2004-2015, SiQuest Corporation. May not be reproduced without written permission of SiQuest Corporation. Internet Examiner Toolkit v5 User Manual Page 110 of 181 Multiple Time Zone Analysis: A Case Study John Doe of New York City is working a case in July. New York City observes daylight savings in accordance with USA Standards and therefore, John is currently observing “Daylight Savings” (Spring to Fall). Therefore, his UTC offset in July would be -0400. The Standard UTC offset for his time zone is -0500. During John’s examination of a case, he comes across a key piece of evidence that apparently occurred at 11:00 PM UTC on February 1st. John began his investigation with the Internet Examiner Time Zone option set to his own time zone using “(UTC-0500) Eastern Time (US & Canada)” with the “Automatically adjust for daylight savings changes” checkbox enabled (selected). John’s initial (manual) interpretation of the 11:00PM UTC timestamp would be to convert the time to 7:00PM using his existing -0400 UTC offset, since he is currently observing daylight savings. THIS IS INCORRECT!!! Why? In the month of February, John’s daylight period does not observe daylight savings. This is the time that is of importance, not the time of the examination. Since the actual UTC offset in February would be -0500, then the 11:00PM UTC timestamp should be properly converted to 6:00PM. Internet Examiner makes this distinction very clear by appending the letters “DST” or “STD” to each and every timestamp that is being displayed or reported. Copyright © 2004-2015, SiQuest Corporation. May not be reproduced without written permission of SiQuest Corporation. Internet Examiner Toolkit v5 User Manual Page 111 of 181 Using Dates in Queries On Day 3, we will be going into depth with creating queries and exploring more about SQL statements and validating queries. However, it seems fitting in this section to provide some helpful tips about how to format dates and times in a custom Query. TIP: Examiners should be mindful about times and time zones whenever defining a Query that takes a date as a parameter (condition). This is why it is sometimes better to contemplate using the UTC timestamps available with the “ActionDateUTC” column, as opposed to the “ActionDateLocal” column. The following illustrates a query that tests for URLs that were visited between two different dates. Date Query #1 SELECT * FROM URLs WHERE (Action = ‘Visited’ OR Action = ‘Loaded’) AND ActionDateLocal BETWEEN #12/31/2008# AND #1/30/2009# ORDER BY ActionDateLocal ASC; Copyright © 2004-2015, SiQuest Corporation. May not be reproduced without written permission of SiQuest Corporation. Internet Examiner Toolkit v5 User Manual Page 112 of 181 Date Query #2 The same query above can be defined in another way which requires a bit more detail in the actual date parameters. Notice the requirement here to add “times” to the dates. Since we are not using the reserved BETWEEN keyword, we have to now incorporate the use of the “OR” operator instead of the “AND” operator. To further clarify our query, we have also not add parentheses to the ActionDateLocal conditions. SELECT * FROM URLs WHERE (Action = ‘Visited’ OR Action = ‘Loaded’) AND (ActionDateLocal >= #12/31/2009 00:00:00# OR ActionDateLocal <= #30/1/2009 00:00:00#) ORDER BY ActionDateLocal ASC; The same query could also be written again like this: SELECT * FROM URLs WHERE (Action = ‘Visited’ OR Action = ‘Loaded’) AND (ActionDateLocal >= #12/31/2009 00:00:00# OR ActionDateLocal <= #29/1/2009 23:59:59#) ORDER BY ActionDateLocal ASC; Copyright © 2004-2015, SiQuest Corporation. May not be reproduced without written permission of SiQuest Corporation. Internet Examiner Toolkit v5 User Manual Page 113 of 181 Managing the “timezones.sqlite” File With the release of Internet Examiner Version 2.7.4, examiners now have extened configurability over the time zones and daylight savings options. timezones.sqlite file is standalone SQLite database file called that is installed in the Internet Examiner program directory. One of the inherent problems that exist with “daylight savings” is that an observing region’s decision to observe daylight savings may vary from one year to the next. For the most part, most regions that do observe daylight savings, do so from one year to the next. Unfortunately, that is not always the case. As an example, Western Australia held a referendum in the spring of 2009 to determine if regions wished to continue observing daylight time or not. The results were calculated and daylight savings is not longer. Copyright © 2004-2015, SiQuest Corporation. May not be reproduced without written permission of SiQuest Corporation. Internet Examiner Toolkit v5 User Manual Page 114 of 181 The following is a post on the government’s website as of November 27, 2009. IMAGE 12.1 - DST no longer observed in Western Australia Copyright © 2004-2015, SiQuest Corporation. May not be reproduced without written permission of SiQuest Corporation. Internet Examiner Toolkit v5 User Manual Page 115 of 181 Customizing DST for Select Regions With Western Australia no longer observing daylight savings, Internet Examiner will have this change pre-configured in the “timezones.sqlite” file, which Internet Examiner relies upon for providing Time Zone settings. Let’s open up the “timezones.sqlite” file using SQLite Expert and see how we can reconfigure the settings for any give region. The following image illustrates how data is organized in the time_zones table. IMAGE 12.2 - “timezones.sqlite” file’s time_zones table UTC_Offset Indicates the offsets in hours and minutes from Greenwich for select regions. STD_Bias Indicates the Windows Registry bias in minutes that need to be added to the UTC_Offset in order to bring the time in sync with Greenwich Mean Time (ground zero). UsesDST A checked column indicates that the selected region IS observing daylight savings. Copyright © 2004-2015, SiQuest Corporation. May not be reproduced without written permission of SiQuest Corporation. Internet Examiner Toolkit v5 User Manual Page 116 of 181 Time Zone References The following URLs are perhaps the topmost used websites for providing accurate information concerning time zones and regions that are observing (or have observed) daylight savings. www.worldtimezone.com This website provides a comprehensive list of Time Zone Abbreviations (codes) which has been found to be both current and accurate. Visit: http://www.worldtimezone.com/wtz-names/timezonenames.html IMAGE 12.3 - Time Zone Abbreviations Copyright © 2004-2015, SiQuest Corporation. May not be reproduced without written permission of SiQuest Corporation. Internet Examiner Toolkit v5 User Manual Page 117 of 181 www.timeanddate.com This website provides a good list reference of DST start dates and end dates for each major region. Visit: http://www.timeanddate.com/time/dst2009.html IMAGE 12.4 - DST start and end dates Copyright © 2004-2015, SiQuest Corporation. May not be reproduced without written permission of SiQuest Corporation. Internet Examiner Toolkit v5 User Manual Page 118 of 181 www.worldtimeengine.com This website provides accurate information about a select region’s proximity to the Equator (which divides the Northern and Southern Hemispheres), and the International Date Line or Prime Meridian (which separates the Western and Eastern Hemispheres). This information is provided as longitude and latitude coordinates. As an example, the following image shows the geographical location of Sydney, Australia. Notice that the region resides in the Souther Hemisphere, as clearly indicated by the latitude value of -33.867139 degrees. Copyright © 2004-2015, SiQuest Corporation. May not be reproduced without written permission of SiQuest Corporation. Internet Examiner Toolkit v5 User Manual Page 119 of 181 IMAGE 12.5 - Sydney, Australia is located in the Southern Hemisphere A negative latitude value indicates that the region resides South of the Equator, and therefore, the Southern Hemisphere. Copyright © 2004-2015, SiQuest Corporation. May not be reproduced without written permission of SiQuest Corporation. Internet Examiner Toolkit v5 User Manual Page 120 of 181 Module 7 FaceDNA™ Biometric Facial Recognition GETTING STARTED Introduction With the release of Version 5, Internet Examiner Toolkit includes the ability recognize, extract and match faces found in pictures, videos, MS Word documents, including Adobe PDF and PSD files. This technology makes it possible for investigators to identify or reveal victims, suspects, missing persons, and other persons of interest embedded within the above file types. FaceDNA™ is provided as an included add-on with the regular perpetual license. It is brought to the forensic space, first and only, by SiQuest. This is SiQuest’s commitment to offering added value to their customers. Applications for FaceDNA™ As an early assessment tool, FaceDNA™ makes it possible for forensic practitioners to examine hundreds or even thousands of files automatically (unattended) in search of faces that are either known or not known. Copyright © 2004-2015, SiQuest Corporation. May not be reproduced without written permission of SiQuest Corporation. Internet Examiner Toolkit v5 User Manual Page 121 of 181 Crimes Against Children One of the reasons, if not the most important reason, why FaceDNA™ was brought into the fold for Internet based investigations was to help investigators find more evidence and find it quickly, in cases involving child exploitation related offences (such as child pornography, child sex assault, human trafficking and Internet luring). By making it possible to find faces of known victims at the onset of an investigation, it is hoped that more serious charges will be laid against offenders. It is hoped that FaceDNA™ can give law enforcement better options when it comes to laying charges in cases of child pornography. While it is commonplace to find evidence of file sharing using peer-to-peer programs, it should not become a practice to skim the surface here and lay charges based on a few artifacts alone, all in sake of a heavy caseload and the need to get onto the next case. It is understandable that charged persons will be likely to plea to these types of charges and in doing so, a lot of the evidence may ever see the light of day. This is where FaceDNA™ proposes to make a difference. By implementing FaceDNA™ as an early assessment tool, investigators can potentially identify more victims and in doing so, rescue them and impose harsher penalties against offenders. Fraud: Document Forgery Detection When it comes to forging documents such as passports, it is not uncommon to find photos of persons (headshots) embedded inside of Microsoft Word documents and more likely in Adobe Photoshop and PDF files. Each of these file types embed images that FaceDNA™ can extract and examine. Investigators can choose the initial option to simply extract faces from all eligible files and make them available within Internet Examiner Toolkit for further reporting. Alternatively, they can enroll known faces into IXTK and then search all files for a match and recover those found files. Copyright © 2004-2015, SiQuest Corporation. May not be reproduced without written permission of SiQuest Corporation. Internet Examiner Toolkit v5 User Manual Page 122 of 181 Online Investigations: Detecting Wanted Persons Using Internet Examiner Toolkit’s built-in web browser to conduct online investigations, FaceDNA™ makes it possible to detect faces within web page documents, extract them and import them directly into an existing case file. IXTK can also alert investigators to a match in real-time by comparing enrolled faces of known or wanted persons. This functionality offers a more effective means of conducting online intelligence gathering. MANAGING FACES Manage Faces Window After you have created a case file, you will then want to introduce faces into the case for comparison (matching) purposes. We refer to this as enrolling. There are two ways to enroll faces. The first is by loading the Manage Faces window via the View Menu within the IXTK main window. The second method is via the independent search windows which provide the option to enroll faces there. Either way, all enrolled faces can be added, annotated or removed from the case via the Manage Faces window. The following images illustrate the different views (steps) of the Manage Faces window. In the below examples, you will notice that there are form fields and buttons that make it easy to annotate each individual face. These include adding a person’s Last Name, First Names, Gender, Date of Birth, and a short description. Future updates to IXTK might provide for additional metadata to be recorded for each face. Copyright © 2004-2015, SiQuest Corporation. May not be reproduced without written permission of SiQuest Corporation. Internet Examiner Toolkit v5 User Manual Page 123 of 181 IMAGE 1 – Manage Faces window showing no faces. Copyright © 2004-2015, SiQuest Corporation. May not be reproduced without written permission of SiQuest Corporation. Internet Examiner Toolkit v5 User Manual Page 124 of 181 Enrolling New Faces From the Manage Faces Window, select the Enroll New faces button to load the Import Faces Window. From there, it’s a simple matter of choosing a single file or a single folder to scan for faces. The options available for scanning are illustrated in the image below. Choosing a Detection Level of Two (Low) is not recommended as it is more likely to identify blurry faces and some false positives (not faces). Since the purpose of enrolling a face is to eventually search for a match, the better the quality of the face equates to increased probabilities of a match. For this reason, the default value is set to High. When set to High, it is expected that you will be importing / enrolling faces that are clear and of a high definition (e.g., portrait photos, digital camera photos). IMAGE 2 – Import Faces Window Copyright © 2004-2015, SiQuest Corporation. May not be reproduced without written permission of SiQuest Corporation. Internet Examiner Toolkit v5 User Manual Page 125 of 181 Once a file has been selected and any faces are found and extracted from the source file(s), you will be prompted to annotate each face. This information is used to visually discern between faces when they are listed in the Filters tab in the IXTK main window. Once they appear in the Filters, selecting a face will return all records in the case where a match to the face has been made. The following image illustrates how faces and their metadata are listed. In this example, we’ve enrolled a number of faces and so far, only one face has been annotated. IMAGE 3 – Enrolled and annotated faces. If there are any files that are NOT of interest and you do not want them imported into your case file, check mark each face and then select “Removed Checked”. When you are ready, click on the “Import/Enroll Faces” button to complete the import. Copyright © 2004-2015, SiQuest Corporation. May not be reproduced without written permission of SiQuest Corporation. Internet Examiner Toolkit v5 User Manual Page 126 of 181 From the Manage Faces Window, select the Enroll New faces button to load the Import Faces Window Deleting Faces Deleting faces from a case is sometimes necessary when you might not have the right quality of faces and you simply want to “reset”. In this case, all you need to do is load the Manage Faces Window and check mark any faces you want removed, then click on “Remove Checked”. IMPORTANT: When a face is removed from the case, it will automatically remove any associated Records in the case. For example, if the face originated by way of being extracted from a file already in the case (e.g., a picture, a cache file), then in this case, deleting a face automatically deletes the file from which they were extracted. On the other hand, if a face was simpy imported (enrolled), then there is no harm removing faces. Copyright © 2004-2015, SiQuest Corporation. May not be reproduced without written permission of SiQuest Corporation. Internet Examiner Toolkit v5 User Manual Page 127 of 181 EXTRACTING FACES Through the use of FaceDNA™, it is possible to extract faces from pictures, videos, Microsoft Word documents, including Adobe PDF and Photoshop files. The intended purpose behind this feature is to reveal potential victims, suspects, and other persons of interest without having to manually review evidence in real-time. By extracting faces through automation, investigators can better utilize their time as well as the time of other team investigators. For instance, digital forensic investigators for law enforcement agencies would find this feature invaluable by making it possible to disclose “all faces” as thumbnails in hardcopy or HTML format. Presenting evidence in this fashion is less time consuming and offers early assessment opportunities to investigative stakeholders (e.g., prosecutors, team investigators). Before you can extact faces, you first need to have files already in your case. These files don’t necessarily have to be just conventional pictures and video files. They can include browser cache files, binary files, and archive files (e.g., .zip, .gzip). How To Extract Faces With a case already open and data already present in the case, go to the Process Menu and choose Extract Faces. IMAGE 1 – Running the Extract Faces feature. Copyright © 2004-2015, SiQuest Corporation. May not be reproduced without written permission of SiQuest Corporation. Internet Examiner Toolkit v5 User Manual Page 128 of 181 The next step is to select the ‘scope’ of the search as shown below. In many cases, you might prefer to select the All Records option. After that, you then need to configure the facial recognition engine as illustrated on the next page. Copyright © 2004-2015, SiQuest Corporation. May not be reproduced without written permission of SiQuest Corporation. Internet Examiner Toolkit v5 User Manual Page 129 of 181 IMAGE 2 – Face Detection Settings Window. Detection Accuracy Level When it comes to extracting faces, the quality of the faces is entirely in your hands. If you want fewer false positives and fewer blurry faces, choose the default Medium level. The higher the level, the stricter the recognition will be. Copyright © 2004-2015, SiQuest Corporation. May not be reproduced without written permission of SiQuest Corporation. Internet Examiner Toolkit v5 User Manual Page 130 of 181 Handling Head Rotations By default, the FaceDNA™ engine will detect faces where the head rotation angle ranges from 0 to 15 degrees in any direction. Setting this value to TRUE extends this rotation range to 30 degrees. Maximum Faces Use this option to limit the number of faces that are extracted for any single file. The upper limit is 50 with the default set at 30. This feature is required in order to control system resources where some high resolution photographs might contain Copyright © 2004-2015, SiQuest Corporation. May not be reproduced without written permission of SiQuest Corporation. Internet Examiner Toolkit v5 User Manual Page 131 of 181 MATCHING FACES Overview There are two means of matching enrolled faces to files within Internet Examiner Toolkit. In the one instance, faces are first enrolled into the case and then matched against files that are already present within the case (e.g., imported/parsed browser cache files, pictures). In the second instance, enrolled faces are used for matching against files that reside OUTSIDE of the case (e.g., a fixed hard disk, a mounted disk). Matching Faces in Records As stated earlier, before matching of faces can be performed, faces must first be enrolled in the case and then records (files) must already be present in the case. To understand how to enroll faces, please see the section on Enrolling New Faces above. Secondly, and most importantly, you need to have already run the Extract Faces option via the View -> FaceDNA menu. This process goes through all specified records in the case and extracts any faces. For each face that is extracted, a Template is created which contains the essential elements for comparison. Normally, IXTK might offer you the option to pre-select which records are to be used for the matching process. However, since the template for each extracted face is already created and stored in the case (as noted above), then it’s remains much simpler to do the matching. For this reason, when you select Match Faces menu, all selected faces are compared against ALL RECORDS which contain already extracted facs. For any matches that are found, the Record_ID of the Records table and the Face_ID of the Faces table are stored in the FaceMatches table. When this happens, every Face that appears in the Filters tree, when selected, will return all records relating to that face. Copyright © 2004-2015, SiQuest Corporation. May not be reproduced without written permission of SiQuest Corporation. Internet Examiner Toolkit v5 User Manual Page 132 of 181 Finding (Matching) Faces in External Files The ability to locate the face of a victim or suspect in a video or picture file is invaluable as an early assessment function for law enforcement. Why? Because it offers investigators the ability to more accurately pinpoint the proverbial needle in a haystack. To be more specific, FaceDNA™ makes it possible to automate the search process and free up valuable time so that investigators can concentrate on other parts of the case. When a match is made, the file that contains the face is then imported in to the case and a new Record is generated. Before the search commences, the investigator can configure the False Acceptance Rate (FAR) which loosens or strengthens the matching criteria. Depending on the FAR value, it has been demonstrated that faces from other generations (of the same family line) can be matched. To start a search, click on the Add Evidence button on the main toolbar and then select the New Search menu to load the New Search Window. IMAGE 1 – New Search Window showing the Find Faces search option. Copyright © 2004-2015, SiQuest Corporation. May not be reproduced without written permission of SiQuest Corporation. Internet Examiner Toolkit v5 User Manual Page 133 of 181 Find Faces Search Window The following screen capture demonstrates how the manage faces functions have been incorporated in the options. IMAGE 2 – Enroll Faces Copyright © 2004-2015, SiQuest Corporation. May not be reproduced without written permission of SiQuest Corporation. Internet Examiner Toolkit v5 User Manual Page 134 of 181 Module 8 Rebuilding Web Pages Tools To Use For the purpose of this module, we will be using the following shareware program. This program is included on the accompanying Training CD. 1. HomeSite Overview Perhaps the most important feature of Internet Examiner is its ability to rebuild web pages from recovered Internet cache. With the pending release of Version 2.8, Internet Examiner will support the following browsers: 1. Internet Explorer - Versions 5-9 (Windows PC) 2. Mozilla Firefox - Version 2-12 (Windows PC and MAC) 3. Google Chrome - Version 1-19 (Windows PC and MAC) 4. Opera - Version 9, 10 (Windows PC and MAC) 5. Safari - Version 3-5 (Windows PC) 6. Safari - Version 4-5 (Windows PC and MAC) The purpose of this module is to provide examiners with advanced insight into the rebuilding process and extend the discussions already presented in the Internet Examiner User Manual. Copyright © 2004-2015, SiQuest Corporation. May not be reproduced without written permission of SiQuest Corporation. Internet Examiner Toolkit v5 User Manual Page 135 of 181 We will introduce you to the HyperText Markup Language (HTML) used to design and present web pages in a browser. We will also the importance of understanding HTML tags, tag attributes, relative paths VS. fully qualified paths, cascading stylesheets and javascripts. Copyright © 2004-2015, SiQuest Corporation. May not be reproduced without written permission of SiQuest Corporation. Internet Examiner Toolkit v5 User Manual Page 136 of 181 HTML Online Reference The World Wide Web Consortium (W3C) (www.w3.org) is an international community that develops standards to ensure the long-term growth of the Web. The W3 website is a gateway to user groups, blogs and discussions that promote the continued development of these interests. HTML Tags The following is a list of common HTML tags that examiners will come across in the source code (contents) of most web pages. TABLE 13.1 - HTML Reference - Tags SCOPE / USAGE DESCRIPTION Anywhere Open and close comment tags. <head></head> After the <html> tag and before the <body> Not viewable by the user, but contains items like the <metadata> tag and the <title></title> tag. <img> Anywhere in the <body> Defines a picture on the web page <a> </a> <body> Open and close anchor tags. Used to define hyperlinks using text or <img> tag. TAG <!-- --> <table></table> <body> <tr></tr> <table> <td></td> <tr> <body></body> <html> <div></div> <body> <link> <head> Defines the start and end of a table. <tr> is used to define a new row inside the table. <td> is used to define a new column within a row. Defines a row that contains one or more <td> tags. Defines a column within a table. Defines the main content area of a web page. Defines a block (or division) of code that can be modified using the attributes of the DIV tag. Attributes are discussed below. The link tag uses the “src” attribute to link to an external file. This has the same idea of “including” or “embedding” the file. Must be defined inside the <head> tag. Copyright © 2004-2015, SiQuest Corporation. May not be reproduced without written permission of SiQuest Corporation. Internet Examiner Toolkit v5 User Manual Page 137 of 181 Create an unordered list. This simply uses bullets instead of numbers. Creates an ordered list where each item in the list is assigned a number. The list item tags appear inside of the ordered or unordered list tags. Defines a style of how text and objects will appear in a file. This is an inline statement. The other option is to use the <link> tag to link to an external cascading stylesheet file. The script tag defines a block of code (in either VBScript or Javascript) that can be executed when the page is displayed. This is another example of an inline statement. A <link> tag could also be used to link to an external javascript (.js) file. The language attribute is used to define the language used. The frame is used to divide the main browser window into smaller browser windows (called a frameset) so that more than one web page can be loaded (into the different framesets). <ul></ul> <body> <ol></ol> <body> <li></li> <ul> or <ol> <style></style> <head> <script></script> anywhere <frame></frame> <frameset> <frameset> </frameset> anywhere When framesets are used, the only objects allowed in the entire file are <frame>s. <form></form> <body> Everything inside the <form> will be submitted (sent out) when an input button is selected. <input> <form> No closing tag. Attributes are used to define a textbox, checkbox, textarea OR select (dropdown combo). <select></select> <body> or <form> Used to create a dropdown list box with a list of choices. <option></option> <select> Creates a single list item for the dropdown list. <textarea></textarea> <form> Used to create a multiline text box. <h1></h1> <body> Used to predefine a bolded heading (large size font). There are a total of five (5) heading tags (e.g., <h1><h2><h3><h4><h5>). As the number increases, the size of the font decreases. <i></i> <body> Makes the font italic <b></b> <body> Makes the font bold (still supported) <strong></strong> <body> Makes the font bold (preferred use) Copyright © 2004-2015, SiQuest Corporation. May not be reproduced without written permission of SiQuest Corporation. Internet Examiner Toolkit v5 User Manual Page 138 of 181 <object></object> <body> Embeds an object (e.g., flash animation file) <br> anywhere Creates a new line feed (carriage return) HTML Attributes TABLE 13.2 - HTML Reference - Attributes TAG SCOPE / USAGE DESCRIPTION src <img> <link> Defines the relative or full path to an object (e.g., picture, cascading stylesheet, javascript file) style Almost any tag can have a style applied to it Used to define one or more style attributes to a tag. Allows for any item on a web page to have a custom appearance. font-family <style> Defines the name of the font to use font-size <style> Defines the size of the font to use color <style> Used to define a hex color value (e.g., color:#C00000) or constant (e.g., color: Red). background Several tags Defines the relative or full path to a picture file. class Several tags A class is a pre-defined <style> that can be used by most tags. Copyright © 2004-2015, SiQuest Corporation. May not be reproduced without written permission of SiQuest Corporation. Internet Examiner Toolkit v5 User Manual Page 139 of 181 The following image illustrates the use of attributes in cascading stylesheets. IMAGE 13.3 - Sample stylesheet NOTE: “background:url” (see line # 89, 90 and 91) is the most critical element to look for in a stylesheet as it will define a path, usually to a picture or replaceable object. When rebuilding web pages that make use of cascading stylesheets, Internet Examiner also needs to replace these file paths too. Parent Paths Whenever a relative path is used to reference objects in a web page, it is commonplace to see a double-dot notation which signifies a parent path. The parent path is a placeholder for the first immediate parent folder in the current path. The benefit in using parent paths is to enable web sites to be moved to any other folder and still enable the site to function, without having to replace the file paths. Copyright © 2004-2015, SiQuest Corporation. May not be reproduced without written permission of SiQuest Corporation. Internet Examiner Toolkit v5 User Manual Page 140 of 181 HTML Keywords TABLE 13.4 - Reserved keywords The following keywords are referred to as “HTML Encoded”. For example, an ampersand sign (&) will not display properly in a web page unless it is encoded as “&”. KEYWORD DESCRIPTION No breaking space. Used to create a single character space. © Copyright symbol ® Registered trademark symbol. < Less than symbol (<). Nice to know. Often found in webmail. > Greater than symbol (>). Nice to know. Often found in webmail. & Ampersand " Double quote (this is required by scripts when formatting HTML code at runtime. Search Expression When investigating the use of web based e-mail (e.g., Hotmail, Yahoo Mail, Google) , a solid understanding of how e-mail addresses are formatted (e.g., Recipient, Sender, CC, BCC) can be very useful for defining custom queries. The following is a sample query statement that looks for all web based e-mail pages that contain an e-mail address of “[email protected]”. SELECT * FROM URLs WHERE HTMLBody LIKE ‘%<[email protected]>%’ ORDER BY ActionDateLocal ASC NOTE: The use of the “<” and “>” keywords are very common in web based e-mail. Copyright © 2004-2015, SiQuest Corporation. May not be reproduced without written permission of SiQuest Corporation. Internet Examiner Toolkit v5 User Manual Page 141 of 181 Editing Cascading Stylesheets The use of styles and attributes are the essential building blocks of cascading stylesheets. Now that we have a basic understanding of how attributes and styles are used to control web page content and presentation, we can now explore how stylesheets are used in rebuilding web pages. Let’s take a look again at the preceding sample stylesheet. It is displayed again below. IMAGE 13.5 - Sample stylesheet Whenever Internet Examiner rebuilds a web page that makes use of a cascading stylesheet, the web page will be copied to the examiner’s workstation. In addition, the cascading stylesheet will be copied out of the cache and the following changes will be made to the file. The background:url attribute listed on line #89 (from our example above) will appear modified by Internet Examiner as follows: background:url(0000001.gif) ..and the original file named: “content-bot-bg.gif” will be copied out of the cache and onto the examiner’s workstation, into the defined Temp folder. The file will also be renamed to “0000001.gif” as indicated above. Copyright © 2004-2015, SiQuest Corporation. May not be reproduced without written permission of SiQuest Corporation. Internet Examiner Toolkit v5 User Manual Page 142 of 181 Exploring Other Features The following topics are listed here for reference purposes, and the content or discussion for which are detailed inside the Internet Examiner User Manual: 1. Examining the Audit tab. 2. Create Graphical, Tabular and Timechart reports. 3. Publishing reports. 4. Using the [autofun.inf] option to manual configure an auto-startup page for published reports. The following is a very simple example of a web page that displays a single logo file in the middle of the page. It also incorporates a few common advanced HTML tags and attributes that examiners are likely to encounter during their investigations. While the Windows NotePad program is an adequate text editor that is well suited for editing web pages, it provides little visual feedback or editing tools to simplify HTML coding. To see how this might look in a rich HTML editor, copy the following code into a new document using HomeSite. Copyright © 2004-2015, SiQuest Corporation. May not be reproduced without written permission of SiQuest Corporation. Internet Examiner Toolkit v5 User Manual Page 143 of 181 IMAGE 13.6 - Web page source code NOTE: HTML encoded files will ignore “white space”. As shown above, there is plenty of white space which does not impact how the text or graphics are displayed. Try this on your own and experiment using the “ ” keyword. Copyright © 2004-2015, SiQuest Corporation. May not be reproduced without written permission of SiQuest Corporation. Internet Examiner Toolkit v5 User Manual Page 144 of 181 Module 10 Creating Custom Queries Tools To Use For the purpose of this module, we will be using Microsoft Access 2007 which should already be installed on your workstation. Overview So far, we’ve shown you how to create one or two simple queries using specific Structured Query Language (SQL) definitions. The following section will now show you how to take advantage of Internet Examiner’s built-in Query Builder located on the Query Manager Window. We will also take a behind-the-scenes look at queries found inside the Internet Examiner Project (.IEP) file, using Microsoft Access. Once we have become familiar with the nuts and bolts of how queries work in the background, we will shift to a more advanced use of Queries. Examiners will learn how to create compound queries (queries that call other queries), including Bookmark Queries which are new in Internet Examiner Version 2.8. Copyright © 2004-2015, SiQuest Corporation. May not be reproduced without written permission of SiQuest Corporation. Internet Examiner Toolkit v5 User Manual Page 145 of 181 USING THE QUERY BUILDER IMAGE 14.1 - Building a new query The Query Builder is actually comprised a series of dropdown lists to help build individual conditions. As you will soon see, SQL Query Language can sometimes get confused if there are many objects and many conditions working together. For this reason, square brackets are used to remove ambiguity in a query definition when referring to Tables and Views (queries). Copyright © 2004-2015, SiQuest Corporation. May not be reproduced without written permission of SiQuest Corporation. Internet Examiner Toolkit v5 User Manual Page 146 of 181 Column Name This column contains a list of all the columns (fields) that are available from the selected COLUMN Source. When we place our mouse cursor inside the cell, a dropdown list of choices appear as shown below. IMAGE 14.2 - Column Names Copyright © 2004-2015, SiQuest Corporation. May not be reproduced without written permission of SiQuest Corporation. Internet Examiner Toolkit v5 User Manual Page 147 147 of 181 Condition This column contains a list of the common logical operators that are used to evaluate a condition for the selected column. When we place our mouse cursor inside the cell, a dropdown list of choices appear as shown below. IMAGE 14.3 - Conditional Statements Internet Examiner has made it easier for examiners to build a logical expression by removing the complexity of having to use the actual operators (e.g., >, <, <>, =). Whenever a conditional statement is selected (from the list), Internet Examiner quietly substitutes the “friendly implementation” with the “syntactically correct SQL implementation”. Copyright © 2004-2015, SiQuest Corporation. May not be reproduced without written permission of SiQuest Corporation. Internet Examiner Toolkit v5 User Manual Page 148 of 181 Value(s) The Value(s) column is a free-form text box that requires the user to type in the specific value that completes the conditional statement. For example, the following image illustrates a first criteria that looks records that come after a certain date. IMAGE 14.4 - Sample criteria #1 IMAGE 14.5 - Condition that evaluates a date range Notice how our Values in 11.4 contain properly formatted dates enclosed in between the single quotes. This is because SQLite actually stores dates and times internally as TEXT. Also note the use of “AND” to separate the start and end dates. Other keywords used to define a query: Copyright © 2004-2015, SiQuest Corporation. May not be reproduced without written permission of SiQuest Corporation. Internet Examiner Toolkit v5 User Manual Page 149 of 181 AND or OR Indicates that the query continues. This will automatically append a new row to the query builder. ORDER BY Signifies the end of the query. This will allow only one more row to be added to the builder. From there, the user can only select a value from the Column Name column and the More column. ASC or DESC Signifies that the query can now only comprise of Column Names and optionally an ASC or DESC statement. Copyright © 2004-2015, SiQuest Corporation. May not be reproduced without written permission of SiQuest Corporation. Internet Examiner Toolkit v5 User Manual Page 150 of 181 Using Parentheses to Group Conditions While the query that we constructed in the earlier section seems syntactically correct and rather detailed, there is one glaring problem with the logic. Can you see it? If we translated the meaning of the query (from Image 11.5) into plain English, here’s how the query would sound: “Select (or return for me) all columns in the URLs table where the ActionDateLocal occurred between January 1st, 2009 and November 29, 2009 AND where the URL somewhere contains the keyword: ‘hotmail’ OR where the contents of the web page (HTMLBody) contains the keyword: ‘[email protected]’ AND THEN order the results in ASCending order based on the ActionDateLocal column” The problem with this query is that the user most likely intended for the query to sound more like this instead: “Select (or return for me) all columns in the URLs table where: 1. the ActionDateLocal occurred between January 1st, 2009 and November 29, 2009 AND 2. where the URL somewhere contains the keyword: ‘hotmail’ OR 3. where the contents of the web page (HTMLBody) contains the keyword: ‘[email protected]’ 4. AND THEN order the results in ASCending order based on the ActionDateLocal column” The area delimited by the dotted lines suggests that the user wanted to test for TWO arguments, not THREE! In order for item #1 to be treated as ONE argument, and items Copyright © 2004-2015, SiQuest Corporation. May not be reproduced without written permission of SiQuest Corporation. Internet Examiner Toolkit v5 User Manual Page 151 of 181 #2 and #3 to be treated collectively as one condition , we need to use parentheses to group our conditions together. The following demonstrates our revised query statement. SELECT * FROM [URLs] WHERE ([URLs].ActionDateLocal BETWEEN #1/1/2009# AND #11/29/2009#) AND ( ([URLs].URL LIKE ‘%hotmail%’) OR ([URLs].HTMLBody ) LIKE ‘%[email protected]%’) ORDER BY ([URLs].ActionDateLocal) ASC Copyright © 2004-2015, SiQuest Corporation. May not be reproduced without written permission of SiQuest Corporation. Internet Examiner Toolkit v5 User Manual Page 152 of 181 Using [Square] Brackets in a Query Definition Square brackets are used to enclose (and make implicit) the names of tables, queries and columns when such names may contain “spaces”. All query statements in Internet Examiner (that are not already encoded as a stored query) need to be translated into proper SQL at run time. Since spaces essential in a SQL Query Statement to separate reserved keywords and values, names with spaces can cause this translation to fail. In the past, it was customary for database developers to use names that comprised strictly of lowercase letters. Underscores were used to take the place of spaces (e.g., “first_name”, “last_name”). Some developers today will use Proper Case spelling for database objects and still include spaces (e.g., “First Name”, “Last Name”). In order to reference these table columns, any query statement would have to use the following syntax to prevent any translation errors: TableName.[First Name] Table names can also contain spaces and therefore it becomes necessary to reference columns in the Sales Contacts table like this: [Sales Contacts].[First Name] Internet Examiner eliminates any possibility of confusion by utilizing a strict Proper Case naming system for all tables, queries and columns. As such, the above noted example would be written (by Internet Examiner) as follows: [SalesContacts].[FirstName] However, since Internet Examiner already observes a strict naming convention for all database objects, the above could be legally re-written as: SalesContacts.FirstName Copyright © 2004-2015, SiQuest Corporation. May not be reproduced without written permission of SiQuest Corporation. Internet Examiner Toolkit v5 User Manual Page 153 of 181 NOTE: Whenever Internet Examiner’s Query Manager translates a Query Builder query into proper SQL definition, it will always ensure that the names of all tables, queries, and columns are enclosed within [square] brackets. This ensures that the definition is “correctly formatted”, thereby allowing it to be transferred into and/or used by other applications. Copyright © 2004-2015, SiQuest Corporation. May not be reproduced without written permission of SiQuest Corporation. Internet Examiner Toolkit v5 User Manual Page 154 of 181 Managing Stored Queries The following is a short list of things that can be done or not done with the queries that are listed on the Stored Queries tab of the Query Manager. TABLE 14.6 - Stored Queries options ACTION ALLOWED HOW Create new query Yes Click on the “Clear” button and then begin typing a valid query definition into the SQL Query Statement box Delete a custom query Yes Any query that is not reserved can be safely deleted. Edit a custom query Yes To update an existing query, users will have select the “Save Query” button and then type in the same query name when prompted to do so. Redefine a query’s “Group Name” Yes Only custom queries. Not allowed for reserved queries. Redefine a query’s “Return Column” Yes Only custom queries. Not allowed for reserved queries. NOTE: This feature is not yet implemented. Copyright © 2004-2015, SiQuest Corporation. May not be reproduced without written permission of SiQuest Corporation. Internet Examiner Toolkit v5 User Manual Page 155 of 181 Stored Query Types SELECT Queries SELECT queries are queries that ask for records to be returned (found) that meet the conditions defined by the SQL Query statement (or definition). All queries in Internet Examiner are technically SELECT queries. BOOKMARK Queries Bookmark queries are queries that (a) SELECT records, and (b) categorize or group the selected records (or hits) into a bookmark folder name, which is defined by the Group Name. Bookmark queries can be executed more than once (e.g., after new cache or history files are introduced into an existing project file). Whenever an individual URL record meets the criteria in a bookmark query, the URL record is flagged as being “bookmarked”, and the URL record ID (primary key value) is recorded in the Bookmarks Table. Each recorded bookmark contains a URL ID and a Bookmark Folder ID (Group Name). NOTE: Deleting a bookmark query has no effect on URLs that have already been bookmarked. KEYWORD LIST Queries This type of query is pending implementation for Version 2.8 or possibly a future dot release. A Keyword List query is intended to SELECT certain records that meet the criteria as defined by the SQL query statement (definition). However, unlike the Bookmark Query that places the results into a Bookmark Folder Name (Group Name), the Keyword List Query stores only the data from the URL column that is defined by the “Return Column” option. Copyright © 2004-2015, SiQuest Corporation. May not be reproduced without written permission of SiQuest Corporation. Internet Examiner Toolkit v5 User Manual Page 156 of 181 Why would there be a Keyword List Query? Good question. Some Internet Examiner users have expressed an interest in searching for records that meet a certain criteria. From the returned results, they then wanted to COPY the field value (from one specific URL column as defined by the Return Column option), into a special folder (or list) as defined by the Group Name column. Possible uses: Create a list of Host (domain) names Create a list of URLs Create a list of users Create a list of dates (times) Copyright © 2004-2015, SiQuest Corporation. May not be reproduced without written permission of SiQuest Corporation. Internet Examiner Toolkit v5 User Manual Page 157 of 181 VALIDATING QUERIES In each of the previous sections, we discuss various ways to build, view, edit and delete queries. However, what we have not really discussed is the validation process for new and modified queries. Validating with the Query Manager How the Validate Button Works The validation of a query is implemented in a very simple way. Whenever the validate button is selected, Internet Examiner takes the current value of the SQL Query Statement “as is” and attempts to do the following with it: 1. A temporary query (Command Object) is created in memory, within Internet Examiner. 2. The command object has a Command Text property that is reserved for the actual SQL definition. This is where the new query definition is copied “as is”. 3. Other properties for the command object are configured as well. 4. Internet Examiner then attempts to add the new command object to the project file. 5. If Steps 1 through 4 are completed without any errors, then the temporary command object is deleted from the project file. 6. A returning value of True will sent back to the Validate button. Copyright © 2004-2015, SiQuest Corporation. May not be reproduced without written permission of SiQuest Corporation. Internet Examiner Toolkit v5 User Manual Page 158 of 181 Validating Queries with SQLite Expert As an alternate method of validating a query, examiners can COPY their SQL Query Statement (definition) to the Windows Clipboard and then PASTE it into a new Query object within SQLite Expert. If the query is then able to be saved, then the query has been validated. If the query is not able to be saved, then an error message will appear within SQLite Expert with an explanation about where any problems lie. For the purpose of this demonstration, we have copied the Pictures (any source) query from within the Query Manager window. The following images illustrate this process step by step. IMAGE 14.7 - Open an existing Internet Examiner Project (.IEP) file within SQLite Expert. Notice how we have already associated .IEP files with SQLite Expert. Copyright © 2004-2015, SiQuest Corporation. May not be reproduced without written permission of SiQuest Corporation. Internet Examiner Toolkit v5 User Manual Page 159 of 181 The following image shows our .IEP file now opened in SQLite Maestro with the list of Table names appearing along the left hand side. IMAGE 14.8 - Internet Examiner Project (.IEP) file open in SQLite Maestro. Before we can add a query to our project file, we choose to Add a New View. NOTE: SQLite supports both Views (simple queries) and actual Queries. For our purposes, a View is all we need. Copyright © 2004-2015, SiQuest Corporation. May not be reproduced without written permission of SiQuest Corporation. Internet Examiner Toolkit v5 User Manual Page 160 of 181 IMAGE 14.9 - Create a new View. This will reveal a blank Create View Wizard window. Copyright © 2004-2015, SiQuest Corporation. May not be reproduced without written permission of SiQuest Corporation. Internet Examiner Toolkit v5 User Manual Page 161 of 181 IMAGE 14.10 - Create View Wizard - Step 1 Here, we define the name of the View. “View01” will appear by default. Copyright © 2004-2015, SiQuest Corporation. May not be reproduced without written permission of SiQuest Corporation. Internet Examiner Toolkit v5 User Manual Page 162 of 181 IMAGE 14.11 - Create View Wizard - Step 2 On Step 2, we need need to select the “source” of the records for our query. In most cases, you will want to select “Records” as this is the main table. Copyright © 2004-2015, SiQuest Corporation. May not be reproduced without written permission of SiQuest Corporation. Internet Examiner Toolkit v5 User Manual Page 163 of 181 IMAGE 14.12 - Create View Wizard - Step 3 This next step prompts you to select which database columns (aka: fields) that are to be included in (or returned by) the query (view). It is recommended that ALL VIEWS created with Internet Examiner include (a) records from the Records table, and (b) ALL columns from that table. Columns that are NOT in the View cannot be queried. Copyright © 2004-2015, SiQuest Corporation. May not be reproduced without written permission of SiQuest Corporation. Internet Examiner Toolkit v5 User Manual Page 164 of 181 IMAGE 14.13 - Create View Wizard - Step 4 Here we see all of the columns added to the View. At this point, we need to click on “Next” until the window closes. By doing this, we are skipping the remaining questions and moving directly onto using the Query Designer window. This will allow us to have more control over defining our conditions for the query. Copyright © 2004-2015, SiQuest Corporation. May not be reproduced without written permission of SiQuest Corporation. Internet Examiner Toolkit v5 User Manual IMAGE 14.14 - Page 165 of 181 This is how the new View will appear in the Query Designer window. Notice how the columns that were selected in the Wizard now appear in the BODY section of the builder window. Copyright © 2004-2015, SiQuest Corporation. May not be reproduced without written permission of SiQuest Corporation. Internet Examiner Toolkit v5 User Manual Page 166 of 181 IMAGE 14.15 - This is the bottom of the column list in the BODY section. IMAGE 14.16 - Now it’s time to define the CONDITION of the query. Let’s create a View (query) that searches for all pictures in our case. To do this, we can simply type directly into this section as follows. Copyright © 2004-2015, SiQuest Corporation. May not be reproduced without written permission of SiQuest Corporation. Internet Examiner Toolkit v5 User Manual Page 167 of 181 IMAGE 14.17 - Now it’s time to Compile the View before we can run it. Copyright © 2004-2015, SiQuest Corporation. May not be reproduced without written permission of SiQuest Corporation. Internet Examiner Toolkit v5 User Manual Page 168 of 181 IMAGE 14.18 - Tip when creating queries for ALL columns. NOTE: Here is abbreviated format of the same condition. The asterisk (*) is a wildcard for ALL COLUMNs and makes defining and editing the query much easier. Copyright © 2004-2015, SiQuest Corporation. May not be reproduced without written permission of SiQuest Corporation. Internet Examiner Toolkit v5 User Manual Page 169 of 181 IMAGE 14.19 - View results. When you are ready to run the query (view), simply double click on the View name in the database explorer tree and see the results. Copyright © 2004-2015, SiQuest Corporation. May not be reproduced without written permission of SiQuest Corporation. Internet Examiner Toolkit v5 User Manual Page 170 of 181 Module 11 Advanced Queries and Reporting Tools To Use For the purpose of this module, we will be using Microsoft Access 2007 and Microsoft Excel 2007 which should already be installed on your computer. Overview Over the last few modules, we had explored a number of different ways to query and filter data (e.g., cache and history URL records) using Internet Examiner. We have also recently seen how we can use Microsoft Access to validate our custom queries. In the following sections, we will introduce you to queries that call other queries and show you how powerful this approach can be when dealing with complex cases or huge amounts of data. We will also explore a unique way of reporting data using Microsoft Excel and introduce graphics or charts in our reports. Copyright © 2004-2015, SiQuest Corporation. May not be reproduced without written permission of SiQuest Corporation. Internet Examiner Toolkit v5 User Manual Page 171 of 181 USING WILDCARDS So far, we have defined queries using known or partial values in our criteria expressions. We have also introduced you to the asterisk (*) wildcard in many examples. However, for the purpose of this section of the course, we will expand our use of wildcards and explain the important differences of using them in different environments. For instance, Microsoft Access uses the Microsoft Jet (Joint Engine Technology) Database Engine which allows the manipulation of a relational database. Today, Microsoft’s SQL Server technology is the enterprise solution for relational database design. Both products allow for the creation and management of data in a database. However, similarly used wildcards are defined quite differently in both environments. Since Internet Examiner uses an SQL compatible bridging technology called Advanced Data Objects (ADO), wildcards within Internet Examiner are the same wildcards used by SQL Server. Therefore, as we move back and forth between Internet Examiner and Microsoft Access, examiners must be aware of the differences to ensure queries are validated. Copyright © 2004-2015, SiQuest Corporation. May not be reproduced without written permission of SiQuest Corporation. Internet Examiner Toolkit v5 User Manual Page 172 of 181 The following table lists the different wildcards permitted for use within Internet Examiner and Microsoft Access. TABLE 15.1 - Wildcards JET ENGINE (ACCESS) SQL SERVER (Internet Examiner) DESCRIPTION * % Matches any character or multiple characters in its position. ? _ Matches any single character in its position. Matches any character in list. Examples: [list] [list] [!list] [^list] Like Like Like Like "[a, z]*" "[a-e]*" "[a-e, k, p-s]*" "a[b, f]*" Excludes any character in list. Example: Like "[!a]*" # N/A Matches the numeric digits 0 through 9. Copyright © 2004-2015, SiQuest Corporation. May not be reproduced without written permission of SiQuest Corporation. Internet Examiner Toolkit v5 User Manual Page 173 of 181 Using the % wildcard The following is a sample query definition created using the Query Manager in Internet Examiner. It is a query that simply checks for any URL that contains the word google in the URL. SELECT * FROM URLs WHERE URL LIKE ‘%google%’ Notice that the “%” wildcard comes before and after the word google. This clearly tells us that we are looking for any URL that contains google anywhere in the URL. A stricter use of the % wildcard might have defined the query using: ‘http://www.google%’ URL LIKE which matches any characters after the google keyword. Copyright © 2004-2015, SiQuest Corporation. May not be reproduced without written permission of SiQuest Corporation. Internet Examiner Toolkit v5 User Manual Page 174 of 181 Module 12 Live Online Investigations DOMAIN RESEARCH USING DOMAINIQ API Introduction Investigations that require information about a website domain, it’s registrant, or Internet Services Provider (ISP) hosting the site can often be a frustrating endeavour. The reason is due to level of difficulty in searching for this information in a timely and accurate fashion. Sure, there are some websites out there that will give you a WhoIs lookup on a domain and its owner. But unfortunately, the degree of quality of information between services providers varies and it is problematic in recording this data in a meaninful and reportable manner. While one of the most commonly known domain research services provider offers a variety of search options, the pricing is available only for individuals and at a premium cost. Limited caps on types of searches also makes it an undesireable option and options to allow software vendors to integrate this technology through a sub-licensed API arrangement are typically cost prohibitive. However, a new player has arrived and their name is DomainIQ Corp (www.domainiq.com). Thanks to a special agreement negotiated between SiQuest and DomainIQ Corp., Internet Examiner Toolkit users now have an abundance of cost effective options at their disposal to conduct online investigations. This is an exclusive arrangement and one that SiQuest is proud to offer to its customers. With the annual purchase of an API Key subscription, Copyright © 2004-2015, SiQuest Corporation. May not be reproduced without written permission of SiQuest Corporation. Internet Examiner Toolkit v5 User Manual Page 175 of 181 individual investigators and/or their entire agency can sit back and conduct their investigations without worrying about their limits and overage costs. SiQuest has secured “high limits” for both a Standard and a Professional (or Advanced) subscription and at a mere fraction of the cost of “that other services provider”. Accessing the DomainIQ Features The online research features for DomainIQ services have been organized into a single toolbar that is displayed on the Browser tab within the Data Pane. This toolbar can be easily hidden or shown via the View Menu at the top of the main window. By default, the DomainIQ Toolbar is made visible. The following search features are availabe as of IXTK Version 5.5. Additional options may be added with future updates. WhoIs and Domain IP WhoIs The WhoIs report provides details about a “domain” (e.g., mywebsite.com) or an “IP” address (e.g., 101.202.303.404). Below is a sample of a WhoIs report for the domain “expedia.com”. The second search option is a “Domain IP WhoIs” which provides a shorter result but reveals the IP address assigned to the domain as well as the Domain Name Server (DNS) use to manage the addressing for the domain. Copyright © 2004-2015, SiQuest Corporation. May not be reproduced without written permission of SiQuest Corporation. Internet Examiner Toolkit v5 User Manual Page 176 of 181 IMAGE 1 – WhoIs results for “expedia.com” NOTE: The items in red are hyperlinks to new DomainIQ searches for information. Each new search will spawn a new tab within the Browser tab. Copyright © 2004-2015, SiQuest Corporation. May not be reproduced without written permission of SiQuest Corporation. Internet Examiner Toolkit v5 User Manual Page 177 of 181 IMAGE 2 – Domain IP WhoIs results for “expedia.com” Copyright © 2004-2015, SiQuest Corporation. May not be reproduced without written permission of SiQuest Corporation. Internet Examiner Toolkit v5 User Manual Page 178 of 181 Reverse IP The Reverse IP search provides a detailed list of all the domains hosted on the same server identified by the IP address being searched. From the previous Domain IP WhoIs search results for “expedia.com”, we ran a Reverse IP search for the ip address of 204.77.99.101. The following image illustrates those results. IMAGE 3 – Reverse IP search results Copyright © 2004-2015, SiQuest Corporation. May not be reproduced without written permission of SiQuest Corporation. Internet Examiner Toolkit v5 User Manual Page 179 of 181 Reverse DNS The Reverse DNS report provides a detailed list of all the domains managed by the same Domain Name Server (DNS). From there, it is possible to further investigate individual domains. IMAGE 4 – Reverse DNS report. Copyright © 2004-2015, SiQuest Corporation. May not be reproduced without written permission of SiQuest Corporation. Internet Examiner Toolkit v5 User Manual Page 180 of 181 Email Report This is one of the most valuable reports available with DomainIQ as it can quickly identify all domains where the email address is part of the registration details. This could be particularly useful in identifying phishing or blog sites, including sites related to the exploitation of children. IMAGE 5 – Email Report sample. Copyright © 2004-2015, SiQuest Corporation. May not be reproduced without written permission of SiQuest Corporation. Internet Examiner Toolkit v5 User Manual Page 181 of 181 Name Report A Name Report searches for all domain registrations associated to an individual person’s name or the name of a business. As shown below, the results report the domains which contain some reference to the name searched, often in the registration details. IMAGE 6 – Sample Name Report for the search term “Bill Gates”. Copyright © 2004-2015, SiQuest Corporation. May not be reproduced without written permission of SiQuest Corporation.