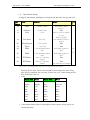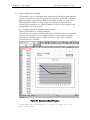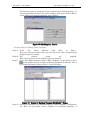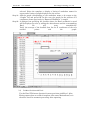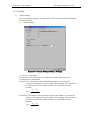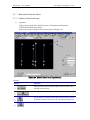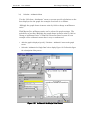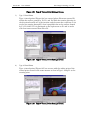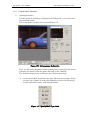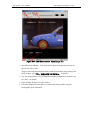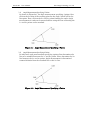
1
Movias Pro User’s Manual
NAC Image Technology Co., Ltd.
800132-0
March 2006
User’s Manual
nac
MOVIAS Pro
SP-613
(Ver.1.63)
NAC Image Technology Co., Ltd.
Movias Pro User’s Manual
NAC Image Technology Co., Ltd.
Trademarks
Microsoft Windows, Windows XP, Windows 2000, Windows NT and Excel are all registered trademarks of
Microsoft Corporation.
Adobe and Acrobat Reader registered trademarks of Adobe.
MOVIAS Pro User’s Manual
March 200
Reference Number 800132-0
(C) NAC Image Technology Co., Ltd., 2006
Movias Pro User’s Manual
NAC Image Technology Co., Ltd.
Warranty and Conditions of Use
This company warranties operation of the software within the range given
below for normal use as stipulated in the User’s Manual.
This company offers no warrany for this product other than that found in
these provisions.
1.Warranty
If this software does not function normally due to a defect in the
recording medium or some other reason, it will be replaced free of charge.
2.Customer Support
If necessary, we will provide information relating to this software, including serious
errors made by this company (bugs) and upgrades in the method of use. This service
shall be valid for one year from the date of delivery of this software.
3.Limits of Warranty
This company shall only be liable for this software as stiplated in 1. and 2. above.
This company shall not be liable for any damage that occurs for any reason arising from the use of this software.
While we attempted to create a flawless User’s Manual, this company shall not be liable for any damage arising
from anything written in this document.
4.Copyrights and Rights of Use
The copyright for this software is owned by NAC Image Technology. NAC Image Techology authorizes
customers use of this software under the following conditions.
5.Scope of Use
This software shall not be used simultaneously on multiple computers.
6.Limitations on Copying
Other than for the express purpose of backup for the customer, reproduction of all or part of this software is
prohibited.
7.Third Party Use
This software and any copies shall not be lent or transfered to a third party for use.
8.Warranty After Changes or Upgrade
This company shall not warranty normal operation if any alterations or upgrades unrelated to the administration
of this company are made to this software. This company shall not be liable for any damages arising for the use
of such modifications or upgrades to this software.
Movias Pro User’s Manual
NAC Image Technology Co., Ltd.
Movias Pro User’s Manual
NAC Image Technology Co., Ltd.
Movias Pro User’s Manual
NAC Image Technology Co., Ltd.
Movias Pro User’s Manual
NAC Image Technology Co., Ltd.
Table of Contents
1.
About Movias Pro .......................................................................................................... 13
1.1 Movias Pro.................................................................................................................. 13
1.2 Recommended Operating Environment ................................................................... 15
1.2.1 Movias Pro Installation....................................................................................... 16
1.2.2 Remove Movias Pro ............................................................................................. 19
1.3 HASP Security Key.................................................................................................... 20
1.4 Movias Pro Startup.................................................................................................... 21
1.4.1 Movias Pro Startup ............................................................................................. 21
1.4.2 Warning Messages when Starting Movias Pro .................................................. 21
1) If the HASP Security Key is Not Inserted ......................................................... 21
1.4.3 Other ....................................................................................................................22
1) Screen Savers ...................................................................................................... 22
2) Windows Design and Performance ..................................................................... 22
1.5 User’s Manual and Sample Marks in pdf Files........................................................ 23
2. Motion Analysis Tutorial............................................................................................... 25
1) Startup ................................................................................................................. 26
2) Creating a Project................................................................................................ 26
3) Designating Initial Project Storage Folder ........................................................ 27
4) Creating a Sequence and Opening an Image File ............................................. 29
5) Specifying Tracking Points and Adjusting Tracking Parameters ..................... 30
6) Start Tracking...................................................................................................... 31
7) Tracking of Point 2, Point 3 and Point 4 <Adjusting Tracking
Parameters>............................................................................................................... 31
8) Setting Standard Lengths................................................................................... 37
9) End Tracking ....................................................................................................... 40
3. Notes .............................................................................................................................. 42
3.1 Movias Pro Edition .................................................................................................... 42
3.2 Projects and Sequences ............................................................................................. 43
1) Project Folder Structure and Backup................................................................. 44
2) Data Tree ............................................................................................................. 45
3.3 Automatic Tracking ................................................................................................... 46
3.3.1 Types of Target Marks that are Automatic Tracking Targets, and the
Tracking Method ...........................................................................................................46
1) 4-quarter Marks .................................................................................................. 46
2) Solid Marks and Shaded Marks ......................................................................... 46
3) Correlation Marks ............................................................................................... 47
3.3.2 Tracking Parameters........................................................................................... 47
1) Correlation Parameters ...................................................................................... 47
1-1) Template Size................................................................................................ 47
1-2) Update Template .......................................................................................... 47
1-3) Search Range ................................................................................................ 47
1-4) Lower Limit for Coefficient of Correlation .................................................. 48
2) Parameters for 4-quarter marks......................................................................... 48
2-1) Diameter of Circle for Detection of Center Point........................................ 48
3) Parameters for Solid/Shaded Marks .................................................................. 48
3-1) Binary Threshold Value ............................................................................... 48
Movias Pro User’s Manual
NAC Image Technology Co., Ltd.
3-2) Update Each Frame (Relative to Max/Min Luminance) ............................ 48
3-3) Fix All Frames .............................................................................................. 48
3-4) Center of Gravity Calculation Method ........................................................ 48
3.3.3 Method of Setting Tracking Parameters ............................................................ 49
1) 4-quarter Marks .................................................................................................. 49
2) Solid/Shaded Marks ............................................................................................ 50
3) Correlation Target ............................................................................................... 50
3.4 Depth Correction........................................................................................................ 52
3.5 3-dimensional Analysis.............................................................................................. 54
3.5.1 Calibration Chart and Control Points................................................................ 54
3.5.2 Calibration Chart Photography and Data Input ............................................... 54
3.5.3 3-dimensional Data Structure ............................................................................ 54
3.6 Models ........................................................................................................................ 56
3.6.1 Description of the Matsui Model ........................................................................ 56
1) Input Points ......................................................................................................... 58
2) Virtual Points ...................................................................................................... 58
3) Essential Segments ............................................................................................. 58
4) Composite Segments ........................................................................................... 58
5) Sticks.................................................................................................................... 58
3.6.2 Model Defined ASCII File ................................................................................... 59
1) Model Defined ASCII File Structure .................................................................. 59
2) Model Defined ASCII File Format...................................................................... 59
2-1) Common Data for Each Item ....................................................................... 60
2-2) Input Point Records...................................................................................... 60
2-3) Virtual Point Records ................................................................................... 61
2-4) Essential Segment Records.......................................................................... 61
2-5) Composite Segment Records ........................................................................ 62
2-6) Stick Records ................................................................................................ 62
3) Example of File.................................................................................................... 62
3.7 3D ASCII File ............................................................................................................. 63
3.7.1 3D ASCII File Example....................................................................................... 63
3.7.2 File Format .......................................................................................................... 64
1) Structure .............................................................................................................. 64
2) Comments Column .............................................................................................. 64
3) Data Row.............................................................................................................. 64
3-1) Structure ....................................................................................................... 64
3-2) FSN ...............................................................................................................64
1-3) PN.................................................................................................................. 64
3-4) TIME ............................................................................................................. 64
3-5) DATA-X、-Y、-Z ............................................................................................. 64
3-6) , (comma)...................................................................................................... 64
3.8 2D ASCII FIles...........................................................................................................65
3.9 CSV Graph Data in Movias Format ......................................................................... 67
3.9.1 File Format .......................................................................................................... 67
1) Header.................................................................................................................. 67
1-1) File Identifiers .............................................................................................. 67
1-2) Graph Settings.............................................................................................. 68
1-3) Graph Data Information .............................................................................. 68
Movias Pro User’s Manual
NAC Image Technology Co., Ltd.
1-4) Horizontal Axis Settings .............................................................................. 68
1-5) Data Channel Settings ................................................................................. 69
1-6) Channel Data Information........................................................................... 71
2) Data Section......................................................................................................... 72
3) Comments Section ............................................................................................... 72
3.9.2 Graph Settings and Managing Graphs .............................................................. 73
3.9.3 File Examples ...................................................................................................... 74
1) Example of Time Graph (XT Graph) .................................................................. 74
2) Example of Correlation Figure (XY Graph) ....................................................... 75
4. Reference Menu ............................................................................................................. 76
4.1 Summary of Menu and Toolbar................................................................................. 76
1) Movias Pro Menu Tree ........................................................................................ 76
2) File Menu ............................................................................................................. 78
3) 3-dimensional Structure Menu........................................................................... 79
4) Display Results Menu ......................................................................................... 79
5) Specify Point Combinations Menu ..................................................................... 79
6) Menu for Changing Coordinates......................................................................... 80
7) Tool Menu.............................................................................................................80
8) Operating Screen................................................................................................. 82
4.2 File Menu ................................................................................................................... 83
4.2.1 New Project.......................................................................................................... 83
4.2.2 Open Projects....................................................................................................... 84
4.2.3 Close Project ........................................................................................................ 84
4.2.4 Save Project ......................................................................................................... 84
4.2.5 Save Project As .................................................................................................... 84
4.2.6 Save All Projects .................................................................................................. 85
4.2.7 Change Project Name.......................................................................................... 85
4.2.8 Sequences............................................................................................................. 85
1) New Sequence...................................................................................................... 85
2) Copy Sequences from Other Projects ................................................................. 87
4.2.9 Sessions................................................................................................................ 87
1) Open Session........................................................................................................ 87
2) Save Session ........................................................................................................ 88
4.2.10 Import ............................................................................................................... 89
1) CSV Graph Data.................................................................................................. 89
2) WaveIn Analog Waveform Data .......................................................................... 89
2-1) Import Data Range ....................................................................................... 89
2-2) Data Units..................................................................................................... 89
2-3) Method of Drawing Graphs.......................................................................... 90
2-4) Units Used in Graphs................................................................................... 90
2-5) Detailed Settings .......................................................................................... 90
4.2.11 Export ............................................................................................................... 93
1) Batch Output for Excel Graphs .......................................................................... 93
2) Output Graph to Excel Template........................................................................ 94
2-1) Example of the Excel Template Output Function....................................... 94
2-2) For More Precision with Excel................................................................... 100
3) Text Formatted Coordinate Data...................................................................... 101
4.2.12 Settings...........................................................................................................102
1) General Settings................................................................................................ 102
Movias Pro User’s Manual
NAC Image Technology Co., Ltd.
1-1) Default Settings.......................................................................................... 102
1-2) Default Graph Settings .............................................................................. 103
1-3) Detailed Settings ........................................................................................ 105
1-4) Save Settings .............................................................................................. 106
1-5) Export.......................................................................................................... 106
2) Default Folder Settings..................................................................................... 107
3) Default Settings to Display Results ................................................................. 108
3-1) Display Video .............................................................................................. 108
3-2) Graph .......................................................................................................... 108
4) User Settings for the Tracking・Editing Screen ............................................... 109
4-1) Overview of View Video .............................................................................. 109
4-2) Tracking Settings........................................................................................ 110
5) Reset All User Settings to the Initial Values ................................................... 110
4.3 3-dimensional Structure Menu ............................................................................... 111
4.3.1 Calibration Information Input.......................................................................... 111
1) Operation ........................................................................................................... 111
2) Specific Steps ..................................................................................................... 112
4.3.2 3-dimensional Data Structure .......................................................................... 113
4.4 Display Results Menu.............................................................................................. 114
4.4.1 Display Video ..................................................................................................... 114
4.4.2 Creating Graphs ................................................................................................ 116
1) Standard Operations ......................................................................................... 116
1-1) Section A: Specifying Data for the Vertical Axis...................................... 117
1-2) Section B: Specifying Data for the Horizontal Axis ................................. 117
1-3) Section C: Changing the Subject of the Graph ........................................ 117
1-4) Section D: Change the Color of the Data Lines ....................................... 118
1-5) Section E:Smoothing.................................................................................. 118
1-6) Section F: Calculating Velocity and Acceleration..................................... 118
1-7) Section G: Graph Preview ......................................................................... 118
1-8) Section H: Multiple Graphs ...................................................................... 119
1-9) Section K: Combined Entry....................................................................... 119
1-10) Section L: Changing the Scale of the Graph ............................................ 119
1-11) Section M: Summary of Data Combinations............................................ 120
1-12) Section N: Method of Displaying Multiple Graphs .................................. 120
1-13) Section P: Delete Combinations................................................................ 120
1-14) Section R: Save/Load Settings .................................................................. 120
1-15) Section S: Drawing Graphs....................................................................... 120
2) Examples of the Graph Creation Process......................................................... 121
2-1) Example of Graph (Single Data) Creation Process................................... 121
2-2) Example of Process to Create Multiple Graphs ........................................ 122
3) Graph Window ................................................................................................... 125
3-1) Graph Menu................................................................................................ 125
3-2) Display Menu.............................................................................................. 127
3-3) Settings Menu............................................................................................. 128
3-4) Select Channel ............................................................................................ 135
3-5) Calculate -Highlight Symbol menu ......................................................... 136
3-6) Calculate-Arithmetic Menu ..................................................................... 137
Movias Pro User’s Manual
NAC Image Technology Co., Ltd.
3-7) Channel Menu ............................................................................................138
3-8) Tools Menu .................................................................................................. 138
3-9) Graph Window Toolbar............................................................................... 140
3-10) Copy/Move Data Between Graph Windows Using Drag and Drop.......... 141
3-11) Change the Name of the Graph Channel .................................................. 143
3-12) Delete Graph Data...................................................................................... 143
3-13) Change the Colors of the Lines in the Graph ........................................... 143
3-14) Graph List Display ..................................................................................... 143
3-15) Add Comments to Graph............................................................................ 144
3-16) Right Click Menu and Double Clicking on the Graph Windows.............. 144
4.4.3 Trajectory Graphs.............................................................................................. 148
4.4.4 Graph Template................................................................................................. 149
4.4.5 Lists.................................................................................................................... 149
4.4.6 3D Stick Animation ........................................................................................... 150
4.5 Menu to Specify Point Combinations...................................................................... 151
4.5.1 Length ................................................................................................................151
4.5.2 Area .................................................................................................................... 152
4.5.3 Angle .................................................................................................................. 152
1) Basis for Angle Settings .................................................................................... 152
2) Type 1 Angles..................................................................................................... 154
3) Type 2 Angles..................................................................................................... 155
4) Type 3 Angles..................................................................................................... 156
5) Type 4 Angles..................................................................................................... 157
4.5.4 Virtual Points .................................................................................................... 158
1) Type 1 Virtual Points ........................................................................................ 158
2) Type 2 Virtual Points ........................................................................................ 158
3) Type 3 Virtual Points ........................................................................................ 159
4) Type 4 Virtual Points ........................................................................................ 159
5) Type 5 Virtual Points ........................................................................................ 160
6) Type 6 Virtual Points ........................................................................................ 160
7) Type 7 Virtual Points ........................................................................................ 161
8) Type 8 Virtual Points ........................................................................................ 161
9) Type 9 Virtual Points ........................................................................................ 162
4.5.5 Mass ................................................................................................................... 162
4.5.6 Area Center of Gravity...................................................................................... 163
4.5.7 Model Application.............................................................................................. 164
1) Reading Model Defined ASCII Files................................................................. 164
2) Applying Models to Sequences.......................................................................... 165
4.6 Menu to Convert Coordinates ................................................................................. 166
4.6.1 Specifying the Starting Point ........................................................................... 166
4.6.2 Specify the Coordinate Axis .............................................................................. 167
4.6.3 2-dimensional Calibration ................................................................................ 168
1) Operating Procedures........................................................................................ 168
1-1) Use the Specify Mark Type block in the upper right of the screen
(Figure 180)to select the type of mark to be used as the standard point.
Select “Do Not Specify” for those other than 4-quarter, solid and shaded
marks. ...................................................................................................................168
1-2) Click “Specify Standard Point”. ................................................................. 169
Movias Pro User’s Manual
NAC Image Technology Co., Ltd.
1-3) The cursor will be arrow shaped and the label Mark1 will be attached. 169
1-4) Next, click in the vicinity of the center of the 2nd point............................ 169
1-5) In the interval section, input the actual dimensions between the two
points in mm units. .............................................................................................. 169
1-6) If conducting depth correction In the standard point depth section,
input the distance (photographic distance) from these two points to the
camera in m units. If not conducting depth correction, leave as 1. .................. 169
1-7) Click “Calculate Coefficient”. ..................................................................... 170
1-8) Click “OK”. .................................................................................................. 170
2) Center Detection Parameters ........................................................................... 170
4.6.4 Mirror Image ..................................................................................................... 171
4.6.5 Specify Time Standards .................................................................................... 171
4.6.6 Specify Displacement Standards ...................................................................... 171
4.7 Tools Menu ...............................................................................................................172
4.7.1 Tracking・Editing ............................................................................................... 172
4.7.2 Stick Definitions ................................................................................................ 172
1) Stick Definitions and Entry .............................................................................. 172
2) Global Stick........................................................................................................ 173
3) 3D Sequence Sticks ........................................................................................... 173
4.7.3 Optical Distortion Correction/SAE Chart Measurement ................................ 174
1) Measuring Optical Distortion Correction Data ............................................... 175
2) Measurement of Distortion Index(SAE J211/2 standards REV.MAR95) ...... 178
4.8 Help Menu................................................................................................................ 181
4.8.1 Sample Mark for Printing................................................................................. 181
4.8.2 User’s Manual.................................................................................................... 181
4.8.3 Version ............................................................................................................... 181
4.9 Data Tree Right Click Menu ................................................................................... 182
4.9.1 Project Right Click Menu .................................................................................. 182
4.9.2 Sequence Right Click Menu .............................................................................. 185
4.9.3 Right Click Menu for Tracking Points.............................................................. 186
4.9.4 Right Click Menu for Individual Tracking Points ........................................... 188
4.9.5 Graphs................................................................................................................188
4.9.6 Optical Distortion Correction ........................................................................... 189
5. Tracking Window......................................................................................................... 191
5.1 Explanation of Tracking Window Buttons.............................................................. 191
1) Toolbar................................................................................................................ 192
2) Graph View ........................................................................................................ 192
3) Zoom View..........................................................................................................194
4) Tracking Point List............................................................................................ 195
5) Right Click Menus for Tracking Points on the Tracking Point List ............... 195
5-1) Stationary Points........................................................................................ 196
5-2) Delete Tracking Results in a Selected Range ........................................... 196
6) Tracking Controller ........................................................................................... 198
5.2 Other Operations ..................................................................................................... 199
5.2.1 Specify Range .................................................................................................... 199
5.2.2 Delete Range Specification ............................................................................... 199
5.2.3 Display Tracking Window ................................................................................. 200
5.2.4 Selecting Targets ............................................................................................... 200
Movias Pro User’s Manual
NAC Image Technology Co., Ltd.
5.2.5 Deleting Targets ................................................................................................ 200
5.2.6 Deleting Tracking Results by Specifying the Range ....................................... 201
1) Ranges that Can Be Specified........................................................................... 201
2) Deletion Method ................................................................................................ 201
5.2.7 Method to Track Again ...................................................................................... 203
5.2.8 Adding Targets .................................................................................................. 204
5.2.9 Changing Tracking Parameters........................................................................ 205
5.2.10 Correcting Tracking Results.......................................................................... 208
6. About Movias Pro Viewer............................................................................................ 210
7. About LAA Measurement............................................................................................ 212
7.1 Opening the Startup and Image Files .................................................................... 212
7.2 Measurement Section .............................................................................................. 214
7.2.1 Measurement Tabs ............................................................................................ 214
1) Size Conversion Settings................................................................................... 215
2) Measurement of Length and Area .................................................................... 216
3) Angle Measurement .......................................................................................... 216
3-1) Angle Measurement Specifying 3 Points................................................... 217
3-2) Angle Measurement Specifying 4 Points................................................... 217
4) Specifying Location with an Enlarged Image .................................................. 218
7.2.2 Image Settings Tab............................................................................................ 218
7.2.3 MCFF Settings Tab ........................................................................................... 218
7.3 Text File Output....................................................................................................... 219
7.4 Practical Examples .................................................................................................. 220
7.4.1 Amount of Motion and Velocity......................................................................... 220
7.4.2 Rotation Angle and Angle Speed ...................................................................... 221
7.5 Note .......................................................................................................................... 222
8. About Image Converter............................................................................................... 224
8.1 Startup ..................................................................................................................... 224
8.2 Specifying File to be Converted .............................................................................. 224
8.3 Verify Image ............................................................................................................. 225
8.4 Conversion Settings................................................................................................. 226
1) Format Section Specify Conversion File Format ........................................... 227
1-1) BMP Files.................................................................................................... 227
1-2) TIFF Files ................................................................................................... 227
1-3) AVI Files......................................................................................................227
2) File Options Section Specify Conversion File Name...................................... 227
2-1) Save frames Section ................................................................................... 227
2-2) Automatic Section....................................................................................... 228
2-3) Number from Section ................................................................................. 228
8.5 Conversion................................................................................................................ 228
8.6 Specifying the Compression Method....................................................................... 228
1-1) Compression Program Section ................................................................... 229
1-2) Compression Quality Section..................................................................... 229
1-3) Key Frame Section ..................................................................................... 229
8.7 About Consecutive File Names ............................................................................... 229
Movias Pro User’s Manual
NAC Image Technology Co., Ltd.
1. About Movias Pro
1.1 Movias Pro
MOVIAS Pro is software designed for motion analysis.
It uses a high speed camera to photograph automobile crash safety tests,
cell phone drop tests and the physical movements of athletes. The
movement of the target marks from the photographed graphic image file
affixed to each part of the subject are automatically tracked. The tracked
movement can be displayed as line drawings, graphs or numerals of the
analytical results. An example of the analytical results is shown in Figure 1.
Figure 1 Example of Analytical Results
This shows an analysis example of the status with cell phone drop tests,
with the following details.
1
•
Top left screen : Image with tracked results labeled
•
Top right screen: Graph of the Y direction velocity for each tracked point
•
Bottom left screen: Graph of the trajectory for each tracked point
•
Bottom right screen: Graph of the imported acceleration sensor signals 1
This function to import electrical signals such as acceleration sensors is an option.
Movias Pro User’s Manual
NAC Image Technology Co., Ltd.
There is a two-dimensional version and a three-dimensional version of
Movias Pro. The three-dimensional version includes all of the functions
included in the two-dimensional version.
With the three-dimensional version, objects for analysis are photographed
from a multitude of differing directions and two-dimensional data is
extracted from each image. Three-dimensional data is created by combining
this data with calibration chart information in order to perform an analysis.
With the two-dimensional version, analysis is conducted only using images
from one direction.
In general, tracking of target marks in the images that become the base for
analysis is automatically conducted but even if performed manually, it is
possible to manually correct the results of automatic tracking. The images
in the video file (AVI file) displayed on the PC screen are automatically
tracked.
The results are displayed as a numerical list, graph or line drawing. Some of
the results (such as trajectories or stick figures) can be displayed
superimposed on the images.
Wave data 2 such as acceleration sensor signals and electromyograph signals
are imported and these can be simultaneously played back with the image
or graph. Data can be directly exported to Excel and data can be exported to
other software programs via a text file such as ASCII.
2 Binary .WVB files created with the image・wave synchronous display software Wave-in
produced by Library Corporation and text files with a CSV format for Movias Pro can be
imported.
Movias Pro User’s Manual
NAC Image Technology Co., Ltd.
1.2 Recommended Operating Environment
Movias Pro can be operated on PCs with the following specifications.
CPU:
Intel Pentium3, 500MHz or equivalent
(Pentium 4 2GHz or higher recommended)
Memory:
256MB or greater (512MB or greater recommended)
Hard Drive: at least 500MB of free space (2GB or greater recommended)
Display:
Resolution 1024x768 or greater (1280x1024 or greater
recommended)
24 bit color display (required)
OS:
Windows XP(SP1 or later recommended), Windows 2000 (SP4
or later recommended)
Other:
CD-ROM drive for software installation required.
1 USB port or 1 parallel port required for security key.
Software: Microsoft Excel 3 required for use of the Excel output function.
Adobe® Reader® (http://www.adobe.co.jp/) installation necessary for
viewing supplemental manual and sample files.
3
Our version is for Excel 2003 (Windows XP SP2) and Excel 2000 (Windows 2000 SP4) and is
not guaranteed to function with all environments.
Movias Pro User’s Manual
NAC Image Technology Co., Ltd.
Installation
1.2.1 Movias Pro Installation
Start “SetUp.exe” on the CD from Explorer to install Movias Pro.
(Administrative rights are required for installation so have the user with
such rights log on before starting)
Once SetUp.exe is started, the “Welcome” dialogue box from Figure 2 will be
displayed.
Figure 2 Welcome dialogue box
Click “Next” to proceed to the “Authorized Use” dialogue box in Figure 3.
Figure 3 Authorized Use dialogue box
Carefully read the “Warranty and Conditions for Use” displayed and click
“Yes” to agree and proceed to the “User Information” dialogue box in Figure
4. Click “No” if not in agreement to interrupt the installation process.
Movias Pro User’s Manual
NAC Image Technology Co., Ltd.
Figure 4 User Information dialogue box
Input the user name and company name in the “User Information” dialogue
box. Both items are required. Once input is complete, click “Next” to proceed
to the “Select Before Installing” dialogue box in Figure 5.
Figure 5 Select Before Installing dialogue box
Designate the folder for installing Movias Pro in the “Select Before
Installing” dialogue box and then click “Next”. The “Start Copying Files”
dialogue box in Figure 6 will appear.
Figure 6 Start Copying Files dialogue box
Details of current settings will be displayed in this “Start Copying Files”
dialogue box. Verify details and if there are no problems, click “Next” to
start copying the files. If errors are found in the settings, click “Back” to
correct the settings.
Movias Pro User’s Manual
NAC Image Technology Co., Ltd.
After copying the files, the “Installing Security Key Driver” dialogue box in
Figure 7 will appear.
Figure 7 Installing Security Key Driver
Once installation is complete, the “Movias Pro Installation Completed”
dialogue box in Figure 8 will appear. Click “Finish” to end the operation.
Figure 8 Movias Pro Installation Completed dialogue box
Movias Pro User’s Manual
1.2.2
NAC Image Technology Co., Ltd.
Remove Movias Pro
Use “Add or Remove Applications” on the control panel to remove Movias
Pro from the system. Click on “Movias Pro” to select and remove. The
“Confirm File Removal” dialogue box in Figure 9 will appear.
Figure 9 Confirm File Removal dialogue box
Click “OK” to completely remove Movias Pro. Click “Cancel” to cancel
removal.
Movias Pro User’s Manual
NAC Image Technology Co., Ltd.
1.3 HASP Security Key
A HASP security key is used to protect programs in Movias Pro. If the HASP
security key is not properly inserted into the PC, Movias Pro will not
function. 4
There are two types of HASP security keys. The functions for the parallel
port model (Figure 10) and the USB port model (Figure 11) are identical.
Figure 10 Parallel Port Model
Figure 11 USB Port Model
4 The HASP security key is not required for installation of Movias Pro. The HASP security
key is required for operation.
Movias Pro User’s Manual
NAC Image Technology Co., Ltd.
1.4 Movias Pro Startup
1.4.1 Movias Pro Startup
Start Movias Pro by clicking the icon on the desktop. Or start by clicking on
“Movias Pro ***” on the “Movias Pro ***” menu (*** is the version) in Start
Programs of Windows.
1.4.2 Warning Messages when Starting Movias Pro
1)
If the HASP Security Key is Not Inserted
If the HASP security key is not inserted or has loosened, it will await
insertion of the HASP security key and then will display the “HASP Error”
screen shown in Figure 12. In this case, after verifying insertion of the
HASP security key, restart Movias Pro.
Figure 12 HASP Error
If this error is displayed even when the HASP security key is properly
inserted, either the driver is not installed correctly or the key itself may be
defective. Please contact us.
Movias Pro User’s Manual
NAC Image Technology Co., Ltd.
1.4.3 Other
1)
Screen Savers
Turn OFF the Windows screen savers. In particular, if a screen saver starts
when processing automatic tracking, the speed of the operation will decline
and problems caused by the screen saver may occur.
2)
Windows Design and Performance
If using Movias Pro on WindowsXP ServicePack2, either set the WindowsXP
visual effects to “Prioritize Performance” or uncheck “Use Visual Style for
Windows and Buttons”. (Refer to Figure 13)
Otherwise, the Movias Pro tracking speed will decline. This can be set with
Control Panel→System→Setting Details→Performance.
Figure 13 WindowsXP Visual Effects
Movias Pro User’s Manual
NAC Image Technology Co., Ltd.
1.5 User’s Manual and Sample Marks in pdf Files
There is an item called “User’s Manual” in the “Movias Pro ***” (*** denotes
the version) menu in Windows Start Programs. Click on this item to open
the User’s Manual (this document) converted to a pdf file 5.
pdf files are copied into \doc folders of folders where Movias Pro has been
installed. Distribute to those who use Movias Pro.
Additionally, there is an item called “Sample Marks” in the “Movias Pro ***”
(*** is the version) menu in Windows Start Programs. Click on this item to
open the pdf file containing the target mark samples. Print this and use by
affixing the mark of the appropriate size to the target for analysis (subject)
with two-sided tape. pdf files are copied into \doc folders of folders where
Movias Pro has been installed.
5 Adobe’s Adobe® Reader® is needed to open pdf files.
Movias Pro User’s Manual
NAC Image Technology Co., Ltd.
Movias Pro User’s Manual
NAC Image Technology Co., Ltd.
2. Motion Analysis Tutorial
Try motion analysis using a sample video before starting the detailed
description of Movias Pro.
There is a folder named “Sample” in the folder where Movias Pro is
installed, containing sample AVI files of cell phone drop tests. In this
tutorial, use the sample AVI file for a description of the series of steps
for automatic tracking of target marks. 6
The target marks used for tracking are shown as the 5 points in Figure 14 7 from Point 0 to Point 4.
Three points are 4-quarter marks and two points are solid marks. CAL 1 and CAL 2
(jointly used with Point 4 and Point 1) are used for calibration (standard length) where
the space between these two points is 72mm.
6 This tutorial describes the process for secondary analysis. The process for automatic
tracking target marks for tertiary analysis is identical.
7 Calibration described in this tutorial is for secondary analysis. Calibration for tertiary
analysis is completely different.
Movias Pro User’s Manual
NAC Image Technology Co., Ltd.
Figure 14 Diagram of Target Marks and Calibration
1)
Startup
Double click on the desktop icon
2)
to start Movias Pro.
Creating Projects
First, click on new project in the file menu to create a project. 8(Figure
15)Designate a project name. The project name for this tutorial is
KEITAI since it analyzes the results of cell phone drop tests.
(Before conducting this the first time, it is necessary to conduct the
following エラー! 参照元が見つかりません。 エラー! 参照元が見つかりませ
ん。)
8 Creating a new project is conducted first in Movias Pro. Analysis of multiple AVI
files can be performed in one project.
Movias Pro User’s Manual
NAC Image Technology Co., Ltd.
Figure 15 New Project
Image data for analysis and analysis results are saved in projects.
For details, refer to “3.2 Projects and Sequences (→page 43).
3)
Designating Initial Project Storage Folder
Initially, the confirmation message in(Figure 16) is displayed so click “Yes”
to set. 9
Figure 16 Verifying Project Folder
Next, the following Figure 17 is displayed so the new project settings are
saved in the “Project Folder”. (The default is in the “Movias Projects” folder
under “My Documents”. )
9
If there are settings that were previously used, such as with an upgrade, the default
settings are carried over and this screen is not displayed.
Movias Pro User’s Manual
NAC Image Technology Co., Ltd.
Figure 17 Project Folder Settings
These settings can be reset from “エラー! 参照元が見つかりません。 エラー!
参照元が見つかりません。(→page エラー! ブックマークが定義されていませ
ん。)”.
Movias Pro User’s Manual
4)
NAC Image Technology Co., Ltd.
Creating a Sequence and Opening an Image File
Once a project is created, the Create New Sequence screen in Figure
18. 10 Here, an AVI file is designated to name the sequence and
perform analysis. The AVI file used in this tutorial is Cellular.avi in
the sample folder. (if installed with the standard settings, it is
C:\Program Files\nac\Movias\Samples\Cellular.avi. 11 )
Figure 18 Create New Sequence
Since “Automatically Create from Image File Name” is checked, it is ON so
when specifying an image file, the sequence name “Cellular” is identical to
the image file name. Create a sequence name if necessary.
After specifying the image file and inputting the sequence name, click “OK”.
10 In Movias Pro, sequences are created in projects where analysis such as graph creation can be performed
by tracking target marks in an AVI file. Multiple sequences can be created in a single project.
Subsequently, new sequences can be created in the File-New-Sequence menu. The new sequence screen
(Figure 18) is automatically displayed immediately after new project creation.
11 At this point, the photographic speed cannot be set. The photographic speed is
automatically set to analyze AVI files created by our high-speed video cameras and
camera software. In this example, there is a text file Cellular_avi.txt that stores
information such as photographic speed, along with the AVI file Cellular.avi.
Movias Pro automatically sets the photographic speed with the information in this
text file. In this example, this function properly sets the photographic speed at
5000fps.
Movias Pro User’s Manual
NAC Image Technology Co., Ltd.
When a new sequence is created, the tracking window (Figure 19) that performs automatic
tracking is displayed.
Figure 19 Tracking Window
5)
Specifying Tracking Points and Adjusting Tracking Parameters
First, specify the tracking points. In this example, the five targets ultimately shown in
Figure 14 are tracked. To simplify this explanation, Point 0 and Point 1 are tracked. These
two targets are 4-quarter targets so first click the 4-quarter Add Target button (Figure 20)
for the 4-quarter Add Target mode.
Figure 20 Add 4-quarter Target Button
Next, click in the vicinity of the center of the first point in Video View.
(Figure 21) 12
Figure 21 Click on the Center of Point 0
12 Zoom View shows a magnified display of the area clicked.
Movias Pro User’s Manual
NAC Image Technology Co., Ltd.
Zoom View shows a magnified display of the area clicked. (Figure 22)
Figure 22 Point 0 Search Results
If the X symbol shown in the search results for the center position of
the target is not centered with the target, click on target center in
Zoom View, or correct by dragging the X symbol to the target center in
Video View and clicking on the Confirm button.
For Point 1, click on the center (refer to Figure 21) and adjust the
search results for the center as necessary (refer to Figure 22).
6)
Start Tracking
Click the “Start Tracking” button to start tracking. Figure 23 shows screens during tracking
and immediately after tracking is complete. In Graph View, a graph shows the tracking
results.
Figure 23 Screens During Tracking and Immediately After Tracking is
Complete
7)
Tracking of Point 2, Point 3 and Point 4
“Adjusting Tracking Parameters”
Next, continue by tracking Point 2, Point 3 and Point 4.
First, since Point 2 is a solid symbol, click on the Add Solid Symbol
button before clicking on the center of the target (Figure 24) for the
Add Solid Symbol mode.
Figure 24 Add Solid Target Button
Movias Pro User’s Manual
NAC Image Technology Co., Ltd.
Next, click in the vicinity of the center of Point 2 in Video View.(Figure
25)
Figure 25 Click on the Center of Point 2
Zoom View shows a magnified display of the area clicked.(Figure 26)
Figure 26 Point 2 Search Results
If the X symbol shown in the search results for the center position of the target is not
centered with the target, click on target center in Zoom View, or adjust by dragging the X
symbol to the target center and clicking on the Confirm button.
.
Click on the Point Properties button (Figure 27).
Figure 27 Point Properties button
Click on the “Detailed Settings for Tracking Parameters” button on
the Point Properties screen (Figure 28) 13.
13
Movias Pro automatically identifies the target marks and uses several tracking
parameters during tracking. If these tracking parameters are not set for the size or
photographic style of the target marks, it will be a factor in the failure of automatic
tracking.
Movias Pro User’s Manual
NAC Image Technology Co., Ltd.
Figure 28 Point Properties Screen
The parameters are modified by accessing the Detailed Settings for
Tracking Parameters screen (Figure 29).
•
Make the template size 10x10. (formerly 18x18)
(cannot be modified any other way)
Figure 29 Screen before Tracking Parameters Details are Set for Point 2
Figure 30 shows the screen after parameter modification.
Movias Pro User’s Manual
NAC Image Technology Co., Ltd.
Figure 30 Screen after Tracking Parameter Details are Set for Point 2
Click “OK” after modifying.
The screen in Figure 31 will appear next. After clicking on “Save as
Default after Applying” 14, click “Apply”.
14
When clicking on “Save as Default after Applying” and then clicking on “Apply”,
the tracking parameters after modifications are applied to the current tracking
point for Point 2, and the solid targets in the future are applied as defaults.
However, with multiple targets that are the same type, size and photographic style,
if the point of the first tracked parameter is adjusted to be the default, there is no
need to change subsequent points. If “Save as Default after Applying” is clicked,
only one target mark can be adjusted for tracking parameters.
Movias Pro User’s Manual
NAC Image Technology Co., Ltd.
Figure 31 Point Properties Screen
Next, click in the vicinity of Point 3 in Video View.(Figure 32)
Figure 32 Click on the Center of Point 3
Zoom View shows a magnified display of the area clicked.
If the X symbol shown in the search results for the center position of
the target is not centered with the target, click on target center in
Zoom View, or adjust by dragging the X symbol to the target center
and clicking on Confirm .
Next, proceed to Point 4. Point 4 is a 4-quarter target so clicking on the 4-quarter target
tracking button switches to the 4-quarter target addition mode.
Click in the vicinity of Point 4 in Video View. Adjust the search results of the center as
necessary.
Then click on the Point Property button to modify the tracking parameters for Point 4 and
click on the “ Detailed Settings for Tracking Parameters” button on the Point Property
screen.
The parameters are modified on the Detailed Settings for Tracking
Parameters screen (Figure 33).
•
Make the template size of the search area 300%x (no other changes can be made).
Movias Pro User’s Manual
NAC Image Technology Co., Ltd.
Figure 33 Screen before Tracking Parameters Details are Set for Point 4
Figure 34 is the screen after the parameters are modified.
Figure 34 Screen after Tracking Parameter Details are Set for Point 4
Click “OK” after modifying the tracking parameters and then click on
Movias Pro User’s Manual
NAC Image Technology Co., Ltd.
“Apply” on the next screen.
Click “Start Tracking”. Tracking of Point 2, Point 3 and Point 4 will begin. (Since
tracking of Point 0 and Point 1 has already been completed, they are not tracked.) Figure
35 shows the screens during tracking and immediately after tracking is complete.
Figure 35 Screens During Tracking and Immediately After Tracking is
Complete
8)
Setting Standard Lengths
Next, set the standard lengths. 15
Next, set the standard lengths. 1
Select the “Secondary Calibration Sequence” menu on the tracking screen.
The screen in Figure 36 will appear.
Figure 36 Two-dimensional Calibration
15 Standard lengths are set by inputting the gap between two points of an image. This enables a
“coefficient for conversion to actual dimensions” to be determined for how many mm per pixel. Standard
lengths can be set prior to tracking target marks.
Movias Pro User’s Manual
NAC Image Technology Co., Ltd.
Two-dimensional calibration is conducted on this screen, which also
displays the labels such as “X Point 0” on the target tracked. In this
tutorial, targets used for calibration are identical to the tracked
targets so the labels interfere with the operations. Simply click on
Display Tracking Point Label (Figure 37) at the bottom of the screen to
hide this display.
Figure 37 Display Tracking Point Label button
Standard lengths are set according to the following procedure.
•
Click on “Designate Standard Points” (Figure 38).
Figure 38 Specify Standard Points button
•
The cursor will show a label called Mark1. Click on the center of the mark on
the left side (refer to Figure 14).(Figure 39)
Figure 39 Calibration of First Point
•
The area clicked will be displayed in the zoom window. (Figure 40) 16 If the center of the target
searched has shifted, drag the center of the x mark to the center of the target and click the confirm
button
to confirm the position of the target.
16 Clicking on Figure 39 automatically searches for the center of the mark and
the results are shown in Figure 40.
Movias Pro User’s Manual
NAC Image Technology Co., Ltd.
Figure 40 Adjusting Center Position
The coordinates of the first mark are displayed as Mark1, as shown in
Figure 41.
Figure 41 Screen after Confirmation of Calibration of First Point
•
The cursor label will be Mark2 so click on the center of the mark on the right
side in the same manner as for the first point. If necessary, adjust the center
position with the zoom window.
•
Input the actual dimensions between the two points in the appropriate column
in mm units.
•
Click “Calculate Coefficient” to calculate the conversion coefficient for the
actual dimensions. In this example, the conversion coefficient for the actual
dimensions is approximately 0.275. (Figure 42)
Figure 42 Screen upon Completion of Calibration
•
Click “OK”. The calibration screen will close and return to the tracking
window from Figure 19.
Movias Pro User’s Manual
9)
NAC Image Technology Co., Ltd.
End Tracking
Once tracking is complete, click “OK” at the bottom of the tracking
window screen to close. The 5 points tracked are entered on the left
side of the main screen. (Figure 43)
Figure 43 Enter Tracking Results
Movias Pro User’s Manual
NAC Image Technology Co., Ltd.
Movias Pro User’s Manual
NAC Image Technology Co., Ltd.
3. Notes
3.1 Movias Pro Edition
The three types of Movias Pro include Movias Pro 3D (3-dimensional
analysis version), Movias Pro 2D (2-dimensional analysis version) and
Movias Pro Basic (Low cost basic function version). The differences in these
editions are shown in Table 1 below. (representative items only)
Function
Number of tracking target
points (max)
Number of tracking frames
(max)
Axis rotation
Moving origin
Virtual points
Length, area, angle
Time, displacement
standard
Position, displacement,
velocity, acceleration
Motion, force, energy,
momentum
Stick
3D analysis
Tracking result correction
Excel batch output function
Excel template function
Analog waveform inport
function
Number of projects (max)
Number of sequences (max)
3dimensional
analysis
version
2dimensional
analysis
version
Basic
version
Unlimited
(*1)
Unlimited
(*1)
○
○
○
○
○
○
○
○
○
○
○
○
○
Unlimited
(*2)
Unlimited
(*2)
Unlimited
(*1)
Unlimited
(*1)
○
○
○
○
○
○
○
○
×
○
○
○
○
Unlimited
(*2)
Unlimited
(*2)
8
150
×
×
×
○
×
○
×
○
×
○
×
×
×
1
2
Table 1 Differences in Program Functions
*1: Depends on PC main memory.
*2: Depends on PC disk memory.
Movias Pro User’s Manual
NAC Image Technology Co., Ltd.
3.2 Projects and Sequences
Movias Pro uses “Sequences” to save the coordinate values and analytical
results from the target mark tracking results. These correspond to Windows
files. Normally, only one type of data is stored in a file but sequences are
different in that they store multiple types of data, including tracking results
and analytical results.
In Windows, folders are used to collect multiple files but in Movias Pro,
projects are used to collect multiple sequences.
An example is when photography is conducted using two cameras for a
single test. In this case, the tracking results and analytical results for each
camera image are saved in two sequences and these are stored together in a
single project.
Since any name can be assigned to the projects and sequences, if the project
is named with the same name as the test number and the same name is
given to various sequences as the camera number and the photograph
location, it is easy to understand in the future.
In Movias Pro, a project is created first and then, only the required
sequences are sequentially created.
Movias Pro User’s Manual
1)
NAC Image Technology Co., Ltd.
Project Folder Structure and Backup
Movias Pro creates sub-folders with the same name as the projects in the
folder specified as “Project Folder” and projects are saved here.
For example, there is a project named “Test” in the project folder set in
Movias Projects in My Documents. At this point, a project folder Test is
created in the same manner as that in Figure 44 that follows.
Several folders used for project files Test.map and data are created.
Figure 44 Project Folder Structure
If creating a backup of a project, backup the entire contents and structure of
the project folder Test without making any changes.
Note:
If saving to a CD-R as backup and then the backup data is written to the
hard drive from the CD-R, there will be specialized attributes when read.
Therefore, backup after compressing the individual project folders using the
ZIP format.
Movias Pro User’s Manual
2)
NAC Image Technology Co., Ltd.
Data Tree
Data trees are used in Movias Pro to graphically express data. Creating a
project or sequence displays these affiliations at the left side of the Movias
Pro screen, as shown in the example in Figure 45.
Figure 45 Example of a Data Tree
Project1 is the project in the figure while seq01 is the sequence contained in
Project1.
Movias Pro User’s Manual
NAC Image Technology Co., Ltd.
3.3 Automatic Tracking
In Movias Pro, the movement of target marks is tracked automatically using
an AVI file. This describes automatic tracking of target marks.
3.3.1 Types of Target Marks that are Automatic Tracking Targets, and the Tracking
Method
In Movias Pro, there are four types of target marks that are automatic
tracking targets, including 4-quarter marks, solid marks, shaded marks and
image correlation marks.
1)
4-quarter Marks
4-quarter marks are round or square target marks divided into four sections,
as shown by the example in Figure 46.
Figure 46 Examples of 4-quarter Marks
In Movias Pro, first the image correlation is determined and the mark and
its position are found. Next, the position of the center of gravity for the
mark is used to divide the mark into 4 regions that detect sub-pixels.
2)
Solid Marks and Shaded Marks
As shown by the example in Figure 47, solid marks are formed of a light
spot (white spot) on a dark background and shaded marks are formed of a
dark spot on a shaded background.
Figure 47 Examples of Solid Marks and Shaded Marks
In Movias Pro, first the image correlation is determined and the mark and
its position are found. Next, the position of the center of gravity for the
object where the correlation contains the maximum amount of points is
detected by sub-pixels. Either the center of gravity area method or the
center of gravity area of luminance method can be used for detecting the
position of the center of gravity.
Movias Pro User’s Manual
3)
NAC Image Technology Co., Ltd.
Correlation Marks
A correlation mark is a tracking mark based only on image correlation. In
this case, the image correlation is determined and tracking performed on
the section with the highest correlation (the section that most resembles the
image).
3.3.2 Tracking Parameters
In Movias Pro, appropriately determining several parameters is essential
when target marks are automatically tracked. These parameters are called
“Tracking Parameters”. A description of these tracking parameters is given
next.
1)
Correlation Parameters
First is a description of the correlation parameters of 4-quarter marks, solid
marks, shaded marks and image correlation marks
The four parameters for correlation parameters include template size,
update template, search range and lower limit for the coefficient of
correlation.
1-1)
Template Size
A template is an original image that is made the standard for correlation.
The size of the template is set in pixels.
Movias Pro detects the image with the greatest correlation with this
template. The size of the template affects the tracking velocity.
1-2)
Update Template
This determines whether or not the template is updated with each frame.
With 4-quarter marks, solid marks and shaded marks, it is not necessary to
update from the default setting (updates with each frame).
Correlation marks are not generally updated since the accuracy detecting
the center of gravity point decreases as the template is updated. However, if
the target is rotating or changing form, since updating the template is
necessary, update at the lowest possible level.
1-3)
Search Range
The search range searches the area with the highest correlation. In other
words, it searches for the area with the highest correlation while slowly
moving the template image within the search range.
The size of the search range is set as a percentage (%), based on the
template size. If the target has a high motion velocity, make the search
range larger.
If there are other targets in the same area, make the search range smaller
to avoid identification errors.
The size of the search area affects the tracking velocity.
Movias Pro User’s Manual
1-4)
NAC Image Technology Co., Ltd.
Lower Limit for Coefficient of Correlation
The degree for the coefficient of correlation can be numerically expressed
from 0 to 100.
With a coefficient of correlation at 100, the two images are perfectly
matched and as the number decreases, the degree of correlation decreases.
During automatic tracking, if the coefficient of correlation reaches the lower
limit, tracking is suspended and further treatment is left to the operator. (It
is possible to automatically avoid suspension via user settings.)
2)
Parameters for 4-quarter marks
2-1)
Diameter of Circle for Detection of Center Point
This parameter determines the diameter of the circle to detect the center
point of the 4-quarter mark. The circle detected must be contained within
the target mark.
3)
Parameters for Solid/Shaded Marks
3-1)
Binary Threshold Value
Determines at what level of luminance the solid/shaded points are identified.
3-2)
Update Each Frame (Relative to Max/Min Luminance)
The threshold value is updated for each frame, using the N% max/min
luminance of a template as the threshold value. It is effective with images
where the brightness gradually changes.
3-3)
Fix All Frames
Specifies the threshold value using luminance [0-255].
3-4)
Center of Gravity Calculation Method
Specifies the way to determine the center of gravity for the range, based on
a threshold value.
Movias Pro User’s Manual
NAC Image Technology Co., Ltd.
3.3.3 Method of Setting Tracking Parameters
1)
4-quarter Marks
The size of the circle for detecting the point of the center of gravity depends
on the image quality, but should be set for the 4-quarter marks according to
the example in Figure 48.
Figure 48 Example of Tracking Parameters for 4-quarter Marks
The accuracy improves slightly with a larger circle but if the mark
disappears, automatic tracking becomes impossible. Also, the accuracy may
deteriorate when the shape is altered.
The accuracy deteriorates slightly with a smaller circle and if the mark
disappears or changes shape, automatic tracking may still be possible.
Movias Pro User’s Manual
2)
NAC Image Technology Co., Ltd.
Solid/Shaded Marks
Set the size of the template for the solid/shaded marks according to the
example in Figure 49.
Figure 49 Example of Tracking Parameters for Solid/Shaded Marks
Make the size of the template so the template frame does not touch the
solid/shaded points.
Adjust the binary threshold value and extract the solid/shaded point from
the background.
3)
Correlation Target
Adjust the template size so the identifies are contained within the template.
Updating the template is essentical with targets that have significant
rotation or changes in shape.
Since the tracking accuracy decreases as the template is updated, adjust the
parameters so they are updated at the lowest possible level.
If the target rotates slightly or changes form, the coefficient of correlation
declines so the best result is achieved by not updating the template.
If tracking a small object that moves on a background, set so not much of
the background is contained in the template.
Movias Pro User’s Manual
NAC Image Technology Co., Ltd.
Movias Pro User’s Manual
NAC Image Technology Co., Ltd.
3.4 Depth Correction
Basically, with 2-dimensional analysis, the movement of the object is
analyzed on the plane of the activity along the same plane perpendicular to
the camera.
If photographing objects with movement in the back, the area nearest the
camera appears larger than those farther away. Objects farther away
appear smaller than those closer.
As a result, to analyze activity on multiple planes of varying distances,
correcting the difference in the size and position of this photographic
distance (the distance from the camera to the object) is necessary. This is
called depth correction.
The depth correction function is available in Movias Pro 2-dimensional
analysis, making it possible to perform quantitative motion analysis on
multiple planes by absorbing the differences in depth. (However, correction
is not possible if the photographic distances gradually change so there may
be times when the movement within the optical axis of the camera is
limited.)
Figure 50 Depth Correction
In Figure 50,
O
: center of screen
d1
: Distance from the camera on the plane where point P1 is located
d2
: Distance from the camera on the plane where point P2 is located
D
: Distance from the camera on the plane (base plane) where the actual
converted standard points (R1,R2) are located, along with point P3
P1,P2,P3
: Actual position of measurement points P1,P2,P3
Movias Pro User’s Manual
NAC Image Technology Co., Ltd.
P1',P2',P3' : Perceived position of measurement points P1,P2,P3
P1",P2"P3" : Position of measurement points P1,P2,P3 after depth
correction
Therefore,
d1
D
d2
the depth correction coefficient for point P2 is
D
the depth correction coefficient for point P1 is
and the depth correction coefficient for point P3 is
D
= 1.
D
For specific calculations,
With the coordinates of the measurement points before correction as
( x , y ) the depth correction coefficient for the measurement points as α ,
the coordinates of the center of the screen as
( cx , cy ) and the coordinates of the measurement points after depth
( X , Y ) , it becomes
X = cx + ( x − cx ) × α
.
Y = cy + ( y − cy ) × α
correction as
As clearly shown in this equation, measurement point P2 appears small due
to the distance from the base plane and since
d2
= α has a value greater
D
than 1, it is magnified with the calculation. On the other hand,
measurement point P1 appears large due to the distance from the base
plane and since
calculation.
d1
= α has a value less than 1, it is compressed with the
D
Movias Pro User’s Manual
NAC Image Technology Co., Ltd.
3.5 3-dimensional Analysis
3.5.1 Calibration Chart and Control Points
Calibration information is essential for performing 3-dimensional analysis.
There is a calibration chart that is photographed with the camera. The
calibration chart displays several examples as solid structures, shown in
Figure 51.
Figure 51 Calibration Chart
The black points on the calibration chart are control points. Measuring the
coordinates (X, Y and Z) of the actual 3-dimensional space of the control
points is required for 3-dimensional analysis.
Ideally, the calibration chart should be a size large enough to cover all of the
space to be analyzed. Also, the control points should have a random
arrangement.
3.5.2 Calibration Chart Photography and Data Input
Photograph this calibration chart with multiple cameras. It doesn’t matter
whether the target for analysis (subject) or the calibration chart is
photographed first. However, the following precautions need to be taken.
•
Do not change the position or angle of view (focus distance of the lens) of the
camera when photographing the subject or calibration chart.
•
All of the control points should be visible from all of the cameras used for
photography.
Next, simultaneously measure (input) the control point positions for each
camera with each camera and input the actual 3-dimensional coordinates of
the control points. At this point, the process for the measurement/input of
the control points is identical.
3.5.3 3-dimensional Data Structure
Movias Pro User’s Manual
NAC Image Technology Co., Ltd.
As noted in 3.2, in Movias Pro, the tracking results and analysis results are
processed and saved as sequences. The two types of sequences include 2D
sequences for 2-dimensional analysis and 3D sequences for 3-dimensional
analysis. 3D sequences are created to build 3-dimensional data. 3D
sequences are created by combining multiple 2D sequences with calibration
data.
Movias Pro User’s Manual
NAC Image Technology Co., Ltd.
3.6 Models
In Movias Pro, it is possible to find the center of gravity for a body based on
human body segment models. The model is described using an example.
The body is often divided into multiple sections (segments) when analyzing
the movements of the body and the position of the center of gravity is
determined for each section. The center of gravity for the entire body is then
determined by combining the centers of gravity for each section.
When determining the center of gravity for each section, the relationship
between the position of the representative point for that section (primarily
joints) and the position for the center of gravity for that section is taken into
consideration, along with the ratio of the weight for the section relative to
that of the weight of the entire body (body weight).
This is called the human body model and there are various types, depending
on the researcher. The human body model employed by this software fulfills
the following conditions.
•
The coordinates of the center of gravity for each section of the body are determined
from at least two points that are representative of those sections.
•
Ratios for the weights of each section of the body relative to the total body weight
are assigned.
3.6.1 Description of the Matsui Model
The Matsui model is given as an example of the model of the human body.
Next is a chart of the points input with the Matsui model and the segments
formed by these combinations.
•
Chart of Input Points
Input
Point
1
2
3
4
5
6
7
8
9
10
Name of
Region
Right
fingers
Right wrist
Right
elbow
Right
shoulder
Left
fingers
Left wrist
Left elbow
Left
shoulder
Right toes
Right
ankle
Input Point Name of
Region
11
Right knee
12
13
Right hip
Left toes
14
Left ankle
15
Left knee
16
17
18
Left hip
Top of head
Back of the
head
Top of spine
Bottom of
spine
19
20
Movias Pro User’s Manual
NAC Image Technology Co., Ltd.
Figure 52 Input Points
•
Each Section(Essential Segments)
Segment
Number
1
2
3
4
5
6
7
8
9
10
11
12
13
Section
Name
Head
Neck
Spine
Right upper
arm
Right
forearm
Right hand
Left upper
arm
Left forearm
Left hand
Right thigh
Right calf
Right ankle
Left thigh
Input Number for
Section
17, 18
18, 19
19, 20
4,3
Wt. Coefficient
%
4.4
3.3
47.9
2.65
Center of gravity
Coefficient %
37.0, 63.0
50.0, 50.0
48.0, 52.0
54.0, 46.0
3, 2
1.5
59.0, 41.0
2, 1
8, 7
0.9
2.65
50.0, 50.0
54.0, 46.0
7, 6
6, 5
12, 11
11, 10
10, 9
16, 15
1.5
0.9
10.0
5.35
1.9
10.0
59.0, 41.0
50.0, 50.0
58.0, 42.0
59.0, 41.0
50.0, 50.0
58.0, 42.0
Movias Pro User’s Manual
14
15
Left calf
Left ankle
•
NAC Image Technology Co., Ltd.
15, 14
14, 13
5.35
1.9
59.0, 41.0
50.0, 50.0
Center of Gravity for Human Body(Composite Segments)
Number of Composite Name
Segment
1
Entire body
Essential Segment Numbers
1,2,3,4,5,6,7,8,9,10,11,12,13,14,15
•
Description
A description is provided using the right forearm as an example. In the
chart of each section, the input points on the right forearm include the right
elbow and the right wrist. The weight is 1.5% of the body weight. The center
of gravity for the right forearm section is calculated from coordinates of the
right elbow and the right wrist as follows.
The X coordinates for the right forearm section center of gravity are XG, the
X coordinates for the right elbow (point number 3) are X3, and the X
coordinates for the right wrist (point number 2) are X2, for
X G = X 3 × 0. 59 + X 2 × 0. 41. (Y and Z coordinates are identical)
In this manner, the center of gravity for each section is determined and the
center of gravity for the entire body is calculated from these.
In addition to the human body, models can be adapted to a wide range of
analysis for machinery and equipment.
The following describes the models.
1)
Input Points
2)
Names and codes are given to the input points (measurement points) used
with models. The maximum number of input points that can be used with
models is 30 per model.
Virtual Points
3)
Defines the virtual points based on input points. A maximum of 10 virtual
points can be defined in a model.
Essential Segments
4)
Shows points (input points or virtual points) for essential segments as well
as the weight coefficient and center of gravity coefficient. A maximum of 20
essential segments can be defined in a model.
Composite Segments
Shows the combinations of essential segments. A maximum of 10 composite
segments can be defined in a model.
5)
Sticks
Shows the method of connecting points when drawing a stick figure using
points found in models. A maximum of 10 sticks can be defined in a model.
Movias Pro User’s Manual
NAC Image Technology Co., Ltd.
Models are written in ASCII text files. This file is called a model defined
ASCII file. Next is a description of the details in a model defined ASCII file.
3.6.2 Model Defined ASCII File
Model defined ASCII files are ASCII text files for the models. Five items can
be included in the files, including the input points, virtual points, essential
segments, composite segments and sticks.
Notations are performed by columns. The type and formation method are
listed in columns.
Columns are called records.
The first character is a / (slash) to validate the record and contains
information relating to the model that can be viewed. Other records show
comments and can be ignored.
Next is a description of the model defined file structure and format. Finally,
an example of a model defined file for the Matsui model is provided.
1)
Model Defined ASCII File Structure
Input Points
Max 30
Defined Points Max 10
Max 20
Max 10
Sticks
2)
Max 10
Model Defined ASCII File Format
Defined Record
No.
Type of Point
Parameter
Input point
1
(IP)
2
:
:
i
Virtual Point
i+1
(VP)
:
:
:
j
j+1
Essential segments
:
(ES)
:
k
k+1
Composite
:
segments
:
(CS)
M
Sticks
1
(STK)
2
:
N
Movias Pro User’s Manual
2-1)
Common Data for Each Item
/No.
•
NAC Image Technology Co., Ltd.
Type of
Point
Code
Name → the following varies by type of point.
Number
Input points, virtual points, essential segments and composite segments are
numbered starting with the number 1. New sticks are numbered starting with the
number 1. Refer to the structure on the previous page for the definition of points and
the number of maximum definitions.
•
Type of Point
The type of point is expressed in 2-3 letters as follows:
IP: Input Point
VP: Virtual Point
ES: Essential Segment
CS: Composite Segment
STK: Stick
•
Code
Code numbers for points use 1~5 letters as desired
•
Name
1~20 letters can be input on the keyboard, excluding the
"," (comma) and ";" (semi-colon).
•
Special Marks
Expressed in the
Description
Item punctuation mark
Punctuation mark in item
Record complete mark
2-2)
↓
Input Point Records
/No.
IP
Code
Name ↓
Notation in the file
"," (comma)
";" (semi-colon)
CR + LF
Movias Pro User’s Manual
2-3)
Virtual Point Records
/ No.
•
NAC Image Technology Co., Ltd.
VP
Code
Name
Type
Point No.
① ② ③
Coeff.
↓
① ②
Type
Type number for the virtual point. Number from 1~9.
•
Point Number
Number of essential structure point. Point of number lower than the defined virtual
point. Input from 0~3 depending on the type of virtual point.
•
Coefficient
Input from 0~2 depending on the type of virtual point. The numerical format is ±
####.###
2-4)
Essential Segment Records
Essential segments are composed of input points or virtual points (excluding
vectors).
/No.
ES
Code
Name Type
Point No.
① ② ③ ④ ⑤
Weight Coeff.
Center of Gravity
↓
Coefficient
① ② ③ ④ ⑤
•
Point Number
Number of essential point. Input from 2~5. Whole numbers in 1~2 columns.
•
Weight Coefficient
Weight of the essential segment a total weight of 100. (For example, at a total weigth
of 80kg, if the essential segment is 10kg, the weight coefficient is 12.5) The
numerical format is ####.###
•
The center of gravity coefficient is the same as the input amount for the point
number. The weight is apportioned for each point with an essential segment mass of
100. The numerical format is ±####.###.
Movias Pro User’s Manual
2-5)
Composite Segment Records
/No.
•
NAC Image Technology Co., Ltd.
CS
Code
Name
↓
Point Number
① ② ・・・・・・
⑳
Point Number
Number of essential segment. Input 2~20. Whole numbers in 1~2 columns.
2-6)
Stick Records
/No.
•
STK
Code
Name
Colo Point Number
r
① ② ・・
Mark Number ↓
⑩
Color
Color number of CRT output. Number from 1~8.
•
Point Number
Number of essential segment. Input 1~10. Whole numbers in 1~2 columns.
•
Mark Number
Input if 1 is input for the point number in the previous item. Whole numbers in 1
column.
3)
Example of File
Next is an example of a model defined ASCII file with the Matsui model.
MATSUI.MDL
Dec. 17, '93
nac Inc.
MODEL DEFINITION FILE for the HUMAN BODY GRAVITY CENTER
based upon the MATSUI model.
Movias Pro User’s Manual
NAC Image Technology Co., Ltd.
3.7 3D ASCII File
Movias Pro reads the coordinate data for tracking point from the ASCII text
file, creates a sequence from this and has a function that can express the
results as a graph. The two types of sequences include 3D sequences for 3dimensional analysis and 2D sequences for 2-dimensional analysis so both
can be created from ASCII text files. 3D ASCII files are used to create 3D
sequences while 2D ASCII files are used to create 2D sequences. 3D ASCII
files are described in this section and 2D ASCII files are described in the
next section.
3.7.1 3D ASCII File Example
First is an example of a file. Then, is an example of a 3D ASCII file showing
3 data points (photographic speed of 0.1sec at 1000fps).
#
# Movias Pro 3D ASCII FILE (Sample)
#
#
File Name : ********.***
#
Date : April 1st 2003
#
# F-Seq Point
Time
X Data
1,
0,
0.0,
0.000,
2,
0,
1.0,
0.628,
3,
0,
2.0,
1.253,
:
:
:
:
:
:
:
:
99, 0,
99.0,
-0.628,
100, 0,
100.0,
0.000,
1,
1,
0.0,
10.000,
2,
1,
1.0,
9.980,
3,
1,
2.0,
9.921,
:
:
:
:
:
:
:
:
99, 1,
99.0,
9.980,
100, 1,
100.0,
10.000,
1,
2,
0.0,
10.000,
2,
2,
1.0,
10.608,
3,
2,
2.0,
11.174,
:
:
:
:
:
:
:
:
99, 2,
99.0,
9.352,
100, 2,
100.0,
10.000,
#
# End of file
Y Data
9.848,
9.816,
9.782,
:
:
-3.090,
-3.256,
2.548,
2.681,
2.749,
:
:
9.164,
9.543,
-8.145,
-7.846,
-7.175,
:
:
0.048,
0.263,
Z Data
-3.420
-3.584
-3.746
:
:
-8.830
-8.746
5.142
5.267
5.587
:
:
2.498
2.175
0.124
0.128
0.121
:
:
0.130
0.127
Movias Pro User’s Manual
NAC Image Technology Co., Ltd.
3.7.2 File Format
1)
Structure
The files are in columns.
The two types include a comments column to write notes and a data column
to include data.
2)
Comments Column
The column starting with # is the comments column.
A description of the contents of the file follows the #. There is no prescribed
format and can include anything. When Movias Pro reads the file, columns
beginning with # are disregarded.
3)
Data Row
3-1)
Structure
The data row has the following structure.
FSN
3-2)
,
PN
,
TIME
,
DATA-X
,
DATA-Y
,
DATA-Z
Enter
FSN
Whole numbers starting with 1 are written as half-width characters using
the frame sequence number.
3-3)
PN
Whole numbers starting with 0 are written as half-width characters using
the point number.
3-4)
TIME
Time data. Actual numbers are written as half-width characters using the
time data in miliseconds starting with 0, as shown in the example.
3-5)
DATA-X,-Y,-Z
Point coordinate data. Actual numbers are written as half-width charactesr
as shown in the example.
3-6)
, (comma)
Data punctuation. The half-width comma is written. For ease of viewing,
several spaces or a tab can be inserted after the comma.
Movias Pro User’s Manual
NAC Image Technology Co., Ltd.
3.8 2D ASCII FIles
The format for 2D ASCII files is an abbreviated form of the 3D ASCII file
format, with a comma just before DATA-Z. If using the same format as 3D
ASCII files, Movias Pro ignores the DATA-Z when reading it.
Movias Pro User’s Manual
NAC Image Technology Co., Ltd.
Movias Pro User’s Manual
NAC Image Technology Co., Ltd.
3.9 CSV Graph Data in Movias Format
Movias Pro can import/export graph data using text data punctuated with
commas (CSV format) The two types of file formats include a time graph
(XT graph) and a correlation figure (XY graph) like a trajectory figure.
Imported graphs can be simultaneously played back with AVI images or
graphs analyzed by Movias.
3.9.1 File Format
The file format is a text data file (CSV file) separated by a comma (,).
Files are constructed of the following three blocks.
•
Header (Fixed Length)
Rows 1~29, contents for each row can be determined.
•
Data section (Variable Length)
From row 30 to "EOD", contains graph data.
•
Comments section (Fixed Length)
From "EOD" to the end of the file, includes comments.
1)
Header
The six parts of the header are constructed of 1) file identifier, 2) graph
settings, 3) graph data information, 4) horizontal axis settings, 5) data
channel settings, 6) channel data information.
Of these, 3) graph data information and 6) channel data information are
only added when exported and are disregarded during imports. “#” is added
to the beginning of the name of each of these items.
1-1)
Row
Number
1
2
File Identifiers
Details
Format
File format and version
identifier
Movias**GraphV## (all half-width)
**:Graph format
(XT for a time graph and XY with a
correlation figure)
##:Version for this format
(columns of half-width numerals)
Ex.) For XT graph and Ver. 1.1
MoviasXTGraphV11
Reserved
Note
s
Movias Pro User’s Manual
1-2)
NAC Image Technology Co., Ltd.
Graph Settings
Settings for the entire graph, including graph title and number of data
channels
Row
Item
Number
3
Title
4
5
SubTitle
NDataCh
6
Creator
Details
Format
Graph Title
Text
Graph Sub-title
Number of data
channels
Creator of this
file
Text
Half-width number
Notes
*1)
Text
*1) Note the creator and version of this file.
1-3)
Graph Data Information
Graph data information added when Movias is output
Row
Item
Number
Details
Format
Notes
7
#NData
Data number
Half-width
number
*2)
8
#FrameInterval[ms]
Time interval between
frames
Half-width
number
*2)
*2) Disregarded when importing.
1-4)
Horizontal Axis Settings
Horizontal axis settings including titles of the horizontal axis and scale
Row
Number
9
Item
Details
Note
s
Format
XAxisCaption
X axis caption
Text
10
11
XUnit
XMin
12
XMax
13
XChName
X axis unit
X axis minimum display
value
X axis maximum display
value
Name of X axis data
channel
Text
Half-width decimal or
“Auto”
Half-width decimal or
“Auto”
Text
(only used with XT graphs)
*3) If “Auto” is specified in Xmin, Xmax, the scale of the axis will be automatic.
*3)
*3)
Movias Pro User’s Manual
1-5)
NAC Image Technology Co., Ltd.
Data Channel Settings
Setting for each channel, including the vertical axis title and scale, line type and color
Row
Number
16
Item
Details
Format
ChNo
Channel number
17
18
ChName
Color
Channel name
Color
19
Line Style
Line style
20
21
22
YAxisCaption
YUnit
YMin
23
YMax
24
YChName
25
XChName
Y axis caption
Y axis Unit
Y axis minimum display
value
Y axis maximum display
value
Name of Y axis data
channel
Name of X axis data
channel
Half-width number
1,2,3,4....
Text
Name of color or number
of color
(Refer to below)
Line number ( Refer to
below )
Text
Text
Half-width decimal or
“Auto”
Half-width decimal or
“Auto”
Text
Note
s
*4)
*4)
Text
(only used with XY graphs)
*4) If “Auto” is specified in Ymin, Ymax, the scale of the axis will be automatic.
Caution: If the same Y axis unit extends for more than two rows, these
axes will be combined into one axis. In this case, the Y asix setting will be
that of the first axis set.
•
•
Color
Color Name
Color
Color Name
Color
Yellow
Yellow
Maroon
Maroon
Fuchsia
Magenta
Navy
Navy blue
Aqua
cyan
Purple
Purple
Red
Red
Teal
Teal
Blue
Blue
Black
Black
Green
Green
Gray
Gray
Lime
Lime
Silver
Silver
Olive
Olive
White
White
Color number: Shown with 16 decimal places in the sequence of blue, green, red
after the pound (#).
Movias Pro User’s Manual
NAC Image Technology Co., Ltd.
The format is #XXYYZZ, where XX is Blue luminance, YY is Green luminance and
ZZ is Red luminance.
For example, #00FF00 is green with the highest luminance.
Movias Pro User’s Manual
•
Line Style
Line
Number
1
Line Style
Legend
Solid line (width 0)
2
Dashed line (width 0)
3
Dotted line (width 0)
4
10
Single dashed line (width
0)
Double dashed line
(width 0)
Solid line (width 1)
6
Solid line (width 2)
11
Solid line (width 3)
7
Solid line (width 4)
12
Solid line (width 5)
5
1-6)
NAC Image Technology Co., Ltd.
Channel Data Information
Information for each channel added when Movias is output
Row
Number
Item
Details
Format
15
#ExcelRange
Channel data cell range in Excel
26
#Min
Minimum value for channel data
27
#Max
Maximum value for channel data
28
#MinTime
29
#MaxTime
Time [ms] when channel data is at a
minimum
Time [ms] when channel data is at a
maximum
Excel standard
Ex) B12:C20
Half-width
decimal
Half-width
decimal
Half-width
decimal
Half-width
decimal
Note
s
Movias Pro User’s Manual
2)
NAC Image Technology Co., Ltd.
Data Section
Time series data for each channel
Row
Number
Details
Format
30
Data section items
31~EOD
Rows for time and
channel data
(XT graph)
Time[ms], Ch1Y, Ch2Y, Ch3Y, Ch4Y.....
(XY graph)
Time[ms], Ch1X, Ch1Y, Ch2X, Ch2Y, Ch3X, Ch3Y,
Ch4X, Ch4Y.....
(1st row)
Time data. Msec units, half-width decimal.
Time segments are all regularly spaced.
(after the 2nd row)
Numerical channel data. Half-width decimal.
Data arranged identical to the 30th row
Notes
*5)
*6)
*5) If there is no data (points not tracked) ""(blank), and if there is no data outside the graph range, (if the graph
data was copied from sequences with a different time range), it is noted with "#N/A".
*The character string does not change if there is no data after Movias Pro Ver1.61.
Select “Ver. 1.60 Format”in the “File>Settings>General Settings>Export” menu to use the existing settings.
*6) If there are comments after the data string, “EOD” will be entered in the first string of the next row in the last
data.
If there are no comments, EOD can be abbreviated.
3)
Comments Section
In Movias, comments can be displayed for each graph.
The comments section is from the first row of the "EOD" to the end of the
file.
Comments are only captured in the first row and if comments are entered,
they are also entered into the comment section of Movias.
This block can be abbreviated.
Format: Text
Movias Pro User’s Manual
NAC Image Technology Co., Ltd.
3.9.2 Graph Settings and Managing Graphs
17: C hN am e(チ ャ ン ネ ル 名 )
3: T itle (グ ラ フ タ イ ト ル )
4 : S u b T itle ( グ ラ フ サ ブ タ イ ト ル )
5: N D ataC h
(チ ャ ン ネ ル 数 )
20: YA xisC ap ion (Y 軸 見 出 し )
22 : Y M ax
(Y 軸 表 示 最 大 値 )
22 : Y M in
(Y 軸 表 示 最 小 値 )
9 : X A xisC a p ion ( X 軸 見 出 し )
1 1: X M in
(X 軸 表 示 最 小 値 )
12: X M a x
(X 軸 表 示 最 大 値 )
Figure 53 Graph Settings and Managing Graphs (Graph Tab)
13: XChName (X軸データチャンネル名)
10: XUnit (X軸単位)
24: XChName (X軸データチャンネル名)
21: XUnit (X軸単位)
Figure 54 Graph Settings and Managing Graphs (List Tab)
コメント
Figure 55 Graph Settings and Managing Graphs (Comments Tab)
Movias Pro User’s Manual
NAC Image Technology Co., Ltd.
3.9.3 File Examples
1)
Example of Time Graph (XT Graph)
A
1
B
C
D
MoviasXTGraphV11
2
3
Title
Vehicle Graph
4
SubTitle
Test1
5
NDataCh
3
6
Creator
MoviasPro
7
#NData
12
8
#FrameInterval[ms]
1
9
XAxisCaption
Time [ms]
10 XUnit
ms
11 XMin
Auto
12 XMax
Auto
13 XChName
Time
14
15 #ExcelRange
B31:B42
C31:C42
D31:D42
16 ChNo
1
2
3
17 ChName
Vehicle displacement
Vehicle velocity
Vehicle acceleration
18 Color
Red
blue
#FF00FF
19 LineStyle
1
3
4
20 YAxisCaption
Displacement [mm]
Velocity [m/s]
Acceleration [ms-2]
21 YUnit
m
m/s
ms-2
22 YMin
Auto
Auto
-100
23 YMax
Auto
Auto
24 YChName
Point 0 displacement [mm] Point 0 velocity [m/s]
Point0 acceleration [m/s2]
2.4596
-11.713
100
25
26 #Min
-2.9832
27 #Max
31.811
31.811
85.973
28 #MinTime
-4
-3
2
29 #MaxTime
7
7
-2
30 Time[ms]
Ch1Y
Ch2Y
Ch3Y
31 -4
2.4596
32 -3
3.4016
-2.9832
33 -2
5.5686
-2.9621
85.973
34 -1
8.3906
-2.9171
68.885
35 0
11.433
-2.8809
26.959
36 1
14.491
-2.8835
-10.944
37 2
17.521
-2.904
-11.713
38 3
20.5
-2.9013
14.235
39 4
23.412
-2.8695
36
40 5
26.254
-2.8252
36.987
41 6
29.041
-2.7936
Movias Pro User’s Manual
42 7
NAC Image Technology Co., Ltd.
31.811
43 EOD
44 Tester:Sato
45 Test Date:2005/01/28
46 Filter:CFC60
2)
Example of Correlation Figure (XY Graph)
A
1
B
C
D
E
F
G
MoviasXYGraphV11
2
3
Title
4
Diagram of vehicle
SubTitle
5
NDataCh
3
6
Creator
MoviasPro
7
#NData
18
8
#FrameInterval[ms]
1
9
XAxisCaption
X coordinates[m]
10 XUnit
11 XMin
m
12 XMax
13
Auto
Auto
14
15 #ExcelRange
16 ChNo
B31:C48
D31:E48
F31:G48
1
2
3
17 ChName
18 Color
Point 0
Point 1
Point 2
Yellow
Fuchsia
Aqua
19 LineStyle
20 YAxisCaption
Left
1
1
door Rear
1
door Front trajectory
21 YUnit
22 YMin
m
m
m
Auto
Auto
Auto
23 YMax
24 YChName
Auto
Auto
Auto
Y coordinates of Y coordinates
of Y coordinates
of
25 XChName
26 #Min
X coordinates of X coordinates of X coordinates of
0.37918
-0.15316
0.43286
-0.15308
0.48135
-0.23094
27 #Max
28 #MinTime
0.42791
-0.15171
0.48036
-0.1519
0.48904
-0.23002
17
0
17
0
17
14
29 #MaxTime
30 Time[ms]
0
17
0
17
10
17
Ch1X
Ch1Y
Ch2X
Ch2Y
Ch3X
Ch3Y
31 0
0.42791
-0.15316
0.48036
-0.15308
32 1
33 2
0.42492
-0.15281
0.47765
-0.15291
0.42186
-0.15176
0.47467
-0.1518
0.41886
-0.15187
0.47169
-0.15212
34 3
35 4
0.41596
-0.1526
0.46897
-0.15274
36 5
37 6
0.4135
-0.1524
0.4662
-0.1524
0.41035
-0.15263
0.46322
-0.15275
38 7
0.40735
-0.15254
0.46023
-0.15254
Movias Pro User’s Manual
NAC Image Technology Co., Ltd.
39 8
40 9
0.4045
-0.15179
0.45808
-0.15191
0.40152
-0.15156
0.4551
-0.15178
41 10
42 11
0.39894
-0.15096
0.45214
-0.15104
0.50684
-0.22939
0.39602
-0.15153
0.44938
-0.15188
0.50484
-0.23039
43 12
44 13
0.39348
-0.15211
0.44657
-0.15224
0.50234
-0.23073
0.39047
-0.15205
0.44352
-0.15227
0.49975
-0.23038
45 14
46 15
0.38751
-0.15228
0.44088
-0.15244
0.49717
-0.23094
0.38466
-0.15232
0.43812
-0.15245
0.49431
-0.2308
0.38212
-0.15198
0.43573
-0.15229
0.49188
-0.23054
0.37918
-0.15171
0.43286
-0.1519
0.48904
-0.23002
47 16
48 17
4. Reference Menu
4.1 Summary of Menu and Toolbar
A summary of the Movias Pro menu tree and each menu item is as follows.
1)
Movias Pro Menu Tree
Movias Pro User’s Manual
Movias Pro
NAC Image Technology Co., Ltd.
ファイル
・新規プロジェクト
・プロジェクトを開く
・プロジェクトを閉じる
・プロジェクトを保存
・プロジェクトに名前をつけて保存
・プロジェクト名を変更
・全てのプロジェクトを保存
・シーケンス
・セッション
・インポート
・エクスポート
・設定
・(最近使ったプロジェクト)
・終了
3次元構築
・キャリブレーション情報入力
・3次元データ構築
結果表示
・ビデオ表示
・グラフを作成
・軌跡グラフを作成
・テンプレートからグラフを作成
・リスト表示
・3Dスティックアニメーション
点の組み合わせ指定
・長さ
・面積
・角度
・仮想点
・質量
・部分重心
・モデル適用
座標変換など
・原点指定
・座標軸指定
・2次元キャリブレーション
・鏡面変換
・時間基準指定
・変位基準指定
ツール
・トラッキング・編集
・スティック定義
・光学歪み補正登録/SAEチャート計測
ヘルプ
・印刷用サンプルマーカ
・取扱説明書
・バージョン情報
Figure 56 Movias Pro Menu Tree
Movias Pro User’s Manual
2)
NAC Image Technology Co., Ltd.
File Menu
As shown in Figure 57, the functions of the “File” menu are as follows.
•
Create new project or sequence.
•
Open projects already created.
•
Change the name of projects and save as a different name.
•
Import Wave-in data.
•
Output target mark coordinates that are the tracking results to text files.
•
Edit default settings.
•
Open the most recently used project
Figure 57 File Menu
Movias Pro User’s Manual
3)
NAC Image Technology Co., Ltd.
3-dimensional Structure Menu
As shown in Figure 58, the functions of the “3-dimensional Structure” menu
are as follows.
•
Measurement of the calibration chart images for 3-dimensional analysis, set 3dimensional space coordinates for each control point.
•
Create 3-dimensional analysis sequences by combining multiple 2-dimensional
analysis data with the calibration chart data.
Figure 58 3-dimensional Structure Menu
4)
Display Results Menu
As shown in Figure 59, the functions of the “Display Results” menu are as
follows.
•
Superimpose trajectory figures or stick figures on to AVI images. (2D, Basic edition)
•
Displays analytical result data as a numerical list or graph.
•
Display graphs based on templates.
•
Display 3D stick figures. (3D edition)
Figure 59 Display Results Menu
5)
Specify Point Combinations Menu
As shown in Figure 60, the functions of the “Specify Point Combinations”
menu are as follows.
•
Combines multiple measurement points and determines the length, area and angle.
•
Combines measurement points and determines the point (virtual point) for
calculation (2D, 3D)
Movias Pro User’s Manual
•
NAC Image Technology Co., Ltd.
Sets the weighted coefficient for each measurement point. Determines the combined
center. (2D, 3D)
•
Enters models and applies models to measurement point data.
Figure 60 Specify Point Combinations Menu
6)
Menu for Changing Coordinates
As shown in Figure 61, the functions of the “Changing Coordinates” menu
are as follows.
•
Establishes new original coordinates as tracking points.
•
Connect two tracking points for a new X axis line segment.
•
Change standard time frame and standard displacement frame.
•
Correct 2-dimensional calibration.
Figure 61 Menu for Changing Coordinates
7)
Tool Menu
As shown in Figure 62, the functions of the “Tool” menu are as follows.
•
Edit tracking results.
•
Create stick figures from combining tracking points.
•
Enter data corrected for optical distortion and calculate SAE distortion index.
Movias Pro User’s Manual
NAC Image Technology Co., Ltd.
Figure 62 Tool Menu
Movias Pro User’s Manual
8)
NAC Image Technology Co., Ltd.
Operating Screen
Figure 63 Operating Screen
Movias Pro User’s Manual
NAC Image Technology Co., Ltd.
4.2 File Menu
As shown in Figure 64, the following menu items from start to finish of a
new project are available in the “File” menu. The sub-menu is to the right
side of each menu item.
Figure 64 File Menu
4.2.1 New Project
Select the “File-New Project” menu to display the screen in Figure 65 as
follows.
Figure 65 File-New Project
Movias Pro User’s Manual
NAC Image Technology Co., Ltd.
Operation is as follows.
Project name
Items requiring input.
The name given to the project is input here. Since the assigned name is also
the named used for saving the projects, use a name identifying details of the
project.
•
The default is set to be ‘Project1”.
•
Test number, name of analyzer
If necessary, input the test number, name of analyzer
Input is not necessary. It can be left blank.
•
Create folder
Designates the location (folder) where the project is created. The default is the foler
where Movias Pro was installed, or specify a folder that is set in the default folder of
the “File-Settings” menu. If there is a need to change this, click
to designate the
desired folder.
4.2.2 Open Projects
Specify this menu when opening a saved project.
At this point, either double click on the project folder or select by clicking
“Open”.
(in previous versions, files with extensions of .map were selected from the
project folder)
4.2.3 Close Project
Closes selected projects with this menu.
4.2.4 Save Project
Saves projects using this menu. Saving the project also saves the attached
sequences.
4.2.5 Save Project As
During editing, a project can be saved by attaching a name. (Figure 66)
This can be used as a backup before changing the project.
Movias Pro User’s Manual
NAC Image Technology Co., Ltd.
Figure 66 Save Project As
Edit projects after saving using the default settings.
To edit a saved project, check “Edit Project Saved Under a Different Name
After Saving a Project with a Name” in the “File-Settings-General SettingsSave Settings” menu (→page エラー! ブックマークが定義されていません。).
4.2.6 Save All Projects
Saves all of the currently open projects at one time.
4.2.7 Change Project Name
Changes the project name.(Figure 67)
Enter the new project name and press OK.
Figure 67 Change Project Name
It may not be possible to change graphs or videos when displayed.
If an error message appears, restart Movias and after accessing the project,
try again before performing other operations such as displaying graphs.
4.2.8 Sequences
Figure 68 Sequence Sub-menu
1)
New Sequence
Select the “File-Sequence-New Sequence” menu and the screen in Figure 69
will be displayed 17.
17 Immediately after creating a new project, the new sequence screen is automatically
Movias Pro User’s Manual
NAC Image Technology Co., Ltd.
Figure 69 File-New-Sequence
This operation is performed as follows.
•
Sequence Name
Items requiring input.
The name given to the sequence is input here. Use a name to easily identify the
sequence details.
With defaults, the name of Sequence 1 is pre-set so check “Automatically Create
from Image File Name” to automatically create a name from the image file name.
(Ex: With Cellular.avi, the sequence name is “Cellular”)
•
Originator
Select how to create a sequence.
Select from AVI/MCFF File, 2D Results File or 3D Results File.
•
File Name
Specify file to create a sequence. Click
•
to specify a file.
Image Information
Select an AVI/MCFF file as the originator and specify the file name so the
displayed.
Movias Pro User’s Manual
NAC Image Technology Co., Ltd.
AVI/MCFF file photographic speed, frame number for the T0 frame, and thumbnail
image will be displayed. 18
•
Scope of Analysis
If analyzing only a section of an AVI/MCFF file, check “Limit the Frame Range to
Analyze” and specify the beginning and ending frame numbers of the frame range to
analyze. Click “View Image to Specify” to view the beginning/ending frames and
specify.
If an AVI/MCFF file was specified as the original data input, it will continue
tracking these target marks. If a 2D/3D Results File was specified as the
original data input,
These files will be read and a new sequence created.
The sequence information set can later be used as a reference for sequence
properties.
Refer to 4.9.2 Sequence Right Click Menu(→page 185).
2)
Copy Sequences from Other Projects
Use this menu when copying sequences from other projects. First select the
project to be copied and then select this menu. Since the screen where the
selected sequence to be copied will be displayed, select the sequence to copy.
Press O and the sequence will be copied.
3-dimensional sequences cannot be copied.
4.2.9 Sessions
Figure 70 Session Sub-menu
Sessions allow multiple projects to be opened. Opened projects are stored as
a session so multiple projects can be opened at one time.
(Note) Session information is saved as a full path so caution is required
when moving projects or copying them to other PCs.
1)
Open Session
18 If the AVI/MCFF file was created with our camera control software fxLink, the
photographic speed and frame number of the To frame is set automatically. With standard
AVI files, since the Movias Pro default value will be displayed, change these values if they
vary from actual.
Movias Pro User’s Manual
NAC Image Technology Co., Ltd.
Specify this menu when opening a saved session.
2)
Save Session
Saves multiple projects currently open as a session.
Movias Pro User’s Manual
NAC Image Technology Co., Ltd.
4.2.10 Import
1)
CSV Graph Data
Use this menu to import graph data that is a CSV format text file. Details of
the CSV format text file are found in
“3.9 CSV Graph Data in Movias Format(→page 67)”.
2)
WaveIn Analog Waveform Data
Use this menu when importing analog waveform data files created in Wavein 19. After selecting the sequence to import from the tree, use this menu to
open the Wave-in analog waveform data file with the extension of .wvb. This
accesses the import screen.
Select the following settings, press the import button and the waveform
data will be imported with the conditions set.
Figure 71 Wave-in Analog Waveform Data
2-1)
•
Import Screen
Import Data Range
The same range as the related image
A time range with the same added sequence image is selected automatically and
captured.
•
Range of All Measured Data
Access all measured data.
2-2)
Data Units
19 Image・waveform synchronized display software produced by Library Corporation.
Movias Pro User’s Manual
•
NAC Image Technology Co., Ltd.
Measured Voltage(Raw Data)
Plot measured voltage.
•
Physical Quantity(Converted Data)
Plots calculated physical quantity based on the conversion coefficient set by Wave-in
during voltage measurement. Refer to the Wave-in manual produced by Library
Corporation.
2-3)
Method of Drawing Graphs
Plots data for multiple channels input to separate graphs by channel. (For example,
create 3 graphs from measurement data from 3 channels.)
Plots all of the channel data on a single graph.
2-4)
Units Used in Graphs
Select the units used for drawing graphs.
Voltage can be in V, mV while time can be in sec, ms.
2-5)
Detailed Settings
Detailed settings are required in special cases where the import range has
shifted and is not synchronized with the image. In general, use the simple
setting screen in Figure 71.
Press the detailed settings button to open the screen shown in Figure 72.
Movias Pro User’s Manual
NAC Image Technology Co., Ltd.
A
B
C
D
E
F
Figure 72 Wave-in Analog Waveform Data
•
Import Screen
If there is data for multiple channels contained in the analog waveform data file and
if a portion of the channel data is not imported, remove the check from these in
section A.
•
When importing, either select the option in section B to import raw data (voltage
data) or to import data converted from the physical quantity.
•
If there is data for multiple channels contained in the analog waveform data file and
if this is superimposed on a single graph, remove the check from “Import Each
Channel from Separate Graphs” in section E.
•
If changing the time range for the analog waveform data to be imported, adjust the
import range in section C. (Note: The retrieved range (imported range) data ID・
trigger time table become the time range with Library waveform input systems. If
importing to actual sequences, import with the time range for the import range
(adjusted time starting point).)
•
If the check to reference the sequence with an image simultaneously photographed in
section D is removed, the image time data cannot be referenced.
If checked, reference the time range for the image data to be able to specify the
Movias Pro User’s Manual
NAC Image Technology Co., Ltd.
import range for the waveform data.
Additionally, if “Link the Import Range with the Sequence Region” is checked, the
import range can be linked with the image range.
At this point, if the ROI in section F is changed, the import range in section C is
linked and moved. Then, the trigger time series will be synchronized with the trigger
time series of the waveform input so if the time range retrieved for the image data and
waveform data differ, the common space for both can be automatically selected.
•
Pressing the simple settings button will return to the simple settings.
Movias Pro User’s Manual
NAC Image Technology Co., Ltd.
4.2.11 Export
1)
Batch Output for Excel Graphs
Using this function enables multiple graph data to be batched and output to
a single Excel workbook. Single graph data for each Excel worksheet can be
output.
Step-1: Display the graph to be exported to Excel on the screen.
Step-2: Either select the “File-Export-Batch Output for Excel Graphs” menu or
press
on the toolbar to display the following “Export Multiple Graphs to
Excel” screen. Enter the graph to be output to Excel in the “Output Graphs”
list and press OK. The name of the worksheet for each graph output is
displayed in the “Worksheet Name” list. In this example, a “Position” graph
can be output to the Excel worksheet “Data1”, a “Velocity” graph to
“Data2”, or an “Acceleration” graph to “Data3”. Graph titles are displayed
on the “Output Graphs” list.
Figure 73 Batch Output for Graphs Screen
Step-3: Press OK to display the save dialogue box for the Excel file output and add
a name to save.
Step-4: Start Excel to automatically open the Excel file specified in Step-3:.
Movias Pro User’s Manual
2)
NAC Image Technology Co., Ltd.
Output Graph to Excel Template
For example, use the coordinate data exported from Movias to perform user
specific calculations in Excel. If drawing the graph, it is difficult to edit the
Excel worksheet exported from Movias each time. In this case, enter the
Excel worksheet where the user specific calculations and graphs have
already been created into an “Excel Template” so data can be exported into
that template for each analysis.
2-1)
Example of the Excel Template Output Function
This is a description of a simple example.
Calculations are conducted on Excel for the Y coordinate data of a 4-quarter
mark at the top right (*1) of a sample cell phone drop image by separate
users (the Y coordinate data is doubled for an average value), with the
graph displayed as follows.
Figure 74 Example of Excel Template
(*1)The sample image of the cell drop test is found in the Samples folder of the
Movias Install folder.
Movias Pro User’s Manual
NAC Image Technology Co., Ltd.
Ex.) C:\ProgramFiles\nac\MoviasPro\Samples\Cellular.avi
Movias Pro User’s Manual
NAC Image Technology Co., Ltd.
Step-1: (Create Excel Template)
Step-1: The 4-quarter marks on the top right of the cell phone drop image are
tracked with Movias.
Step-2: The Y positions of the tracked points are graphed.
Step-3: Press “Export to Excel”
on the graph to export the graph data to Excel.
Step-4: For ease of use, change the name of the worksheet exported to “Exported
Worksheet”.
Step-5: Insert the user specific calculations and graphs into a new worksheet for
display.
Here, the name of the worksheet is “Display Results”.
Step-6: The Y coordinate data in “Exported Worksheet” is doubled to create cell
range
[A2:A151]
in
the
“Display
Results”
worksheet.
In this case, input “=exported worksheet !B31*2” into cell A2 and auto-fill
[A2:A151].
Write “column with doubled data” for the comments in cell A1 using the
color red.
A2セルの数式
Step-7: The
column
of
the
Select column A to be graphed.
doubled
data
is
graphed.
Movias Pro User’s Manual
NAC Image Technology Co., Ltd.
Step-8: The average value for the column with the doubled data is output.
Input the formula for the average of column A “=AVERAGE(A:A)” into cell
C4.
Write “average value of doubled data” for the comments in cell C3 using the
color red.
C4セルの数式
Step-9: Save
Here,
this
it
Excel
is
workbook
saved
in
the
as
desired
location.
“SampleTemplate.xls”.
Movias Pro User’s Manual
NAC Image Technology Co., Ltd.
<Excel Template Entry・Edit>
Step-10: Select “File-Export-Output Graph to Excel Template” on the menu or press
on the toolbar to display the “Export Multiple Graphs to Excel” screen
and select the “Template Entry ・Edit” tab.
Figure 75 Template Entry Screen
Step-11: Press “Enter an Existing Workbook as the Template” to display the Select
File
dialogue
box
and
select
the
template.
Here “SampleTemplate.xls” from Step-9: is selected.
Step-12: The following “Properties of Template Workbook” dialogue box will appear
for a name to be given to the template subsequently created. Here it is
“Doubled Y Coordinate Template”. If necessary, comments can be entered.
Figure 76
Properties of Template Workbook Screen
Step-13: A listing of Excel templates is displayed in the “Specify Data Worksheet”
list. Remove the checks from everything but the worksheet to be exported
by Movias (in this case “Exported Worksheet”). Press OK to finish entering
templates.
Step-14: Verify that the entered template is on the list of entered templates.
Movias Pro User’s Manual
NAC Image Technology Co., Ltd.
If editing the name or comments on the template press “Edit Properties”. If
referencing/editing the Excel file in the template itself, press “Edit in Excel”
and if deleting an entered templated, press “Delete”.
Figure 77 Edit Template Screen
<Output Graph to Existing Excel Template>
Step-15: Track
new
points
different
from
those
in
Step-1:.
Here, the 4-quarter marks at the very left side of the same cell phone drop
sample image are tracked.
Step-16: The
tracked
points
are
graphed.
Here, the X positions of the tracked points are graphed.
Step-17: Select “File-Export-Output Graph to Excel Template” on the menu or press
on the toolbar and the “Output to Existing Template Workbooks” tab on
the “Export Multiple Graphs to Excel” screen will open.
Figure 78 Output to Existing Template Workbooks Screen
Step-18: Select the template to be exported from the “Select Template” combination
box. Here, the previously created “Doubled Y Coordinate Template” is
Movias Pro User’s Manual
NAC Image Technology Co., Ltd.
selected. Select the template to display a listing of worksheet names for
export and a listing of graphs displayed on the screen.
Step-19: Add the graph corresponding to the worksheet name to be output to the
“Graphs” list and press OK. In this case, the graph for the position of X
coordinates drawn previously in “Exported Worksheet” is output.
Step-20: A dialogue box specifying the location where the Excel workbook is saved
will be displayed so save by adding the desired name and the corresponding
Excel
file
will
start
automatically.
Verify the average of the doubled data for the X coordinates of the new
tracked
points
and
the
graph.
2-2)
For More Precision with Excel
Use the Excel VBA macro function for more precision with Excel. After
Movias exports data to an Excel template, this starts MoviasStart() so it
should be used for automatic processing after exporting.
Movias Pro User’s Manual
3)
NAC Image Technology Co., Ltd.
Text Formatted Coordinate Data
With this menu, raw coordinate data for tracking points is output to text
formatted files.
Click on sequence in the data tree to select this menu and save the X, Y
coordinates for all of the tracking point in the sequence to a hard disk as
text files. The units for these X, Y coordinates are pixels in AVI images. The
starting point for the coordinates is the top left of the screen.
Next, Figure 79 shows an example of a text file. The data is separated by
commas to make it easy to access in Excel.
Here, starting with the row # Pix Size at Cal Depth, the numerals are
coordinates in pixels that have been converted to mm units.
#
# MOVIAS PRO
#
# file name : D:\Work\Export_ASCII.csv
# date : 02/08/20
# Sequence Name : MIRA BLUE
# Sequence Source File : S0099v3.avi
# Point : 0 = Point 0
# Point : 1 = Point 1
# Pix Size at Cal Depth , 6.23638
# F-seq, Point, time, X, Y, Z
0,0,0,427.334299033567,230.859412522263,10
1,0,0.001,424.892176130767,231.547336800701,10
2,0,0.002,421.854097573042,232.301120242838,10
3,0,0.003,418.85780280482,231.852017877732,10
4,0,0.004,415.898853921539,231.936674457328,10
5,0,0.005,413.164865734215,232.025465487598,10
0,1,0,480.336618284009,230.867379647052,10
1,1,0.001,477.755161396579,231.171027661172,10
Figure
79 Example of File-Export-ASCII Output
2,1,0.002,474.388188303128,232.303173380077,10
3,1,0.003,472.028496109502,231.590372797911,10
4,1,0.004,468.94655237997,231.811649935502,10
5,1,0.005,466.59564176589,231.902456552889,10
#
Movias Pro User’s Manual
NAC Image Technology Co., Ltd.
4.2.12 Settings
1)
General Settings
All of the default settings relating to Movias Pro can be decided in “SettingsGeneral Settings”.
1-1)
Default Settings
Figure 80 General Settings-Default Settings
•
Velocity・Acceleration
This is where the defaults for the method of calculating velocity and
acceleration are determined.
Formula 1:Use the data for the surrounding frames to calculate the
velocity/acceleration for a given frame. For example, the velocity for
the X direction VX for frame number i is calculated with the
formula
VX i =
X i +1 − X i −1
.
Ti +1 − Ti −1
Formula 2: Use the data for this frame and the next frame to calculate the
velocity/acceleration for a given frame. For example, the velocity for
the X direction VX for frame number i is calculated with the
formula
VX i =
X i +1 − X i
.
Ti +1 − Ti
Movias Pro User’s Manual
NAC Image Technology Co., Ltd.
•
Default for Starting Point
Either set the default starting point at the top left or the bottom left of the
screen.
• Default Photographic Speed
If analyzing images without photographic speed information, the
photographic speed set here will be displayed as the default. Set the
photographic speed with the highest speed used.
1-2)
Default Graph Settings
Figure 81 General Settings-Default Graph Settings
This is where the default for the characters showing the graph title and axis
captions are determined. When characters starting with $ are graphed, the
Movias Pro User’s Manual
NAC Image Technology Co., Ltd.
actual data name and sequence name are changed. The conversion for this
is shown on the right side of the screen.
Movias Pro User’s Manual
1-3)
NAC Image Technology Co., Ltd.
Detailed Settings
Figure 82 General Settings-Detailed Settings
•
Data Output Frequency
This is where the sampling rate is selected for converting data shown on a graph.
Text data can also be output with this sampling rate.
The default sampling rate matches the photographic frame rate.
The internal sampling rate is determined as follows.
・If the photographic frame rate is less than 8000fps,
the photographic frame rate is doubled so the miniumu value is greater than
10000fps.
For example, it is 10000fps if the photographic frame rate is 500, 1000 or 5000fps.
It is 12000fps if the photographic frame rate is 4000fps.
It is 14000fps if the photographic frame rate is 7000fps.
If the photographic frame rate is greater than 8000fps,
the photographic frame rate is used.
•
Raw Data for Starting Point Position
Determines the starting position when raw data is output to a text file.
Movias Pro User’s Manual
•
NAC Image Technology Co., Ltd.
Color Sequence for Point
Determines the color of the data line when graphs are output. If the number of points
exceeds 16, it repeats from the first color.
1-4)
Save Settings
Figure 83 General Settings-Save Settings
* Project
Check “Edit Project Saved under a Different Name after Saving a Project
with a Name” to open a project saved under a different name and then edit
it.
* Session
Check “Verify if a Session was Saved when an Application was Ended” to
determine if a session was saved when MoviasPro was ended.
1-5)
Export
Figure 84 General Settings -Export
Sets the characters for Excel/CSV output for graphs.
Refer to “3.9 CSV Graph Data in Movias Format(→page 67” for
the output format.
Movias Pro User’s Manual
2)
NAC Image Technology Co., Ltd.
Default Folder Settings
Figure 85 Settings- Default Folder Settings
Here, the default for the operating folder is set.
•
Project Folder
This is a folder where projects are saved. The default is the “My Documents\Movias
Projects” folder.
•
Image File Import Folder
This is the folder where the AVI/MCFF files are saved.
•
Template Graph Settings Import Folder
This is the folder where the graph templates are saved.
•
CSV Graph Data Import Folder
This is the folder where the CSV formatted text files imported as graphs are saved.
•
WaveIn Analog Waveform Import Folder
This is the folder where the Wave-in analog waveform files are saved.
•
Check “Save where Last Used” to save the file in the folder that was last loaded.
Movias Pro User’s Manual
3)
NAC Image Technology Co., Ltd.
Default Settings to Display Results
This is divided into display video and graphs.
3-1)
Display Video
The default format for the video display is determined here. (Figure 86)
Figure 86 Display Video ―Default Settings
The three items at the top determine the color, the shape and the size of the
point.
to set the color.
Click
As shown in Figure 87, the two point shapes include a cross and a circle.
Figure 87 Point Shape Cross and Circle
Sets the size of the point.
Sets the line width.
3-2)
Graph
Sets
•
Verification if the results are saved when the graph is closed
•
Verification if the graph is entered in the results
• The default cursor for the graph created
for the graph output.
エラー! 参照元が見つかりません。エラー! 参照元が見つかりません。 エラー!
参照元が見つかりません。 explains the changes to the standard styles.
Movias Pro User’s Manual
NAC Image Technology Co., Ltd.
Figure 88 Graph-Default Settings
4)
User Settings for the Tracking・Editing Screen
Sets the operations for tracking. (Figure 89)
Figure 89 Settings- User Settings for Tracking・Editing Screen
4-1)
Overview of View Video
The display color for tracking points selected as well as other tracking
points and the tracking trajectory display is set in the tracking window.
* Display Color of Tracking Points
Sets the display color of tracking points.
Points selected can be set separately from points not selected.
* Image Display Position
Movias Pro User’s Manual
NAC Image Technology Co., Ltd.
When the image size is within the display area of the video view, the
display position can be set to the top left or the center of the screen.
* Trajectory Display
Trajectory display on the tracking screen can be turned OFF by
removing the check mark.
* Before/After the Current Frame
Selects how many frames to display before/after the currently
displayed frame.
Limiting the length demonstrates the difference in the velocity
according to the difference in trajectory length.
This setting is also used for trajectory frame drawing settings in the
“Display Results―エラー! 参照元が見つかりません。” menu(→page エラー!
ブックマークが定義されていません。).
4-2)
Tracking Settings
This can be set to interrupt the detection process when a tracking point
detection error occurs.
Select “Interrupt the Tracking Process If a Tracking Point Detection
Problem Occurs” and if the correlation coefficient is less than the lower limit
established or if there is an error in center point detection, the user is
informed and manual correction is required.
If “Do Not Interrupt If Center Point Detection is Successful” is checked and
the center point detection is successful even if the correlation coefficient is
less than the lower limit established, it is not interrupted.
If “Continue Tracking Even If a Tracking Point Detection Problem Occurs”
is selected, automatic tracking in the designated range continues until the
end without advising the user even if there is a tracking point detection
problem during tracking.
(If this option is selected and a tracking point is out of place, since a
completely different point will be tracked, in most cases it will need to be
corrected later so the amount of work increases.)
5)
Reset All User Settings to the Initial Values
Resets all user settings to the initial values.
Items reset with this function include
•
•
User settings set in “File-Settings-All Settings” menu
Default settings parameters used for tracking
Other user settings (values set at the end of each type)
Movias Pro User’s Manual
NAC Image Technology Co., Ltd.
4.3 3-dimensional Structure Menu
4.3.1 Calibration Information Input
1)
Operation
Input control point data with the menu “3-dimensional StructureCalibration Information Input”.
Select this menu to display the screen shown in Figure 90.
Figure 90 Control Point Data Input Screen
Functions
Button
①
Operation
Opens previously input control point data saved on the disk. Can be
used with current projects.
Saves input control point data to the disk for use in other projects.
②
③
Sets the number of cameras used for input. Each time this is clicked,
the number of cameras increases by one. The minimum number is 2.
Deletes the last camera set with 'Add Camera'.
④
Movias Pro User’s Manual
NAC Image Technology Co., Ltd.
Click on the control point position in the image.
⑤
Verifies the center position setting for the control points.
⑥
Determines the number of control points used. Increases by one each
time this is clicked. (Minimum of 6)
⑦
Decreases the control points used.
⑧
Changes the cameras.
⑨
Changes the control points.
⑩
⑪
X, Y, Z
Inputs the actual 3-dimensional coordinate values for the control
points.
Please use coordinate values from a coordinate system where the front
of the subject is the X axis (movement direction), the left side is the Z
axis and the top (ceiling direction) is the Y axis.
2)
Specific Steps
Specific steps for control point data input are as follows.
1) Click “Increase CP”(⑦) several times to adjust the number of control
points used.
2) Load the camera image file (Tiff file or AVI file) used with “Add
Camera”(③) while simultaneously specifying the camera name.
Repeat for the number of cameras.
3)
Use the camera selection section (⑨) for the first camera (#0).
4) Use the control point selection section (⑩) for the first point (#1).
5)
Click “Specify CP Position”(⑤).
6)
Click on the position of the first control point (#1) on the image(⑭).
7)
Use the mouse to right click on the center of the point in the zoom
window(⑮),
At this point, changes in the image display position can be made by
dragging with the left mouse button.
8)
Click “Specify Center Position” (⑥).
9)
Use the control point selection section (⑩) for the following points.
10) Repeat from (5) until the last control point.
If all of the control points are not in a single frame when the image file
is an AVI file, use the play frame button in ⑯ to display the frames
capturing the specified control points.
11) If the center of the control point is incorrect, use the control point
selection section (⑩) to select that point and repeat steps (6) to (8).
12) Use the camera selection section(⑨)to proceed to the next camera.
Movias Pro User’s Manual
13)
14)
15)
NAC Image Technology Co., Ltd.
The image for this camera will be automatically displayed.
Repeat from step 4) and specify the center of the control points for all
of the cameras.
At this point, the procedure for specifying control points for all of the
cameras is identical.
Once the centers have been specified, input the actual 3-dimensional
coordinates for all of the control points. Use the control point selection
section(⑩)for input to replace the points. At this point, it doesn’t
matter which camera is selected.
Click “OK” upon completion.
4.3.2 3-dimensional Data Structure
Specify combinations of multiple 2D sequences and control point data using
the “3-dimensional Structure-3-dimensional Data Structure” menu to create
3D sequences.
Specify this menu and the screen in Figure 91 will be displayed.
Figure 91 3-dimensional Data Structure
Specify combinations of 2D sequences and control point data in this screen.
Select sequences and control point data for the same camera on the list to
the left and then click the > > button. Perform this for multiple sequences.
If there is an error, select the incorrect item on the list to the right, click the
> > button to delete and then make the corrections.
If one of the measurement points is the starting point for the coordinates,
select the 2-dimensional sequences and calibration data and then check
“Move Starting Point”. Then, select the point to be the starting point from
the “Move Starting Point” list.
Movias Pro User’s Manual
NAC Image Technology Co., Ltd.
4.4 Display Results Menu
Next is a description of the menu to display results.
The menu to display results is accessed by clicking on the toolbar
button to display results from Figure 92, as follows.
Figure 92 Display Results Toolbar
4.4.1 Display Video
The toolbar button corresponding to the “Display Results – Display
Video” menu is .
With this menu, the tracking results (a trajectory or stick figure) are
shown on the image as found in Figure 93.
Figure 93 Example of Display Video
Movias Pro User’s Manual
NAC Image Technology Co., Ltd.
The functions of the buttons at the top of the screen are as follows.
: Turns ON/OFF each display.
: Turns ON/OFF the display of the point name, such as Point 0.
: Turns ON/OFF the video image display.
: Turns ON/OFF the trajectory figure display.(Settings for the
number of frames displayed on the trajectory are made in “4.2.124) User
Settings for the Tracking・Editing Screen(→page 109)”.)
: Turns ON/OFF the stick figure display (if the stick is defined).
: Turns ON/OFF display of the coordinate axis (if coordinate axis
is given).
: Turns ON/OFF display of the O mark showing the tracking
point.
: Displays enlarge/reduce of the image.
: Enlarges/reduces the display each time the button is clicked.
: Displays pixel rate.
: Adjusts the size with the window.
: Displays optional sizing. Enter the number and press Enter.
: Other settings
: Copies video display to the clipboard.
: Sets the background color when the image display is OFF.
Changing the background color makes the trajectory figures
and point displays easier to see.
: Press this button when displaying multiple video display
sequences to set the time interval for the image to the
standard for image playback.
Movias Pro User’s Manual
NAC Image Technology Co., Ltd.
4.4.2 Creating Graphs
1)
Standard Operations
The toolbar corresponding to the “Display Results – Create Graphs” menu is
.
First, select the sequence containing the tracking points to be output
as a graph by clicking on the data tree. Then click on the graph menu.
The screen is as shown in Figure 94.
Figure 94 Display Results – Create New Graph
Select the data to be graphed on the top half of this screen. Specify the data
combinations relating to the horizontal and vertical axis.
Enter the data combinations on the bottom half of the screen and specify the
applications for the smoothing filter to eliminate noise.
On the following page, references are noted for each part of the graph setting
screen. Then, specific examples of the operating procedures are given.
Tabs such as “length, angle, area” appear on the upper left of the
screen. The descriptions are found on the “Specifying Point
Combinations” menu.
Movias Pro User’s Manual
NAC Image Technology Co., Ltd.
Figure 95 Explanatory Diagram for Specific Operations on the Graph
Settings Screen
1-1)
Section A: Specifying Data for the Vertical Axis
Determine data related to the vertical axis.
Items determined include the following four types.
• Select tracking points called Point 0, Point 1
• Data differentiated by position, displacement and velocity
• X, Y, Z and absolute value data
•
1-2)
m and mm units
Section B: Specifying Data for the Horizontal Axis
Set data related to the horizontal axis. Items set are identical to those
described in A.
If the tracking point data for the horizontal axis differs from the
vertical axis, remove the checkmark from “select points identical to
those on the vertical axis”.
1-3)
Section C: Changing the Subject of the Graph
Use this section to change the subject of the graph (main title).
First, clear the checkmark from “use existing subject”. Next, change
the existing subject shown in “subject”. With multiple graphs
Movias Pro User’s Manual
NAC Image Technology Co., Ltd.
(described later in Section H), change to “multiple graph subjects” on
the right side.
1-4)
Section D: Change the Color of the Data Lines
The color of the graph data 20 can be changed from the default value.
1-5)
Section E: Smoothing
This section is used to perform smoothing.
First, check “use filter”. Then, select from the filter types of
Vaatwasser, CFC 21and moving average. Then set the parameters
corresponding to each type.
As shown in Figure 95, Vaatwasser designates the cutoff frequency.
As shown in Figure 96, CFC selects the frequency class from 1000, 600,
180 and 60. The moving average designates the type (3 point average,
5 point average) and the relevant count.
Figure 96 Setting CFC Parameters (at left) and Moving Average Parameters
1-6)
Section F: Calculating Velocity and Acceleration
Select the method of calculating velocity and acceleration.
Refer to エラー! 参照元が見つかりません。エラー! 参照元が見つかりません。
のエラー! 参照元が見つかりません。エラー! 参照元が見つかりません。 for
the calculation method.
1-7)
Section G: Graph Preview
This displays a graph preview with the contents set. Single data lines
are previewed even if there are multiple graphs (described later in H).
20
Data lines are determined according to the default colors for each point. With a
single graph of multiple data points (ie: X and Y coordinates), these are all the
same color, making it hard to decipher. In this case, it is useful to modify the colors.
The color of the data lines can be changed after creating the graphs.
21
CFC are based on J211-1 of the SAE standards.
Movias Pro User’s Manual
1-8)
NAC Image Technology Co., Ltd.
Section H: Multiple Graphs
Click and hold this button to create multiple graphs. With multiple
graphs, two or more data lines are drawn on a single graph.
Figure 97 Examples of Multiple (Left) and Single Data Graphs
1-9)
Section K: Combined Entry
These three buttons are effective when clicking the multiple graph
button in H. If creating multiple graphs, these combinations are
entered in M after the data combinations relating to the
vertical/horizontal axis have been designated. This performs the
multiple data combinations desired. Click on the “Add” button when
entering data combinations. Click on the “Delete” button when
deleting combinations entered. Click on the “Replace” button to
switch the entered combinations with the currently designated
combinations.
1-10) Section L: Changing the Scale of the Graph
This changes the minimum/maximum value of the Y axis (vertical)/X
axis (horizontal) scale of the graph, and changes the axis label (title).
Movias Pro User’s Manual
NAC Image Technology Co., Ltd.
Figure 98 X Axis/Y Axis Settings
1-11) Section M: Summary of Data Combinations
This section displays a summary of the data combinations added with
the Add button in section K. Select data combinations for deleting and
replacing by clicking with the mouse to delete or replace in section K.
1-12) Section N: Method of Displaying Multiple Graphs
Remove the check from “Draw on the Same Graph” to create
individual graphs with independent data combinations on multiple
graphs.
1-13) Section P: Delete Combinations
Click on the “Delete All” button to delete all of the data combinations
added and displayed in section M.
1-14) Section R: Save/Load Settings
The summary of data combinations shown in section M is saved on
the hard drive with the “Save Settings” button (graph template file)
The summary of combinations stored can be restored to section M
using “Load Settings”. This function enables simple creation of graphs
combining multiple sequences.
(Point names are used for specifying point combinations. Point names with
some meaning aid in the creation of graph templates. )
A settings files with these saved in it (graph template) Graph(→page
149) can also be created.
1-15) Section S: Drawing Graphs
After specifying the data combinations relating to the
vertical/horizontal axis and entering these combinations in section M
for multiple graphs, the graph is drawn once “Draw Graph” is clicked.
Movias Pro User’s Manual
2)
NAC Image Technology Co., Ltd.
Examples of the Graph Creation Process
Next are specific examples of creating graphs. In this generic example,
the titles and color of the data lines are changed accordingly, and
smoothing processes are specified.
2-1)
Example of Graph (Single Data) Creation Process
This is an example of the process to create a graph of the Point 2 Y
displacement over time (horizontal axis).
Step-1: First, select the desired sequence for graph creation from the
data tree on the left side by clicking on the mouse. Next,
specify with the “Display Results – Graph” menu or the
graph tool
. This opens the graph settings screen (Figure
99).
Figure 99 Graph Settings Screen
Step-2: In the block labeled “Data for Vertical Axis of Graph” at the
upper left, select Point 2 in Select Points, Y in Components,
displacement as the data and mm as the units. (Figure 100)
Figure 100 “Data for Vertical Axis of Graph” Block Settings
Step-3: Click on “Draw Graph”. This creates the graph shown in Figure
Movias Pro User’s Manual
NAC Image Technology Co., Ltd.
101.
Figure 101 Example of Graph (Single Data)
Refer to “エラー! 参照元が見つかりません。 エラー! 参照元が見つかりません。
(→page エラー! ブックマークが定義されていません。)” to create graphs.
2-2)
Example of Process to Create Multiple Graphs
This is an example of the process creating a graph of the Point 2 Y
displacement (unit: mm) and Y velocity (unit: mm/s) over time
(horizontal axis).
Step-1: Access the graph settings screen in the same manner as that
in the example for a (single data) graph.
Step –2: Click on “Multiple Graphs” (section H).
Step –3: In the block labeled “Data for Vertical Axis of Graph” at the
upper left, select Point 2 in Select Points, Y in Components,
displacement as the data and mm as the units. (Figure
102)
Figure 102 “Data for Vertical Axis of Graph” Block Settings
Movias Pro User’s Manual
NAC Image Technology Co., Ltd.
Step-4: Click on the “Add >>” button.
The displacement data for the Y component is entered in
section M. (Figure 103)
Figure 103 Entering Y Displacement Data
Step-5: In the same manner, in the block labeled “Data for Vertical
Axis of Graph” at the upper left, select Point 2 in the Point
Selections, Y in Components, velocity as the data and units
of mm.
(Figure 104)
Figure 104 “Data for Vertical Axis of Graph” Block Settings
Step-6: Click on the “Add >>” button.
The velocity data for the Y component is entered in section M. (Figure
105)
Figure 105 Entering Y Velocity Data
Movias Pro User’s Manual
NAC Image Technology Co., Ltd.
Step-7: Click on “Draw Graph”. This creates the graph shown in Figure
106.
Figure 106 Example of Multiple Graphs
Movias Pro User’s Manual
3)
NAC Image Technology Co., Ltd.
Graph Window
This section describes working in the graph window. (Figure 107)
Figure 107 Graph Window
3-1)
Graph Menu
As shown in Figure 108, the graph menu has six sub-menus, from graph
information to printing.
Figure 108 Graph Menu
•
Graph Information
As shown in Figure 109, graph information display and settings can be implemented
in the graph information menu. Items to be set include the channel name, the X axis
data name and the Y axis data name.
Movias Pro User’s Manual
NAC Image Technology Co., Ltd.
Figure 109 Graph Information
•
2-dimensional Calibration Information
In the 2-dimensional calibration information menu, the status of 2-dimensional
calibration at the point where the graph was created is displayed. (Figure 110)
However, it is not possible to reset the calibration for reference in this screen.
Figure 110 2-dimensional Calibration Information
•
Change Name
Use this menu to change the main title of the graph.
Movias Pro User’s Manual
•
NAC Image Technology Co., Ltd.
Copy to Clipboard
Use this menu to copy graphs to the clipboard as images. The copy format is the
Enhanced WindowsMetaFile format. Image files can be saved using an application
such as “Paint” by attaching to a word processing document.
•
Export
CSV File
Use this menu to output data displayed in a graph to a text file with CSV Graph Data
in Movias Format(→page 67).
•
Export
Output to Excel
If Microsoft Excel is installed on the computer, use this menu to output data
displayed in a graph with CSV Graph Data in Movias Format(→page 67)directly
to Excel.
•
Export
T/HIS
Use this menu to output data displayed in a graph and time data to a text file. If there
are multiple graphs, single data can be output to text files.
Select this menu to open the dialogue box specifying the output destination and file
name for the text file and specify these. T/HIS format text files can be created for
single data. For example, two T/HIS format text files can be created to correspond to
each point from a time change graph for the Y coordinates of Point 0 and Point 1. At
this point, the dialogue box specifying the output destination and file name for each
point will continue to remain open.
•
Print
Print
Prints graphs with the printer.
•
Print
Old Printer/File Menu
This is a menu to maintain compatibility with old versions.
3-2)
Display Menu
As shown in Figure 111, use the display menu to turn the graph toolbar and
graph legend ON/OFF.
Movias Pro User’s Manual
NAC Image Technology Co., Ltd.
Figure 111 Display Menu
3-3)
Settings Menu
As shown in Figure 112, the settings menu executes detailed graph settings,
selection of cursor shape and selection of fonts for list display.
Figure 112 Settings Menu
• Detailed Graph Settings
Use the “Detailed Graph Settings” menu to customize graphs. This is shown
in the screen from Figure 113.
Figure 113 Customized Menu
Next is a description of typical tabs.
>> Axis Tab → Change Scale
Click the “Axis” tab to change the scale of the axis. (Figure 114)
Movias Pro User’s Manual
NAC Image Technology Co., Ltd.
Figure 114 Change Scale
The minimums/maximums for each axis can be checked on this screen and
the minimum/maximum values for the scale of the axis can be set as desired.
The maximum value for the axis scale can be set by checking the maximum.
>> Color Tab → Change Color in Graph Section
Click on the “Color” tab to change the color in a section of the graph. (Figure
115)
Figure 115 Change Color in Graph Section
The sections where the color can be changed include the foreground of the
desktop, the background of the desktop, shadow color, graph foreground,
and graph background. Select the target section from the left side of the
screen and select the color from the right side. The sections corresponding to
the graph are as follows. Use the graph in Figure 116 as an example.
This graph is created with default section colors.
Movias Pro User’s Manual
NAC Image Technology Co., Ltd.
Figure 116 Graph with Default Settings
The graph in Figure 117 is created using black in all of the sections.
Figure 117 Graph using Black in All of the Sections
The next graph is based on the graph in Figure 117 where all of the sections
Movias Pro User’s Manual
NAC Image Technology Co., Ltd.
are white. Each section can be seen.
Figure 118 Example of White Desktop Foreground
Figure 119 Example of White Desktop Background
Movias Pro User’s Manual
NAC Image Technology Co., Ltd.
Figure 120 Example of White Shadow
Figure 121 Example of White Graph Foreground
Movias Pro User’s Manual
NAC Image Technology Co., Ltd.
Figure 122 Example of White Graph Background
>> Style Tab → Change Style of Data Lines
Click on the “Style” tab to change the style of the data lines.
(Figure 123)
Figure 123 Change Style of Data Lines
Movias Pro User’s Manual
NAC Image Technology Co., Ltd.
Select the data line to be changed on the left side of the screen and specify
the color, type of point and the line type on the right side.
•
Cursor Shape
Use the cursor shape menu (Figure 124) to select the cursor shape displayed
in the graph as a vertical line/crossed lines/square.
Figure 124 Cursor Shape Menu
Characteristics of each cursor are as follows.
Vertical Line: Times are very easy to read when the horizontal axis of
the graph is time data.
Crossed Lines: In addition to the characteristics of the vertical line
cursor, data values on the vertical axis are very easy to read.
Square:Effective with trajectory figures (with the X coordinates on the
horizontal axis and the Y coordinates on the vertical axis).
Figure 125 Examples of Vertical Line/Crossed Lines/Square Cursors
If there is multiple data displayed and crossed lines or square cursors are
selected, select the channel to display the cursor. 3-4) Select Channel→page
135)
•
Fonts for List Display
Use this menu to set the font and size for list output.
Movias Pro User’s Manual
3-4)
NAC Image Technology Co., Ltd.
Select Channel
There are several ways to select channels.
a) Click Select Channel
Click Select Channel
select channel.
in the graph window on the right side to
Figure 126 Select with Select Channel
b) Click Graph Line
Select by clicking on a line on the graph.
Figure 127 Select by Clicking Line
c) Click Graph Legend
Movias Pro User’s Manual
NAC Image Technology Co., Ltd.
Select by clicking on the legend in the graph.
Figure 128 Select by Clicking Legend
3-5)
Calculate - Highlight Symbol menu
Use this menu (Figure 129) to temporarily highlight data symbols displayed
on the graph. First, select the channel to highlight the symbol. Then, click
on the Highlight Symbol menu.
Figure 129 Highlight Symbol Menu
Movias Pro User’s Manual
3-6)
NAC Image Technology Co., Ltd.
Calculate-Arithmetic Menu
Use the “Calculate-Arithmetic” menu to execute special calculations on the
data displayed on the graph. An example of such use is as follows.
“Multiply the graph shown in meter units by 1000 to change to millimeter
units.”
With Movias Pro, millimeter units can be selected in graph settings. The
probability of needing “Multiply the graph shown in meter units by 1000 to
change to millimeter units” is slim but is described here because it is an
example of the arithmetic menu that is easy to understand.
•
After the graph is displayed, specify “Calculate – Arithmetic” menu on the graph
screen.
•
Select the “Arithmetic for Single Data” tab to display Figure 130. Follow this figure
for a description of the process.
Figure 130 Arithmetic for Single Data Screen
Movias Pro User’s Manual
NAC Image Technology Co., Ltd.
① Select the data to be multiplied by 1000 and check the boxes at the
front of these rows. If multiple data is displayed in the original graph, it is
displayed in this section so check the boxes of the data to be processed.
②
③、④
⑤
⑥
⑦
⑧
⑨
3-7)
Specify either the X axis data or the Y axis data to be processed.
Specify the processing to be performed. In this case, input 1000 in
the list box (③)and click * for multiplying(④). mu(1000) will
then be entered in the operation box under the operation. mu is an
abbreviation for multiple.
After specifying the process, press “Calculate”. Processing for the
data selected in ① is conducted and the results are entered in ⑥.
Check the boxes at the front of the rows.
Convert the Y axis data units from m to mm.
Change the name of the graph as necessary.
Press “Draw” to display the graph after processing.
Channel Menu
The channel menu operates all of the channels.
Please refer to 3-11)~ 3-13) for details. (→page 143)
Figure 131 Channel Menu
•
Change name
•
Change color
•
Delete the selected channel
3-8)
Tools Menu
The Tools menu performs the following processing for graphs, as shown in
Figure 132.
Figure 132 Tools Menu
•
Select Frame
In this menu, click and drag the mouse on the graph screen to select the frame
corresponding to the position of the cursor.
Movias Pro User’s Manual
•
NAC Image Technology Co., Ltd.
Zoom
Click and the cursor will become a magnifying glass. Drag to the area to be zoomed.
This will zoom the area inside.
Figure 133 Zoom Screen
•
Cancel Zoom
This menu cancels the zoom and reverts to the original.
•
During playback, set the time scale on this graph as the standard
If displaying graphs for multiple sequences or video images with image files of
varying photographic speeds, the time data for the graph clicked in this menu is used
as the standard for the playback speed. For example, if the image is 1000fps and the
waveform data graph is 10000Hz, data is played at 10000Hz sampling intervals.
•
Correct the time data for this graph so the current frame is time 0
Click on this menu and the time for the current frame becomes 0 and the time data
for the graph is converted. This time data conversion impacts only the graph
specified and does not impact the sequence data itself.
Movias Pro User’s Manual
3-9)
NAC Image Technology Co., Ltd.
Graph Window Toolbar
The functions of the graph window toolbar are as follows. 。(Figure 134)
Please refer to the description for each menu for their functions.
•
Select Frame
•
Zoom
•
Cancel Zoom
•
Export
Output to Excel
•
Export
Output to CSV File
•
Copy to Clipboard
•
Print
•
Select Cursor
•
Change Channel Color
•
Display Channel Buttons
•
Set the Time Scale on this Graph as the Standard for Playback
フレーム
選択
ズーム
Excelに
出力
ズーム
取り消し
クリップ
ボードに
コピー
Movias形式の
csvファイル
で保存
印刷
垂直線
カーソル
チャンネル
色変更
十字線
カーソル
Figure 134 Graph Toolbars
チャンネル
ボタン表示
四角
カーソル
再生
時間刻み基準
Movias Pro User’s Manual
NAC Image Technology Co., Ltd.
3-10) Copy/Move Data Between Graph Windows Using Drag and Drop
As shown in Figure 135 below, data can be copied or moved using drag and
drop when graphs are displayed on two screens.
Figure 135 Example of Graphs
To copy data, drag and drop the channel select button for that data to the
graph to be copied using the left button on the mouse. (Figure 136) Graphs
are created as shown in Figure 137.
Figure 136 Copy Channel
Figure 137 Copied Results
Movias Pro User’s Manual
NAC Image Technology Co., Ltd.
In a similar manner, to move channels, drag and drop the channel select
button for that data to the graph to be copied using the left button on the
mouse and select “Move” from that menu.
Figure 138 Move Channel
Figure 139 Move Results
Movias Pro User’s Manual
NAC Image Technology Co., Ltd.
3-11) Change the Name of the Graph Channel
The name of the graph channel can be altered. (Figure 140,Figure 141)
Graph channel names are displayed in the multiple line legend section on
the right side of the graph window.
Figure 140 Click Change Name
Figure 141 Change Channel Name
3-12) Delete Graph Data
If multiple data is displayed on a single graph, data can be deleted as
desired. Right click on the channel corresponding to the data to be deleted
and select the “Delete” menu. (Figure 142)
Figure 142 Delete Channel
3-13) Change the Colors of the Lines in the Graph
Right click on the channel corresponding to the graph where the colors are
to be changed and select the “Change Colors” menu. (Figure 143)
Figure 143 Change the Colors of the Channels
3-14) Graph List Display
Movias Pro User’s Manual
NAC Image Technology Co., Ltd.
Click on the “List” tab on the graph screen to display the list. (Figure 144)
Figure 144 Display List
3-15) Add Comments to Graph.
Comments can be added to graphs. Click on the “Comments” tab on the graph screen to display
comments. These comments can be output to the end of data output to Excel/CSV. (Figure 145)
Figure 145 Edit Comments
3-16) Right Click Menu and Double Clicking on the Graph Windows
In addition to channel buttons, there is a right click menu on the graph
windows with “Legend” , “Axis” and “Title”, that conduct several operations.
If double clicked instead of right clicking, the items in bold on the right click
menu will be implemented.
Please review the description for each item on the menu corresponding to
the main menu for these functions. (Refer to the detailed settings for each
item in the quick settings menu)
Movias Pro User’s Manual
NAC Image Technology Co., Ltd.
Figure 146 Right Click Menu on Legend (Channels)
Figure 147 Right Click Menu on Titles
Figure 148 Right Click Menu on X Axis
Movias Pro User’s Manual
NAC Image Technology Co., Ltd.
Figure 149 Right Click Menu on Y Axis
Figure 150 Graph Area (Right Click Menu on Desktop)
Movias Pro User’s Manual
NAC Image Technology Co., Ltd.
Figure 151 Graph Area (not desktop) Right Click Menu (Quick Settings Menu)
Movias Pro User’s Manual
NAC Image Technology Co., Ltd.
4.4.3 Trajectory Graphs
Click on “Create Trajectory Graph” on the Display Results menu or the
and the dialogue box shown inFigure 152 will open.
trajectory tool
Click “OK” to change the graphs or axis titles and units as necessary.
Next, the trajectory will be displayed in graph format, as shown by
the example in Figure 153The functions of this menu and toolbar are
identical to that in graphing. 22
After creating the trajectory graph, switch display/do not display to select
the points to draw on the trajectory graph. Refer to “4.9.3 Right Click Menu
for Tracking Points (→page 186)” for details.
Figure 152 Dialogue Box for Trajectory Figure Settings
Figure 153 Example of Trajectory Figure
22
The frame selection process for trajectory figures differs from that for graphs. For
trajectory figures, align the cursor on the data line and click when the cursor
changes to the shape of a hand.
Movias Pro User’s Manual
NAC Image Technology Co., Ltd.
4.4.4 Graph Template
Graph Template is a function to create graphs without using the Graph
Settings screen, by following the settings saved in “4.4.21-14) Section (→
page 120)”. This is useful when conducting standard analysis. (Refer to
4.4.21-14) Section for the method to create graph template files. )
Select the “Display Results – Create Graph Template” menu or the
graph template tool on the toolbar to create a graph from a graph
template file.
Select the desired graph template file from the dialogue box
displaying the saved settings.
Multiple graphs can be created at one time by selecting multiple graph
templates.
4.4.5 Lists
First, select the tracked points to be output to the list by clicking on
the data tree. Select the “Display Results –Lists” menu or click Lists
on the toolbar button list. A list such as that shown in the example in
Figure 154 will be displayed.
Figure 154 Example of Display Results - List Output
Movias Pro User’s Manual
NAC Image Technology Co., Ltd.
The contents of this list are as follows.
•
Time: Time data in seconds.
•
X, Y: For 2-dimensional analysis, the X and Y coordinates for the tracked
•
points for pixels, with the starting point at the top left of the screen.
For 3-dimensional analysis, the X and Y coordinates for the tracked points.
Z: For 2-dimensional analysis, the distance data from the camera. (if
conducting depth correction)
For 3-dimensional analysis, the Z coordinates for the tracked points.
4.4.6 3D Stick Animation
This menu provides a 3-dimensional display of a stick figure. Use the slider
to change the line of vision 23.
Figure 155 Example of 3-dimensional Stick Animation
23
To display 3-dimensional stick animation, the stick in the 3-dimensional sequence
displaying this must be defined. Or, before building the 3-dimensional data structure, a
stick definition must be given for one of the multiple 2-dimensional sequences in the 3dimensional version.
Movias Pro User’s Manual
NAC Image Technology Co., Ltd.
4.5 Menu to Specify Point Combinations
The length, area, angle and virtual points combining multiple tracking
points are defined in the “Specify Point Combinations” menu. The center of
gravity for the region is determined by the mass data set for each tracking
point, which is then applied to the model.
4.5.1 Length
Select the “Length” menu to display the screen shown in Figure 156.
Figure 156 Length Settings Screen
•
Select by double clicking on the order of points to create a segment from those
tracking points shown in “Available Points ①”. The points selected will be entered
as “Selected Points ②”. Two or more tracking points can be selected.
If an error is made in the points selected, either double click on those points to delete
or click “Delete All ③” to delete all of the selected points and start over.
•
In ④, select the length of the data output and the time change for the length (primary,
secondary). Units can be specified at the same time.
•
In ⑤, select the horizontal axis data and units.
•
If conducting 3-dimensional analysis, in ⑥, check Lx, Ly and Lz to determine the
Movias Pro User’s Manual
NAC Image Technology Co., Ltd.
length when each is projected on a surface with coordinates. Check La to determine
the length of the space.
With 2-dimensional analysis, check La.
•
Check ⑦ “Automatic Stick” to define a specific length as a stick.
•
After selecting, click “Draw Graph”.
The results are displayed as a graph.
•
The lower half of the settings screen is the same as that of graph.
4.5.2 Area
Select the “Area” menu to display the screen shown in Figure 157. This
functions in the same manner as Length. Three or more points can be
selected.
Figure 157 Area Settings Screen
4.5.3 Angle
1)
Basis for Angle Settings
In Movias Pro, the following four types of angles can be set.
Type 1:Two line segments of two tracking points are selected and the angle
of the
intersection of these is determined. With these two line segments,
Movias Pro User’s Manual
NAC Image Technology Co., Ltd.
the first selected becomes the starting point, and the angle is
measured clockwise or counterclockwise to the second selected. If
selecting line segments with two tracking points, the direction of
the line segments follows the order in which the points were
selected (the direction from the first point selected to the second
point selected). It is easier to understand as vectors. With vectors, if
the origin of two vectors is aligned, it is easy to understand the
angle of which section is to be determined. It is the same with types
2-4.
Type 2: The angle of sections between 2 vectors is determined 24.
With these two vectors, the first vector selected becomes the
starting point, and the angle is measured clockwise or
counterclockwise to the second vector selected.
Type 3: The angle between the line segment of two tracking points and the
coordinate axis is measured. With the coordinate axis as the
starting point, the angle is measured clockwise or counterclockwise
to the selected line segment.
Type 4: The angle between the vector and the coordinate axis is measured.
With the coordinate axis as the starting point, the angle is
measured clockwise or counterclockwise to the selected vector.
In addition to angles, data that can be graphed includes angular velocity
and angular acceleration. Units that can be specified for each type of data
are as follows.
Angle: radian, degrees
Angular velocity: rad/s, deg/s, rpm
Angular acceleration:rad/s2, deg/s2
Angles can be expressed in the following three ways.
-π to π: The angle expressed as an integer from –π (-180 degrees) to π
(180 degrees).
If over 180 degrees, for example, 181 degrees is expressed as –
179
degrees.
This will appear as an unconnected line when graphed. The
same will apply for those with less than –180 degrees.
0 to 2π: The angle expressed as an integer from 0 degrees to 2π (360
degrees).
If items that rotate exceed 360, it will reset at 0. This will
appear as an unconnected line when graphed. The same will apply for those
with less than 0.
Cumulative angle: To avoid having unconnected lines on a graph such as
that when 361 exceeds 360, a continuous angle is determined.
24
Vectors for type 2 and type 4 must be defined as virtual points (described later).
Movias Pro User’s Manual
2)
NAC Image Technology Co., Ltd.
Type 1 Angles
The settings screen for Type 1 angles is shown in Figure 158.
Figure 158 Type 1 Angle Settings Screen
Four points are specified to determine two line segments in the “Starting
Points or Vectors” section of this screen. Set two points P1 and P2 specifying
the line segment that will become the starting point. Set two points P3
andP4 specifying the second line segment.
Set the data type, unit, angle expression and angle direction in the “Y Axis
(vertical axis)” section.
Set the data type and unit in the “X Axis (horizontal axis)” section.
Check “Automatic Stick” to define the stick figure of connected dots using
the angle settings.
The bottom half of the screen is identical to graph.
Movias Pro User’s Manual
3)
NAC Image Technology Co., Ltd.
Type 2 Angles
The settings screen for Type 2 angles is shown in Figure 159.
Figure 159 Type 2 Angle Settings Screen
Two vectors are specified in the “Starting Points or Vectors” section of this
screen. Set V1 as the vector of the starting point. Set V2 as the second vector.
Otherwise, this is identical to that of Type 1. (excluding automatic stick)
Movias Pro User’s Manual
4)
NAC Image Technology Co., Ltd.
Type 3 Angles
The settings screen for Type 3 angles is shown in Figure 160.
Figure 160 Type 3 Angle Settings Screen
Two points are specified in the “Starting Points or Vectors” section of this
screen to determine the line segment. Set the two points designating the
line segment as P1 and P2.
Select axis coordinates that will be the standard for measurement of angles
in “Axis Coordinates”.
Otherwise, this is identical to that of Type 1. (excluding automatic stick)
Movias Pro User’s Manual
5)
NAC Image Technology Co., Ltd.
Type 4 Angles
The settings screen for Type 4 angles is shown in Figure 161.
Figure 161 Type 4 Angle Settings Screen
Vectors are specified in the “Starting Points or Vectors” section of this screen
to determine the angle. Otherwise, this is identical to that of Type 3.
Movias Pro User’s Manual
NAC Image Technology Co., Ltd.
4.5.4 Virtual Points
Virtual points points or vectors created by combining tracking points. Other
virtual points can be created by combining them with other previously
created virtual points. The 9 ytpes of virtual points include those from Type
1 to Type 9.
1)
Type 1 Virtual Points
Type 1 Virtual Points (Figure 162) are points on a line connecting two
tracking points P1 and P2. This virtual point is created by a coefficient of
the numbers of the two points. The coefficient(k) is expressed as the
distance from P1 to the virtual point (with 1 as the distance from P1 toP2).
Figure 162 Type 1 Virtual Point Settings Screen
2)
Type 2 Virtual Points
Type 2 virtual points (Figure 163) are created where P2 rotates around P1
within the surface created by P1, P2, and P3. With the rotation direction in
the direction from P2 to P3, the rotation angle becomes the coefficient.
Movias Pro User’s Manual
NAC Image Technology Co., Ltd.
Figure 163 Type 2 Virtual Point Settings Screen
3)
Type 3 Virtual Points
Type 3 virtual points (Figure 164) are created where P2 rotates around P1
within the surface created by P1, P2, and P4. With the rotation direction in
the direction from P2 to P4, the rotation angle becomes the coefficient. P4 is
on the line passing through P1 that is perpendicular to the surface formed
by P1, P2, and P3. P4 is positioned on the right screw on P1 and is on the
side that rotates around from P2 to P3.
Figure 164 Type 3 Virtual Point Settings Screen
4)
Type 4 Virtual Points
Type 4 virtual points (Figure 165) are vectors with the ending point of the
virtual point created in the same manner as that in Type 1 using P1 as the
starting point
Figure 165 Type 4 Virtual Point Settings Screen
Movias Pro User’s Manual
5)
NAC Image Technology Co., Ltd.
Type 5 Virtual Points
Type 5 virtual points (Figure 166) are vectors created from the sum of two
vectors. When summing, a coefficient is applied to each vector.
Figure 166 Type 5 Virtual Point Settings Screen
6)
Type 6 Virtual Points
Type 6 virtual points (Figure 167) are points where one point is the starting
point and one vector is the ending point. Coefficients can be applied to
vectors.
Figure 167 Type 6 Virtual Point Settings Screen
Movias Pro User’s Manual
7)
NAC Image Technology Co., Ltd.
Type 7 Virtual Points
Type 7 virtual points (Figure 168) are unit vectors in the direction of each
coordinate axis.
Figure 168 Type 7 Virtual Point Settings Screen
8)
Type 8 Virtual Points
Type 8 virtual points (Figure 169) are unit vectors on lines connecting two
points.
Figure 169 Type 8 Virtual Point Settings Screen
Movias Pro User’s Manual
9)
NAC Image Technology Co., Ltd.
Type 9 Virtual Points
Type 9 virtual points (Figure 170) are element vectors of a given vector.
Figure 170 Type 9 Virtual Point Settings Screen
4.5.5 Mass
The mass of each point on the screen shown in Figure 171 is set in
kilograms. Mass is used in calculations of kinetic volume, energy and center
of gravity.
Figure 171 Mass Settings Screen for Measurement Points
Movias Pro User’s Manual
NAC Image Technology Co., Ltd.
4.5.6 Area Center of Gravity
The area center of gravity is a center of gravity for a combination of multiple
points. The mass of these points was set previously in エラー! 参照元が見つ
かりません。.
Figure 172 Area Center of Gravity Settings Screen
Check the relevant points on the screen in Figure 172 to select. Specify the
name of the center of gravity point. Click “Execute” to calculate the center of
gravity point and to display the data tree. The AVI drawing will be
displayed in the same manner as standard points so the results can be
graphed.
Calculation Example: The area center of gravity is calculated for points P1,
P3, P6 and P7 as follows.
GX =
m1 × P1 X + m3 × P3 X + m6 × P6 X + m7 × P7 X
m1 + m3 + m6 + m7
GY =
m1 × P1Y + m3 × P3Y + m6 × P6Y + m7 × P7Y
m1 + m3 + m6 + m7
GZ =
m1 × P1Z + m3 × P3Z + m6 × P6 Z + m7 × P7 Z
m1 + m3 + m6 + m7
Here, m1, m3, m6 and m7 are the mass for points P1, P3, P6 and P7.
Movias Pro User’s Manual
NAC Image Technology Co., Ltd.
4.5.7 Model Application
Refer to “エラー! 参照元が見つかりません。エラー! 参照元が見つかりませ
ん。” for models and model defined ASCII files.
1)
Reading Model Defined ASCII Files
After selecting a sequence, select the “Model Applications” menu. The screen
in Figure 173 will be displayed.
Figure 173 Reading Model Defined ASCII Files
Click “Read Model” on this screen. The screen in Figure 174 will be
displayed.
Figure 174 Model Defined ASCII File Settings
Movias Pro User’s Manual
NAC Image Technology Co., Ltd.
Specify the model defined ASCII file to be read using this screen.
screen in Figure 175 will be displayed.
The
Figure 175 Assign Name to Model
Specify a name to be assigned to the model. Use a name that easily
identifies the model.
Repeat this to read multiple models.
2)
Applying Models to Sequences
First, select the model to apply to a sequence in the “Select Model” section.
If the model selected can be applied to a sequence,
“Model Application Possible” will be displayed in the verdict section. Click
on “Apply Model” at the bottom right and a new sequence will be created
from those results.
If the tracking points are insufficient, a message stating “The number of
points are insufficient for applying to a model” will be displayed in the
verdict section as the model selected cannot be applied.
Figure 176 Applying Models to Sequences
Movias Pro User’s Manual
NAC Image Technology Co., Ltd.
4.6 Menu to Convert Coordinates
In the “Convert Coordinates” menu, new coordinates can be determined
using tracking points and coordinates for points can be corrected with
calculations based on these. Use one of the tracking points as the new
coordinate starting point, or use two tracking points to determine the X and
Y coordinate axis.
As demonstrated below, the settings for these new coordinates are
particularly effective when determining the motion of an area different from
the area in motion.
•
Manequin motion relative to the vehicle for automobile crash tests
•
Movement of another area of the body relative to the hips
•
Mechanical movement on a vibrating table
•
Elimination of camera movement during photography
This “Convert Coordinates” menu is also used for changing time data and
displacement data standards.
4.6.1 Specifying the Starting Point
Select the “Specify Starting Point” menu and the screen in Figure 177 will
be displayed. This screen is a section of the “Starting Point and Axis” tab on
the 2-dimensional calibration screen.
Figure 177 Screen to Specify the Coordinate Starting Point
•
Check “Bottom Left of Screen” and the starting point will become the bottom left
corner of the screen.
(In the File-Settings menu, if the upper left is selected as the default starting point,
this will be at the upper left of the screen. )
•
Check “Fix” to set a particular location on the screen as the starting pont. After
clicking on “Specify Starting Point” click on the location on the screen that will be
the starting point.
The area clicked will be enlarged for display so drag the mouse so the × mark is
exactly aligned for the starting point and then click the confirm button
.
Movias Pro User’s Manual
•
NAC Image Technology Co., Ltd.
Check “Use Tracking Points” to specify the tracking point as the starting point and
specify the point to be the starting point.
4.6.2 Specify the Coordinate Axis
The direction of the coordinate axis can be designated with the Specify the
Coordinate Axis menu. Select the “Specify the Coordinate Axis” menu and
the screen in Figure 178 will be displayed. This screen is a section of the
“Starting Point and Axis” tab on the 2-dimensional calibration screen.
Figure 178 Coordinate Axis Settings Screen
•
Check “Right Facing Horizon” and vertical and horizontal lines on the screen will
become the coordinate axis (the direction of the axis is to the right).
•
To arbitrarily set the direction of the coordinate axis, set the position of two points
on the screen. A line will connect these two points and the parallel line will become
the coordinate axis. The direction is from the first point to the second point. First
check “Fix”. After clicking on “Specify Position” click on the first point (starting
point) on the screen. The area clicked will be enlarged for display so drag the mouse
so the × mark is exactly aligned for the starting point and then click the confirm
button
. Next, click on the location for the second point in the same manner to
precisely align it and then click the confirm button
•
Check “Use Tracking Points” to specify the tracking point as the starting point and
specify the second point to be the axis.
•
.
Select the direction of the Y axis.
Movias Pro User’s Manual
NAC Image Technology Co., Ltd.
4.6.3 2-dimensional Calibration
1)
Operating Procedures
Use this menu to implement “2-dimensional Calibration” to set and correct
the standard length.
Select this menu to display the screen in Figure 179.
Figure 179 2-dimensional Calibration
First, use the frame playback control button at the bottom left of the screen
to display the frame of the two points that will be the standard.
The standard length is set according to the following procedure.
1-1)
Use the Specify Mark Type block in the upper right of the screen (Figure 180) to
select the type of mark to be used as the standard point. Select “Do Not Specify”
for those other than 4-quarter, solid and shaded marks.
Figure 180 Specify Mark Type block
Movias Pro User’s Manual
NAC Image Technology Co., Ltd.
1-2)
Click “Specify Standard Point”.
1-3)
The cursor will be arrow shaped and the label Mark1 will be attached.
In the image, click close to the center of the first point to be the standard
point.
Figure 181 Calibration
1st Point
The automatic detection results for the center of the mark will be displayed
in the zoom window on the right side. Operation is as follows.
•
If there is no problem with detecting the center
Proceed to specify the 2nd point.
•
If there are problems detecting the center
Drag the × mark indicating the center position to near the center and click on the
magnet button (
) to perform automatic detection of the center again. Once the
center is detected properly, click Verify (
) and proceed to specify the 2nd point.
If the center is still not detected correctly, drag the × mark to the center and click
Verify (
1-4)
) and then proceed to specify the 2nd point.
Next, click in the vicinity of the center of the 2nd point.
Verify or correct the center detection results in the same manner as with the
1st point.
1-5)
In the interval section, input the actual dimensions between the two points in mm
units.
1-6)
If conducting depth correction
In the standard point depth section, input the distance (photographic distance)
from these two points to the camera in m units.
If not conducting depth correction, leave as 1.
Movias Pro User’s Manual
1-7)
NAC Image Technology Co., Ltd.
Click “Calculate Coefficient”.
The conversion coefficient for actual dimensions will be displayed.
Figure 182 Screen when Calibration is Complete
1-8)
2)
Click “OK”.
Center Detection Parameters
Various center detection parameters are used for center mark detection. The
parameters used those saved as defaults in the automatic tracking section.
(If the parameters in the automatic tracking section are not changed, the
system default parameters are used. ) If the center mark cannot be properly
detected even when there are no problems with the image, modify the
parameters in the tracking screen and save the results as defaults.
Movias Pro User’s Manual
NAC Image Technology Co., Ltd.
4.6.4 Mirror Image
Click on the “Mirror Image” menu to invert the X coordinates. The video
image will also be reversed left/right. Click again to revert to the original.
4.6.5 Specify Time Standards
This is an operation to change the To frame that is the starting point for
time and is performed on the “Tracking - Editing” screen.
4.6.6 Specify Displacement Standards
Select the “Specify Displacement Standards” menu to display the screen in
Figure 183.
Figure 183 Screen to Specify Displacement Standards
Input the frame number that will become the new displacement standard
and click “OK”.
Click
and the frame currently displayed becomes the new displacement
standard.
Movias Pro User’s Manual
NAC Image Technology Co., Ltd.
4.7 Tools Menu
4.7.1 Tracking - Editing
Automatic tracking is performed here and the tracking results can be edited.
Refer to “5Tracking Window” for details.
4.7.2 Stick Definitions
Stick figure definitions are located here. Stick figures (Figure 184) are
defined as lines connecting two or more tracking points. Stick figures are
superimposed on AVI images.
Figure 184 Entire Screen for Stick Definitions
1)
Stick Definitions and Entry
Stick figure definitions are conducted in the “Stick Definitions” section at
the top left of the screen. (Figure 185).
Figure 185 Stick Definition Section
First, input the name of the stick to be defined in the Stick Title section.
Next, double click on the color section to set the stick color.
Then display the frame that is suitable for defining sticks and click in order
of the labels for the points forming the sticks (section displaying Point 0).
Movias Pro User’s Manual
NAC Image Technology Co., Ltd.
Numbers of the points forming the sticks are punctuated by commas.
Instead of clicking on points inside the image, commas can be input to
punctuate the numbers of the points. For example, if defining sticks
connecting the 4 points of 2, 5, 8, 9, input 2,5,8,9.
If an error is made in specifying the numbers of the points, click
on the
right side, delete the numbers of the input points and re-enter them.
Once this is complete, click “Enter”. Repeat this for the required number of
sticks.
Sticks entered will be displayed in the section “Entered Sticks” (Figure 186).
Since the entered sticks are displayed, sticks can be replaced with
as
necessary.
Click “Global Entry” and the sticks currently displayed will be entered as
global sticks.
Figure 186 Entered Stick Section
2)
Global Stick
If sticks defined by sequences are globally saved, they can be used in other
sequences. (Figure 187) To apply a stick saved globally to a sequence, select
the applicable global stick and press “Apply”.
Figure 187 Global Stick Section
Important : Tracking points forming sticks are identified by the point
number. If applying global stick, and if a tracking point with the
same number and order as when it was defined is not in the sequence,
this will generate an error.
3)
3D Sequence Sticks
If displaying sticks with 3D analysis, start with a 3D structure and define
the sticks during the 2D stage. Sticks defined in 2D can be moved to
initially formed 3D sequences.
Movias Pro User’s Manual
NAC Image Technology Co., Ltd.
4.7.3 Optical Distortion Correction/SAE Chart Measurement
Select “Optical Distortion Correction/SAE Chart Measurement” from the
“Tools” menu to display the screen in Figure 188.
Figure 188 Initial Screen for Optical Distortion Correction/SAE Chart
Measurement
Click “New”. The screen in Figure 189 will be displayed.
Figure 189 Name Combination Attribute Settings and Specifying Files
The following can be performed on this screen.
•
Name Combinations
Input the name specifying the combinations of cameras and lenses that photographed
images to be measured (identifying name). Name combinations must be input.
Movias Pro User’s Manual
•
NAC Image Technology Co., Ltd.
Items from Camera Names to Lens Production Number
Input items from the camera names to the lens production number. Input is not
essential but since this is the basis for specifically determining what camera and lens
combination is involved, it should be input.
•
Data for Correcting Optical Distortion
Shows whether or not data for correcting optical distortion has been calculated.
•
SAE J211 D/I
This value is displayed when distortion index calculation is conducted with SAE
J211. This is not essential.
•
Image Files for Correcting Optical Distortion
Press
to select the image file (TIFF image file) where images photographed of
the chart for correcting optical distortion are recorded with the combination of these
cameras and lenses. Press “Calculate” to measure data for correcting optical
distortion using the image file (1).
•
Image File for SAE J211 Distortion Index
Press
to select the image file (AVI file) where the image for calculating the SAE
J211 Distortion Index photographed with this combination of cameras and lenses is
recorded. Press “Calculate” to measure the distortion index data using the image file
(0).
1)
Measuring Optical Distortion Correction Data
Figure 190 is displayed next. Click “Specify Four Corners”.
Figure 190 Specify Four Corners
A dialogue box stating “Click on the Upper Left Corner of the Image” will
appear. Click on the upper left corner of the chart in the image. The borders
Movias Pro User’s Manual
NAC Image Technology Co., Ltd.
of the section clicked will be enlarged and the screen in Figure 191 will be
displayed.
Figure 191 Closeup of Upper Left Corner
In the enlarged image displayed at the upper right of the screen, right click
the mouse on the corner and then click on “Verify Intersection”. If the
position displayed in the enlarged image is not correct, drag with the left
mouse button to adjust.
Specify the upper right, bottom left and bottom right corners in the same
manner.
After specifying the corner has been completed, click “Semi-automatic
Identification”. The dialogue box in Figure 192 will be displayed.
Figure 192 Dialogue Box for Specifying Grid Lines
Use this dialogue box to input horizontal and vertical lines to create a chart
and then click “OK”. Conduct semi-automatic identification of the
intersection and the screen in Figure 193 will appear.
Movias Pro User’s Manual
NAC Image Technology Co., Ltd.
Figure 193 Results of Semi-automatic Identification of Intersection
View this screen and determine if there are any errors in identifying the
intersections.
If there are no errors and all of the intersections are properly identified,
click “Calculate Coefficient” to complete the identification process for the
intersections.
If there are errors and there are intersections that are not properly
identified, first manually correct the errors. The procedure for correcting
errors is as follows.
•
Use the mouse to click on the small circle corresponding to the intersection with the
error in the image of identification results.
•
The section clicked will be displayed as an enlarged image to the top right. Right
click at the intersection in the same manner as when inputting the corners and then
click “Verify Intersection”.
•
Repeat this for all of the intersections with errors.
After correcting all of the errors, click “Calculate Coefficient”.
The screen in Figure 194 will reappear. Click “OK” to finish.
Movias Pro User’s Manual
NAC Image Technology Co., Ltd.
Figure 194 Screen to Finish Correction of Optical Distortion
2)
Measurement of Distortion Index (SAE J211/2 standards REV.MAR95)
Figure 195 is shown next.
Figure 195 Initial Screen for Measurement of Distortion Index
Click “Measure” after selecting “Semi-Automatic”. Continue to Figure 196.
Movias Pro User’s Manual
NAC Image Technology Co., Ltd.
Figure 196 Indicate the Center of the Circle
Sequentially click on the mark in the center of the 5 circles on this screen. A
message will appear on the bottom of the screen to click on the center of the
circles at the upper left, upper right, lower left, lower right and center.
Once the centers of the 5 circles are specified, mark detection is
automatically conducted.
Since the center might not be detected properly or there might be a problem
with mark detection, a small cross will be displayed in the location detected
as the center mark and the screen shown in Figure 197 will be displayed.
Figure 197 Potential Problems with Detecting the Centers
View the cross displayed and
•
If the location of the cross is in the center, click “Yes”.
•
If the location of the cross is not in the center, click “No” and manually click on the
center mark with the cursor.
The Distortion Index is calculated once center mark detection has been
completed and Figure 198 will be displayed.
Movias Pro User’s Manual
NAC Image Technology Co., Ltd.
Figure 198 Distortion Index Measurement Completed
Movias Pro User’s Manual
NAC Image Technology Co., Ltd.
4.8 Help Menu
4.8.1 Sample Mark for Printing
Open the pdf file of the sample mark for printing.
Adobe(R) Reader is required.
Refer to the Adobe website http://www.adobe.co.jp/ for details.
4.8.2 User’s Manual
Open the pdf file for this user’s manual.
Adobe(R) Reader is required.
Refer to the Adobe website http://www.adobe.co.jp/ for details.
4.8.3 Version
Information on the version will be displayed.
Movias Pro User’s Manual
NAC Image Technology Co., Ltd.
4.9 Data Tree Right Click Menu
Right click on the items displayed on the data tree to delete or change the
display color of the tracking points.
Since only some operations can be conducted by right clicking, they are
described here. Please review the descriptions on the related pages for
operations from the main menu.
4.9.1 Project Right Click Menu
Right click on the project on the data tree and the popup menu in Figure
199 will be displayed.
Figure 199 Project Right Click Menu
Click “Close Project” to close a project.(4.2.3 Close Project→page 84)
Click “Save Project” to save a project.(4.2.4 Save Project→page 84)
Click “Save Project As” to save a project under a different name. (4.2.5 Save
Project As→page 84)
Click “Change Project Name” to change the name of a project. (4.2.7 Change
Project Name→page 85)
Click “Delete Project” to open the following confirmation screen. If “Yes”,
any unwanted projects can be sent to the Explorer trash bin. Use caution
when moving all project files, including analytical results and original
image files to the trash bin.
Movias Pro User’s Manual
NAC Image Technology Co., Ltd.
Figure 200 Deleting Projects(Confirmation Screen)
Click “Open Project in Explorer” to open a previously saved project in
Explorer.
Movias Pro User’s Manual
NAC Image Technology Co., Ltd.
Figure 201 Open Project in Explorer
Movias Pro User’s Manual
NAC Image Technology Co., Ltd.
Click “Properties” to display the project information in Figure 202.
Figure 202 Project Information
4.9.2 Sequence Right Click Menu
Right click Sequence on the data tree to display the popup menu in Figure
203.
Figure 203 Sequence Right Click
Click “Properties” to display the sequence properties shown in Figure 204.
Click “Change Name” to change the sequence name.
Click “Delete” to delete the sequence.
Use caution since it cannot be recovered.
Movias Pro User’s Manual
NAC Image Technology Co., Ltd.
Figure 204 Sequence Properties
4.9.3 Right Click Menu for Tracking Points
Right click the tracking points on the data tree to display the popup menu
in Figure 205.
Figure 205 Tracking Points Right Click
Click “Tracking-Editing” to open the tracking screen again. Add or edit
tracking points (correct results) here. (5 Tracking Window→page 191)
Click “Display Video” to display the video. (エラー! 参照元が見つかりません。
→page エラー! ブックマークが定義されていません。)
Movias Pro User’s Manual
NAC Image Technology Co., Ltd.
Click “Create Graph” to create a graph of the selected sequence. (エラー! 参
照元が見つかりません。 エラー! 参照元が見つかりません。→page エラー! ブ
ックマークが定義されていません。)
Click “Create Trajectory Graph” to create a trajectory graph of the selected
sequence. (エラー! 参照元が見つかりません。 エラー! 参照元が見つかりませ
ん。→page エラー! ブックマークが定義されていません。)
Click “Create Graph From a Template” to create a template graph of the
selected sequence. (4.4.4 Graph→page 149)
Click “2-dimensional Calibration” to display -set 2-dimensional calibration
information for the selected sequence. (4.6.3 2-dimensional Calibration →
page 168)
Click “Switch Display/Do Not Display Points” and the screen in Figure 206
will be displayed. Check the points to be displayed when displaying points
in a trajectory figure or video display or remove checks when not displaying
points.
Figure 206 Display/Do Not Display Points
Movias Pro User’s Manual
NAC Image Technology Co., Ltd.
4.9.4 Right Click Menu for Individual Tracking Points
Right click on Points on the data tree to display the popup menu in Figure
207.
Figure 207 Tracking Points Right Click
Click “List Display” and the list display of analysis results will be displayed.
(Graph List Display→page 143)
Click “Change Name” to change the name of the tracking points.
“Switch Display/Do Not Display Points” is identical to that of the tracking
points above. (→Figure 206)
Click “Change Display Color” to change the color of the point displayed on
the video display.
Click “Delete” to delete the sequence of these tracking points. Use caution
since deleted points cannot be recovered.
4.9.5 Graphs
Right click on a graph entered in the Results in the data tree and the popup
menu in Figure 208 will be displayed.
Figure 208 Graph Results Right Click
Click “Display” to show the graph entered. (→エラー! ブックマークが定義
されていません。 page)
Click “Delete” to delete the graph entered.
Movias Pro User’s Manual
NAC Image Technology Co., Ltd.
4.9.6 Optical Distortion Correction
Click ODC on the data tree to display the popup menu in Figure 209.
Figure 209 Optical Distortion Correction Right Click
Click “Apply” and optical distortion correction will be applied to this
sequence.
Click “Delete” and the optical distortion correction applied to this sequence
will be deleted.
Movias Pro User’s Manual
NAC Image Technology Co., Ltd.
Movias Pro User’s Manual
NAC Image Technology Co., Ltd.
5. Tracking Window
5.1 Explanation of Tracking Window Buttons
This chapter explains the buttons in the tracking window.
The tracking window is divided into the 7 sections shown in Figure 210. An
explanation for the buttons in each section is given here. There are no
buttons in the Video View and Message Display sections to explain.
Figure 210 Sections of the Tracking Window
Movias Pro User’s Manual
1)
NAC Image Technology Co., Ltd.
Toolbar
The toolbar includes the sections shown in Figure 211.
Figure 211 Toolbar
: Displays the frame number of the current frame.
Input a number here to change the current frame.
: Displays the beginning frame number of the selected range.
Input a number here to change the beginning frame.
: Displays the ending frame number of the selected range.
Input a number here to change the ending frame.
, :Plays back the video file (AVI file, MCFF file) forward or in reverse.
, :Frame by frame playback of the video file forward or in reverse.
, :Jumps the current frame to the one immediately before or after. The
jump frame must be either the first/last frame of the video file or the
beginning/ending frame of the selected range.
: Jumps to the T0 frame as the current frame.
: Sets the current frame as the To frame.
: Changes to the point selection mode.
: Changes to the mode to add 4-quarter targets.
: Changes to the mode to add solid targets.
: Changes to the mode to add shaded targets.
: Changes to the mode to add correlation targets.
: Deletes the (selected) targets.
: Sets the position of the target (when tracking again after deleting).
: Deletes the (selected) targets within the current selected range.
: Changes the current frames to the beginning frame of the selected range.
: Changes the current frames to the ending frame of the selected range.
: Deletes the selected range.
: Enlarged/reduced display of the image.
: Displays 1:1 sizing of the image. (pixels)
: Displays the image in exactly the same size as the Video View.
: Switches between display all of the tracking points in the video view and
display of only the selected points.
2)
Graph View
Graph View includes the sections shown in Figure 212.
Movias Pro User’s Manual
NAC Image Technology Co., Ltd.
Figure 212 Graph View
: Select the type of graph.
X-T: plays a graph of the X coordinates for the frame number.
Y-T: Displays a graph of the Y coordinates for the frame number.
XY-T: Displays a graph of the trajectory figure (horizontal axis is the X
coordinates, vertical axis is the Y coordinates)
Complete tracking: Displays the tracking location for each target.
Incomplete tracking: Displays the tracking location or deleted location for
each target.
: Moves the current frame. If clicked inside a graph while this button is
pressed, the current frame moves to the location clicked.
: Designates the selected range. If dragged inside a graph while this
button is pressed, the dragged range becomes the selected range.
: Zooms the graph display. If dragged inside a graph while this button is
pressed, the dragged range becomes the selected range.
: Resets the zoom display and displays the entire object.
: Resets the selected range and sets the entire object as the selected range.
Movias Pro User’s Manual
3)
NAC Image Technology Co., Ltd.
Zoom View
Zoom view includes the sections shown in Figure 213.
Figure 213 Zoom View
: Enlarged/reduced display of the image.
:Automatic centering toolbar button. Press this button to automatically
view the center of the target and move to that point.
: Verification button to indicate if the operation has been completed, such
as when designating the center of a target or interrupting tracking.
: Button to return to the original operation when changing the location of
the center of the target.
Movias Pro User’s Manual
4)
NAC Image Technology Co., Ltd.
Tracking Point List
The tracking point list includes the sections in Figure 214.
Figure 214 Tracking Point List
: Click this button after selecting a target to switch between track/do not
track the target.
: Changes the tracking method to automatic tracking (auto).
: Changes the tracking method to semiautomatic tracking (semi-auto).
: Changes the tracking method to manual tracking.
: Click this button after selecting a target to switch between display/do
not display the tracking results.
: Opens the target property settings dialogue box.
: Click this button to select all tracking points as a group.
5)
Right Click Menus for Tracking Points on the Tracking Point List
Right click a tracking point on the tracking point list to open the screen in
Figure 215.
Figure 215 Right Click Menu for the Tracking Point List
Movias Pro User’s Manual
NAC Image Technology Co., Ltd.
This menu includes the following items.
: Opens properties screen for the right clicked tracking points.
: Changes the name of the right clicked tracking points.
: Selects all of the points.
: Changes the type of the right clicked tracking points.
: Changes the right clicked tracking points to stationary
points.
: Changes the tracking mode of the right clicked tracking points.
: Deletes the right clicked tracking points from the list.
: Deletes the tracking results for the right clicked
tracking points within the selected range.
5-1)
Stationary Points
If desired, any location within an image can be made into a stationery (does
not move) point. After being entered, it is handled in the same manner as
other tracking points.
Stationary points have the following characteristics.
•
Stationary points can be designated where there are no marks (4-quarter or solid).
•
If the location of a stationary point in a given frame is changed, this change is
applied to all of the frames.
•
5-2)
Stationary points cannot be deleted in a given section of a range.
Delete Tracking Results in a Selected Range
If delete tracking results in a selected range is specified, the screen in
Figure 216 will be displayed.
Movias Pro User’s Manual
NAC Image Technology Co., Ltd.
Figure 216 Delete Tracking Results in a Selected Range
The range for deletion is selected with this screen.
Movias Pro User’s Manual
6)
NAC Image Technology Co., Ltd.
Tracking Controller
The tracking controller includes the sections in Figure 217.
Figure 217 Tracking Controller
: Click this button to start tracking with the set conditions.
: Click this button during tracking to interrupt tracking.
: Press this button for the tracking direction.
: Press this button for automatic reverse tracking.
: Press this button for reverse tracking.
:Use this for frame by frame image playback.
Movias Pro User’s Manual
NAC Image Technology Co., Ltd.
5.2 Other Operations
5.2.1 Specify Range
Specify range is used to designate the range of the frames to be tracked and
is necessary to designate the range of frames to delete sections of tracked
results and conduct additional tracking.
It includes the following three methods.
•
Method Designating Exact Frame Number
This method is useful when the starting and ending frame numbers of the range have
been determined.
Input the starting frame number for the range using the current frame on the toolbar
(
). (Press Enter after input.) After the current frame moves to the
starting frame of the range, click the range starting frame settting button ( ).
Input the ending frame of the range in the same manner and then click the range
ending frame button ( ).
•
Method of Specifying on a Graph
#1
This method is useful when specifying a range while viewing the tracking status on a
graph. Verify that the move current frame button ( ) in View Graph is pressed. If not,
click it. Click on the location of the starting frame of the range on the graph. The
location clicked becomes the current frame. (this can be clicked multiple times.) Use the
frame by frame buttons ( 、 ) on the toolbar to make minute adjustments to the
current frame (to move multiple frames) , Click on the range starting frame settings
button ( ) to specify. In the same way, click on the location of the ending frame for the
range and then click on the range ending frame settings button ( ).
•
Method of Specifying on a Graph
#2
This method is useful when specifying a range while viewing the tracking status on a
graph.
Click on the select range settings button ( ) in View Graph. Drag from the range
starting frame on the graph to the range ending frame.
5.2.2 Delete Range Specification
To delete a range specification (select the entire range), click on the delete
range button ( ) on the toolbar. Deletion can also be conducted by clicking
the delete range button ( ) in Graph View.
Movias Pro User’s Manual
NAC Image Technology Co., Ltd.
5.2.3 Display Tracking Window
If it becomes necessary to track new points after closing the tracking
window when initially completing tracking, or if correcting the tracking
results becomes necessary, the tracking window must be opened again. To
open the tracking window again, double click or right click on Tracking
Points in sequences on the data tree and select the “Tracking ・Editing”
menu displayed. (Figure 218) The tracking window can also be opened by
selecting the Tracking-Editing” menu on the Tools menu.
Figure 218 Tracking・Editing Menu
5.2.4 Selecting Targets
When performing any activity relating to targets in the tracking window,
there may be occasions when it is necessary to select targets for the activity.
Selecting targets is conducted in the following 4 manners.
•
Click on the target mark (
or
) displayed in Video View.
Targets selected will be shown in yellow (default).
•
Click on the line corresponding to the selected target from those lines on the graph
shown in Graph View. The line of the selected target will become thicker.
•
Select from the list box (
•
Click from the list of tracking points on the row with the selected target.
) in the Zoom View section.
5.2.5 Deleting Targets
The following three methods exist to delete tracking targets.
•
First, select the target to delete using the method described in エラー! 参照元が見
つかりません。. Then, select the delete menu for Editing – Points.
•
First, select the target to delete using the method described in エラー! 参照元が見
つかりません。. Then click on the delete button
( ) for Toolbar points.
•
Align the cursor with the target to be deleted from the list of tracking points and then
right click. Then, click on the menu for deleting points.
Movias Pro User’s Manual
NAC Image Technology Co., Ltd.
5.2.6 Deleting Tracking Results by Specifying the Range
If the tracking results are partially wrong, they can be deleted and
corrections can be made on only that section. This describes the method of
deleting tracking results by specifying the range.
1)
Ranges that Can Be Specified
The following 5 types can be designated as ranges to be deleted.
2)
•
Range between starting frame and ending frame
•
All frames
•
Current frame only
•
Range from the starting frame to the current frame
•
Range from the current frame to the ending frame
Deletion Method
The method for deleting tracking results by specifying the range is as
follows.
•
First, select the range to delete using the method described in エラー! 参照元が見
つかりません。.
Or adjust the current frame.
•
Next, select the target to delete using the method described in エラー! 参照元が見
つかりません。.
•
With either method, the screen in Figure 219 will be displayed.
1) Select “Delete Tracking Results by Specifying the Range” from the Editing menu.
2) Click on the “Delete Tracking Results by Specifying the Range” button ( ) on
the toolbar.
3) Align the cursor with the target to be deleted from the list of tracking points and
then right click. Then select the “Delete Tracking Results for the Selected Range”
menu.
•
Figure 219 will be displayed. Select the range to delete and click “OK”.
Movias Pro User’s Manual
NAC Image Technology Co., Ltd.
Figure 219 Delete Tracking Results by Specifying the Range
Movias Pro User’s Manual
NAC Image Technology Co., Ltd.
5.2.7 Method to Track Again
Figure 220 is a reference screen when Point 1 has been partially deleted.
Figure 220 Partially Deleted Point 1
In this example, Point 1 in the range of frames 100~200 is partially deleted.
The current frame is 150.
To begin retracking Point 1, click the “Start Tracking” button.
The dialogue box in Figure 221 will be displayed to specify the location of
Point 1.
Figure 221 Dialogue Box to Specify the Location of Point 1
Click “Yes”. The screen in Figure 222 will be displayed to reset the location
of Point 1.
Movias Pro User’s Manual
NAC Image Technology Co., Ltd.
Figure 222 Resetting the Location of Point 1
After Point 1 is displayed with a frame in Video View, drag this frame to the
location of Point 1. An enlarged figure of the location dragged will be
displayed in Zoom View so click on the exact center of the target and then
click Verify .
Point 1 retracking will begin within the specified range.
5.2.8 Adding Targets
If adding points, such as when adding a 5th point (Point 4) to where tracking
has already been completed on four points, this is identical to that found in
2Motion Analysis Tutorial エラー! 参照元が見つかりません。. If the 5th point
is a 4-quarter target, first click on the Add 4-quarter Target button (Figure
223) to access the Add 4-quarter Target mode.
Figure 223 Add 4-quarter Target Button
Next, click in the vicinity of the center of the 5th point in Video View. (Figure
224)
Figure 224 Click on the Center of Point 4
Movias Pro User’s Manual
NAC Image Technology Co., Ltd.
The results are shown in Zoom View. (Figure 225)
Figure 225 Point 4 Detection Results
When displayed in Zoom View, detection of the center position is
automatically conducted. If there are no problems with the detection results,
click Verify . If there is a problem with the detection results, correct and
then click Verify. Then click “Start Tracking”.
5.2.9 Changing Tracking Parameters
It is necessary to set appropriate values for various parameters to
automatically track targets. To set parameters, first select the tracking
points and then select the “Edit – Properties” menu (Figure 226), right click
on the tracking points in the tracking point list to select the Properties
menu (Figure 227), click the “Properties Button” (Figure 228) or double click
on the tracking points list.
Figure 226 Edit - Properties
Figure 227 Properties Menu
Figure 228 Properties Button
The tracking point properties screen in Figure 229 will open.
Movias Pro User’s Manual
NAC Image Technology Co., Ltd.
Figure 229 Tracking Point Properties
Click on “Detailed Settings for Tracking Parameters” on the tracking point
properties screen. Depending on the type of tracking point, the detailed
settings for tracking parameters will open, as shown in Figure 230, Figure
231 or Figure 232. Refer to “3.3.2Tracking Parameters” or “3.3.3Method of
Setting Tracking Parameters “ to set the parameters.
Figure 230 Detailed Settings for Tracking Parameters for 4-quarter Marks
Movias Pro User’s Manual
NAC Image Technology Co., Ltd.
Figure 231 Detailed Settings for Tracking Parameters for Solid/Shaded Marks
Figure 232 Detailed Settings for Tracking Parameters for Correlation Marks
After setting the parameters, click “OK” to close the screen. It will return to
Figure 229 Tracking Point Properties.
Click “Apply” to apply the specific tracking parameter settings to the
tracking points. Click “Save as Default after Applying” and then click
“Apply” to apply the tracking parameters to the tracking points and make
the current settings the default settings.
Movias Pro User’s Manual
NAC Image Technology Co., Ltd.
5.2.10 Correcting Tracking Results
The procedure for correcting tracking that extends across sections is as
described in エラー! 参照元が見つかりません。 エラー! 参照元が見つかりませ
ん。 . The procedure for correcting tracking results from a single frame to
multiple frames is as follows.
Figure 233 shows an example where a problem with tracking causes
distorted results for center detection. If this type of distortion occurs, use
the mouse to click on the true center in Zoom View or drag the mouse to the
true center based on the detection results using the
mark. Then, click
Verify .
Figure 233 Screen to Correct Tracking Results
Movias Pro User’s Manual
NAC Image Technology Co., Ltd.
Movias Pro User’s Manual
NAC Image Technology Co., Ltd.
6. About Movias Pro Viewer
Movias Pro Viewer opens projects created in Movias Pro and is designed to
display the analytical results, including graphs and video display of
sequences previously created.
Since it is designed specifically for displaying, it cannot track newly created
sequences or create new graphs.
It can be operated without the HASP security key. Results analyzed in
Movias Pro can be displayed on other PCs.
Features and notes for Movias Pro Viewer are as follows.
•
Movias Pro Viewer can be used to present the data analyzed by Movias Pro on
separate PCs and to distribute to other researchers.
25
Since the HASP security key is not needed, any PC meeting the requirements in
1.2Recommended Operating Environment can display the results of analysis with
Movias Pro.
•
The folders for projects created in Movias Pro can be copied if displaying or
distributing Movias Pro analysis results on other PCs.(3.21) Project Folder Structure
and Backup → page 44)
•
When using Movias Pro Viewer and creating new sequences with Movias Pro, AVI
files are copied into the projects.
•
Movias Pro Viewer can only display results previously created in projects. New
sequences cannot be created or tracked, nor data edited.
•
Graphs can display results entered. New graphs cannot be created.
•
Settings for the starting point, coordinate axis and 2D calibration can be verified but
not changed.
•
25
Operation is identical to that of Movias Pro.
Movias Pro Viewer can be distributed as desired. Please do not distribute on internet web
sites or ftp sites without permission from this company. Distributing on the local network
or emailing to specific addresses is allowed.
Movias Pro User’s Manual
NAC Image Technology Co., Ltd.
Movias Pro User’s Manual
NAC Image Technology Co., Ltd.
7. About LAA Measurement
LAA measurement is software included with Movias Pro that easily
measures the length, area and angle of the subject in an image file.
It is also possible to determine the velocity, amount of motion and rotation
speed using video image files.
7.1 Opening the Startup and Image Files
Click “LAA” in “Start-Programs-NAC Applications” to start. Once started,
the opening screen in Figure 234 will be displayed.
Figure 234 LAA Measurement Opening Screen
Open the image file to be measured in the “File-Open” menu.
Usable image files include AVI files, nac MCFF files, TIFF files, JPEG files
and BMP files.
Once the image file is open, the screen in Figure 235 will be displayed.
Movias Pro User’s Manual
NAC Image Technology Co., Ltd.
Figure 235 LAA Measurement Open Image File
•
Start Measurement Button
Click this button to open the measurement section on
the left side of the screen.
The three tabs in the measurement section include measurement, image settings and
MCFF settings. (See エラー! 参照元が見つかりません。 for details.)
•
Text File Output Button Click to output the remaining measurement results to a text
file. (See7.3 for details)
•
Frame Number Displays the frame number.
•
Time data Displays the time data converted from the frame number using the
photographic speed information.
Movias Pro User’s Manual
NAC Image Technology Co., Ltd.
7.2 Measurement Section
7.2.1 Measurement Tabs
Click on the Start Measurement Button in Figure 235 to open the
measurement tab screen in Figure 236.
Size conversion settings, length measurement, area measurement and angle
measurement can be performed using the measurement tab.
If there is a need to set photographic speed information such as when the
time difference between frames must be measured, set the photographic
speed information and To frame information using 7.2.2Image Settings Tab
before using this measurement tab.
Figure 236 Measurement Tab
Movias Pro User’s Manual
1)
NAC Image Technology Co., Ltd.
Size Conversion Settings
Size conversion settings that become the basis for length and area
measurement are set with the Size Conversion Settings section shown in
Figure 237.
Figure 237 Size Conversion Settings Section
First, click “Specify Standard Points” and then sequentially click on two
points in the image with known intervals. Next, click “Specify Standard
Length”, set the interval and unit and then click “OK”. (Figure 238)
Figure 238 Standard Length Interval and Unit Settings
If not setting a standard length,
・ The length and area can be obtained from the result of pixels.
・ Angles can be obtained from standard results.
Movias Pro User’s Manual
2)
NAC Image Technology Co., Ltd.
Measurement of Length and Area
Since the measurement of length and area are identical, a combined
explanation is given.
Measurement of length and area is conducted in the section shown in Figure
239.
Figure 239 Measurement of Length and Area
for length or
for area.
Under the Start Measurement button, click on
Next, sequentially click on the section for length or area.
Click on at least 2 points for length and 3 points for area. Each time a point
is clicked greater than the required number of points, the measurement
results will be displayed.
to jump to measure the length or area of another section.
Click
Once measurement is complete, click
again or click
.
3)
Angle Measurement
Angle measurement is conducted in the section shown in Figure 240. The
two methods include the angle measurement method of specifying 3 points
and the method of specifying 4 points.
Click
to measure by specifying 3 points. Then, proceed according to 3-1)
Angle Measurement Specifying 3 Points .
Click
to measure by specifying 4 points. Then, proceed according to 3-2)
Angle Measurement Specifying 4 Points .
On the right side of Figure 240, check degrees or radians to select the unit
for the measurement results.
Figure 240 Angle Measurement
Movias Pro User’s Manual
3-1)
NAC Image Technology Co., Ltd.
Angle Measurement Specifying 3 Points
As shown in Figure 241, for angle measurement specifying 3 points, first
click on the location of the starting point for the angle, which will be the
first point. Next, click on the 2nd and 3rd points forming the angle. Angle
measurement is conducted counterclockwise using the line connecting the
1st and 2nd points as the standard.
Figure 241 Angle Measurement Specifying 3 Points
3-2)
Angle Measurement Specifying 4 Points
As indicated, angle measurement specifying 4 points first determines the
line to be standard between the 1st and 2nd points. Next, determine the 2nd
line between the 3rd and 4th points. Angle measurement is determined
counterclockwise from the standard line to the 2nd line.
Figure 242 Angle Measurement Specifying 4 Points
Movias Pro User’s Manual
4)
NAC Image Technology Co., Ltd.
Specifying Location with an Enlarged Image
A precise location can be specified using an enlarged image to specify
standard length or to measure length/area/angle.
Figure 243 Specifying Location with an Enlarged Image
To specify a location using an enlarged image, check “Use Enlarged Image”
in Figure 243. Then, click on the location in the image to specify in the same
manner as usual. The area around the clicked location will be enlarged.
Click on the location of the enlarged image to specify.
7.2.2 Image Settings Tab
Click on the image settings tab to open the screen shown in Figure 244.
This screen is used for playback speed, photographic speed and To frame
settings for video image files.
Figure 244 Image Settings Tab
•
Playback speed Sets the playback speed for playback of the video image file. The
playback speed depends on the PC performance so the value set is the standard.
Check Playback Speed Preference to jump frames when the playback speed is less
than the set value so it is as close to the set value as possible.
•
Image Information FPS Sets the photographic speed when photographing video
images.
•
T0 Frame Click
after the frame to be the starting point of time measurement,
such as the instant of impact, is displayed so that frame will become the time
standard frame.
7.2.3 MCFF Settings Tab
Movias Pro User’s Manual
NAC Image Technology Co., Ltd.
Click the MCFF settings tab to open the screen in Figure 245.
Adjustments such as Gain or Gamma are made in this screen when the
MCFF file that is the video image file is opened.
Figure 245 MCFF Settings Tab
7.3 Text File Output
After opening an image file, click
on the tools menu to specify the
location to save the file and the file name, and subsequent measurement
results can be saved as text files.
Figure 246 Tools Menu
Text file output is conducted automatically, and output continues until the
LAA measurement program is finished.
Movias Pro User’s Manual
NAC Image Technology Co., Ltd.
7.4 Practical Examples
Several practical examples using video images are given here. These are
provided to explain the procedure and have no numerical significance.
7.4.1 Amount of Motion and Velocity
Using a video image photographing the location where an automobile
reaches a given speed, the amount of motion and velocity can be determined.
Figure 247 shows the screen where the 1st point for length measurement has
been clicked after the photographic speed and size conversion settings have
been made. The time is 0.02 seconds.
Figure 247 Length Measurement 1st Point
Figure 248 shows the screen where the 2nd point was clicked 15 frames later.
The time is 0.05 seconds with a length measurement of 0.0668m.
The amount of motion is 0.0668m during 0.03 seconds, so the speed of
motion per second is approximately 2.2m.
Figure 248 Length Measurement 2nd Point
Movias Pro User’s Manual
NAC Image Technology Co., Ltd.
7.4.2 Rotation Angle and Angle Speed
Using a video image photographing the location where there is rotation at a
given speed, the rotation angle and angle speed can be determined.
Figure 249 shows the screen where the 1st and 2nd points for angle
measurement have been clicked after the photographic speed settings have
been made. This time is 0.0 seconds
Figure 249 Angle Measurement 1st, 2nd Points
Figure 250 shows the screen where the 3rd and 4th points were clicked 20
frames later.
The time is 0.02 seconds with an angle measurement of 30.5°.
The amount of rotation is 30.5° during 0.02 seconds, so the speed of rotation
per second is approximately 4.2 rotations.
Figure 250 Angle Measurement 3rd, 4th Points
Movias Pro User’s Manual
NAC Image Technology Co., Ltd.
7.5 Note
As indicated, velocity and rotation speed are easily determined with LAA
measurement. However, this does not apply to velocity and rotation speed
with gradual changes over time. Use Movias Pro for this.
Movias Pro User’s Manual
NAC Image Technology Co., Ltd.
Movias Pro User’s Manual
NAC Image Technology Co., Ltd.
8. About Image Converter
Image Converter is a program to convert the format for image files.
Multiple TIFF and BMP files are converted to AVI files with sequentially
numbered file names and AVI files are converted to sequential TIFF and
BMP files.
8.1 Startup
Click “Movias Tool – Image Converter” in “Start-Programs-Movias Pro
***” (*** refers to the version number) to start.
8.2 Specifying File to be Converted
Select “Open Local” in the file menu. First, select the type of file to be
converted in the file type section. (Figure 251)
Figure 251 Specify File to be Converted (1)
Next, move to the folder where the file to be converted is saved. A list of files
to convert will be displayed on the screen. (Figure 252)
Movias Pro User’s Manual
NAC Image Technology Co., Ltd.
Figure 252 Specify File to be Converted (2)
Click on the file to be converted from this list of files and press “Open”.
If there are multiple sequential files to be converted, select the file with the
lowest number. (Refer to 8.7)
at the top
If it is difficult to locate the file with the lowest number, press
right of the screen and double click on
to switch the files to
numerical order.
8.3 Verify Image
After specifying the file for conversion in the previous section, the screen
shown in Figure 253 will be displayed. Playback this image as a video and
confirm whether or not it was specified correctly.
Figure 253 Verify Image for Conversion
Movias Pro User’s Manual
NAC Image Technology Co., Ltd.
There are playback control buttons (
)above the
image. Use these to verify the image. The functions of the buttons are as
follows.
,
: Forward or reverse playback
: Pause playback
: Stop playback and return to the first frame
,
: Frame by frame playback or reverse
: Specify the interval for playback for play or frame by frame playback
For example, playback of every other frame when 2 is specified.
: Return the changes in display size of the dragged area in the window to
the original.
(
:These buttons have no function.)
8.4 Conversion Settings
Select “Save As...” from the file menu. The screen for settings(Figure 254)
will be displayed.
Figure 254 Save As Screen
Movias Pro User’s Manual
NAC Image Technology Co., Ltd.
The operations are as follows.
1)
Format Section Specify Conversion File Format
Specify the conversion file format in the section shown in Figure 255.
Figure 255 Specify Conversion File Format
Specify the BMP, TIFF or AVI file format in the Format section.
Designate the options for each format in the File Options section. Options
are as follows.
1-1)
BMP Files
There are no options for BMP files.
1-2)
TIFF Files
Select None of the several options for TIFF files.
1-3)
AVI Files
Select either Compress or Uncompressed for AVI files. If selecting Compress,
specify the compression format with the steps to create AVI files. (refer to
8.6)
There are no special operations required in the Format section shown in
Figure 256. The screen should remain unchanged.
Figure 256 (no special operation required)
2)
File Options Section Specify Conversion File Name
Specify the conversion file name in the section shown in Figure 257.
Figure 257 Specify Conversion File Name
2-1)
Save frames Section
Movias Pro User’s Manual
NAC Image Technology Co., Ltd.
The range of frames to be converted is set by specifying the minimum value
and maximum value for the frame number.
The defaults displayed are the maximum and minimum values for the
conversion file. At this point, if the conversion file is a BMP or a TIFF file,
the minimum and maximum values will be displayed. If the conversion file
is an AVI file, the minimum value will be 0 and the maximum value will be
the number of frames in the AVI file. (in reality, one less than the frame
number)
If all of the frames in the conversion file are to be converted, there is no
need to change these figures. If changing the range of frames to be
converted, specify both the number of the frame to begin conversion and the
number of the frame to end conversion.
2-2)
Automatic Section
Specify the location and file name for the conversion file (the converted
results) to be saved. If selecting a BMP or a TIFF file as the format for the
conversion file, it will be added to the file name specified.
2-3)
Number from Section
Specify the beginning number.
8.5 Conversion
Click “Save” at the bottom right of the screen in Figure 254. This starts
conversion. Once conversion is complete, “All Done” will be displayed at the
bottom left of the screen. (Figure 258)
Figure 258 Completing Conversion
8.6 Specifying the Compression Method
If Compress has been specified for the AVI file to be converted in
8.4Conversion Settings, after clicking “Save”, the following compression
settings screen will be displayed.
Movias Pro User’s Manual
NAC Image Technology Co., Ltd.
(Figure 259)
Figure 259 Specifying the Compression Method
1-1)
Compression Program Section
This specifes the compression program (Codec) used for compression. Use
Codec installed on the PC. An example of Codec is IndeoR 5.10.
1-2)
Compression Quality Section
Set the compression quality.
The larger the number, the higher the quality but the size of the file will
also increase.
1-3)
Key Frame Section
Input the key frame interval. If the number is too large or too small, there
will be problems such as excessive time required when jumping frames so
input a number from 10~30.
8.7 About Consecutive File Names
Figure 260 shows an example of an AVI file called Sample.avi converted to a
TIFF file with the starting number of 0. Consecutive numbers starting with
the starting number can be added to the conversion file names.
Movias Pro User’s Manual
NAC Image Technology Co., Ltd.
Figure 260 Consecutive File Names
On the other hand, if multiple copies of BMP or TIFF files are converted to
AVI files, assign consecutive file names to the BMP or TIFF files in advance,
as shown in Figure 260.