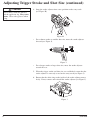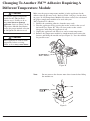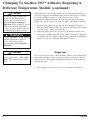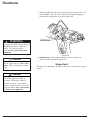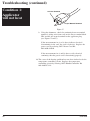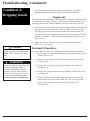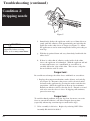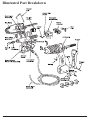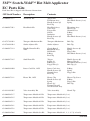
1
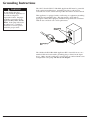
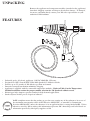
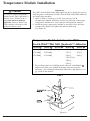
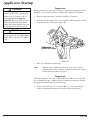
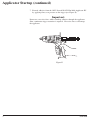
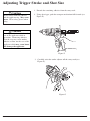
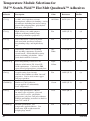
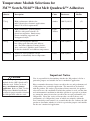
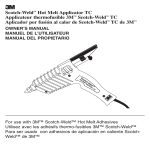
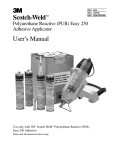
3
Scotch-Weld™ Hot Melt Applicator EC
Aplicador EC por Fusión en Caliente
Scotch-Weld™
Applicateur d’adhésif thermo-fusible EC
de Scotch-Weld™
Adhesive Applicator
Aplicador de adhesivo
Applicateur d’adhésif
Owner’s Manual
Manual del propietario
Manuel de l’utilisateur
Utilice el aplicador con los Adhesivos por Fusión en Caliente Scotch-Weld™ de
3M™ en cartuchos Quadrack™.
Use with 3M™ Scotch-Weld™ Hot Melt Adhesives in Quadrack™ cartridge form.
Utilisez avec l’adhésif thermo-fusible 3M™ Scotch-Weld™ sous forme de cartouche
Quadrack™.
Table of Contents
Important Safety Instructions..........................................................................1
Grounding Instructions ...................................................................................2
Unpacking .......................................................................................................3
Features ...........................................................................................................3
Temperature Module Installation ....................................................................4
Applicator Startup ...........................................................................................5
Adjusting Trigger Stroke and Shot Size .........................................................8
Changing to Another 3M Adhesive
Requiring a Different Temperature Module .................................................10
Shutdown.......................................................................................................12
Preventive Maintenance ................................................................................13
Operator Productivity and Comfort ..............................................................14
Troubleshooting ............................................................................................15
Condition 1: Applicator will not heat .................................................16
Condition 2: Dripping nozzle .............................................................22
Condition 3: Low or no adhesive flow ...............................................24
Illustrated Parts Breakdown ..........................................................................26
3M™ Scotch-Weld™ Hot Melt Applicator EC Parts Kits...........................27
Accessories....................................................................................................28
Temperature Module Selections for 3M™ Scotch-Weld™
Hot Melt Quadrack™ Adhesives ..................................................................29
Warranty and Repair .....................................................................................31
3M Sales Branches…......................................................................Back cover
Important Safety Instructions
•
•
Save these instructions
Read all instructions before using this
product
3M™ Scotch-Weld™ Hot Melt
Applicator EC Operation and Servicing
!
WARNING
To reduce the risk of electrical shock or injury while
operating or servicing the 3M Scotch-Weld Hot Melt
Applicator EC, observe the following safety rules:
1. Operate and service the applicator only as
described in this manual.
2. Connect the applicator only to a properly
grounded outlet.
3. Do not unplug the applicator by pulling on the
cord. Grasp the plug, not the cord, to unplug.
4. Do not handle the plug or applicator with wet
hands.
5. Do not use the applicator outdoors or on wet
surfaces.
6. Do not use the applicator if the cord or plug is
damaged.
7. Do not use the applicator if it is not working
properly or has been damaged, submerged in water
or left outdoors.
!
WARNING
Use only 3-prong grounded plug and properly
grounded outlet. Failure to use properly grounded
plug and outlet may cause electrical shock. If you
are not sure of proper connections, get help from a
qualified electrician or service person.
!
WARNING
Disconnect electrical power and make sure applicator
has cooled to room temperature before servicing.
Failure to disconnect electrical power or failure to
allow applicator to cool before servicing may cause
electrical shock or burns. Read owner’s manual
before servicing.
!
WARNING
Do not use an unapproved extension cord with the
applicator. Use of an unapproved extension cord may
cause electrical shock. Use an extension cord which
complies with NEC requirements and state and local
codes and other requirements.
1
!
WARNING
Use only 3M-specified replacement parts. Use of
other replacement parts may cause hazardous
conditions or damage the applicator.
!
Caution
Allow applicator to cool to room temperature before
servicing. Failure to do so may cause burns.
Caution
!
Avoid contact with hot adhesive and applicator tip.
May cause burns. Wear safety glasses when using.
Caution
!
Use only the proper temperature module for the 3M™
Quadrack™ adhesive used. Failure to do so may
cause burns or damage applicator. Refer to Table 1
for proper module selections for 3M Quadrack
adhesives.
!
Caution
Do not pull adhesive stick from the rear of the
applicator while in operation. Removing the adhesive
from the rear may cause molten adhesive to flow out
the rear of the applicator which may cause burns
and damage the applicator.
3M™ Scotch-Weld™ Hot Melt
Adhesive
Note:
For health and safety information, see product
label and Material Safety Data Sheet for 3M
Scotch-Weld Hot Melt Adhesive before using.
!
WARNING
Use only with 3M™ Scotch-Weld™ Hot Melt
Quadrack™ adhesive sticks. Use with any other
materials may cause hazardous conditions.
!
WARNING
Do not clean or remove the 3M Scotch-Weld Hot
Melt Adhesive with solvent. May cause fire. For
additional health and safety information, see the
product label and Material Safety Data Sheet for the
3M Scotch-Weld Hot Melt Adhesive used.
© 3M 2006
Grounding Instructions
!
WARNING
Do not modify the plug
provided with the applicator or
use with an adaptor or
ungrounded outlet. Improper
grounding connection of the
applicator may cause electric
shock. If the plug will not fit
the outlet, have a qualified
electrician or service person
install the proper outlet.
The 3M ™ Scotch-Weld ™ Hot Melt Applicator EC must be grounded.
If the applicator malfunctions, grounding provides a path of least
resistance for electric current to help reduce the risk of electrical shock.
This applicator is equipped with a cord having an equipment-grounding
conductor and grounding plug. The plug must be used with an
appropriate outlet that is properly installed and grounded in accordance
with all state and local codes and requirements.
Grounged
Outlet
Grounging
Pin
The 3M Scotch-Weld Hot Melt Applicator EC is intended for use on a
nominal 120-volt circuit with a grounding plug as shown in the figure
above. Make sure the applicator is connected to an outlet with the same
configuration as the plug. Do not use an adaptor.
© 3M 2006
2
UNPACKING
Remove the applicator and temperature modules (attached to the applicator)
from their shipping container and inspect for obvious damage. If damaged,
do not use and immediately contact your 3M sales representative or your
authorized 3M distributor.
FEATURES
•
•
•
•
•
•
•
Industrial-grade, all-electric applicator, 120 VAC 40/60 Hz, 350 watts.
Designed for 3M™ Scotch-Weld™ Hot Melt Quadrack™ Adhesive Sticks.
Delivers up to 5.5 pounds of 3M adhesive per hour on demand.
Innovative transport mechanism minimizes dripping.
Applicator is supplied with five removable temperature modules. Refer to Table 1 in the Temperature
Module Installation section for proper module selection for 3M Quadrack adhesive used.
Palm trigger helps improve operator comfort in high demand applications.
Stroke adjuster enables precise deposit of adhesive.
RoHS compliant means that the product or part does not contain any of the substances in excess of
the maximum concentration values in EU Directive 2002/95/EC, as amended by Commission
Decision 2005/618/EC, unless the substance is in an application that is exempt under RoHS. Unless
otherwise stated by 3M in writing, this information represents 3M’s knowledge and belief based on
information provided by third party suppliers to 3M.
3
© 3M 2006
Temperature Module Installation
!
Caution
Use only the proper temperature
module for the 3M™ Quadrack™
adhesive used. Failure to do so
may cause burns or damage
applicator. Refer to Table 1 for
proper module selection for 3M
Quadrack adhesive used.
Important:
The 3M™ Scotch-Weld™ Hot Melt Applicator EC is designed to operate
with the proper combination of 3M™ Scotch-Weld™ Hot Melt Adhesives
and temperature modules.
1. Refer to Table 1 on this page or the chart on pages 29-30
(Temperature Module Selections section) for selection of the proper
temperature module to be used with your 3M Quadrack adhesive.
2. Install the proper temperature module by inserting it into the lower
portion of the handle and tighten the fastener until snug
(see Figure A).
Temperature Module Selections for 3M™
Scotch-Weld™ Hot Melt Quadrack™ Adhesives
Module 1
Module 2 * Module 3
Module 4
Module 5
3762 LMQ
3762 LMQ
3738 Q
3731 Q
3776 LMQ
3776 LMQ
3747 Q
3779 Q
3792 LMQ
3792 LMQ
3748 Q
3789 Q
3762 Q
3748 V-O Q
3764 Q
3792 Q
* Tests indicate that use of LM Quadrack adhesives with Module 2
improves the flow rates without damaging most heat sensitive
substrates. For additional information about these 3M adhesives, see
pp. 29-30 of this manual.
Table 1
Figure A
© 3M 2006
4
Applicator Startup
!
Caution
Use only the proper temperature
module for the 3M™ Quadrack™
adhesive used. Failure to do so
may cause burns or damage
applicator. Refer to Table 1 in the
Temperature Module Installation
section for proper module selection
for 3M Quadrack adhesive used.
Important:
Before proceeding, make sure the proper temperature module has been
installed. See previous section on Temperature Module Installation.
1. Plug the applicator into a grounded 120 VAC receptacle.
2. Push the on/off switch to the “on” position, indicated by the visible
red portion of the switch (see Figure B).
! Caution
Avoid contact with hot adhesive
and the applicator tip. May cause
burns. Wear safety glasses when
using.
Figure B
3. Wait 5 to 10 minutes for heat-up.
Note:
Allow at least 15 minutes for heat-up at its next use if the
applicator did not have adhesive extruded at shut-down. Refer
to shut-down procedure on page 12.
Important:
Thermal expansion can cause a small amount of adhesive to drip from
the tip during heat-up. With the proper temperature module selection,
the applicator should not drip after heat-up.
4. Inspect the nozzle tip. Use a Scotch-Brite® pad or equivalent to
remove accumulated adhesive or foreign matter from the tip.
5
© 3M 2006
Applicator Startup (continued)
!
WARNING
Use only with 3M™ ScotchWeld™ Hot Melt Quadrack™
Adhesive Cartridges. Use with any
other materials may cause
hazardous conditions.
5. Insert 3M Scotch-Weld Hot Melt Quadrack adhesive stick through
the stroke adjuster and transport mechanism (see Figure C).
Figure C
!
Caution
6. Align flat surfaces of stick as show in Figure D.
Do not pull adhesive sticks from
the rear of the applicator while in
operation. Removing adhesive
from the rear may cause molten
adhesive flow out the rear of the
applicator which may cause burns
and damage the applicator.
Figure D
© 3M 2006
6
Applicator Startup (continued)
7. Extrude adhesive from the 3M™ Scotch-Weld™ Hot Melt Applicator EC
by applying firm, even pressure to the trigger (see Figure E).
Important:
Do not use excessive force while extruding adhesive through the applicator.
Slow, continuous trigger actuation is required. Excessive force can damage
the applicator.
Figure E
7
© 3M 2006
Adjusting Trigger Stroke and Shot Size
!
Caution
Avoid contact with hot adhesive
and the applicator tip. May cause
burns. Wear safety glasses when
using.
!
1. Extrude the remaining adhesive from the entry track.
2. Using the trigger, push the transport mechanism full forward (see
Figure F).
Caution
Do not pull adhesive stick from the
rear of the applicator while in
operations. Removing adhesive
from the rear may cause molten
adhesive to flow out the rear of the
applicator which may cause burns
and damage the applicator.
Figure F
3. Carefully twist the stroke adjuster off the entry track (see
Figure G).
Figure G
© 3M 2006
8
Adjusting Trigger Stroke and Shot Size (continued)
!
Caution
Avoid contact with hot adhesive
and the applicator tip. May cause
burns. Wear safety glasses when
using.
4. Snap the stroke adjuster into a new position on the entry track
(see Figure H).
Figure H
•
For a shorter stroke or smaller shot size, move the stroke adjuster
forward (see Figure I).
Figure I
•
For a longer stroke or larger shot size, move the stroke adjuster
toward the rear.
5. When the trigger stroke and shot size are established, ensure that the
stroke adjuster is correctly seated on the entry track (see Figure J).
6. Ensure that the white ring on the inside of the stroke adjuster moves
freely. If not, remove and reinstall the stroke adjuster (see Figure J).
Figure J
9
© 3M 2006
Changing To Another 3M™ Adhesive Requiring A
Different Temperature Module
!
Caution
Use only the proper temperature
module for the 3M Quadrack
adhesive used. Failure to do so
may cause burns or damage
applicator. Refer to Table 1 in the
Temperature Module Installation
section for proper module selection
for 3M Quadrack adhesive used.
!
Caution
Make sure the proper temperature module is in the applicator for the
adhesive then in the entry track. Refer to Table 1 on page 4 or the chart
on pages 29-30 (Temperature Module Selections section) for selection of
the proper temperature module to be used with your
3M™ Quadrack™ adhesive.
1. Extrude the remaining adhesive from the entry track.
2. Turn the applicator off by pressing the rocker switch at the rear of
the handle (see Figure K). The red visor on the rocker switch
disappears, indicating the applicator is off.
3. Unplug the applicator and allow it to cool to room temperature.
4. Remove the temperature module by simultaneously unscrewing the
fastener and lifting the module out (see Figure L). Save the module
for possible reuse.
Allow applicator to cool to room
temperature before servicing.
Failure to do so may cause burns.
™
ld
We
ch- tor EC
cot
a
3 S Applic
elt
Hot M
Figure K
Note:
Do not unscrew the fastener more than 8 turns before lifting
the module out.
Figure L
© 3M 2006
10
Changing To Another 3M™ Adhesive Requiring A
Different Temperature Module (continued)
!
Caution
Use only the proper temperature
module for the 3M Quadrack
adhesive used. Failure to do so
may cause burns or damage
applicator. Refer to Table 1 in the
Temperature Module Installation
section for proper module selection
for 3M Quadrack adhesive used.
!
WARNING
Use only with 3M™ Scotch-Weld™
Hot Melt Quadrack™ Adhesive
Sticks. Use with any other
materials may cause hazardous
conditions.
Install the proper temperature module for the adhesive that has been
selected by inserting and tightening the fastener until snug (see Figure
L). Refer to Table 1 on page 4 or the chart on pages 29-30
(Temperature Module Selections section) for selection of the proper
temperature module to be used with your 3M™ Quadrack™ adhesive.
5. Reconnect the power cord to the 120 VAC grounded receptacle.
Push the on/off switch to the “on” position, indicated by the visible
red visor of the switch (see Figure K).
6. Allow the applicator to heat up for 5 to 10 minutes with the new
temperature module. Extrude all old adhesive left in the applicator
by inserting the new adhesive and advancing through the applicator
until it is ready to be reloaded with another stick.
Caution
Important:
Avoid contact with hot adhesive
and the applicator tip. May cause
burns. Wear safety glasses when
using.
Do not use excessive force while extruding adhesive after changing the
temperature modules. Slow, continuous trigger actuation is required.
Excessive force can damage the applicator and cause molten adhesive
flow out the rear.
!
7. The applicator is now ready to be used with the new adhesive.
11
© 3M 2006
Shutdown
1. Turn the applicator off by pressing the rocker switch at the rear
of the handle. The red visor on the rocker switch disappears,
indicating the applicator is off (see Figure M).
!
WARNING
Use only with 3M™ Scotch-Weld™
Hot Melt Quadrack™ Adhesive
Sticks. Use with any other
materials may cause hazardous
conditions.
!
Caution
Avoid contact with hot adhesive
and the applicator tip. May cause
burns. Wear safety glasses when
using.
!
Figure M
2. Immediately, extrude approximately half of a Quadrack
adhesive stick through the applicator.
Important:
For long-term shutdown, disconnect the power cord from the power
source.
Caution
Do not pull adhesive stick from the
rear of the applicator while in
operation. Removing adhesive
from the rear may cause molten
adhesive to flow out the rear of the
applicator which may cause burns
or damage the applicator.
© 3M 2006
12
Preventive Maintenance
!
WARNING
Do not clean or remove the 3M™
Scotch-Weld™ Hot Melt Adhesive
with solvent. May cause fire. For
additional health and safety
information see the product label
and Material Safety Data Sheet for
Scotch-Weld Hot Melt Adhesive
used.
!
1. Inspect the nozzle tip every day before startup. Use a Scotch-Brite®
pad or equivalent to remove accumulated adhesive or foreign matter
from the tip
2. Inspect the adhesive entry track and transport mechanism daily to
ensure it is clear of foreign matter and slides freely.
3. Inspect the applicator once a week. Refer to the Troubleshooting
and Repair Procedures of this manual if necessary.
Caution
Avoid contact with hot adhesive
and the applicator tip. May cause
burns. Wear safety glasses when
using.
!
Caution
Do not pull adhesive stick from the
rear of the applicator while in
operation. Removing adhesive
from the rear may cause molten
adhesive to flow out the rear of the
applicator which may cause burns
or damage the applicator.
13
© 3M 2006
Operator Productivity and Comfort
AVOID:
•
•
•
•
Raised elbow
Bent Wrist
Reaching
Bending over
These positions can result in irritation of the nerves, muscles, tendons, and cartilage of the shoulder, elbow, wrist,
hand and back.
Adjust your workstation so you can:
•
•
•
Stand or sit erect
Keep your elbows close to your sides
Hold the applicator with a straight wrist
© 3M 2006
14
Troubleshooting
!
WARNING
Use only 3M-specified replacement
parts. Use of other replacements
parts may cause hazardous
conditions or damage the
applicator.
This part of the owner’s manual is divided into three sections to assist in
evaluating possible operating difficulties with your 3M™ Scotch-Weld™
Hot Melt Applicator EC.
If the applicator will not heat, refer to:
Condition 1:
Applicator will not heat
Page 16
If the applicator is heating, refer to:
Condition 2:
Dripping nozzle
Page 22
Condition 3:
No or low adhesive flow
Page 24
An applicator diagram and replacement parts list can be found on pages
26-27. Should your applicator require repair, replacement parts can be
ordered from your local authorized 3M Scotch-Weld Hot Melt Adhesive
distributor. If, after following these procedures, a problem still exists,
contact your local Sales Representative. For telephone numbers of the
nearest 3M location refer to the back cover of this manual.
Important:
Service on this applicator should only be performed by a qualified
electrician or service person.
15
© 3M 2006
Troubleshooting (continued)
Condition 1:
Applicator
will not heat
! Caution
Use only the proper temperature
module for the 3M™ Quadrack™
adhesive used. Failure to do so
may cause burns or damage
applicator. Refer to Table 1 in the
Temperature Module Installation
section for proper module selection
for 3M Quadrack adhesive used.
Important:
Troubleshooting steps should be conducted only by a qualified
electrician or service person.
1. Turn the applicator on by pushing the on/off switch to the “on”
position, indicated by the visible red visor of the switch
(see Figure N). If no heat, proceed to the next step.
Figure N
2. Check to make sure that the proper temperature module is fully
engaged by inserting and tightening the fastener until snug (see
Figure O). Refer to Table 1, page 4, for the proper module. If no
heat, proceed to the next step.
Figure O
© 3M 2006
16
Troubleshooting (continued)
Condition 1:
Applicator
will not heat
Allowable Resistance
Module 1
21-26 K ohms
Module 2
12-16 K ohms
Module 3
3-5 K ohms
Module 4
1-1.5 K ohms
Module 5
0-10 ohms
Table 2
3. Check to make sure that power cord is plugged in and that the
electrical outlet has power. If there is no power, contact an
electrician. If outlet has correct power, proceed to the next step.
4. Disconnect the power cord from the electrical outlet, then remove
the temperature module by unscrewing the fastener and lifting out
(see Figure O). Inspect the module for damage to the pins.
If no damage is found, check the resistance between the pins using
an ohmmeter. If the measured value does not agree with that listed
in Table 2, then the temperature module is defective. Replace it by
ordering the appropriate Temperature Module Kit. See Parts Kit list
on page 27 on this manual.
If the measured value agrees with that listed in Table 2, place
temperature module aside for re-use and proceed to next step.
Important:
Remove the power cord from the electrical outlet before conducting any
further evaluations or repairs.
Handle Disassembly
!
WARNING
Disconnect the electrical power and
make sure the applicator has cooled
to room temperature before
servicing. Failure to disconnect the
electrical power or failure to allow
applicator to cool before servicing
may cause electrical shock or
burns.
!
5. Remove the remaining adhesive from the entry track by using a
utility knife to cut off the adhesive stick just before it enters the
white sleeve assembly, and gently remove it.
Refer to Figure P for steps 6 through 8.
Caution
Do not pull adhesive stick from the
rear of the applicator while in
operation. Removing adhesive
from the rear may cause molten
adhesive to flow out the rear of the
applicator which may cause burns
or damage the applicator.
Figure P
6. Remove the stroke adjuster by firmly grasping and twisting upward.
7. Remove the end clip by gently prying off one end of the clip.
8. Slide the transport mechanism off the entry track.
17
© 3M 2006
Troubleshooting (continued)
Condition 1:
Applicator
will not heat
9. To remove the trigger (see Figure Q):
a. Use a small screwdriver to remove the E-ring from the pin at the
base of the trigger.
b. Remove the trigger pin.
c. Remove the trigger and spring.
Figure Q
10. If the temperature module is installed, remove it by unscrewing the
fastener and lifting out (see Figure O). Set aside until reinstalled.
11. Remove the six screws and hanger clip from the applicator handles.
Remove the left-handle (see Figure R).
3 Sco
tch-Weld ™
Hot M
elt Applic
ator E
C
Figure R
© 3M 2006
18
Troubleshooting (continued)
Condition 1:
Applicator
will not heat
12. Inspect all terminal block connections for loose or disconnected wires
by making certain the screws in each terminal block are securing the
wires. If any connections are loose or have pulled out of the terminal
blocks, reconnect and retighten the connections (see Figures S and T).
After reconnections have been made, reassemble the applicator
making sure wiring is properly located and will not be pinched when
handles are closed (see Figures P, Q and R). Reinstall the previously
removed temperature module (see Figure O).
If all terminal block connections were initially found to be tight,
proceed to the next step.
WARNING
!
Disconnect the electrical power and
make sure the applicator has cooled
to room temperature before
servicing. Failure to disconnect
electrical power or failure to allow
the applicator to cool before
servicing may cause electrical
shock or burns.
Important:
Power switch MUST be in “on” position (red visor visible) for step 13.
13. Check electrical continuity of heater/TCO/switch assembly. Using an
ohmmeter, measure across the terminals numbered 3 and 4 on the top
terminal block labeled TB2. These are the terminal block positions
for the black wire from the power switch and the white wire from the
heater, respectively (see Figure S).
Value measured should be between 40-50 ohms. If measured value is
not in this range, replace the heater/TCO/switch assembly by ordering
3M™ Heater Kit #62-9680-9731-1.
If measured value is within the specified range, proceed to the next
step.
TB2
123
4
Figure S
19
© 3M 2006
Troubleshooting (continued)
Condition 1:
Applicator
will not heat
Important:
Applicator must be cooled to room temperature for step 14.
14. Check continuity of the thermistor. First, disconnect the thermistor
lead from terminal number 1 of the upper terminal block (TB2)
(see Figure S). Using an ohmmeter, measure between the
disconnected thermistor lead and terminal number 2 of terminal
block TB2 (see Figure S).
Important:
Thermistor lead must be disconnected for this test.
Measured value between the disconnected thermistor lead and
terminal number 2 should be between .65 and 1.25 Mega-ohms.
If measured value is not within this range, replace the defective
thermistor assembly by ordering 3M™ Thermistor Kit
#62-9680-9733-7.
If measured value is within the acceptable range, reconnect the
previously disconnected thermistor lead to terminal number 1 of
terminal block TB2 (see Figure S) and proceed to the next step.
15. Check the power cord for obvious wire damage. If damage is
observed, replace the power cord by ordering 3M™ Power Cord Kit
#62-9680-9920-0.
If no damage is observed, check the electrical continuity of the
power cord wires (steps 15A and 15b).
a. Using an ohmmeter, check for continuity between terminal
number 1 (black wire from cord) on the lower terminal block
TB1 and the AC line terminal on the applicator plug
(see Figures T and U).
White wire
Black wire
Figure T
© 3M 2006
20
Troubleshooting (continued)
Condition 1:
Applicator
will not heat
AC Line Terminal
AC Neutral Terminal
Figure U
b. Using the ohmmeter, check for continuity between terminal
number 2 (white wire from cord) on the lower terminal block
TB1 and the AC neutral terminal on the applicator plug
(see Figures T and U).
If the measurements in a) or b) above indicate electrical
discontinuity in the cord, the cord is defective. Replace the
power cord by ordering 3M™ Power Cord Kit
#62-9680-9920-0.
If the measurements in a) and b) above verify electrical
continuity, then the power cord is functioning properly.
16. The cause of the heating problem has now been isolated to be the
temperature controlling circuit. Replace the temperature
controlling circuit by ordering 3M™ Handle/Controller Kit
#62-9680-9732-9.
21
© 3M 2006
Troubleshooting (continued)
Condition 2:
Dripping nozzle
1. Plug in the power cord of the applicator and turn it on. Follow
Applicator Startup Procedure on page 5 of Owner’s Manual.
Important:
Thermal expansion can cause a small amount of adhesive to drip from the
tip during heat-up. This is normal. If the nozzle continues to drip after a
warmup period of more than 10 minutes, then proceed to the next step.
2. Check to make sure that the proper temperature module is inserted into
the applicator for your adhesive. Refer to Table 1 on page 4 or the
chart on pages 29-30 (Temperature Module Selections section) for
selection of the proper temperature module to be used with your 3M™
Quadrack™ adhesive. If the applicator continues to drip, proceed to
the next step.
3. Make sure that the adhesive is clean and not contaminated, and
proceed to the next step.
!
Caution
Avoid contact with hot adhesive
and the applicator tip. May cause
burns. Wear safety glasses when
using.
!
WARNING
Do not pull adhesive stick from the
rear of the applicator while in
operation. Removing adhesive
from the rear may cause molten
adhesive to flow out of the rear of
the applicator which may cause
burns or damage the applicator.
© 3M 2006
Backmelt Procedure:
4. If the adhesive stick is very difficult to extrude, check for backmelt:
a. Slowly push the adhesive stick into the applicator so stick is flush
with the white sleeve.
b. Remove stroke adjuster by firmly grasping and twisting upward
(see Figure P).
c. Remove the end clip by gently prying off one end of the clip
(see Figure P).
d. Remove the transport mechanism by sliding it off the entry track
(see Figure P).
e. Turn the applicator off by unplugging the power cord from the
outlet and pressing the rocker switch off. The red visor on the
rocker switch disappears, indicating the applicator is off
(see Figure N).
22
Troubleshooting (continued)
Condition 2:
Dripping nozzle
Figure V
! Caution
Allow applicator to cool to room
temperature before servicing.
Failure to do so may cause burns.
f. Immediately (before the applicator cools), use a blunt object to
gently push the adhesive stick approximately one inch into the
applicator so the white sleeve is empty (see Figure V). Allow
the applicator to cool to room temperature before proceeding to
next step.
g. With the tip pointed down and away from body, look inside the
white sleeve.
h. If there is a thin skin of adhesive on the inside of the white
sleeve, the applicator is backmelted. With the applicator off and
at room temperature, use a small knife or screwdriver to
carefully loosen the edge of this skin. This creates a ridge for
the next adhesive stick to catch.
Important:
Be careful not to damage the white sleeve with knife or screwdriver.
i. Replace the transport mechanism, stroke adjuster, and end clip
(see Figure P). Reconnect the power cord to electrical outlet
and turn on the applicator by pressing the rocker switch to the
on position. Allow the applicator to heat up for ten minutes.
Extrude an adhesive stick to clear the sleeve. Extrude a second
stick to be sure the sleeve is clear. If dripping still continues,
proceed to next step.
Important:
To avoid backmelt problems, keep the tip clean, do not use excessive
force to extrude the adhesive, and allow adequate heat-up time
(especially when using extension tips or small orifice tips).
5. Valve assembly is defective. Replace by ordering 3M™ Valve
Assembly Kit #62-9234-9930-5.
23
© 3M 2006
Troubleshooting (continued)
Condition 3:
Low or no
adhesive flow
1. Check to make sure that the proper temperature module is inserted
and fastened into the applicator for your adhesive. See the
Temperature Module Installation procedure on page 4 of this manual
for proper selection and installation of the temperature module. If the
flow problem still exists with the proper temperature module
installed, proceed to next step.
2. If adhesive is not properly extruded during shut-down (see shutdown
procedure on page 12), the applicator requires 15 minutes of heat-up
time before adhesive will flow properly. If the flow problem still
exists after the 15 minute heat-up, proceed to the next step.
!
Caution
Use only the proper temperature
module for the 3M™ Quadrack™
adhesive used. Failure to do so
may cause burns or damage
applicator. Refer to Table 1 in the
Temperature Module Installation
section for proper module selection
for 3M Quadrack adhesive used.
WARNING
!
Use only with 3M™
Scotch-Weld™ Hot Melt
Quadrack™ Adhesive sticks. Use
with any other materials may cause
hazardous conditions.
3. When using high viscosity 3M adhesive (3779, 3789, 3747 adhesive),
use a .125” fluted tip (3M #62-9940-6920-1) or a high viscosity valve
(3M #62-9729-9930-4). If a flow problem still exists with the proper
valve and tip being used, proceed to the next step.
4. If the applicator is on for a long period of time without dispensing
adhesive (for example 2-3 hours), charring may occur at the nozzle
tip. Charring blocks adhesive flow and may cause adhesive backmelt.
Remove charred adhesive by pushing a paper clip into the tip to clear
the opening. If the flow problem still exists, proceed to the next step.
Important
To avoid this problem, remember to follow the shutdown procedure on
the page 12 and to extrude at least one adhesive stick every three hours
while the applicator is on.
! Caution
Avoid contact with hot adhesive
and applicator tip. May cause
burns. Wear safety glasses when
using.
© 3M 2006
24
Troubleshooting (continued)
Condition 3:
Low or no
adhesive flow
5. If the transport mechanism does not move freely on the track or if
the arms of the mechanism do not open and close freely, clean the
transport mechanism (steps 5a-5d).
a. Extrude the remaining adhesive from the entry track.
b. Disconnect the power cord from the outlet.
c. Allow the applicator to cool to room temperature.
!
Caution
Allow applicator to cool to room
temperature before servicing.
Failure to do so may cause burns.
WARNING
!
Do not clean or remove the 3M™
Scotch-Weld™ Hot Melt Adhesive
with solvent. May cause fire. For
additional health and safety
information, see the product label
and Material Safety Data Sheet for
Scotch-Weld Hot Melt Adhesive
used.
25
d. Use 3M™ Citrus Base Cleaner or equivalent to remove any dirt
that restricts free movement of the transport mechanism. See
Figure P to remove or reinstall transport mechanism if
necessary.
If the transport mechanism is damaged, replace it with 3M™ Transport
Mechanism Kit #62-9787-9930-2. If the flow problem still exists,
proceed to the next step.
6. The adhesive applicator may be backmelted. See Backmelt
procedure on page 22 of this manual. If the flow problem still
exists after cleaning the backmelt, proceed to the next step.
7. There may be gelled adhesive in the heat-block or valve. Replace
the heat block, valve and nozzle with the 3M™ Heat Block Kit
#62-9680-9730-3.
© 3M 2006
Illustrated Part Breakdown
© 3M 2006
26
3M™ Scotch-Weld™ Hot Melt Applicator
EC Parts Kits
Each Parts Kit is shipped with illustrated instructions
3M Stock Number
Description
Contents
62-9680-9733-7
Thermistor Kit
Trigger Pin
Thermistor Assy
Handle Screws (6)
End Clip
E-Ring
Heat Block Inserts (1 set)
Spring
62-9680-9730-3
Heat Block Kit
Heat Block Assy
Valve Assy
Trigger Pin
Nozzle
Insulation
Handle Screws (6)
End Clip
Thermistor Assy
Heater Clip
Ground Screw
E-Ring
Spring
Heat Block Inserts (1 set)
62-9787-9930-2
Transport Mechanism Kit
Transport Mechanism
End Clip
62-9786-9930-4
Stroke Adjuster Kit
Stroke Adjuster
End Clip
62-9680-9732-9
Handle/Controller Kit,
120V
Circuit Board/
RH Handle Assy
LH Handle
E-Ring
End Clip
Handle Screws (6)
Spring
Trigger Pin
Heat Block Inserts (1 set)
62-9680-9734-5
Small Parts Kit
Trigger
Spring (3)
E-Ring (3)
Trigger Pin (3)
Handle Screws (6)
Hanger Clip (2)
Heat Block Inserts (3 sets)
End Clip (2)
62-9680-9920-0
Power Cord Kit, 120V
Power Cord Assy
Handle Screws (6)
Ground Screw
End Clip
E-Ring
Spring
Trigger Pin
62-9680-9731-1
Heater Kit, 120V
Heater Clip
Handle Screws (6)
Spring
Heater (2)/
Thermal Cut-off/
On-Off Switch Assy
Heater Clip Screw
E-Ring
Trigger Pin
End Clip
62-9234-9930-5
Valve Assembly Kit
Valve Assembly
Nozzle Tip
62-9680-9851-7
Temperature Module #1 Kit
Temperature Module #1 (3 ea.)
62-9680-9852-5
Temperature Module #2 Kit
Temperature Module #2 (3 ea.)
62-9680-9853-3
Temperature Module #3 Kit
Temperature Module #3 (3 ea.)
62-9680-9854-1
Temperature Module #4 Kit
Temperature Module #4 (3 ea.)
62-9680-9855-8
Temperature Module #5 Kit
Temperature Module #5 (3 ea.)
62-9680-9856-6
Temperature Module Set Kit
Temperature Module #1, 2, 3, 4, 5 (1 of each)
27
© 3M 2006
Accessories
3M Stock Number Description
62-9921-0066-9
.090 inch Fluted Tip
62-9922-0066-7
.063-inch Fluted Tip
62-9940-6920-1
.125-inch Fluted Tip
62-9946-6980-2
.072-inch Brass Extension
62-9725-9930-2
Mini-Extension Tip, .072-inch Opening
62-9726-9930-0
“T” Tip w/Adapter
62-9727-9930-8
“L” Tip w/Adapter
62-9729-9930-4
High Viscosity Valve (recommended for use with adhesives 3779, 3789, 3747)
62-9785-9930-6
.070-inch Tapered Aluminum Extension
62-9945-9935-5
Bench Stand
© 3M 2006
28
Temperature Module Selections for
3M™ Scotch-Weld™ Hot Melt Quadrack™ Adhesives
Scotch-Weld
Adhesive
Temperature
Module
Description
Color
Resistance
3731 Q
A 100% solid, high heat resistant
thermoplastic adhesive for bonding a variety
of substrates including low surface energy
plastics like polypropylene, polyethylene
and many other plastics.
Off-White
265°F (129°C)
(5)
3738 Q
High delivery rate, multi-purpose
adhesive with long bonding range
and good performance properties.
Tan
130°F (55°C)
(4)
3747 Q
Good adhesion to a variety of plastic
and wood with good heat resistance,
long bonding range, and high delivery
rate.
Tan
145°F (63°C)
(4)
3748 Q
Outstanding adhesive for rigidizing
and attaching components to printed
circuit boards. Good adhesion to many
plastics including polyolefins. Offers
good shock and heat resistance.
OffWhite
175°F (80°C)
(4)
3748 V-O Q
Self-extinguishing version of 3748
adhesive which meets UL 94 and UL
1410 requirements. Can bond to FRP,
epoxy board, polypropylene, polyethylene.
Light
Yellow
175°F (79°C)
(4)
3762 Q
A rapid-setting, low viscosity
adhesive that exhibits excellent “hot tack”
properties. Can be used on most paper
and paper products.
Tan
130°F (55°C)
(3)
3762LM Q
Similar to 3762 Q adhesive
except applied at a substantially
lower temperature.
Cream
130°F (55°C)
(1)
3764 Q
Clear, high performance adhesive
for many types of plastics, glass and
wood, such as acrylic, polyolefins,
polystyrene, polyester, and polycarbonate.
Exhibits outstanding resistance to shock at
both 72°F and 0°F.
Clear
140°F (60°C)
(4)
3776LM Q
Medium performance, low
temperature applied adhesive. Can
bond many light weight materials
to light gauge metals.
Tan
140°F (60°C)
(1)
29
© 3M 2006
Temperature Module Selections for
3M™ Scotch-Weld™ Hot Melt Quadrack™ Adhesives
Scotch-Weld
Adhesive
Temperature
Module
Description
Color
Resistance
3779 Q
High performance adhesive for
many electrical or electronic applications.
Meets UL 94 V-O requirements.
Amber
300°F (149°C)
(5)
3789 Q
High performance, general purpose
adhesive with good resistance to
plasticizer migration. Bonds many
plastics including supported and
unsupported vinyls.
Light
Yellow
220°F (105°C)
(5)
3792 Q
Clear, general purpose adhesive
has a long open time and good delivery
rate. Excellent adhesion to many plastics,
glass, and wood. Exhibits good resistance
to shock at both 0°F and ambient temperatures.
Clear
140°F (60°C)
(4)
3792LM Q
Similar to 3792 Q adhesive except
applied at substantially lower temperature.
Clear
140°F (60°C)
(1)
! Caution
Use only the proper temperature
module for the 3M™ Quadrack™
adhesive used. Failure to do so
may cause burns or damage
applicator. Refer to Table 1 in the
Temperature Module Installation
section for proper module selection
for 3M Quadrack adhesive used.
© 3M 2006
Important Notice
User is responsible for determining whether the 3M product is fit for a
particular purpose and suitable for user’s method of application.
Please remember that many factors can affect the use and performance of
a 3M product in a particular application. The materials to be bonded
with the product, the surface preparation of those materials, the product
selected for use, the conditions in which the product is used, and the time
and environmental condition in which the product is expected to perform
are among the many factors that can affect the use and performance of a
3M product. Given the variety of factors that can affect the use and
performance of a 3M product, some of which are uniquely within the
user’s knowledge and control, it is essential that the user evaluate the 3M
product to determine whether it is fit for a particular purpose and suitable
for the user’s method of application.
30
Warranty and Repair
During Warranty Period
Contact your nearest 3M sales branch or authorized 3M™
Scotch-Weld™ Hot Melt Adhesive distributor.
After Warranty Period
The 3M™ Scotch-Weld™ Hot Melt Applicator EC has been engineered
to be durable and reliable. Recognizing that it will eventually need
maintenance, we have made it easy to disassemble and repair.
Should your 3M Scotch-Weld Hot Melt Applicator EC require repair,
you can order replacement part kits from your local authorized 3M
Scotch-Weld Hot Melt distributor or from the nearest 3M sales branch
listed on the back cover.
Important Notice: User is responsible for determining whether the
3M Scotch-Weld Hot Melt Applicator EC is fit for a particular purpose
and suitable for user’s method of application.
Warranty: 3M warrants for 12 months from the date of purchase or
use, whichever occurs first, that the 3M Scotch-Weld Hot Melt
Applicator EC will be free of defects in material and manufacture. 3M
MAKES NO OTHER WARRANTIES, EXPRESS OR IMPLIED,
INCLUDING, BUT NOT LIMITED TO, ANY IMPLIED WARRANT
OF MERCHANTABILITY OR FITNESS FOR A PARTICULAR
PURPOSE OR ANY IMPLIED WARRANT ARISING OUT OF A
COURSE OF DEALING, CUSTOM, OR USAGE OF TRADE; This
warranty does not cover routine maintenance, normal wear and tear, or
damage resulting from accident, misuse, alteration, corrosion, lack of
reasonable care, service performed by an unauthorized repair service,
use of unauthorized replacement parts or accessories, or installation,
use, operation, or maintenance not in accordance with 3M
recommended procedures, or use of adhesive sticks not manufactured
by 3M or not subject to 3M quality standards.
Limitation of Remedies: If the 3M Scotch-Weld Hot Melt Applicator
EC is proven to be defective within the warranty period stated above,
THE EXCLUSIVE REMEDY, AT 3M’S OPTION, SHALL BE TO
REFUND THE PURCHASE PRICE OF OR TO REPAIR OR
REPLACE THE DEFECTIVE 3M APPLICATOR, provided that the
defective applicator is, at 3M’s choice, returned immediately to 3M, or
an authorized service representative designated by 3M, or made
available at user’s premises in a location suitable for servicing.
Limitation of Liability: 3M shall not otherwise be liable for any
losses or damages, whether direct, indirect, special, incidental, or
consequential, regardless of the legal or equitable theory asserted,
including contract, negligence, warrant, or strict liability.
31
© 3M 2006