1
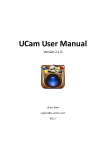
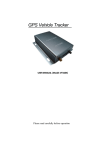
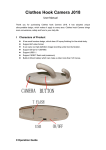
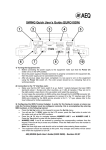
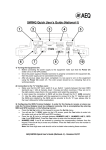
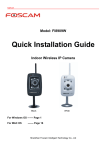
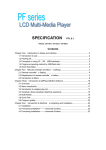
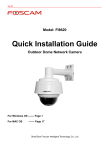
Video Camera Operation Manual
1. Camera
2. Indicator
3. Ventilation hole
Power switch 7. Recording 8. Reset
4. Microphone 5. IF card
9. Ventilation hole
6.
10. USB
Indicators:
Red light on---Power switch on
Red light off---Power switch off
Blue light on---Recording standby
Blue light flash---Recording on
Green light on---Mobile phone connection mode (AP mode)
Green
light
off---
Router connection mode (STA mode)
Green light flash--- (STA mode) Camera unconnected to the router
Camera Operation:
Press NO\OF button, the machine starts up when the red light is on, and the red, blue
and green light are all on after the system runs for 20 seconds (automatic recording will
begin while the blue light flashes at starting up when IF card is loaded). Press the
Recording key for 2 seconds to stop and save the recorded file when recording is going
on and blue light is always on. Press the recording key again for 2 seconds when
required. Red light is off when long pressing the power switch after starting up, and the
machine is off.
Long press Reset button until the green light keeps flashing, then release the button,
when the machine is abnormal due to inappropriate operation or other unknown reasons.
The machine is restored to factory settings and restarts. The camera enters mobilephone
connection mode (AP mode)
1
For software downloading and troubleshooting, please visit WWW.QR-CAM.COM.
Ⅰ. Installation of Mobilephone APP Software
Android Client
Apple Client
As the software scanned and downloaded is a compressed file in rar format, and the
mobilephone must be installed with Winrar. The QR code scanning and downloading is
not available for Tencent-related browser.
1. You can download Android scan packing and QR code on the Manual by visiting
www.qr-cam.com.
2. You can also search QR-CAM software in App Store and download iPhone scan
packing and QR code on the Manual.
3. For jailbreak iPhone, visit www.qr-cam.com and click iPhone client for downloading.
When QR-CAM software is installed, the following icon will appear on the mobilephone
as in Fig. 1.
Fig. 1
Ⅱ. Point-to-Point View of Camera & Mobile phone (AP Mode)
Long press Power button, the red light is on for starting up, and the red, blue and green
lights are on after the system runs for 20 seconds. Turn on WLAN of the mobilephone.
Search for machine SSID hotspot of IPCAM-AP-8000******, and input password
12345678; open QR-CAM client software when connection is successful. Enter the page
in Fig. 2,
2
Fig. 2
Click the search icon
Fig. 3
on the top left corner, a black and blue item column appears
and WLAN dialogue box popup as shown in Fig. 3, click “Cancel” to view the camera and
enter the page in Fig. 4. Select “Yes” to enter “WIFI setting” page.
Fig. 4
Fig. 5
Click the black TextField in Fig. 4 to enter the page in Fig. 5. You can operate accordingly
on the camera.
Ⅲ. Camera & WLAN Connection View (STA Mode)
As in the above-mentioned steps, enter the page in Fig. 5 when the mobilephone is
successfully connected with the camera, click “Camera Settings” to enter the page in Fig.
6, and click “WLAN” to enter Fig. 7 and select “STA Mode”. Find the router WIFI hotspot
to be added as shown in Fig. 8, input the router WIFI password and click “Complete”.
3
Fig. 6
Fig. 7
Fig. 8
The camera restarts. The green light is always off (indicating STA Mode) after 20
seconds, the camera has been connected with the router successfully. The user's
mobilephone is also connected with the above wireless router. Return to the “Equipment
List" page in Fig. 4. Click the search icon on the top left corner to update the equipment
list, and click the black TextField in the LAN to visit the camera. Click the blue TextField if
the mobilephone and the camera are not in the same network (P2P link) for a remote
access to the camera.
Ⅳ. Computer Client View
1. Install Computer Client: Connect the camera with the router (i.e. STA Mode), the
computer and the camera are in the same network, input 192.168.1.168 in the computer
IE address field, and the webpage that appears is as shown in Fig. 9 below. Icon
will appear on the desktop after ActiveX control is downloaded and installed. If the
computer and the camera are not in the same network, visit www.qr-cam.com for
downloading and instllation to install computer client.
Fig. 9
2. Recorded File Playback: Computer client installation will simultaneously install its
4
own AV format player
. The file recorded by the camera will require this AV player
for playback.
3. View Camera in the LAN: Connect the camera with the router (STA Mode). Click the
search icon
at the lower right corner of the window, equipment IP address will
appear in the unused equipment list. Start the equipment by double clicking the IP
address to view the real-time picture. Click the real-time video window to show various
function keys on top of the window. Photgraph file folder can be accessed from the
“Snapshot Management” , and video file information saved on the computer can be
viewed through “Local Playback File”
4. View Camera through Remote Network (P2P Link): The camera and the router are
connected (STA Mode). When the camera and the computer are not in the same network
environment, open the computer client, click the icon
at the lower right corner to
pop up a setting window, click “Add Equipment”, select “P2P Link Mode”, input UID code
(UID code is the black text below the blue TextField in Fig. 4, which is also P2P account)
at the "Equipment Address\UID”. Input password 123456, click "Save", and then click
“Yes”. New equipment then appears in the unused equipment, and remote real-time
pictures can be viewed by double clicking the new equipment to start it.
Ⅵ. Setting of Password & Name
1. WIFI Hotspot Name and Password: Enter the page in Fig. 7 after the
mobilephone is connected with the camera. WIFI hotspot will be a new name
when searching for the camera after WIFI name is revised. The revised
password of the original password 12345678 of WIFI must be 8 figures. The
camera will restart after revision. If the new password setting is less than 8
digits, the camera will remain the original password. If “Unable to add” is
prompted when trying to re-add the WIFI hotspot after the password is revised,
then the hotspot must be “deleted” or “ignored" before searching and adding
hotspot.
5
Fig.10
2. Name of Camera: Click the icon
on the rigth in Fig. 4 to enter Fig. 10.
“Name" can be revised by the user. The revised name is the one shown in Fig.
4. The name will not be refreshed or replaced after is is revised. The user can
not revise by himself “User Name” admin and “Password” 123456 in Fig. 10.
It would be impossible for him to view the video picture of the camera if it is
revised.
3. Password Setting of Computer Client: The default user name admin can
not be revised. Open the computer client; click “System” on the top right
corner of the window to select password modification. When the password is
modified, it is necessary to input the new password when opening and/or
closing computer client.
Notes:
1. The AP Mode and STA Mode of the camera are two different modes, and the camera
must be restarted to take effect after conversion.
2. When you want to visit the camera, you need to know what the WIFI mode of the
camera is (AP or STA mode), then the corresponding connection mode is used to
connect to the camera;
3. When connecting the camera with wireless WIFI, it may lead to connection break,
machine restart or unsmooth wireless transmission due to WIFI signal strength, the
surrounding environment of the camera, the wireless router’s compatibility and
performance, etc. Please solve the relevant problems according to the actual situation;
4. The built-in battery of the machine can supply the machine in a short period of time. A
low battery voltage may lead to restart or unstable working conditions of the machine.
Please connect the machine to an external power supply when it is working for a long
period of time;
5. When a camera breaks down due to operation or setting error or other unknown
reasons, long press the Reset button and wait until the green light begins to flash before
releasing the button, then the machine will be restored to factory setting and restarts.
6