1
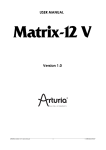
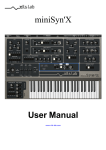
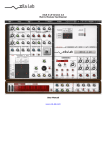
LX122 Premium
User Manual
www.xils-lab.com
Table of contents
1 INTRODUCTION................................................................................................................................................4
2 FEATURES.......................................................................................................................................................... 5
3 INSTALLATION................................................................................................................................................. 6
3.1 SERIAL NUMBER.................................................................................................................................................. 6
3.2 WINDOWS (XP, VISTA, WINDOWS 7)................................................................................................................. 6
3.3 MAC (OSX 10.5.0 AND LATER)........................................................................................................................... 6
4 GETTING STARTED......................................................................................................................................... 7
4.1 INSERT OR BUS .................................................................................................................................................. 7
4.1.1 LX122 Premium as insert ....................................................................................................................... 7
4.1.2 LX122 Premium on a Bus........................................................................................................................ 7
4.2 TOOLBAR........................................................................................................................................................... 7
5 PRESET MANAGEMENT................................................................................................................................. 8
5.1 MAIN TOOLBAR.................................................................................................................................................. 8
5.2 PRESET MENU..................................................................................................................................................... 8
5.3 SORT MENUS..................................................................................................................................................... 10
5.4 SORTING MENU: ADDITIONAL FUNCTIONS ............................................................................................................ 10
5.5 A/B COMPARISON.............................................................................................................................................. 11
6 ADJUSTING THE INSTRUMENTS PARAMETERS (KNOBS)................................................................. 11
7 ROTATING SPEAKERS CABINET............................................................................................................... 12
8 THE MAIN PANEL........................................................................................................................................... 13
8.1 THE GENERAL LEVEL AREA ................................................................................................................................ 13
8.1.1 Slow/Fast/Stop Area.............................................................................................................................. 14
8.1.2 Studio Area............................................................................................................................................ 14
8.1.3 Cabinet settings area............................................................................................................................. 15
9 OPTION MENU.................................................................................................................................................18
9.1 MAIN.............................................................................................................................................................. 18
9.2 DISPLAY........................................................................................................................................................... 18
9.3 MISC............................................................................................................................................................... 18
10 CREDITS......................................................................................................................................................... 19
1 Introduction
Thank you for choosing the LX122 Premium !
LX122 Premium is a rotating speaker emulation, featuring XILS-lab proprietary True Stereo
Dynamic Engine (TSDE). Thanks to this advance, you now have a whole new way to record
the rotating speaker effect.
Knowing that the real sound of a rotating speaker depends mostly on how it reacts to the room where
it is, the TSDE algorithm allows to extract the exact feeling of this well-known and always wanted
effects.
The tube based amplification, heart of the most important characteristics of the original concept has
not been forgotten. Its drive parameter allows you to overload its input circuitry in a simple but
efficient way, giving the distortion that nice tube feeling.
And last but not least, LX122 Premium allows you to change the structure of the rotating
speaker cabinet, removing the drum or the horn, increasing the length of the horn or changing
the speed of the Slow or Fast mode, independently for the both motors.
What about a four motor cabinet? The dual mode mimics this never done before model, where
left and right channel are dived into two independent speaker pairs, each with their own speed,
never in sync, giving an even more dramatic effect.
-4-
2 Features
LX122 Premium offers:
•
True stereo path, independent Right and Left Rotating speaker structure
•
Five Cabinets structures
•
Four room emulations
•
True Stereo Dynamic Engine
•
Three reverberation algorithms
•
All parameters are MIDI controllable
LX122 Premium is available in the following formats:
•
•
Mac OSX 10.5 and later: 64 and 32 bits, VST, Audio Unit, RTAS (Pro Tools 7.0 and
later)
Windows 7, XP and Vista: 64 and 32 bits, VST, RTAS (Pro Tools 7.0 and later)
Minimum system requirements: 1 Gigabyte of RAM and a 1 GHz processor.
LX122 Premium is a plug-in and is not available as a standalone application
-5-
3 Installation
3.1
Serial number
LX122 Premium uses a simple proprietary serial number based protection.
When launching LX122 Premium for the first time, it will ask for this number.
After submitting, you must close and re-launch it once to complete the registration. This serial
number will never be asked for again, even when installing updates.
Tip: It is always a good idea to back up this serial number, or to print it, in case you should
have to reinstall LX122 Premium (i.e. if you encountered a HD crash for example, or have to
reinstall your OS).
3.2
Windows (XP, VISTA, Windows 7)
To install LX122 Premium on Windows XP, Vista or Windows 7, launch the installer file
LX122_ Premium_win_setup.exe. Please download the latest version from the XILS-lab website.
Once you have accepted the license agreement, you will be asked to select the installation directory
and provided with a default one. Presets and various files, like this manual, used by the LX122
Premium will be stored in this directory. Please note that this location is different from the VST
install directory, which you will need to specify in the next step of the installer.
Once the installation directory is specified, you will be asked to select the VST plug-in directory, with
a suggested default location. Keep this default directory if you do not use the VST version.
Important notice for Vista or Windows 7: be sure to use a folder owned by the user (do not use
“c:/program files” for instance). Otherwise you will have to run your music application with
“administrator rights”.
The RTAS plug-in and its table control management Pro Tools are directly copied into the following
directory: C:\Program Files\Common Files\Digidesign\DAE\Plug-Ins
3.3
Mac (OSX 10.5.0 and later)
To install LX122 Premium on a computer equipped with Mac OSX 10.5.0 or later, double-click the
file LX122_Premium_osx_setup.dmg.
Please download the latest version from the XILS-lab website.
Then launch the install program, LX122 Premium.pkg, and follow the instructions. Warning: the
install program will ask you for your system password.
The various files of the LX122 Premium will be copied into the following directories:
Library/Application Support/Digidesign/Plug-Ins
Library/Audio/Plug-Ins/Components
Library/Audio/Plug-Ins/VST/XILS-lab (32)
Library/Audio/Plug-Ins/VST/XILS-lab (64)
Library/Application Support/Documentation/XILS-lab/LX122
Library/Application Support/XILS-lab/LX122
users/username/Library/Preferences/XILS-lab/LX122
-6-
4 Getting Started
4.1
Insert or Bus
Like any other effect units, LX122 Premium can be inserted in the instrument channel of your mixer or
DAW, or be used on an auxiliary bus. There are advantages and disadvantages to each method.
4.1.1 LX122 Premium as insert
When inserted on the instrument channel, you can adjust the dry/wet signal between the incoming dry
signal and the delay signal (wet) using the DRY/WET knob located at the bottom right of the unit.
This can result in a loss of the global volume; therefore you should use the Global Output Gain knob to
compensate for this.
4.1.2 LX122 Premium on a Bus
When placed in an auxiliary bus, LX122 Premium provides you total control of the processed signal: You
can EQ it, compress it, choose to add reverb on it, or a different reverb than on the dry signal, in short you
can perform all the processing you want. You can also render the signal of LX122 Premium on an audio
track then cut/paste/slice/edit it.
In an auxiliary track, LX122 Premium can also receive data from SEVERAL separate audio channels.
You can experiment with this and create stunning effects that would be different if LX122 Premium
received only a single channel signal.
In that method, you must turn full right the Dry/wet parameter remove the dry signal. To mix between dry
and wet, you will use the global level of each individual tracks, and/or the global level of the LX122
Premium.
4.2
Toolbar
Note: The toolbar at the top of the interface allows you to load or save presets, make a comparison between
settings A and B, or modify the options. These functions are described in detail later in this manual.
Click on the PRESET name field to show the available presets in the current sorted group. Please note that
selecting a new preset without saving your current settings will erase any changes you have made to those
settings.
Click on the sort arrow button to display the current sorted group and to choose the preset within it.
You can sort presets by: Author, Feeling, Type, Style, Bank or Projects.
Click on the sorting label over the sorted group name, to sort your preset according to your preferences
Please note that LX122 Premium powerful Preset management is fully detailed in chapter 5 of this
manual.
5 Preset Management
5.1
Main Toolbar
At the left of the toolbar you can find one, displaying the category name (Bank, Author, Type, Style, Feeling or
Project), which open the sort management menus.
The first text fields show the current sorting group and the second one shows the current preset.
Clicking on the name field of the category or preset names opens the corresponding menus.
Note: When a parameter is modified, the name of the preset is followed by a *, indicating that the current
settings of the LX122 Premium no longer match the stored preset.
When you want to save a modified preset, click on the Save or Save As button.
In order to prevent you from erasing them, the Factory presets cannot be modified. When you edit a Factory
preset, the Save button will be grayed out, and you will have to use the Save As function to save it in another
bank.
If you edit any other preset than a Factory one, the Save and Save As function will both be
available.
The main difference is that the Save function will save the preset under its current name,
and with its current tags, overwriting the previous incarnation of the preset, while the Save
as function opens a dialog box where you can modify the name of the preset, the bank in
which it will be stored, and all its tags
The settings of LX122 Premium are then saved in the currently displayed preset, and the * disappears.
Clicking on the Save As button to duplicate and save this preset with another name and/or to other sorting
groups, clicking on the Move To will change its name and/or other sorting groups.
5.2
Preset menu
Factory Presets: LX122 Premium contains many Factory Presets, including standard well-known Rotating
Speakers configurations and uses..
Hint: We’d recommend to Choose TYPE as first criteria in the sorting menu when you begin to play with LX122
Premium, and use the preset type corresponding to the situation.
Click the Preset name field to open the preset menu. Here you can choose and load another preset from the
current sort groups into LX122 Premium
You can also use the Up (next preset) /Down (previous) arrows located at the right of the preset name to
browse presets
In this menu, other actions are also available:
Delete Preset: use this to delete the current preset (a popup confirmation window appears). This option is only
available if the current preset is not a factory one.
Export Preset: Use this function to export the current preset in an external file (.mskd format). This file can be
imported later as a new bank. It always makes sense to back up your presets on external support like CD ROMs
etc.
Open preset Information (or click on SAVE AS): opens the following preset information window where the
name and all other information related to the current preset can be displayed or changed.
In this window you can modify the Name of the preset, specify the Bank in which the preset will be saved, and
also enter information in the other fields:
•
•
•
•
•
Author (Your name, otherwise used by Sound Designers for factory presets),
Type (Category of the instrument like Keys, Leads, Basses, etc.)
Style (Musical Genre),
Feeling (Cold, warm, soft)
Project ( My Song, My_Live_Project ).
Note: You can also see its creation date and the last update date.
To modify a preset name, click in the preset field and enter the new preset name this will also save all the
current settings.
To change preset information, click on the display, this will open a menu when you can select one of the
existing items.
Note: You can add a new item in any category, and therefore create custom banks, custom styles, Projects,
categories of instruments etc.
To add a new item in any filed, select “New….”at the bottom of the list.
Note: You may have to browse until the end of the list in order to select “new” depending on its length.
A Pop Up window opens when you can enter the new name. The current preset will then be associated to
this new item.
Note: Please be aware that creating too many categories can also have its drawbacks and make browsing
become from difficult and painful to nearly impossible. Should you create around 200 different custom
instrument categories, it would become very difficult to browse the library using the Style sorting.
Once you have filled in all the desired/required fields:
SAVE AS: Will save the current preset in the chosen Bank, with its new (or unchanged) Name, tags in all
the fields you filled in.
REPLACE: Allows saving the current preset in another location. This is handy to gather a lot of preset into
a single location, or User Bank, which you can export in a single file containing all the presets you created
or edited for a given project.
CANCEL: Will just cancel all operations and return to the standard LX122 Premium GUI.
Sort menus
5.3
These sorting menus are a powerful and unique tool. Allowing you to perform sophisticated tasks like
displaying the preset list with one of the following selections:
•
•
5.4
All the Settings tagged with a given musical genre
All the presets you have made for one tack, one live project etc.
Sorting Menu: Additional Functions
In this menu, other actions are also available:
Delete: deletes all of the presets of the current group that are not factory ones. IMPORTANT: Use this function
with care: If the bank does not contain any factory presets, ALL PRESETS IN THIS BANK WILL BE PERMANENTLY
DELETED.
Rename: modifies the current group name. Selecting this choice will open a window where the new name will
be entered.
Use Factory: enables or disables the display of factory presets.
Sort By: sorts the presets according the bank, author, project, or shows all presets (Bank Name, Author
Name, Project Name, All Presets). The preset menu will show presets of the same category (same author,
same project or same bank).
Export Bank: exports a bank in LX122 Premium proprietary cross platform format, (Mac and PC). The
selected bank (i.e. the bank which contains the currently active preset) will be exported to a user specified
location on your hard drive.
Import Bank: allows you to browse your hard drives to select a file and imports a Masque bank.
A/B comparison
5.5
You can store two different settings at the same time and instantly switch from one to the other to compare
their settings. These two settings are stored in the A and B memories.
When you launch LX122 Premium, the default-activated memory is A. When you load or
modify a preset, this memory –A- is also modified in real time according to your edits. You
can switch to B memory by clicking on the B button.
To copy the current active memory content to the other memory slot, just press the button
labeled -> or <-, according to the current active memory.
With this A/B comparison system, you can easily have two settings and compare them in a convenient way.
6 Adjusting the instruments parameters (Knobs)
On LX122 Premium, most sound parameters, like the delay time and feedback, or the filter’s Cut Off
frequency are controlled using Knobs.
To adjust the parameters of LX122 Premium with the mouse, you have two axes: horizontal and vertical, which will give the same results.
To increase a parameters value, click and drag the knob to the right or to the top.
To decrease a parameter value, click and drag the knob to the left or to the bottom.
If you right-click on a parameter, or if you hold shift while clicking, you can adjust the parameter with fine
precision (the ? button of the toolbar displays a panel summarizing these shortcuts).
Right clicking in the studio setting Pad allows keeping a correct Left-right balance. In the same manner,
right clicking on the two Microphone angle knobs keeps them in sync.
Keyboard shortcuts
In addition we have provided some soft keys combination to perform several very useful tasks:
Windows:
•
•
•
CTRL+left click: reset parameter to its default value.
CTRL+right click or CTRL+Shift+left click: initialize the default value of the parameter.
Win+Alt+CTRL + click: open the MIDI Control panel, with the parameter already selected.
OSX:
• Apple+left click: reset parameter to its default value.
• Apple+Shift+left click: initialise the default value of the parameter
Apple+Alt+CTRL + click: open the MIDI Control panel, with the parameter already selected.
7 Rotating speakers cabinet
At the middle of the last Century, Mr. Leslie was disappointed by the sound of his just bought Hammond organ,
comparing to what he has heard in the large showroom of the store. I then tried to design a system, which gave
the same feeling of a pipe organ by a moving speaker. Further experimentations resulted in the familiar
combination of a rotating drum and horn for bass and treble frequencies respectively, creating special audio
effects using the Doppler effect.
Although there is a lot a various models, the classic Leslie speaker consists of two driver units - a stationary
treble unit with spinning horns (called Horn in this manual), and a stationary woofer and spinning rotor (called
Drum in this manual), with a crossover, that divides the frequencies between the horn and the woofer.
Both the horns and a sound baffle for the bass are rotated to create Doppler effect based vibrato, tremolo and
chorus effects. The rotating elements can be stopped, switched between slow (chorale) and fast (tremolo), or
transitioned between the two settings. Not only the unit gives this particular effect, but also the ensemble it
creates with the room where it is located.
The LX122 Premium emulates the Horn and the Drum, as well as the room where various coherent reflections
are occurring when they are rotating. It also emulates the tube base amplifier as well as the intrinsic
characteristics of the Drum (woofer response and drum size) or the Horn (Tweeter response, horn size and
diffusers)
8 The Main Panel
The base concept of LX122 Premium is that everything you need to play with it live is available from the
Main Panel, except the advance modulation settings.
You’ll find on the main Panel the following areas: the general levels area, the Slow/Fast/Stop commands
and the studio/cabinet settings area.
8.1
The general level area
Two vu-meters help to keep the volume at the
correct level.
LEVEL: set the output gain of the LX122 Premium.
It has a wide range as the stereo space can bring
small gain
DRY/WET: the mix between the dry and the
processed signal. The rotating speakers effects is
normally a full wet effect, but adding dry signal can
give some nice phasing effects.
DRIVE: This knob helps to overload the tube base
amplification circuitry without changing too much
the overall level. Turning left (toward 1) will give a
different algorithm than turning right (toward 2)
DUAL MODE: when engaged, this switch allows the
left and right channels to be treated by two
independent paths. At the expense of a higher CPU
load, this is giving you a four speakers cabinet as if
two units would be used.
8.1.1 Slow/Fast/Stop Area
The LX122 Premium provide different cabinet structures, hence, the buttons allowing to engage the slow or fast
mode are displayed in two way, either a single button, when only the drum of the horn are present in the
structure, either offering to command the drum or the horn independently.
Slow/Fast command when the drum and the horn are
available.
Slow/Fast command when only the drum or the horn is
available.
Clicking on the SLOW switch engages the slow mode, giving the well-known “Choral” effect. This means that
the corresponding motor speed will decrease at a rate set by the deceleration knob (see below, the cabinet
settings chapter), until it reaches the slow speed. Inversely, clicking on the FAST button engages the fast mode,
giving the well-known “Tremolo” effect. This means that the corresponding motors speed will increase at a rate
set by the acceleration knob (see below, the cabinet settings chapter) until it reaches the fast speed.
Clicking on the STOP button will stop the corresponding motor. This means that the speed will decrease at a rate
set by the deceleration knob until it stops. At this time, the position of the speaker is then no controllable.
8.1.2 Studio Area
Clicking on the STUDIO button displays the studio view, allowing the user to position the microphones that
are recording the rotating speakers at various positions, giving a wide range of sounds and feelings.
In this panel, you can also change the characteristics of the room as well as the reverberation algorithms
Clicking on the microphone allow you to put it where ever in the room, right clicking keeping the left-right
balance (the other microphone is moved accordingly). The closer the cabinet you are, and when the
microphones are directed toward the unit, the less the room and its reflection will be important, as if a
dry/wet of the reverberation would be turned in the dry direction.
On the contrary, if the microphones are not directed toward the cabinet or if the microphones are put far
from it, the room will then be more present. As if a dry/wet of the reverberation would be turned in the
wet direction.
STUDIO SIZE: This knob sets the “size” of the room, acting on how the first reflection will be spaced.
MIC ANGLE LEFT or RIGHT: These knobs change the angle of the corresponding microphone. Right click
allows to keep the both in sync, keeping the stereo balance.
STUDIO WALL: This menu allows you to choose the room, from None, where no reflection or reverb are
created, to Complex, where a complex room, at the expense of a higher CPU load, gives you a denser
result.
TIME: This knob set the reverberation time
HDAMP: This knob sets how the high frequencies are reduced during the reverberation time. Turning left
reduce the high frequency level while turning right increases them.
Large/Medium/Small: This selector allows you to change the reverberation algorithm, from small to
large.
HIGH-PASS: This selector allows to add or not an high pass 6 dB filter before the reverb, avoiding some
blurry basses. Two cutoff frequencies are available, 80 Hz or 160 Hz.
8.1.3 Cabinet settings area
Clicking on the CABINET button displays the Cabinet view, allowing change various parameters of your
Rotating Speaker unit.
First, you can choose how your cabinet is build, adding or not a drum, a horn, removing the treble speaker
or the woofer speaker. This is done thought the menu TYPE
1 Horn, 1 Drum: The typical rotating speaker unit,
holding a drum for the low end, and a horn for the high
frequency. In this case, you have access to the Drum
and Horn motors parameters.
1 Horn, 1 Woofer: Some rotating speakers units used
to get only a horn but provide a woofer for the low
end. In this case, you have access to the Horn motor
parameters as well as the balance between low and
high ends.
1 Treble, 1 Drum: Some rotating speakers units used
to get only a drum but provide a tweeter for the high
end. In this case, you have access to the drum motor
parameters as well as the balance between low and
high ends.
1 Horn: Some rotating speakers units used to get only
a horn. In this case, you have access to the horn motor
parameters. There isn't any filtering done before the
horn, only its characteristics are emulated.
1 Drum: Some rotating speakers units used to get only
a drum. In this case, you have access to the drum
motor parameters. There isn't any filtering done before
the drum, only its characteristics are emulated.
DIFFUSER OUT: In the real rotating speakers
units, the horn, when present has some metallic
part, used to avoid its intrinsic directivity, giving a
more subtle effect. This is nicely emulated by the
LX122 Premium. But in some case, musician wants
a more “strait to you face” effect and removed this
metallic part from their horn. So the LX122
Premium does, when clinking on this button.
When the structure of your rotating speaker cabinet has been chosen, you can set the characteristics of its
motors. Let us explain the case when both Horn and Drum are there, it is obvious to adapt these
explanation for the other modes.
You can see two parts, one for the horn, and the other for the drum.
SLOW: set the speed of the slow mode (when the SLOW/FAST buttons are engaged to SLOW)
FAST: set the speed of the fast mode (when the SLOW/FAST buttons are engaged to FAST)
ACC.: set time the motor will go from the SLOW to the FAST mode.
DEC.: set time the motor will go from the FAST to the SLOW mode.
RND/CLK/CNT-CLK: This selector allows you to choose the sense of the rotation of the speakers. CLK as
clockwise, CNT-CLK, as counterclockwise and RND as Random. In this last position, the motors are
changing their sens of rotation in a random way, giving a nice and never heard effects.
DIAMETER: This knob set the size of the horn, the bigger, the wider the Doppler effect.
RIBBON: This knob set how the ribbon which makes drum to rotate is new or old.
BALANCE: this knob sets the relative level of the signal sent to the woofer or the tweeter.
CABINET EFFECT: this knob sets the importance of the internal cabinet reflexions. Turned it left will make
the sound as if there were no cabinet wood panel.
9 Option menu
This menu allows choosing the global settings. These settings are defined for all the instances of the
LX122 Premium. Each time an option is changed, the related option file is saved.
9.1
Main
In the toolbar, the Options button opens a menu for selecting various options for the LX122 Premium.
This menu shows the following options settings:
LX122 Premium About: displays information about the LX122 Premium (version, build date and credits).
Open MIDI settings panel: Opens a popup where you can assign MIDI controllers for each of the LX122
Premium’s parameters. Click on the parameter label to select the parameter you want assign, then enter
the MIDI controller number (from 0 to 127), or switch on the learning switch and send a MIDI command with
the correct MIDI controller number. The LX122 Premium will memorize it. This setting popup can also be
opened by CTRL+ALT+Apple+Left-click (Mac) or CTRL+Win+ALT+Left-click (Win) on the desired LX122
Premium parameter.
9.2
Display
Output level follows presets: When checked, this option allows the output level to follow the presets. That
means that the output level is programmed with the value saved in the preset. Otherwise it keeps its value.
Popup On: shows a popup window while modifying the value of a knob.
Popup Over On: shows a popup window when the mouse is over a switch.
Popup Name On: the name of the current modified parameter is displayed.
GUI update: low: slow refresh rate for the GUI. Useful when it is necessary to save CPU power.
GUI update: middle: standard refresh rate for GUI.
GUI update: fast: fast refresh rate for GUI. Useful when it is necessary to precisely follow the sequencer's led
for instance.
9.3
Misc
Init settings from current settings: initializes the default values of the LX122 Premium from the current
settings. All the new presets will be created from these settings, when the init settings choice is selected.
These parameters will also be used when setting a control to its default value. (Win: CTRL+Click, OSX:
ALT+Apple+Click).
Wheel Incr: 0.01: parameter increment of 0.01 when using of the mouse wheel.
Wheel Incr: 0.05: parameter increment of 0.05 when using of the mouse wheel.
Wheel Incr: 0.1: parameter increment of 0.1 when using of the mouse wheel.
10 Credits
Concept of LX122 Premium and original UI design was done by:
Xavier Oudin
Rotating speaker and Stereo processing concept and coding were done by:
Xavier Oudin
Digital Signal Processing and plug-in coding was done by:
Xavier Oudin
The graphical user interface was created by:
Xavier Oudin helped by Laurent Bourgeon
The graphics created by:
Yannick Bonnefoy
This manual was written by
Xavier Oudin
And proofread and corrected by:
Michael Logue
The presets were done by:
Lotuzia, Xavier Oudin, Mathias Brussel.
Thanks to :
Nori Ubukata, Mathias Brussel, Laurent Bourgeon, Kelvin Ford, Ingo Weidner, Boele Gerkes
Modules licenses:
The LX122 parameters concept, emulation of the Rotating speakers, reverberation unit, True Stereo
Engine, are licensed by Xavier Oudin to XILS-lab for exclusive use in LX122 software.