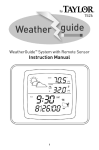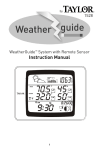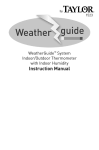
1
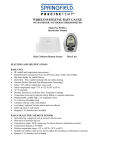
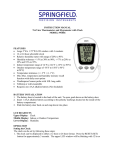
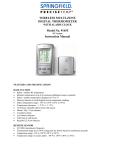
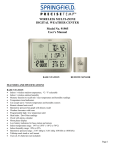
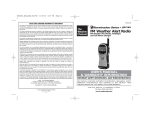
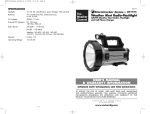
Model 96200
7 Channel Portable Weather Radio
Be prepared for extreme weather 24 hours a day. The Springfield® Portable Weather Radio receives
National Weather Service alerts for weather warnings, tornados, hurricanes, blizzards and more to keep
you informed of weather conditions in your area. Your Springfield® Weather Radio features:
● 7 NOAA weather channels receive warning broadcasts
● Emergency audio alert with standby mode
● Telescoping antenna for long range reception
● AM/FM Radio with clock for additional news reports
● LED flashlight in case of power outage
● Backlit display for easy viewing
To Power the Weather Radio:
This weather radio operates on a low frequency 120V, 5 pin mini USB adaptor (not included) or 3 AAA
batteries (not included).
Adaptor Power:
To power the radio using the adapter, pull down the rubber stopper on the side of the radio to expose
the adaptor jack. Insert the adaptor connector plug into the jack, and plug the other end into the proper
electrical outlet or a computer’s USB port.
Battery Power:
1. Use 3 AAA batteries (not included).
2. Remove the battery compartment cover on the back of the radio.
3. Install the batteries according to the “+” and “-” polarity symbols in the compartment.
4. Replace the battery compartment cover.
5. Replace the batteries when the low battery icon displays (“
”) or if readings grow dim or
irregular. Always replace all batteries at the same time; do not combine old and new batteries. Do not
mix Alkaline, carbon-zinc (standard) or Nickel-Cadmium (rechargeable) batteries.
NOTE: Please recycle or dispose of batteries per local regulations.
WARNING: Batteries may pose a choking hazard. Do not let children handle batteries.
PRECAUTION: Do not dispose of batteries in fire. Batteries may explode or leak. Remove the batteries if
the unit will not be used for a long period of time.
To Set the Clock:
1. Press and hold “
” for 2 seconds while the radio is off. “12:Hr” or “24:Hr” blinks.
2. Press “
” or “
hour digits blink.
” to toggle between a 12 or 24 hour clock. Press “
3. Press “
” or “
” to change the hour. Press “
4. Press “
” or “
” to change the minutes. Press “
” to select. The
” to select. The minute digits blink.
” to select. The clock is set.
Please note:
If no buttons are pressed within 1 minute, the unit will exit the Clock Setting mode. If this occurs, simply
repeat the clock setting steps above.
To Listen to the AM/FM Radio:
1. Press “
” to turn the radio on.
2. Press “
” to toggle to the AM or FM radio display.
3. Press “
” or “
” to change the radio frequency. Press and hold the button for 1 second to
automatically advance to the next tuned in station. (If it takes less than 1 second to scan to the next
station, the scanning will stop at the next tuned-in station).
4. Press “
” or “
” to adjust the volume.
5. Extend the antenna and adjust direction as needed for the best reception.
6. Press “
” to turn the radio off and return to the clock display.
To Listen to a NOAA Weather Channel:
1. Press “
” to turn the radio on.
2. Press “
” to toggle to the WB radio display.
3. Press “
” or “
” to scroll between the 7 channels until the desired one displays.
4. Press “
” or “
” to adjust the volume.
5. Extend the antenna and adjust direction as needed for the best reception.
6. Press “
” to turn the radio off and return to the clock display.
Weather Alert:
To automatically receive weather alerts, tune the radio to the clearest NOAA Weather Band (WB)
station and set to Standby Mode (see next section for Standby Mode information). In the event of an
Emergency Broadcast Signal, the “Alert” light will flash, the backlight will flash for 10 seconds, and the
radio will turn on at the highest volume and broadcast current weather information from the pre-set
NOAA WB radio station.
To silence the radio alerts, turn the radio off. Please be sure to reset to Standby Mode to receive future
emergency weather alerts.
Emergency Alert Standby Mode:
Your NOAA Weather Radio has a Standby Mode which mutes the radio broadcast until an alert
broadcast is received. To activate/deactivate Standby Mode:
1. Press “
” to turn the radio on and “
appears on the LCD.)
” to switch to the Weather Band channels. (“WB”
2. Press and hold “
” for 2 seconds. “WB” blinks. The radio is in Standby Mode.
3. If an Emergency Alert is broadcast, the radio will automatically turn on and broadcast until silenced.
An alarm sounds and the Alert light flashes during the first 10 seconds of the warning.
4. Press and hold “
” for 2 seconds to deactivate Standby Mode. “WB” stops blinking. Standby
Mode will also deactivate when the radio is turned off or switched to the FM or AM channels.
Please note: To help preserve battery life and get the best service from your NOAA WB radio, we
recommend using adaptor power while in Standby Mode. This will reserve battery life for emergency
use during a power outage or storm-related interference.
NOAA Weather Channel Information:
NOAA Weather Radio is a nationwide network of radio stations broadcasting continuous weather
information directly from a nearby National Weather Service office. It is the lone government-operated
radio system that provides direct warnings to the public for natural and man- made hazards, from floods
to forest fires to oil spills. NWR broadcasts National Weather Service warnings, watches, forecasts and
other hazard information 24 hours a day. These broadcasts air on one of 7 channels. Broadcasts will
report current weather conditions, forecasts and severe weather warnings, as well as warnings from the
Department of Homeland Security (DHS), Federal Emergency Management Agency (FEMA) and local
emergency management officials.*
To check the NOAA channel (Frequency) available for your area, visit the web site below and select your
state & county/city/area. Then select the NOAA channel number corresponding to the frequency of your
area.
http://www.nws.noaa.gov/nwr/indexnw.htm
Frequency Coverage of NOAA weather radio
Channel 1 : 162.400 MHz
Channel 2 : 162.425 MHz
Channel 3 : 162.450 MHz
Channel 4 : 162.475 MHz
Channel 5 : 162.500 MHz
Channel 6 : 162.525 MHz
Channel 7 : 162.550 MHz
*Broadcasted weather and emergency messages are communicated through the Nation Oceanic and
Atmospheric Administration. Transmissions may vary based on local, state and federal agencies.
Backlight Feature:
Your Weather Radio has a convenient backlight feature for easy display viewing. When the radio is
turned on, the backlight will turn on for 20 seconds. Press any button to turn on the backlight again.
Please note: The backlight does not operate in Radio Off/Clock Mode.
Flashlight Feature:
Your Weather Radio has a built-in LED flashlight. Press the “
turn the flashlight on and off.
“ button on the side of the radio to
Helpful Tips:
1. To conserve battery power, it is recommended to always use the adapter to power the unit while the
weather radio is on. The radio can still operate with backup batteries alone during power outages.
2. A low frequency 120V, 5 pin mini USB adaptor is recommended. Using a higher frequency power
adaptor will influence radio reception.
3. Retract the antenna when not in use to help prevent damage.
Care and Precautions:
1. The radio is weather-resistant but not waterproof. Do not immerse the radio in water. Keep moisture
from getting inside the adaptor jack. If you spill liquid on the radio, dry immediately with a soft, lint-free
cloth.
2. Do not clean the radio with abrasive or corrosive materials. This may scratch plastic parts and corrode
electronic circuits.
3. Do not subject the radio to excessive force, shock, dust, temperature or humidity. This may result in
malfunction, shorter electronic life span, damaged battery or distorted parts. Avoid rough treatment. Do
not drop or kick it. Treat it with care to ensure the best performance.
4. Do not tamper with the radio’s internal components. Doing so will invalidate the warranty on this
product and may cause damage. Other than replacing the batteries, the radio contains no userserviceable parts.
5. Do not mix old and new batteries. Do not mix Alkaline, carbon-zinc (standard) or Nickel-Cadmium
(rechargeable) batteries. Do not dispose of batteries in fire. Batteries may explode or leak. Remove the
batteries if the radio will not be used for a long period of time.
6. Always read the instruction manual before operating this product.
FCC Statement of Compliance:
Caution: Changes or modifications not expressly approved by the party responsible for compliance could
void the user’s authority to operate the equipment.
Note: This device complies with part 15 of the FCC Rules. Operation is subject to the following two
conditions: (1) this device may not cause harmful interference, and (2) this device must accept any
interference received, including interference that may cause undesired operation. This equipment has
been tested and found to comply with the limits for a Class B digital device, pursuant to part 15 of the
FCC rules. These limits are designed to provide reasonable protection against harmful interference in a
residential installation. This equipment generates, uses and can radiate radio frequency energy and, if
not installed and used in accordance with the instructions, may cause harmful interference to radio
communications. However, there is no guarantee that interference will not occur in a particular
installation. If this equipment does cause harmful interference to radio or television reception, which
can be determined by turning the equipment off and on, the user is encouraged to try to correct the
interference by one or more of the following measures:
● Reorient or relocate the receiving antenna.
● Increase the separation between the equipment and receiver.
● Connect the equipment into an outlet on a circuit different from that to which the receiver is
connected.
● Consult the dealer or an experienced radio/TV technician for help.
One (1) Year Limited Warranty:
This unit is warranted against defects in materials of workmanship for one (1) year for the original
purchaser from date of retail purchase (excluding batteries and adaptor). It does not cover damages or
wear resulting from accident, misuse, abuse, commercial use, or unauthorized adjustment and/or
repair. Do not return to retailer. Should this unit require service (or replacement at our option) while
under warranty, please pack the item in the original packaging and return it prepaid, along with store
receipt showing date of purchase and a note explaining reason for return to:
Taylor Precision Products, Inc. / Springfield Precision
2220 Entrada Del Sol, Suite A
Las Cruces, New Mexico 88001 USA
www.springfieldprecision.com
There are no expressed warranties except as listed above. This warranty gives you specific legal rights,
and you may have other rights which vary from state to state.
For additional product information, or warranty information outside the USA, please contact us through
www.springfieldprecision.com or www.taylorusa.com.
2013 Taylor Precision Products, Inc. and its affiliated companies, all rights reserved. Springfield® is a
registered trademark of Taylor Precision Products, Inc and its affiliated companies, all rights reserved.
Made to our exact specifications in China.
96200 7.13