1
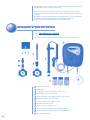
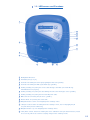
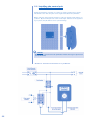
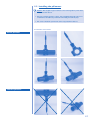
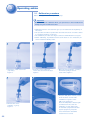
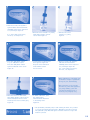
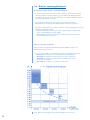
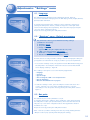
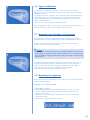
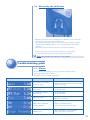
Product waste disposal - Protection of the environment:
In accordance with the provisions of the Waste Electrical and Electronic Equipment
(WEEE - 2002/96/EC) Directive, used electric and electronic products must be
destroyed separately from normal household waste in order both to promote
re-use, recycling and other forms of recovery and to reduce the quantity of waste
to be destroyed and hence the disposal operations.
When you dispose of this product, comply with the local waste disposal
instructions. Do not throw it away in the middle of nowhere: take it to a waste
collection centre that specialises in used electrical and electronic products
and / or consult your dealer when buying a new product.
20
Contents
1
Description of your pH Perfect
1.1. Identification of parts
1.2. LCD screen and functions
2
Installation
2.1. Recommendations
2.2. Technical details
2.3. Installation diagram
2.4. Installing the control unit and electrical connections
2.5. Installing the pH sensor
3
Operating advice
3.1. Calibration procedure
3.2. Rule for injecting pH Perfect
4
Adjustments: “ Settings ” menu
4.1. Language
4.2. “Settings” menu - Default parameters
4.3. Set point
4.4. Type of dosage
4.5. “OFA” over-feed protection
4.6. Type of calibration
4.7. Detection that filtration is in progress
4.8. Resetting the appliance
5
Care and maintenance of your pH Perfect
5.1. Changing the peristaltic pipe
5.2. Winterizing the pH Perfect
6
7
22
22
23
24
24
24
25
26
27
28
28
30
31
31
31
31
32
32
33
33
33
34
34
35
Trouble - shooting guide
35
6.1. Alarms
6.2. Problem solving
35
36
Your guarantee
37
21
Congratulations, you are now the owner of a Zodiac pH Perfect, which allows you to
regulate the pH of your pool simply and easily.
The pH Perfect measures the pH value between 0.0 (acidic) and 14.0 (alkaline)
using a pH sensor on the filtration system, which constantly analyzes the water in
your pool.
Depending on the value measured, the pH Perfect dosing pump injects the amount
of product needed to maintain the balance of the water in the pool.
The pH Perfect will function with either acid or alkaline dosing.
1
Description of your pH Perfect
1.1. Identification of parts
The pack contains the items shown and required to install your pH Perfect:
1
2
3
7
5
6
9
8
10
11
4
12
22
1
pH Perfect controller
2
Wall bracket
3
2 x Stainless-steel screws and plugs (Ø = 6 mm)
4
Polyethylene inlet tube (5 metres)
5
Intake pipe with 2-metre PVC tube and 3-metre cable
6
FPM lipped injection flap valve (3/8")
7
pH Sensor with 5-metre shielded cable
8
Injection flap valve reducer
9
Sensor holder, model PSS3 (1/2”)
10
Collar for fixing the injection valve to DN 50 mm pipe
11
Collar for fixing the injection flap valve on tube DN 50 mm
12
pH calibration fluid kit
1.2. LCD screen and Functions
1
13
12
11
10
2
9
8
3
4
5
6
7
1
Backlighted LCD screen.
2
Peristaltic pump (1.5 L/h).
3
Connection for linking the semi-rigid polyethylene inlet tube (part# 4).
4
Connection for linking the PVC crystal intake pipe (part# 5).
5
Packing assembly: for passing the control cable directly to the filter (220-240V AC only
when filtration is in progress).
6
Packing assembly: for passing the cable linking the unit to the intake pipe sensor (part# 5).
7
Packing assembly: for passing the 220-240V AC power cable.
8
BNC socket for connecting the pH sensor: (part# 7).
9
Master switch: for powering the control unit.
10
Navigation button “down”: for navigating in the “Settings” menu.
11
“SET/Esc” button: button for exiting from the “Settings” menu; also for displaying the pH
set point when pressed continuously.
12
Navigation button “up”: for navigating in the “Settings” menu.
13
“CAL/Enter” button: button for enabling the sensor calibration mode (the button must be pressed
for 5 seconds). This is also used for accepting changes in the “Settings” menu.
23
2
Installation
2.1. Recommendations
!
Warning: The pH Perfect must be installed by an experienced pool
professional.
➣ Should pH perfect require any electrical maintenance always disconnect
the appliance from the power supply.
➣ Before installing the pH Perfect controller, make sure that you have all
the components required and that you have read the instruction manual
carefully.
➣ Failure to comply with the instructions contained in this manual can be
dangerous, cause damage to the appliance and may void the warranty.
➣ While installing the pH Perfect controller, make sure of the following:
– The supply voltage is as indicated on the label attached to the side of
the appliance
– The pressure at the injection point is less than 150 kpa
– The protective housing on the pump is properly clipped into position
– The suction tube is immersed with the intake pipe in the container of
corrective solution to be injected and is connected to the pump (on
the left). Then retighten the nut on the connector
– The inlet tube will then be connected to both the pump (on the
right), and the inlet pipe to the pool through the injection flap valve
(part# 6).
➣ Use pH corrective products as recommended by your pool specialist.
➣ The pH sensor should be handled with care.
2.2. Technical details
Dimension (L - W - H)
Weight (appliance, sensor, tube and pipes)
Power feed 50Hz
Consumption
Pump flow rate
Maximum backpressure
pH control range
Appliance accuracy
Calibration of the sensor
24
240 x 200 x 90 mm
1.7 kg
220-240 V AC
9W
1.5 l/h (or 25 ml/min)
150 kpa
0.0 pH-14.0 pH
+/- 0.1 pH
Semi-automatic in 2 points
(1 point possible)
2.3. Installation diagram
Installation of the pH Perfect on the filtration system
60 cm mini
!
Important:
The distance between the sensor and the injection point must not be less
than 60 cm.
The injection point must be the last element on the return line before the pool.
Keep the sensor cable away from other power cords in order to prevent electrical
interference.
The maximum pressure in the pipes must not exceed 150 kpa.
To increase the life span of the peristaltic pipe, the pressure should not exceed
100 kpa.
If the pool has a chlorinator, a heating system or any other equipment, they must
be situated after the pH sensor but before the acid injection point.
25
2.4. Installing the control unit
and electrical connections
Install the pH Perfect controller on a wall in an easily accessible place. Fix the
wall bracket to the wall using the screws supplied and attach the pH Perfect.
Before doing any work inside the appliance, make sure that the main switch is on
position 0. By unscrewing the two screws on the right-hand side of the appliance
by a 1/4 turn, the pH Perfect can be opened sideways.
!
CAUTION:
The electrical connections for the pH Perfect must be done by an experienced
pool professional.
“ Standard ” electrical connections for a pH Perfect
26
2.5. Installing the pH sensor
!
Caution: The length of pipe between sensor and injection point must
not be less than 60 cm.
➣ The sensor must be vertical, or at 45° max. and always above the pipe. In no
circumstances should it be positioned horizontally or below the pipe.
➣ The sensor should be positioned before any treatment devices.
Installation instructions
Correct positions
Incorrect positions
27
3
Operating advice
3.1. Calibration procedure
Refer to paragraph 4.2. to change the language.
!
Important:
The sensor must be calibrated when your pH Perfect is first installed and
ideally every two months there after.
> Calibration must be done each time your pool is restarted at the beginning of
the season.
> The procedure should be repeated if an abnormal amount of corrective solution
is consumed (pH minus or pH plus).
> The calibration procedure can only be carried out when filtration is stopped.
> Before calibrating, stop filtration and close the valves so as to isolate the pH
sensor holder from flowing water.
1
> Fill flask n°2 with clean water
(tap water).
Figure 1.
4
2
> Undo the sensor holder and
remove the sensor from the pipe.
Figure 2.
5 a
b
> Immerse the sensor
in flask n°1 (pH 7).
Figure 4.
28
3
> Rinse the sensor in flask n°2 (water).
Then shake gently to remove
excess water. Figure 3.
c
> Keep the “CAL/Enter” button pressed
for more than 5 seconds until
“Calibration” appears on the
LCD screen (Figure 5a).
Press the “CAL/Enter” button again
as indicated on the screen for
calibration on pH7 (Figure 5b):
an automatic progression bar then
appears (Figure 5c). Keep the
sensor immersed in the buffer
solution for 30 seconds.
6
7
8
> After 30 seconds, the appliance
again indicates the measurement
reliability of the sensor expressed
as a percentage. Figure 6.
E.g.: 100 % with a new sensor;
if < 25 %, see chapter 6.2.
9 a
> Press the “CAL/Enter” button
to go to calibration on pH4.
Press the “CAL/Enter” button
again as indicated on the screen
Figure 9a.
11
> Rinse the sensor in flask n°2 (water).
Then shake gently to remove
excess water. Figure 7.
b
> Immerse the sensor
in flask n°3 (pH 4).
Figure 8.
10
> an automatic progression bar
then appears. Figure 9b.
Keep the sensor immersed
in the buffer solution
for 30 seconds.
12
> After 30 seconds, the appliance
indicates the measurement
reliability of the sensor expressed
as a percentage. Figure 10.
E.g.: 100 % with a new sensor;
if < 25 %, see chapter 6.2.
• When calibration is completed, your
pH Perfect is ready to regulate the
pH in your pool automatically.
• If the pH in the pool is very far
from the set point of the appliance
(7.4 pH by default), pause the
over-feed protection for 24 or
48 hours (see paragraph 4.5.).
> Rinse the sensor in clean water,
then shake gently to remove excess
water and replace it in its sensor
holder (it must not touch the pipe).
Figure 11.
> To finish calibration, press
the “CAL” button.
The instrument will return
to measuring mode.
Figure 12.
• The pH Perfect peristaltic pump is self-starting. However, it is possible
to operate it manually by keeping the “Navigation“up button pressed.
The peristaltic pump will then inject corrective solution as long as the
button is pressed.
29
3.2. Rule for injecting pH Perfect
Proportional cyclic dosing - exclusive to Zodiac
• To reach the set point in the best possible conditions (the quickest, but with
the least possible corrective solution), your pH Perfect automatically detects
the difference of the pH value measured in the pool compared with the desired
set point (default value = 7.4 pH).
• This proportional injection is cyclic and the cycle time is 10 minutes.
What will change in dosing is the different times of injection and pause.
• This type of dosing makes it possible to reach the set point quickly and precisely
with the following advantages:
– Optimal consumption of corrective solution (better balance of water, little
action on the buffering capacity or TAC).
– Water treatment functioning in the best conditions (the active chlorine is
more effective with a good pH).
Rule for injecting pH Perfect
The proportions are adjusted automatically and the different dosages are
distributed in steps of 0.15 pH.
• E.g.: For 4 cycles with a set point of 7.4 pH and acid regulation (pH minus):
– pH ≤ 7.55 : 20 % injection (2 minutes) & 80 % pause (8 minutes)
– pH ≤ 7.70 : 50 % injection (5 minutes) & 50 % pause (5 minutes)
– pH ≤ 7.85 : 75 % injection (7 minutes 30 secondes) & 25 % pause
(2 minutes 30 secondes)
– pH ≥ 7.90 : 100 % injection (10 minutes, continuous)
Note: The rule for injecting is reversed if an alkaline dose is chosen.
30
4
Adjustments: “ Settings ” menu
4.1. Language
A
The default language displayed on the pH Perfect is French. Figure A.
You can choose between 6 languages for the LCD display: French, English, German,
Spanish, Italian and Dutch.
To change language when in the “Settings” menu, enable the option list by
pressing the “CAL/Enter” button (a small arrow appears on the right of the
screen and the language message flashes). Then select the language using the
“up” and “down” navigation buttons.
Accept the choice by pressing the “CAL/Enter” button.
4.2. “ Settings ” menu - Default parameters
!
The pH Perfect is factory preset with the following settings
(suitable for most cases):
a. Language: French
b. Set point: pH = 7.4
c. Dosage = acid
(injection when the pH is higher than the set point)
d. “ OFA” over- feed protection: 240 minutes
e. Calibration = enabled in 2 points (pH7 & pH4)
f. Detection that filtration is in progress: enabled
B
However, there is an easily accessible “settings” menu for changing the settings of
your appliance to match them as closely as possible to your pool's requirements.
• To access the “Settings” menu, the appliance must be ON. Simultaneously press
the “CAL/Enter” and “SET/Esc” buttons for about 5 seconds until the LCD
screen displays “Settings”. Figure B.
C
This “settings” menu gives access to the following adjustments:
– Language
– Set point
– Type of dosage
– Time of using the “ OFA” over- feed protection
– Type of calibration
– Detection that filtration is in progress
• To exit the “Settings” menu, press the “SET/Esc” button and select “Yes”
or “No”, using the “up” and “down” navigation buttons to save the
new settings or not. Accept the choice by pressing the “CAL/Enter” button.
Figure C.
4.3. Set point
D
The default set point on the pH Perfect is 7.4 pH.
To change it when in the “Settings” menu, enable the option list by pressing
the “CAL/Enter” button (the pH value flashes). Then select the value chosen
using the “up” and “down” navigation buttons. The adjustment is made in
increments of 0.1 pH.
Accept the choice by pressing the “CAL/Enter” button.
Note: : It is also possible to directly access the set point by holding down the
“SET/Esc” button (keep pressing while changing the setting).
31
E
4.4. Type of dosage
The default dosage on the pH Perfect is acid (injection of pH minus).
Figure E.
To change it when in the “Settings” menu, enable the option list by pressing
the “CAL/Enter” button (a small arrow appears on the right of the screen and
the type of dosage flashes). Then select the dosage using the “up” and “down”
navigation buttons.
Accept the choice by pressing the “CAL/Enter” button.
F
4.5. “ OFA ” over - feed protection
Your pH Perfect is equipped with protection to prevent over-feeding with
corrective solution in the event of a problem on the pH sensor, for example.
The purpose of this protection, called “OFA” (Over Feed Alarm), is to pause the
appliance if it has not reached the set point at the end of the time; set by default
at 240 minutes. Figure F.
The “OFA” over-feed protection functions in 2 steps:
> #1: “ OFA alarm ” flashes on the LCD screen after 70 % of the OFA programmed
time has been used without reaching the set point. However, the appliance
continues running.
> #2: “ Stop OFA” is displayed on the LCD screen after reaching 100 % of
the OFA programmed time (240 minutes in the original setting). The appliance
is then safe.
• To cancel this protection and start your pH Perfect, press the “CAL/Enter”
button (possible on the 2 steps of the OFA alarm).
Note: Make sure that the pH sensor is in good condition. If necessary, clean
and/or recalibrate it.
• The over-feed protection is set by default for a maximum time of 240 minutes.
It is possible to adjust it from “OFF” (disabled) to “240” by intervals of
1 minute.
Note: A fairly high setting is strongly recommended to avoid any inopportune
and/or unjustified start.
• To regulate the OFA when in the “Settings” menu, enable the option list by
pressing the “CAL/Enter” button (the value in minutes flashes). Then select
the value chosen using the “up” and “down” navigation buttons.
The adjustment is made by intervals of 1 minute.
Accept the choice by pressing the “CAL/Enter” button.
Special functions of the OFA
To prevent “false” alarms just after installing a pH Perfect (if the pH is poorly
balanced), the OFA may be temporarily disabled for 24 or 48 hours:
> Press “up” & “down” & “CAL”: OFA disabled for 24 hours (automatically
re-enabled).
> Press “up” & “down” & “SET”: OFA disabled for 48 hours (automatically
re-enabled).
32
G
4.6. Type of calibration
Your pH Perfect is calibrated by default in 2 steps: pH7 and pH4. Figure G.
This can be done in one single step on pH7 (faster but with lower measurement
reliability over time).
To change it when in the “Settings” menu, enable the option list by pressing the
“CAL/Enter” button (a small arrow appears on the right of the screen and the
type of calibration flashes). Then select the type chosen using the “up” and
“down” navigation buttons.
Accept the choice by pressing the “CAL/Enter” button.
Note: If calibration is done in one step, the procedure described in paragraph 3.1.
will automatically stop at the end of calibration with solution 7.
4.7. Detection that filtration is in progress
Your pH Perfect is equipped by default with a double power feed for keeping
the appliance live in order to calibrate the pH sensor when filtration is stopped.
However, it is possible to disable this function if the electrical connection
is different (work done by a professional).
!
H
Caution:
The pH Perfect no longer takes into account whether filtration is in progress
and is likely to inject corrective solution when there is no flow in the
pipes. Disabling is only possible if the mains power cable is controlled by
the filtration.
To change this function when in the “Settings” menu, enable the option list by
pressing the “CAL/Enter” button (a small arrow appears on the right of the
screen and the status of detection of filtration flashes). Then select “ON” or
“OFF” using the “up” and “down” navigation buttons. Figure H.
Accept the choice by pressing the “CAL/Enter” button.
4.8. Resetting the appliance
In the event of incorrect manipulation, it is possible to restore all the original pH
Perfect functional settings.
Procedure for resetting the pH
> Switch OFF the appliance.
> Switch ON the appliance by pressing simultaneously on the two “up” and
“down” navigation buttons (keep the buttons pressed until the message
appears on the screen).
> Select “Yes” or “No” using the navigation buttons, then accept using the
“CAL/Enter” button.
> All the factory settings will then be restored.
33
5
Care and maintenance of your pH Perfect
5.1. Changing the peristaltic pipe
1
> Remove the protective cover
carefully drawing it towards you.
Figure 1.
4
> Position the tablet holder on
“10:20” turning clockwise.
Figure 4.
34
2
> Position the tablet holder on
“10:20” turning clockwise.
Figure 2.
5
> Insert the left-hand connection
in its housing, then pass the tube
under the guide of the tablet holder.
Turn the tablet holder clockwise and
at the same time put the tube
into the pump head up to the
right-hand connection.
Figure 5.
3
> Fully release the left-hand
connection keeping it stretched
outwards, then turn the tablet
holder clockwise in order to free
the tube up to the right-hand
connection. Figure 3.
6
> Replace the protective cover (place
the pin in the attachment hole).
Figure 6.
5.2. Winterizing the pH Perfect
• When the regulator has to be winterized, it is advisable to pump clean water
through it in order to rinse the peristaltic pipe.
Then, position the tablet holder on “6:00” using the self-priming function
and pressing the navigation button “up” (or by turning the tablet holder
clockwise).
These two precautions will make it easier to restart the appliance.
• Remove the pH sensor from its holder. Store it in its original flask
or a cup filled with tap water. If necessary plug sensor holder.
!
6
Note: never leave the end of the sensor out of water!
Trouble-shooting guide
6.1. Alarms
The left portion of the LCD screen on your pH Perfect displays various
alarms (message flashing or fixed).
This makes it easy to identify the problem.
Alarm
Cause
Solution
The container of corrective
solution is empty
• Replace the container
• Make sure that the white float on the intake
functions correctly
First OFA step enabled
(time > 70 %)
• Press “CAL/Enter”
to stop the alarm
Second OFA step enabled
(time = 100 %)
• Press “CAL/Enter”
to stop the alarm
Filtration stopped
• Start filtration
• Check the connection
Buffer solution ineffective
PH sensor defective
• Replace the buffer solutions
• Clean and/or replace the pH sensor
Parameter error
• Press “CAL/Enter” to cancel the fault
• Call your local pool professional
35
6.2. Problem solving
Problem
The pH Perfect always displays
a pH near to 7.0
The appliance always displays
a high value or the measurement
is constantly unstable
Cause
Remedy
Problem with cable
and/or connector
• Make sure that the sensor-pH Perfect connection
is not short-circuited (between the central core
of the cable and the exterior sheathing)
• Make sure that there is no moisture and/or
condensation around the BNC socket
The electrode connection
cable is damaged
• Check the cable and/or the BNC socket
The pH sensor has an air
bubble in the bulb
• Put the sensor into upright position and shake
gently so that the air bubble rises back up to
the top
Note: The sensor should be fitted in a vertical
position or at an angle no greater than 45°
The pH sensor is worn
• Replace the pH sensor
The sensor cable is too close
to a power cable causing
interference
• Reduce the distance between the appliance and
the sensor and/or place the cable elsewhere
• Make sure that the solution used is pH 7
Buffer solution is ineffective
• Purchase a new pH 7 buffer solution
and recalibrate again
Impossible to calibrate on pH 7
(error message)
Quality of calibration of the pH
sensor < 25 %
• Check the pH buffer solution with a pH
electronic meter
Problem with the sensor's
porous element, dirt deposits
• Make sure that the electrode bulb is in good
condition, that it has not been allowed to dry
out of the water.
As a last resort, clean by soaking the electrode
in a 10 % hydrochloric acid solution
The pH sensor is worn
• Replace the pH sensor
• Make sure that the solution used is pH 4
Buffer solution is ineffective
• Purchase a new pH 4 buffer solution
and recalibrate again
Impossible to calibrate on pH 4
(error message)
Quality of calibration of the pH
sensor < 25 %
Slow response from the pH sensor
36
• Check the pH buffer solution with a pH
electronic meter
Problem with the sensor's
porous element, dirt deposits
• Make sure that the electrode bulb is in good
condition, that it has not been allowed to dry
out of the water.
As a last resort, clean by soaking the electrode
in a 10 % hydrochloric acid solution
The pH sensor is worn
• Replace the pH sensor
Static electricity
on the pH sensor
• During the calibration phase DO NOT WIPE
the pH sensor with a cloth or paper, but after
rinsing, shake it gently
7
Your guarantee
Conditions
We have taken every care and applied all our technical experience in
the production of this appliance. It has been subject to stringent quality controls.
We make regular improvements and modifications to our models, which
incorporate technological advances, therefore it must be clearly understood
that such improvements cannot be added to earlier models under the guarantee.
If, despite all the care and expertise in the manufacture of our products,
you have to call on our guarantee, it will apply only to the replacement of
defective parts. Transport costs in this instance, shall be borne by you the user.
The guarantee is only valid if the appliance has been installed by a professional.
Warranty period
In Australia, South Africa and the United States of America, pH Perfect is guaranteed
for 12mths (1yr) following the date of purchase excluding the replacement of worn
parts due to normal operation of the product.
Covered by the guarantee
Only the control unit (PCB, pump motor and intake pipe) are covered by the
guarantee period specified above. Any PCB found to be defective will be repaired
or replaced by the manufacturer with a new part or a part in good working order.
The following parts: the peristaltic pipe, buffer solutions, pH sensor and
non-return valve are deemed consumable parts and therefore do not benefit
from the guarantee period specified above.
In all cases, the costs of travel and labour will be borne by the user. In the case of
workshop returns, transport costs will be borne by the user and the cost of labour
will be borne by the manufacturer.
Damage in transport
Appliances are always transported at the user's own risk. It is up to the user,
before taking delivery of the appliance, to make sure that it is in perfect condition
and, if necessary, to note any reserves on the carrier's delivery note.
We cannot be held liable in this matter.
37