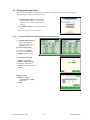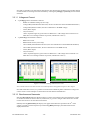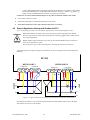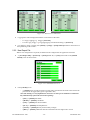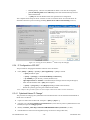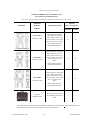
1
CYBERHAWK
EFFICIENCY AND
POWER METER
Models: EP-300D/T
USER MANUAL
EP-300 Manual Ver: A06
-1 -
202-001054-600
EP-300 Manual Ver: A06
-2 -
202-001054-600
Warranty & Limitation of Liability
For products and software that are sold or licensed by Powersmiths International Corp. (“Powersmiths”)
during the period from the date of purchase until the present, Powersmiths warrants to the original buyer:
(1)
that this product (other than software) is substantially free from defects in materials and workmanship
during the warranty period, which is 1 year from the date of purchase by the original buyer; and
(2)
that the medium on which any purchased software (“Software”) is provided is substantially free from
defects in materials and workmanship for a period of 1 year from the date of purchase by the original
buyer.
THE SOFTWARE ITSELF IS PROVIDED “AS IS” WITHOUT ANY WARRANTY OF ANY KIND.
POWERSMITHS’ WARRANTY OBLIGATION IS LIMITED, AT POWERSMITHS’ SOLE OPTION, TO
EITHER A REFUND OF THE PURCHASE PRICE, CHARGE FREE REPAIR, OR REPLACEMENT OF A
DEFECTIVE PRODUCT, WHICH IS RETURNED TO POWERSMITHS OR AN AUTHRORIZED
DISTRIBUTOR OF POWERSMITHS (“DISTRIBUTOR”) WITHIN THE WARRANTY PERIOD.
THIS WARRANTY AND LIMITATION OF LIABILITY (“LIMITED WARRANTY”) SHALL EXTEND ONLY
TO THE ORIGINAL BUYER OR ORIGINAL END-USER CUSTOMER OF POWERSMITHS. THIS LIMITED
WARRANTY SHALL NOT APPLY TO ANY PRODUCT THAT HAS BEEN SUBJECT TO ALTERATION,
DAMAGE BY ACCIDENT, MISUSE, ABUSE, NEGLECT, OR A FAILURE TO FOLLOW POWERSMITHS’
INSTRUCTIONS FOR OPERATION, MAINTENANCE AND REPAIR.
ONLY THE TERMS EXPRESSED IN THIS LIMITED WARRANTY SHALL APPLY AND NO PARTNER,
DISTRIBUTOR, EMPLOYEE OR OTHER REPRESENTATIVE OF POWERSMITHS OR ANY OTHER
ENTITY IS AUTHORIZED TO AMEND, MODIFY OR EXTEND THIS LIMITED WARRANTY IN ANY WAY.
To obtain warranty service, contact Powersmiths or send the product, with a description of the problem,
transportation and insurance prepaid, to Powersmiths, 10 Devon Road Brampton, Ontario, Canada L6T
5B5. Powersmiths assumes no risk for loss or damage in transit. Following warranty repair, the product will
be returned to the sender, transportation prepaid. If Powersmiths determines that the failure was caused by
alteration, accident, misuse, abuse, neglect or a failure to follow Powersmiths instructions for operation,
maintenance and repair, Powersmiths will provide an estimate of repair costs and a Purchase Order giving
authorization for the repair and payment will be necessary prior to the commencement of the repair.
THIS LIMITED WARRANTY IS THE EXCLUSIVE REMEDY AND IS IN LIEU OF ALL OTHER
WARRANTIES, EXPRESS OR IMPLIED, INCLUDING BUT NOT LIMITED TO WARRANTIES OF NONINFRINGEMENT AND THE IMPLIED WARRANTIES OF MERCHANTABILITY AND FITNESS FOR A
PARTICULAR PURPOSE OR USE.
IN NO EVENT SHALL POWERSMITHS BE LIABLE TO THE ORIGINAL BUYER, THE ORIGINAL ENDUSER CUSTOMER OF POWERSMITHS, OR TO ANY OTHER PERSON OR ENTITY UNDER ANY
LEGAL CLAIM OR THEORY (WHETHER BASED ON CONTRACT, INDEMNITY, TORT (INCLUDING
NEGLIGENCE AND STRICT LIABILITY) OR OTHERWISE).
IN NO EVENT SHALL POWERSMITHS BE LIABLE TO THE ORIGINAL BUYER, THE ORIGINAL ENDUSER, OR TO ANY OTHER PERSON OR ENTITY FOR SPECIAL, INDIRECT, INCIDENTAL, PUNITIVE,
EXEMPLARY, LIQUIDATED OR CONSEQUENTIAL DAMAGES WHATSOEVER WITH RESPECT TO
THIS PRODUCT INCLUDING BUT NOT LIMITED TO, BUSINESS INTERRUPTION, LOSS OF USE,
WORK STOPPAGE, LOSS OF REVENUE OR PROFIT, LOSS OF GOODWILL, DATA LOSS, OR
EP-300 Manual Ver: A06
-3 -
202-001054-600
SYSTEM FAILURE OR MALFUNCTION IN CONNECTION WITH THE PURCHASE OR OPERATION OF
THE PRODUCT, EVEN IF POWERSMITHS OR ANY OF ITS REPRESENTATIVES HAS BEEN ADVISED
OF THE POSSIBILITY OF SUCH DAMAGES.
THE ORIGINAL BUYER OR ORIGINAL END-USER, AS THE CASE MAY BE, AGREES THAT IT HAS
CAREFULLY REVIEWED THE TERMS OF THIS LIMITED WARRANTY PRIOR TO ITS PURCHASE OF
THIS PRODUCT AND THAT THESE TERMS REFLECT A REASONABLE ALLOCATION OF RISK AND
LIMITATION OF LIABILITY.
If any provision in this Limited Warranty is held invalid or unenforceable by a court of competent jurisdiction,
such holding will not affect the validity or enforceability of any other provision.
This Limited Warranty and each of the documents contemplated by or delivered under or in connection with
this Limited Warranty shall be governed by and construed in accordance with the laws of the Province of
Ontario (and the laws of Canada applicable therein) without reference to its conflict of law principles and
shall be treated in all respects as an Ontario contract. The parties to this Limited Warranty hereby
irrevocably and unconditionally attorn to the exclusive jurisdiction of the courts of the Province of Ontario
and all courts competent to hear appeals therefrom.
Contact Information:
Powersmiths International Corp.
Powersmiths Corporation
10 Devon Road
Brampton, Ontario, Canada, L6T 5B5
Toll-Free: 1-800-747-9627 • (905) 791-1493
Fax: (905) 791-8870
E-mail: [email protected]
www.powersmiths.com
8400 Esters Blvd.
Suite 140
Irving, TX. 75063. USA
Toll-Free 1-866-929-0770 • 972 929 0770
Fax 972-929-0977T
E-mail: [email protected]
www.powersmiths.com
The latest documentation may be found on the WEB: powersmiths.com
EP-300 Manual Ver: A06
-4 -
202-001054-600
Safety Warning
These notes to be read in full
It is solely the responsibility of the operator to be fully aware of all necessary safety
regulations and procedures and be familiar with the operating instructions detailed in this
manual. For work on live installations (bare exposed electrical terminals), they must be suitably
trained and authorized to work on live installations and be fully acquainted with the risks of
electrical shock or burns from plasma arcs caused by inadvertent shorts, and take all
necessary safety precautions which will include but not limited to the use of Electrically
Insulated Gloves, Safety Goggles, and the removal of any metallic objects (jewelry, watches
etc.) from their person.
DANGER
ELECTRIC
SHOCK RISK
All electrical devices can constitute a potential hazard to the operator and the voltages present
at and on the test lead hookup to this instrument present a potential risk of electrical shock
leading to serious injury or death if safety precautions are not taken in its use. Primary among
the safety precautions, it is imperative that no un-insulated live test leads be handled before all
power is removed, including apparently “Low Voltage” current transformer (CT) leads which
can generate dangerous voltages if open-circuited with current flowing in its primary circuit.
Connecting “light” hook- up wires to high power circuits without the use of protective devices
(fuses, breakers) also present a risk of severe burns from Plasma Arcs caused by the hook-up
wires vaporizing if they are miswired (shorted).
IT IS IMPERATIVE THAT POWER BE PROVEN DISCONNECTED BEFORE ANY
WORK ON OR PHYSICAL CONTACT TO ELECTRICAL CIRCUITS IS ATTEMPTED: DO
NOT ASSUME BUT CHECK ACROSS THE LINES AND TO GROUND WITH A METER
AND ENSURE THAT THE SOURCE DISCONNECTION DEVICES ARE LOCKED OUT FOR
YOUR SAFETY.
EP-300 Manual Ver: A06
-5 -
202-001054-600
Safety Notices
The Cyberhawk Power Meter has been constructed in compliance with the requirements with safety standard UL
61010C-1 (600V CAT III) and UL916, and as such helps ensure the safety of the operator when normal safety
precautions are observed which are the responsibility of the operator. However, because of the nature of the
instrument (i.e. connection to circuits with voltages that constitutes a shock hazard), operation of the instrument on
exposed live electrical conductors should only be performed by qualified, competent personnel who have been
trained in and are fully familiar with the operation of electrical equipment.
During operation of this device, hazardous voltages from several sources are present on its terminals. Note that if
the Current transformer (CT) inputs open-circuited, potentially lethal voltages can be generated if its primary
circuits are energized (i.e. current flowing in CT primary).
Use of this equipment is limited to a maximum of 600 Volt circuits.
WARNING
Inspect the equipment before use, including the test leads, to be sure that it is in its
original safe condition
Ensure that all external power sources are proven removed before handling any
electrical connections.
Do not attempt to remove the cover from the Meter before disconnecting both
mains power and the external test circuits and refer all servicing to qualified
personnel.
Do not operate any CTs (current transformers) with the output open circuited.
ELECTRIC
SHOCK RISK
CAUTION
!
Ensure the accuracy of hookup prior to energizing, i.e. the Voltage leads are not
plugged into the Current Inputs, which would short-circuit the Voltage source and
vaporize the test leads causing severe burns from the resulting plasma arc.
Failure to observe the voltage and current limitations of this instrument specified in
this manual could result in operator injury and/or permanent damage to this device.
The ground connection in the instrument must be securely connected to an earth
ground for both safety of the operator and for correct operation of the instrument.
Do not connect the Status inputs or communication circuits to external (utility)
power sources.
Handle Voltage Probes and Clamp -on CTs only by the insulated handles and not
touch any other part of it during operation.
Standards Compliance:
UL 61010C-1 CAT III, UL916
FCC Part 15 Class A
EP-300 Manual Ver: A06
-6 -
202-001054-600
Table of Contents
1
2
Overview .............................................................................................................................................................................12
1.1
Syntax.........................................................................................................................................................................12
1.2
The Hardware..........................................................................................................................................................12
1.3
Firmware...................................................................................................................................................................12
1.4
Measurement Configurations..............................................................................................................................12
1.5
Data and Logging....................................................................................................................................................12
1.6
Communication.......................................................................................................................................................13
1.7
Application ...............................................................................................................................................................13
1.8
Powering Up .............................................................................................................................................................13
1.9
User Commands ......................................................................................................................................................13
1.10
Test Leads and Probes...........................................................................................................................................14
1.11
Accuracy....................................................................................................................................................................14
1.12
Menu Structure .......................................................................................................................................................15
Quick Start .........................................................................................................................................................................16
2.1
Introduction .............................................................................................................................................................16
2.2
SMART-1 Metering Port......................................................................................................................................16
2.2.1
Hookup to SMART-1.......................................................................................................................................17
2.3
Generic Application Hookup...............................................................................................................................17
2.3.1
Procedure............................................................................................................................................................18
2.4
Configuration and Setup ......................................................................................................................................19
2.4.1
Continue Report File (existing file and manual setup)...............................................................................19
2.4.2
New Report File Setup (new test and setup Wizzard)................................................................................21
2.5
3
Operation..................................................................................................................................................................22
Detailed Operation...........................................................................................................................................................24
3.1
Overview ...................................................................................................................................................................24
3.1.1
Starting Screen ..................................................................................................................................................24
3.1.2
Main Screen (default).......................................................................................................................................25
3.2
Detailed Data............................................................................................................................................................25
3.2.1
Voltage and Current .........................................................................................................................................25
3.2.2
System.................................................................................................................................................................28
3.2.3
Status...................................................................................................................................................................31
3.2.4
Menu ...................................................................................................................................................................31
4
Hookup................................................................................................................................................................................34
4.1
Connections ..............................................................................................................................................................34
4.2
Hookup ......................................................................................................................................................................34
4.3
Using the Twist-Lock Connectors ......................................................................................................................34
4.3.1
SMART-1 Metering Port .................................................................................................................................34
4.4
Generic Application Hookup with Probes and CTs ......................................................................................37
4.4.1
Polarity................................................................................................................................................................38
4.5
Direct Measurement Connections ......................................................................................................................39
EP-300 Manual Ver: A06
-7 -
202-001054-600
4.5.1
4.5.2
4.6
5
Metering Configurations..................................................................................................................................39
Connection Diagrams .......................................................................................................................................40
Medium Voltage Systems ......................................................................................................................................43
Measurement Configuration and Setup ......................................................................................................................44
5.1
Overview ...................................................................................................................................................................44
5.2
Configuration and Setup from Start Screen ...................................................................................................44
5.2.1
Continue Report File ........................................................................................................................................44
5.2.2
New Report File ................................................................................................................................................45
5.3
General Setup Instructions ..................................................................................................................................48
5.3.1
System Parameters............................................................................................................................................48
5.3.2
Individual Setup Procedures ...........................................................................................................................49
5.3.3
Contrast (Display Screen) Adjustment..........................................................................................................55
5.3.4
Communication.................................................................................................................................................55
6
Viewer, Software and Communication........................................................................................................................56
6.1
Communication Ports ............................................................................................................................................56
6.2
CyberhawkViewer Software................................................................................................................................56
6.2.1
CyberhawkViewer............................................................................................................................................56
6.2.2
CyberhawkViewer Operation .........................................................................................................................57
6.2.3
Plot Generation..................................................................................................................................................59
6.3
Ethernet Setup.........................................................................................................................................................60
6.3.2
Intranet Connection (remote access).............................................................................................................61
6.3.3
Direct Ethernet EP-300 to PC (non Intranet)...............................................................................................61
6.3.4
IP Configuration of EP -300* ..........................................................................................................................62
6.4
USB .............................................................................................................................................................................63
6.4.1
Installation and Setup.......................................................................................................................................63
6.4.2
File Browsing over USB..................................................................................................................................65
6.5
RS232/485 .................................................................................................................................................................66
6.5.1
Connections and Hookup ................................................................................................................................66
6.5.2
RS232/485 Setup ..............................................................................................................................................67
7
Cables and Probes............................................................................................................................................................68
7.1
Cabling.......................................................................................................................................................................68
7.2
Standard (SMART-1) Cables ..............................................................................................................................68
7.3
External Measurement Hookup Kit..................................................................................................................70
7.3.1
Phase Coding.....................................................................................................................................................71
7.4
Current Probes (CTs)............................................................................................................................................71
7.4.1
Clamp -on CT Accuracy and Maintenance...................................................................................................71
8
Technical Specifications.................................................................................................................................................74
8.1
Measurement Inputs:.............................................................................................................................................74
8.1.1
Meter Port 1 .......................................................................................................................................................74
8.1.2
Meter Port 2 & 3 ...............................................................................................................................................74
8.1.3
Voltage Inputs (all meter ports): ....................................................................................................................74
8.1.4
CT Current Inputs (all meter ports): ..............................................................................................................74
8.1.5
Status:..................................................................................................................................................................74
8.2
Communication.......................................................................................................................................................74
8.2.1
RS232/485 combination Port:.........................................................................................................................74
8.2.2
USB.....................................................................................................................................................................75
8.2.3
Ethernet...............................................................................................................................................................75
8.3
Time Keeping: .........................................................................................................................................................75
EP-300 Manual Ver: A06
-8 -
202-001054-600
8.4
Power Supply:..........................................................................................................................................................75
8.5
Environmental:........................................................................................................................................................75
8.6
Mechanical: ..............................................................................................................................................................75
8.7
Standards Compliance:.........................................................................................................................................75
8.8
Display .......................................................................................................................................................................75
8.9
Parameters and Accuracy ....................................................................................................................................76
8.9.1
Metering:............................................................................................................................................................76
8.9.2
Data Logging .....................................................................................................................................................76
8.9.3
Efficiency ...........................................................................................................................................................77
8.9.4
Demand: .............................................................................................................................................................77
8.9.5
Waveform Capture: ..........................................................................................................................................77
8.9.6
Harmonics ..........................................................................................................................................................77
8.10
Service/Calibration.................................................................................................................................................77
8.11
Instrument Accuracy.............................................................................................................................................78
9
Clamp-on CTs....................................................................................................................................................................79
9.1
Overview ...................................................................................................................................................................79
9.1.1
Cla mp-on CT Accuracy and Maintenance...................................................................................................79
9.1.2
Operator Safety Notes......................................................................................................................................79
9.2
CT Specifications ....................................................................................................................................................79
9.3
Characterization .....................................................................................................................................................80
10
Logged Parameters......................................................................................................................................................82
11
I/O Pin Numbers ..........................................................................................................................................................84
11.1
Port 1 Pin Numbers................................................................................................................................................84
11.2
Port 2 & 3 Pin Numbers........................................................................................................................................84
11.3
Status Input Pin Numbers ....................................................................................................................................84
12
Cyberhawk Firmware Update Procedures..............................................................................................................85
12.1 Initial Preparation ..................................................................................................................................................85
12.1.1
Downloading Terra Term Pro .........................................................................................................................85
12.1.2
Downloading Cyberhawk Firmware .............................................................................................................85
12.2 Updating procedures..............................................................................................................................................85
12.2.1
Setting up Terminal Emulation Program......................................................................................................85
12.2.2
Preparing the Cyberhawk EP -300 Meter ......................................................................................................86
12.2.3
Connecting the Computer to the Cyberhawk Meter ...................................................................................86
12.2.4
Flashing the EP -300 .........................................................................................................................................87
12.2.5
Recovery if Re-Flashing is interrupted.........................................................................................................88
EP-300 Manual Ver: A06
-9 -
202-001054-600
List of Figures and Tables
Figure 1:1: Starting Screen......................................................................................................................................................13
Figure 1:2: Main (default) screen on ¼ VGA Display showing 2 Port Model................................................................14
Figure 1:3: Menu Structure to three levels............................................................................................................................15
Figure 2:1: Hookup to Powersmiths SMART-1 Metering Port with Twist-lock interface ............................................16
Figure 2:2: Hookup to Powersmiths SMART-1 Metering Port with Banana Interface.................................................16
Figure 2:3: Typical Measurement hookup of the EP-300 for Transformer Measurement............................................17
Figure 2:4: CT connection and phasing.................................................................................................................................18
Figure 3:1: Starting Screen......................................................................................................................................................24
Figure 3:2: Main Screen...........................................................................................................................................................25
Figure 3:3: Typical first level screens under the Port selections......................................................................................25
Figure 3:4: Detailed Voltage and Current screens..............................................................................................................26
Figure 3:5: Waveform and Harmonic analysis screens......................................................................................................27
Figure 3:6: Power and Energy screens for selected Port...................................................................................................27
Figure 3:7: Distortion screen for selected Port....................................................................................................................28
Figure 3:8: System Screen showing summary of I.O Conditions.......................................................................................28
Figure 3:9: Efficiency Screen...................................................................................................................................................29
Figure 3:10: Demand setup screen.........................................................................................................................................30
Figure 3:11: System Power and Energy Screens..................................................................................................................31
Figure 3:12: Status screesn showing Temperatures and TVSS Status..............................................................................31
Figure 3:13: Expanded Selections under Menu....................................................................................................................31
Figure 3:14: Event Screen........................................................................................................................................................32
Figure 3:15: Tools Screen........................................................................................................................................................32
Figure 3:16: File Browser Screen...........................................................................................................................................33
Figure 3:17: About Screen........................................................................................................................................................33
Figure 4:1: EP-300 Rear panel (Port 3 is not installed for 2-Port model)......................................................................34
Figure 4:2: SMART-1Metering Port Schematic (reference only)......................................................................................35
Figure 4:3: Powersmiths SMART-1Measurement Port (Twist-Lock) with hookup block diagram.............................35
Figure 4:4: Powersmiths SMART-1Measurement Port (Banana) with schematic diagram.........................................36
Figure 4:5: Typical Measurement hookup of the EP-300 for Transformer Measurement............................................37
Figure 4:6: CT Power flow and Polarity identification......................................................................................................38
Figure 4:7: CT phasing and hookup.......................................................................................................................................38
Figure 4:8: Single-phase 2-wire 1-wattmeter connection for Meter Port 1 ....................................................................40
Figure 4:9: Single-phase 2-wire 1-wattmeter connection for Meter Ports 2 & 3...........................................................40
Figure 4:10: Single-phase 3-wire 2-wattmeter connection for Meter Port 1 ..................................................................41
Figure 4:11: Single phase 3-wire 2-wattmeter connection for Meter Port 2 & 3...........................................................41
Figure 4:12: Three phase 3-wire 2-wattmeter connection for Meter Ports 1 .................................................................41
Figure 4:13 Three phase 3-wire 2-wattmeter connection for Meter Port 2 & 3.............................................................42
Figure 4:14: Three phase 3-wire 3-wattmeter connection for Meter Ports 1 & 2..........................................................42
Figure 4:15: Three phase 4-wire 3-wattmeter connection for Meter Ports 1 & 2..........................................................42
Figure 5:1: Starting Screen......................................................................................................................................................44
Figure 5:2: Main Screen 3 and 2 Ports..................................................................................................................................45
Figure 5:3: UNIT ID Wizard screen.......................................................................................................................................45
Figure 5:4: Configuration Setup screen.................................................................................................................................46
Figure 5:5: PT/CT Setup screen..............................................................................................................................................46
Figure 5:6: Reports Setup Screen............................................................................................................................................47
Figure 5:7: Setup Menu Screen...............................................................................................................................................49
Figure 5:8: Password Screen...................................................................................................................................................50
Figure 5:9: New Password Screen..........................................................................................................................................50
Figure 5:10: Configuration Setup screen ..............................................................................................................................51
Figure 5:11: PT/CT Setup screen............................................................................................................................................51
Figure 5:12: Reports setup screen..........................................................................................................................................52
Figure 5:13: Nameplate Data Field........................................................................................................................................53
Figure 5:14: Sag/Swell setup screen.......................................................................................................................................54
Figure 5:15: Demand setup screen.........................................................................................................................................54
EP-300 Manual Ver: A06
- 10 -
202-001054-600
Figure 5:16: Time and Date Screen........................................................................................................................................55
Figure 6:1: Typical CyberhawkViewer Screen.....................................................................................................................59
Figure 6:2: Command screen with ping test..........................................................................................................................60
Figure 6:3: Navigating to Network Connections (WindowsTH 2000 on left XP on Right)............................................61
Figure 6:4: Selecting Network Connection (WindowsTH 2000 on left XP on Right) ......................................................61
Figure 6:5: Setting IP on PC (WindowsTH 2000 on left XP on Right) ..............................................................................62
Figure 6:6: Example of CyberhawkViewer initialization file as viewed with “Notepad”............................................63
Figure 6:7: Dialog boxes when installing USB Driver .......................................................................................................64
Figure 6:8: Setting location for Driver file............................................................................................................................64
Figure 6:9: WindowsTM “Activesync” installation dialog box...........................................................................................65
Figure 6:10: Microsoft TH “Activesync status screens..........................................................................................................65
Figure 6:11: RS232 PC connection to EP-300.....................................................................................................................66
Figure 6:12: RS232/485 Setup screen....................................................................................................................................67
Figure 7:1: Picture of typical probe illustrating polarity and power flow directions. ..................................................73
Figure 8:1: Energy Flow Diagram.........................................................................................................................................76
Figure 9:1: Characterization Code.........................................................................................................................................80
Figure 12:1: Initial Terra Term dialog box...........................................................................................................................86
Figure 12:2: Terra Term Main Menu Screen........................................................................................................................86
Figure 12:3: Communication Setup........................................................................................................................................86
Figure 12:4: Initial Menu Selection Screen...........................................................................................................................87
Figure 12:5: Menu Selection....................................................................................................................................................87
Figure 12:6: In the Load Firmware Menu.............................................................................................................................87
Figure 12:7: Next Screen in the Re-flash procedure............................................................................................................87
Figure 12:8: File selection on Terra Term ............................................................................................................................88
Figure 12:9: Terra Term Screen during file transfer to Cyberhawk.................................................................................88
Figure 12:10: Terra Term Recovery Screen..........................................................................................................................88
Table 2-1: Color code chart cross-reference guide .............................................................................................................18
Table 4-1: Color code chart cross-reference guide .............................................................................................................38
Table 4-2: Configuration capability of each Meter Port.....................................................................................................39
Table 5-1: Setup measurement parameters............................................................................................................................48
Table 6-1: Ethernet Port Characteristics...............................................................................................................................60
Table 6-2: Default IP Address .................................................................................................................................................60
Table 6-3: RS232/485 pin identification................................................................................................................................66
Table 6-4: COM 1 RS 485 Connections.................................................................................................................................67
Table 6-5 RS232/485 Communication parameters...............................................................................................................67
Table 7-1: Standard Probe set illustration and description...............................................................................................68
Table 7-2 SMART-1 Meter Port Banana interface adapters..............................................................................................69
Table 7-3: Optional Banana adapter Cables and Probes...................................................................................................70
Table 7-4: Color code chart cross-reference guide .............................................................................................................71
Table 7-5: Current Probes (CTs).............................................................................................................................................72
Table 8-1: Accuracy Specifications.........................................................................................................................................78
Table 9-1: Clamp-on CT General Specifications.................................................................................................................79
Table 9-2: Clamp-on CT model specific specifications.......................................................................................................80
Table 9-3: Characterization Chart and correction factors.................................................................................................81
Table 10-1: Table of Logged Parameters ..............................................................................................................................82
Table 10-2: Table of User saved Parameters........................................................................................................................83
EP-300 Manual Ver: A06
- 11 -
202-001054-600
1 Overview
1.1
Syntax
The following symbols are used in this manual:
1.2
§
⇒ : Select and depress button
§
[****] : Button identification with ID within square brackets
The Hardware
The Powersmiths Cyberhawk Efficiency and Power Meter is manufactured as either a Two-Port 3-phase
meter (EP-300-D), or a Three-Port 3 phase meter (EP-300-T). Internally, the instrument comprises the
Powersmiths PMP-30 “POWER MANAGEMENT PLATFORM” together with a “Touch Screen” Panel PC
running the Microsoft WindowsTM CE operating system. The Touch Panel PC runs an embedded SCADA
software package, providing user interface to the measurement data and data logging. Operator interface to
the instrument is by means of the Menu driven, Touch Screen Display.
With reference to the three-Port model, it is equipped with 16 high speed analog input channels (8 Voltage
and 8 Current) each with a dedicated 12-bit A-D converter channel, enabling simultaneous measurements
of up to three 3-phase electrical circuits (e.g. one input and up to two outputs of a device), synchronized
sources only. The sampling rate at 64 times per cycle, occurs simultaneously for all paired input port sets
(Voltage and Current) eliminating phasing errors associated with sequential sampling. All data is
continuously processed in real time (except for harmonic analysis) including data processing such as
averaging, digital integration (watt-hours), rms computations, power, etc. The algorithms used for the
computations follow IEEE Std 1459-2000.
The voltage inputs are fully differential and impedance isolated using precision matched resistors (to better
than 0.05%) with a direct connection capability to 600VAC with an equally large common mode range
(line to ground). The current inputs are differential galvanically isolated for connection to external CTs (no
direct line connection), with dual rated inputs for 1 Amp (Clamp -on CTs) and 5 Amps (commercial donut
CTs). Both voltage and current inputs incorporate range switching for greater dynamic range.
1.3
Firmware
The unit firmware is ‘Flash’ based which facilitates upgrades/updates to the unit in a field environment
using a PC connected to the service port of the PMP-30.
1.4
Measurement Configurations
Measurement configurations include 2 or 3-wire single-phase and 3 or 4-wire three-phase systems with 2 or
3-wattmeter measurement methods. Also medium voltage systems (to 65,000 Volts) are accommodated
using PTs (Note that CTs must also be rated for the system voltages). Configuration setup of the instrument
includes Voltage ranges, PT ratios, CT ratios, Correction Factors (PTs and CTs), CT Phase compensation,
Alarm settings, communication, etc, and the data logging. Additionally, a set of status inputs is provided to
monitor up to 3 equipment temperatures (thermistor sensors) plus Ambient and 3 digital status signals (e.g.
TVSS status).
1.5
Data and Logging
Data available to the user includes RMS Voltages and Currents, Power (Active, Reactive and Apparent),
Energy import/export (Active, Reactive and Apparent), Efficiency, Distortion, Power Factor (Displacement
and Total), Harmonics, Temperatures, etc. plus Waveform Display and Harmonics spectrum to the 25th .
The Log File is generated using a user defined file name to which are appended specific identifiers for the
type of file being logged or recorded. The instrument is also capable of logging an extensive set of
parameters to the local “Flash Card” memory, which is a sufficiently large memory capacity (128mB) to
log all parameters in 1-minute intervals for a period of greater that one month (Note that the “Flash Card” is
not user replaceable as the operating system and SCADA software are also stored on it). The logged data is
locally or remotely accessible via the Ethernet or USB ports and additionally all measurements are directly
available remotely using “MODBUS” protocol over the RS232/RS485 port. The supplied Powersmiths
EP-300 Manual Ver: A06
- 12 -
202-001054-600
software program “CyberhawkViewer” running under Microsoft Windows TM, can be used to generate a
report file of the logged in “Excel”.
1.6
Communication
The EP-300 is equipped with three native communication ports supporting RS232/485, USB and Ethernet.
The RS232/485 port supports the MODBUS protocol for direct access to the internal meter registers, for
use with third party software (such as (National Instruments “Lookout”). The USB port supports the
Microsoft Windows TM file structure environment and the Ethernet port supports TCP/IP; these are used to
access the logged data files on the internal ’Flash’ memory.
1.7
Application
The EP-300 is primarily intended for Efficiency and Power quality measurements on electrical power
networks and electrical power equipment (e.g. Electrical networks, transformers, UPS, Static Switches,
etc.). The innate capability of this instrument enables a complete Power Quality profile (except transients)
to be created. It is expected that this device will find wide application in monitoring the performance of
Electrical Networks and Equipment to ensure optimal efficiency, performance and reliability also providing
the information to facilitate informed guidance on Energy management and financial decisions.
1.8
Powering Up
The instrument is powered from a utility supply 120VAC to 240VAC nominal with the capability to “ridethrough” sags of < 35% of nominal (to ~40VAC) so as to maintain monitoring functions during extreme
power quality conditions. The supplied power cord is connected to the instrument by a standard IEC 320
connector (3 prong) on the rear of the instrument and may be changed by the customer to match the utility
connection (wall plug type). The instrument is turned on by the panel-mounted switch. After powering on
the instrument, the panel PC (display) will “boot” (about 1 min) and the startup screen will be displayed.
This screen shows the current logging “Filename” and allows the user to choose either to continue
measurement and/or logging to that file or to choose a new file and/or setup. The starting screen is as
shown below:
Figure 1:1: Starting Screen
1.9
User Commands
Shown below is the main screen of the unit, which presents a summary of the power system profile; from
here the user can navigate to other screens for more detailed measurement information, setup or logging.
All menu selections are entered by the context sensitive, menu driven “Touch Screen” soft keys. The menu
structure is arranged to be “intuitive” for ease of operation, and will enable the operator to easily navigate
through the menus after a brief review of these instructions. The main (default) screen of the meter is
shown below.
EP-300 Manual Ver: A06
- 13 -
202-001054-600
Figure 1:2: Main (default) screen on ¼ VGA Display showing 2 Port Model
Note: The display incorporates an energy saving screen off mode, which is brought back up by touching
any part of the active screen area). The use of a stylus will facilitate operation of the ‘Touch’ screen.
1.10 Test Leads and Probes
Test leads connect to the instrument using circular twist lock connectors, which must be connected to the
meter prior to connection to the measurement power circuit. Safety banana interface connectors are
available for connection to the twist-lock cables and are color coded to assist correct phasing hookup.
Measurement kits are available which include Voltage Probes ant Clamp -on CTs.
1.11 Accuracy
The absolute accuracy of the measurements is dictated by the basic accuracy of the instrument, and the
accuracy of the external transducers. The instrument has provision for entering correction factors for both
the PTs (only required for Medium Voltage systems) and CTs transducers. The instrument also includes the
ability for the operator to input error correction factors for external PTs and CTs and as well as CT phase
compensation to further enhance the measurement accuracy.
The EP-300 is factory calibrated using a precision power standard calibrator to better than 0.1%. However,
the accuracy of relative measurements, like efficiency, benefits from the ratio-metric nature of the
instrument, i.e. common A-D conversion elements, thermal tracking of components and common internal
voltage reference and hence the error follows the basic accuracy of the instrument (as errors are ratiometric in nature resulting in 0.2% overall and not an overall result of 0.4%).
CTs (nominally Class 0.3) supplied by Powersmiths are characterized and matched as sets to < + 0.1%
over a 10 to 100% range, and Clamp-on CT probes are also characterized and matched to < + 0.2% over a
15 to 100% range, and assigned a four- part characterization alpha-identifier code which may be entered
into the Cyberhawk meter. Further, Powersmiths Smart-1 Monitoring Ports employ ratio-metric scaling so
that I/O currents are of the same order of magnitude and likewise with Clamp -on CT sizing for I/O current
measurement. Thus, the actual accuracy of the result will be significantly better than the absolute accuracy
of the probe due to the ratio-metric advantage of the matching (CTs operate at about the same secondary
current) and the error correction of the probes (overall result no worst than 0.2%).
The accuracy of the measurement may be further enhanced, by inputting the exact correction factor for the
CT, which is read from the actual characterization curve of the CT being used (available from
Powersmiths). This approach virtually nulls out the error due to the measurement CTs.
EP-300 Manual Ver: A06
- 14 -
202-001054-600
1.12 Menu Structure
An overview of the menu structure in shown in Figure 1:3 below. Operation of the unit is driven by Menu
selections, which are context sensitive making the unit very user friendly to operate. Most data is available
at just one level below the main screen. The setup menus are protected by password to prevent inadvertent
changes or unauthorized tampering. This manual uses a bold square bracket enclosing the button logo, e.g.
[System] to refer to a function selection being described.
View
Voltage
Current
THD
View Details
Voltage
Frequency
View Details: Current
Select
Main Screen
Overview of:
Reference File
Loading,
Power In/Out,
Select
Port 1
Port 2
Port 3
System
Menu
Port 1/2/3
Voltage
Current
Power
Energy
Graphs
THD
View detail: Power
View detail: Energy
View:/Actions
Waveforms
Harmonics
Snapshots (save)
View details: THD
View
Effective Values
Frequency
Select
Efficiency
Power
Energy
Status
View: Efficiency I/O
View: Power (all Ports)
View: Energy (all ports)
View:
Temperatures
TVSS Status
View
Time/Date
Select
Lock/Unlock
USB
Events
Tools
Setup
About
View
Time/Date
Firmware Version
Software Version
Serial Number
Calibration Date
View: Event History
Actions
Restart (application)
Exit Application
Reset Energy
File Browser
Set / Actions
Password (unlock/change)
Config. (System PT/CT)
Reports (select logs)
Unit ID (site Info.)
Demand (setup)
Events (setup)
Clock (set)
Figure 1:3: Menu Structure to three levels
EP-300 Manual Ver: A06
- 15 -
202-001054-600
2 Quick Start
2.1
Introduction
This quick start section assumes some familiarity with the EP-300 and power measurement procedures in
general, otherwise please refer to the following more detailed sections on operation, setup and hookup.
For this quick start guide, a transformer equipped with a Powersmiths SMART-1 Metering Port and a
generic hookup with clamp -on CTs are used as examples.
2.2
SMART-1 Metering Port
Shown below is a SMART-1 Port with Twist-Lock Interface.
Figure 2:1: Hookup to Powersmiths SMART-1 Metering Port with Twist-lock interface
Hookup instructions for SMART-1 interface are as follows (note that the Twist-Lock interface is directly
connected, while the Banana interface uses the Banana interface adapters shown in the picture below):
Figure 2:2: Hookup to Powersmiths SMART-1 Metering Port with Banana Interface
Note: Internal connections are similar to the diagram of the generic hook-up shown below except that
voltage and CT connections are internal
EP-300 Manual Ver: A06
- 16 -
202-001054-600
2.2.1 Hookup to SMART-1
§ Ensure CT Shunt switches on SMART-1 interface are in the ‘ON’ position.
§
§
Connect Test Lead Cables:
-
Voltage cable from “INPUT” to meter “Port 1”
-
Current cable from “INPUT” to meter “Port 1”
Repeat above for Voltage and Current connections from “OUTPUT” to meter “Port-2 and “Port-3
(if present)”
-
Status Cable to Status Input
Turn “Shunt” switches to “OFF”
Note: Turn shunt switches back “ON” before test lead disconnection
§
2.3
Setup meter and measure as described following in meter setup
Generic Application Hookup
Note: The following procedures are intended for suitably trained and qualified personnel.
Read and be familiar the safety notices and warnings given at the beginning of this manual.
WARNING
Exercise caution and use electrically insulated gloves and safety goggles when working around
live exposed equipment.
Handle Alligator Clips and Clamp-on CTs only by the insulated handles being careful not to
touch any un-insulated live parts.
ELECTRIC
SHOCK RISK
Ensure all power is proven disconnected prior to touching bare electrical connections.
A typical hookup configuration to the input and output of a transformer is illustrated in the figure below,
which uses the 2-Wattmeter method on the input and the 3-wattmeter method on the output (note
instructions following).
EP-300
Voltage I/P
VA
R
VB
Y
VC
B
METER PORT-2
Current I/P
+IA -
+IC -
R
B
Voltage I/P
VA
R
VB
Y
VC
B
Current I/P
VR
W
+IA - +IB- +ICR
Y
B
SOURCE
H1
X1
H2
X2
H3
X3
LOAD
METER PORT-1
X0
Figure 2:3: Typical Measurement hookup of the EP-300 for Transformer Measurement.
EP-300 Manual Ver: A06
- 17 -
202-001054-600
The test leads are color coded for ease of identification of the phases and the current probe leads are
polarity sensitive with the common lead identified with a “BLACK” tip at the end of the Banana plug.
Please refer to the table and picture shown below to assist in correct hookup:
Table 2-1: Color code chart cross-reference guide
Phase
Traditional
Identifiers
EP-300 Color
codes
Traditional North American
colors
European
A
H1, X1, U
Red
Yellow, Black or Red
Red
B
H2, X2, V
Yellow
Red, Brown, Blue or Black
Yellow
C
H3, X3, W
Blue
Red, Blue or Orange
Blue
N
N, X0
White
White
White
Note that this table is only a summary of general color coding practices; other colors are used to
identify special conditions, e.g. orange for the highest phase voltage in center grounded delta system
2.3.1 Procedure
Initial Preparation:
LOAD
§
Prepare Meter by connecting Twist-lock Cables to Meter
and Banana adapter leads to Twist-Lock cable
§
Plug in CTs to the Banana test leads observing polarity*
§
Connect to device under test as per schematic shown
carefully observing phase and polarity (power flow)
-
Port-1: Attach Voltage probes to primary A, B, C
Port-2: Attach Voltage probes to secondary, A, B, C,
N
Port-1: Clamp -on CTs to Phase A & C primary*
Port-2: Clamp -on CTs to Phase A, B, C secondary*
SOURCE
Power
flow
Common
current
direction
black
tip
* Note: Refer to figure opposite for correct CT phasing and
power flow direction
§
§
Setup meter and measure as described following in meter
setup
-
Port-1: 3-wire 2-wattmeter method and enter nominal
Voltage/Current, Port I/O, PT/CT ratios
-
Port-2: 4-wire 3-wattmeter method and enter nominal
Voltage/Current, Port I/O, PT/CT ratios
Measure and/or setup logging as required following
appropriate menus keys
Figure 2:4: CT connection and phasing
EP-300 Manual Ver: A06
- 18 -
202-001054-600
2.4
Configuration and Setup
Power on meter and allow it to “boot” (about 1 minute) to the Opening Screen; the current log file is
displayed with two choices presented as follows:
⇒ [Continue Report File] to continue prior
measurement (restarts etc.) and continue
logging to current file (File also reference
shown)
⇒ [New Report File] for a new report file and
setup
Instructions based on selection follows:
2.4.1 Continue Report File (existing file and manual setup)
⇒ [Continue Report File] and
main screen displayed
Logging status displayed
beside file name.
To Start or Stop Loging
⇒ [¦ Log ] / [¦ Logging]
If Locked see Password belo
⇒ [Main] to get back to start
To Unlock a Locked unit
⇒ [Menu] ⇒ [Locked]
⇒ [####]⇒ [OK] ⇒ [Back]
Or from setup when locked
⇒ [####] (password; default “0”)
⇒ [Back]
Changes to setup
⇒ [Menu] ⇒ [Setup]
⇒ [Password] ⇒ [####]
(default “0”)
⇒ [Back]
EP-300 Manual Ver: A06
- 19 -
202-001054-600
Changes to configuration
⇒ [Config.]
Volts Line-Line ⇒ [####]
System kVA ⇒ [####]
⇒ [Calculate Amps]
⇒ [Input] or [Output] for
Port number as Input/Output
⇒ [####] Port Configuration
(eg. 3-wire, 4-wire, disabled)
⇒ [PT/CT] for each Port
PT Ratio ⇒ [####] or
⇒ [No PTs] (when no PTs)
CT Ratio ⇒ [####]
⇒ [####] Correction group
or correction factors
⇒ [####] Deg.
(Note:Typical compensation
0.3 CTs; 0.7 Clamp -On CTs)
Demand Settings
⇒ [Menu] ⇒ [Demand]
⇒ [####] period in seconds
⇒ [####] Number. of periods
Note: Typical is 60 secs. And
15 periods; for quick view
use 10 secs. and 6 periods
Changes to Logging
⇒ [Menu] ⇒ [Setup]
⇒ [Reports]
⇒ File name and log
selections including time
⇒ [Unit ID]
⇒ Details for reference
Note File Naming: Use only
alphanumeric characters,
no white spaces, dashes;
underlines not at beginning.
EP-300 Manual Ver: A06
- 20 -
202-001054-600
2.4.2 New Report File Setup (new test and setup Wizzard)
⇒ [New Report File]
⇒ [####] Password (default
‘0’)
⇒ [OK]
⇒ [Continue]
⇒ [Filename] File (Unit ID)
⇒ [####] all other unit details
Note File Naming: Use only
alphanumeric characters,
no white spaces, dashes;
underlines not at beginning.
⇒ [Next]
Volts Line-Line ⇒ [####]
System kVA ⇒ [####]
⇒ [Calculate Amps]
⇒ [Input] or [Output] for Port
number as Input or Output
⇒ [####] Port Configuration
(eg. 3-wire, 4-wire, disabled)
⇒ [Next]
⇒ [PT/CT]
PT Ratio ⇒ [####] or
⇒ [No PTs] (when no PTs)
CT Ratio ⇒ [####]
⇒ [####] Correction group or
correction factors
⇒ [####] Deg. (0.7 typical)
⇒ [Next] and repeat for other
Ports 1/2/3 as required
⇒ [Next]
⇒ File name (if not
previously set) and log
selections including time
⇒ [Done] Returns to main
EP-300 Manual Ver: A06
- 21 -
202-001054-600
2.5
Operation
From Main
View Loading and I/O conditions
and/or select as follows:
⇒ [Port1] or Port2] or [Port3]
⇒ [System]
⇒ [Menu]
⇒ [¦ Log ] / [¦ Logging]
⇒ [Snapshot] for all current
conditions including
waveforms
⇒ [Main] to get back to start
:
Data by Port
⇒ [Port1] or [Port2] or
[Port3] or [System]
Select further menu
selections for tabular data
Data details
⇒ [Voltage] or [Current]
etc. for tabular data
⇒ [Waveforms]
then select item to view
⇒ [Harmonics]
then select item to view
Data for System
⇒ [System]
⇒ [Power]
⇒ [Energy]
⇒ [Status] temperatures
etc.
Select menus for tabular data
⇒ [System] ⇒ [Efficiency]
Efficiency calculated by
Instantaneous, Demand, Average
(kW/kWh)
⇒ [Reset] clears energy registers
⇒ [Demand] demand setup
Select menus for tabular data
EP-300 Manual Ver: A06
- 22 -
202-001054-600
This Page Intentionally Blank
EP-300 Manual Ver: A06
- 23 -
202-001054-600
3 Detailed Operation
Operation of this instrument is a 4-part procedure, which requires hookup to the electrical network or
equipment under test, the configuration (setup) of the instrument to match the hookup configuration,
measurement, and communication setup to access the logged data (if and when required).
The general procedure is to choose the appropriate measurement configuration from the examples given in
the following section and hookup accordingly. The meter is then (or prior) configured to match the
hardware hookup. The procedural overview is as follows:
§
Hookup – The physical connection
§
Setup – Configure the meter for measurement topology and interfaces
§
Operation – Measure and Log
§
Document measurements – Acquire and document measurement results
3.1
Overview
Before hooking up the EP-300, review and select the desired hardware hookup configurations (for input
and for output) from the following section on Hookup. The standard cable set supplied with the instrument
allows for direct hookup to the Powersmiths SMART-1 Metering Port or for generic type hookups using
the external measurement kit (Alligator probes and Clamp -on CTs. The meter incorporates both 1 Amp
and 5 Amp rated CT inputs for all Meter Ports with selection made by the cable set used; the Smart-1 cable
set uses the 5 Amp input and the Clamp -on CT cables use the 1 Amp inputs. Note that a description of the
cables is given in the following section on “Hookup”.
3.1.1 Starting Screen
Power on the instrument, the panel PC (display) will “boot” (about 1 min) and the startup screen will be
displayed (note do not touch the screen until the starting screen pops up).
This screen shows the current logging “Filename” and allows the user to choose either to continue
measurement and/or logging to that file or to choose a new file and/or setup. Note that it is important to
follow this procedure to avoid appending data to a previous logged file. The starting screen is as shown
below:
Figure 3:1: Starting Screen
To continue measurement and /or logging to existing file:
§
⇒ [Continue Report File] and the “Main” screen will come up, described next
To begin a new setup and/or change the file name
§
⇒ [New Report File] and the user will be guided through the “Setup Wizard”; follow setup procedures
in section 5.
EP-300 Manual Ver: A06
- 24 -
202-001054-600
3.1.2 Main Screen (default)
The default (main) screen shown below on power up, displays a summary of the main system parameters
with descriptions adjacent.
Title Block & Status
Log Status/Control
Snapshot
Total Active Power
In: kW & kVA
Port setting as Input
or Output
% Loading Graphs
Menu Buttons
Figure 3:2: Main Screen
The Menu selections [Port 1] [Port2] or [Port3] for each meter port lead to more detailed data for each
meter measurement, the [System] key provides a snapshot of the System I/O conditions including
efficiency data and the [Menu] button expands the menu structure.
File logging and “Snapshot” (record of all measured parameters plus waveforms) can also be initiated from
this screen
3.2
Detailed Data
Using the [Port 1], [Port 2] and [Port 3] (option) buttons from the Main screen provides detailed
measurements for each of the Meter Ports (1, 2 and 3).
3.2.1 Voltage and Current
The first screen under the Port selections provides a summary of the voltage and currents together with the
THD for each in a diagrammatic form, as shown below:
Figure 3:3: Typical first level screens under the Port selections
EP-300 Manual Ver: A06
- 25 -
202-001054-600
Note that it is possible to navigate directly between the other Ports directly from this screen. Further details
on related to the screen being viewed are available by selecting the [Voltage] or [Current] for more details
as follows:
3.2.1.1 Voltage and Current
§ ⇒ [Voltage] presents the details as follows:
-
RMS Line and Phase Voltage (4-wire only)
Voltage THD (Total Harmonic Distortion, the ratio of harmonics to the fundamental harmonic)
-
Voltage DIN (Distortion Index, the ratio of harmonics to the RMS voltage)
ANG* (Phase Angle)
CF (Crest Factor)
*Note: All phase angles are given relative to Meter Port 1 A-B Voltage when connected or to
Meter Port 2 A-N Voltage if former not present, and likewise to Port 3)
§
⇒ [Current] presents details as follows
-
RMS Line Current
RMS Neutral Current (4-wire only)
Current THD (Total Harmonic Dis tortion, the ratio of harmonics to the fundamental harmonic)
-
Current DIN (Distortion Index, the ratio of harmonics to the RMS current)
ANG* (Phase Angle)
CF (Crest Factor)
*Note: All phase angles are given relative to Meter Port 1 A-B Voltage when connected or to
Meter Port 2 A-N Voltage if former not present, and likewise to Port 3)
Figure 3:4: Detailed Voltage and Current screens.
Note: Further button selections in each screen allow for direct navigation to input or other output.
Note that within these screens, it is possible to switch between different phases and between voltage and
current screens. Screen examples are shown below for Waveforms and Harmonics.
3.2.1.2 Waveforms and Harmonics
Selecting [Waveform] under the detailed voltage or current screens shown above will display the voltage
or current waveforms as selected. The CF (Crest Factor) is given for voltages with K-Factor for currents.
Use the selection arrow to select desired waveform.
Similarly selecting [Harmonics] will display a bar graph of the harmonic spectrum to the 25th of the
voltage or current waveform respectively and selecting [Data] will display the numeric data for the
displayed harmonics.
EP-300 Manual Ver: A06
- 26 -
202-001054-600
Figure 3:5: Waveform and Harmonic analysis screens.
Individual Waveforms and Harmonic Spectra may be recorded by ⇒ [Record] function button as they are
being viewed; they are saved to the currently set File name.
3.2.1.3 Power, Energy, THD and DIN
Further menu selections under the [Port 1], [Port 2] and [Port 3] selections include [Power], [Energy],
[THD] (both voltage and current) and the Totals given is the sum for all phases. Note: Per phase power and
energy is not relevant for 3-φ, 3-wire systems:
§
§
⇒ [Power] shows:
-
Real (kW) per phase and total
Reactive (kVAR) per phase and total
-
Apparent (kVA) per phase and total
Total Power Factor (PF), total and per phase
Displacement Power Factor (DPF) per phase
⇒ [Energy] shows:
-
Energy (delivered and/or consumed)
Active (kWh) per phase and total
-
Reactive (kVARh) per phase and total
Apparent (kVAh) per phase and total
Quadrant (Energy in each quadrant for kWh, kVARh and kVAh)
Figure 3:6: Power and Energy screens for selected Port
§
⇒ [THD] provides the following details:
-
THD (Total Harmonic Distortion) Voltage and current
EP-300 Manual Ver: A06
- 27 -
202-001054-600
-
DIN (Distortion Index) Voltage and currents
-
ANG (Angle) Phase angle relative to Phase A (red)
CF (Crest Factor) Voltage and Current
KF (K-Factor) for Current
Figure 3:7: Distortion screen for selected Port
3.2.2 System
The System screen selected under the [System] button provides an overview of the overall system I/O
conditions based on effective Voltage, Current, Power and Total Power Factor of the system as follows:
§
⇒ [System] displays:
-
Effective Voltage
Effective Current
Effective Power
Effective Total Power Factor
Note: Effective values are the averages for all phases
Figure 3:8: System Screen showing summary of I.O Conditions
From here a number of further menu choices are available described as following.
EP-300 Manual Ver: A06
- 28 -
202-001054-600
3.2.2.1 Efficiency
The Efficiency screen under [System] ⇒ [Efficiency] provides for a system efficiency reading based on
total input and output conditions parameters and illustrated in the figure below.
Figure 3:9: Efficiency Screen
Data fields provide Load (kW or kWh), Losses (kW or kWh), TEX (see TEX definition following) and
Efficiency. Four efficiency computations are provided based on four different parameters as follows:
§
Instantaneous
-
§
Demand
-
§
Computed efficiency based on peak demand. (Note that the Demand parameters must be set)
Average Power
-
§
Instantaneous data based on at the moment conditions (Note that this data will fluctuate based on
the load variance)
Computed efficiency based on the average power which is derived from the Energy consumption
from the time at reset divided by the elapsed time
Energy
-
Efficiency based on Load kWh / Input kWh and would indicate the average efficiency over the
period of the measurement
Note that the efficiency based on kWd requires that [Demand] be set and that the time to a result will
depend on the “Demand” parameters
3.2.2.1.1 TEX Number
The TEX number is equivalent to the miles per gallon measure in automobiles and is a good relative
indicator when comparing the performance of various transformers. It is derived from the ratio of Load
(Powe r or Energy) divided by losses (Power or Energy) and expressed mathematically as follows:
TEX =
Load
Losses
Note: Units in numerator and denominator either kW or kWh
Considering as an example a Transformer with a TEX number of 60 would mean that 1 kWh is lost for
every 60 kWh of energy delivered or put another way there would be 1kW of power lost for every 60 kW
of loading. Comparing this with a transformer TEX number of 45 would mean 1 kWh is lost for every 45
kWh delivered, which is 50% more losses than the first case. Note that the TEX number will vary based on
the Transformer efficiency for the load (just as the miles per gallon of an automobile will vary based on
speed and driving conditions).
EP-300 Manual Ver: A06
- 29 -
202-001054-600
3.2.2.1.2 Reset
The [Reset] function is used to reset the energy accumulators and is used at the beginning of a new
measurement to remove “old” data. To reset ⇒ [Reset]
3.2.2.1.3 Demand
Demand (kWd) is the measure of power divided by the time over which it was consumed. Typical settings
are a period of 60 seconds (1 min.) with number of periods at 15. The screen for setting demand is shown
below.
Figure 3:10: Demand setup screen
Setup Demand as follows:
§
⇒ [Demand] ⇒ Period [####] seconds and enter the period time (typical 60 secs.)
§
⇒ Periods [####] and enter the number of periods (typical 15 periods)
Note: Typical values are suggested are for log term logging. For quick measurements (< 5 minutes) set
period to 1 sec. and periods to 10.
3.2.2.1.4 Cost of Losses
The cost of losses is automatically computed based on the average power losses times the user inputted cost
of energy (cost/kWh. To enter the cost of energy:
§
⇒ [####] and enter the cost in kWh using the pop-up keyboard
3.2.2.2 Power and Energy
Power and Energy is available under [Energy] and [Power] buttons. A summary of the main electrical
system parameters is presented as follows:
§
§
⇒ [Power] for each Meter Port in terms of Input or Outputs
-
Real (kW) total
Reactive (kVAR) total
-
Apparent (kVA) total
⇒ [Energy] for each Meter Port in terms of Input or Outputs
-
Real (kWh) total
Apparent (kVAh) total
Reactive (kVARh) total
The screens below illustrates the System Power and Energy fields:
EP-300 Manual Ver: A06
- 30 -
202-001054-600
Figure 3:11: System Power and Energy Screens
3.2.3 Status
The Status menu works with Powersmiths SMART -1 Metering Port and displays temperatures (as read
through external sensors) and the condition of installed TVSS devices. On SMART-1 equipped
transformers, there is one sensor per leg (per phase). The Ambient temperature is sensed through a sensor
installed in the Status cable. Note that a reading of 0O C indicates that no sensor is present. A typical screen
is illustrated below:
Figure 3:12: Status screesn showing Temperatures and TVSS Status
3.2.4 Menu
An expanded Menu selection is available under the [Menu] key as illustrated below. Note that this screen
also displays the current time and the “Power Off” and “Power On” times. ( [Setup] is covered in the
section on “Setup”).
Figure 3:13: Expanded Selections under Menu
EP-300 Manual Ver: A06
- 31 -
202-001054-600
3.2.4.1 Lock
The EP-300 utilizes a simple password protection to protect the meter setup and logged data from
inadvertent tampering when on site. The unit is “unlocked” by the user using a 4-digitnumeric password
(factory default “0”) and will automatically relock 30 minutes later.
§
To lock the meter at any time, from [Main] ⇒ [Menu] ⇒ [Lock]
3.2.4.2 Events
The Event Logs may be viewed on this screen by using the buttons, which are self-explanatory. The
recorded events are as follows:
§
Sags/Swells
§
Power down and Restart
Figure 3:14: Event Screen
3.2.4.3 Tools
The Tools menu is shown below and the actions are as follows:
Figure 3:15: Tools Screen
Note that a valid password must be entered prior to using the Tools Menu selections.
§
To unlock password: ⇒ [Locked] ⇒ [####] (password) ⇒ [Back]
§
Reset energy (accumulators): ⇒ [Reset Energy]
§
Exit Application: Used to Exit to the Windows TM CE operating system to set screen contrast, align touch
screen and set Ethernet IP and covered in the section on Setup. ⇒ [Exit Application]
§
Clear Event Logs: ⇒ [Reset Event Logs]
§
Restart: ⇒ [Restart] (returns user to opening screen)
EP-300 Manual Ver: A06
- 32 -
202-001054-600
§
File Browser (used to manage logged files)
-
⇒ [File Browser] and file browser screen is opened as shown below:
Figure 3:16: File Browser Screen
-
The logged files may be browsed ⇒ [Browse Files] and selected file deleted ⇒ [Delete
Selected File]
-
The logged file directory may also be totally erased ⇒ [Delete ALL Report Files]
Note: Ensure that you do not delete files before they are read and saved by CyberhawkViewer.
3.2.4.4 USB
Used to activate the USB link to an external PC. For details see section on Communication.
3.2.4.5 About Screen
Displays relevant information about Meter as follows:
Model/Serial number, software version and calibration date etc. and is shown below.
§
Current Time and date
§
Cyberhawk Firmware version xx.xx.xx
§
Display Panel PC Software version ID xxxx
§
§
Serial No: xxxxxxx (note this is the serial number of the internal PMP-30 which does the data acquisition
and signal processing)
Calibration date
Figure 3:17: About Screen
EP-300 Manual Ver: A06
- 33 -
202-001054-600
4 Hookup
CAUTION
!
4.1
Be familiar with the warnings given at the beginning of this manual and pay attention to additional
Warnings, Cautions and Instructions presented throughout this manual. The use of recommended
fusing will help prevent damage to the instrument or injury to personnel in the event of
misconnection or inadvertent errors.
Connections
All connections to the EP -300, except the USB and RS232/485 (which are on the main panel), are made via
the rear-mounted connectors as illustrated in the silkscreen image below. Note that for reference purposes,
connector pin numbers are identified in Appendix 2.
Figure 4:1: EP-300 Rear panel (Port 3 is not installed for 2-Port model)
Power supply connection (120-240VAC nominal) is via the IEC 320 receptacle on the right with the
Ethernet RJ45 jack located on the left. The Status and Input metering connections are circular Twist-Lock
types and connection is made to them with the supplied cable sets. Note that Meter Port-3 is not installed
for a 2 input EP -300 model.
4.2
Hookup
The EP-300 Cable set and accessories facilitate direct connection to either the Powersmiths SMART-1
Metering Port (Twist-Lock or Banana interface using adapters) or to power systems or equipment using
clamp -on CTs and voltage probes (see Section on Hookup with subsection on Cables and Probes for more
information).
4.3
Using the Twist-Lock Connectors
To attach the twist-lock cables, lightly rotate the twist-lock plug against the receptacle and when it locates
in the guide key (key notch prevents further rotation), turn the lock ring clockwise until it locks (3/4 turn)
and the connector will be pulled and locked in place. To disconnect, turn the lock ring counter-clockwise
until it stops rotating and then pull straight out.
4.3.1 SMART-1 Metering Port
The Powersmiths SMART -1 Metering Port is a metering interface usually installed on Transformers. It
includes fused disconnects for the voltage connections and revenue grade CTs for current on both the input
and output (Note shunt switches with open circuit protection are installed in the CT connections). It
facilitates safe convenient power quality analysis of electrical networks and power loss analysis of the
Transformer. It is wired as a 3-wire 2-wattmeter method on the primary and 4-wire 3-wattmeter on the
secondary circuit. It also includes compatible temperature sensors and TVSS (if installed) status contacts
brought out to the operator interface panel. The internal SMART-1 wiring also includes fused PTs for
Medium Voltage systems. The ratios of the CTs and PTs, installed in the SMART-1 package, are recorded
on top of the operator panel with correction factors (if this option is ordered). Shown below is the
schematic of the SMART-1 Metering Port for reference purposes only.
EP-300 Manual Ver: A06
- 34 -
202-001054-600
SMART-1 Metering Port
VH1
VH3
VH2
yello
w
red
IHA+
blu
e
yello
wgree
n
red
blu
e
white
VH1 VH2 VH3
IHA+
*
BR1
IHA-
IHC-
VXA
yello
wgree
n
SW1
Output Current
TVSS
IHC+
IHA-
Status
Output Voltage
Input Current
Input Voltage
VXB
yello
w
red
VXC
blu
e
IXA+
VXN
whit
e
yello
w
SW2
black
white
yello
wgree
n
IXB+
yello
w
SW3
BR2
IHC+
IXA-
black
white
VXA VXB VXC VXN
IHC-
IXA+
*
IXC+
IXByello
wgree
n
yello
w
black
IXA-
white
BR4
IXB+
TVSS1
yello
wgree
n
Temperature
TVSS 2
yello
w
yello
w
TVSS1
TVSS2
TA
yello
w
TB
yello
w
TC
yello
w
TCOM
yello
w
SW5
SW4
BR3
IXC-
black
IXB-
white
IXC+
BR5
black
IXC-
TA
TB
TC
TCOM
CT Grounding
PT Ground
GND
red
green
blue
white
black
white
yellow
white
yel
black
red
white
blue
red
black
white
white
black
red
black
black
black
white
black
TVSS
Alarm
PT2
PT1
F
F
F
F
white
(x1)
white
(x1)
black
(x2)
CT1
black
(x2)
CT3
X1
H1
white
(x1)
black
(x2)
Phase A
Coil
CT4
To
27k
Volts
X2
H2
white
(x1)
black
(x2)
white
(x1)
CT2
black
(x2)
CT5
Phase B
Coil
Phase C
Coil
208
to
600
Volts
X3
H3
Transformer
X0
Figure 4:2: SMART-1Metering Port Schematic (reference only).
Note that PT 1 & 2 are installed only on medium voltage systems.
4.3.1.1 SMART-1 Twist-Lock hookup
Shown below is a SMART-1 Port with Twist-Lock Interface and a simplified hookup diagram.
Figure 4:3: Powersmiths SMART-1Measurement Port (Twist-Lock) with hookup block diagram
EP-300 Manual Ver: A06
- 35 -
202-001054-600
Hookup instructions for twist-lock interface are as follows:
§
Ensure CT Shunt switches in the ‘ON’ position.
§
§
Connect Test Lead Cables to Meter as follows:
-
Twist-Lock Voltage cable from “INPUT” to meter “Port 1”
-
Twist-Lock Current cable from “INPUT” to meter “Port 1”
Repeat above for Voltage and Current connections from “OUTPUT” to meter “Port 2”
Twist-Lock Status Cable to Status Input
Turn “Shunt” switches to “OFF”
Note: Turn shunt switches back “ON” before test lead disconnection
§
Setup meter and measure as described following in meter setup
4.3.1.2 SMART-1 Banana hookup
Shown below is SMART-1 Port with Banana interface which is identical to the twist-lock interface except
for the terminations.
Figure 4:4: Powersmiths SMART-1Measurement Port (Banana) with schematic diagram
Hookup instructions for the Banana interface is similar to the twist-lock case except for the following:
§
Ensure CT Shunt switches in the ‘ON’ position.
§
Connect Test lead twist-lock to banana interface adapters to SMART-1 and meter Port as follows:
-
Connect 3-wire Banana/Twist-lock adapter to Voltage cable to meter “Port 1” and Bananas to
“INPUT” Voltage with Red to VH1 , Yellow to VH2 and Blue to VH3
Connect 2-CT Banana/Twist-lock adapter to Current cable to meter “Port 1” and Bananas to
“INPUT” current with Red to IHA +, and Red/Black to IHA -, Blue to IHC+ and Blue/Black to IHCConnect 4-wire Banana/Twist-lock adapter to Voltage cable to meter “Port 2” and Bananas to
“OUTPUT” Voltage with Red to VXA , Yellow to VXB, Blue to VXC and White to VXN
Connect 3-CT Banana/Twist-lock adapter to Current cable to meter “Port 2” and Bananas to
“OUTPUT” current with Red to IHA +, and Red/Black to IHA -, Yellow to I XB+ and Yellow/Black
to IXB-, Blue to IHC+ and Blue/Black to IHC-
EP-300 Manual Ver: A06
- 36 -
202-001054-600
-
Connect Status Banana/Twist-lock adapter (straight tips non-safety type) to Status Cable to Meter
Status input and Bananas to “TVSS and TEMP” as follows: Red to TA , Yellow to TB, Blue to TC,
White to Tcom, and Black Bananas to TVSS 1 & 2 (polarity insensitive)
Caution: Do not connect Status Banana Adapters to any other terminal but “TEMP” and “TVSS”
§
Turn “Shunt” switches to “OFF”
§
§
Setup meter and measure as described following in meter setup
4.4
Turn shunt switches back “ON” before disconnecting meter or test leads
Generic Application Hookup with Probes and CTs
Note: The following procedures are intended for appropriately trained and qualified personnel.
Read and be familiar the safety notices and warnings given at the beginning of this manual.
WARNING
Exercise caution and use electrically insulated gloves and safety goggles when working around
live exposed equipment.
Handle Alligator Clips and Clamp -on CTs only by the insulated handles being careful not to
touch any un-insulated live parts.
ELECTRIC
SHOCK RISK
Ensure all power is proven disconnected prior to touching bare electrical connections.
A typical hookup to the input and output of a transformer is shown in the figure below with instructions
following:
EP-300
METER PORT-1
VA
R
VB
Y
VC
B
Current I/P
+IA-
+IC -
R
B
Voltage I/P
VA
R
VB
Y
VC
B
Current I/P
VR
W
+IA- +IB- +IC R
Y
B
SOURCE
H1
X1
H2
X2
H3
X3
LOAD
Voltage I/P
METER PORT-2
X0
Figure 4:5: Typical Measurement hookup of the EP-300 for Transformer Measurement.
Note that the test leads are color coded for ease of identification of the phases. Please refer to the table
shown below to assist in correct hookup:
EP-300 Manual Ver: A06
- 37 -
202-001054-600
Table 4-1: Color code chart cross-reference guide
Phase
Traditional
Identifiers
EP-300 Color codes
Traditional North
American colors
European
A
H1, X1, U
Red
Black or Red
Red
B
H2, X2, V
Yellow
Red or Black
Yellow
C
H3, X3, W
Blue
Blue, Orange
Blue
N
N, X0
White
White
White
Note that this table is only a summary of general color coding practices; other colors are used to
identify special conditions, e.g. orange for the highest phase voltage in center grounded delta system
4.4.1 Polarity
The CTs are polarity sensitive for power flow direction and banana lead connection. The power flow
direction is identified by a block arrow and the common banana connection by an outlined triangular box.
The common of the connection banana leads are identified with a “BLACK” tip at the end of the Banana
plug with the phase indication by the main body color.
Power Direction
Common (polarity)
Figure 4:6: CT Power flow and Polarity identification
§
Prepare Meter by connecting Test Lead Cables to Meter as
follows:
-
§
Twist-Lock Voltage Cables to Port-1 with 3-wire Voltage
Banana adapter and alligator clip
Twist-Lock Voltage Cables to Port-2 with 4-wire Voltage
Banana adapter and alligator clip
2-CT Banana Cables to Port-1 Current with CT connected
(note common on CT)*
3-CT Banana Cables to Port-2 Current with CT connected
(note common on CT)*
Connect to device under test as per schematic shown carefully
observing phase and polarity
-
Port-1: Attach Voltage probes to primary A, B, C
Port-2: Attach Voltage probes to secondary, A, B, C, N
Port-1: Clamp -on CTs to Phase A & C primary*
-
Port-2: Clamp -on CTs to Phase A, B, C secondary*
LOAD
SOURCE
Power
flow
Common
current
direction
black
tip
* Note: Refer to the picture opposite for correct CT phasing
and power flow direction
Figure 4:7: CT phasing and hookup
EP-300 Manual Ver: A06
- 38 -
202-001054-600
§
Setup meter and measure as described following in meter setup
-
§
4.5
Port-1: 3-wire 2-wattmeter method and enter nominal voltage and current, CT ratios
Port-2: 4-wire 3-wattmeter method and enter nominal voltage and current, CT ratios
Measure and/or setup logging as required following appropriate menus keys
Direct Measurement Connections
Hookup directly to an electrical network or device can be facilitated (up to 600VAC) by use of the optional
adapter leads, which provide safety banana termination for connection to Voltage Probes (“Alligator”) and
clamp -on CTs. The unit must be configured for the measurement configuration desired (i.e. 3/4 wire, 2/3
wattmeter method, etc.) and setup as per instructions in the section on “Setup” before use.
The procedure in summary is as follows with detailed procedures following:
§
Review the hook-up configurations listed in the diagrams following in this section and select the
metering configuration required
§
Locate the unit in a convenient position near to the equipment under test
§
Hookup the test leads as per the desired configuration exercising due caution if circuits are live
§
Configure the EP-300 as per instructions in Section on “Setup”.
Note: Configuration may be done prior to or after energizing the power circuits.
4.5.1 Metering Configurations
The instrument may be used on 2-wire or 3-wire single-phase or 3-wire or 4-wire three-phase systems for
all meter ports, except that Meter Port 1 is limited to a three-wire two-wattmeter method. The table below
summarizes the capability of each of the three Meter Ports.
Table 4-2: Configuration capability of each Meter Port
Meter Port
1 Ph 2-wire
1 Ph 3-wire
3 Ph 3-wire
3 Ph 4-wire
1
√
√
√
-
2
√
√
√
√
3 (option)
√
√
√
√
For three-phase 3-wire systems, either the 2-wattmeter or the 3-wattmeter methods may be employed.
Review the diagrams on the following pages to select an appropriate hook-up diagram suitable for the
measurement application, and hook-up according to the desired configuration. This applies to both input
and/or output measurements; e.g. for a three-phase system with 3-wire in and 4-wire out, an appropriate
connection would be the two wattmeter method for the input and the three wattmeter method for the
output. These are illustrated in the following section.
EP-300 Manual Ver: A06
- 39 -
202-001054-600
4.5.2 Connection Diagrams
The following connection diagrams are applicable to any of the three input ports (Meter Port 1, 2 or 3),
however note the limitations as applicable to Meter Port 1 which is limited to a two-wattmeter method
which is more suited to a three-wire three phase system (Note Phasing on CTs).
Inspect the equipment before use, including the test leads, to be sure that it is in its
WARNING original safe condition
Ensure that all electrical terminals are proven ‘DEAD” before handling.
Do not operate any CTs (current transformers) with the output open circuited.
Ensure Voltage leads are not connected to the Current Inputs, which would short-circuit
the source and vaporize the test lead causing severe burns from the resulting plasma arc
ELECTRIC
SHOCK RISK
Handle Voltage Probes and Clamp -on CTs only by the insulated handles and not touch
any other part of it during operation.
4.5.2.1 Single-phase 2-Wire Connections
EP-300 METER PORT-1
Current I/P
Voltage I/P
VA
VB
+IA-
VC
+IC -
L2
Source
Load
L1
Figure 4:8: Single-phase 2-wire 1-wattmeter connection for Meter Port 1
EP-300 METER PORT-2/3
Voltage I/P
VA
VB
VC
Current I/P
VR
+IA- +IB- +IC-
L2
Source
Load
L1
Figure 4:9: Single-phase 2-wire 1-wattmeter connection for Meter Ports 2 & 3
EP-300 Manual Ver: A06
- 40 -
202-001054-600
4.5.2.2 Single-phase 3-wire Connections
EP-300 METER PORT-1
Voltage I/P
VA
VB
Current I/P
+IA-
VC
+IC-
N
Source
Load
L2
L1
Figure 4:10: Single-phase 3-wire 2-wattmeter connection for Meter Port 1
EP-300 METER PORT-2/3
Voltage I/P
VA
VB
VC
Current I/P
VR
+I A- +I B- +I C-
N
Source
Load
L2
L1
Figure 4:11: Single phase 3-wire 2-wattmeter connection for Meter Port 2 & 3
4.5.2.3 Three-phase 3-Wire 2-Wattmeter Method
EP-300 METER PORT-1
Voltage I/P
VA
VB
VC
Current I/P
+IA-
+IC -
C
Source
Load
B
A
Figure 4:12: Three phase 3-wire 2-wattmeter connection for Meter Ports 1
EP-300 Manual Ver: A06
- 41 -
202-001054-600
EP-300 METER PORT-2/3
Voltage I/P
VA
VB
VC
Current I/P
+IA- +IB- +IC-
VR
C
Load
B
A
Figure 4:13 Three phase 3-wire 2-wattmeter connection for Meter Port 2 & 3
4.5.2.4 Three-phase 3-Wire 3-Wattmeter Method
EP-300 METER PORT-2/3
Voltage I/P
VA
VB
VC
Current I/P
VR
+IA- +IB- +IC -
C
Source
Load
B
A
Figure 4:14: Three phase 3-wire 3-wattmeter connection for Meter Ports 1 & 2
4.5.2.5 Three-phase 4-Wire 3-Wattmeter Method
EP-300 METER PORT-2/3
Voltage I/P
VA
VB
VC
Current I/P
VR
+IA- +IB- +IC-
N
Source
C
Load
B
A
Figure 4:15: Three phase 4-wire 3-wattmeter connection for Meter Ports 1 & 2
EP-300 Manual Ver: A06
- 42 -
202-001054-600
4.6
Medium Voltage Systems
The EP300 and associated cables, probes and CTs are designed built and approved for up to 600VAC
systems only. Direct connection to medium voltage systems is definitely not possible. The instrument does
support the use of PTs, which step down the high voltage to nominally 120 Volts. However, due to
significant safety concerns, it is definitely not recommended that any measurements be made on a Medium
Voltage system except through the Powersmiths SMART-1, which has integrated fused PTs and
appropriately insulated CTs for the application (illustrated in Figure 4:2: SMART-1Metering Port
Schematic (reference only).
Note that PT 1 & 2 are installed only on medium voltage systems.).
EP-300 Manual Ver: A06
- 43 -
202-001054-600
5
Measurement Configuration and Setup
5.1
Overview
After the meter is hooked up to the circuit to be measured, it must be configured for the measurement
parameters and configuration. There are two ways to enter setup:
§
From the “Startup” screen
§
From the “Main” screen
Starting from the “Startup” screen jumpstarts the user to the appropriate screens based on some initial
choices, but the actual procedure is the same. All setup parameters are password protected to prevent
inadvertent changes or tampering during measurement. Refer to the “General Setup Instructions” for full
setup details.
5.2
Configuration and Setup from Start Screen
The following is a comprehensive setup procedure for any application.
§
Power on meter and allow it to “boot” (about 1 minute) to the Opening Screen and the current log file is
displayed with two choices presented as follows:
-
Select [Continue Report File] to continue prior measurement (restarts, etc.) and continue
logging to current file
Select [New Report File] for a new report file and setup
The starting screen is shown below.
Figure 5:1: Starting Screen
5.2.1 Continue Report File
This selection is used to continue measurement and logging (if previously on) with the currently set
configuration.
§
Select [Continue Report File] and the Main screen will be displayed
Note that the configuration of the screens shown will depend on the previous setup as illustrated
below.
EP-300 Manual Ver: A06
- 44 -
202-001054-600
Figure 5:2: Main Screen 3 and 2 Ports
§
§
Logging status will be displayed beside the current reference file name.
-
To stop [¦ Logging] ⇒ [¦ Log ] ⇒ [Password]
-
To start Logs [¦ Log ] ⇒ [¦ Logging] (logging red indicator flashing) ⇒ [Password]
For changes to setup or logging select [Menu] ⇒ [Setup] ⇒ [Setup Wizard] and follow instructions on
Setup following in this section.
5.2.2 New Report File
When a new configuration is required, the Meter must be configured for the application as follows:
§
⇒ [New Report File] ⇒ [Password] ⇒ [####] (default “0”) ⇒ [Next] which leads to the [Unit ID
Wizard] screen as shown below:
Figure 5:3: UNIT ID Wizard screen
§
From [Unit ID] screen:
⇒ [######] File* (Unit ID) and enter new file name. Note that this file name will be used as the
precursor for all logged (file types are appended to this)
*Note File Naming: Use only alphanumeric characters no white spaces and dashes or underlines
only within the body of the name (not at the beginning).
-
-
*[Site:] ⇒ [######] Site details
-
*[Model:] ⇒ [######] Unit Model
-
*[S/N:] ⇒ [######] Unit Serial Number
-
*[kVA:] ⇒ [######]Unit nameplate kVA
-
*[VP/VS:] ⇒ [######] Primary and Secondary Voltages
-
*[Misc:] ⇒ [######] Additional reference information the user might wish to record
EP-300 Manual Ver: A06
- 45 -
202-001054-600
*Note pressing any of this buttons clears adjacent field
-
⇒ [Next] where the [Config.] screen is presented and reference data automatically recorded
Figure 5:4: Configuration Setup screen
§
From [Config.] screen:
-
⇒ [Port (1, 2 & 3)] (3Ph3W, 3Ph4W or Disabled)
-
⇒ [Input] or ⇒ [Output] (assignment of port to input or output for efficiency calculations)
-
⇒ Nominal Voltage (line-to-line) [####] (e.g. 208, 400, 480, 600 etc) for each Port
-
⇒ Nominal Input Current* [####] Amps
or ⇒ Nominal System Power [####] kVA ⇒ [Calculate] kVA
*System Nominal Current computed as follows:
1 φ System:
I=
P
V*
3 φ System:
I=
P
V* 3
Note: P is power in watts and V is line- to-line voltage
-
⇒ [PT/CT] to setup PTs and CTs
Figure 5:5: PT/CT Setup screen
§
From [PT/CT] screen (note for each Port in turn)
-
⇒ [####] PT Primary Volts ⇒ [####] PT Secondary Voltages (not system voltage; e.g. 4160
primary and 120 secondary)
Note: With no PT in system ⇒ [No PTs] (nominal system voltages will be entered in PT fields)
EP-300 Manual Ver: A06
- 46 -
202-001054-600
-
⇒ [####] CT Ratio (note the secondary current is fixed at either 1 or 5 Amps)
Note: CT ratios for Input and output given on SMART inner panel
-
⇒ [####] *PT Correction if known (default 1.000)
For automatic CT correction entry, under the Label CT Correction Group select the CT correction
group for the CTs being used (Powersmiths supplied probes are labeled). Note that the
compensation is specific to current < 35% > (see section 9 on Clamp -on CTs)
-
For manual CT correction factor entry ⇒ [####] CT Correction if known (default 1.000)
-
⇒ [Back] ⇒ [PT/CT] for next Port to setup
-
⇒ [####] CT Phase Correction if known
⇒ [Back] ⇒ [Next] to go to [Reports] screen as shown below
*Note: CT Compensation given Section9. Set Global Phase Compensation 0.30 for SMART-1
application or 0.70O for Clamp-on Probes
Figure 5:6: Reports Setup Screen
Note refer to Section 10 for a list of parameters that are logged.
§
§
From [Reports] screen
-
⇒ [####] File (Unit ID) for unique file name (if not already done in previous [Unit ID] screen)
-
⇒ [√ ] reports required
-
⇒ [##] for time logs
-
⇒ [√ ] log by time
-
⇒ [Snapshot] records current data at the time of the Snapshot for parameters as selected in Log
Reports.
-
To start Logs [¦ Log ] ⇒ [¦ Logging] (logging red indicator flashing). Note may be started from
[Main] when ready
⇒ [Done] completes setup saves the configuration and returns user to [Main]
EP-300 Manual Ver: A06
- 47 -
202-001054-600
5.3
General Setup Instructions
The EP-300 may be configured by navigating from the “Main” screen to the appropriate menus. The
following are a list of parameters that are user settable under password protection (note exceptions):
§
Password (unlock and change)
§
Port Configuration (1/3Phases, 2/3/4 wire, active/disabled, etc.)
§
System Nominal Parameters (Voltage, Current, etc.)
§
PT/CT Ratios and Correction factors
§
Nameplate and miscellaneous site data (unit identification)
§
Report files
§
Resets (Energy, etc under Tools menu.)
§
Events (Alarms)
§
Input / Output Digital Ports
§
Time and Date
§
Screen Contrast (under Tools Menu)
§
Communication Ports (see section on “Communication)
Note that “Log reports” should be setup prior to beginning any configuration so that a reference file
name may be established to save the configuration setups.
5.3.1 System Parameters
The instrument must be first configured for the following parameters prior to operation:
§
System Parameters (Voltage, Current)
§
Meter Port Configuration (phases, 3/4 wire, 2/3 Wattmeter)
§
PT/CT Ratios and Correction factors (can also be set from display)
§
Log Files for logging to unique file name
§
Unit ID for Site and Unit reference information
§
Events (if required)
Note that it is not necessary for the measurement circuits to be live for these setups, only that the unit be
powered. Setup selections are summarized in the table below with specific setup instructions following:
Table 5-1: Setup measurement parameters
EP-300 Manual Ver: A06
- 48 -
202-001054-600
Item
Meter
Default
Nominal System
Voltage
Port 1
480V
Port 2 or 3
208V
Primary CT Ratio
Port 1 or 2 or 3
5A
5 – 9,000 Amps
Secondary CT
Ratio
Port 1 or 2 or 3
5A
5 Amp
1 Amp is automatically selected with CT cables
3 Phase
None
1 Phase 2-wire: 1 wattmeter method
1 Phase 3-wire: 2 wattmeter method
3 Phase 3-wire (Delta): 2 wattmeter method
3 Phase 4-wire (Wye): 3 wattmeter method
Port 1
3 Phase
None
1 Phase 2-wire: 1 wattmeter method
1 Phase 3-wire: 2 wattmeter method
3 Phase 3-wire (Delta): 2 wattmeter method
Port 2 or 3
200A
Port 1
90A
Port 2 or 3
Output
Input or Output
Port 1
Input
Input (not changeable)
Port 2 or 3
System Configure
Nominal Current
Input/
Output
Selection
Nominal System L – L Voltage
Nominal Line Current
5.3.2 Individual Setup Procedures
§ To stop logging [Main] ⇒ [¦ Logging] ⇒ [¦ Log ] ⇒ [Password] ⇒ [Back] or [Main]
§
From [Main] ⇒ [Menu] ⇒ [Setup] and the screen below is presented.
Note that by ⇒ [Main] from any menu will return the user to the Main screen
Figure 5:7: Setup Menu Screen
From here all setup selections are available and described in detail following and note that a valid password
must be entered in order to change any setup values. ⇒ [Locked] button from any screen will allow the
user to enter the password and unlock setup access.
5.3.2.1 Password (unlock and change)
The EP-300 utilizes a simple password protection to protect the meter from inadvertent tampering when on
site. The unit is “unlocked” by the user using a 4-digitnumeric password (factory default “0”) and will
automatically relock 30 minutes later but may be immediately relocked at any time by the user.
EP-300 Manual Ver: A06
- 49 -
202-001054-600
The procedure for password access and changing is as follows:
§
Unlock Password Protection
-
From [Main] ⇒ [Menu] ⇒ [Password] or ⇒ [Locked] from any screen where displayed
⇒ [####] valid password on the popup keypad (Note “0” is original factory default)
-
⇒ [OK] on the keypad
-
⇒ [Back] to return to Setup Menu
Figure 5:8: Password Screen
Note, “Access Enabled” will expire in 30 minutes if no change in setup is entered
§
Change password from [Password] screen ⇒ [New Pass]
Figure 5:9: New Password Screen
§
-
⇒ [####] Password field and enter a new password.
Record the new selected password (Note, be sure that the new password is confirmed and
recorded prior to entry or the user will be locked out)
-
⇒ [OK] key
-
⇒ [Back] ⇒ [Main] to return to Setup Menu
To immediately lock meter at any time, from [Main] ⇒ [Menu] ⇒ [Lock]
5.3.2.2 Configuration
Sets up the meter for the hardware measurement configuration (i.e. Nominal Values, I/Os, PTs, CTs,
1/3Phases, 3/4 wire, etc.)
§
From [Setup] ⇒ [Config.] and a screen showing the nominal Voltage and Current setting for each Port is
presented with additional menu choices as shown in the figure below:
EP-300 Manual Ver: A06
- 50 -
202-001054-600
Figure 5:10: Configuration Setup screen
-
⇒ [Port (1, 2 & 3)] (3Ph3W, 3Ph4W or Disabled)
-
⇒ [Input] or ⇒ [Output] (assignment of port to input or output for efficiency calculations)
-
⇒ Nominal Voltage (line-to-line) [####] (e.g. 208, 400, 480, 600 etc) for each Port
-
⇒ Nominal Input Current* [####] Amps
or ⇒ Nominal System Power [####] kVA ⇒ [Calculate] kVA
*System Nominal Current computed as follows:
1 φ System:
-
I=
P
V*
3 φ System:
I=
P
V* 3
P is power in watts and
V is line- to-line voltage
⇒ [PT/CT] in turn for each port
Figure 5:11: PT/CT Setup screen
§
From [PT/CT] screen (note for each Port in turn)
-
⇒ [####] PT Primary Volts ⇒ [####] PT Secondary Voltages (not system voltage; e.g. 4160
primary and 120 secondary)
Note: With no PT in system ⇒ [No PTs] (nominal system voltages will be entered in PT fields)
-
⇒ [####] CT Ratio (note the secondary current is fixed at either 1 or 5 Amps)
Note: CT ratios for Input and output given on SMART inner panel
-
⇒ [####] *PT Correction if known (default 1.000)
-
For automatic CT correction entry, under the Label CT Correction Group select the CT correction
group for the CTs being used (Powersmiths supplied probes are labeled). Note that the
compensation is specific to current < 35% > (see section 9 on Clamp -on CTs)
EP-300 Manual Ver: A06
- 51 -
202-001054-600
-
For manual CT correction factor entry ⇒ [####] CT Correction if known (default 1.000)
-
⇒ [Back] ⇒ [PT/CT] for next Port to setup
-
⇒ [####] CT Phase Correction if known
⇒ [Back] ⇒ [Next] to go to [Reports] screen as shown below
*Note: CT Compensation given Section9. Set Global Phase Compensation 0.30 for SMART-1
application or 0.70O for Clamp-on Probes
5.3.2.3 Reports (Logs) Setup
The Meter must be setup for logging data for automatic report generation or at least a unique file name
should be defined in order to save the setup configuration to a known file name. Follow the procedures
outlined below to setup report logging. Note refer to Section 10 for a list of parameters that are logged.
§
From [Setup] ⇒ [Reports] and the Log Reports setup screen will be presented as shown below:
Figure 5:12: Reports setup screen
-
To stop [¦ Logging] ⇒ [¦ Log ]
-
⇒ [####] File (Unit ID) for unique file name (if not already set)
-
⇒ [√ ] reports required
-
⇒ [##] for time logs
-
⇒ [√ ] log by time
-
⇒ [Snapshot] captures current log data
-
To start Logs [¦ Log ] ⇒ [¦ Logging] (logging red indicator flashing) when ready or from
[Main]
-
⇒ [Unit ID] for shortcut to Unit ID screen
-
⇒ [Config] for shortcut to Configuration. Setup screen
-
⇒ [Main] completes setup and returns user to [Main]
5.3.2.4 Unit ID
Log File (Unit ID) is entered on this screen and reference data on site and unit under test may be recorded
for future reference.
§
From [Setup] or [Reports] ⇒ [Unit ID] and the following screen will be presented
EP-300 Manual Ver: A06
- 52 -
202-001054-600
Figure 5:13: Nameplate Data Field
-
⇒ [######] File (Unit ID) and enter new file name. (Note that this file name will be used as the
precursor for all logged (file types are appended to this)
-
*[Site:] ⇒ [######] Site details
-
*[Model:] ⇒ [######] Unit Model
-
*[S/N:] ⇒ [######] Unit Serial Number
-
*[kVA:] ⇒ [######]Unit nameplate kVA
-
*[VP/VS:] ⇒ [######] Primary and Secondary Voltages
-
*[Misc:] ⇒ [######] Additional reference information the user might wish to record
*Note pressing any of this buttons clears adjacent field
-
⇒ [Record] to write reference data to file for future recall
-
⇒ [Reports] to go to Reports Setup Screen
-
⇒ [Main] to exit setup
5.3.2.5 Events (Alarms)
Sags and Swells are setup by navigating over to the Setup Menu as follows:
§
From [Setup] ⇒ [Events] and for each Port (1, 2 and/or 3)
§
Sags
-
⇒ [####] Threshold (trip) level as % of nominal (e.g. 85%) ⇒ [ENT] for each entry
⇒ [####] Hysteresis (reset) as % of nominal change to return to normal (e.g. 2%) ⇒ [ENT] for
each entry
Note: The values given in the example will, for a 480V system, set a Sag trip level of 408V (85% of
nominal) with recovery at 417.6V (87% of nominal).
-
§
Swells
-
⇒ [####] Threshold (trip) level as % of nominal (e.g. 115%) ⇒ [ENT] for each entry
⇒ [####] Hysteresis (reset) as % of nominal change to return to normal (e.g. 2%) ⇒ [ENT] for
each entry
Note: The values given in the example will, for a 480V system, set a Swell trip level of 552V (85% of
nominal) with recovery at 542.4V (87% of nominal).
-
EP-300 Manual Ver: A06
- 53 -
202-001054-600
Figure 5:14: Sag/Swell setup screen
5.3.2.6 Demand
Demand (kWd) is the measure of power divided by the time over which it was consumed. For a sliding
window, typical settings are a period of 60 seconds (1 min.) with the number of periods set at 15. The
screen for setting demand is shown below.
§
From [Setup] or [Efficiency] screens ⇒ [Demand] to setup and screen shown below is presented
Figure 5:15: Demand setup screen
§
Setup Demand for sliding window as follows:
-
⇒ [Demand] ⇒ Period [####] seconds and enter the period time (typical 60 secs.)
-
⇒ Periods [####] and enter the number of periods (typical 15)
Note typical values suggested set a measurement period of one minute for a 15-minute sliding window
§
Setup Demand for fixed window as follows:
-
⇒ [Demand] ⇒ Period [####] seconds and enter the period time in seconds
-
⇒ Periods [####] and enter [ 1 ] for one period
5.3.2.7 Time and Date
To change the current time and date from the setup menu, unlock password, then:
§
From [Setup] ⇒ [Clock]
The current time is displayed and may be changed using the [? ] and [? ] buttons
§
Select [Set] to save changed data or [ESC] to abort changes
.
EP-300 Manual Ver: A06
- 54 -
202-001054-600
Figure 5:16: Time and Date Screen
5.3.3 Contrast (Display Screen) Adjustment
The procedure for changing the contrast in the EP-300 is as follows:
§
5.3.4
From [Main] ⇒ [Menu] ⇒ [Tools] ⇒ [Exit Application] ⇒ [Yes] to confirm
-
⇒ [Exit] in Remote Agent
-
⇒ [Start] ⇒ [Settings] ⇒ [Control Panel]
-
⇒ [Display] ⇒ [Backlight] ⇒ [Advanced]
-
[Increase Brightness] and [Decrease Brightness] to adjust.
[OK] when complete. Close Control Panel.
-
⇒ [Start] ⇒ [Programs] ⇒ Run [Registry Saver] (confirms when finished)
-
Restart the system by powering off or Reboot from Taskbar
Communication
For communication setup see next section on “Software and Communication”.
EP-300 Manual Ver: A06
- 55 -
202-001054-600
6 Viewer, Software and Communication
6.1
Communication Ports
The EP-300 is equipped with the following three communication ports. These are:
§
RS232/485: MODBUS protocol
-
§
For direct access to the Cyberhawk Data registers using a SCADA type software package and for
firmware upgrades (future option)
USB (Client): Microsoft Windows TM file access
-
For log file management and Display Panel software upgrades (future option)
Note that a future release of CyberhawkViewer will permit connection over USB
§
Ethernet: TCP/IP protocol
-
For access to logged data files, locally ore remotely using CyberhawkViewer
Connection and setup information is given in the following subsections.
6.2
CyberhawkViewer Software
The primary means of acquiring the logged data is by means of the Powersmiths CyberhawkViewer
software, which is provided as part of the accessory package to the EP -300 and allows the user to select the
logged raw data file and import it into a Microsoft Excel file as a spreadsheet. The EP -300 can be
connected directly to a PC or to remotely on an Intranet connection using the built-in Ethernet connection.
A separate worksheet is provided for each log report selected on the EP-300 and the data can then be
reformatted by the user to produce the required reports.
The minimum requirements to run this software are:
-
Windows 2000 (SP3) or Windows XP (note that it is important that the latest updates be loaded
prior to installing CyberhawkViewer)
-
Microsoft Excel (Microsoft TM Office)
-
Local Area Network adapter
-
Ethernet cross-over cable for direct PC to EP -300 connection
-
Ethernet patch (standard) cable for connection to an Intranet
The latest version of this software is available on Powersmiths.com WEB site. To load it onto a PC,
download the self-extracting file and follow the installation instructions. More instructions on connecting
and operating this software are detailed late in this section.
6.2.1 CyberhawkViewer
The logged data may be acquired over the Ethernet connection either locally to a PC or remotely over an
Intranet. To connect a PC directly to the EP-300 a crossover network cable is required or a straight Ethernet
cable for connection to the Ethernet network.
6.2.1.1 Connection to PC (direct)
To establish a connection it is first necessary to establish a physical connection and to set up the IP address
and IP Gateway on the PC, following the instructions given in Section 6.3.3 below. Connect an Ethernet
crossover cable between the PC Network Adapter and the EP -300 Ethernet port.
6.2.1.2 Connection over an Intranet (indirect)
Connection to Cyberhawk via an Intranet connection is the simplest and easiest way to make a connection
and acquire the logged data files, assuming that the PC network connection is already established. Connect
an Ethernet patch cable between a spare Ethernet Network Port and the EP-300 Ethernet port.
EP-300 Manual Ver: A06
- 56 -
202-001054-600
Note that the connection may be tested by pinging Cyberhawk, (see instructions in Section 6.3.1.1 below),
and if there is a network IP conflict (meter assigned IP the same as another network device), it will be
necessary to change the default IP to another unused IP address and also change the default IP within
CyberhawkViewer; instructions are detailed in Section 6.3.4 below.
6.2.2 CyberhawkViewer Operation
Run “CyberhawkViewer” from
the PC on which it is loaded
Setting Remote URL
⇒ [Help] ⇒ [Config] ⇒ [URL]
Enter IP and file location
Note it may only be necessary to
change IP
Setting Local File transfer
directory
⇒ [Help] ⇒ [Log Files…]
⇒ [Directory]
Enter directory where raw data files
will be stored.
Tip: Use one folder per file
EP-300 Manual Ver: A06
- 57 -
202-001054-600
Setting Local Excel File location
⇒ [Help] ⇒ [ExcelFiles…]
⇒ [Directory]
Enter directory where ‘Exsel’ files
will be stored
Tip: Use one folder per file
Transfer Files
⇒ [File]
⇒ [Open Cyberhawk Reports] then
⇒ [Transfer Files Over Ethernet] or
⇒ [Open Local Files] (raw data files)
⇒ [Refresh] to update file selection window
Note: Files without date/time extensions are time
logs and files with date/time extensions are
‘Snapshot” files which includes waveforms
An “Excel” file will be generated using the source
file name selected which can be saved as desired.
This file will contain all the logged data associated
with the selected file, which can then be used to
create the required report.
Or for previously formatted files:
⇒ [Open Excel book…] then using browser
opened, navigate over to the file location to open
EP-300 Manual Ver: A06
- 58 -
202-001054-600
6.2.3 Plot Generation
A typical CyberhawkViewer screen is shown below. The user can select any desired parameter to be
displayed on either the left or right access..
Figure 6:1: Typical CyberhawkViewer Screen
§
To view plot select left or right axis and then parameter
§
Add parameters to either left or right axis as desired
§
Right click mouse over graph to ‘Edit’ or to ‘Zoom’ in
§
Delete button removes last plot added
§
Copy button copies to ‘Windows’ clipboard for pasting into “Report” document
EP-300 Manual Ver: A06
- 59 -
202-001054-600
6.3
Ethernet Setup
A 10/100Base-T Ethernet port connection is available and situated on the rear panel of the EP -300. Its
primary application is to facilitate either local or remote access to the logged files stored in the internal
“Flash” memory. A CAT 5 unshielded twisted pair cable is recommended for connection.
Table 6-1: Ethernet Port Characteristics
Item
Specification
Data Rate
10/100 Mbps
Supported Protocols*
Modbus RTU, Modbus TCP
Isolation
Transformer isolation 1,500 VAC
The unit comes programmed with a default IP and Mask address as given in the table below:
Table 6-2: Default IP Address
Item
Default
IP
192.168.1.20
Mask
255.255.255.0
The EP-300 is shipped with a default IP as listed in the table above. The default IP may need to be changed
only if it conflicts with another existing IP when used on an Intranet. Refer to the following procedures for
establishing a connection over the Ethernet Port.
6.3.1.1 Pinging the EP-300
The EP-300 may be “pinged” for an echo to test the network connection when it is connected to the Intranet
(note that not all networks allow a ping response). The procedure is as follows:
§
§
Select ⇒ [Run] from the start menu and enter [cmd] to open a command window
In the command window that opens type “ping 192.168.1.20” (or the alternate IP address used) and if
successful a reply will be received as illustrated below.
Figure 6:2: Command screen with ping test
EP-300 Manual Ver: A06
- 60 -
202-001054-600
6.3.2 Intranet Connection (remote access)
Prior to connection to the Intranet, it is advisable to check with the network Administrator for potential
conflicts with the default IP in the EP -300. Alternatively, the default IP may be tested by trial and error, by
connecting the unit testing it. If there is a conflict the EP-300 will not be seen by the PC (no
communication) and/or will not echo a ping, and in this case the default IP will have to be changed. Note
that when the default IP is changed, both the IP in the EP-300 and the initialization file for
Cyberhawkviewer will have to be changed by following procedures outlined below.
To connect the EP -300 to an Intranet (note IP issues), simply connect it to the network using a standard
Ethernet cable. The meter may then be accessed remotely through the Ethernet network by a PC by running
CyberhawkViewer (see CyberhawkViewer Operating Instructions following).
6.3.3 Direct Ethernet EP-300 to PC (non Intranet)
The PC first has to be setup for direct connection to the meter and the procedure is as follows (Note that
illustrations following each instruction are provided as a guide to the user, Windows 2000 on the left and
Windows XP on the right):
§
From the Start Menu ⇒ [Programs] ⇒ [Control Panel]
Figure 6:3: Navigating to Network Connections (WindowsTH 2000 on left XP on Right)
§
⇒ [Network and Dial-up connections] then ⇒ [Local Area Connections]
Figure 6:4: Selecting Network Connection (WindowsTH 2000 on left XP on Right)
§
⇒ [Properties] then ⇒ [Internet Protocol (TCP/IP)] and in the dia log box presented:
-
Select ⇒ [Use the following IP address] and enter the following:
o
o
EP-300 Manual Ver: A06
IP address:
Subnet mask:
192.168.1.21 (IP for PC set at one above EP-300 IP)
255.255.255.0
- 61 -
202-001054-600
o
Default gateway: 192.168.1.20 (default IP for meter or use other IP as assigned)
o
[Use the following DNS server addresses] will be selected automatically but leave
address fields blank
o
⇒ [OK] and close the Windows that were opened for this configuration
This completes the IP setup for the PC. Note that in order to reconnect the PC to a network the PC IP
should be returned to it previous setting (normally [Obtain an IP address automatically] selected)
Figure 6:5: Setting IP on PC (WindowsTH 2000 on left XP on Right)
6.3.4 IP Configuration of EP-300*
The procedure for changing the IP address in the EP-300 is as follows:
§
From [Main] ⇒ [Menu] ⇒ [Tools] ⇒ [Exit Application] ⇒ [Yes] to confirm
-
⇒ [Exit] in Remote Agent
-
⇒ [Start] ⇒ [Settings] ⇒ Network and Dial-up Connections]
-
⇒ [LAN90001] to open the entry window (double touch)
Open Input Panel from Taskbar to edit IP Fields (the rectangle with the red pen through it)
-
Enter desired IP address and ⇒ [OK] when complete
⇒ [Start] ⇒ [Programs] ⇒ Run [Registry Saver] (confirms when finished)
Restart the system by powering off or Reboot from Taskbar
*Note: Only use this procedure if there is an IP conflict when the EP-300 is used on an Intranet.
6.3.4.1 CyberhawkViewer IP Change*
The procedure for changing the CyberhawkViewer initialization file to access other than the default IP of
the EP -300 is as follows:
§
§
Open a text editor such as Microsoft “Notepad” ⇒ [File] ⇒ [Open…]
Navigate over to C:\ Program Files\CyberhawkViewer\ (or the directory where CyberhawkViewer was
installed) and open file config.properties
§
Identify “INITIAL_URL=http://192.168.1.20/HARDDISK/studio/Cyberhawk/” (3rd line)
§
Edit IP address to reflect new IP assignment (being careful not to change other data)
EP-300 Manual Ver: A06
- 62 -
202-001054-600
Example: “INITIAL_URL=http://192.167.1.25/HARDDISK/studio/Cyberhawk”
§
Save the file and exit “Notepad”
*Note: Only use this procedure if the IP on the EP-300 was changed.
Figure 6:6: Example of CyberhawkViewer initialization file as viewed with “Notepad”
6.4
USB
USB connection allows the user to manage the log files in the meter (to copy or delete) using a Windows
file-browsing program. To operate via the USB requires the installation of a driver “USB EZ -Link” and
Microsoft “ActiveSync”. These are available on the included CD or from powersmiths.com.
Note: The use of USB is limited to browsing and managing logged files on the EP-300 at this time. Future
software upgrades will include the use of CyberhawkViewer and software upgrades over USB.
6.4.1 Installation and Setup
Installation of the software to support the USB function is a two-step process where a USB driver is first
installed then Microsoft TM “Activesync”.
6.4.1.1 USB Driver Install
§ Put the Cyberhawk CD in the target PC or download the files from powersmiths.com to a suitable
subdirectory
§
Turn on EP-3oo and allow to boot, then connect the USB “Host” output from the PC to the “Client” USB
port on the meter. A “…Found New Hardware…” Wizard dialog box will appear announcing that a new
hardware device has been found.
-
⇒ [Next] ⇒ [Search for a suitable driver…] ⇒ [Next]
-
⇒ [CD-ROM drives] and also ⇒ [Specify a location] ⇒ [Next]
EP-300 Manual Ver: A06
- 63 -
202-001054-600
Figure 6:7: Dialog boxes when installing USB Driver
-
⇒ File path in window as illustrated or ⇒ [Browse…] to directory containing driver ⇒ [OK]
Figure 6:8: Setting location for Driver file
The rest of the installation will complete automatically and a subdirectory will be shown in a file
browsing program called “Mobile Device”.
6.4.1.2 Activesync Install
§ Download MicrosoftTM Activesync from Microsoft.com
-
§
Go to www.microsoft.com and search for “Activesync”, then select download
Install by following installation instructions given.
Alternatively, load from Cyberhawk CD
-
Put the Cyberhawk CD in the target PC or download the files from powersmiths.com to a
suitable subdirectory
-
From the Windows task bar ⇒ [Start] ⇒ [Run…] ⇒ [Browse…] and navigate over to:
-
Cyberhawk CD \Cyberhawk\software \Activesync\ or Location where downloaded file is saved
Double click on file “MSASYNC”
EP-300 Manual Ver: A06
- 64 -
202-001054-600
Figure 6:9: WindowsTM “Activesync” installation dialog box
-
⇒ [Next] and the installation process will automatically complete (note installation may appear
to stall at ~ 92% complete but do not interrupt it).
Reboot the PC and then test the link as described in next section on file b rowsing over USB.
6.4.2 File Browsing over USB
To browse, copy or delete files over USB, turn on the EP-300 and when it has booted to the welcome
screen:
§
§
Connect the PC to EP -300 meter with a USB Host/Client cable
On the PC ⇒ [Start] ⇒ [Programs] ⇒ [Microsoft Activesync] and a dialog box will appear as shown
below and then connected after initializing the link on the EP-300
Figure 6:10: Microsoft TH “Activesync status screens
§
§
On EP -300 screen from [Main] ⇒ [Menu] ⇒ [Locked] ⇒ [####] enter password [Back]
⇒ [USB] (to enable USB link) and Activesync dialog box will show “Connected”. The Activesync dialog
box may be closed and it will run in the background and the green round icon will be displayed in the
Windows TM taskbar.
Note; If “Activesync” fails to make a connection, unplug the USB cable and reinsert it two seconds
later, then reinitiate the USB link by ⇒ [USB] on the meter.
§
Open [Windows Explore] or [My Computer] (or any Windows file browsing program) in PC and
browse [Mobile Device] to folder containing reports is located in:
-
Mobile Device\Harddisk\ Logdata\*
Files in this directory are logged files, which may be copied or deleted.
EP-300 Manual Ver: A06
- 65 -
202-001054-600
*Note: The files in this directory are the log records generated by the meter and share the memory with
the Microsoft WindowsTM CE operating system and application specific software, and the user should be
careful not to modify or delete any files in any other directory.
6.5
RS232/485
The RS232/485 is a combination port that automatically switches from RS485 to RS232 if a device is
connected to the RS232 pins. It is wired to a DB9 male connector and located on the front panel of the
instrument. This Port supports the MODBUS protocol with uses register addresses to access data (note
contact factory for a registry address listing). Characteristics and Pin outs for this port are given in the
tables below.
6.5.1 Connections and Hookup
The RS232 and RS485 connections are physically brought out on the panel mounted DB-9 connector
6.5.1.1 Pin outs
Pin outs for the DB9 connector are given in the table below. Note that the selection between RS232 and
RS485 communication is made automatically by sensing connection to any of the RS232 pins. Hence the
RS485 connection is disabled for RS232 connection.
Table 6-3: RS232/485 pin identification
RS232
RS485
Pin Number
(reserved RS485)
Data - (A)
1
RXD
-
2
TXD
-
3
(reserved RS485)
Data + (B)
4
GND
GND
5
DSR
-
6
RTS
-
7
CTS
-
8
-
-
9
6.5.1.2 RS232 Computer Connection
6
7
8
9
1
2
3
4
5
1
2
3
4
5
6
7
8
9
Computer
(PC)
RS232/
485 Port
When connecting a computer (PC) to the EP -300, use a null modem cable as illustrated in the figure below.
Both ends of the modem cable will need to be female DB9 types with maximum cable length limited to less
than 50 feet.
Figure 6:11: RS232 PC connection to EP-300
6.5.1.3 RS232 Connection to a Modem
Use a standard RS 232 cable (pin to pin connections) for connection to an external modem with a female
DB 9 connector on the instrument end. Note the reserved pins for the RS485 connection on the connector.
EP-300 Manual Ver: A06
- 66 -
202-001054-600
6.5.1.4 RS 485 Connection
This connection is made at the RS232/485 combination port. Note that if any connection is made to any of
the RS232 pins, the RS485 will be automatically disabled. Up to 32 devices may be connected to this port
and it is recommended that a twisted shielded 22 AWG gauge (or larger) wire be used. Note that impedance
termination (120 ohms) is required at each end of the RS485 network.
Table 6-4: COM 1 RS 485 Connections
Pin
Description
1
R/T – (A)
4
R/ T + (B)
5
Com (shield)
6.5.2 RS232/485 Setup
Port Communication Parameters are given in the table below.
Table 6-5 RS232/485 Communication parameters
Mode
RS232
RS485
Flow
Control
RTS/CTS
RTS with
delay
Not used
Baud
1,200
2,400
4,800
9,600
19,200
Selections
Data
Protocols
Format
8-N-1
8-E-1
8-O-1
*Modbus
RTU
Delay
0–
1000ms
(1ms
steps)
Defaults/Notes
ID: 1 (1 – 247)
9,600, 8-N-1
Disabled
ID: 1 (1 –247)
*Modicon Modbus Protocol Reference Guide” PI-MBUS-300 Rev. J
The procedure to setup the required communication parameters is as follows:
§
From [Main] ⇒ [Menu] ⇒ [Setup] ⇒ [Comm.] and the following screen is displayed:
Figure 6:12: RS232/485 Setup screen
-
⇒ [Modbus RTU] (Default protocol)
-
⇒ [####] Baud rate
-
⇒ [####] Format
-
⇒ [####] Address (1 – 247)
-
⇒ [####] Delay in milliseconds (default 10ms )
EP-300 Manual Ver: A06
- 67 -
202-001054-600
7 Cables and Probes
7.1
Cabling
A variety of cables, both standard and options, facilitate hookup to either the Powersmiths SMART-1
Metering Port or for generic measurements of an electrical device or power system using the optional
adapters. The types of Cables required will be determined by the type of measurement connection being
used (i.e.SMART -1 type or generic type hookups).
7.2
Standard (SMART-1) Cables
The standard Cable set supplied with the Meter is designed to interface directly with the Powersmiths
SMART-1 Metering Port (Twist-lock interface) and for direct measurement connections using Voltage
Probes and Clamp -on CTs by the use of the external measurement kit. These are illustrated in the tables
following.
Table 7-1: Standard Probe set illustration and description
Standard Accessories
Individual
Illustration
Quantity
Technical Description
Model No./
Part No:
VC-TT
306-000878-101
CC-TT
306-000878-102
SC-TT
306-000878-103
EP-300D
(-102)
EP-300T
(-103)
(6ft) Voltage Cable 600V CAT
III, EP-300 to SMART-1 or
Voltage Probe (Twist-lock to
Twist-lock) for 3/4-wire
connection
2
3
(6 ft) Current Cable 5Amp, EP 300 to SMART-1 (Twist-lock to
Twist-lock) for 2/3 watt-meter
method connection
2
3
(6ft) Status Cable, EP -300 to
SMART-1 (Twist-lock to Twistlock) for reading transformer coil
temperatures and TVSS status +
Ambient Sensor (in cable)
1
1
7’ Power Cord for AC power
connection
1
1
Stylus to facilitate operation of
“Touch Screen” Display
1
1
P-Cord
910-001125-101
Stylus
922-001043-900
For connection to the Powersmiths SMART -1 Metering Port with Banana interface, Banana to Twist-lock
cables are available and are as illustrated in the table below.
EP-300 Manual Ver: A06
- 68 -
202-001054-600
Table 7-2 SMART-1 Meter Port Banana interface adapters
SMART-1 BANANA ADAPTER KIT
Model No. SBA-KIT (Part No: 202-001054-150)
Individual
Illustration
Model No./
Part No.
VB-3W
306-000878-106
VB-4W
306-000878-104
CB-2W
306-000878-107
CB-3W
306-000878-105
SB-6W
306-000878-108
EP-300 Manual Ver: A06
Technical Description
Quantity
(1 ft) SMART-1 Banana
to Twist-lock adapter
(connects SMART-1
“Input” Voltage to VC-TT
cable)
1
(1 ft) SMART-1 Banana
to Twist-lock adapter
(connects SMART-1
“Output” Voltage to VCTT cable)
1
(1 ft) SMART-1 Banana
to Twist-lock adapter
(connects SMART-1
“Input” CT Current to
CC-TT cable)
1
(1 ft) SMART-1 Banana
to Twist-lock adapter
(connects SMART-1
“Output” CT Current to
CC-TT cable)
1
(1 ft) SMART-1 Banana
to Twist-lock adapter
(connects SMART-1
Status to SC-TT cable)
1
- 69 -
202-001054-600
7.3
External Measurement Hookup Kit
Measurement of an electrical network or device requires the use of Clip-on Voltage Probes and Clamp -on
CTs. using Safety Banana plug interfaces. The adapter cables for these are illustrated in the table below
with CTs described in the following subsection.
Table 7-3: Optional Banana adapter Cables and Probes
EXTERNAL MEASUREMENT KIT
Model No. EXM-KIT (Part No: 202-001054-120 or 202-001054-130 for 3-Port)
Individual
Illustration
Model No./
PART No.
VP-3W
306-000878-110
Quantity
Technical Description
EP-300D
EP-300T
1
1
1
2
(9 ft) 1 Amp Current Probe Set,
direct connection CT to meter
(Twist-lock to banana) for 2wattmeter method connection
(ex. Transformer input: IA, IC)
1
1
(9 ft) 1 Amp Current Probe Set,
direct connection CT to meter
(Twist-lock to banana) for 3wattmeter method connection
(ex. Transformer output: IA, IB,
IC), neutral is derived
1
2
7
11
(3 ft) Voltage Probe set 600V
CAT III, connection to VC-TT
Cable (Twist-lock to Banana) for
direct 3-wire connection (e.g..
Transformer input H1, H2, H3)
Note: Includes VP1-R/Y/B
probes shown below
VP-4W
306-000878-111
(3 ft) Voltage Probe set 600V
CAT III, connection to VC-TT
Cable (Twist-lock to Banana) for
direct 4-wire connection (e.g.
Transformer output X1, X2, X3,
X0)
Note: Includes VP1-R/Y/B/W
probes shown below
CT-2W
306-000878-112
CT-3W
306-000878-113
AP-R
983-000851-302
AP-B
983-000851-303
AP-Y
983-000851-304
AP-W
983-000851-309
EP-300 Manual Ver: A06
Alligator Voltage Probes rated
600V CAT III with ¾” Jaw
opening used for direct voltage
probing to live terminals
Red (-R), Yellow (-Y), Blue (B), White (-W) (select color)
- 70 -
202-001054-600
7.3.1 Phase Coding
The EP-300 cable set (safety banana terminated types) are color coded per phase sets using the IEC
European conventions for ease of use and CT leads are further color coded for identifying the +/- polarity.
The table below summarizes the color code used in reference to other conventions.
Table 7-4: Color code chart cross-reference guide
Phase
Traditional
Identifiers
EP-300 Color codes
Traditional North
American colors
European
A
H1, X1, U
Red
Black or Red
Red
B
H2, X2, V
Yellow
Red or Black
Yellow
C
H3, X3, W
Blue
Blue, Orange
Blue
N
N, X0
White
White
White
Note that this table is only a summary of general color coding practices; other colors are used to
identify special conditions, e.g. orange for the highest phase voltage in center grounded delta system
7.4
Current Probes (CTs)
The portable Clamp -on Probes (CTs) available for the EP -300 are illustrated and described in the table
below. The choice of probe to be employed is determined by the current to be measured and/or the girth of
the wires to be clamped to.
These probes are characterized by Powersmiths, and supplied as matched sets to improve the measurement
accuracy. Correction factors for these probes are available from Powersmiths. The Probe characterization
is defined by a four-part alpha-numb er such as DB-BA to allow for correction factors based on current
magnitude where the first two digits represent the characterization for < 35% of probe current (e.g. 67
Amps for 200 Amp probe) and the last two digits is the characterization for > 30% probe current.
CAUTION
The supplied CT probes are rated only for Low Voltage circuits of < 600VAC and should not
under any circumstances be used on higher voltages (i.e. Medium or High Voltages).
!
Handle Clamp -on CTs only by the insulated handles and not touch any other part of it during
operation.
7.4.1 Clamp-on CT Accuracy and Maintenance
For continued accuracy of measurement, please follow the following guidelines:
§
Inspect and ensure that the Jaw Faces in the CT are clean at all times as any foreign matter or even a
scratch will affect accuracy
§
Clean with a soft lint-free cloth and do not touch the metal faces, as body fluids will cause corrosion
§
Make sure that the CT is firmly closed during operation to ensure accuracy of measurement.
§
Use only ratio-metrically matched CT sets as supplied by Powersmiths and input the correction
factors appropriate for the CT Probe characterization
EP-300 Manual Ver: A06
- 71 -
202-001054-600
Table 7-5: Current Probes (CTs)
CURRENT PROBES and ACCESSORY CASE
Part Numbers as individually listed
Note: Probe selection more dictated by Jaw opening size rather than current rating
Quantity
Individual
Illustration
Technical Description
Model No./
PART No.
200 Amp nom. 300 Amp
max. Clamp -On Current
probe. Near revenue class
accuracy SPEC: 1%*, Fixed
ratio CT: 200:1 (3.5” JAW)
CT-NS-200-1
981-001175-402
(min. recommended)
EP-300D
EP-300T
5
8
3
6
3
6
1
1
*Note: Supplied in ratiometrically matched sets
1,000 Amp nom. 1,500 Amp
max. Clamp -On Current
probe. Near revenue class
accuracy SPEC: 1%*, Fixed
ratio CT: 1000:1 (5.24”
JAW)
CT-H-1000-1
981-001175-410
*Note: Supplied in ratiometrically matched sets
2,000 Amp nom. 3,000 Amp
max. Clamp -On Current
probe. Near revenue class
accuracy SPEC: 1%*, Fixed
ratio CT: 2000:1 (5.83”
JAW)
CT-P-2000-1
981-001175-420
*Note: Supplied in ratiometrically matched sets
Accessory Case as a means
of transporting cables and
probes
A-Case
924-001185-301
* Note that Probes are characterized and supplied as matched sets to better than + 0.2% matching and with
characterization and correction factors given in Section 9 Clamp -on CT.
EP-300 Manual Ver: A06
- 72 -
202-001054-600
In addition to the phase color-coding, CT leads are coded for both phase and polarity (+/plus and /common). The negative or common for each CT lead has a “BLACK” color-coded “TIP”. Also the
direction of the power flow must be observed prior to attachment to the power circuit to ensure correct
readings. The picture below provides a graphical illustration.
LOAD
SOURCE
Power
flow
Common
current
direction
black
tip
Figure 7:1: Picture of typical probe illustrating polarity and power flow directions.
EP-300 Manual Ver: A06
- 73 -
202-001054-600
8 Technical Specifications
8.1
Measurement Inputs:
8.1.1 Meter Port 1
q
q
3 Vo ltages & 2 Currents
Configuration: 3 wire, 2 CT (1 or 3 phase)
8.1.2 Meter Port 2 & 3
q
q
3 Voltages & 3 Currents (each)
Configuration: 4 wire, 3 CT or 3 wire, 2 CT (1 or 3 phase)
8.1.3 Voltage Inputs (all meter ports):
q
q
q
q
q
q
q
q
q
Dual Range; 300 & 600VAC (selected at setup)
True RM S
25% over-range
600VAC Common mode range
1,500VAC overload
2,500VAC 1 min.
5 Meg ohm Impedance
Effective resolution: to 12 Bits
Sample Rate: 64 per cycle
8.1.4 CT Current Inputs (all meter ports):
q
1A nom. or 5A nom. (cable selected)
q
True RMS
Galvanic Isolated 1,500VAC
Burden < 0.01 VA
q
q
q
q
q
Effective resolution: to 16 Bits
Sample Rate: 64 per cycle
+ 2 degree phase compensation
8.1.5 Status:
q
q
8.2
Temperature: 3 Inputs: -20 O C to + 220 O C
Thermistor: 10K Type A (+ 2% recommended)
Resolution: 12 Bits
TVSS Status: 3 inputs
Self Biased: 24 VDC, 10mA
Communication
8.2.1 RS232/485 combination Port:
q
RS232 or RS485 selected by connection
q
q
1,200 – 19,200 bps
1,500 VAC Isolation from measurement circuits
Protocol: Modbus RTU
q
Connector: DB9
q
EP-300 Manual Ver: A06
- 74 -
202-001054-600
8.2.2 USB
q
q
USB Client 1.1 compliant
Connector Type “B”
8.2.3 Ethernet
q
8.3
q
10/100Base-T
Connector RJ-45
q
1,500 VAC transformer isolated
Time Keeping:
q
q
8.4
8.5
Power Supply:
q
85 – 250VAC 1 φ
q
60VA max.
Environmental:
q
Operational: 0 O C to + 40 O C
q
Accuracy range: 10 O C to 30 O C
Storage: - 40 O C to + 85 O C
Humidity: 5 – 95% (non-condensing)
q
q
8.6
Mechanical:
q
q
8.7
47 cm (18 ½ ”) x 37 cm (14 ½”) x 19 cm (7 ½ ”) high
11kg (24 lbs)
Standards Compliance:
q
Safety
UL 61010C-1 CAT III
q
EMI/RFI
FCC: Part 15 Class A
Surge Withstand
q
q
8.8
Real Time Clock
Battery Backed (CR2032)
~ 10 year life
ANSI/IEEE C62.41 Surge withstand
Accuracy
ANSI C12.20 (pending)
Display
q
q
q
Size: 5.7” (diagonal)
Resolution: 320 x 240 Pixels (QVGA)
q
Colors: 256
Touch Screen: Resistive type, continuous resolution
Viewing angle: 90O
q
Contrast ratio 35:1
q
EP-300 Manual Ver: A06
- 75 -
202-001054-600
8.9
Parameters and Accuracy
8.9.1 Metering:
q
Cyberhawk provides 4-quadrant revenue accurate metering for each of the three meter ports as
follows:
kWh, imported, exported & net
kVARh, net
kVAh, net
The energy flow convention used is as per IEEE Std 1459-2000 and illustrated Figure 8:1: Energy Flow
Diagram below.
Reactive Power
(VAR) Delivered
cos φ = 0
90 o
-
+
I
Reactive
Power VAR
Ap
par
ent
pow
er
VA
A
rV
we
o
p
ent
par
Ap
Power Factor Lagging
(Inductive load)
Reactive
Power VAR
II
Power Factor Leading
(ICapacitive load)
Active Power Received W Active Power Delivered W
+
Power Factor Lagging
(Inductive load)
Active Power Received W Active Power Delivered W
Reactive
Power VAR
Active Power
(W) Recieved
A
rV
we
o
p
ent
par
Ap
Ap
par
ent
pow
er
VA
III
+
IV
Reactive
Power VAR
cos φ = -1
Reference for Active Power Flow
+
0o cos φ = 1
180o
-
Active Power
(W) Delivered
Power Factor Leading
(Capacitive load)
270o
cos φ = 0
Reactive Power
(VAR) Recieved
Figure 8:1: Energy Flow Diagram
8.9.2 Data Logging
Cyberhawk provides three types of data logs, each time stamped with time and date to the nearest 10 ms.
and it also records total energy (watt-hours) consumed for each of the three meter ports allowing the
average efficiency or losses sets to be computed.
EP-300 Manual Ver: A06
- 76 -
202-001054-600
8.9.2.1 Event Logs (alarms):
The event log comprises 128 of the most recent events, and is generated by such events as voltage, current,
temperature, etc. beyond limits set, status inputs, etc.
8.9.2.2 Scheduled Parameter Log:
This log records a variety of parameters at a period set by the user for a total of 384 records.
8.9.3 Efficiency
The EP-300 can provide efficiency measurements based on one input and up to two outputs from an
electrical device. This measurement is available as an instantaneous measurement (current conditions) and
as an average, based on energy in and energy out.
8.9.4 Demand:
The unit supports the standard demand calculations such as Block, and Sliding Block, kW, kVAR and kVA
on one selected input measurement
8.9.5 Waveform Capture:
Cyberhawk includes the ability to capture and display waveforms for voltage and current inputs, which
may be viewed locally on the QVGA Display or on a remotely connected computer.
8.9.6 Harmonics
A Harmonic spectrum (to the 25th ) is available from Cyberhawk in both a Bargraph format and numeric
values in a tabular form for all of the measured voltages and currents.
8.10 Service/Calibration
The EP-300 does not require regular service or maintenance and there are no user serviceable parts
internally. The clock battery will be checked and replaced, if required, during calibration service.
Calibration is recommended every 2 years and is a factory procedure. Also, the most current
software/firmware upgrades will be applied during any calibration service.
EP-300 Manual Ver: A06
- 77 -
202-001054-600
8.11 Instrument Accuracy
The accuracy specifications of the instrument are detailed in Table 8-1: Accuracy Specifications below and
are applicable over an ambient temperature range of 15O C to 35O C.
Table 8-1: Accuracy Specifications
Parameter
Voltage:
Accuracy
Nominal
+ 0.1% + 0.01% FS
Range (scale)
125%
(+ 15 % of nominal)
208/120, 400/230
480/277, 600/ 347
Current
+ 0.1% + 0.01% FS
(20 – 150% of nominal)
1/5Amp (Input
selected)
150%
Power:
+ 0.3%
N/A
Energy:
kWh, kVARh, kVAh
+ 0.3%
N/A
Efficiency
+ 0.1%
V - 50 % Nominal
kW, kVAR, kVA
I - 20- 125% Nominal
Total PF
+ 1%
N/A
0– 1
Cos φ (displacement)
+ 1%
N/A
0– 1
Distortion THD
+ 1%
N/A
0 – 1,000%
Distortion (Index)
+ 1%
N/A
0 – 100%
Harmonic Data
+ 5%
N/A
1st to 25th
K-Factor Current
+ 5%
N/A
1 – 30
Crest Factor
+ 5%
1.412
1– 5
Neutral Current
2%
N/A
Frequency
+ 0,01%
50/60Hz
47 – 63 Hz
Temperature
(measurement)
+ 2 OC
25 O C
0 to +220 O C
Clock
+ 3 sec/day
N/A
EP-300 Manual Ver: A06
- 78 -
202-001054-600
9 Clamp-on CTs
9.1
Overview
Clamp -on CTs (current transformers) facilitate energy studies on electrical networks without having to
break the power cables to install a donut type CT. The absolute accuracy class is 1% but are characterized
and supplied as ratio-metrically matched sets to better than + 0.2% in two ranges. The ratio-metric
matching and characterization allows the user to achieve near revenue class accuracy when the CTs are
used as matched sets and the specified correction factors are inputted into the EP-300.
9.1.1 Clamp-on CT Accuracy and Maintenance
For repeatable accuracy of measurement, please follow the following guidelines:
§
Inspect and ensure that the Jaw Faces in the CTs are clean at all times as any foreign matter or even a
scratch will affect accuracy
§
Clean CT Jaw Faces with a soft lint-free cloth and do not touch the metal faces with bare hands, as
body fluids will cause corrosion and degrade accuracy
§
Ensure that the CT is firmly closed during operation.
§
Use only ratio-metrically matched CT sets as supplied by Powersmiths and input the correction
factors appropriate for the CT Probe characterization
9.1.2 Operator Safety Notes
Please note the following:
9.2
§
Handle CTs only by the insulated handles
§
Never operate a CT with its secondary unloaded (open circuit) which will produce high output
voltages and could result in damage to the CT and/or operator injury
§
CTs are rated for 600V CAT III circuits and operation on circuits with higher potentials is dangerous
CT Specifications
General CT Clamp -on specifications are listed in the tables below:
Table 9-1: Clamp-on CT General Specifications
Item
Specification
Output Current
1 Amp (nominal primary current)
Absolute Accuracy
< + 1%
Characterization
< + 0.2 %
Operating Voltage
600V CAT III
High Pot. Isolation
4,000 VAC
Current Over-range
150 % continuous, 200% 3 minutes max.
Phase
~ 0.7 degrees
Frequency Range
40 – 5,000 Hz (-3db response)
Termination
4 mm Safety Banana
EP-300 Manual Ver: A06
- 79 -
202-001054-600
Table 9-2: Clamp-on CT model specific specifications
Model
Ratio
Nominal
Primary
(amps)
Maximum
Current
(amps)
CT-NS-200-1
200:1
200
300
Cable /Busbar
Size (inches)
Outline Drawing
2” diameter/
2.0” x 0.5”
2.76” diameter/
CT-H-1000-1
1000:1
1,000
1,500
5.0” x 1.3”/
4.0” x 1.8”
3.27” diameter/
CT-P-2000-1
2000:1
2,000
3,000
5.0” x 1.8”/
4.0” x 2.25”
9.3
Characterization
The Clamp -on CTs (Current Transformers) supplied with this instrument have been characterized and
supplied as ratio-metrically matched sets to better that + 0.2% matching. The CTs are assigned a 4-part
code, which defines the characterization class and the Table below provides the compensation factors
associated with the characterization. The characterization defines the compensation in two ranges for
greater precision; that is < 35% of nominal CT current rating and > 35% of nominal CT rating. The first
two digits of the code defines the compensation for currents less than 35% of the nominal rating of the CT
and the last two digits the compensation for > 35% of nominal CT rating and illustrated in the figure below.
BC - CC
< 35% Nom. I
> 35% Nom.
Figure 9:1: Characterization Code
EP-300 Manual Ver: A06
- 80 -
202-001054-600
Table 9-3: Characterization Chart and correction factors
< 35% Current*
ID Code
st
(1 Part XX-)
> 35% Current
Compensation
ID Code
(2
nd
Part -XX)
Compensation
AA
0.9918
AA
0.9918
AB
0.9933
AB
0.9928
AC
0.9948
AC
0.9938
AD
0.9963
AD
0.9948
BA
0.9933
BA
0.9933
BB
0.9948
BB
0.9943
BC
0.9963
BC
0.9953
BD
0.9978
BD
0.9963
CA
0.9953
CA
0.9948
CB
0.9968
CB
0.9958
CC
0.9983
CC
0.9968
CD
0.9998
CD
0.9978
DA
0.9973
DA
0.9963
DB
0.9988
DB
0.9973
DC
1.0003
DC
0.9983
DD
1.0018
DD
0.9993
EA
0.9993
EA
0.9978
EB
1.0008
EB
0.9988
EC
1.0023
EC
0.9998
ED
1.0038
ED
1.0008
EE
1.0053
EE
1.0018
FA
1.0008
FA
0.9993
FB
1.0023
FB
1.0003
FC
1.0038
FC
1.0013
FD
1.0053
FD
1.0023
FE
1.0068
FE
1.0033
FF
1.0083
FF
1.0043
*Note: Current here refers to the nominal current rating of the probe
Note: The recommended Phase Compensation for these probes is 0.700 O
EP-300 Manual Ver: A06
- 81 -
202-001054-600
10 Logged Parameters
The following is a list of parameters that can be logged (user selected) at the specified time intervals. These
parameters are also recorded when “Snapshot” is selected.
Table 10-1: Table of Logged Parameters
User Selected Reports
Parameter
Meter
Port 1
Meter
Port 2
√
√
√
√
√
√
√
IN Amps
√
√
PPH kW
√
√
√
√
√
√
√
√
√
√
VL-L Volts
VL-N Volts
IL Amps
PT kW
√
√
S PH kVA
S T kVA
√
QPH kVAR
Meter
Port 3
QT kVAR
√
√
√
VL-L THD
√
√
√
√
√
√
√
VL-N THD
IL THD
√
Efficiency
√
√
√
Energy Wh
√
Nom. kVA
√
Efficiency (Demand)
√
I/P % Load
√
O/P % Load
√
√
Temperature
VL-L Harmonics
√
VL-N Harmonics
IL Harmonics
√
IN Harmonics
Time Data
EP-300 Manual Ver: A06
Temperature
√
√
√
√
√
√
√
√
√
√
√
- 82 -
√
√
202-001054-600
The following is a list of parameters that are saved by user selection
Table 10-2: Table of User saved Parameters
Parameter*
Description
Meter Configuration
A record of all the User Setup Parameters in the Meter
Unit ID
A record of the Site/Unit Parameters entered by the user
Event logs
A list of all event logs generated by the mater
Waveforms (individual)
Saved waveforms for each item selection
Harmonics (indi vidual)
Saved harmonic Spectrum for each item selection
Waveforms (Snapshot)
A complete set of all Parameters, (Waveforms, Harmonics, Unit ID and Meter
Configuration for all Ports (Events excepted)
*Note: Saved data also includes time/date stamps
EP-300 Manual Ver: A06
- 83 -
202-001054-600
11 I/O Pin Numbers
The following diagrams reference the input port functions (ID) to the pin numbers. All of the connectors
shown here are Twist-Lock types. The syntax is “Pin number – Signal name”.
1-V A
1- IA+
5-VB
2- IA-
Port 1
Current
Port 1
Voltage
11.1 Port 1 Pin Numbers
6-VC
7- IC+
8- IC-
1-V A
1- IA+
5-VB
2- IAPort 2 & 3
Current
Port 2 & 3
Voltage
11.2 Port 2 & 3 Pin Numbers
6-VC
4-VR
5- IB+
6- IB7- IC+
8- IC-
11.3 Status Input Pin Numbers
Status Inputs
1- T A 2- T B 3- TC T8Amb
EP-300 Manual Ver: A06
4TCOM
- 84 -
5- S1
6- S 2 7- S 3
9SCOM
202-001054-600
12 Cyberhawk Firmware Update Procedures
The Cyberhawk EP -300 is flash-based and can be re-flashed by the user and the following instructions
details the procedure, step by step. The Software and Hardware requirements for this operation are as
follows:
§
PC with RS232 Port
§
Terminal emulation software. (Note: Terra Term Pro (freeware) is recommended and available
from Powersmiths WEB or at http://hp.vector.co.jp/authors/VA002416/teraterm.html )
§
RS232 Null Modem Cable (female both ends)
§
Latest Cyberhawk Firmware in accessible directory
§
“WINZIP” (available from http://www.winzip.com/ ) or equivalent zip utility
§
Microsoft Internet Explorer (or equivalent) and WEB access to the Powersmiths WEB site
(http://powersmiths.com/cyberhawk/ ) for all referenced software and firmware
12.1 Initial Preparation
Prepare for the update process by installing “Terra Term” or equivalent terminal emulation software and
downloading the Cyberhawk Firmware Update as described following.
12.1.1 Downloading Terra Term Pro
§
Open an Internet Browser and navigate over to http://powersmiths.com/cyberhawk/ and select
“Software”
§
Find Terra Term link and click “Click here to download” and save zip file in appropriate directory
§
Unzip Terra_term in a temporary directory
§
Find setup.exe (in the extracted files) and double click to open it and follow the instructions to
complete installation
12.1.2 Downloading Cyberhawk Firmware
§
Open an Internet Browser and navigate over to http://powersmiths.com/cyberhawk/ and select
“Latest Updates”
§
Hold the mouse arrow over the name “Click here to download” (do not left click as it will open),
Right click and select “Save Target As”
§
Select or create an appropriate directory (you will need to find this file during the update process)
and then select “Save” (do not change the file name)
12.2 Updating procedures
This procedure will re -flash the main Cyberhawk Firmware. Carefully follow the instructions as detailed
below.
12.2.1 Setting up Terminal Emulation Program
§
Open Terra Term Pro on the Computer
§
Select “Serial” In the Dialog box that opens and ensure that the appropriate COM port is
referenced (usually COM 1) then select [OK]
EP-300 Manual Ver: A06
- 85 -
202-001054-600
Figure 12:1: Initial Terra Term dialog box
§
The Terra Term Main screen will now be displayed
Figure 12:2: Terra Term Main Menu Screen
§
From Menu select [Setup] then [Serial Port…] and set dialog box as shown below then select
[OK]
Figure 12:3: Communication Setup
12.2.2 Preparing the Cyberhawk EP-300 Meter
The communication protocol must be first setup to VT -100 protocol on the meter as follows:
§
From [Main] ⇒ [Menu] ⇒ [Setup] ⇒ [Comm.]
§
⇒ [Locked] then ⇒ [####] password to unlock ⇒ [Back] to “Comm.” Screen
§
Under the Protocol Screen, first select ⇒ [None] scroll down to see VT100 and ⇒ [VT100] then
⇒ [Back]
Note: Baud Rate to be 19,200 and Format 8-N-1(the default values)
12.2.3 Connecting the Computer to the Cyberhawk Meter
§ Connect a Null Modem cable between the Computer RS232 Port and the Meter RS232/485 Port
EP-300 Manual Ver: A06
- 86 -
202-001054-600
12.2.4 Flashing the EP-300
§
With Terra Term open and active on the computer screen, press [Space Bar] and the following
menu will appear. Note that if the following screen does not appear check Terra Term setup and
power ON and OFF meter (do not disconnect any cables).
Figure 12:4: Initial Menu Selection Screen
§
Select option 3 by entering the numeral “3”
§
Type password (same as EP-300 password, note default “0”) and then [Enter]. Note that if meter
was previously unlocked, password may not be requested and following screen will be displayed
Figure 12:5: Menu Selection
§
Enter numeral “7” from selection as shown
Figure 12:6: In the Load Firmware Menu
§
Push [Enter] or “Return” key
Figure 12:7: Next Screen in the Re-flash procedure
EP-300 Manual Ver: A06
- 87 -
202-001054-600
§
From the Terra Term Menu On the Menu Bar, Select [File] then [Send File…] and using the file
select arrow, navigate over to where the file had been previously saved as illustrated in the figure
below
Note if a different terminal emulation program is used, the program file has to be sent in text mode
(not transfer protocols like “Kermit”) and “Send File” may be found under the “Transfer” menu.
Figure 12:8: File selection on Terra Term
§
Select the file to be loaded (previously downloaded) by clicking once on it
§
Select [Open] and the following screen will be displayed and when update is complete, Terra
Term will return to the start screen previously illustrated. (Note process will take several minutes)
Figure 12:9: Terra Term Screen during file transfer to Cyberhawk
§
Re-flashing procedure is complete when the Terra Term screen returns to the initial screen.
Information as to the version of the software is available on the meter under the [About] screen (subset
menu under the [Menu] button)
12.2.5 Recovery if Re-Flashing is interrupted
Note if the process is interrupted, close Terra Term and reopen it and re -enter setup values as previously
described. Power EP-300 OFF and ON (Press the [Space] bar if initial or screen below does not appear)
Figure 12:10: Terra Term Recovery Screen
From the Terra Term Menu On the Menu Bar, Select [File] then [Send File…] and using the file select
arrow, navigate over to where the file had been previously saved and select it as previously described.
EP-300 Manual Ver: A06
- 88 -
202-001054-600