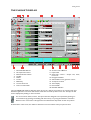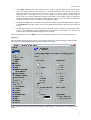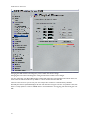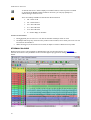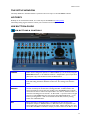
1
SADIE MTR USER MANUAL V5.6 SADiE MTR User Manual v5.6 Table Of Contents INTRODUCTION......................................................................................................... 1 LICENCE AGREEMENT ............................................................................................................................................... 2 COPYRIGHT NOTICE ................................................................................................................................................. 3 GETTING STARTED ................................................................................................... 5 INSTALLING THE SOFTWARE................................................................................................................................. 5 CONNECTING THE LRX........................................................................................................................................... 6 SADIE MTR BASICS....................................................................................................................................................... 6 STARTING SADIE MTR................................................................................................................................................ 8 THE PLAYLIST DISPLAY .............................................................................................................................................. 9 LRX EDIT CONTROLLER......................................................................................................................................... 10 RECORDING AUDIO................................................................................................. 11 QUICK START RECORDING.................................................................................................................................. 11 RECORDING AND IMPORTING AUDIO ........................................................................................................... 12 SETTING THE AUDIO INPUT SOURCES............................................................................................................ 12 MICROPHONE LEVEL ADJUSTMENT & PHANTOM POWER ..................................................................... 16 AUDIO CLOCKS ......................................................................................................................................................... 17 TIMECODE .................................................................................................................................................................... 18 TIMECODE RECORD MODES ................................................................................................................................ 21 9-PIN CONTROL......................................................................................................................................................... 21 RECORD ENABLING ................................................................................................................................................. 22 STREAM NAMING....................................................................................................................................................... 23 RECORD MONITORING.......................................................................................................................................... 24 RECORD MONITORING ON THE LRX.............................................................................................................. 25 AUDIO FILES................................................................................................................................................................. 26 MAKING CUTS DURING RECORDING.............................................................................................................. 29 DROPPING IN AND OVERDUBS .......................................................................................................................... 29 OPTIMISED RECORD MODE .................................................................................................................................. 29 TALKBACK.................................................................................................................................................................... 29 IMPORTING AUDIO .................................................................................................................................................. 30 METADATA AND MIRRORING ............................................................................................................................. 33 METERS ....................................................................................................................... 43 WORKING IN THE PLAYLIST ................................................................................ 45 PLAYLIST STREAMS .................................................................................................................................................... 49 PLAYING AND LOCATING .................................................................................................................................... 50 UNDO AND REDO.................................................................................................................................................... 55 MANIPULATING CLIPS ............................................................................................................................................. 56 ADJUSTING CLIP LEVELS ......................................................................................................................................... 59 EDITING ......................................................................................................................................................................... 61 ADDITIONAL NOTES............................................................................................... 67 i SADiE MTR User Manual v5.6 SOURCE TRACKS PANE........................................................................................................................................... 67 THE DISK MANAGER ................................................................................................................................................ 70 THE SETUP WINDOW.............................................................................................................................................. 75 HOTKEYS....................................................................................................................................................................... 75 LRX BUTTON GUIDE................................................................................................................................................ 75 IXML IMPLEMENTATION CHART......................................................................................................................... 78 LRX FAQS & TROUBLESHOOTING ..................................................................................................................... 80 SADIE LRX REGISTRATION.................................................................................... 87 ii INTRODUCTION SADiE MTR™ is an alternative interface for SADiE systems aimed at Multi-Track Recording on either an LRX or H64 hardware system. As such it is simplified over the normal SADiE5 interface and in a single window it offers the facilities that you will normally need for recording. Projects created in SADiE MTR can be opened in the full SADIE5 software, but you may find some benefit in using the simplified MTR view when performing critical recording tasks. You will find the manual and on-screen help valuable in explaining the underlying concepts of the system, suggesting methods of completing common tasks, and as a technical reference. We have tried to keep the manual and on-screen help as concise and clear as possible. Please take a little time to read this reference; it will pay off in time saved later. To access the SADiE Web site go to www.sadie.com. MOVING AROUND THE HELP FILE Words that are yellow and underlined contain jumps to other topics, pop-up information, and hyperlinks to the Internet. To navigate around the help file, use the "Next" and "Previous" arrow buttons at the top of the window to turn the pages of the chapter. Throughout the help file the following symbols have been used: Where a specified function is available as a keyboard "Hotkey". Where a function is available on the LRX or Hardware Controller Jog Panel if present. The following terms are used in describing mouse movements: Click Press and release the left mouse button once. To "press" an on-screen button, point at it and click. DoubleClick Press and release the left mouse button twice in quick succession. Right-Click Press and release the right mouse button once. Drag Click and hold the left mouse button over the chosen item, move it with the mouse to a new position, and then release the button. Right-button clicking with the mouse over many areas gives you a menu of alternatives for that part of the screen; remember to try this everywhere! On screen button names will be printed in BOLD, and their picture shown in the margin. The computer keyboard is used for typing in names, and for Hotkeys, which are useful shortcuts to many functions. There are also modifier keys on the keyboard, used in conjunction with Hotkeys. These are the Shift key (marked ), the Control (marked Ctrl) key, the Alt. Key and the Return ( ) key (duplicated by the Enter key). Ctrl + X means hold the Control key while pressing the X key. 1 SADiE MTR User Manual v5.6 LICENCE AGREEMENT This legally binding agreement is between you (either an individual or a single entity), the dealer or distributor, and Prism Media Products Ltd (referred to herein as SADiE). SADiE retains ownership in all its software in any form and its use by you is governed exclusively by this agreement, which is to be interpreted and enforced under English law. This agreement also sets out the limited warranties provided by SADiE in relation to the software. You agree to the terms of this agreement by installing and/or using the software package. If you do not agree with the terms of this agreement, do not install the software onto your hard disk. Return the software together with all documentation, packaging and associated hardware purchased for a full refund if applicable less any handling charges notified to you by your distributor. SADiE SOFTWARE LICENCE SADiE makes this software (the Software) available for the support of the hardware product (the Hardware) with which it is supplied provided that you comply with all terms and conditions of this agreement. The software comprises executable programs that perform specific tasks and tools. The sale price of the digital audio system includes the software licence fee. The use of the software with any hardware other than that manufactured by SADiE (with the exception of the computer system to which the hardware is physically attached) is expressly forbidden. RIGHTS AND LIMITATIONS You may: 1. 2. 3. Make safety backup copies of the Software and transfer the Software to the hard disc of the computer or computers to which the supplied hardware is to be connected, provided that these copies are not supplied to any third party. Use the software programs and tools on the machine or machines onto which they have been copied as permitted in item 1 above. Use the documentation that accompanies the Software for internal, non-commercial reference purposes only. You must not: 1. Disclose or make the software available in any form to third parties. 3. Assign the benefit of this agreement to any third party. 2. 4. 5. 6. Reverse engineer, decompile, disassemble or otherwise inspect the workings of software in object or executable form. Install the Software or future updates or upgrades if you are not using a licensed copy of the Software. Use the software in any application where there is risk of life or accidental harm to persons. Distribute the software to any third party without the express written permission of SADiE. RESERVATION OF RIGHTS AND OWNERSHIP SADiE reserves all rights not expressly granted to you in this agreement. The Software is protected by copyright and other intellectual property laws and treaties. SADiE owns the title, copyright, and other intellectual property rights in the Software. The Software is licensed, not sold. This agreement does not grant you any rights to trademarks or service marks of SADiE. TERMINATION 1. You terminate this licence by selling some or all the hardware with which it is supplied. 3. You also terminate this agreement by violating any of its conditions. 2. 4. 2 SADiE will provide a new software licence to the purchaser on payment of a registration and licence fee. The licence fee is not refundable on termination. Introduction 5. On termination, all copies of the software in your possession must be destroyed, and the original disks returned to SADiE. MEDIA WARRANTY AND EXCLUSION OF WARRANTY The physical media on which the software is distributed is supplied with the same warranty conditions as the hardware. The software is made available with no warranties whatsoever. It is up to you the user to determine that the software is suitable for the purposes to which you intend to put it. Whilst every effort is made to ensure its correctness, SADiE cannot anticipate all the uses to which the software may be put. SADiE does not accept any liability for the software failing to perform in any way, whether by design or through negligence and whether used on its own or in conjunction with other software. Neither SADiE nor its employees, distributors, or anyone involved in the manufacture or supply of the software shall be liable for any losses due to the use of, misuse of or the inability to use the software whether direct, indirect, consequential or incidental. Any liability that may be determined to be SADiE's or its employees', distributors' or others shall be limited to the purchase price of the hardware with which this software is supplied and which together comprise SADiE. LAW This agreement is governed by English law. In the event that any terms are found to be invalid by a court of law, the remainder of the agreement remains in force to the extent that it can be interpreted. This agreement is the entirety of the agreement between you and SADiE. No verbal or written variation is in force, whether to vary to the terms of this agreement, or to imply any suitability of the software for any specific purpose. All queries relating to this agreement should be addressed in writing to the registered office: Prism Media Products Limited, The Old School, Stretham, Ely, Cambridgeshire, CB6 3LD, United Kingdom. COPYRIGHT NOTICE This user manual is provided for use by bona-fide customers of Prism Media Products Ltd. for use in the support of the SADiE LRX and PCM-H64 products. All other uses are expressly forbidden. Whilst we have made every effort to ensure that the information in this manual is correct at the time of going to press, Prism Media Products Ltd. can accept no liability for any errors or mis-statements it may contain. We reserve the right to change specifications without notice in the interests of product improvement. No part of this manual may be reproduced or transmitted in any form or by any means, electronic or mechanical, including photocopying and recording, for any purpose without the express written permission of Prism Media Products Ltd. Copyright © Prism Media Products Ltd., 1991 - 2008. All rights reserved. Prism Media Products Ltd. reserves the right to make changes to specifications at any time and without prior notice. The information contained herein is believed to be accurate and reliable, however, no responsibility is assumed by Prism Media Products Ltd. for its use, nor for any infringement of patents or other rights of third parties resulting from its use. Errors and Omissions Excepted. Reference is made to the following in this manual: Microsoft and MS-DOS are registered trademarks and Windows is a trademark of the Microsoft Corporation. USB is a trademark of the Universal Serial Bus Implementers Forum Inc. SADiE is a trademark of Prism Media Products Ltd. Other brand and product names are trademarks or registered trademarks of their respective holders 3 GETTING STARTED THE SADIE SYSTEM A SADiE system will comprise a host computer (which displays the user interface on a monitor and tells the system what you want it to do), running the SADiE or MTR software, and the audio hardware unit. In the case of an LRX, the audio hardware is a USB2 attached device containing audio inputs and outputs plus a hardware controller and motorised faders, as well as the Digital Signal Processing (DSP) processing hardware. Thus the computer hardware may be a laptop computer. In the case of the PCM-H64, the audio hardware is usually contained in the same chassis as the computer. A PCM-H64 system will be provided as a turnkey system and will have the software already installed and thus you can ignore the next two sections and go straight to SADiE MTR Basics INSTALLING THE SOFTWARE 1. 2. 3. 4. 5. 6. Before installing the software, you should connect power and then a USB lead between the PC and the LRX2 unit. After a short while, a Windows' "Welcome to the Found New Hardware Wizard" message box will appear. On this first occasion you should press the cancel button. This may be followed by another message warning that your hardware may not work correctly. This is OK – the software installation will resolve this. You will have been provided with a CD-ROM containing the software installer. Place the disk in the CD-ROM drive. It should auto-run and a menu will appear. (NOTE: If the CD does not auto-run, press the Windows™ "Start" button; select "Run" and type: "D:\autorun" - if you are installing from CD-ROM. In this example D: is the letter of your CD-ROM drive. That may not be the case, so use the correct letter for your drive.) Press the “LRX” button on the main menu, and then press the “Install SADiE v5 Software” button on the next page. Follow the instructions on screen as you run through the setup program. You will be asked which software (of four possible choices) you wish to install – you should choose SADiE5 (and MTR if you wish to be able to run the simplified Multi-Track Recorder software). A SADiE5 icon to run the full SADIE5 software will appear on your desktop, along with an MTR icon if you’d chosen to install that software too. When the software installer reports that it is finished, you can double-click on the SADiE5 icon to run the software. 5 SADiE MTR User Manual v5.6 7. The first time you start the SADiE5 or MTR software, a message may appear…… – say Yes, and then navigate the browser to your CD-ROM’s root directory where you should see an “SPW” file which contains authorisation codes. 8. 9. This will install any other plug-ins that you may have bought, along with 30-day evaluation period licences for other plug-ins. The list of the plug-ins that are installed is found in the Help menu of SADiE, under the Plugins item. The SADiE or MTR software will start. CONNECTING THE LRX Your LRX should come with a USB2 (A to B) cable, and a 12V DC power supply (PSU), with a mains plug appropriate to your geographical location and the 12V supplied on a 4-pin XLR connector. Your USB2 cable will have an "A" type end and a "B" type end. USB "A" Type connector USB "B" Type connector 1. Connect the Power Supply to the LRX unit, and plug in to an appropriate mains supply. 3. Wait for Windows to plug-and-play the LRX; allow windows to install the hardware drivers automatically. Wait until there is notification that the hardware is ready to use before running the SADiE MTR or SADIE5 software. 2. Plug the "A" type connector in to a USB2 or Hi-Speed socket on the back of your PC, and plug the "B" type connector in to the USB socket on the LRX unit. SADIE MTR BASICS SADiE MTR software is aimed at Multi-track recording but also includes many of the editing tools from SADiE5. All editing of audio files in SADiE5 or SADiE MTR is in a manner which is called "non-destructive" SADiE never changes or deletes data in the audio file; instead you work in SADiE with an Edit Decision List also known as a Playlist or EDL for short. 6 Getting Started The EDL thus provides a sequence for playing out the audio files, to include the edits, fades, level changes etc. you've designed. The advantage of this method is that you never lose sections of audio - imagine a scenario where in editing the beginning of a sentence, you have mistakenly removed the very start of the first word - in SADiE, it's the simplest thing to extend an entry out again to recover this audio, however if this section had been deleted from the audio file, to recover this error would be difficult or impossible. PROJECTS SADiE MTR has the concept of Projects: everything that is stored in one folder on the PC is deemed to belong to that Project. The name of the Project is the same as the name of the Project folder on the disk drive. PLAYLIST Your main working environment is the Playlist itself - think of your EDL as your working document - when you save in SADiE MTR, you are saving a file with the extension .EDL. AUDIO FILES The other important elements of your project are your audio files. When you record into a Playlist, the audio files are stored in the project folder. AUDIO INPUTS AND OUTPUTS When a new project is created in SADiE MTR, the playlist will have one stream for each existing audio input. The output for each stream will be routed directly to the same numbered physical output (if one exists). THE MIXER When running SADiE MTR on an LRX (but not on an H64) the hardware faders are used to control levels of an N into 2 (where N is the number of physical inputs) mixdown which can be recorded onto the dedicated stereo stream at the top of the playlist. Only level (the mixdown as well as input level for Mic amps), pan and PFL (or solo) in this mixer can be controlled by the hardware faders; mutes and solos can be controlled using on-screen buttons. The LRX PFL buttons can optionally be made to control Solo instead of PFL (Setup option in the LRX page ). The mixdown levels and pans etc. are saved as part of the EDL, but this is lost if the EDL is opened in SADIE5 and re-saved - SADiE5 uses its own separate mixer. On loading an EDL into SADIE MTR, you will be asked if you wish to apply the saved mix levels or not. 7 SADiE MTR User Manual v5.6 STARTING SADIE MTR The first time you start the SADiE MTR, you may wish to decide where your work is going to be stored. At first the SADiE main window will appear, but empty of contents. 1. 2. 3. 4. 5. 8 Select the File menu at the top left of the screen Select the New Project item and the following box will appear: If this hasn't been set already, SADiE MTR will default to creating it's first Project in the C:\Projects folder, inside a sub-folder with the same name as the Project. (Certain options on the picture above are only available on the LRX2). You should select the Sample and Frame Rates that the project will be working with at this stage. They can be changed later. You should choose where you want to record the audio at this point. This dialog has a default location for projects, but if this doesn't suit you, press the Browse button to select a different location. When you're happy with the Project Folder's location just type a name for your project. The Record Destination can be changed later, but it's best to choose the right location at the point of creating the project, because then the EDL file will be saved to the same location as the audio recordings. SADiE MTR will open an empty Playlist - you're ready for action now! Getting Started THE PLAYLIST DISPLAY 1. 2. 3. 4. 5. 6. 7. 8. 9. Record Enable Buttons Mic Input level control Phantom Power buttons Toolbar Meters Locator EDL Entry Current Time Line Source Tracks Folder 10. Stream Control Buttons 11. Input Select 12. Status Bar control - Sample rate, clock, frame rate 13. Navigator Window 14. Online Button -LTC generate or slave 15. Transport Controls 16. Time Display 17. Record Disk 18. Metadata Window The main SADiE MTR window, filling the whole screen, has a title bar and menu bar in common with most Windows applications. The menu bar contains words that reveal drop-down menus. For example, the File menu is displayed by clicking on the word "File". For most common tasks, however, the system has been designed to be operated by pressing onscreen buttons (by pointing and clicking with the mouse), or by using the hardware controllers. Buttons on the screen have a 3D appearance and should look "depressed" in their On position. At the bottom of the screen, the status bar describes on-screen buttons when you point at them. 9 SADiE MTR User Manual v5.6 Resting the mouse pointer over a button displays the button name in a yellow box (and any Hotkey for the function in brackets), and the status bar at the bottom of the screen describes its action. Most menu commands and button actions are available as Hotkeys on the computer keyboard. Some are also available on the LRX front panel where applicable. On some desktops, the Windows Task bar along the bottom of the screen may obscure the SADiE MTR status bar. If this is the case, click with the Right-mouse button on the Task Bar, select Properties, and make sure that "Keep the Task Bar on top of other Windows" is not ticked. Then press "OK". LRX EDIT CONTROLLER If you are using the LRX, the front panel includes 9 pre-programmed editing buttons, a fully functional Jog wheel, large Play, Stop and Record buttons, and a bank of six other buttons, some of which can double as programmable keys. Further details of these functions will be found in the relevant sections of this help file, wherever you see the icon. 10 RECORDING AUDIO QUICK START RECORDING Later topics in this section will go into more detail on how to set up for recording, but this has been made very simple in SADiE MTR and the fundamental settings are easily accessible from the main panel of the software. You will probably want to make the following decisions: What sample rate and bit rate you are recording at ? Are you locking SADiE to Video or an AES Reference or Word clock ? Where to record the audio ? If timecode is being used, what frame rate, and whether SADiE is to generate or slave to the timecode. Along the bottom of the SADiE MTR display on the "Status Bar" are a number of controls which a) display the current status of a setting and b) allow you to change that setting. SAMPLE RATE & FRAME RATE When you're preparing for a new recording, you can select the Sample Rate and Frame Rate at the point of making a new project. From the File menu, select New Project. It is best to choose your sample and frame rate at this point. However both Sample Rate and Frame Rate can be changed at a later stage by using the Status Bar Controls at the bottom of the screen - right-mouse-clicking over either of these controls will offer the available sample or frame rates. Bit Rate defaults to 24-bit in SADiE MTR; if you need to change that then you'll need to go to the View Menu / Setup Window / Audio and change both input resolution and output resolution. AUDIO DISK Also in the New Project dialog you can of course name the project. Make sure also that you are happy with the choice of drive to which your primary recording is to be made. Use the Browse button to change this location if you wish. Audio is recorded to the same place that the project is saved to. It's possible to change the record destination later (if for instance you fill a disk drive) but it's best to select the correct drive at the moment of creating the project. 11 SADiE MTR User Manual v5.6 A Mirror Drive can be selected from the Record Destinations section at the left side of the screen. CLOCKS There is a Status Bar control at the bottom of the screen to choose between Internal Clock, Locked to external AES Ref, or Locked to Video. Right-mouse click on Clock Source. TIMECODE The Status bar button to the left of Stop on the Status bar is the Online button. Right mouse clicking this button allows you to change between LTC Master or LTC slave. Once the LTC mode is selected, pressing this button (or on the LRX panel - SHIFT-Set) will enable timecode operation. AUDIO SOURCE On the H64 you will have to set up which type of audio inputs (AES/Analog/MADI etc) you want to use. On the LRX2 you will only need to switch between Mic and Line. Mic / Line switching is performed by means of a button on each stream or the Audio IO setup page. Switches for AES/Analog/MADI on an H64 are in the Audio Setup page, and the Audio IO setup page. See Setting the Audio Input Sources below for more detail. You may need to set phantom power for microphones (the "lightning" button on each stream) and set Mic levels (the pot on the stream or, on the LRX, toggle the button to the right of the faders until Input is lit then adjust level with the fader.) then.... RECORD Enable the streams you wish to record on. You will hear the input and be able to set up levels and phantom power if you're using Mic inputs. The quickest way of record enabling is to use the Record All on the LRX panel (otherwise available as a hotkey function or from the Playlist menu), which record enables all edit-enabled streams - i.e. those whose stream button is pushed in. Thus to avoid record enabling unused streams, press their stream button before using Record All. Then press the Record button to start recording. RECORDING AND IMPORTING AUDIO When you record new audio using SADiE, you are recording a "Source Track" directly to a hard disk drive. Audio is recorded using the Playlist and transport controls. The Source Track is placed in the Playlist as a Clip, starting from where the Timeline appears at the start of the recording. SADiE can record mono, stereo or multi-channel Tracks, and labels them as such in the Clipstore and Playlist. Multi-channel tracks are still treated as a single Track when moved around the Playlist, but they can be ungrouped to mono tracks to be worked on individually if required. SADiE can also import existing audio from a hard drive to use in your Playlist, or can "rip" tracks from an audio CD. SETTING THE AUDIO INPUT SOURCES The available audio input sources will depend on your hardware; SADiE can record from analog line, analog microphone, digital AES or digital MADI or combinations thereof. Also the LRX2 and H64 have different I/O configurations - 12 Recording Audio A non-MADI LRX2 allocates input numbers from 1 to 48 to each card based on its position in the unit. This is independent from its format type - 1-16 will be allocated to the slither in Slot1 (if it's an input card) followed by 17-32 in Slot 2 and so on. There is no need to choose between AES and Analog because i.e. an analog card in Slot 1 will use inputs 1-16, and an AES card in slot 2 will use inputs 17-32. To use the first AES input, simply record enable a stream that has Input 17 selected as its input. You will still need to switch between Mic and Line, which is set on each stream by clicking on the Mic/Line button or else in the Audio IO setup page (see below). An LRX2 with MADI has the maximum of 64 inputs and outputs assigned to MADI and has selectors in the Audio IO setup page to allow you to choose which channel numbers any other input cards will occupy. the H64 input numbers are set by the position of the slither card. For instance an analog input slither in slot 5 and an AES slither in slot 9 would BOTH be assigned to Input numbers 1-16, and you will need to select which format (AES/Analog) to use in software. If this is an H64, then there are TWO areas of the Setup window where you can select the input source: GLOBALLY The main Audio Setup page allows you set to change all inputs from, for instance Analogue to AES, and also allows you set up Input and Output Resolution and sample rate settings. It's also possible to change the Input Source globally, by right-clicking on "Input Source" at the bottom of the Playlist. 13 SADiE MTR User Manual v5.6 On an LRX2, Inputs cannot be source-selected globally other than in the Audio IO Setup page. MIXED INPUT FORMATS However it's likely that you may want some inputs to be Analog, others AES, or perhaps some inputs Line & others Microphone level. The input format for each physical input is set in the Audio IO setup page. This lists every input pair, and has columns for Line, Mic, AES, or MADI (depending on what your hardware supports). You can double-click in the boxes to select the source for each input pair. 14 Recording Audio Inputs must be switched in pairs (i.e. you cannot have Input 1 Line level and Input 2 Microphone level) and in the case of MADI, must be switched in banks of 16 channels. If you double click on the header button of any column, all inputs will be switched globally (where possible) to that format. If you have an LRX2 with a MADI card the Slither Routing selectors will appear (otherwise it won't). These allow you to allocate input numbers to the other two slither cards (if they exist). Notice that the column header buttons are coloured and these colours are replicated on the Input buttons in the EDL to help identify which format your input is set to. 56+8 MADI & Slither Configuration You may have noticed above that I said that MADI must be switched in banks of 16. There is an exception to that rule on the LRX2 in that it's possible to switch the top eight channels (i.e. 57 to 64) out of MADI and into Analogue, Mic or AES, in order to accommodate the situation where your console may be feeding you 56 channels of standard MADI, and you may wish to use the remaining 8 channels on the LRX2 for, for instance, audience microphones. But only channels 57-64 can be switched from MADI as a bank of eight - all other inputs must be switched in groups of 16. At 96KHz sampling rate, MADI switches in banks of 8, and of course the "56+8" exception becomes a "28+4" exception. Input Select Buttons in the EDL Additionally the Input Source can be selected in the EDL using the little microphone icon stream. Pressing the button will display all possible options. alongside each The usual restrictions on grouping apply - Analogue, Mic & AES switch in channel pairs, MADI in banks of 16, and the LRX2 56+8 exception. On an H64, changing the input source globally will override the Audio IO Matrix selections and set every input to the global setting. 15 SADiE MTR User Manual v5.6 MICROPHONE LEVEL ADJUSTMENT & PHANTOM POWER If you have a Microphone slither as an input card, any inputs set to Microphone will have an input level control and a phantom power switch. PHANTOM POWER For inputs for which you wish to set a 48V phantom power press the to warn that it is enabled. Phantom button, which will turn red Note that it may be dangerous to connect certain devices to the Mic input whilst Phantom Power is enabled. When you exit SADiE MTR the phantom status is saved but the phantoms are switched off. When you re-enter the program you will be asked if you wish to re-enable them or start the program with phantoms disabled. INPUT LEVEL ADJUSTMENT Microphone input levels are adjusted by :- The LRX Faders - these are multi-function, and their function is changed by means of the black button just to the right of the eighth fader. The "Alt" function is not supported and so pressing this button twice from the standard "Output" state will change the faders to operating the Mic input level adjustments. To adjust input levels on inputs higher than 8, press the Bank Select button just above the Fader Mode Select button. Alternatively, which is the only method on an H64, Playlist streams that are set to record from a Mic input have a blue pot to adjust input level. Analog Line and Digital Inputs have no input level adjustment. 'SENSITIVE' MODE When adjusting Mic input levels, the faders can be switched to make them more sensitive. Press the SHIFT button, then touch and release the fader. A small dot appears in the number display, and the fader will move to a central position to allow you to adjust around the standard, "coarse" level position. LEVEL PAD BUTTON Later model Microphone Slither cards have the facility to reduce the input level in order to accommodate particularly loud sources. If the Pad button appears then your Mic card does have this facility. Pressing this button in will reduce the input level by 20db. Some users have requested that the line input level be adjustable - the 'Mic' setting with the pad enabled is equivalent to an adjustable line level - the Line setting is a fixed and thus predictable level. 16 Recording Audio AUDIO CLOCKS The quickest way to set audio clocks is by means of the Status Bar control at the bottom of the screen Clock Source. Right mouse click on that control to chose between the available options. This will provide all the options you need, however more flexibility may be available via the Setup pages. FURTHER AUDIO SETTINGS In the Setup page, open the "Further Audio Settings" page by double clicking on Audio on the list on the left side, then selecting Further Audio Settings. SADiE's audio clock has FOUR different settings: Auto The audio switches according to whether inputs are enabled or not. In normal playback, the audio clock will be free running. If an audio input is record enabled, or SADiE is in record, then the clock source may switch, depending on the GLOBAL input setting in the main Audio Setup page. If the Global setting is analog, then clocks remain free running. If the global input setting is digital - AES or MADI, then the clocks will be derived from the lowest numbered audio input. Note that if you're set to Auto clock with the global audio input set to AES, SADiE will be looking for an external clock, even if you have changed the Audio IO matrix so that you are recording from an analog input. In that case you should change the clock to Internal so as to avoid "missing clock" error messages. Internal SADiE's clock is always free-running (unless the "Internal Clock/ Lock to Video" switch is ticked - see "video" below) Genlock SADiE's clock will be locked to an external digital audio reference. The possible sources are listed in the dropdown list next to the genlock button and will depend on the hardware. AES Ref, any AES Input, MADI, or Word Clock may be available. Video SADiE's clock can be locked to a Video or Video black and burst signal by setting the "Clock Source" to Internal, and "Internal Clock" setting to "Lock to Video". Note that you cannot lock to a Video signal when genlocked to a digital audio reference - the Video signal may be required to be present to provide frame references for timecode functions, or 9-pin slave functions, but it's not possible to switch the "Internal Clock/ Lock to Video" switch. 17 SADiE MTR User Manual v5.6 TIMECODE The quickest way to set Timecode is by means of the Status Bar control at the bottom of the screen - Online. Right mouse click on that control to chose between the available options. This will provide all the options you need, however more flexibility may be available via the Setup pages. SYNC SETTINGS The Sync setup page sets up the timecode sources. Usually timecode provides a coarse "time of day" synching, whereas audio genlock provides clocking for "speed" purposes (but generally has no idea what time it is.) MASTER MODE Master mode is only used when you want SADiE to generate LTC. In this case, set the frame rate, and set "Sync Mode" to "Master Mode". When the Online button is pressed, LTC will be generated at the time of the Playlist. SLAVE MODE Slave mode is more likely to be used in a recording situation. Set the frame rate, and set "Sync Mode" to "Slave Mode". Press ONLINE to enable sync. 18 Recording Audio There are three possible scenarios: 1. 2. 3. Slave mode with playback start being triggered by timecode. SADiE will wait until a short sequence of valid timecode frames are read before starting playback - thereafter SADiE's playback speed is determined by the audio clock setting. For SADiE to remain in sync with the timecode, you need to ensure that the source for SADiE's audio clock and the source of timecode are synchronous. If these drift or change, then there are a number of ways of handling (or ignoring) the change. Slave mode with playback of the master machine being controlled by SADiE over 9-pin. The SADiE interface passes the Play command to the master machine; the master machine enters playback; thereafter the situation is the same as above. Slave mode with SADiE as a 9-pin slave. SADiE's transports and record enables are controlled by another device. The master device determines when SADiE goes into play and will usually pass timecode to SADiE over the 9-pin connection. There's a fourth scenario, but this really the same as #1: 4. Slave mode to LTC with Chase. Playback is triggered by timecode; thereafter SADiE's audio clock is derived from the speed of the LTC. To do this, SADiE must be in internal clock, recording analog only, and "Slave Mode" should be set to "Chase Lock". 1. SLAVE MODE WITH TIMECODE. In Sync Setup, set the frame rate. 19 SADiE MTR User Manual v5.6 Choose the Timecode Type - most usual will be LTC, or 9-pin timecode. 9-pin timecode is not synchronous on its own - it's more of a call/response regime with SADiE's asking "what's the time?" and the master device replying "half past nine...". Thus to ensure that SADiE is on the correct video frame you will need to provide a video signal. You do NOT have to switch anything else to enable the video frame sync - switching on 9-pin timecode will automatically force SADiE to look for a video signal at the video input. Note that the Lock to Video switch in Further Audio Settings is an Audio clock setting and not a Timecode Sync setting and as such is unrelated to 9-pin frame lock. You have some settings at hand in the Sync Setup Page, and its subpage (Autostart and Offset) to change the behaviour when timecode stops, jumps, drops out or otherwise falters. In the Sync Setup page there is Timesync - this feature is aimed at recording rushes, and when timecode is seen to jump to another valid range, SADiE can stop the current recording, and start another when the next timecode range settles. Record Stop Time is the time before a timecode break causes the new recording to start (or SADiE to stop if Timesync is switched off). Timesync can only operate if the audio format is SADIE3 format. Don't stop After Valid TC when this is ticked, the loss of timecode, or a jump in timecode range will not cause SADiE to stop playback or record. SADiE will start playing when the timecode trigger is received, and only stop when the operator intervenes. And in the sub page there is: Autostart Time this is usually automatic, however this setting allows you to delay SADiE's trigger. 20 Recording Audio Timecode Offset allows you to apply an offset between the timecode coming in and the time in the Playlist that SADIE's plays or records to. Flywheel Length Frames allows SADiE to continue over timecode that may be missing (due to i.e. tape drop out) Record Stop Time is the time before a timecode break causes SADiE to stop (or else a new recording to start if Timesync is switched on. Record Timestamp Delay this allows you to delay the moment at which SADiE timestamps the current recording. Setting this to 2 or 3 seconds will allow you to accommodate timecode where the first few frames may be spurious or jumping. 2. SLAVE MODE WITH SADIE AS 9-PIN MASTER. This situation is similar to the last, except for the fact that playback is initiated by SADIE. You will need a 9-pin cable to connect between SADiE and the 9-pin device, and 9-pin must be set up - see the 9-pin control section for details. When enabled, the 9-pin device will respond to SADIE's standard transport controls, and mouse double-clicks to start playback. To enable Slave mode with 9-pin master, the ONLINE button is used, however you must click with the right mouse button on the on-screen Online button to choose which 9-pin device you are controlling (standard LTC sync will be one possible option). Note that your hardware must include a CAT PCI card in order to use 9-pin machine control. 3. SLAVE MODE WITH SADIE AS A 9-PIN SLAVE. To set SADiE to be a 9-pin Slave see "9-pin slave" later in this manual. Note that your hardware must include a CAT PCI card in order to use 9-pin machine control. TIMECODE RECORD MODES When SADiE is SLAVE to LTC, two special modes are available: Auto online when pressing record If your sync settings are already set to Slave to LTC, and some streams are record enabled, when you press the record button, online will be enabled simultaneously and SADiE will follow any incoming timecode. Recording will start first, and any re-positioning of the timeline to follow the LTC will happen later, so that the record start is more immediate. This mode allows for a single button press to initiate the recording. Auto record on receiving timecode Once again, your sync settings must be set to Slave to LTC. Online must be enabled, and some streams must be record enabled. As soon as timecode is detected on the LTC input, recording will start. In this mode, you can leave SADiE record enabled and online, and then you can control another machine and have SADiE automatically record any playback on the other machine. You can enable both of these modes together. These are both enabled by switches in the Record page of the Setup Window. 9-PIN CONTROL Setting up 9-pin Machine for master control and slave operation is discussed in the SADIE5 Help file and manual. The LRX would have be working with a desktop PC in order to support 9-pin functions via the PCI CAT card. 21 SADiE MTR User Manual v5.6 RECORD ENABLING To record enable a stream press its green record enable button. Other methods for enabling record exist: On the LRX Above each of the faders is a record enable button which turns red when armed. To record enable streams greater than number 8 press the BANK SELECT button to select the next bank of 8 streams. Additionally, to speed things up with larger track counts, the LRX2 has a Record All button above the jog wheel. This record enables all edit-enabled streams, and thus if you want to avoid record enabling unused streams, disable them press their stream button before using Record All. Disabled streams have their button in the up position, and have a darker grey background to the clips. Over 9-pin slave - record arm the chosen channels using the edit controller. At this point the following happens: The record enable buttons turns yellow to show that you are record armed. The selected inputs are opened, and if E to E is enabled, you will be able to monitor the audio that's coming into the inputs. You can adjust levels if appropriate at this point. E to E is enabled by default, and on a setup switch : go to the View Menu, Setup Window, click on the Mixer topic on the left side, and about halfway down there is E to E mode and the choice between Off and On for Record enabled streams. 22 Recording Audio STREAM NAMING The Stream buttons are initially numbered from 1 upwards, with the Stereo Mixdown stream named "Stereo". The stream name will be appended to the filenames as they are recorded, and these names will also appear in metadata as track names. Therefore you may wish to change these from numbers to make the filenames more descriptive. You can rename the stream by right mouse-clicking over the Stream name button and choosing "Rename". Additionally, there are hotkeys to allow you to move from stream to stream and rename the stream without using a mouse: (suggested hotkeys are described, you may prefer to set your own) TAB - to move to the next Stream - the button will be outlined in red to show you which stream is focussed. SHIFT-TAB - to move to the previous stream. Q (because it's close to TAB on some keyboards - other languages may have a different key that's more appropriate positioned) - to rename the Stream. To name the streams the routine would then be TAB; Q; type name; ENTER (to confirm - ESC cancels) TAB; Q; type the next name .. and so on. 23 SADiE MTR User Manual v5.6 To set up these hotkeys, go to the View menu; Setup Window; Hotkey Setup. Choose Category "Playlist - Stream Focus" Choose "Focus next Stream" under "Commands"; choose the key from the drop down list under "New Hotkey" then press assign. You'll also want to assign "Focus previous stream" and "Rename Focussed Stream". RECORD MONITORING RECORD, PLAYBACK AND MONITORING To enter record press either the on-screen or Jog Controller panel. record button, or the Record button on either the LRX panel Alternatively, you can enter playback first, in which case the record enable buttons will flash and playback will be started. Pressing a Record button at this point will "punch" into record. red/yellow, Similarly if you are following a timecode sync, then you will need to press the ONLINE button to enable sync, at which point, if the timecode is moving then SADiE's playback will start. There are considerations of monitoring here. If you are punching in after playback has started, this is effectively an "overdub" recording", and so you may need some flexibility as to what is monitored before punching in you may want to hear either the audio at the inputs, or the audio that has already been recorded. This choice is made by means of the Source Monitor function, which is available : 24 from the Playlist Menu - Monitor Source (this has a tick when enabled). Recording Audio or a hotkey - Hotkey Setup, Category "Transport - Record" , command is "Monitor Source". By default Source Monitor is enabled in which case when streams are record enabled, Audio inputs are always monitored. If Source Monitor is disabled, then the audio heard depends on the state: Record Enabled, playback stopped Audio input is monitored Record Enabled, playback started (not record) Input muted, Stream is heard (even if silent) Record Enabled, record started Audio input is monitored For extra flexibility the Source Monitor state may be set for each stream. this is available as a hotkey settings go to View Menu / Setup Window /Hotkey Setup and choose the "playlist - monitor source" category and assign a hotkey for whichever streams you need to set. RECORD MONITORING ON THE LRX The LRX running SADiE MTR has a "hidden" mixer. Every Playlist stream is monitored on it's respective Audio output. All Playlist streams are mixed down into stereo by means of the hardware faders (which can control both mix level and pan), and this stereo mixdown can be recorded on the Stereo Mixdown Stream at the top of the Playlist. MIXING ON THE LRX (Apologies from the artist for his topless faders.) 25 SADiE MTR User Manual v5.6 The faders by default control the output level of streams 1 to 8. Toggling the lower black button changes them to controlling Pan, Input level, then Output (mix) level again. Toggling the Bank Select changes the faders to controlling streams 9-16, 17-24 and so on in banks of eight. STEREO MIXDOWN STREAM The Stereo Mixdown Stream is monitored on both the Headphone Out and Mon L&R outputs on phono connectors at the rear of the LRX. Additionally you can choose to monitor the Stereo Mixdown on a higher quality balanced output on an Output slither. Additional Monitor Output in the LRX Setup page enables this and allows you to choose which pair of outputs this should appear on. In order to provide simplest monitoring the Mixdown stream is effectively always in "E to E" mode (regardless of record enabling) and thus what appears on the Headphones and Mon L&R is a mixdown of all the main recorded streams. If however you wish to play back what's been recorded on the Mixdown Stream, you will have to change the "Source Monitoring" for the stereo stream. The control for this is the red arrow button which on this stream is in place of the Solo button. When the button is pressed When the button is up, (default) the mixdown of the other streams is always heard. , the audio clips on the Mixdown stream are heard. The Stereo Mixdown stream's monitoring is independent of the global "Monitor Source" setting in the Playlist Menu. PFL Pressing the top button above each fader will put the selected streams into Pre-Fade Listen mode. Monitoring through the main outputs is unchanged, but the Headphones and Mon L&R outputs will hear only that stream at pre-fader level. AUDIO FILES By default, when SADiE MTR records, each stream of the EDL will create a single MONO Broadcast WAV (BWF) file, except for the Stereo Mixdown stream, which will record to a single STEREO interleaved BWF file. If any streams have been Stereo Merged (right-mouse-click over the stream controls and select Merge into Stereo Stream) then these create stereo interleaved BWF files instead of two mono files. There is also an option to record to Multi-Channel Interleaved Files. These are also known as 'Polyphonic BWFs'. SADiE can record to Polyphonic BWF files of up to 16 channels, and so these are suitable for smaller multitrack projects, particularly where the files are being delivered to a system that has a preference for this type of file (see the note about performance below). On the LRX, the most convenient time to set up the Polyphonic option is when you are making a new project. You can choose between mono and polyphonic files using the File Channels selector. 26 Recording Audio n If your stream count is higher than 16, then SADiE will set to record the main playlist streams to mono files, with the Stereo Mixdown recorded to a stereo file - as per the default. If your stream count is 16 or less, then you will be offered:- Inputs->Mono. Mix->Stereo the default setting:- all recordings are to mono files, excepting the Stereo Mixdown which will be to a stereo file. 27 SADiE MTR User Manual v5.6 Inputs+Mix->poly (MAX 14+2) all channels including the stereo mixdown will be recorded to a single polyphonic WAV file. The stereo mixdown will occupy the highest numbered pair of channels inside the file. Inputs->poly. Mix->stereo (MAX 16+2) the main recorded streams will be to a polyphonic WAV, and the Stereo Mixdown is recorded to a separate stereo file. SETUP OPTIONS Alternatively this can be changed using an option in the Record page of the Setup Window - Polyphonic Group Size. This allows for other possible combinations. When Polyphonic Group Size is ON and set to a number (which will be any number up to 16) any multichannel recording (more than ONE stream) will have its streams grouped into single files according to the Group Size number, and any stream merging is ignored. So if an 8 channel recording is made with a Polyphonic Group Size of 8 a single file would be created. If the Polyphonic Group Size had been greater than 8, the result would have been the same - the Polyphonic Group Size defines the largest width of file that can be created; if more than 8 streams had been recorded, more than one 8 channel polyphonic WAV will be created. If 64 channels had been recorded with a Polyphonic Group Size of 8, then 8 x 8ch Poly WAV/BWFs would be created. If 63 channels were recorded, 7 x 8ch Poly WAV/BWFs and 1 x 7ch would be made. During recording, red lines are drawn in the playlist to show where the file breaks appear. NOTE ON POLYPHONIC WAV PERFORMANCE. Recording with Poly WAVs will use more processing resources than recording many mono files, and is not recommended for larger recordings, or recordings where the stream count is close to the limits of the system. You should also be sure that any other application that may be receiving the files can support Polyphonic WAV files, and in particular the channel width that you are creating. Every audio application can work with mono files, and most with stereo files, but the support for Polyphonic WAVs is not so widely spread. It is well known that Avid prefers polyphonic WAVs for ingest, however there are some versions of Avid which can only support a maximum of 4 channels in a single file, and so the SADiE user should check first ! POLYPHONIC WAV MAXIMUM SIZE. WAV and BWF files cannot exceed 4GB in size, due to the use of a 32 bit unsigned integer to record the file size. Some other applications may limit this to 2GB. Thus when for instance you are recording 16 channel Poly WAVs, the maximum record time is 1/16th of what it would be if you were set to record to 16 x Mono WAVs at the same sample rate (doubling the sample rate will halve the maximum record time for same-format files). The maximum length for a 16 channel Polyphonic BWF at 48KHz 24-bit is approximately 30 minutes, whereas if this were recorded with 16 x Mono files, approx. 8 hours recording would be possible. Because the stereo stream is recorded to a single stereo interleaved file, if you were to add a Stereo Mixdown stream to the 16ch. example, the maximum record time for 16 channels PLUS a Stereo Mixdown would be approx. 4 hours - limited by the maximum possible size for the Stereo Mixdown stream. It's possible that when recording multiple files together, they may have slightly different file sizes if you are using metadata - i.e. the stream named "Maybe it's because I'm a Londoner" will use marginally more disk space than if it were named simply, "1". THE STEREO MIXDOWN STREAM AND POLYPHONIC WAVS When recording less than or equal to 16 tracks (including the stereo mixdown stream) it's possible to include all the audio channels in a single Multi-channel interleaved/Polyphonic WAV file. For recordings over 16 channels, or for a Polyphonic Group Size setting where you are creating more than one polyphonic file, the stereo mixdown will always record to a separate stereo WAV file. For less than 16 tracks, this can be selected by the option in the Record Setup page to 'Include Stereo Mixdown stream in polyphonic files'. 28 Recording Audio MAKING CUTS DURING RECORDING The RAZOR and SCISSORS buttons will work during recording, dividing the Clip as it is being placed in the Playlist. There are more on these in the Editing section. Using these will not affect the Source Track in the Clipstore, only the Clip in the Playlist. This can be a useful way of marking edit points that you will need to return to later. If you press PAUSE while you are recording, the current Source Track will end. A new one will begin when you release the pause button again. This can be useful to "edit-out" unwanted sections of the incoming signal. Recording will resume as a new Source Track, so you must use Autotake, otherwise SADiE will assume you want to re-record using the previous Track name. DROPPING IN AND OVERDUBS When you record into a Playlist that already has Clips in it, these will be replayed as you record. Therefore you can record, for example, a singer on Stream 3 whilst listening to a stereo guitar already recorded on Streams 1&2; or a voice-over on Stream 1, while hearing a music bed already on Streams 3&4. This is known as overdubbing. Record enable the stream you wish to record to, and press PLAY. The record button will flash to indicate you are in record standby. Record in the usual way. You will hear the existing Clips play back as you record. You may also wish to record on the same Stream as an existing Clip to replace a section. This is known as dropping in. Record enable the stream in question and press PLAY. The record button will flash red/yellow to indicate you are in record standby. Listen to the existing Clip and then press RECORD at the point to start the drop in. The record enable button will turn red and SADiE will replace the existing Clip with a Clip of the new recording up to the point where you drop out of record. The whole Source Track can still be found in the Clipstore. If you don't want to replace a Clip, record on a different Stream. In order to perform an Overdub, Optimised Recording Mode must be disabled. OPTIMISED RECORD MODE In critical recording situations, where the recording is a simple "capture" operation and little replay, and no overdubbing is required, it may be advisable to enable Optimised Record Mode to ensure that all SADiE performance is dedicated to recording rather than attempting to replay any audio. Under normal circumstances, any existing audio is always played on a record enabled stream to allow the user to punch out and immediately switch to playing "off-tape". When Optimised Record Mode is enabled, there is never playback from a record enabled stream thus relieving the processor of any unnecessary work. And therefore in this mode you will not be able to listen to what you've just recorded until you disable the record buttons for those streams. To enable Optimised Record Mode, go to the View menu / Setup Window / Record and tick the Optimised Record Mode option. In SADiE MTR, Optimised Record Mode defaults to On. TALKBACK On the LRX2 a talkback facility (otherwise known as 'Slate') is available for: a) speaking to others who are monitoring the main outputs. b) adding a 'Slate' - you can record the mic into the Stereo Mixdown stream to add an audible 'comment' to the recording. Plug a dynamic mic for talkback into the stereo mini-jack connector on the right side of the LRX2. TALKBACK SETUP In the Record page of the Setup Window there are some options for the talkback mic 29 SADiE MTR User Manual v5.6 Enable Slate/Talkback Mic - must be ticked to allow talkaback. Talkback uses two input channels. This is only an issue when you need to record the maximum number of channels - i.e. 64 channels at 48KHz or 32 channels at 96KHz; if you also need talkback then the maximum possible number of channels is 62 and 30 respectively. For this reason a switch to enable or disable talkback is also offered at the moment of creating a new project. Slate Level - a level control for the talkback mic. When talkback is enabled, while the Talkback Button on the LRX2 panel is pressed and held, the talkback mic will appear on the mixdown outputs - i.e. the Headphones and the Monitor Outputs, and the normal monitor mix will be reduced in level by the amount set for...... Dimmed background level. Enable recording of slate mic to mixdown stream - when this is ticked, when SADiEMTR is in record and the Talkback Button is pressed and held, the talkback will also be recorded into the Stereo Mixdown stream. Recording the Talkback to the Stereo Mix can be enabled and disabled with a button on the left side of the Stereo stream: when slate is enabled, and when it's disabled. IMPORTING AUDIO IMPORTING SOURCE TRACKS You can import existing audio tracks in to your Clipstore for use in your Playlist. 30 1. At the top of the Playlist, click the "Import Audio" button (the left-most of the three Import/Mix buttons shown below). 2. The "Import Source Tracks" window will appear. Recording Audio 3. This window works in the same way as Disk Manager and Windows Explorer. The files in the right hand pane with a blue icon are audio tracks which you can click on to import. You can select more than one file by holding down the keyboard Ctrl key whilst clicking the tracks you require. Selected tracks will turn dark blue (as above). Once you have made your selection, click the "OK" button. The window will close, and the tracks will appear in your Clipstore, ready for use. Import Source Tracks leaves the audio files in their original locations. Other methods of Importing files are discussed here. RIPPING FROM A CD SADiE can "rip" audio from an audio CD, using the PC CD-ROM. 1. At the top of the Playlist, click the "Import CD Tracks" button (the centre of the three Import/Mix buttons shown below). 2. The "Import CD tracks" window will appear. 31 SADiE MTR User Manual v5.6 3. Select your CD-ROM device. 5. Set the CD name (shown here as "Tutorial") using the "Set base name" button. 4. 6. 7. 32 Select the tracks you wish to import, using the tick boxes next to each track. Press the "Start" button to begin importing the track(s). A blue bar will show the progress of the import. Once the import is complete, you can close this window, and your imported tracks will appear in the Clipstore (shown here highlighted). You can now use them as you would any other clip. Recording Audio METADATA AND MIRRORING There is an accessible method for putting metadata into the file you are recording. What is Metadata ? In this context we are using the word metadata in a fairly narrow sense to mean "data that is not audio data that is stored in an audio file". There are plenty of ways of putting metadata into an audio file already in SADIE - for instance sample rates, bit rates, & timestamps are stored in all audio files. The BWF format file has a number of extra fields that can be (reasonably) freely used for user data - for instance information and memoranda about the recordings that someone further down the production chain will be able to use to help identify the recording. The Metadata function in SADIE uses the BWF Description field - this is primarily aimed at Film and TV location recording, and this field is commonly used to store metadata in these areas. Optionally this Metadata may also be included in an iXML chunk in the file - there is a tick box in the Record Setup page to enable this. It's also possible to "mirror" (duplicate) the recordings to an alternative disk drive. An optional facility provided by this interface is to have all file names be constructed automatically from chosen metadata fields, rather than manually typing into the "Track Name" field in the Transport Window. There is a topic in the Setup Window called Record which has switches to enable the functions associated with the metadata and mirroring features. 33 SADiE MTR User Manual v5.6 CONSTRUCT TRACKNAMES FROM METADATA This is the default mode for operating SADiE MTR. If you untick "Construct Tracknames from Record Metadata" in the Record Setup page, a "Track Name" field will appear beside the Transport Controls at the bottom of the screen. RECORD IXML CHUNK When this is selected, any metadata will also be put into an iMXL chunk in the BWF file. SADiE's iXML implementation chart is in the Additional Notes section at the end of this manual. You'll find technical information about the iXML chunk at www.ixml.info. LOW DISK SPACE WARNING When "Low Disk Space warning threshold" is ticked, the Record Configuration Dialog will display a warning when either the primary or mirror record locations remaining disk space goes below the setting (for the number of tracks currently in record). METADATA TEMPLATE FILE There are buttons to allow you to save and load different Metadata Setups. Having customised the metadata fields that you wish to save to recordings, you can save the configuration as a template. SADiE is provided with two templates which will set you up for standard operation:record_metadata_template.xml and us_record_metadata_template.xml The only difference is that the U.S. template is set to label Scenes as a Number AND letter - i.e. Scene 10C, whereas in the general template the Scene is labelled numerically. OPTIMISED RECORD MODE The text underneath the setting and the earlier page in this manual - Optimised Record Mode - explains this. When this is enabled, SADiE's DSP is reserved for recording and never attempts to play clips on a record enabled stream. OPTIMISED FILE CREATION MODE You should only need to enable this if you are recording fairly large multi-tracks and the project is large. When the number of files in a disc directory becomes larger, Windows takes longer to read it. Thus when you are adding new files, a refresh of the directory can take some time when there are thousands of files. 34 Recording Audio And at the point of stopping a recording, lots of files are being closed, but also the same number of files are being created, and you won't be allowed to punch back into record until the new files are ready. When "Optimised File Creation Mode" is enabled, SADiE will make lots of files in preparation for recording, to minimise the activity at crucial moments like dropping in and out of record. When this mode is enabled, the record directory will contain possibly hundreds of zero byte files called i.e. 123.pre which are made in readiness for recording. While they're being recorded they will of course increase in size, but there may be a delay between the recording ending and the files getting their correct names - this is all tidied up at a less busy moment. THE RECORD CONFIGURATION DIALOG This is the interface for entering metadata and setting up where audio files will be recorded to when "Metadata and Mirroring" mode is set. You can access this window by selecting the Record Configuration option from the Project menu. Also if you are set to automatically name tracks using metadata, clicking in the Track Name field of the Transport controls, or using its hotkey will open the Record Configuration. The top section of this dialog is used to enter text or numbers into the Metadata fields, the bottom section allows you to set up both the primary and the mirror record destinations. The "Record Metadata" and "Record Destination" bars can be pressed to minimise one or other of the sections. Note that when a record error occurs (for instance "Disk Space - low" ) the Record Destination section will always pop up (even if the dialog is closed) SCENE AND TAKE FIELDS The Take field is set (by default) to automatically increment for every new recording, but it can be manually edited. 35 SADiE MTR User Manual v5.6 There are three special hotkeys ( which can be assigned to any key in the usual way ) that control the way the Scene number changes). As mentioned in the previous topic, there are two Metadata Templates that define slightly different behaviour of the Scene field - the "general" template where the Scene is purely numeric and a "U.S." template where the Scene is numeric with a letter modifier - i.e. "Scene 10C". The three "Scene" hotkeys are found in the "Record Metadata" Category of Hotkey Setup and are called: “Advance Scene Letter”, “Advance Scene Number” “Advance Scene Number, Reset Letter” When using the US template, you should set two hotkeys for “Advance Scene Letter”, and “Advance Scene Number, Reset Letter”, whereas if you’re using purely numeric Scene numbers all you’ll need is the “Advance Scene Number” key set. The take number always resets to 1 after changing a Scene number. CUSTOMISING METADATA It should be noted that the BWF Description field that is used to store this metadata with the audio is restricted to 256 characters, and so if you use labels or data that are too long, then some data will have to be truncated. If used, the iXML chunk has no such restriction. If you press the View All Metadata Fields button you will see the following window, which allows you to add new metadata fields. Each field has a "Field" box for the metadata's name, a Value, and a position. The position determines which order the fields are presented in the main Record Configuration Dialog. Note that you must set a contiguous sequence of position numbers and not miss out any (you will be warned if you do). 36 Recording Audio New and Delete buttons allow you to make a new metadata field and delete the selected one. Notice that in this example I have made a new field called "MICS" - this is not a standard metadata field, but these fields can be freely named. In this case I've used this field to describe the microphones used and which channel of the recording they are assigned to. But none of this is set in stone - you may add a "Notes" or even "Fishybits" field if you like (but of course you may expect some raised eyebrows from post production engineers if your metadata is too ... nonstandard) Notice also that in the Field Editor above there some fields which have no "position". They will not display on screen, but they will be included in the BWF Description. Note that "Originator" is a special field, and will be placed into the Originator field of the BWF. 37 SADiE MTR User Manual v5.6 As an example, the above dialogs produce a BWF Description field as follows : sSCENE=32 sTAKE=14 sNOTES=a bit loud 10:12:42 sNAME=TTW sMICS=1 Stereo L 2 Stereo R 3 Stand 4 Lav 5 Camera 6 Radio METADATA RIGHT MOUSE MENU Right mouse clicking in a metadata field will show this menu, which allows you to set the behaviour of the data in that field. Font lets you choose the font for display in the Record Configuration Numeric Only sets the field's value to numeric only and in that case there will be increment decrement arrows by the side of the value. Auto-increment will increase a numeric value by one every time record is entered Multi-line allows a carriage return character to be used in the value. It's been noticed that users find it difficult to avoid pressing the Return key to confirm the data entry (but this is not necessary - the metadata is updated continuously) - turning Multi-line off will ignore any returns and thus not allow new lines in metadata fields. Default Value lets you set the initial value for the field. User Editable allows you to edit the value (or disable editing). Add to track name Only fields with this value ticked will be included in the track name when "Construct Tracknames from Record Metadata" is ticked in the Record Settings page. The example above will produce a file name "TTW_032_014" if the Name, Scene and Take fields are added to the track name. Add label to track name when Add to track name is selected also, this will also include the field name in the track name, for instance you could make the track name "TTW_SCENE032_TAKE014" by ticking this for the Scene and Take fields. Metadata Templates can be saved and loaded from the Setup Window/ Record page. IXML If you create custom metadata fields that don't exist in the iXML specification, these will appear in the USER part of the iXML chunk. So for instance the MICS field in the example above is non standard, and so will appear as "MICS=1 Stereo L 2 Stereo R 3 Stand 4 Lav 5 Camera 6 Radio" in the USER field in the iXML. 38 Recording Audio See the iXML Implementation Chart in the ‘Additional Notes’ chapter at the end of this manual for details on the specified iXML fields. MIRROR RECORDING When you're in Metadata Mode, you also have the option to make SADiE put copies of all recordings onto a second disk drive - Mirror Recording. There are two possible modes for mirroring Real Time - where the file copies are made simultaneously with the primary recording. This is the most usual method, for where the two disk drives are both able to keep up with the recording in real time. Delayed Mirror where the second drive does not have sufficient performance to cope with recording in real -time - for instance if you are using Mirror create a DVD-RAM for delivering the recordings. (NOTE - this function is only available under the SADiEMTR software on an LRX2 system). Performance considerations Although it's not the same burden as recording twice the number of tracks, there is always an overhead when mirror (either mode) is enabled. When you're recording large numbers of tracks you should not turn on mirror just because it seems like a good idea, and you should perform tests to check that your disks and PC can handle it. A modern (as of 2007) PC and disks with an H64 or LRX2 should be able to cope with recording 48 tracks mirrored fairly easily, but it's wise to test first for numbers above that. Enabling Mirror The Record Destination section of the Record Configuration Dialog sets where the files are recorded to. Note that to enable the Record Configuration Dialog, you must have enabled Metadata and Mirroring mode. For a project named "prjname" the primary destination will record files into a "prjname" subdirectory of the chosen location i.e. d:\prjname in the example below. The mirror destination will replicate the primary record destination's path. In the example below the mirror files will record to the m:\prjname directory, however as examples: if the primary destination had been d:\audio, then a mirror destination of m:\ will place the files in m:\audio\prjname, if the mirror destination were m:\projects files would be placed in m:\projects\audio\prjname. Therefore in most cases you only need to select a root directory for the mirror destination in order to replicate the primary path. 39 SADiE MTR User Manual v5.6 When a mirror is set, audio will be recorded to both locations simultaneously. Delayed Mirror The most likely reason to want to use delayed mirror is for delivering files on DVD-RAM, because DVD-RAMs are a lot slower than hard disks. DVD-RAM is a common delivery format in the Film world, and many of the common film location recorders can write a DVD-RAM, in order to provide a disk that a Fostex DV40 or DV824 can play. For this purpose it would be wise to format the DVD-RAM as UDF format - other formats may be supported, but UDF is cross-platform and supported by all Fostex players. Windows XP is not able to provide full support for formatting and writing to UDF disks, however we recommend a third party software to enable this in Windows - WriteUDF! UDF Writer for Windows - which is available from Software Architects www.softarch.com. To enable Delayed Mirror, check the tickbox marked DVD-RAM. 40 Recording Audio When you tick the DVD-RAM option, the lower section of the Mirror Record Destination window opens up to show the progress on the copying process. Note unlike real-time Mirror, the directory chosen for delayed mirror is the directory that audio will be mirrored to and NOT a subdirectory of that location named after the project name. Delayed mirroring will start after the first recording has finished, and thus there will always be some waiting time (i.e. a delay !) after recording has finished before the delayed mirror is complete. Delayed Mirror is not very suitable large multi-track recording - a) it make take a long time for the delay to cacth up, as the DVD-RAM is quite slow and b) if you're delivering on DVD-RAM you should ask yourself - is there a device that requires DVD-RAM that can play as many tracks as you are recording from DVD-RAM ? 41 METERS Each Playlist stream has a 64 segment level meter which displays Input levels when the stream is record enabled, or playback level (pre-fade ) when in playback. These can be customised to suit your screen layout, and to allow you to change the focus of level ranges and the thresholds at which the meters change colour. If you right-mouse click on the PPM displays the PPM menu will appear: which allows you to instantly change between presets, and provides a quick link to the Setup page. The Setup page for this is a sub-page of Playlist Setup, called Playlist Streams. 43 SADiE MTR User Manual v5.6 Changing the LED numbers will change the point at which the colours change. Changing the Level values will change the scaling and the level at which colour changes. You can reduce the "Top Red" LED number and that will reduce the overall length of the whole meter, but ensure that the Yellow and Green top LEDs are a lower number than the Red one. There are four stores for you to save your own setups. Also a button to recall the factory defaults. Normally the numeric peak hold displays will turn red when the level goes over the "Top Yellow" value, but there is a setup option to revert to SADiE meters' normal behaviour of only going red when level goes over 0db. 44 WORKING IN THE PLAYLIST THE PLAYLIST DISPLAY 1. 2. 3. 4. 5. 6. 7. 8. 9. Record Enable Buttons Mic Input level control Phantom Power buttons Toolbar Meters Locator EDL Entry Current Time Line Source Tracks Folder 10. Stream Control Buttons 11. Input Select 12. Status Bar control - Sample rate, clock, frame rate 13. Navigator Window 14. Online Button -LTC generate or slave 15. Transport Controls 16. Time Display 17. Record Disk 18. Metadata Window The main SADiE MTR window, filling the whole screen, has a title bar and menu bar in common with most Windows applications. The menu bar contains words that reveal drop-down menus. For example, the File menu is displayed by clicking on the word "File". For most common tasks, however, the system has been designed to be operated by pressing onscreen buttons (by pointing and clicking with the mouse), or by using the hardware controllers. Buttons on the screen have a 3D appearance and should look "depressed" in their On position. 45 SADiE MTR User Manual v5.6 At the bottom of the screen, the status bar describes on-screen buttons when you point at them. Resting the mouse pointer over a button displays the button name in a yellow box (and any Hotkey for the function in brackets), and the status bar at the bottom of the screen describes its action. Most menu commands and button actions are available as Hotkeys on the computer keyboard. Some are also available on the LRX front panel where applicable. On some desktops, the Windows Task bar along the bottom of the screen may obscure the SADiE MTR status bar. If this is the case, click with the Right-mouse button on the Task Bar, select Properties, and make sure that "Keep the Task Bar on top of other Windows" is not ticked. Then press "OK". ADDING AND REPEATING CLIPS ADDING CLIPS TO THE PLAYLIST Click and hold on the Clip you want in the Clipstore and drag it to the Stream and time that you want it to start in the Playlist. You will see that the mouse pointer has changed to a reel of tape, with a cross indicating where the in-point of the Clip will be positioned. Release the mouse button to place the Clip into the Playlist. This does not use the Paste Buffer. REPEATING CLIPS To repeat one or more Entries, either: 1. 2. Copy them and then paste them in at a new point, as described below Select them and then hold the Ctrl key whilst you click and drag a copy with the mouse to the required position. PROFILES SHOWING CLIPS AS PROFILES The SHOW ALL PROFILES button in the top left-hand corner of the Playlist switches between displaying all Clips as solid blocks and waveform profiles. Function key F7 on the keyboard also operates the SHOW ALL PROFILES button The Profile Display setting is saved in the user settings, and thus SADiE will open in whatever state it was left in. NOTES ON PROFILES: Depending on the performance of your PC, the profiles may update slowly when you are playing the Playlist, particularly at the higher horizontal zooms. The highest three horizontal zooms (zooms 22 - 24) are the only zooms at which you will be able to see single samples. These zooms are always drawn as point-to-point lines. LEVEL RESPONSIVE PROFILES Profiles of the Clips in the Playlist are drawn proportional to the current clip level. This means that waveforms will grow and shrink to show fade in and outs, and any clip-wide level changes that have been made. A "ghost" of the original profile will appear behind the Clip. 46 Working in the Playlist Original Altered Levels with "ghost" PROFILE DISPLAY MODES When displaying profiles, there are 8 different types of waveform profile available, visually boosting different parts of the dynamic range. For example, if your audio is very quiet, the waveform on screen may be very small, or alternatively if the audio level is very high and not terribly dynamic it may look like a thick straight line. You can change the profile type in "Profile Display Mode" on the "Playlist" menu, to find one more suitable to the audio you are working with; the high numbers will make lower level audio look "fatter". Type 1 is the default. SCROLLING AND ZOOMING When the Playlist is playing back, the audio will appear stationary, and the Timeline will scroll across it. You may want to move around your Playlist or change which part or how much of it is displayed. This can be done either by scrolling so that a different part is in the window, or by changing the magnification by zooming in or out. There are two Playlist Scrollbars with attached zoom buttons. The one along the bottom of the Playlist scrolls and zooms horizontally (left and right along the time bar). The one at the right-hand side scrolls and zooms vertically (top and bottom) so that you can reveal any Streams not currently in view. 1. 2. 3. 4. 5. Click and drag the box for coarse scrolling Click either side of the box to scroll one window width Click or hold down the arrows for fine scrolling Zoom out Zoom in You can press the zoom buttons repeatedly, until you reach maximum or minimum magnification. Alternatively, there are options for "Vertical Zoom" and "Horizontal Zoom" levels under the Playlist menu. These clickable zoom menus are also available if you hold the Ctrl key down when you click on the normal zoom buttons with the mouse. For users who have a mouse with a wheel, you can use it in the Playlist in the following ways: Wheel = Vertical scroll (as per other applications) Shift + Wheel = Horizontal Zoom in/out Ctrl + Wheel = Vertical Zoom in/out If you have an LRX you can alternatively press the top right button on your LRX controller (labelled "Zoom"), and turn the jog wheel to zoom horizontally in and out. Likewise owners of the Hardware Controller Jog panel can press the ZOOM button and move the jog wheel to change zoom. Shift-Zoom on the Jog Panel allows you to change vertical zoom. There are buttons for 4 preset zoom levels to the left of the horizontal Scrollbar, along with a button labelled "A" that will "Zoom to All" (e.g. your entire Playlist). The preset zoom level assigned to each button can be changed by right clicking on the appropriate number button and selecting a new zoom level. 47 SADiE MTR User Manual v5.6 To the left of these is a "Centre display on Timeline" button, so that if you have scrolled or zoomed in the Playlist and the Timeline is off screen, you can jump quickly to it, without having to scroll or zoom. There are Hotkeys available for these Preset Zoom Functions: F8 - Zoom to All F10 - Zoom Preset 2 F9 - Zoom Preset 1 F11 - Zoom Preset 3 F12 - Zoom Preset 4 C - Centre display on Timeline NOTES ON ZOOMING: During playback you can zoom in or out, but the Timeline will always remain on view. When zooming out, at the minimum zoom levels, all Clips are shown as blocks and not profiles. The Playlist will always stay centred on the position of the Timeline, and so when you zoom in it will be wherever the Timeline is. STREAM COLOURS Playlist streams can be "colour-washed" for identification. This uses the same scheme as in full SADiE5, however the function is only available from the menu that appears by right-mouse clicking over the stream button. 48 Working in the Playlist PLAYLIST STREAMS Whether you are rearranging Clips that were not recorded in their final playback order, building a Playlist from the Clipstore, or creating different versions of the same material, you will want to move Clips around, add them to, and remove them from the Playlist. Where you place Clips horizontally in the Playlist determines at what time they are played back. The choice of where you place them vertically, e.g. on which Stream they are placed, will depend on how you want to control them and view them. It is very easy to move Clips around in time and between Streams, so you can always change your mind! NOTE: You can place as many Clips as you like on top of each other on the same Stream, although this will not make them easy to view, and they will all play back together. STEREO STREAMS You can merge two adjacent mono Streams to create a Stereo Stream so that they can be controlled together. When you record onto a stereo Stream you create a Stereo Source Track whereas recording onto two (or more) mono Streams produces two (or more) Source Tracks, even when the recorded streams are part of a multi-track set. Right-click over the Stream control buttons, and select "Merge into Stereo Stream": When Streams are merged, they retain separate channels of audio but they have a single set of Stream control buttons, so they can be muted, soloed, or enabled/disabled together, and can also be record enabled together for speed. RENAMING STREAMS The name of the Stream appears on the STREAM NAME button on the left hand side. By default, Streams are labelled with ascending numbers, but you can change this to any 8character name. Right-click over the small Stream buttons and select "Rename Stream", type in the new name, followed by Return ( ). To avoid confusion, don't give the same name or number to different Streams! Hotkeys for renaming streams are described in Stream Naming in the "Recording Audio" chapter. ENABLING AND DISABLING STREAMS Enabling and disabling streams provides a means of separating some streams from others for certain editing functions, and of allowing you to select a stream or sets of streams that you are working on without affecting others. Disabled streams are shown with a darker grey background than enabled streams. When a stream is disabled, it will play back as usual, but is not affected by any Playlist cutting or editing functions. 49 SADiE MTR User Manual v5.6 The STREAM NAME button displays the Stream name and clicking on this enables/disables that stream. The Playlist will start with all Streams enabled. Holding the Shift key when clicking this button acts on the group of Streams above it that are all the same status. This is like using the Shift key to select items from a list in most Windows applications. Additionally there is a "reverse" enabling function; if you hold the Ctrl key when clicking the stream button, then this stream will be enabled and all other streams will be disabled. PLAYING AND LOCATING TRANSPORT CONTROLS 1. 2. 3. 4. 5. Online/Sync enable Stop Play 6. Record Pause Current Time Display The Transport Controls are a permanently available toolbar in the bottom right corner of the Playlist. PLAY and STOP are also activated by the spacebar on the computer keyboard. If you have an LRX, PLAY and STOP are also activated by the long black button under the jog wheel, along the bottom of the controller. Likewise users of the Hardware Controller Jog panel have dedicated PLAY & STOP buttons. Online The Online button enables sync - either for LTC generation or for slave to LTC. SHIFT+SET on the LRX panel toggles Online on & off. Note that right-mouse clicking on the Online button allows you to quickly change between LTC Master and Slave mode as well as selecting 9-pin devices. Double-clicking in the time bar activates PLAY. A single click in the time bar activates STOP. EXTRA PLAY FUNCTIONS Additionally the Playlist Menu provides some useful extra play functions: Play Selected Clips - This previews only the selected clips and can be used to quickly play one clip or several, separated from the Playlist. Auto-Return on... ...Stop - Creates a temporary locator at the point at which play starts, and when play is stopped the Timeline will jump back to that point. ...Play - As for stop, but the Timeline will only jump back to the locator when play is restarted. This function is also available on Hotkeys with some extra functionality: 50 Return on Stop enabled Return on Play enabled Off Space in Stop starts playback at current time and drops marker locates to marker and starts playback starts playback and drops a (hidden) marker Space in Play stops playback, locates to marker stops playback, stays where it is stops playback, stays where it is Working in the Playlist Alt + Space in Stop starts playback at current starts playback at current time and drops marker time and drops marker locates to (hidden) marker and starts playback Alt + Space in Play stops playback and stays stops playback and stays stops playback, locates to where it is - doesn't where it is - doesn't marker Return to the marker. Return to the marker STREAM SOLO AND MUTE Each Stream has its own control buttons for (silencing that Stream). soloing (listening to that Stream alone) and muting You can also activate these using keyboard Hotkeys: Ctrl + the Stream number to Solo, Alt + the Stream number to Mute. TIME DISPLAY WINDOW For applications where being able to see the exact time at a glance is important, there is a re-sizable time display window available. This window can be displayed via the "View" menu, and the two buttons will be named according to their current setting. Pressing either button shows a menu to allow you to change how time is displayed in this window. The left side button in the picture has four options to determine what time is being displayed: 1. Current - displays the current absolute time within the Playlist. 3. Play - counts the time up from the last point at which play started. 2. 4. 5. 6. 7. Countdown - counts down to the end of the final entry in the Playlist. Start - counts the time up from the beginning of the first entry in the Playlist. Start of Clip - counts the time from the beginning of any EDL entries that are selected in red. If no entries are selected the Time Display will show --:--:--. The timer will also show a negative value if the current time is before start of the first selected clip so as to count down to its start. End of Clip - the same as "Start of Clip" except that this references the end of the last selected EDL entry. PQ Track - this option will not work in SADiE MTR The right side button in the picture allows you to change the format of the time display: 1. 2. Auto - this Time Display will follow the global setting under Setup / General / Time Format The other five options allow you change the format to make this Time Display show a separate format to that shown by the Transport Controls and the timeline. 51 SADiE MTR User Manual v5.6 As with other Windows, you may click in the top left hand corner of this window and set it to "Always on Top" LOCATING There are several ways of locating the Timeline to points in the Playlist: 1. Using the Time Bar Double-click in the white time bar area at the top of the Playlist to start playback immediately from that point. The mouse time display will show the exact time you are pointing to. Single-click anywhere in the time bar to stop playback. Single-click in the time bar when playback is stopped to locate the Timeline to that point. 2. NOTE: Scroll or zoom out to access parts of the Playlist that are not currently on view (see The Playlist Display). Using the Current Time Display Click, hold and drag the mouse up or down over any field of digits in the time display (e.g. the hours, minutes or seconds, etc.). Their value will increase or decrease, and the more you move the mouse, the faster they change. Release to set the new value and locate the Timeline. Alternatively, double-click on the time display. The box that pops up allows you to: Directly type in the time that you want to locate to. End with the keyboard Click on the up / down arrows to adjust the time. These nudge the lowest units. Hold the keyboard Shift whilst clicking to nudge seconds, Ctrl to nudge minutes. Finish with "OK". 3. Click on "Zero" to Zero-locate, followed by "OK". Return key. Using the Transport Controls Double-clicking on the STOP button is a quick and easy way to get the Timeline back to Zero. The REWIND and FAST-FORWARD buttons are latching with the speed of wind increasing the longer they operate. Using the time bar as described above is usually quicker and easier for most operators. 4. Using Hotkeys There are two very useful default Hotkeys on the computer keyboard: 5. "Home" will locate to the start of the first Clip in the Playlist. "End" will locate to the end of the last Clip. Using the LRX If you have an LRX or a Jog panel, with none of the buttons activated, moving the jog wheel will move the Timeline location across the Playlist. LOCATING TO CLIP IN AND OUT POINTS The Timeline will locate to the in or out point of the previous or next Clip on any enabled Stream when you use these keyboard Hotkeys: 52 Select previous Clip Select next Clip - Left Arrow Right Arrow Working in the Playlist There are also Hotkeys available for "Locate to Selection start" and "Locate to Selection end" under the Playlist section of the Hotkey setup. These are , (comma - the key with < above) and . (full stop - the key with > above) LOCATORS AND MARKERS There are three different types of Locator that can be used to mark specific times in the Playlist. These markers are always saved as part of each Playlist. They appear as markers along the timeline, but each type can have different properties. A single pair of Left and Right points for looping, automatic punch-in recording and region editing. Ten or more numbered locator points each with their own dedicated hotkey sets for Setting, Locating to (Go To), and Clearing. Any number of Named locator points which have text attached. These have a generic set of hotkeys for Setting, Locating To (Go To next and previous locator), Clearing, Renaming etc. The Locator Table There is a table showing the locators and their individual properties, which can be seen at the bottom of the Playlist window by pressing the "Show/Hide Text Pane" button at the top right of the Playlist, and then selecting the "Locators" tab. This works in a similar fashion to the Text EDL: you can edit parameters in the table you can double-click in the Entry number column to start playback from that locator; single click here locates without starting playback. you can re-order by clicking on the column header. SETTING LOCATORS Locators can be set using either Mouse - clicking on buttons in the Transport Controls' Locators pane. Hardware Controller - has dedicated keys for the numbered and L & R locators. Hotkeys 53 SADiE MTR User Manual v5.6 The LRX front panel has dedicated hotkeys along the top right for setting locators and lcoating to them. SET sets a new locator - these are numbered but can also hold a name if edited as below. PREV locates to the previous (in time, not the next numbered) locator. NEXT locates to the next locator. LOCATOR PARAMETERS AND FEATURES 1. 2. 3. 4. Once set, locators can be dragged with the mouse to re-position them. This is only allowed if they are set to be "Moveable" either in the table, or from the menu that appears when you right-mouse-click over the locator. There is a setup option to allow locators to default to "moveable" or not. Locators can be set to follow slip rules (or not). When edits in the Playlist are causing entries up- or down-stream to slip, then so will the Locators. There are setup options to determine the default state, but individual locators can be set to slip or not, hence some locators can be fixed time marks, and others can mark audio events. The Slip state of a locator can be changed, either in the table, or by choosing the Slip item from the menu that appears when you right-mouse-click over the locator. "Named" Locators have text, which can be viewed in a yellow help-bubble that appears when you hover the mouse over the locator. This text can be edited, either in the table, or by choosing the Edit item from the menu that appears when you right-mouse-click over the locator. There is the concept of a “Current Named locator” – you can click on a locator and it changes colour to red. A number of hotkeys (under the “Transport- Locators” section of hotkey setup) can be set to work on the “Current Locator” :”Delete ”Edit 5. current text of named current locator” named locator” ”Next…..” and “Previous named locator” which selects the next (or previous) locator, and locates the timeline to its position. If the timeline is not at the Current Locator position, then the first press of a “Next” or “Previous” will locate to current locator. There are two hotkeys for setting named locators: ”Insert named locator at current time” (which auto-names it from the text alongside the "Get" button in the Locators pane of the Transport Controls.) ”Insert and edit named locator at current time” (which puts up a dialog box for you to name the locator straight after setting it). MULTI-DIMENSIONAL LOCATORS. If the setup switch in Locators Setup \Multi-dimensional locators is ticked, then when you capture a locator position, the Horizontal and Vertical Zoom as well as the Vertical streams view is captured, and recalled when you "Go To" to that locator. There are fields in the Locator Table for these :- Stream, Vertical Zoom and Horizontal Zoom where their values can be changed or disabled. For instance it would be possible to save just Stream and set V- and H-zoom to be unspecified if you so wished. TRANSMISSION MODE This mode enters Play, and locks out the Keyboard and Mouse, to prevent accidental key strokes which could interrupt an important Playback, for example when playing out to external equipment. To enter Transmission Mode, hold Ctrl. whilst starting playback in the usual way. The following box will appear: 54 Working in the Playlist The only way to escape from transmission mode is to click on one of these two options. "Terminate Playback" will stop playback and allow you full control of SADiE. "Regain control of SADiE" will allow you full control, but will continue playback. AUDIBLE SCRUBBING Scrub is a useful generic method of hearing audio whilst quickly moving the virtual playback head (Timeline). There are two ways to scrub. Shuttle moves large distances through the audio in either direction whilst hearing the audio scrub past the Timeline. Jog scrubs the audio left to right to find a particular edit point, like nudging the Timeline backwards and forwards for short distances. You can quickly search audibly through the Playlist using keyboard Hotkeys to "Shuttle" through the audio. There are three default fixed shuttle speeds. With "Num Lock" turned on the following number pad Hotkeys apply: 1 = Shuttle backwards at normal speed / 3 = Shuttle forwards at normal speed 7 = Shuttle backwards at double speed / 9 = Shuttle forwards at double speed 4 = Shuttle backwards at one-and-a-half times speed / 6 = Shuttle forwards at one-and-ahalf times speed These Shuttle facilities are locking. Press the Hotkey once to start Shuttling, press again to stop. The double speed Shuttle functions are also available on keys J and K to make things simpler for laptop users. You can change the default speeds in the setup page. If you have a LRX or Hardware Jog panel, you also have the facility to Jog through the Playlist, this is more like nudging backwards and forwards through the audio. Simply press the top left button above the Jog wheel (labelled "Scrub" on the button key) to activate the Jog function, then turn the Jog wheel. The audio will play back only while you are turning the wheel and in the direction you are turning, and the speed of jog will depend on how fast you turn the wheel. NOTE: You will hear all Streams that are not muted, so you may choose to Stream(s) with the small Stream control button. SOLO the relevant UNDO AND REDO Pressing UNDO can reverse the last change that you made to the Playlist. Press UNDO again to reverse the change before that, and so on, stepping back through the history of your actions. REDO will step forward through the action history, if you UNDO too many times. Undo and Redo are also available on the "Edit" menu. This also gives a description of the operation to be undone or redone. There are up to 50 levels of undo available. These functions are also available as keyboard Hotkeys: Ctrl + "Z" = Undo Ctrl + "Y" = Redo 55 SADiE MTR User Manual v5.6 MANIPULATING CLIPS SELECTING CLIPS To perform any function on a Clip it first needs to be selected: To select one Clip, click on it. It will turn red to show it is selected. To select adjacent Clips, click, hold and drag the mouse to draw a box around the Clips to be selected. Don't start the box on a Clip that is already red, or you will find you are moving it! To select more than one, hold the Shift key whilst clicking on the Clips to select. To select all the Clips in the Playlist, click on the "Edit" menu, then "Select All". To deselect individual Clips, hold Shift whilst clicking on them again. To deselect all Clips, click on a grey bit of a Playlist Stream. NOTE: Selected Clips are red. Red is a warning! Once selected it is quite easy to move Clips by mistake, so always deselect them when you have finished. There are several Hotkeys for selecting and deselecting Clips: Right Arrow = Select Previous Left Arrow = Select Next Ctrl + A = Select All Esc = Deselect All If you have an LRX or Jog Controller panel, you can position the Timeline over a clip using the Jog wheel, then press the bottom left button SEL (or Edit Select on Jog Controller) to select the Clip. RENAMING CLIPS To rename a clip right-click over the Clip itself and select "Edit Entry Name". Type the appropriate name, and then press Return ( ). Press "Y" on the Keyboard to rename the currently selected Clip. This Hotkey will only work on a selected Clip which is currently displayed on the screen. CUT, COPY, AND PASTE These techniques can be used to remove, move and add Clips in exactly the same way that text can be manipulated in a word processor. Clips are pasted into the Playlist from a temporary store called the Paste Buffer. The Paste Buffer can contain Clips that you select to cut or copy from within the Playlist. So you can move Clips by cutting and pasting them somewhere else, and you can repeat them by copying them and pasting the copy somewhere else. These tools are on the Playlist toolbar. 56 Working in the Playlist CUTTING AND REMOVING CLIPS Select the Clip(s) required, then press CUT ENTRIES TO PASTE BUFFER On the LRX The fourth button from right at the top is called CUT and performs this same function. NOTE: The previous contents of the Paste Buffer are replaced each time it is loaded. If you want to remove a Clip from the Playlist without it being loaded into the Paste Buffer, select it and press the keyboard "Delete" key, or right-click on it and select "Delete Entry". This will be useful if the Paste Buffer already contains something you want to paste in later. COPYING CLIPS Select the Clip(s) required, then press COPY ENTRIES TO PASTE BUFFER PASTING CLIPS Once you have loaded the Paste Buffer, by Cutting, or Copying you can then paste the Buffer to the Playlist: Press LOAD PASTE BUFFER TO CURSOR. When you move your mouse pointer (or cursor) over the Playlist Streams, you will see that it has changed to a reel of tape with a cross indicating where the in-point of the Clip(s) will be positioned. The mouse time display will give you the exact EDL time. Click to paste the Clip(s) into the Playlist. This function is available as keyboard Hotkey, by pressing Shift + "V" On the LRX The third button from right at the top is called PASTE and performs this same function. To cancel pasting and drop the paste symbol from the mouse pointer, press the button again, or right-click with the mouse. Pressing the PASTE TO CURRENT TIME button will place the contents of the paste buffer into the Playlist at the current time. Under normal circumstances, this will be with the entry's start time to the current time. NOTE: Multiple Clips cut or copied from the Playlist will be pasted back with the same time and Stream relationships between them. After pasting, the Paste Buffer is not emptied, so you can paste further copies as many times as you like. PASTING WHOLE EDLS TO ANOTHER EDL The paste buffer can be loaded with an entire Playlist that has been previously saved. On the menu bar, select "File", then "Load to Paste". An "Open EDL" box will appear allowing you to select the Playlist you want, then press "Ok". The PASTE button will have been pressed for you so you can immediately paste the selected Playlist into your current Playlist. This is very useful for compiling work that you have built up in sections; for example, edited tracks compiled into albums, scenes compiled into reels, etc. 57 SADiE MTR User Manual v5.6 PASTING BETWEEN EDLS You are able to copy selections between EDLs that are in the same project. 1. Select some entries; select COPY ENTRIES TO PASTE BUFFER by one of the methods above. 3. Then Paste the entries into the new EDL usign any of the methods above. 2. Open the destination EDL by double-clicking on its icon at the bottom of the Clipstore (press V to open the Clipstore). MOVING CLIPS You can move Clips around the Playlist in many ways: 1. 2. 3. Cut and Paste them as described above. Select Entries, and then click and drag them with the mouse to a new location or Stream. The Playlist will scroll automatically if you move the Entry near its edges. NOTE: While you are moving the Entry, the mouse time display will change to show the start time you are about to set when you "drop" it. Red is a warning! Once selected it is quite easy to move Entries by mistake, so always deselect them when you have finished. Nudge them by small amounts left/right (earlier/later in the EDL) or up/down (to different Streams without changing in and out times and so maintaining sync), using keyboard hotkeys. You can also move Entries when using Playlist Editing mode. PLACEMENT OF CLIPS REMOVE GAP (BUTT) To butt a selected Clip up against the previous Clip on a Stream, press the REMOVE GAP button. The start of the selected Clip's fade-in will be changed to coincide with the start of the preceding Clip's fade-out. This function is also available as a keyboard Hotkey, by pressing "F4" SNAP TO CURSOR This is a very useful tool for synchronising Clips. Right-click over the Clip you want to move and select either "Snap entry in-point to current-time" or "Snap Entry's end to current-time". The Entry will jump to a new position with either its in or out-point on the Timeline. This is useful: On the fly whilst listening to music to run alongside speech. A voice Clip can be snapped to the Timeline during playback. After positioning the current-time cursor by double-clicking on the current-time display and typing a new value. With a single Clip selected, these functions are also available as keyboard Hotkeys: "I" = Snap entry in point "O" = Snap entry's end SLIP Slip is a useful function for keeping Clips in Sync with one another. Turns the Slip function on and off 58 Working in the Playlist Enables Slip for all Clips to the Left (earlier in the time line) of the selected one. Enables Slip for all Clips to the Right (later in the time line) of the selected one. With the Slip function on and a Clip selected, other Clips on enabled Streams will turn dark blue and will automatically be moved with the selected Clip: Moving a Clip by nudging, dragging it with the mouse, using Remove Gap, or by any editing functions will cause Slipped Clips to move with it. If right Slip is selected, removing a Clip from the Playlist will cause later Clips to be brought forward by an amount equal to the selected Clip's duration. This means that removing a Clip between two cuts in continuous audio will automatically remove the gap that would otherwise be left. If right Slip is selected, pasting a new Clip into the Playlist causes Clips after it to be moved back by an amount equal to its duration, e.g. they make room for it! GROUPING CLIPS Any number of Clips may be grouped together. They will be redrawn as a single block in the Playlist and this can be renamed and edited as if it were one clip. This is useful for convenience of display, if you are repeating operations on the same group of Clips, or to avoid accidentally undoing edits. Select the Entries you want to group and then press GROUP SELECTED EDL ENTRIES. NOTE: When selecting lots of Clips it may be easier to select all the Clips in the Playlist and then deselect the ones you don't want included in the group. Click on the "Edit" menu, then "Select All" (or press Ctrl + "A" on the keyboard). Deselect Entries by holding Shift on the keyboard while clicking on them with the mouse. A group can be broken down in to its component parts by selecting it and pressing the UNGROUP button. When a Clip or group is selected, these functions are also available as keyboard Hotkeys: "G" = Group "U" = Ungroup When editing a Group clip, you will only be allowed to edit the starts and ends of the clip, and will not be able to perform and edit that would break any internal edits. ADJUSTING CLIP LEVELS To adjust the level or single or multiple selected clips, go to the "Playlist" menu, and select "Adjust level of selected clips". The window which appears allows you to make an absolute or relative change to the level for all the selected clips. The level is changed by typing a value in the box, or clicking on the nudge buttons. 59 SADiE MTR User Manual v5.6 This function is also available as a Hotkey, by pressing "L" when the desired clips are selected. NORMALISE The normalise function automatically adjusts clip levels in order that the maximum peak in that clip reaches a specified level (set by the user). This option is available from the "Playlist" menu. First you should select the clips that you wish to normalise. Each clip will be normalised individually (this also applies to the individual clips inside (yellow) group clips). Set the "Normalise clip level" by typing a number or using the nudge buttons, and on pressing "OK", SADiE will analyse the clips to find the highest peak, and will then lower or raise the level accordingly. The time taken to perform the Normalise will depend on several factors and will vary from Clip to Clip. This function is also available as a Hotkey, by pressing "N" when the desired clips are selected. 60 Working in the Playlist EDITING SADiE provides the user with a fast and intuitive interface for editing. With stereo Clips, the two channels are always edited simultaneously if they were recorded together, unless a stereo Clip is first ungrouped as described under Grouping Entries. There are three editing techniques at your disposal: 1. 2. 3. Simple cut-and-splice editing in the Playlist using the Scrub functions to accurately locate edit points, and making "razor-cuts", just as you would on tape. This creates separate Clips so that unwanted material can then be removed. Playlist Editing allows you to make and also adjust edits by altering the in-point and out-point of any Clip, as well as fade durations. Region Editing - the previous editing methods are Clip based, but region editing is useful for cutting, copying areas that haven't yet been defined as Clips. You can, for instance, use region editing to remove a complete section of the Playlist across all streams. RAZOR AND SCISSORS Pressing the RAZOR button, divides the Clips under the Timeline on any enabled Stream into two at the Timeline position. If you have an LRX or Jog Controller panel you can, alternatively, press the bottom right button on your LRX controller (labelled "Razor") or the Jog panel key marked Razor. Whereas the RAZOR button always cuts at the Timeline, when you press the SCISSORS button, the mouse-pointer will change into a dinky scissors icon with a cross hair to show the exact cutting point (mouse time). You can then make a freehand cut anywhere in the Playlist. This is useful if you can see exactly where to cut from the waveform profile. NOTE: When using the RAZOR, if there are Entries at the cut point on other Streams which you don't want to be cut, disable those Streams first. The SCISSORS function cuts only on the Stream the mouse icon is over, providing a useful alternative to the RAZOR if working only on one Stream. Holding the Ctrl key whilst scissor-cutting, cuts across all enabled streams at the mouse time. Using Ctrl + Alt cuts on all streams at the current (Timeline) time, the same as the razor. Holding the Alt key whilst scissor-cutting, cuts at the current (Timeline) time rather than at the mouse time, on the Stream which the mouse icon is over. Right clicking while you have the scissors selected disables them and returns the cursor to its normal "select" mode. CUT AND SPLICE EDITING 1. 2. 3. 4. 5. Scrub through the audio to locate your edit point. Before cutting, you should disable any Streams that contain Clips that you don't want to edit. Pressing the STREAM NAME button enables/disables Streams for cutting. Disabled Streams appear a darker grey. Press the RAZOR button. All Clip(s) on enabled Streams will be divided at the Timeline. If you are trimming a Clip's beginning or end, you can now simply remove the unwanted Clip material to the left or the right of the razor-cut. If you are removing material from within the Clip, you will need to locate and make a second razor-cut so that you can remove the material between them. Select (by clicking on it) the unwanted material and remove it (either, by using CUT TO PASTE or right-clicking and selecting "Delete"). If you have SLIP on, the resulting gap will be automatically joined up. Play the finished edit by double-clicking in the time bar just before it. If you don't like it, use UNDO and do it again or adjust it using Playlist Editing Mode. 61 SADiE MTR User Manual v5.6 Whereas the RAZOR button always cuts at the current-time cursor, when you press the SCISSORS button, the mouse-pointer will change into a dinky scissors icon with a cross to show the target point. You can then make a freehand cut anywhere in the Playlist (useful if you can see where to cut from the waveform profile) and so skip the process of scrubbing to locate the edit point. PLAYLIST EDITING PLAYLIST EDITING WITH THE MOUSE In this mode, when a Clip is selected in the Playlist, it will change to a waveform profile and its In and Out points can be adjusted. Playlist Editing has the following uses: After making a razor or scissors cut as described above, by adjusting the out-point of the preceding Clip, and the in-point of the next, you can use Playlist Editing to remove (or repeat) material at the edit point. The initial razor-cut doesn't even have to be that accurate, as the adjustment will fine-tune the edit. You can adjust an existing edit. You can adjust the join between two unrelated Clips, such as a music Clip fades and speech starts over it. To use Playlist Editing: 1. 2. 3. Activate PLAYLIST EDITING mode with this button on the Playlist toolbar. With the mouse, select the Clip you want to adjust. It will turn bright red. Depending where you point the mouse over the Clip, a handy little graphic at the mouse cursor will appear to tell you which bits of the Clip are going to move. Cursor Area Operation In-point Body and Fade-out move In-point Main body Out-point Out-point Main body while holding CTRL key 4. Fade-in moves Whole Entry moves Fade-in and Body move Fade-out moves Moves the body of the entry but leaves the In and Out where they were. When the appropriate mouse graphic for your chosen function is displayed, click and drag the mouse over the Clip profile to move through the audio. When you release the mouse button, the edit adjustment is done! You can also enable "Scrub" to hear the changes being made. NOTE: Scrub is useful for quickly losing large amounts of audio material at an edit point, just like dumping tape onto the floor, but you don't have to worry about stepping on it! NOTE: Whether previous or subsequent Clips move when you release the mouse button will be determined by whether you have selected a SLIP mode (see Placement of Clips). 5. NOTE: The time display in the Transport Controls will show you the time of the In or Out point being adjusted and this (or the new duration) will appear alongside the Clip on the Stream. When moving the whole Entry, the Stream display shows the in and out times. To hear the edit play it back as normal. IN PRACTICE Playlist Editing is much quicker to do than to read about! Try it out to familiarise yourself with the functions and what they do. 62 Working in the Playlist FADES AND CROSSFADES There are four more mouse graphics which let you increase the length of the fades at the in and out points by dragging out the start or the end of each fade. Overlapping them will create crossfades. Hold the keyboard Ctrl key as you move the mouse over the edit point: Cursor Operation Start of the Fade-in End of the Fade-in Start of the Fade-out End of the Fade-out The type of fade curve can be altered by holding the keyboard Shift+Alt key (for coarse changes) or the Alt key (for finer adjustments), as you move the mouse over the edit point: Cursor Operation Fade-in shape Fade-out shape PLAYLIST EDITING WITH AN LRX If you have an LRX or a Jog Controller panel, all the major editing functions are available to you on the controller, minimising the use of your mouse. Enable Playlist Editing mode in the usual way, and then simply press the buttons detailed below (see LRX Edit Controller for more details) and move the jog wheel to alter the specified points. Buttons on LRX IN IN + EDL/SRC OUT + EDL/SRC OUT IN + XFADE OUT + XFADE Equivalent Cursor Operation Fade-in moves Body and Fade-out move Fade-in and Body move Fade-out moves End of the Fade-in Start of the Fade-out You can also enable "Scrub" to hear the changes being made. 63 SADiE MTR User Manual v5.6 REGION EDITING The basic principle of Region Editing is that you firstly define a "region" of the Playlist, and next perform another action on that region; you may want to delete it, move it or copy it elsewhere for instance. The region is defined between the standard Left and Right Locators, and across all streams enabling you to more easily edit across all enabled streams. You could use the region editing tool for removing a section, or for moving it or copying it elsewhere. Another possible use for region editing is for simple speech editing tasks. Where you otherwise may use razor cutting and Playlist editing, defining a region and deleting it can be very quick, particularly for repetitive tasks. There also keyboard Hotkeys for the Region Editing functions and this can speed up operation significantly. To enable Region Editing, press the REGION EDITING ENABLE button; region editing is turned on when the button is pressed in. DEFINING AND ADJUSTING THE REGION DEFINING THE REGION When Region Editing is enabled, the mouse cursor will change to a ready to define a new region. pencil tool, which signifies that you are To define a Region, with the pencil tool, click at the position in the Playlist where you want the region to start (it doesn't matter which stream you are over when you click, anywhere between the time bar and the bottom of the Playlist will do), then whilst holding the mouse button down, drag the mouse to the right, and when you reach the point at which you want the region to end let go of the mouse button. The region will be coloured dark red, and you'll notice the Left and Right locators are positioned at the start and end of the region respectively. You can also start at the end of the region and drag leftwards towards the start, whichever method is most convenient. ADJUSTING THE REGION Clicking with the mouse outside the defined region gives you the pencil tool again, and will start making a new region. You could use this method to redraw the region from scratch. 64 Working in the Playlist When the mouse is close to the start or end of the region, the mouse cursor will change to a left pointing or a right pointing arrow shaped cursor. Clicking and dragging one of these cursors allows you to adjust the region start or end. REGION EDITING FUNCTIONS To see the sort of thing you can do with Region Editing simply press the keyboard "Delete" key. Assuming you have Slip off, you will see the region disappear, and razor cuts are made to tidy up the ends of the clips left behind. Press UNDO, and then set SLIP to be RIGHT. Press "Delete" again and this time the region disappears, but all clips to the right are slipped to fill in the hole. Press UNDO. This time press the CUT button. The same thing as before will happen: the region disappears and clips move left to fill the hole. Go to the end of the Playlist and press PASTE and the mouse cursor changes to the usual paste icon. Clicking in the Playlist will now drop a copy of the whole region into the Playlist. Alternatively, you can use the COPY button to leave the original region unchanged (and unrazored) to allow you to paste a copy of the region elsewhere in the list. NOTE: You may want some streams of the Playlist NOT to be affected by any region editing. Region editing only works on streams that are currently enabled (see Enabling and Disabling Playlist Streams). THE TEXT EDL The Text EDL is shown by pressing the Text Pane button in the top left of Playlist. The Text EDL offers a list of editable parameters for every EDL entry. The SADiE5 manual has a more detailed description of the Text EDL 65 ADDITIONAL NOTES SOURCE TRACKS PANE On the right-hand side of the SADiE MTR window, you can show (press hotkey V) a vertical bar that shows us all the elements that make up your Project. It is split into two sections: The "Clipstore" otherwise known as the "Source Tracks Folder" which holds all the source audio material that the project is using. The Metadata and Mirroring pane which is used during recording for adding metadata to the files recorded, and for setting locations where the recordings and their optional mirrors are stored CLIPSTORE The Clipstore holds the Source Audio Tracks which you are using in your Project. It is organised by Scene, and you can double click on each Scene folder to view the separate takes. When the mouse is hovering over a clipstore entry, a yellow "pop-up" will appear showing details about the clip and displaying metadata inside the file. 67 SADiE MTR User Manual v5.6 This metadata can become quite large, particularly when iXML is included in the file; the Clipstore Setup page has controls to allow you to filter what is displayed in the yellow pop-up. PREVIEWING CLIPS If you right-mouse-click on any take in the clipstore, you will see the menu below. Selecting the Preview option and the clip will be opened inside a separate Preview window. 68 Additional Notes This window shows all the channels of the clip with profiles. There are the usual horizontal and vertical zoom buttons and a scroll bar down the right side to allow you view different areas of the clip. The slider below the clip display can be dragged left or right to allow you to move the cursor to a different time in the clip, and then playback can be started from that position by pressing the START button. IMPORTING SOURCE FILES New files recorded will be stored in the same folder as the EDL i.e. the Project Folder. However it is possible to import audio files into your project from other disc drives or directories. To do this, right-mouse click anywhere in the clipstore and you will see the menu. Select Import Source Tracks to browse and import audio files (further description of this is available in the Importing Source Tracks Section). When you import audio files from another disk or directory the audio is played from the files' original locations, and no copy is made in the Project Folder. 69 SADiE MTR User Manual v5.6 However note that the Copy non-project audio locally function will look in the clipstore for any audio files that are outside the Project Folder, and copy them INTO the Project Folder. This is a good way to ensure that all the files for the project are in one place, to help, for instance, if you are backing up the project to another disk drive, or CD- or DVD-ROM. Cleanup unused audio is a way of deleting files that are not in use. This will remove any audio files that are not used in any of the EDLs in the current project. Audio files that are external will be removed from the project, but not deleted. Audio that is inside the Project Folder will be deleted. Drag and Drop. It is also possible to import source tracks from their original location by dragging them from a file viewer such as Windows Explorer or Disk Management. Some Sound Effects Database applications may also support drag and drop of files. You can drop files to the EDL in order to place them directly, or else drag to the clipstore. Drag and Drop files always leaves files in their original location. THE DISK MANAGER DISK MANAGEMENT SADIE MTR, as with all SADiE Series 5 systems, can play and record audio files to any disk drive that the Windows PC can read and write to. Of course some devices will not have sufficient storage or performance to record a usable amount of audio (floppy disc for instance). Additionally some drives require special software for writing (CD-R or DVD-R are not appropriate for real-time recording or playback). However, anything that operates like a normal hard drive (be it IDE, SCSI, Firewire, etc.) can be used in SADIE, as long as Windows can use it. It must be noted that Windows' own User Management may set privileges for some users on certain drives, or even certain folders on drives, either locally or across a network. Therefore, if the User does not have the ability to write files to a drive under Windows, then SADIE will not be able to record files to that drive. DISK MANAGER Disk Manager is designed to allow you to see all of the drives, folders and files on your machine, for the purpose of copying or deleting files, and previewing audio files in the same way as you'd expect in Windows Explorer. In fact you can use Windows Explorer for some of these functions, but Disk Manager will offer you some extra, SADIE–specific functions that Explorer cannot. Disk Manager allows you to "import" an audio file into a SADIE Project. You can also use it to mount and unmount removable drives. The left hand pane of the Disk Management window shows a "tree": 70 Additional Notes Double-clicking with the mouse on each branch of the tree opens or closes the contents of that branch, so that you can browse down through the levels to find a particular file. System is just a name for the top of the tree. However, when you right-click on System, one function is available on the menu that appears – "Properties". You can also press the PROPERTIES button. The page that appears gives you details of storage capacity and usage for all drives that can be seen on the system. See Checking space on your disk. My Computer lists every drive that is currently attached to the PC. This will include: Lettered drives, including system hard drives c:, d:, etc, plus any network drives that are mapped to a drive letter within Windows. CD-ROM, CD-R, DVD-ROM, or DVD-R drives, which will probably be mapped to a letter. Normally these will appear with a "book" icon beside the drive name/letter, which means that the drive is readonly. For a SADIE-supported CD-R drive, it will appear as writeable when the appropriate media is inserted (CD-R disk). However if a CD-ROM disk is inserted, the drive will also appear as read-only. PC Network will show you a list of all the other systems on your network, much like the "My Network Places" within Windows Explorer. You can browse down through this tree (if you have access rights) to find, copy, and log files on other disc drives on other systems. Underneath, but still in the My Computer section, you may see drives that are attached to the PC, but not assigned letters under Windows, tape drives for instance. Any audio file that you find in the My Computer section (and is SADIE compatible) can be previewed and imported into the Clipstore using the right-click menu items. Once imported the audio files can be used in the SADiE project and edited in EDLs. 71 SADiE MTR User Manual v5.6 A SADiE project can therefore play back files from any drive that is visible in the "My Computer" section. It is also possible to play files from many different drives together in the same Playlist. However, this does assume that the drive and/or the network connection have sufficient performance for real-time playback of these files. You may find that copying the files to a local hard drive that has better and more predictable performance will save time in the long run. You can copy files in Windows Explorer (if the drives are visible to Windows) or SADIE's Disk Manager. The Copy Bin is a simple tool that enables you to drag files from different sources for copying, then drag the whole copy bin to a single destination. When you browse through your drives in Disk Manager, sub-directory folders will be shown for each Project . You can create further folders by right-clicking on the folder or disk name, or selecting it and using this button. These project folders will contain the audio and the waveform profiles of each Track. When Projects and their components have been backed up as described in the Projects section above, it will also contain packed Project files. These buttons on the Disk Management toolbar select whether only audio Tracks or all files are listed in the next column. On the far right, details for each file are given in columns that can be customised. Click on their heading buttons and select alternatives from the box that appears. The dividers between column buttons can be dragged to change the column width. NOTE: As with most Windows applications, multiple selection of files in the list can be done by selecting them while holding the Ctrl or Shift keys. CHECKING SPACE ON YOUR DISK In the tree, select the storage device you want to check and press PROPERTIES. A display box will tell you how much space is used, how much is available. This command is also available by rightclicking on the device. You can also use this button to show you the storage properties for the whole SYSTEM, which will look similar to this: Note that the Time Available is displayed in the format in which you are set to record. COPYING FILES You can copy files between disks or folders by simply dragging them across and releasing them over the destination symbol. You can drag-and-drop files, or folders, or even an entire disc drive. The directory structure within folders or whole discs will be re-created on the destination. The copy bin can be used as a temporary store when copying files from more than one folder. So, drag some files into the copy bin (from any directory. as you can use the copy bin as a "shopping basket"), then click and drag the Copy Bin to where you want the files copied to. 72 Additional Notes File copying is a background process, so you can do other work in the foreground. You will be informed when the copy is complete. The speed of copying will depend on the demand made on the system by your foreground activities; the copy may actually stop during periods of heavy playback/record, then continue as and when the processor power returns. During a Copy process, a new "copy process" branch appears on the left, and clicking on it displays the progress of the copy, which files have completed, and how far the others have got. Note that the Copy Bin has it's own "Used Space" entry in the System Storage Properties window. This will help you check how much space you need for your copy operation. RENAMING AND DELETING FILES Select the file and press the RENAME button to rename it or the DELETE button to delete it from the audio disk entirely. These commands are also available by right-clicking on the file name. WARNING: Renaming an audio file that is used by a saved EDL will mean that the EDL will not be able to find it when it is next opened. Only currently open EDL's are updated with the new name. WARNING: You cannot retrieve a deleted file; all EDL's that refer to it will be affected. REMOVABLE DRIVES SADiE MTR provides a means to safely remove, not only standard Windows Removable drives, such as Firewire or USB drives, but also drives which Windows doesn't normally register as "removable" - such as SCSI Drives (of course the seasoned SADiE user will know better and may have been using SCSI drives in removable caddies for many years !) 73 SADiE MTR User Manual v5.6 Hoewever, beware. It is HIGHLY DANGEROUS to remove a disc drive while it is operating and you risk corrupting the disc drive (and others perhaps) if you do so. However, older versions of SADiE, with their own dedicated SCSI busses made this a little safer; under Windows it is particularly dangerous to remove a drive with removing it first in software. So, if you've got into the habit with SADIE4 of removing drives without telling the software that you want to unlog it, then you have been lucky so far, but if you continue this practice with PC drives, then you will surely lose some files from a drive soon. THE CORRECT METHOD FOR REMOVING DISK DRIVES. Removable disk drives will have to be in a removable carrier. A number of carriers exist, but the better ones include a "HotSwap" option to allow you to safely remove the drive while the PC is powered up. However this "HotSwap" option does not override the need to remove the drive under software. Before proceeding, close any open SADiE projects. Drives that are attached to the PC are drives that are lettered and thus belong to the PC and are under Windows' control. As suggested above, removal of Windows' drives can be more long-winded than removal of SADIE SCSI drives in older versions. Click on the drive's name in Disk Manager, and press the REMOVE DRIVE button (or right-click and select "Remove Drive"). SADiE will then ask Windows if it's OK to remove the drive (so you need to wait until this conversation has completed satisfactorily). There are a number of reasons why Windows may refuse to give up the drive: The drive may be shared to a network. Windows almost certainly will not allow a shared drive to be removed. The drive may be in use by another program. Did you forget to close your Project? If so then Windows will detect that the files are still in use and refuse to allow the drive to be removed. Windows may still be writing to the drive for some other reason. If SADiE passes this inquisition successfully, you will see the message "It's safe to remove your drive now", and in this case, then it IS indeed safe to remove the drive. However, you may well see several messages from Windows explaining why it cannot be removed. Almost always the way to resolve Windows' refusal to remove a drive is to power down the system. In fact the only foolproof and 100% safe and reliable way to remove a drive from Windows under every possible circumstance is to remove the drive when the system is powered down. If you remove a drive when Windows has warned you not to, then you are in danger of corrupting the drive. You may get away with some times, but can you afford to take that risk? You will need the appropriate Windows Administrative privileges to hot swap drives. If a removal fails due to "access rights" or a similar message then contact your System Administrator. If in any doubt, turn off the computer before pulling the drive out. To log a drive that has been newly attached to the PC, click on "My Computer" in Disk Manager, and press the SCAN DRIVES button. SADiE will ask Windows to refresh its disk drives – this can take about 30 seconds. Take care to give the new drive time to spin up – if Windows doesn't find it first time you may have to try again. YOU MUST use the "Remove Drive" command in Disk Manager to tell the software that the drive is about to be removed before physically turning off the drive. If you remove a drive without doing this and while the PC is powered, there is a strong chance that your disk drive will be corrupted. 74 Additional Notes THE SETUP WINDOW The Setup Window in the MTR software operates in the same way as in the full SADiE5 software. HOTKEYS Hotkeys can be customised in MTR , in a similar way to full SADiE5 see Hotkey Setup. The Hotkey Setup page has buttons to allow you to load and save hotkeys. LRX BUTTON GUIDE LRX BUTTONS & CONTROLS FADERS Faders can be changed to operate on a different Bank (i.e. 1-8, 9-16 etc.) using the Bank Select button, or for different functions - Output faders, pan or Input level (Mic inputs only)- with the button below the Bank button. MASTER FADER In full SADiE5 this can be assigned to any fader by right mouse clicking on that fader and ticking the Master Hardware Fader item. This setting saves with the mixer. RECORD ENABLE Record Enable buttons operate on the playlist stream of the appropriate number, and not necessarily the stream that is feeding that fader. In MTR software the stream and fader are always the same number, but a full SADiE5 mixer could be customised so that for instance all output faders were stereo, and then faders 1-8 would be controlling level of streams 1-16. Be careful – if you have stereo merged streams in a full SADiE5 EDL then two buttons will enable/disable them – so for instance pressing button 1 will record enable streams 1&2, but then pressing button two will disable them. PFL PFL is automatic in the MTR software, and will PFL-solo that stream to the Headphone outputs. In SADIE5 software a PFL button has to be applied to each stream (ALT-Drag a Aux Send button from the mixer palette) and then you must route a Bus called PFL to whichever output you wish to listen to the PFL on. Thus 75 SADiE MTR User Manual v5.6 pressing the PFL button (software or hardware) routes that fader to the PFL bus. A software option can change the PFL buttons to perform solo instead (LRX Setup page) L.E.D. METERS Metering LEDS- these light at the thresholds set for the green, yellow and red bands of the Horizontal Meters - these are set in Setup / Playlist / Playlist Streams. SCRUB Puts the wheel into "jog" mode, whereby moving the will play audio at a speed related to the wheel rotation. EDL/SRC This button is used during Editing to select the type of edit. See Playlist Editing with an LRX for more detail. XFADE Switching Xfade on whilst in Edit mode allows you to adjust the length of the fade at the point (In or Out) which is currently selected. SELECT Select will select the clip under the current time line and turn it red in preparation for another function (delete for instance) ZOOM When Zoom is selected, the wheel will change the current horizontal zoom setting. OUT Press In or Out to enter Playlist Edit mode on the clip under the current time line. Whilst in PLE mode, you can press the other key to jump to the other edit point; pressing the key for the edit point at which you are currently positioned takes you out of PLE. RAZOR Razor makes a razor cut across clips on enabled streams at the current time position. BAR The bar acts in the same way as the keyboard space bar - press to start playback, press again to stop. Whilst in Edit mode, the bar acts as a preview. SET Set sets a locator PREV & NEXT Prev / Next locates to the Previous or Next locator RECORD ALL Record enables (or disables) all selected streams SHIFT Allows an alternative function for other buttons IN SHIFTED FUNCTIONS SHIFT-BANK SELECT Switches the fader bank to lower numbered streams. SHIFT-SET Switches the Online button and hence enables either LTC generate or LTC slave. The light above SET will light to show that Online is enabled. 76 Additional Notes SHIFT-RECORD ALL Record enables (or disables) the stereo mixdown stream in the SADiE MTR software. SHIFT-FADER Shift and touch and release a fader when set to adjust Mic Inputs, puts the fader into "sensitive" adjustment mode. MODE Mode switches the first four buttons so that they become programmable function keys. In the software these would be HWC F1 to HWC F4 respectively and are set in the usual Hotkey section of the Setup page. You can use SHIFT in conjunction with these buttons for another four hotkeys (which are assigned as HWC F5 to HWC F8 respectively) When the LED on Mode is lit, the other keys are user keys. TALKBACK Opens up the talkback microphone if enabled and if you are in record, this button will record the talkback mic to the stereo mixdown stream in the MTR software. MON L&R and H/P L&R Monitor Outputs (RCA phono connectors at the rear of the unit) and the Headphone Outputs are available in the SADIE5 software as additional output busses called Mon L&R and H/P L&R which can be routed in the normal way. In the MTR software these always monitor the Mixdown stereo stream (except when PFL is pressed) PHANTOM POWER Phantom Power is enabled on Microphone inputs by pressing the small "lightning bolt” icon in the left side of the EDL stream. 77 SADiE MTR User Manual v5.6 IXML IMPLEMENTATION CHART SADiE v5.6 and SADiE MTR v5.6 Date: 8th January 2007 iXML v1.4 iXML Master Tag iXML Sub Tag Written Read Notes <PROJECT> O O Project <SCENE> O O Scene <TAKE> O O Take <TAPE> O O Tape (user definable) <CIRCLED> O O Circled <FILE_UID> O O <UBITS> O O UBITS(user definable) <NOTE> O O Note (user definable) <BEXT> X O <USER> O O <SPEED> <SPEED> <NOTE> X O <SPEED> <MASTER_SPEED> X O <SPEED> <CURRENT_SPEED> X O <SPEED> <TIMECODE_FLAG> O O <SPEED> <TIMECODE_RATE> O O <SYNC_POINT> <SYNC_POINT_TYPE> X O <SYNC_POINT> <SYNC_POINT_FUNCTION> X O <SYNC_POINT> <SYNC_POINT_COMMENT> X O <SYNC_POINT> <SYNC_POINT_LOW> X O <SYNC_POINT> <SYNC_POINT_HIGH> X O <SYNC_POINT> <SYNC_POINT_EVENT_DURATION> X O <SYNC_POINT_LIST> <HISTORY> 78 User (+ any non-std. fields)* Additional Notes <HISTORY> <ORIGINAL_FILENAME> O O <HISTORY> <PARENT_FILENAME> X O <HISTORY> <PARENT_UID> X O <FILE_SET> <TOTAL_FILES> O O <FILE_SET> <FAMILY_UID> O O <FILE_SET> <FAMILY_NAME> X O <FILE_SET> <FIEL_SET_INDEX> O O <TRACK_LIST> <TRACK_COUNT> O O <TRACK_LIST> <CHANNEL_INDEX> O O <TRACK_LIST> <INTERLEAVE_INDEX> O O <TRACK_LIST> <NAME> O O <TRACK_LIST> <FUNCTION> X O <FILE_SET> <TRACK_LIST> O=YES, X=NO * SADiE allows custom metadata fields to be created; any that are non-standard titles are added to the USER field. 79 SADiE MTR User Manual v5.6 LRX FAQS & TROUBLESHOOTING If SADiE does not start when your LRX is connected: Is it connected correctly ? Is the Power Supply connected correctly ? 80 Is it connect to a USB2 port (NOT a standard slow USB port) ? "Hi-speed Device plugged into non-Hi-speed USB hub" message. Is the LRX connected to a USB2 port ? Or just standard USB ? It must be a USB2 port. If you ignore this message, the PC may crash ! My PC won't go into Standby with SADiE running This is deliberate and to avoid interruption of a mission-critical task such as a recording or playback. You will see a message of the sort "System Standby Failure.. The Device driver for the ‘OpusSys’ device is preventing the machine from entering standby……………………………….". Additional Notes 81 Index 4 Dropping In.....................................................................29 5 E 4GB file limit .................................................................. 26 56+8 MADI & Slither Configuration........................ 12 A Adding Clips................................................................... 46 Additional Monitor Output ....................................... 25 DVD-RAM ......................................................................39 E to E................................................................................22 Edit Entry Name............................................................56 Editing AES Ref ........................................................................... 17 Audible Scrubbing......................................................... 55 Audio Clocks................................................................. 17 Audio Files...................................................................... 26 Audio IO Matrix ........................................................... 12 Auto online when pressing record .......................... 21 Auto record on receiving timecode........................ 21 B Buttons............................................................................ 75 C Clips Adding......................................................................... 46 Adjusting Levels........................................................ 59 Copying ...................................................................... 56 Grouping .................................................................... 59 Moving ........................................................................ 58 Pasting......................................................................... 56 Placement................................................................... 58 Profiles........................................................................ 46 Removing ................................................................... 56 Renaming.................................................................... 56 Repeating ................................................................... 46 Selecting ..................................................................... 56 Slip ............................................................................... 58 Clipstore.................................................................. 46, 67 Connections......................................................................6 Copy ................................................................................ 56 Crossfades...................................................................... 63 Cut ................................................................................... 56 Cut and Splice ............................................................... 61 D Delayed Mirror ............................................................. 39 Delete Files .................................................................... 73 Disk Management......................................................... 70 Display.........................................................................9, 45 Drag and Drop.............................................................. 67 F Playlist Editing with a LRX......................................63 Playlist Editing with a Mouse .................................62 Region Editing............................................................64 FAQs ................................................................................80 File Channels ..................................................................26 G Genlock ...........................................................................17 Group...............................................................................59 H Hotkeys Save & Load................................................................75 Hotkeys ...........................................................................75 I Importing Source Tracks............................................................30 Tracks from a CD ....................................................31 Input Level Adjust .........................................................16 Input Select .....................................................................12 Input Source ...................................................................12 Inputs..................................................................................6 Installing .............................................................................5 Interleaved Files.............................................................26 iXML .................................................................................36 J Jog .....................................................................................55 L L.E.D.s ..............................................................................80 LED ...................................................................................80 Level Pad Button ...........................................................16 Load Hotkeys .................................................................75 Locating ...........................................................................52 Lock to Video ................................................................17 83 SADiE MTR User Manual v5.6 M R Merge into Stereo Stream.......................................... 26 record enable .................................................................22 Maximum File Size........................................................ 26 Mic Gain.......................................................................... 16 Mirror Recording ......................................................... 39 Mixing .............................................................................. 59 Monitor........................................................................... 25 Moving Clips .................................................................. 58 MTR Basics........................................................................6 Multi-Channel Interleaved Files ................................ 26 N Razor ................................................................................61 Record Modes................................................................21 Record Monitoring on the LRX ................................25 Recording Making Cuts ...............................................................29 Ripping from CD ......................................................31 Recording .................................................................11, 12 Redo .................................................................................55 Region Editing Adjusting the region.................................................64 Defining the region ..................................................64 Functions ....................................................................65 Normalise....................................................................... 59 O Online.............................................................................. 50 Region Editing ................................................................64 Overdubbing.................................................................. 29 Remove Gap...................................................................58 Outputs..............................................................................6 P Pad.................................................................................... 16 Paste................................................................................. 56 PFL.................................................................................... 25 Phantom Power ............................................................ 16 PLAY................................................................................ 50 Playback Transmission Mode ................................................. 54 Playback........................................................................... 50 Playlist..........................................................................9, 45 Playlist Display Scroll and Zoom ...................................................... 47 Playlist Editing Crossfades ................................................................. 63 with a LRX................................................................. 63 Playlist Editing................................................................ 62 Polyphonic Group Size................................................ 26 Polyphonic WAVs ........................................................ 26 Pre-Fade Listen ............................................................. 25 Preview ........................................................................... 67 Profiles ............................................................................ 46 Q Quick Start..................................................................... 11 Removable Drives.........................................................73 Rename Files...................................................................73 Repeating Clips ..............................................................46 Ripping .............................................................................31 S Save Hotkeys..................................................................75 Scene ................................................................................35 Scene and Take Fields ..................................................35 Scissors ............................................................................61 Scrollbar ..........................................................................47 Scrub.................................................................................55 Selected Clips.................................................................56 Shuttle ..............................................................................55 Slate ..................................................................................29 Slate Level .......................................................................29 Slip.....................................................................................58 Software Installation ....................................................................5 Software ............................................................................5 Source Monitor .............................................................22 Starting SADiE..................................................................8 Stereo...............................................................................26 Stereo Mixdown Stream .............................................25 STOP ................................................................................50 stream name...................................................................23 84 Sadie LRX Registration Streams ........................................................................... 49 U Take ................................................................................. 35 Undo.................................................................................55 T Talkback.......................................................................... 29 Track Recording................................................................... 12 Track................................................................................ 12 Transmission Mode...................................................... 54 Transport Controls ..................................................... 50 Troubleshooting ........................................................... 80 UDF ..................................................................................39 Ungroup...........................................................................59 W Waveforms .....................................................................46 Word Clock ...................................................................17 Z Zooming ..........................................................................47 85 SADIE LRX REGISTRATION All fields with a star (*) are mandatory. *Name: Company: Address: *Country: Phone number: *Email address: *Serial number of product: *Make and model of computer to be installed on: *Basic computer description (processor speed, amount of ram, OS): Type of work: Are you an existing SADiE user \ owner: *Where did you buy the product? *Date of purchase: Where did you hear about the product? What made you choose SADiE LRX? Tick this box if you do not wish to receive offers and product information from SADiE Fax to Prism Media Products +44 1353 648867 87